NVIDIA DOCA Developer Guide
This guide details the recommended steps to set up an NVIDIA DOCA development environment.
This guide is intended for software developers aiming to modify existing NVIDIA DOCA applications or develop their own DOCA-based software.
For steps to install DOCA on NVIDIA® BlueField® DPU, refer to the NVIDIA DOCA Installation Guide for Linux.
This guide focuses on the recommended flow for developing DOCA-based software, and will target the following environments:
BlueField DPU is accessible and can be used during the development and testing process
BlueField DPU is inaccessible, and the development happens on the host or on a different server
It is recommended to follow the former case, leveraging the DPU during the development and testing process.
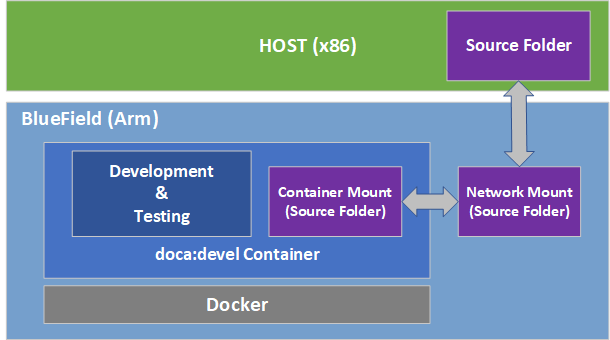
This guide recommends using DOCA's development container during the development process, whether it is on the DPU or on the host. Deploying development containers allows multiple developers to work simultaneously on the same device (host or DPU) in an isolated manner and even across multiple different DOCA SDK versions. This can allow multiple developers to work on the DPU itself, for example, without the need to have a dedicated DPU per developer.
Another benefit of this container-based approach is that the development container allows developers to create and test their DOCA-based software in a user-friendly environment that comes pre-shipped with a set of handy development tools. The development container is focused on improving the development experience and is designed for that purpose, whereas the BlueField software is meant to be an efficient runtime environment for DOCA products.
Setup
DOCA's base image containers include a DOCA development container (doca:devel) which can be found on NGC. It is recommended to deploy this container on top of the DPU when preparing a development setup.

The recommended approach for working using DOCA's development container on top of the DPU, is by using docker, which is already included in the supplied BFB image.
Make sure the docker service is started. Run:
            sudo systemctl daemon-reload
sudo systemctl start docker
Pull the container image:
Visit the NGC page of the DOCA base image.
Under the "Tags" menu, select the desired development tag.
The container tag for the docker pull command is copied to your clipboard once selected. Example docker pull command using the selected tag:
sudo docker pull nvcr.io/nvidia/doca/doca:1.5.1-devel
Once loaded locally, you may find the image's ID using the following command:
sudo docker images
Example output:
            REPOSITORY                 TAG           IMAGE ID       CREATED         SIZE
nvcr.io/nvidia/doca/doca   1.5.1-devel   931bd576eb49   10 months ago   1.49GB
Run the docker image:
sudo docker run -v <source-code-folder>:/doca_devel -v /dev/hugepages:/dev/hugepages --privileged --net=host -it <image-name/ID>
For example, to map a source folder named my_sources into the same container tag from the example above, the command should look like this:
sudo docker run -v my_sources:/doca_devel -v /dev/hugepages:/dev/hugepages --privileged --net=host -it nvcr.io/nvidia/doca/doca:1.5.1-devel
After running the command, you get a shell inside the container where you can build your project using the regular build commands:
From the container's perspective, the mounted folder will be named /doca_devel
WarningMake sure to map a folder with write privileges to everyone. Otherwise, the docker would not be able to write the output files to it.
--net=host ensures the container has network access, including visibility to SFs and VFs as allocated on the DPU
-v /dev/hugepages:/dev/hugepages ensures that allocated huge pages are accessible to the container
Development
It is recommended to do the development within the doca:devel container. That said, some developers prefer different integrated development environments (IDEs) or development tools, and sometimes prefer working using a graphical IDE until it is time to compile the code. As such, the recommendation is to mount a network share to the DPU (refer to NVIDIA DOCA DPU CLI for more information) and to the container.
Having the same code folder accessible from the IDE and the container helps prevent edge cases where the compilation fails due to a typo in the code, but the typo is only fixed locally within the container and not propagated to the main source folder.
Testing
The container is marked as "privileged", hence it can directly access the HW capabilities of the BlueField DPU. This means that once the tested program compiles successfully, it can be directly tested from within the container without the need to copy it to the DPU and running it there.
Publishing
Once the program passes the testing phase, it should be prepared for deployment. While some proof-of-concept (POC) programs are just copied "as-is" in their binary form, most deployments will probably be in the form of a package (.deb/.rpm) or a container.
Construction of the binary package can be done as-is inside the current doca:devel container, or as part of a CI pipeline that will leverage the same development container as part of it.
For the construction of a container to ship the developed software, it is recommended to use a multi-staged build that ships the software on top of the runtime-oriented DOCA base images:
doca:base-rt – slim DOCA runtime environment
doca:full-rt – full DOCA runtime environment similar to the BlueField image
The runtime DOCA base images, alongside more details about their structure, can be found under the same NGC page that hosts the doca:devel image.
For a multi-staged build, it is recommended to compile the software inside the doca:devel container, and later copy it to one of the runtime container images. All relevant images must be pulled directly from NGC (using docker pull) to the container registry of the DPU.
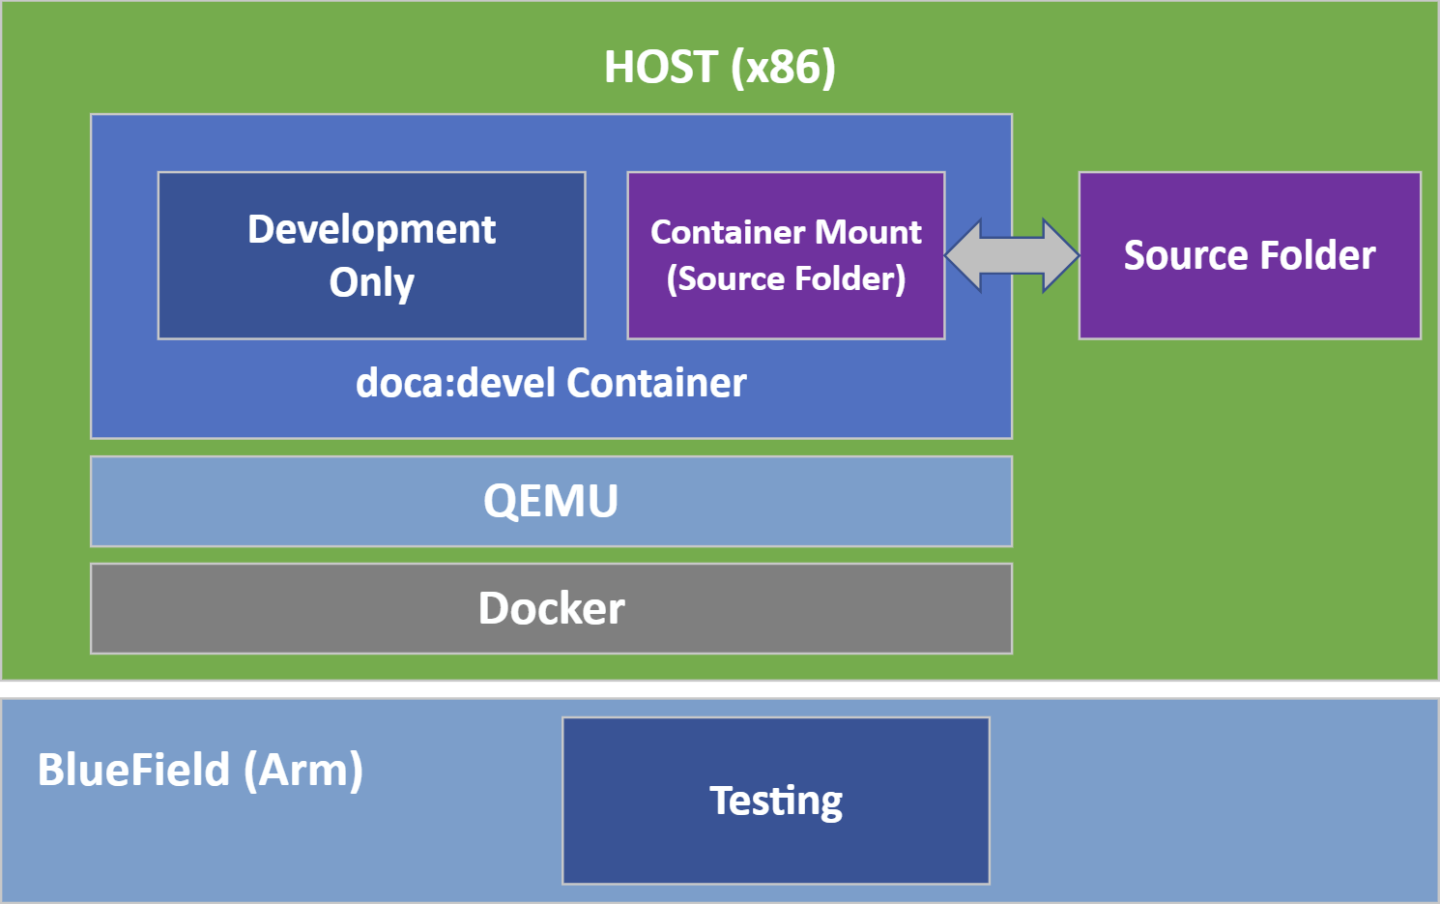
If the development process needs to be done without access to a BlueField DPU, the recommendation is to use a QEMU-based deployment of a container on top of a regular x86 server. The development container for the host will be the same doca:devel image we mentioned previously.

Setup
Make sure Docker is installed on your host. Run:
docker version
If it is not installed, visit the official Install Docker Engine webpage for installation instructions.
Install QEMU on the host.
WarningThis step is for x86 hosts only. If you are working on an aarch64 host, move to the next step.
Host OS
Command
Ubuntu
sudo apt-get install qemu binfmt-support qemu-user-
staticsudo docker run --rm --privileged multiarch/qemu-user-static--reset -p yesCentOS/RHEL 7.x
            sudo yum install epel-release
sudo yum install qemu-system-arm
CentOS 8.0/8.2
            sudo yum install epel-release
sudo yum install qemu-kvm
Fedora
sudo yum install qemu-system-aarch64
If you are using CentOS or Fedora on the host, verify if qemu-aarch64.conf Run:
cat /etc/binfmt.d/qemu-aarch64.conf
If it is missing, run:
echo ":qemu-aarch64:M::\x7fELF\x02\x01\x01\x00\x00\x00\x00\x00\x00\x00\x00\x00\x02\x00\xb7:\xff\xff\xff\xff\xff\xff\xff\xfc\xff\xff\xff\xff\xff\xff\xff\xff\xfe\xff\xff:/usr/bin/qemu-aarch64-static:" > /etc/binfmt.d/qemu-aarch64.conf
If you are using CentOS or Fedora on the host, restart system binfmt. Run:
$ sudo systemctl restart systemd-binfmt
To load and execute the development container, refer to the "Setup" section discussing the same docker-based deployment on the DPU side.
The doca:devel container supports multiple architectures. Therefore, Docker by default attempts to pull the one matching that of the current machine (i.e., amd64 for the host and arm64 for the DPU). Pulling the arm64 container from the x86 host can be done by adding the flag --platform=linux/arm64:
sudo docker pull --platform=linux/arm64 nvcr.io/nvidia/doca/doca:1.5.1-devel
Development
Much like the development phase using a BlueField DPU, it is recommended to develop within the container running on top of QEMU.
Testing
While the compilation can be performed on top of the container, testing the compiled software must be done on top of a BlueField DPU. This is because the QEMU environment emulates an aarch64 architecture, but it does not emulate the hardware devices present on the BlueField DPU. Therefore, the tested program will not be able to access the devices needed for its successful execution, thus mandating that the testing is done on top of a physical DPU.
Make sure that the DOCA version used for compilation is the same as the version installed on the DPU used for testing.
Publishing
The publishing process is identical to the publishing process when using a BlueField DPU.
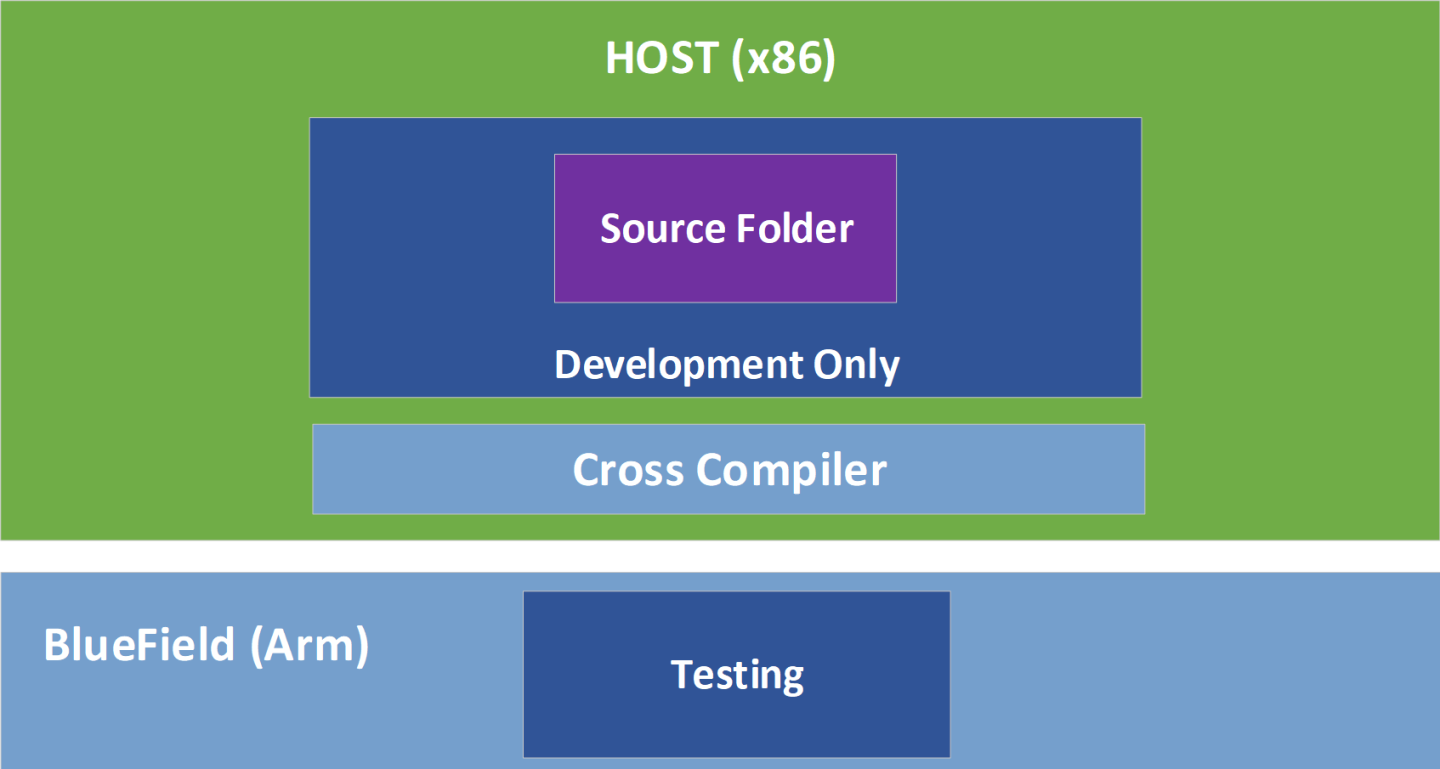
In a typical setup, developers prefer to work on a familiar host since compilation is often significantly faster there. Therefore, developers may work on their host while cross-compiling their project to the DPU's Arm architecture.

Setup
Install Docker and QEMU your host. See steps 1-4 under section Setup.
Download the doca-cross component as described in the NVIDIA DOCA Installation Guide for Linux and unpack it under the /root directory.
Inside this directory one can find:arm64_armv8_linux_gcc – cross file containing specific information about the cross compiler and the host machine
DOCA_cross.sh – script which handles all the required dependencies and pre-installations steps
A .txt file used by the script
To load the development container, refer to section "Docker Deployment" of the NVIDIA BlueField DPU Container Deployment Guide.
WarningIt is important to ensure that the same DOCA version is used in the development container and the DOCA metapackages installed on the host.
Start running the container using the container's tag while mapping the doca-cross directory to the container's /doca_devel directory:
sudo docker run -v /root/doca-cross/:/doca_devel --privileged -it <imagename/ID>
Now the shell will be redirected to be within the container.
Run the preparation script to copy all the Arm dependencies required for DOCA's cross compilation. The script will be in the mapped directory named doca_devel.
            (container) /# cd doca_devel/
(container) /doca_devel# ./DOCA_cross.sh
Exit the container and run the same script from the host side:
(host) /root/doca-cross# ./DOCA_cross.sh
The /root/doca-cross directory is now fully configured and prepared for cross-compilation against DOCA.
Update the environment variables to point at the Linaro cross-compiler:
export PATH=${PATH}:/opt/gcc-linaro/<linaro_version_dir>/aarch64-linux-gnu/bin:/opt/gcc-linaro/<linaro_version_dir>/bin
Everything is set up and the cross-compilation can now be used.
WarningMake sure to update the command according to the Linaro version installed by the script in the previous step. <linaro_version_dir> can be found under /opt/gcc-linaro/.
WarningCross-compilation requires Meson version ≥0.61.2 to be installed on the host. This is already provided as part of DOCA's installation.
DOCA and CUDA Setup
To cross-compile DOCA and CUDA applications, you must install CUDA Toolkit 12.1:
The first toolkit installation is for x86 architecture. Select x86_64.
The second toolkit installation is for Arm. Select arm64-sbsa and then cross.
Select your host operating system, architecture, OS distribution, and version and select the installation type. It is recommended to use the deb (local) type.
Execute the following exports:
export CPATH=/usr/local/cuda/targets/sbsa-linux/include:$CPATH export LD_LIBRARY_PATH=/usr/local/cuda/targets/sbsa-linux/lib:$LD_LIBRARY_PATH export PATH=/usr/local/cuda/bin:/usr/local/cuda-
11.6/bin:$PATHVerify the meson version is at least 0.61.2 as provided with DOCA's installation.
Everything is set up and the cross-compilation can now be used.
Development
It is recommended to develop normally while remembering to compile using the cross-compilation configuration file arm64_armv8_linux_gcc which can be found under the doca-cross directory.
The following is an example procedure for cross-compiling DOCA applications from the host and to the Arm architecture:
Enable the meson cross-compilation option in /opt/mellanox/doca/applications/meson_options.txt by setting enable_cross_compilation_to_dpu to true.
Cross-compile the DOCA applications:
            /opt/mellanox/doca/applications # meson cross-build --cross-file /root/doca-cross/arm64_armv8_linux_gcc
/opt/mellanox/doca/applications # ninja -C cross-build
The cross-compiled binaries are created under the cross-build directory.
Cross-compile the DOCA and CUDA application:
Set flag for GPU-enabled cross-compilation, enable_gpu_support, in /opt/mellanox/doca/applications/meson_options.txt to true.
Run the compilation command as follows:
            /opt/mellanox/doca/applications # meson cross-build --cross-file /root/doca-cross/arm64_armv8_linux_gcc -Dcuda_ccbindir=aarch64-linux-gnu-g++
/opt/mellanox/doca/applications # ninja -C cross-build
The cross-compiled binaries are created under the cross-build directory.
Due to the system's use of the PKG_CONFIG_PATH environment variable, it is crucial that the cross file include the following:
            [built-in options]
pkg_config_path = ''
This definition, already provided as part of the supplied cross file, guarantees that meson does not accidently use the build system's environment variable during the cross build.
Testing
While the compilation can be performed on top of the host, testing the compiled software must be done on top of a BlueField-2 DPU. This is because the tested program is not able to access the devices needed for its successful execution, which mandates that the testing is performed on top of a physical DPU.
Make sure that the DOCA version used for compilation is the same as the version installed on the DPU used for testing.
Publishing
The publishing process is identical to the publishing process when using a BlueField DPU.
For questions, comments, and feedback, please contact us at DOCA-Feedback@exchange.nvidia.com.