Ubuntu Setup (Target)
NVIDIA DRIVE™ provides and supports the Ubuntu-based file system. This file system is suited for small to medium embedded target systems based on NVIDIA® Tegra® processors.
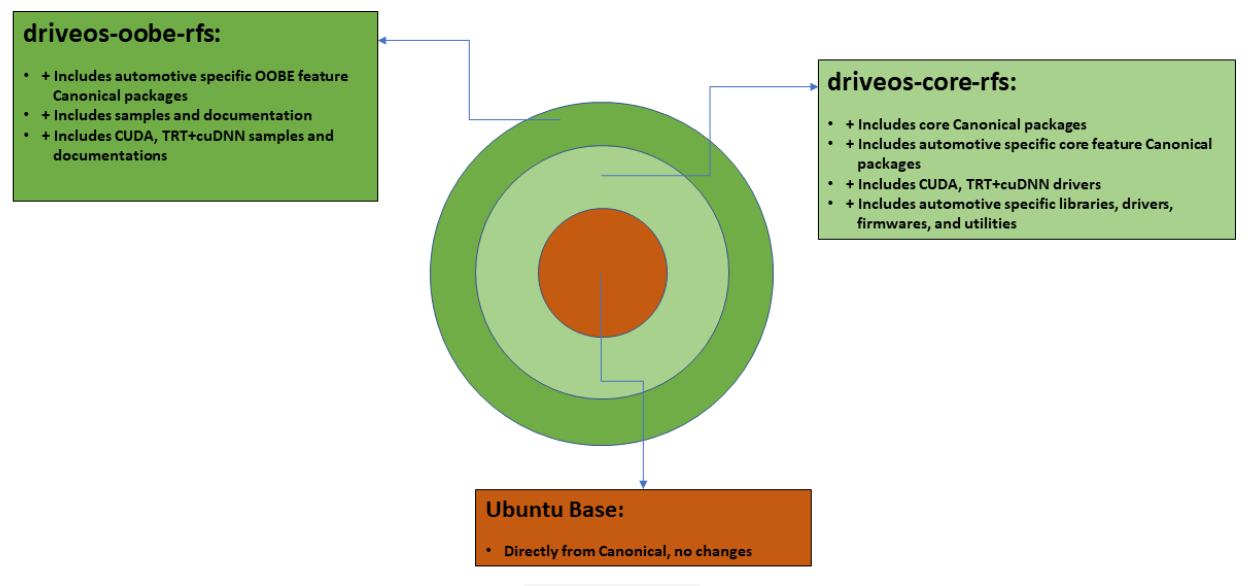
Ubuntu-Based File System
The Ubuntu-based file system is intended to be used for software development because it has immense flexibility to quickly add required 3rd party pre-built packages from Internet-based PPA servers.
NVIDIA Linux Filesystems
Filesystem | Base Filesystem | Image Format | Filesystem Installer | Debian Packages Manifest | Use Case |
driveos-oobe-rfs | driveos-core-rfs | ext4 | Targetfs_directory: drive-t186ref-linux-<RELEASE>-<BUILD>-driveos-oobe-rfs.run
Targetfs_image: nvidia-driveos-<RELEASE>-driveos-oobe-rfs.deb | driveos-oobe-rfs.MANIFEST.json | Development use. (Recommended) Contains "-dev" debian packages and other utilities like ssh, vim for easy access to files on the target.
Contains samples and docs for NVIDIA applications. |
Installation
To install a Linux target filesystem, install the corresponding filesystem installer mentioned in the
NVIDIA Linux Filesystems section above.
If the installer for targetfs_directory is used, it extracts the target filesystem into a directory inside the DRIVE OS installation directory.
If the installer for targetfs_image is used, it installs the target filesystem image in the DRIVE OS installation directory.
# Targetfs_directory installer
# Change directory to where you have downloaded the DRIVEOS SDK
nvidia@test-pc:~$ cd ~/nvidia/driveos/
# Install the Filesystem Installer
nvidia@test-pc:~/nvidia/driveos$ bash drive-t186ref-linux-<RELEASE>-<BUILD>-driveos-oobe-rfs.run
# Filesystem is installed in the directory
nvidia@test-pc:~/nvidia/driveos$ ls -l drive-t186ref-linux/targetfs/
# Targetfs_image installer
# Change directory to where you have downloaded the DRIVEOS SDK
nvidia@test-pc:~$ cd ~/nvidia/driveos/
# Install the Filesystem Installer
nvidia@test-pc:~/nvidia/driveos$ sudo apt install ./nvidia-driveos-<RELEASE>-driveos-oobe-rfs.deb
Please input NV_WORKSPACE path.
NV_WORKSPACE: Path where DRIVEOS SDK is installed
~/nvidia/driveos/
Installing image
Updating targetfs.img symlink
nvidia@test-pc:~/nvidia/driveos$ ls -l drive-t186ref-linux/targetfs.img
lrwxrwxrwx 1 root root 31 Aug 6 13:43 drive-t186ref-linux/targetfs.img -> targetfs-images/driveos-oobe-rfs.img
Filesystem Package List
For the exact Debian and version, see Debian Packages Manifest in the
NVIDIA Linux Filesystems section above.
The file is located at:
<top>/drive-t186ref-linux/targetfs-images/
Debian Information
# Change directory to where you have installed Filesystem Installer
nvidia@test-pc:~$ cd ~/nvidia/driveos/
# See the manifest file for exact Debian and version of packages.
nvidia@test-pc:~/nvidia/driveos$ cat drive-t186ref-linux/targetfs-images/driveos-oobe-rfs.MANIFEST.json
. #Manifest Contents
.
.
"DebianPackages": [
"adduser=3.116ubuntu1",
"alsa-utils=1.1.3-1ubuntu1",
"apt=1.6.11",
"base-files=10.1ubuntu2.4",
"base-passwd=3.5.44",
"bash=4.4.18-2ubuntu1.1",
"bc=1.07.1-2",
"bsdutils=1:2.31.1-0.4ubuntu3.3",
"bzip2=1.0.6-8.1ubuntu0.1",
"can-utils=2018.02.0-1",
"coreutils=8.28-1ubuntu1",
"cpp-7=7.4.0-1ubuntu1~18.04.1",
"cpp=4:7.4.0-1ubuntu2.3"
.
.
.
Filesystem Installer Interactive Prompts
SI No. | Installer | Interactive Prompt | Scenario |
1 | Targetfs_image | "Please input NV_WORKSPACE path.
NV_WORKSPACE: Path where DRIVEOS SDK is installed" | Prompt: Specify the path of DRIVEOS SDK installation to install the target filesystem image into
Value: Directory Path
Default: Will take value of ${NV_WORKSPACE}, if defined in the environment. |
2 | Targetfs_image | "<filesystem>.img already exists, do you wish to replace the img [y/N] ?" | Prompt: Another filesystem image with the same name as the one being installed exists in the targetfs-images directory
Y: to replace the image
N: to not replace the image Default: Do not replace the existing image (N) |
3 | Targetfs_image | "targetfs.img symlink already exists, and points to <path>
"Do you wish to update the symlink to currently installing rootfs [Y/n] ?" | Flashing tool will flash the filesystem pointed to by the targetfs.img symlink ( if use_rootfs_img.sh is executed )
Prompt: If the targetfs.img symlink should be updated to point to currently installing rootfs
Y: to update the symlink
N: to not update the symlink
Default: Update symlink (Y) |
4 | Targetfs_directory | "targetfs folder not empty , do you wish to delete contents [Y/n]" | Filesystem image is extracted into targetfs directory,
Flashing tool will flash filesytem extacted in targetfs directory ( if use_rootfs_img.sh is not executed )
Prompt: if the contents of the folder should be deleted and replaced with contents of currently installing filesystem
Y: to remove contents
N: to retain old filesystem contents
Default: Remove contents (Y) |
To have a silent installation bypassing all these interactive prompts, export these variables in the shell environment before installation to take the default values:
• export _NV_NON_INTERACTIVE=yes to take defaults for prompts 2, 3, and 4.
• export NV_WORKSPACE=<path to DRIVE OS SDK installation> for targetfs_image installer to take the specified value for prompt 1.
Note: | For targetfs_image installer, if the target filesystem has to be extracted into another NV_WORKSPACE, run: dpkg-reconfigure nvidia-driveos-<RELEASE>-<rootfs> Where <rootfs> is one of the following: driveos-core-rfs driveos-oobe-rfs |
Yocto-GENIVI File System
Additionally, NVIDIA DRIVE provides and supports the Yocto-GENIVI file system. This file system is also suited for small to medium embedded target systems based on NVIDIA® Tegra® processors.
For information on building and installing this file system, see Building the Yocto Project-Based Components in the NVIDIA DRIVE OS 5.1 Linux PDK Development Guide.
Logging In
Note: | If you experience instability or timeouts with ssh connections to a Xavier processor in the Drive AGX system, set -o ServerAliveInternal to keep the ssh session live. For example: $ ssh -o ServerAliveInternal=240 nvidia@<xavier IP address> See the standard Linux ssh manpage documentation for more information. |
The file systems (drive-oobe-rfs only) support Secured Shell (SSH) and serial console logins. Use following username/password to login:
username: nvidia
password: nvidia
DRIVE OS Linux Username and Password
For information about the default DRIVE OS username and password, and how to change the username and password, see
Changing the Default Target Username and Password.
Using apt-get
The apt-get tool is the mechanism with which the Ubuntu systems keep track of software installations.
apt-get is a command line interface that enables:
• Installing software packages from Ubuntu repositories on the local system or the Internet
• Removing existing packages
• Upgrading existing packages (or even the entire system)
Because package dependency information is included with the packages (i.e., B requires A, C conflicts with D), removals and upgrades can be checked to see if dependencies are broken, making the system safe and easy to use. The file system comes with the Ubuntu 18.04 ARM Internet repository already set up, so you can use apt-get immediately to install Ubuntu software packages from the Internet.
apt-get keeps a local database of available packages from the repositories it knows about. The packages in the Internet repository are periodically updated with bug fixes, security patches, and other minor changes, and the local database will not contain these updates until it itself is updated.
Prerequisites
• Your target has Internet access.
To update the local database
• Enter the following command:
$ sudo apt-get update
Packages can then be installed with the apt-get install command.
To install packages
• Enter:
$ sudo apt-get install <package> <package>
Where <package> is the name of the package to install, such as foo and bar in the following command:
$ sudo apt-get install foo bar
The command line is sufficient even if foo and bar depend on other packages that are not yet installed. apt-get determines what dependencies are missing and offers to install them. If dependency conflicts prevent the installation of either package, apt-get reports the conflicts and refuses to do anything.
To remove packages
• Enter:
$ sudo apt-get remove <package> <package>
Where <package> is the name of the package to remove. For example, the following command line removes the bar and baz packages:
$ sudo apt-get remove bar baz
If other packages require a package to remain installed, then apt-get also offers to remove the other packages. To prevent accidental removal of needed packages, verify the full list of packages to be removed.
For additional information, see apt-get in “Chapter 3. Package Management” of the Ubuntu Server Guide at:
https://help.ubuntu.com/18.04/serverguide/serverguide.pdf
Installing GUI on the Target
The default filesystem that comes with the SDK does not contain the graphical user interface.
To install the GUI and work with the graphical user interface, execute the following steps:
1. Ensure target filesystem driveos-oobe-rfs.run is flashed on the board.
2. Ensure the target is connected to the internet and execute the following commands below:
sudo apt-get update
sudo apt-get install gdm3 ubuntu-unity-desktop
3. The commands result in the following prompts that require the following user actions:
1. On query for /etc/alsa/alsa-base.conf to keep or overwrite: Press enter (keeps current version).
2. For time zone configuration: Choose continent, city to set time zone, and press enter.
3. On query for /etc/gdm3/custom.conf to keep or overwrite: Press enter (keeps current version).
4. Information prompt on Xserver: Choose Ok and press enter.
5. Choose default display-manager between gdm3 or lightdm: Choose gdm3 and press enter.
4. At this point, apt-get install completes. Rename the session file in /usr/share/xsessions from ubuntu.desktop to ux-ubuntu.desktop:
cd /usr/share/xsessions/
sudo mv ubuntu.desktop ux-ubuntu.desktop
cd -
5. Reboot the target:
sudo reboot
Network Configuration in NVIDIA Filesystems
The service/daemon that manages/configures the network in NVIDIA filesystems (driveos-core-rfs, driveos-oobe-rfs) is systemd-networkd, which is different from the standard network manager (NetworkManager) used in Ubuntu 18.04 by default.
systemd-networkd is the only network manager installed. Hence, utilities like netplan aren’t installed to support both systemd-networkd and NetworkManager.
Configuring Interfaces
To configure a particular interface, you must create a network file/netdev file in /etc/systemd/network/.
For example, to configure interface eth0 with DHCP, create network file 50-wired.network and place it in /etc/systemd/network/:
[Match]
Name=eth0
[Network]
DHCP=ipv4
For more information on network file semantics, priority, and location, see the
systemd-networkd man page.
File System Source Code
The drive-t186ref-linux-<release>-oss-src.run installs filesystem sources under the directory:
<top>/drive-t186ref-linux_src/driveos-rfs-src.tar.bz2
NVIDIA DRIVE Linux filesystems contain a combination of Ubuntu repository and NVIDIA CUDA repository packages. As an alternative to above source, you can get the source of Ubuntu repository packages (from the Ubuntu repository) using the command:
apt-get source <package>
Disclaimer: | Ensure that all data is saved. Execute a software shutdown command, such as halt/shutdown to the target system to avoid data corruption; otherwise, file system corruption may occur. Once the target system is shut down, you may use physical/electrical shutdown or reset commands, such as tegrareset or aurixreset in the AURIX command terminal. |