Viewer Reference
User Interface
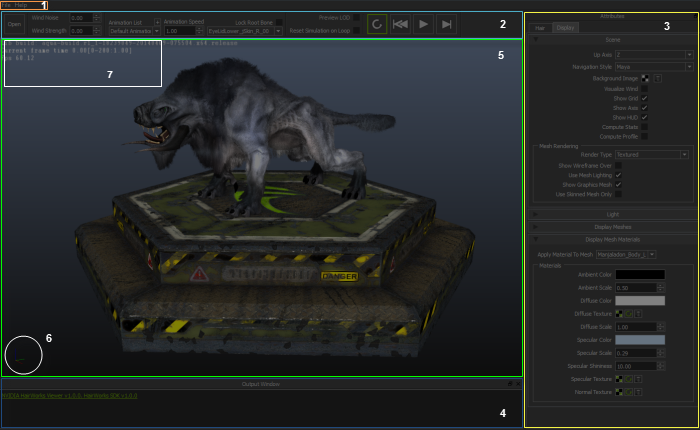
Layout
- 1: Menu bar
- 2: Toolbar The Toolbar has animation controls and other controls that are commonly used for iterating on a project scene wide.
- 3: Attributes Panel The Attributes Panel contains everything that is settable in the scene on a per object level. It is divided into a Hair tab for Hair specific attributes and visualizers, and a Display tab for Scene visualizers, toggles, and display mesh management. The Attributes Panel is dockable.
- 4: Output Window The Output Window is dockable.
- 5: Viewport
- 6: Axis Indicator Indicates the world axis of the scene
- 7: Heads Up Display The heads Up Display(HUD) contains many different statistics that are essential in tuning Hair.
Texture Input Buttons
Throughout HairWorks viewer there is a series of icons that pertain to texture inputs like density, root color, or background images. These buttons all have the same functionality through the user interface.
 Open File Texture Opens a file dialogue to load a file texture
 Reopen File Texture Texture is currently loaded. Hover over the icon to get a tool tip with the loaded file path. Clicking the button opens a file dialog to load a different file texture.
 Reload File Texture Reload a file texture if one is already loaded.
 Remove File Texture Remove a file texture.
Menus
File
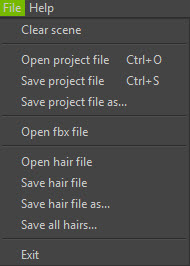
Clear Scene Resets HairWorks Viewer to a blank scene. There is no references to any project files, Hair files, or textures files when a scene is cleared.
Open project file Launches a file dialog to allow the user to open a project file.
Save project file Saves the current project file.
Save project file as... Launches a file dialog to allow the user to save a project as a new file.
Open fbx file Launches a file dialog to allow the user to open a .fbx file. Only one fbx can be loaded at a time. opening a .fbx file clears the current fbx file from the scene.
Open hair file Launches a file dialog to allow the user to open a hair file.
Save hair file Saves the current hair file.
Save hair file as... Launches a file dialog to allow the user to save a hair file.
Save all hair files Saves all hair files associated with the current project.
Exit Close the HairWorks viewer.
Help
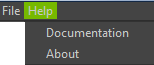
Documentation Launches this help document.
About Launches a dialog with various information about HairWorks including the version and web links.
Toolbar

Open project file Launches a file dialog to allow the user to open a project file.
Wind Noise Generic noise that is applied globally to the wind for all hair assets.
Wind Strength Wind strength that is applied globally to all hair assets. This value is always set in meter unit, regardless of what the scene scale is set too.
Animation List Launches a file dialog to allow the user to import additional animation via fbx. the animation will be added to the drop down list allowing the user to choose which animation to preview. Only matching bone names will have animation updated. Currently animation adding is not implemented and users can only select between the bind pose and the default animation.
Animation Speed Allows user to adjust the speed of animation playback.
Lock Root Bone When toggled on, mutes the translation animation for the selected bone with the intention of the keep the character animating in place. The user can choose the root bone from the drop down list of bones in the scene.
Preview LOD Allows the user to preview the Level of Detail attributes that are set on all hair assets by zooming the viewport camera in and out.
Transport Controls
- Reset Simulation on Loop Determined whether or not the simulation should reset to its initial position each time the animation loops. This control is only applies when the Loop control is enabled.
 Loop Determines if the animation continuously loops during playback.
 Rewind Set the animation playback to the beginning of the playback range.
 Play/Stop Toggles playback of the animation. If Loop is toggled off, and the animation is at the end of the frame range then pressing play will automatically rewind the aniamtion to the begining of the playback range and play the entire sequuence.
 Step Forward Steps the animation forward 1 frame. Note that the simulation does step and continues to simulate freely.
Hair Tab
The Hair tab contains all of the attributes, visualizers, and file management to iterate quickly on hair assets.
General Attributes
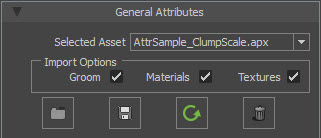
Selected Asset Lists the currently selected asset that all other controls in the Hair tab apply to. Multiple hair assets can be loaded at once, however only one can be edited at a time. Import Options
Import Options A hair file can be loaded in such a way that only specific sections of it are loaded. This is convenient for fast and effective iterations.
- Groom When importing a hair file, determines if the groomed guide curves should be imported or not.
- Materials When importing a hair file, determines if the material attribute settings should be imported or not. This encompasses all rollouts, General, Physical, Graphics, and Level of Detail.
- Textures When importing a hair file, determines if the texture references should be imported or not.
 Load Asset From File Launches a file dialog to allow the user to open a hair file. Loading a full asset from file
 Import File Into Current Asset Launches a file dialog to allow the user to import a hair file into the current asset using the above import options.
 Save Current Asset Saves the current hair file.
 Reload Current Asset Reloads the currently selected hair file.
 Remove Current Asset Removes the currently selected hair asset from the project.
Hair Visualizers
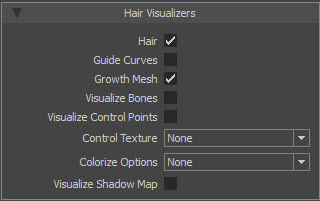
All visualizers apply to the currently selected hair asset.
Hair Display the rendered hair for the currently selected asset.
Guide Curves Display the guide curves for the currently selected asset as red lines.
Growth Mesh Display the growth mesh used for the currently selected asset. Sometimes this results in fighting with the display meshes. if necessary, toggle off conflicting display meshes from the Display Meshes section of the Display Tab.
Bones Display bones for the currently selected hair asset.
Control Points Display the cv’s for the guide curves for the selected hair asset.
Control Texture If a texture is connected to drive the selected option, then it will be rendered onto the growth mesh.
Colorize Options Renders the hair strands in different colors depending on what the user is trying to analyze. Options are None, LOD, Tangents, and Normals.
Visualize Shadow Map Renders what the shadow map looks like over the entire viewport.
Physical Materials
All attribute apply the currently selected hair asset.
Simulation
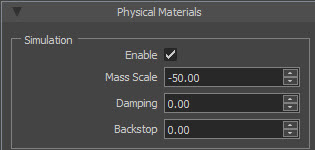
- Enable Toggle the simulation of the hair on/off.
- Mass Scale Determines the weight of the hair by increasing or decreasing the mass of the hair. This value is always set in meter unit, regardless of what the scene scale is set too.
- Damping The strength of the influence of movement that slows down the fur strands.
- Backstop Approximates the surface of the growth mesh to use as collision. A value of 0 does not use the solution while a value of 1.0 uses the avaerage edge length of the entire growth mesh to determine an approximation. A side effect of this is that it can artificially fluf up the root fo the hairs. This can be desired or undesired.
Volume
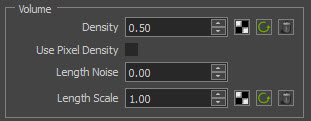
- Density The amount of hair strands produced by interpolation between the guide curves. A value of 0 produces no hair. Currently, a density value of 1.0 produces maximum 64 hairs per each triangle of growth mesh. A value above 1.0 will scale number of hairs correspondingly. If a texture control is used, then this control becomes a multiplier for the texture. A texture control by default is sampled per vertex in uv space.
- Use Pixel density If a texture map is used to control Density, then the texture will influence the density calculation per pixel in uv space instead of the default per vertex. Users should note, however, that using this option may result in a significant performance drop. So this option should be used only when absolutely necessary.
- Length Noise The strength of random value noise that is applied to the length of the interpolated hairs resulting in non uniformly interpolated hairs.
- Length Scale Only grows the hair to a percentage of the full length. A value of 0 is no hair and value of 1 is 100% length.
If a texture control is used, then this control becomes a multiplier for the texture. A texture control by default is sampled per vertex in uv space.
Strand Width
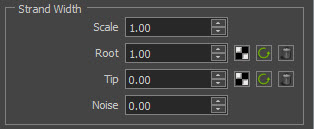
- Scale Determines the base width of each hair. All other parameters in this group as well as their textures act as multipliers to this value. This value is always set in millimeters, reagardless of what the scene scale is set too.
- Root Multiplier to the width scale that applies toward the root of each individual hair. If a texture map is used, then the sampled texture values per each hair will be multiplied to this constant. The combined value then acts as multiplier to the base scale value.
- Tip Multiplier to the width scale that applies toward the tip of each individual hair. If a texture map is used, then the sampled texture values per each hair will be multiplied to this constant. The combined value then acts as multiplier to the base scale value.
- Noise The strength of random value noise that is applied to the overall width of individual hairs.
Stiffness
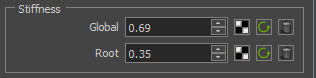
Controls how closely the hair strand stays to it’s initial groomed position. The stiffness of each hair vertex is computed as the sum of two components below.
- Global The strength of stiffness that is applied to each individual hair. If a texture map is used, then the texture will influence the stiffness calculation for each simulated (guide) hairs.
- Root The strength of stiffness that weakens toward the tip of hair. If a texture map is used, then the texture will influence the stiffness calculation for each simulated (guide) hairs.
Clumping
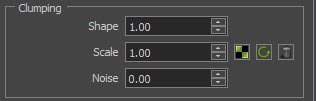
Determines how much each hair follows a clumped shape. Each clump is generated for each growth mesh triangle, and this value controls how much the hair shape is bent toward the center hair. Currently, clumps are defined by triangles and cannot exist across beyond there own triangle.
- Shape Determines the shape of each clump. A value of 0 is a concave clump A value of 2.0 is, a convex clump, and the default value of 1.0 is a neutral clump.
- Scale The strength of clump that is applied to each individual hair. If a texture map is used, then the sampled texture value per hair will act as a multiplier to this constant value.
- Noise The strength of the percentage of hairs that are included in each clump.
Waviness
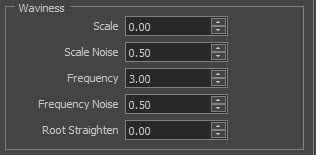
Determines the number of sine waves applied to each individual strand creating the look of waves or curls.
- Scale Determines the amplitude of the waves. This value is always set in centimeter unit, regardless of what the scene scale is set too.
- Scale Noise The strength of noise that is applied to the Scale of each individual hair.
- Frequency Determines the number of waves generated down the length of each individual strand.
- Frequency Noise The strength of noise that is applied to the Frequency of each individual hair..
- Root Straighten Determines how much of the root of each individual hair should remain without waves. A value of 0 has no effect. A value of 1.0 makes waves linearly scale up toward the tip, where tip would get the full wave scale, while root will have no waves.
Graphics Materials
Strands
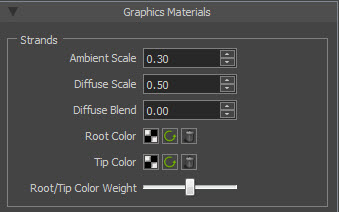
- Diffuse Blend Diffuse lighting for hair is different from usual diffuse term for meshes, and this can cause mismatch in the lighting for very short fur. By setting this value to 1.0, users can ignore hair diffuse term and match mesh lighting more closely. A value of 0.0 will force hair lighting only.
- Root Color The color that is used for the roots of strands. This is determined by loading a texture input and is sampled per hair.
- Tip Color The color that is used for the tips of strands. This is determined by loading a texture input and is sampled per hair.
- Root/Tip Color Weight Balances how much of the Root and Tip color is used along the length strands.
Specular
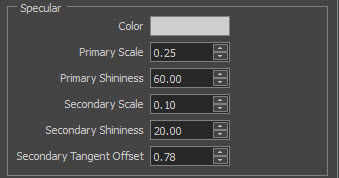
- Color The color that is applied to both primary and secondary specular.
- Primary Scale The strength that the primary specular is applied.
- Primary Shininess How loose or tight the fall off is for primary specular.
- Secondary Scale The strength that the secondary specular is applied.
- Secondary Shininess How loose or tight the fall off is for secondary specular.
- Secondary Tangent Offset Offsets the secondary specular term from the primary specular creating seperation and two distinct highlight regions. This is part of what makes hair look like hair.
Shadow
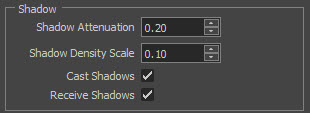
- Shadow Attenuation The strength that shadows are applied to hair.
- Shadow Density Scale The resolution of hair shadows.
- Cast Shadows Enables hair to cast shadows.
- Receive Shadows Enables hair to receive shadows.
Level of Detail
LOD is designed to continuously provide visually seamless transition between lower and higher details at various distances. There is no concept of stepped or numbered LODs with HairWorks. The power of continuous LOD maintains artistic integrity of the assets fluidity through the lod regions creating a more seamless experience and more successfully hiding the detail changes to the end user. These distance values are always set in meter units, regardless of what the scene scale is set too.

Culling These are controls that all how Strands to get culled,not rendered, in different ways.
- View Frustrum Culling Culls hairs when they are off screen.
- Backface Culling Enables the hairs to be culled when their associated face is pointing away from the camera. This is based on the Backface Culling Threshhold.
- Backface Culling Threshold Threshold that determines the strands that are culled via Backface Culling.
Continuous Distance LoD allows the the hair strands to get wider and reduce density automatically until no hair is drawn at a distance.
- Enable: Allows the user to use or not use Continuous Distance LOD.
- Start Distance: The distance from the camera where Continuous Distance LOD begins.
- End Distance: The distance from the camera where Continuous Distance LOD ends. At this point no hair is drawn.
- Width: When Continuous LOD reaches it’s end distance, the Base Width of the strands interpolates to this value. Typically this is a larger value than what Base Width is set as in the Physical Material, resulting in larger strands when the camera is further away and density becomes lower.
- Density: When Continuous LOD reaches it’s end distance, the over all Density interpolates to this value. Typically this value is is 0, therefore removing all strands when the camera is at far LOD.
Continuous Detail LoD allows the the hair strands to get thinner and increase density during close up moments.
- Enable: Allows the user to use or not use Continuous Detail LOD.
- Start Distance: The distance from the camera where Continuous Detail LOD begins. for Detail LOD, this distance is further from the camera.
- End Distance: The distance from the camera where Continuous Detail LOD ends. For Detail LOD, this is closest to the camera and results fur at it’s highest density.
- Width: When Detail LOD reaches it’s end distance, the Base Width of the strands interpolates to this value. Typically this is a smaller value than what Base Width is set as in the Physical Material, resulting in finer strands when the camera is closer.
- Density: When Detail LOD reaches it’s end distance, the over all Density interpolates to this value. Typically this value is greater than one, there fore creating more fur when the camera is closer.
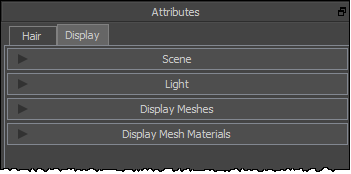
Display Tab
The Display tab contains things such as Scene settings, Lights, Display Mesh visibility, and Display Mesh materials. All settings made on this tab asre saved with the HairWorks project file.
Scene
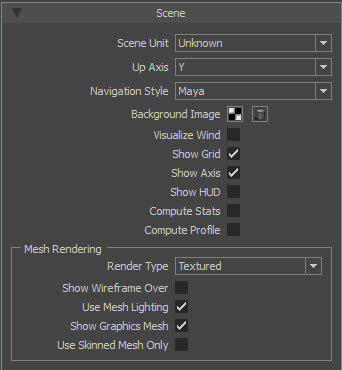
Scene Unit Determines the unit scale that the scene operates in. Make sure to set this before opening any assets.
Up Axis Determines the up axis for the scene. Upon project or fbx load, the viewer will attempt to correctly identify and set the up a
Navigation Style Allows the user two switch between two familiar forms of viewport navigation, Maya, and 3dsMax. Also see Keyboard Shortcuts.
Background Image Allows the user to set an custom image in the background of the viewport. This is helpful for seeing your scene in context with your game.
Visualize Wind Toggles on/off the wind indicator in the viewport.
Show Grid Toggles on/off the ground plane grid in the viewport.
Show Axis Toggles on/off the viewport axis in the lower left hand side of the viewport.
Show HUD Toggles scene statistics via a heads up display on/off in the upper left hand corner. Statistics included are current frame time and fps.
Compute Stats When the HUD is toggled on, additional statistics are shown such as hair id, total number of hairs, average hair density, and average hair density per face.
Compute Profile When the HUD is toggled on, additional statistics specific to gpu/cpu rendering and updating are shown..
Mesh Rendering These are scene wide rendering styles that only apply to meshes.
- Render Type The style of rendering that the scene is rendered in. Options are Wireframe, Flat(lit with no smoothing), Shaded(lit with smoothing), and Textured(lit with smoothing and textures).
- Show Wireframe Over Overlays a black wireframe on top of the chosen Render Type.
- Use Mesh Lighting Toggles if lighting should be applied to the meshes using the chosen render type.
- Show Graphics Mesh Toggles the visibility of all Display Meshes on/off.
- Use Skinned Mesh Only Toggles the visibility of all Display Meshes that are not skinned on/off.
Light
Scene Ambient Color Determines the ambient color for the all objects in the scene.
Name Selects the active light to be edited. Lights are preset to Key, Fill and Rim to light the scene however you like. All 3 lights are directional
Enable Enables the currently select light.
Color The color of the selected light. The color of the light is also previewed on the visualization shape that represents it.
Intensity The strength of the currently selected light.
Shadow Enables shadows to be cast from the currently selected light.
Visualize These are visualizers that apply to the selected light.
- Light Enables visualization for the selected light.
- Shadow Map Displays the shadow map of the current light over the viewport.
- Distance How far the visualized light is away from origin along it’s direction.
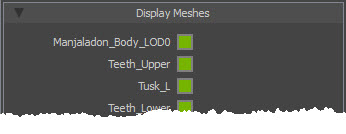
Display Meshes
This is a list of meshes that is loaded with the fbx file and allows the user to toggle visibility of each object on/off. Meshes can be skinned or static.
Display Mesh Materials
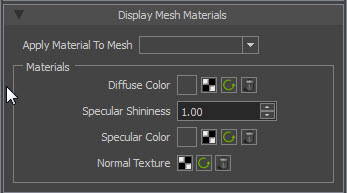
Apply Material To Mesh Drop down list of all meshes in the scene. The selected mesh asset contains the settings in the Materials group.
Diffuse Color The color applied to the material either by color or texture.
Specular Shininess How loose or tight the fall off is for specular.
Specular Color Determines the color to be used for specular high lights either by color or texture.
Normal Texture Texture input for normal map.
Keyboard Shortcuts
- General
- ctl + o: Open project file
- ctl + s: Saves project file
- ctl + x: Toggles presentation mode on/off
- space bar: Toggles play animation on/off
- ctl + Left Mouse: Rotate active Light
- shift + Left Mouse: Rotate wind direction
- Maya Navigation
- Alt + Left Mouse: Rotate
- Alt + Middle Mouse: Translate
- Alt + Right Mouse: Zoom
- 3dsMax Navigation
- Alt + Middle Mouse: Rotate
- Middle Mouse: Translate
- Middle Mouse Scroll Wheel: Zoom
File Types
- FBX
- FBX is used to transfer the skinned character and any other accent display meshes to be used in HairWorks Viewer.
- Hair Files
- APX or APB files that are used to transfer HairWorks assets between software packages.
- They contain all the attribute settings, the growth mesh and its skinning data, guide hairs, and even texture name references.
- Texture Formats
- The viewer currently supports various popular image formats such as .dds, .tga, .png, .bmp, and .jpg
- Project File
- The viewer can save and load .furproj file that contains reference to a fbx file and multiple .apx/.apb files as well as global settings such as camera, light, display and animation options. etc. This file is only used by the viewer.