
NVIDIA® Nsight™ Development Platform, Visual Studio Edition 4.7 User Guide
Send Feedback
When performing remote debugging with NVIDIA® Nsight™ Visual Studio Edition, all of the files that your target application needs at runtime must be copied to the remote machine. The status bar shows you when the debugger is synchronizing files, including how many have been copied out of the total number of files to be copied:
The Nsight Monitor copies the files that match the pattern in the Extensions to synchronize field of the User Settings window. The Nsight Monitor looks for files in the following directories:
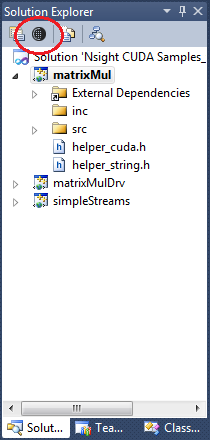
To specify files and directories to synchronize when remote debugging:
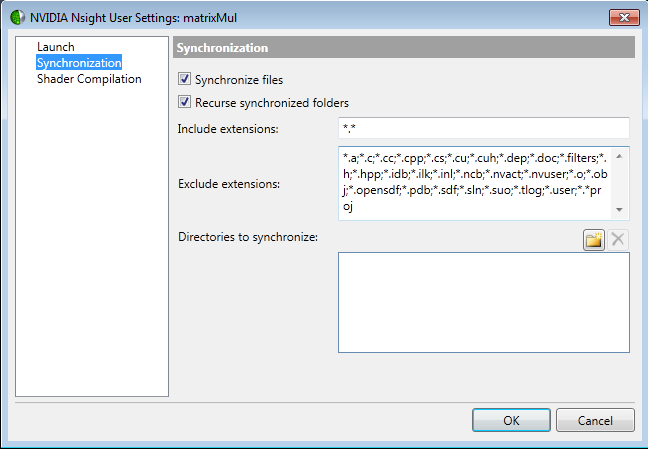
MyKillerApp.*;*.dll;*.pdb;*.exe
You can use the question mark and asterisk as wildcards:
*- substitute for multiple characters
?- substitutute for a single character
Remember to include the target application (usually *.exe).
When the Nsight Monitor synchronizes files to a remote machine, it saves them to a specific directory. This directory is the concatenation of two parts:
[SynchronizationDirectory]+[OutputDirectory]
The default for the first part, the Synchronization Directory, is in the following subdirectory of the %AppData% folder:
C:\Users\[current-user-on-target]\AppData\Roaming\NVIDIA Corporation\Nsight\Monitor\Mirror\[hostname]\[host-outdir]
The default for the second part, the Output Directory, is the output directory defined in your project’s Project Properties, including the hostname and drive letter. You can specify additional Directories To Synchronize in the Nsight – User Settings window as explained above.
For example, let’s say that the hostname of your local machine is MyDesktop-01, and that the output directory of your project on your local machine is:
C:\MyKillerApp\Bin
Let’s also assume that you have logged on to the remote machine as jsmith.
When the Nsight Monitor synchronizes files for remote debugging, it creates the following directory (the result of the concatenation of the two paths described above):

The Nsight Monitor copies the files from the local machine to the above directory. In the above example, it would copy the files from the C:\MyKillerApp\Bin directory on the local machine to the remote machine. In addition to those files, the debugger will also copy files from any directories you specified in the Directories To Synchronize field in the Nsight – User Settings window.
You can override the default Synchronization Directory. For example, instead of the default path in the AppData directory, you could specify the Synchronization Directory to be:
C:\TargetAppRoot
If the hostname of your local machine were MyDesktop-01 and the output directory of your project on your local machine were C:\MyKillerApp\Bin, the Nsight Monitor would copy the files to this directory on the remote machine:
C:\TargetAppRoot\MyDesktop-01\c\MyKillerApp\Bin
To change the Synchronization Directory:
C:\MySynchRoot.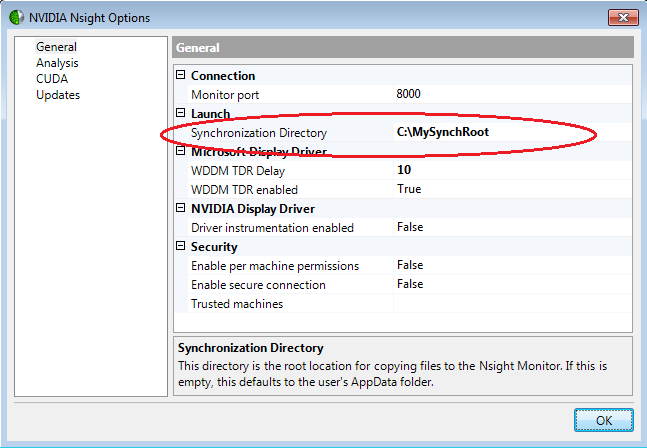
The Nsight Monitor uses the directory you specified as the root directory for file synchronization the next time you perform remote debugging with this project. If this directory does not exist on the remote machine, the Nsight Monitor creates the directory.
NVIDIA GameWorks Documentation Rev. 1.0.150630 ©2015. NVIDIA Corporation. All Rights Reserved.