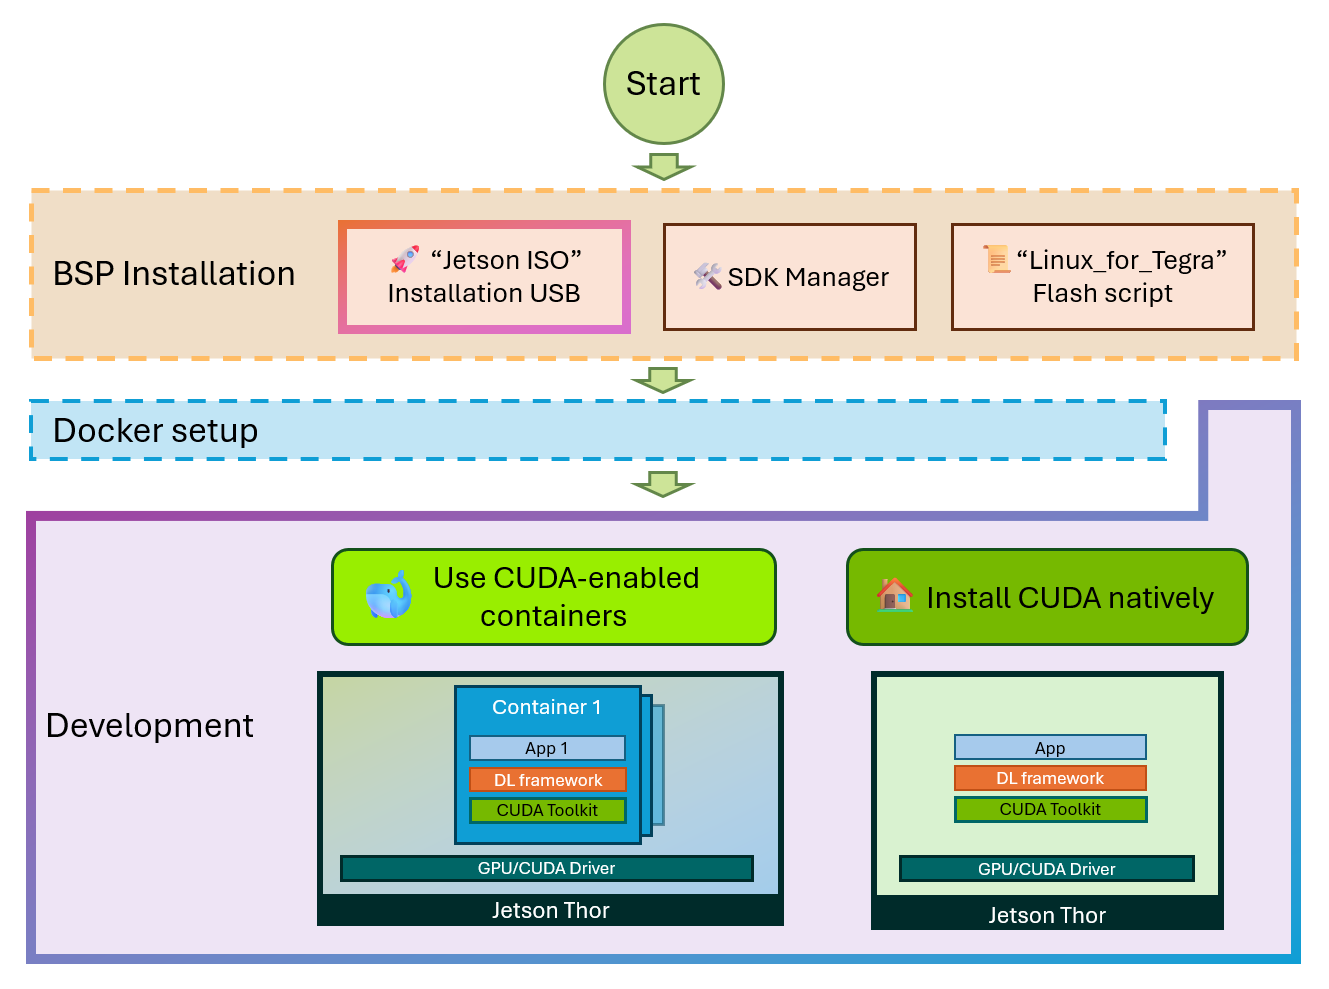
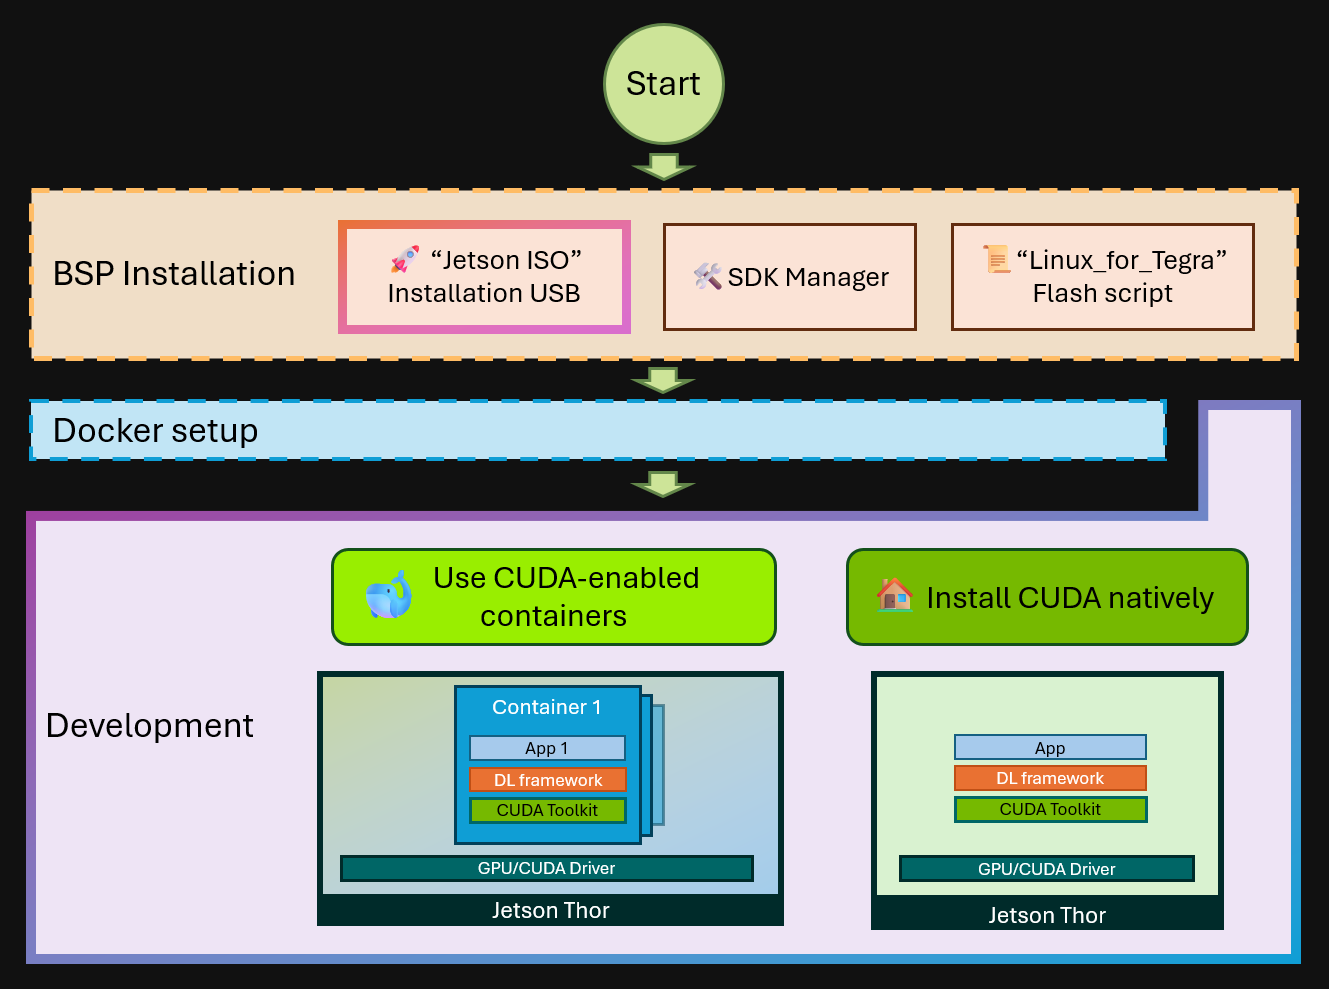
CUDA Setup#
CUDA Setup Options#
Comparison#
While experiences vary and some points are open to debate, the table below provides a practical side-by-side comparison of container-based and native development. It’s not meant as an absolute judgment, but as guidance to help weigh trade-offs when choosing an environment for your development and deployment.
Comparison Table for 🐋 Container-based vs. 🏠 Native
Metric |
🐋 Container-based Development |
🏠 Native Development |
|---|---|---|
📋 Setup Time |
⚡ 5-10 minutes |
⌛ 20-45 minutes |
🔧 CUDA Installation |
✅ Pre-configured |
🛠️ Manual setup |
🐋 Docker Required? |
✅ Yes |
❌ No |
💾 Disk Space |
📦 2-8+ GB |
💿 1-4 GB |
🏋️ Performance Overhead |
⚠️ Generally negligible |
🎯 0% |
🔄 Environment Consistency |
🧪 Reproducible userspace via image tag/digest |
⚠️ Varies by system |
🛡️ System Isolation |
🧱 Process isolation (namespaces/cgroups) |
🔓 Shared system |
🌍 Portability |
📦 Works everywhere |
🔒 System-specific (OS/architecture dependent) |
🔧 Maintenance |
⬇️ Easy updates |
🛠️ Manual updates |
👥 Team Onboarding |
🚀 Instant setup (one command) |
📚 Documentation + troubleshooting pre machine |
🐛 Debugging |
🔍 Container-specific |
🎯 Direct access |
🔄 Version Management |
🏷️ Image tags (easy rollback) |
📦 Package versions |
🚑 Failure Recovery |
🔄 Quick restart |
🛠️ Manual troubleshooting required |
📈 Scalability |
🧩 Easy replication |
⚠️ System-dependent |
💰 Cost Impact |
💸 More storage; compute ≈ native |
💵 Less storage pressure |
🐋 Ways to use CUDA-enabled containers#
If you have Docker already setup, you can immediately pull (download) and run CUDA-enabled containers, without installing anything on your host environment.
Run NGC container#
NGC (NVIDIA GPU Cloud) is the hub for GPU-optimized software for deep learning and more, and a registry for NVIDIA-provided containers.
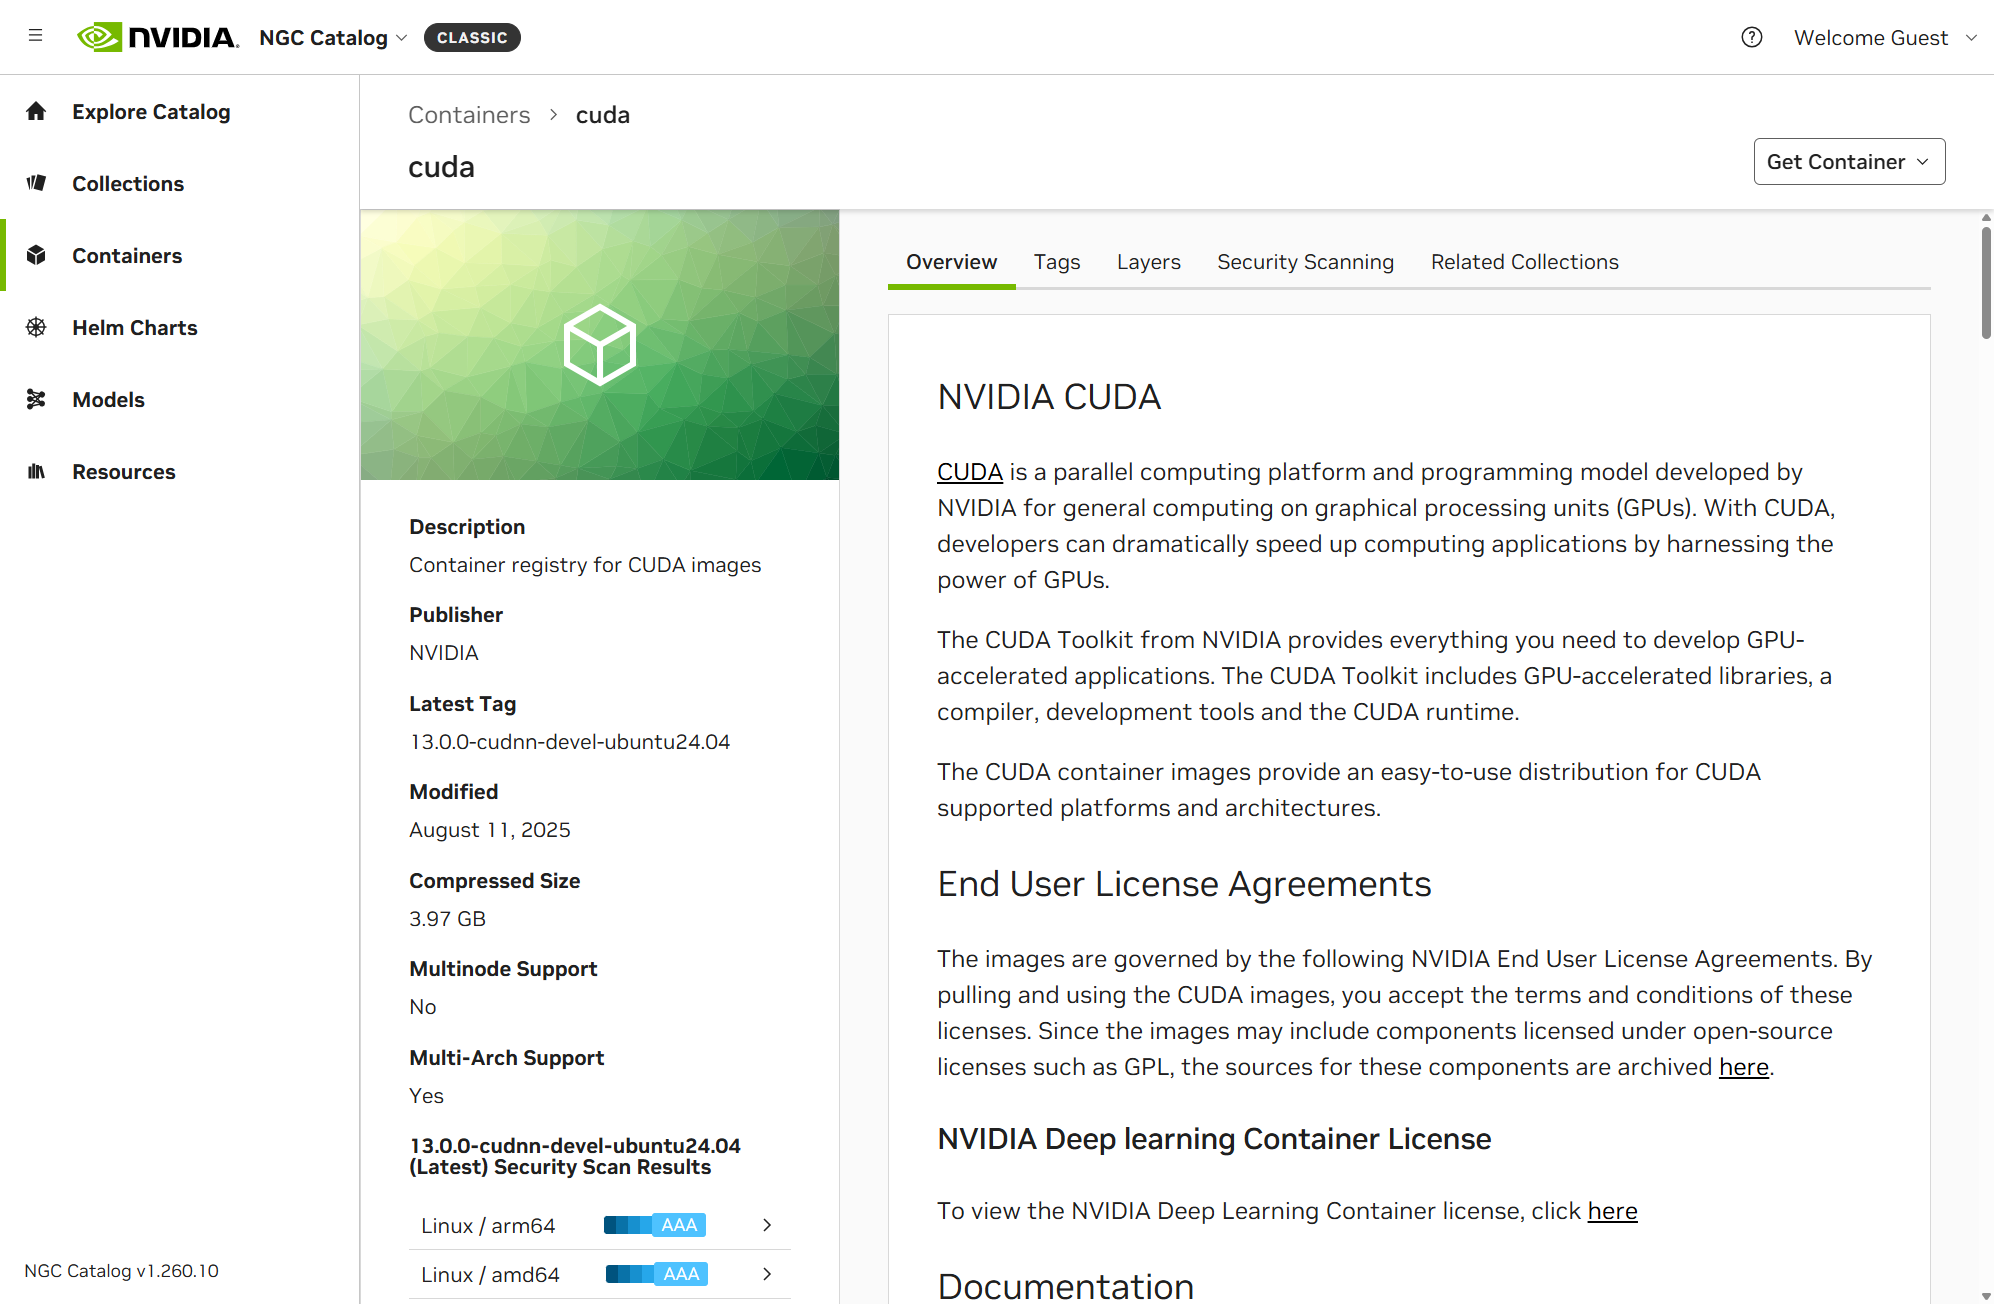
Under the “Tags” section, you can see a list of tags for the hosted container.

Notice that it shows “2 Architectures”. This means that the container image is available for both x86_64 and arm64 architectures.
You can click on icon to copy the container image path with that tag into your clipboard.
Example 1: Run CUDA container#
You can run the docker run command with the copied container image path.
docker run -it --rm nvcr.io/nvidia/cuda:13.0.0-devel-ubuntu24.04
It will start pulling (downloading) the container image from NGC, and
jetson@jat02-iso0817:~/s$ docker run --gpus all -it --rm nvcr.io/nvidia/cuda:13.0.0-cudnn-devel-ubuntu24.04
Unable to find image 'nvcr.io/nvidia/cuda:13.0.0-cudnn-devel-ubuntu24.04' locally
13.0.0-cudnn-devel-ubuntu24.04: Pulling from nvidia/cuda
e3bd89a9dac5: Already exists
7388693f29f9: Pull complete
2ab05901de2a: Pull complete
652943dea480: Pull complete
13e8f87efde8: Pull complete
eeb7c7586928: Downloading [===============>                                   ]  489.2MB/1.594GB
bc96c5cba8de: Download complete
b00b8bab1407: Download complete
c31d48f5d410: Download complete
a3c2647420c6: Downloading [==============>                                    ]  630.2MB/2.113GB
a6cc4fad3425: Download complete
37d31402f37f: Download complete
Once download and extraction is complete, or if you have already pulled the container image, you will see something like this:
jetson@jat02-iso0817:~/$ docker run -it --rm nvcr.io/nvidia/cuda:13.0.0-devel-ubuntu24.04

==========
== CUDA ==
==========

CUDA Version 13.0.0

Container image Copyright (c) 2016-2023, NVIDIA CORPORATION & AFFILIATES. All rights reserved.

This container image and its contents are governed by the NVIDIA Deep Learning Container License.
By pulling and using the container, you accept the terms and conditions of this license:
https://developer.nvidia.com/ngc/nvidia-deep-learning-container-license

A copy of this license is made available in this container at /NGC-DL-CONTAINER-LICENSE for your convenience.

WARNING: The NVIDIA Driver was not detected.  GPU functionality will not be available.
Use the NVIDIA Container Toolkit to start this container with GPU support; see
https://docs.nvidia.com/datacenter/cloud-native/ .

root@99042c33f4b2:/#
Example 2: Build cuda-samples using NGC CUDA container#
On your Jetson (Docker host), crate a diretory to be mounted on the container, so that you will not loose your built binaries.
cd ~
mkdir -p $HOME/cuda-work && cd $HOME/cuda-work
docker run --rm -it \
    -v "$PWD":/workspace \
    -w /workspace \
    nvcr.io/nvidia/cuda:13.0.0-devel-ubuntu24.04
Once in the container, you can build cuda-samples using the following command.
apt update && apt install -y --no-install-recommends git make cmake
git clone --depth=1 --branch v13.0 https://github.com/NVIDIA/cuda-samples.git
cd cuda-samples/Samples/1_Utilities/deviceQuery
cmake . -DGPU_TARGETS=all -DCMAKE_BUILD_TYPE=Release
make -j$(nproc)
./deviceQuery
You should see something like this:
root@84419057c31d:/workspace/cuda-samples/Samples/1_Utilities/deviceQuery# ls
CMakeCache.txt  CMakeFiles  CMakeLists.txt  Makefile  README.md  cmake_install.cmake  deviceQuery  deviceQuery.cpp
root@84419057c31d:/workspace/cuda-samples/Samples/1_Utilities/deviceQuery# ./deviceQuery
./deviceQuery Starting...

  CUDA Device Query (Runtime API) version (CUDART static linking)

Detected 1 CUDA Capable device(s)

Device 0: "NVIDIA Thor"
  CUDA Driver Version / Runtime Version          13.0 / 13.0
  CUDA Capability Major/Minor version number:    11.0
  Total amount of global memory:                 125772 MBytes (131881811968 bytes)
  (020) Multiprocessors, (128) CUDA Cores/MP:    2560 CUDA Cores
  GPU Max Clock rate:                            1049 MHz (1.05 GHz)
  Memory Clock rate:                             0 Mhz
  Memory Bus Width:                              0-bit
  L2 Cache Size:                                 33554432 bytes
  Maximum Texture Dimension Size (x,y,z)         1D=(131072), 2D=(131072, 65536), 3D=(16384, 16384, 16384)
  Maximum Layered 1D Texture Size, (num) layers  1D=(32768), 2048 layers
  Maximum Layered 2D Texture Size, (num) layers  2D=(32768, 32768), 2048 layers
  Total amount of constant memory:               65536 bytes
  Total amount of shared memory per block:       49152 bytes
  Total shared memory per multiprocessor:        233472 bytes
  Total number of registers available per block: 65536
  Warp size:                                     32
  Maximum number of threads per multiprocessor:  1536
  Maximum number of threads per block:           1024
  Max dimension size of a thread block (x,y,z): (1024, 1024, 64)
  Max dimension size of a grid size    (x,y,z): (2147483647, 65535, 65535)
  Maximum memory pitch:                          2147483647 bytes
  Texture alignment:                             512 bytes
  Concurrent copy and kernel execution:          Yes with 1 copy engine(s)
  Run time limit on kernels:                     Yes
  Integrated GPU sharing Host Memory:            Yes
  Support host page-locked memory mapping:       Yes
  Alignment requirement for Surfaces:            Yes
  Device has ECC support:                        Disabled
  Device supports Unified Addressing (UVA):      Yes
  Device supports Managed Memory:                Yes
  Device supports Compute Preemption:            Yes
  Supports Cooperative Kernel Launch:            Yes
  Device PCI Domain ID / Bus ID / location ID:   0 / 1 / 0
  Compute Mode:
    < Default (multiple host threads can use ::cudaSetDevice() with device simultaneously) >

deviceQuery, CUDA Driver = CUDART, CUDA Driver Version = 13.0, CUDA Runtime Version = 13.0, NumDevs = 1
Result = PASS
Use jetson-containers#
Follow Getting Started section of jetson-containers repository to git-clone and install dependencies.
Then, you can easily run various pre-built containers using jetson-containers CLI.
jetson-containers run $(autotag stable-diffusion-webui)
🏠 Ways to natively install CUDA Toolkit#
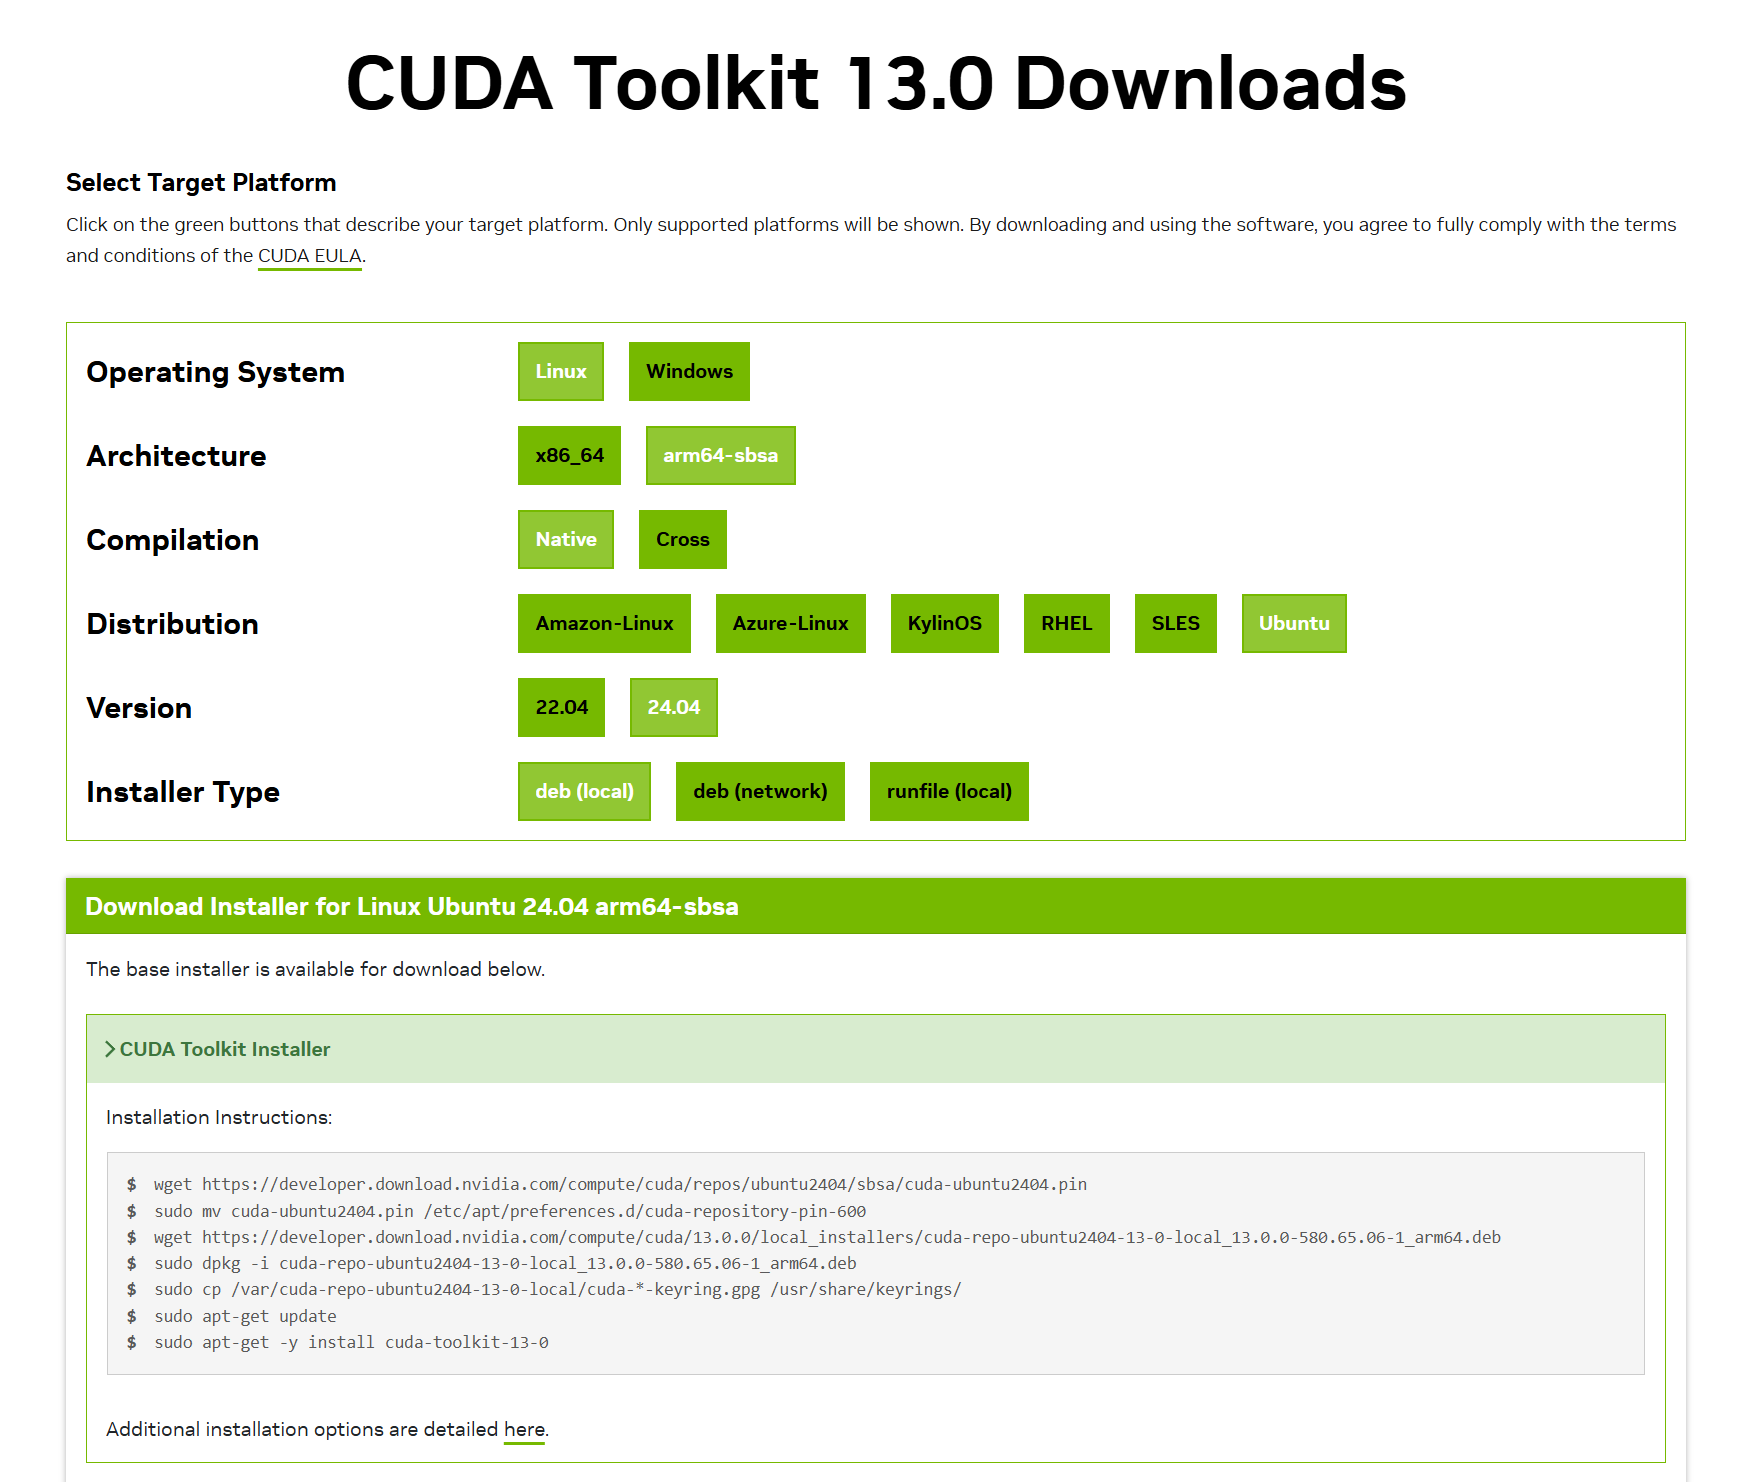
Option 1: CUDA Download Page#
You can go to NVIDIA’s CUDA download page and download the Debian package for CUDA Toolkit, and install it on your Jetson.
Jump to CUDA download page and select:
Linux arm64-sbsa Native Ubuntu 24.04 deb (local)
or, click this direct link.
Then, execute the commands given in the installation instructions.
Caution
DO NOT follow the “Driver Installer” section directly below the “CUDA Toolkit Installer” section.
The instruction is for ARM servers (SBSA) and not for Jetson.

Option 2: JetPack APT repo#
To install the whole JetPack component software/SDK on your Jetson, including CUDA Toolkit for development, you can use the following command:
sudo apt update
sudo apt install nvidia-jetpack
Note that this will consume 15GB+ of storage space on your Jetson.
Note
nvidia-jetpack is a meta package that will install the following components:
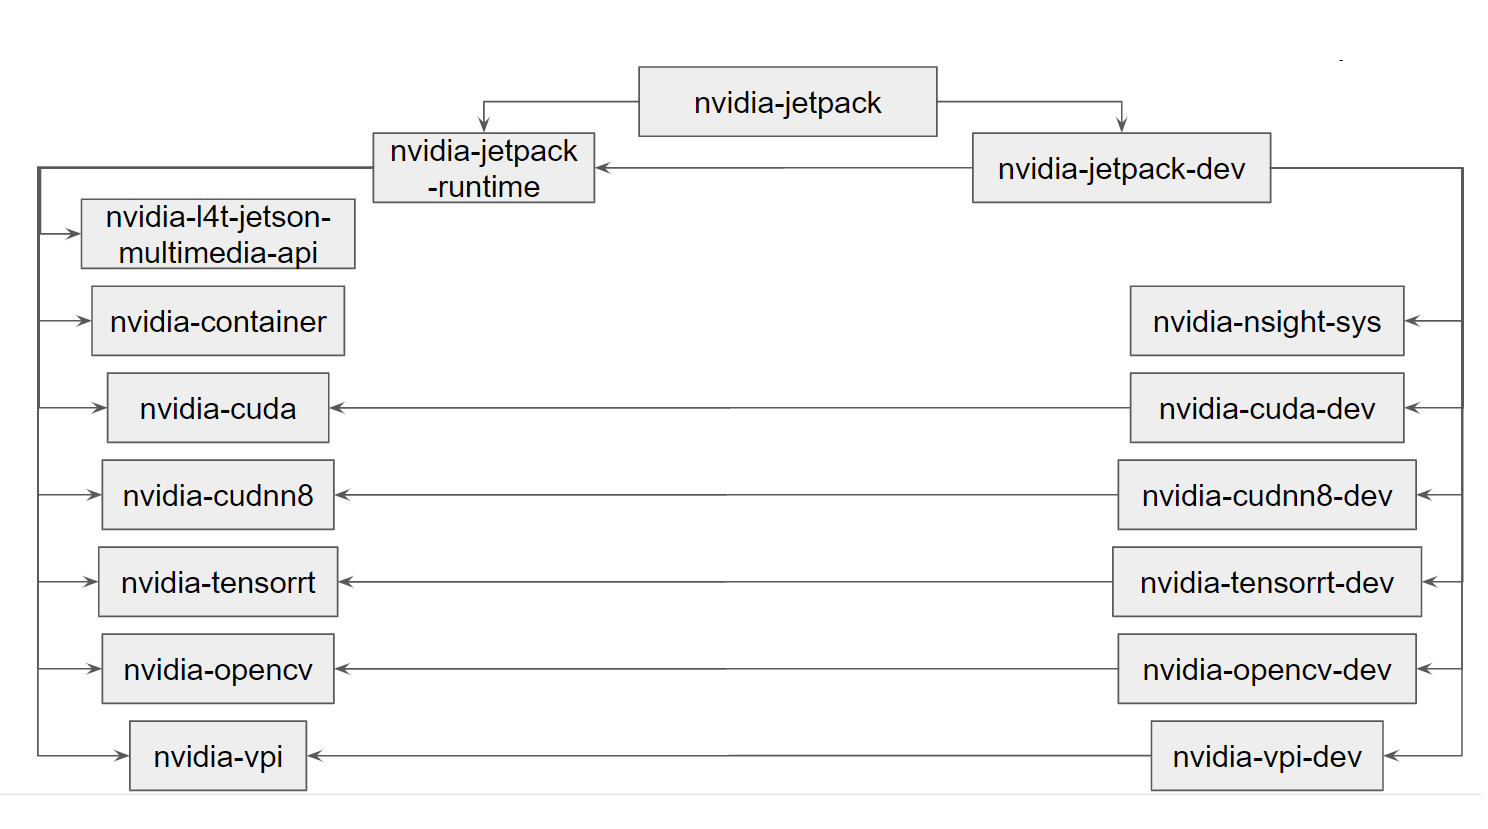
Therefore, you can install specific JetPack components by specifying the sub meta-package, like:
sudo apt update
sudo apt install nvidia-cuda-dev
Hint
nvidia-cuda contains only the CUDA runtime libraries, while nvidia-cuda-dev contains the CUDA development tools.
You can install just the CUDA Toolkit for your development on your Jetson using JetPack’s sub meta-package.
You can use the following command:
sudo apt update
sudo apt install nvidia-cuda-dev
Caution
Please do not install nvidia-cuda-toolkit package.
While nvidia-cuda-dev and nvidia-cuda-toolkit appear similar, the one ends with -toolkit is a package managed under Ubuntu repository, and may not offer the CUDA designed for Jetson.
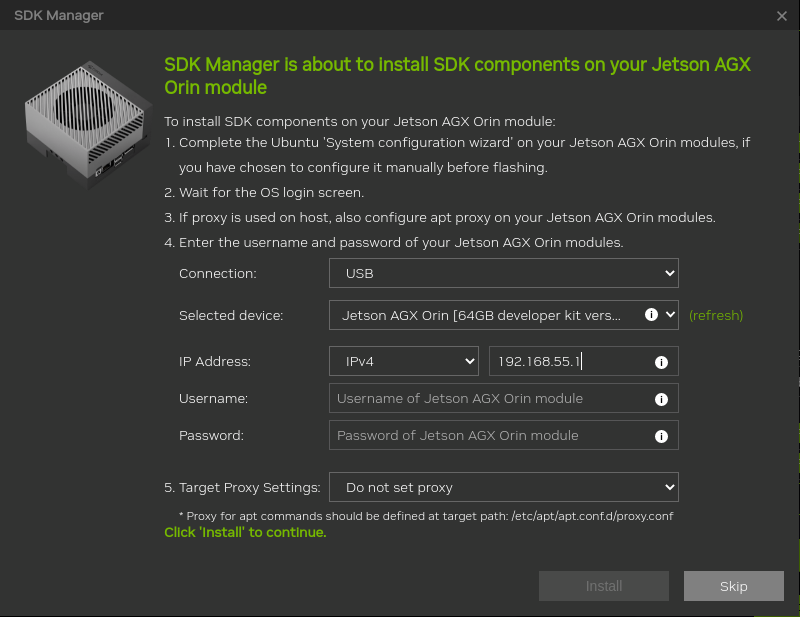
Option 3: SDK Manager#
If you have a host Ubuntu PC, you can run SDK Manager to install CUDA Toolkit on your Jetson.
Connect your PC and Jetson with a USB cable and follow the instructions after Step 03 - 6 in SDK Manager Documentation’s “Install Jetson Software with SDK Manager” page.
Post Install Setup : CUDA PATH configuration#
After installing CUDA Toolkit, you need to configure the PATH and LD_LIBRARY_PATH environment variables to use the CUDA Toolkit.
You can do this by adding the following lines to your ~/.bashrc file.
echo "export PATH=/usr/local/cuda/bin:$PATH" >> ~/.bashrc
echo "export LD_LIBRARY_PATH=/usr/local/cuda/lib64:$LD_LIBRARY_PATH" >> ~/.bashrc
source ~/.bashrc