Delegated License Service User Guide
NVIDIA Delegated License Service User Guide
Documentation for system administrators that explains how to install, configure, and manage the Delegated License Service.
The NVIDIA License System is used to serve a pool of floating licenses to licensed NVIDIA software products. The NVIDIA License System is configured with licenses obtained from the NVIDIA Licensing Portal.
Note: NVIDIA vGPU software releases earlier than 13.0 do not support NVIDIA License System. For full details of NVIDIA vGPU software releases that support NVIDIA License System, refer to NVIDIA Delegated License Service Release Notes.
1.1. Introduction to NVIDIA Software Licensing
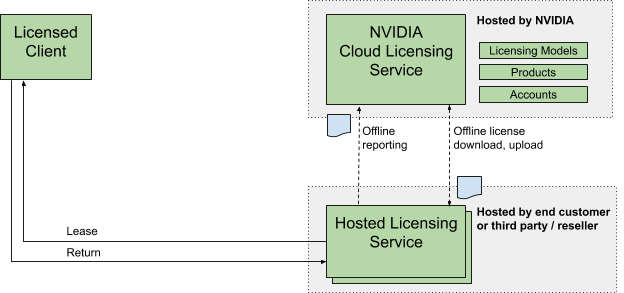
To activate licensed functionalities, a licensed client leases a software license served over the network from an NVIDIA License System service instance when the client is booted. The license is returned to the service instance when the licensed client is shut down.
1.2. About Service Instances
A service instance is required to serve licenses to licensed clients.
NVIDIA License System supports the following types of service instances:
- Cloud License Service (CLS) instance. A CLS instance is hosted on the NVIDIA Licensing Portal.
- Delegated License Service (DLS) instance. A DLS instance is hosted on-premises at a location that is accessible from your private network, such as inside your data center.
To provide isolation for performance, security, and ease of administration, you can deploy multiple service instances as needed. For example, you can deploy service instances in distinct physical locations by deploying a DLS instance in each of your data centers. You can also use a mixture of CLS and DLS instances to serve your licenses to licensed clients.
Note: You cannot mix CLS and DLS instances in a high availability (HA) cluster of service instances. Each node in an HA cluster must be a DLS instance.
1.2.1. About Cloud License Service (CLS) Instances
A Cloud License Service (CLS) instance is hosted on the NVIDIA Licensing Portal.
Because a CLS instance is hosted on the NVIDIA Licensing Portal, you do not need to download licenses from the NVIDIA Licensing Portal and upload them to the instance.

Hosting a CLS instance on a cloud service provides robustness and dynamic scalability for the CLS instance. Because a CLS instance is maintained by NVIDIA and the cloud service provider, feature and maintenance updates are generally transparent to users.
1.2.2. About Delegated License Service (DLS) Instances
A Delegated License Service (DLS) instance is hosted on-premises at a location that is accessible from your private network, such as inside your data center.
Because a DLS instance is fully disconnected from the NVIDIA Licensing Portal, you must download licenses from the NVIDIA Licensing Portal and upload them to the instance manually.
1.3. High Availability for NVIDIA License System DLS Instances
To provide licensed clients with continued access to licenses if a DLS instance fails, you can configure DLS instances for high availability.
High availability requires two DLS instances in a failover configuration:
- A primary DLS instance, which is actively serving licenses to licensed clients
- A secondary DLS instance, which acts as a backup for the primary DLS instance
Configuring two DLS instances in a failover configuration increases availability because simultaneous failure of two instances is rare. The primary and secondary license DLS instances work together to ensure that licenses in the enterprise remain continually available to licensed clients.
If the primary DLS instance fails, failover occurs. The secondary DLS instance becomes the primary instance and begins to serve licenses. The DLS instance that failed becomes the secondary instance when it is returned to service. The next time that failover occurs, the roles of the primary DLS instance and secondary DLS instance are reversed again.
Note: To ensure that licenses in the enterprise remain continually available after failure of the primary DLS instance, return the failed DLS instance to service as quickly as possible to restore high availability support. After failure of a DLS instance, the remaining instance becomes a single point of failure.
During normal operation, the primary DLS instance continually updates the secondary DLS instance with information about the licenses that are being served to clients.
For more information about configuring DLS instances for high availability, see Configuring an HA Cluster of DLS Instances.
To simplify the installation and administration of the DLS, the DLS is distributed as a software image to be installed or deployed on a supported platform. The DLS is a secure, hardened environment in which access to the application software is strictly controlled.
The following types of DLS software image are available:
- A virtual appliance image to be installed on a supported hypervisor
- A containerized software image for deployment on a supported container orchestration platform
Each DLS software image is configured with a fixed set of user accounts. You cannot add other user accounts to the software image. Furthermore, modifications to the configured accounts are strictly controlled.
In each VM-based virtual appliance image, the DLS application software is containerized to allow limited access to the OS so that non-root users can install security compliance and scanning tools in the VM. However, a container orchestration platform cannot control or restrict access to the OS on which the platform is running. As far as possible, the container-based and VM-based DLS appliances are functionally equivalent. Therefore, whether to use a container-based or VM-based DLS appliance depends on whether a container orchestration platform or hypervisor best meets the requirements of your IT infrastructure. For additional guidelines, refer to the following resources from the vendors of platforms that support NVIDIA License System:
- Citrix: Containers or Virtual Machines? It Doesn’t Have to Be One or the Other.
- Microsoft: Containers vs. virtual machines
- Red Hat: Containers vs VMs
- VMware: Why use containers vs. VMs?
2.1. Platform Requirements for a DLS Virtual Appliance or Containerized DLS Software Image
Before proceeding, ensure that you have a platform suitable for hosting a DLS virtual appliance or containerized DLS software image.
- The hosting platform must be a physical host running a supported hypervisor or container orchestration platform.
- The minimum resource requirements for the VM in which the DLS virtual appliance or DLS container will run is as follows:
- Number of vCPUs: 4
- RAM: 8 Gbytes
- Disk Size: 10 Gbytes
- The platform must have a fixed (unchanging) IP address. The IP address may be assigned dynamically by DHCP or statically configured, but must be constant.
- The platform’s date and time must be set accurately. NTP is recommended.
Note: Before proceeding with the installation, refer to NVIDIA Delegated License Service Release Notes for details of supported hypervisors and known issues.
2.2. Host Name Resolution Requirements for a DLS Virtual Appliance
The platform that hosts a DLS virtual appliance must be identified by its IP address or its fully qualified domain name. If you want to identify the platform by its fully qualified domain name, ensure that the required DNS entries are set before installing the DLS virtual appliance. If you want to identify the platform by its default host name, you must set a DNS entry that maps the default host name to the fully qualified domain name.
The process for setting these DNS entries is separate from the process for installing the DLS virtual appliance. Use the standard interfaces of the name resolution service that you are using to set the required DNS entries.
Determining Whether the Forward Pointer and Reverse Pointer DNS Entries Are Correct
For each mapping between a domain name and an IP address, ensure that you set both the forward pointer and reverse pointer DNS entries. A DLS virtual appliance requires the reverse pointer entry to determine the domain name of the DLS virtual appliance when creating a client configuration token.
To determine whether the forward pointer and reverse pointer DNS entries have been set correctly, type the following commands in a shell on any UNIX or Linux host on the same network as the DLS virtual appliance:
-
For the forward pointer entry, type:
$ host domain-name
- domain-name
- The domain name for which you want to determine whether the forward pointer DNS entry is correct.
If the DNS entry has been set correctly, the command displays the IP address that is mapped to the domain name.
-
For the reverse pointer entry, type:
$ host ip-address
- ip-address
- The IP address for which you want to determine whether the reverse pointer DNS entry is correct.
If the DNS entry has been set correctly, the command displays the domain name that is mapped to the IP address.
How a DLS Instance Determines Whether a Fully Qualified Domain Name Is Set
How a DLS instance determines whether a fully qualified domain name is set depends on the type of DLS instance.
- VM-based DLS virtual appliance: When the VM that hosts a DLS instance starts, the DLS instance checks whether a fully qualified domain name is mapped to the IP address of the VM. If a name is mapped to the IP address of the VM, the DLS instance retrieves the name to display in the user interface of the NVIDIA Licensing application on the appliance.
-
Containerized DLS Software Image: The fully qualified domain name is set through an environment variable. When the container within which the DLS software image is deployed is started, the DLS instance checks whether this environment variable is set.
Note:Note: Licensed clients outside the container must be able to resolve the fully qualified domain name. The environment variable must not specify a name that can be resolved only by the container orchestrator.
- If this environment variable is set, the DLS instance retrieves the name to display in the user interface of the NVIDIA Licensing application on the appliance.
- If this environment variable is not set, a user cannot connect to the container in which the DLS software image is deployed through a fully qualified domain name, even if a fully qualified domain name is mapped to an IP address in the DNS server.
For more information, refer to Setting Properties for a Containerized DLS Software Image.
How the Host Name of the VM or Container that Hosts a DLS Instance Is Set
How the host name of the VM or container that hosts a DLS instance is set depends on the type of DLS instance.
- VM-based DLS virtual appliance: The host name is preset in the virtual appliance image.
- The host name of a standalone DLS virtual appliance is preset to
nls-si-0. - The host names of the DLS virtual appliances in an HA cluster are preset to
nls-si-0andnls-si-1.
The host name can be changed as explained in Changing the Host Name of a VM-Based DLS Virtual Appliance.
- The host name of a standalone DLS virtual appliance is preset to
- Containerized DLS Software Image: The host name is set through an environment variable. If this environment variable is not set, the container orchestration platform sets the host name to the container ID. For more information, refer to Setting Properties for a Containerized DLS Software Image.
2.3. Communications Ports Requirements
To enable communication between a licensed client and a CLS or DLS instance, specific ports must be open in your firewall or proxy server. If you are using an HA cluster of DLS instances with a firewall or proxy server between the DLS instances, additional ports must be open in your firewall or proxy server.
Communications Ports Between a Licensed Client and a CLS Instance
To enable communication between a licensed client and a CLS instance, the following ports must be open in your firewall or proxy server:
| Port | Protocol | Egress / Ingress | Protocol / Service | From | To |
|---|---|---|---|---|---|
| 80 | TLS, TCP | Egress | License acquire, renewal | Client | CLS |
| 443 | TLS, TCP | Egress | License Release | Client | CLS |
Communications Ports Between a Licensed Client and a DLS Instance
To enable communication between a licensed client and a DLS instance, the following ports must be open in your firewall or proxy server:
| Port | Protocol | Egress / Ingress | Protocol / Service | From | To |
|---|---|---|---|---|---|
| 80 | TLS, TCP | Egress | License acquire, renewal | Client | CLS |
| 443 | TLS, TCP | Egress | License Release | Client | CLS |
Note:
- The following ports for client to DLS connections are no longer required, but are supported for backward compatibility: 8081, 8082.
- For a container-based DLS appliance, ports 80 and 443 might not be available for the DLS appliance to bind to, either because the container orchestrator administrator has restricted access to these ports or because the ports are in use by other containers. In this situation, you must set the environment variables
DLS_HTTP_PORTandDLS_HTTPS_PORTto the ports that the DLS appliance must bind to. For more information, refer to Setting Properties for a Containerized DLS Software Image.
Communications Ports Between DLS Instances in an HA Cluster
If you are using an HA cluster of DLS instances with a firewall or proxy server between the DLS instances, the following ports must also be open in the firewall or proxy server:
| Port | Containerized Instance | VM-Based Instance | Protocol | Egress/Ingress | Protocol/Service | From | To |
|---|---|---|---|---|---|---|---|
| 443 | - | ✔ | TLS, TCP | Both | Licensing Services | Primary DLS | Secondary DLS |
| 4369 | ✔ | ✔ | EPMD (peer discovery) | Both | RabbitMQ, Erlang | Primary DLS | Secondary DLS |
| 5671 | ✔ | ✔ | AMQP, TLS | Both | RabbitMQ | Primary DLS | Secondary DLS |
| 8080 | ✔ | ✔ | HTTPS | Both | Licensing Services | Primary DLS | Secondary DLS |
| 8081 | ✔ | ✔ | HTTPS | Both | Licensing Services | Primary DLS | Secondary DLS |
| 8082 | ✔ | ✔ | HTTPS | Both | Licensing Services | Primary DLS | Secondary DLS |
| 8083 | ✔ | ✔ | HTTPS | Both | Licensing Services | Primary DLS | Secondary DLS |
| 8084 | ✔ | ✔ | HTTPS | Both | Licensing Services | Primary DLS | Secondary DLS |
| 8085 | ✔ | ✔ | HTTPS | Both | Licensing Services | Primary DLS | Secondary DLS |
✔ Port is used.
- Port is not used.
The following ports that were required to be open in earlier releases are no longer used:
- 22
- 1883
- 5672
- 8883
- 15672
- 25671
- 25672
- 61613
- 61614
Communications Ports in the Container Orchestrator
The following ports must be available in the container orchestrator to allow the DLS appliance container to bind to them:
| Port | Service |
|---|---|
| 8080, 18080 | Administration Service |
| 8081, 18081 | Authorization Service |
| 8082, 18082 | Licensing Services |
| 8083, 18083 | File Installation |
| 8084, 18084 | Service Instance |
| 8085 | Virtual Appliance Service |
| 9001 | Process Manager (supervisord) |
| 25672 | RabbitMQ |
2.4. Sizing Guidelines for a DLS Appliance
Use the measured performance numbers to determine the optimum configuration for your container-based or VM-based DLS appliances based on the expected number and frequency of requests from licensed clients.
2.4.1. Throughput for a DLS Appliance
Throughput measures the number of clients that a VM-based or container-based DLS appliance can process in 1 second.
Note:
- All measurements were taken with a CPU clock speed of 2.6 GHz.
- For a VM-based DLS appliance, the disk size is preset to 10 Gbytes in the virtual appliance image. If you want to retain diagnostic log files for longer than the default period of three months, the increase the disk size in the appliance.
- The measurements for a container-based DLS appliance were taken from a Docker container in an Ubuntu VM. Only the containers for the DLS appliance were running in the VM while the measurements were taken.
| Number of vCPUs | Total RAM (GB) | RAM Consumed (GB) | Throughput (Clients per Second) | Average Response Time (ms) |
|---|---|---|---|---|
| 4 | 8 | 4 | 3 | 31 |
| 6 | 12 | 6 | 5 | 39 |
| 8 | 12 | 8 | 6 | 32 |
2.4.2. Scalability for a DLS Appliance
Scalability measures the maximum number of licensed clients that a VM-based or container-based DLS appliance can serve in a specific interval. A DLS appliance serves a licensed client by performing a licensing operation for the client, namely the borrowing, return, or renewal of a license. Registration of a licensed client is not considered a licensing operation because it occurs only once for any client.
These measurements capture the maximum number of licensed clients that DLS appliances with varying numbers of vCPUs and amounts of RAM can serve for different lengths of time for which a license is borrowed up to 24 hours.
Note:
- Intervals in the table are the renewal intervals when a client contacts the DLS appliance to request a licensing operation.
- The renewal interval is set to 15% of the length of time for which a license is borrowed.
- The measurements assume that a license is borrowed for at least 10 minutes.
- The measurements were taken with the throughput measured in Throughput for a DLS Appliance.
- All measurements were taken with a CPU clock speed of 2.6 GHz.
- The measurements for a container-based DLS appliance were taken from a Docker container in an Ubuntu VM. Only the containers for the DLS appliance were running in the VM while the measurements were taken.
| Length of Time License Is Borrowed | Interval | Maximum Number of Licensed Clients | ||
|---|---|---|---|---|
| 4 vCPUs, 8 GB of RAM | 6 vCPUs, 12 GB of RAM | 8 vCPUs, 12 GB of RAM | ||
| 10 minutes | 1.5 minutes | 270 | 450 | 540 |
| 1 hour | 9 minutes | 1,600 | 2,700 | 3,200 |
| 6 hours | 54 minutes | 9,700 | 16,000 | 19,000 |
| 12 hours | 1.8 hours | 19,000 | 32,000 | 38,000 |
| 24 hours | 3.6 hours | 38,000 | 64,000 | 77,000 |
2.4.3. Burst Load Performance for a DLS Appliance
Burst load performance measures the time that a VM-based or container-based DLS appliance requires to process the requests received from a large number of clients in a short interval of time. Burst load performance does not measure concurrency or throughput.
Note:
- Burst processing times are illustrative only because they are for retry logic in performance tests that use simulated client drivers. Times may differ with real client drivers.
- The test systems were configured with 4 vCPUs and 8 GB of RAM.
- The measurements for a container-based DLS appliance were taken from a Docker container in an Ubuntu VM. Only the containers for the DLS appliance were running in the VM while the measurements were taken.
| Number of Clients | Interval | Processing Time |
|---|---|---|
| 100 | 0-1 second | 10 seconds |
| 1,000 | 0-2 seconds | 1 minute |
| 5,000 | 0-100 seconds (1 minute and 40 seconds ) | 5 minutes |
| 10,000 | 0-200 seconds (3 minutes and 20 seconds) | 10 minutes |
2.5. Installing a VM-Based DLS Virtual Appliance
To simplify the installation process, a VM-based DLS virtual appliance is supplied as a virtual appliance image to be installed on a supported hypervisor.
After verifying the requirements in Platform Requirements for a DLS Virtual Appliance or Containerized DLS Software Image and reviewing the guidelines in Sizing Guidelines for a DLS Appliance, install and configure the DLS virtual appliance by following this sequence of instructions:
- Installing the DLS Virtual Appliance Image on a Supported Hypervisor
- If necessary: Setting the IP Address of a DLS Virtual Appliance from the Hypervisor
- Registering the DLS Administrator User
- Optional:Creating an HA Cluster of DLS Instances
- Optional: Setting the Static IP Address of a DLS Virtual Appliance
2.5.1. Installing the DLS Virtual Appliance Image on a Supported Hypervisor
DLS virtual appliance images are available for several hypervisors. You use standard interfaces of the hypervisor to install the DLS virtual appliance on your chosen hypervisor.
The DLS virtual appliance image for each supported hypervisor except Red Hat Enterprise Linux KVM specifies the minimum configuration for the VM as listed in Platform Requirements for a DLS Virtual Appliance or Containerized DLS Software Image. You are not required to specify the VM configuration when you install the DLS virtual appliance for these hypervisors. After installing the DLS virtual appliance, you can use standard interfaces of the hypervisor to change the configuration of the VM if necessary.
2.5.1.1. Installing the DLS Virtual Appliance on Citrix Hypervisor
The DLS image for Citrix Hypervisor is distributed as a ZIP archive that contains an XVA file, which is a format that is specific to Xen-based hypervisors.
Use the Citrix XenCenter Import wizard to perform this task on the Citrix Hypervisor host on which you want to run the DLS virtual appliance.
For additional information, see Import VMs From XVA on the Citrix product documentation website.
- Download the ZIP archive that contains the XVA file that contains the DLS virtual appliance image to the hypervisor host.
- Extract the contents of the ZIP archive that you downloaded.
- In Citrix XenCenter, from the File menu, choose Import.
- Browse for and select the downloaded XVA file, and click Next.
- Select the server on which the imported VM will be placed and click Next.
- Select the storage repository where the virtual disks for the newly imported VM will be stored and click Import.
- Select the default virtual network interfaces in the template for the virtual appliance and click Next.
- Review the settings for importing the virtual machine and click Finish to create the virtual machine.
- Start the VM that you created.
Allow approximately 15 minutes after the VM is started for the installation of the DLS virtual appliance to complete and for the DLS virtual appliance to start. What to do after the DLS virtual appliance starts depends on whether the VM has been assigned an IP address automatically, for example, by a DHCP server:
-
If the VM has been assigned an IP address, what to do next depends on whether you are performing a new installation or are upgrading an existing DLS instance:
- If you are performing a new installation, register the DLS administrator user on the appliance as explained in Registering the DLS Administrator User.
- If you are upgrading an existing DLS instance, migrate the existing DLS instance as explained in Migrating a DLS Instance.
-
Otherwise, set the IP address of the DLS virtual appliance from the hypervisor as explained in Setting the IP Address of a DLS Virtual Appliance from the Hypervisor.
2.5.1.2. Installing the DLS Virtual Appliance on Microsoft Windows Server with Hyper-V
The DLS image for Microsoft Windows Server with Hyper-V is distributed as a ZIP archive.
Use Hyper-V Manager to perform this task on the Microsoft Windows Server with Hyper-V host on which you want to run the DLS virtual appliance.
For additional information, see Import a Virtual Machine on the Microsoft documentation website.
- Download the ZIP archive that contains the DLS virtual appliance image to the hypervisor host.
- Extract the contents of the ZIP archive that you downloaded.
- From the Hyper-V ManagerActions menu, choose Import Virtual Machine.
- Browse for and select the folder to which you extracted the DLS virtual appliance image and click Next.
- When prompted to choose the type of import, select the Copy the virtual machine (create a new unique ID) option and click Next.
Browse for and select the folders in which you want to store virtual machine (VM) files and click Next.
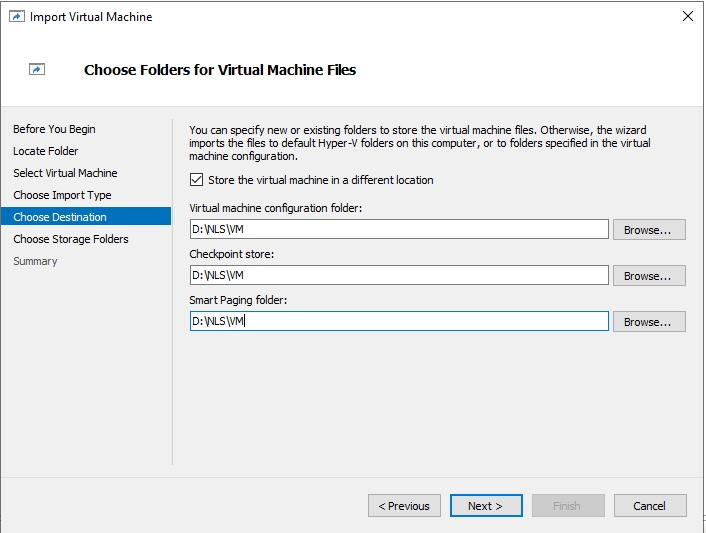
- Browse for and select the folder for storing the virtual disk.
Note:
Note: If you are creating two VMs for a cluster of DLS instances, ensure that you choose a unique folder for each VM to prevent errors from Hyper-V Manager.
- Review the settings for importing the VM and click Finish to create the VM.
- After the VM has been created, specify the virtual switch that the VM should use.
- From the Actions menu under the name of the imported VM, choose Settings.
- Under Hardware in the left navigation bar of the Settings window, select Network Adapter, select the virtual switch from the Virtual switch drop-down list, and click Apply.
- Start the imported VM.
- From the Actions menu under the name of the imported VM, choose Connect.
- In the Virtual Machine Connection window that opens, click Start.
A command window opens when the installation of the imported VM is started. Use this window to log in to the DLS virtual appliance only if you need to set the IP address of the DLS virtual appliance from the hypervisor.
Allow approximately 15 minutes after the VM is started for the installation of the DLS virtual appliance to complete and for the DLS virtual appliance to start. What to do after the DLS virtual appliance starts depends on whether the VM has been assigned an IP address automatically, for example, by a DHCP server:
-
If the VM has been assigned an IP address, what to do next depends on whether you are performing a new installation or are upgrading an existing DLS instance:
- If you are performing a new installation, register the DLS administrator user on the appliance as explained in Registering the DLS Administrator User.
- If you are upgrading an existing DLS instance, migrate the existing DLS instance as explained in Migrating a DLS Instance.
-
Otherwise, set the IP address of the DLS virtual appliance from the hypervisor as explained in Setting the IP Address of a DLS Virtual Appliance from the Hypervisor.
After the VM has started, you can get its IP address from the Networking tab for the VM in Hyper-V Manager.
2.5.1.3. Installing the DLS Virtual Appliance on Red Hat Enterprise Linux KVM
The DLS image for Red Hat Enterprise Linux KVM is distributed as a ZIP archive that contains a QEMU copy-on-write (QCOW2) image file. After preparing the QCOW2 file, install the image by using Virtual Machine Manager to create a VM from the QCOW2 file.
Perform this task from the Red Hat Enterprise Linux KVM host.
- Download the ZIP archive that contains the QCOW2 image file to the Red Hat Enterprise Linux KVM host.
- Extract the contents of the ZIP archive that you downloaded.
- Copy the QCOW2 image file to the /var/lib/libvirt/images directory on the Red Hat Enterprise Linux KVM host.
- Start Virtual Machine Manager.
- Add a connection to the Red Hat Enterprise Linux KVM host.
- In the Virtual Machine Manager window, from the File menu, choose Add Connection.
- In the Add Connection window that opens, set the options in the following table and click Connect.
Option Setting Hypervisor From the drop-down list, select QEMU/KVM. Connect to remote host over SSH Select this option. User Name In this text-entry field, type root. Hostname In this text-entry field, type the IP address or the fully qualified host name of the Red Hat Enterprise Linux KVM host.
The connection is added to the Virtual Machine Manager window.
- Context click the connection that you added in the previous step and choose New. The Create a new virtual machine wizard starts.
- In the first New VM window, select the Import existing disk image option and click Forward.
- In the second New VM window, import the downloaded QCOW2 image file and choose the operating system to install.
- Click Browse.
- In the Choose Storage Volume window that opens, select the downloaded QCOW2 image file and click Choose Volume.
- Back in the second New VM window, type Ubuntu 20.04 in the search box and from the list of operating systems that opens, select Ubuntu 20.04 (ubuntu).
- Click Forward.
- In the third New VM window, set Memory to 8192 MiB and CPUs to 4, and click Forward.
- In the final New VM window, specify the VM name and the network that the VM will use.
- In the Name text-entry field, type your choice of name for the VM that you are creating.
- Select the Customize configuration before install option.
- From the Network Selection drop-down list, select the network that the VM will use.
- Click Finish.
- In the window for reviewing a new VM, in the left navigation bar, select Display Spice and from the Type drop-down list, select VNC Server.
- Click Apply to save your changes to the configuration and click Begin Installation.
- After the VM is created, click the play button to start the VM on the Red Hat Enterprise Linux KVM host.
A command window opens when the VM starts. Use this window to log in to the DLS virtual appliance only if you need to set the IP address of the DLS virtual appliance from the hypervisor.
Allow approximately 15 minutes after the VM is started for the installation of the DLS virtual appliance to complete and for the DLS virtual appliance to start. What to do after the DLS virtual appliance starts depends on whether the VM has been assigned an IP address automatically, for example, by a DHCP server:
-
If the VM has been assigned an IP address, what to do next depends on whether you are performing a new installation or are upgrading an existing DLS instance:
- If you are performing a new installation, register the DLS administrator user on the appliance as explained in Registering the DLS Administrator User.
- If you are upgrading an existing DLS instance, migrate the existing DLS instance as explained in Migrating a DLS Instance.
-
Otherwise, set the IP address of the DLS virtual appliance from the hypervisor as explained in Setting the IP Address of a DLS Virtual Appliance from the Hypervisor.
2.5.1.4. Installing the DLS Virtual Appliance on VMware vSphere
The DLS image for VMware vSphere is distributed as a ZIP archive that contains an Open Virtual Appliance (OVA) file.
Use the VMware vSphere Client to perform this task on the ESXi server on which you want to run the DLS virtual appliance.
For additional information, see the following topics on the VMware Docs site:
- Download the ZIP archive that contains the OVA file that contains the DLS image for VMware vSphere.
- Extract the contents of the ZIP archive that you downloaded.
- Log in to vCenter Server by using the VMware vSphere Client.
- From the VMware vSphere ClientActions menu, choose Deploy OVF Template.
- Select the Local file option, browse for and select the downloaded OVA file, and click Next.
- Enter the your choice of virtual machine name, select a location for the virtual machine, and click Next.
- Select a compute resource where the virtual machine will be created and click Next.
- Review the details of the template that you are deploying and click Next.
- Select the storage for the virtual appliance configuration and disk files and click Next.
- Leave the destination network as-is, set the IP allocation option to Static - Manual, and click Next.
- Set the virtual network and IP allocation properties for the VM and click Next.
- In the ipaddress text-entry field, type the IP address that you want to assign to the VM.
- In the netmask text-entry field, type the subnet mask of the VM's network in classless inter-domain routing (CIDR) format without the leading slash character (/). To get a subnet mask in CIDR format from its decimal equivalent, refer to the table on page 2 of IETF RFC 1878: Variable Length Subnet Table For IPv4. For example, the subnet mask in CIDR format of the decimal equivalent 255.255.255.0 is 24.
- In the gateway text-entry field, type the IP address of the VM's default gateway.
Note:
Note: If you leave the gateway field empty, the DLS virtual appliance uses DHCP settings.
- Optional: In the dns_server_one text-entry field, type the IP address of the first DNS server to be used for name resolution.
- Optional: In the dns_server_two text-entry field, type the IP address of the second DNS server to be used for name resolution.
- Review all the details of the virtual machine that you are creating and click Finish.
- Start the VM that you created.
Allow approximately 15 minutes after the VM is started for the installation of the DLS virtual appliance to complete and for the DLS virtual appliance to start. What to do after the DLS virtual appliance starts depends on whether the VM has been assigned an IP address automatically, for example, by a DHCP server:
-
If the VM has been assigned an IP address, what to do next depends on whether you are performing a new installation or are upgrading an existing DLS instance:
- If you are performing a new installation, register the DLS administrator user on the appliance as explained in Registering the DLS Administrator User.
- If you are upgrading an existing DLS instance, migrate the existing DLS instance as explained in Migrating a DLS Instance.
-
Otherwise, set the IP address of the DLS virtual appliance from the hypervisor as explained in Setting the IP Address of a DLS Virtual Appliance from the Hypervisor.
2.5.2. Setting the IP Address of a DLS Virtual Appliance from the Hypervisor
If the VM that hosts a DLS virtual appliance has not been assigned an IP address automatically, you must set the IP address from the hypervisor. Each DLS virtual appliance provides a shell script specifically for this purpose and is configured with a user account for running the script.
Note: You can perform this task only on a VM-based DLS virtual appliance. You cannot perform this task on a containerized DLS software image. Instead, you can use standard interfaces of the OS on which the container orchestration platform is running to make this change.
- Use the hypervisor management console of the appliance to log in as the user dls_system to the VM that hosts the DLS virtual appliance. You don't need to provide a password to log in as the dls_system user.
- Run the /etc/adminscripts/set-static-ip-cli.sh script.
$ /etc/adminscripts/set-static-ip-cli.sh
- When prompted, enter the details of the IP address. The script presents any default values that are already set for the virtual appliance's network.
- Enter the number that denotes the IP version that the virtual appliance's network uses.
- For an IPv4 network, type 4.
- For an IPv6 network, type 6.
- Enter the IP address that you want to assign to the DLS virtual appliance.
- Enter the IP address of the DLS virtual appliance's default gateway.
Note:
Note: If you omit the default gateway address, the DLS virtual appliance uses DHCP settings.
- Enter the IP address of the first DNS server to be used for name resolution.
- Enter the IP address of the second DNS server to be used for name resolution.
- Enter the subnet mask of the DLS virtual appliance's network in classless inter-domain routing (CIDR) format without the leading slash character (/). To get a subnet mask in CIDR format from its decimal equivalent, refer to the table on page 2 of IETF RFC 1878: Variable Length Subnet Table For IPv4. For example, the subnet mask in CIDR format of the decimal equivalent 255.255.255.0 is 24.
- Enter the number that denotes the IP version that the virtual appliance's network uses.
After the IP address has been set, log files containing progress message from the script are available in the /tmp/static-ip-cli-logs directory.
What to do next depends on whether you are performing a new installation or are upgrading an existing DLS instance:
- If you are performing a new installation, register the DLS administrator user on the appliance as explained in Registering the DLS Administrator User.
- If you are upgrading an existing DLS instance, migrate the existing DLS instance as explained in Migrating a DLS Instance.
2.6. Deploying a Containerized DLS Software Image
To simplify the deployment process, a containerized DLS software image is to be deployed on a supported container orchestration platform.
After verifying the requirements in Platform Requirements for a DLS Virtual Appliance or Containerized DLS Software Image, deploy a containerized DLS software image by following this sequence of instructions:
- Setting Properties for a Containerized DLS Software Image
- Deploying the Containerized DLS Software Image on a Supported Platform
- Registering the DLS Administrator User
- Optional:Creating an HA Cluster of DLS Instances
2.6.1. Contents of the Containerized DLS Software Image Download
The containerized DLS software image is distributed as the ZIP archive nls-2.0.0-bios.zip.
This ZIP archive contains the following artifacts:
- dls_appliance_2.0.0.tar.gz
- The DLS application container.
- dls_pgsql_2.0.0.tar.gz
- The PostgreSQL database container.
Note: The version of both containers must be the same.
The DLS application container and the PostgreSQL database container share a common volume for exchanging information between them. If both containers are deployed on a multinode cluster, they must be run on the same worker node.
2.6.2. Setting Properties for a Containerized DLS Software Image
To enable communications with the container within which the DLS appliance is running, you must set properties such as host names, IP addresses, and port numbers. Set these properties before deploying the containerized DLS software image on a supported platform.
Set the properties for a containerized DLS software image by editing the appropriate deployment file for your container orchestration platform.
| Container Orchestration Platform | File |
|---|---|
| Docker | docker-compose.yml |
| Kubernetes | nls-si-0-deployment.yaml |
| Red Hat OpenShift Container Platform | nls-si-0-deployment.yaml |
| VMware Tanzu Application Platform | nls-si-0-deployment.yaml |
2.6.2.1. Setting Environment Variables to Specify String Properties
You can set environment variables to specify string properties for all supported container orchestration platforms.
Set environment variables to specify string properties by editing the appropriate section of the deployment file for your container platform.
- In docker-compose.yml, edit the
environment:section. - In nls-si-0-deployment.yaml, edit the
- env:section.
The environment variables for specifying string properties are as follows:
-
Required:
DLS_DB_HOST - The IP address of the database container.
-
Required:
DLS_PUBLIC_IP - The IP address of the container orchestration platform. To access the NVIDIA Licensing application, the user connects to the container in which the DLS software image is deployed through this address.
-
Optional:
DLS_PRIVATE_HOSTNAME -
The host name of the container in which the DLS software image is deployed.
If this environment variable is not set, the container orchestration platform sets the host name to the container ID.
-
Optional:
FQDN -
The fully qualified domain name that is mapped to the IP address that is specified by the
DLS_PUBLIC_IPenvironment variable.Ensure that this name can be resolved by licensed clients. Do not specify a name that can be resolved only by the container orchestrator.
If this environment variable is not set, a user cannot connect to the container in which the DLS software image is deployed through a fully qualified domain name.
2.6.2.2. Specifying Port Numbers by Setting Environment Variables
You can specify port numbers for Docker, Red Hat OpenShift Container Platform, and VMware Tanzu Application Platform by setting environment variables.
Note:Kubernetes does not accept string values for port numbers. Therefore, you cannot specify port numbers for Kubernetes by setting environment variables. Instead, you must specify port numbers for Kubernetes as explained in Specifying Port Numbers as Integer Values.
To specify port numbers by setting environment variables, edit the appropriate section of the deployment file for your container platform.
- In docker-compose.yml, edit the
environment:section. - In nls-si-0-deployment.yaml, edit the
- env:section.
The following environment variables for specifying port numbers apply to Docker, Red Hat OpenShift Container Platform, and VMware Tanzu Application Platform:
-
Optional:
DLS_HTTP_PORT -
The port on which the container in which the DLS software image is deployed listens for HTTP requests.
Default: 80
-
Optional:
DLS_HTTPS_PORT -
The port on which the container in which the DLS software image is deployed listens for HTTPS requests.
Default: 443
-
Optional:
DLS_RABBITMQ_SSL_PORT -
The Secure Sockets Layer (SSL) port through which the nodes in and HA cluster of DLS instances communicate with each other.
Default: 5671
The following environment variables for specifying port numbers apply only to Red Hat OpenShift Container Platform and VMware Tanzu Application Platform:
-
Optional:
DLS_EXPOSED_HTTP_PORT -
The port on which the container orchestrator listens for and forwards the request to the port that is specified by the
DLS_HTTP_PORTenvironment variable.Not applicable to Docker.
Default: 30000
-
Optional:
DLS_EXPOSED_HTTPS_PORT -
The port on which the container orchestrator listens for and forwards the request to the port that is specified by the
DLS_HTTP_PORTSenvironment variable.Default: 30001
-
Optional:
DLS_VA_SERVICE_PORT -
The port in the container orchestrator to which the DLS appliance container binds.
Not applicable to Docker.
Default: 8085
2.6.2.3. Specifying Port Numbers as Integer Values
Kubernetes does not accept string values for port numbers. Therefore, you cannot specify port numbers for Kubernetes by setting environment variables. Instead, you must specify port numbers for Kubernetes as integer values.
To specify port numbers as integer values, replace the references to environment variables with actual values in the ports: section of the nls-si-0-deployment.yaml and nls-si-0-service.yaml deployment files.
- In nls-si-0-deployment.yaml, the references to environment variables in the
ports:section are as follows:ports: - containerPort: ${DLS_HTTP_PORT:-80} hostPort: ${DLS_EXPOSED_HTTP_PORT:-80} - containerPort: ${DLS_HTTPS_PORT:-443} hostPort: ${DLS_EXPOSED_HTTPS_PORT:-443} - containerPort: ${DLS_RABBITMQ_SSL_PORT:-5671} hostPort: ${DLS_RABBITMQ_SSL_PORT:-5671} - containerPort: 8085 hostPort: ${DLS_VA_SERVICE_PORT:-8085}
- In nls-si-0-service.yaml, the references to environment variables in the
ports:section are as follows:ports: - name: "DLS_HTTP_CONTAINER" port: ${DLS_HTTP_PORT:-80} targetPort: ${DLS_HTTP_PORT:-80} nodePort: ${DLS_EXPOSED_HTTP_PORT:-30000} - name: "DLS_HTTPS_CONTAINER" port: ${DLS_HTTPS_PORT:-443} targetPort: ${DLS_HTTPS_PORT:-443} nodePort: ${DLS_EXPOSED_HTTPS_PORT:-30001} - name: "DLS_RABBITMQ_SSL_PORT" port: ${DLS_RABBITMQ_SSL_PORT:-5671} targetPort: ${DLS_RABBITMQ_SSL_PORT:-5671} nodePort: ${DLS_RABBITMQ_SSL_PORT:-5671} - name: "DLS_VA_SERVICE_PORT" port: 8085 targetPort: 8085 nodePort: ${DLS_VA_SERVICE_PORT:-8085}
The values with which to replace these references to environment variables are as follows:
-
Both files:
${DLS_HTTP_PORT:-80} - The port on which the container in which the DLS software image is deployed listens for HTTP requests.
-
nls-si-0-deployment.yaml:
${DLS_EXPOSED_HTTP_PORT:-80} -
nls-si-0-service.yaml:
${DLS_EXPOSED_HTTP_PORT:-30000} -
The port on which the container orchestrator listens for and forwards the request to the port that is specified by the
DLS_HTTP_PORTenvironment variable. -
Both files:
${DLS_HTTPS_PORT:-443} - The port on which the container in which the DLS software image is deployed listens for HTTPS requests.
-
nls-si-0-deployment.yaml:
${DLS_EXPOSED_HTTPS_PORT:-443} -
nls-si-0-service.yaml:
${DLS_EXPOSED_HTTPS_PORT:-30001} -
The port on which the container orchestrator listens for and forwards the request to the port that is specified by the
DLS_HTTP_PORTSenvironment variable. -
Both files:
${DLS_RABBITMQ_SSL_PORT:-5671} - The Secure Sockets Layer (SSL) port through which the nodes in and HA cluster of DLS instances communicate with each other.
-
Both files:
${DLS_VA_SERVICE_PORT:-8085} - The port in the container orchestrator to which the DLS appliance container binds.
This example shows the ports: sections in the nls-si-0-deployment.yaml and nls-si-0-service.yaml deployment files in which the references to environment variables are replaced with actual values.
- In nls-si-0-deployment.yaml, the
ports:section is as follows:ports: - containerPort: 80 hostPort: 80 - containerPort: 443 hostPort: 443 - containerPort: 5671 hostPort: 5671 - containerPort: 8085 hostPort: 8085
- In nls-si-0-service.yaml, the
ports:section is as follows:ports: - name: "DLS_HTTP_CONTAINER" port: 80 targetPort: 80 nodePort: 30000 - name: "DLS_HTTPS_CONTAINER" port: 443 targetPort: 443 nodePort: 30001 - name: "DLS_RABBITMQ_SSL_PORT" port: 5671 targetPort: 5671 nodePort: 30002 - name: "DLS_VA_SERVICE_PORT" port: 8085 targetPort: 8085 nodePort: 30003
2.6.3. Deploying the Containerized DLS Software Image on a Supported Platform
The containerized DLS software image is distributed with default deployment files for several container orchestration platforms. You use standard interfaces of the container orchestration platform to deploy the containerized DLS software image on your chosen platform.
The default deployment file for each supported container orchestration platform specifies the resource reservations for the container that are listed in Platform Requirements for a DLS Virtual Appliance or Containerized DLS Software Image. You are not required to specify the resource reservations for the container when you deploy the containerized DLS software image. Follow the instructions for the container orchestration platform that you are using.
| Container Orchestration Platform | Instructions |
|---|---|
| Docker | Deploying the Containerized DLS Software Image on Docker |
| Kubernetes | Deploying the Containerized DLS Software Image on Kubernetes Platforms |
| Red Hat OpenShift Container Platform | Deploying the Containerized DLS Software Image on Kubernetes Platforms |
| VMware Tanzu Application Platform | Deploying the Containerized DLS Software Image on Kubernetes Platforms |
2.6.3.1. Deploying the Containerized DLS Software Image on Docker
Ensure that the required environment variables have been set as explained in Setting Properties for a Containerized DLS Software Image.
- Import the DLS appliance artifact and the PostgreSQL database artifact.
- Import the DLS appliance artifact.
docker load --input dls_appliance_2.0.0.tar.gz
- Import the PostgreSQL database artifact.
$ docker load --input dls_pgsql_2.0.0.tar.gz
- Import the DLS appliance artifact.
- Change to the directory that contains the docker-compose.yml file.
- Start the DLS appliance and PostgreSQL database containers.
$ docker-compose up
2.6.3.2. Deploying the Containerized DLS Software Image on Kubernetes Platforms
Perform this task if you are using Kubernetes, Red Hat OpenShift Container Platform, or VMware Tanzu Application Platform.
Ensure that the following prerequisites are met:
- The required environment variables have been set as explained in Setting Properties for a Containerized DLS Software Image.
- A private repository for the DLS appliance artifact and the PostgreSQL database artifact has been created.
- If a registry secret is required for pulling the artifacts from the private repository, the registry secret has been created.
In the deployment files for the DLS appliance artifact and the PostgreSQL database artifact, the name of the registry secret is preset to
registry-secret. If you create a secret with this name, you don't need to edit the deployment files to reference the secret.
Note: The DLS application container and the PostgreSQL database container share a common volume for exchanging information between them. If both containers are deployed on a multinode cluster, they must be run on the same worker node.
- Import the DLS appliance artifact and the PostgreSQL database artifact into your private repository.
- Edit the deployment files for the DLS appliance artifact and the PostgreSQL database artifact to pull these artifacts from the private repository into which they were imported. In each file, replace the string
<POPULATE THIS WITH PRIVATE REPOSITORY>with the name of the private repository.- For the DLS appliance artifact, edit the following line in the file nls-si-0-deployment.yaml:
image: <POPULATE THIS WITH PRIVATE REPOSITORY>:appliance
- For the PostgreSQL database artifact, edit the following line in the file postgres-nls-si-0-deployment.yaml:
image: <POPULATE THIS WITH PRIVATE REPOSITORY>:pgsql
- For the DLS appliance artifact, edit the following line in the file nls-si-0-deployment.yaml:
- If a registry secret is required for pulling the artifacts from the private repository, edit the deployment files for the DLS appliance artifact and the PostgreSQL database artifact to reference the secret. In each file, replace the string
registry-secretwith the name of your registry secret.- For the DLS appliance artifact, edit the file nls-si-0-deployment.yaml.
- For the PostgreSQL database artifact, edit the file postgres-nls-si-0-deployment.yaml.
- Start the PostgreSQL database container pod with the supplied deployment file postgres-nls-si-0-deployment.yaml.
$ kubectl create -f directory/postgres-nls-si-0-deployment.yaml
- directory
- The full path to the directory that contains the file postgres-nls-si-0-deployment.yaml.
- Get the IP address of the PostgreSQL database container pod.
$ kubectl get pods -o wide
- Set the
DLS_DB_HOSTenvironment variable in the file nls-si-0-deployment.yaml to the IP address that you got in the previous step.Note:Note: To enable the DLS appliance container pod to create and modify files on the volumes mapped to it, ensure that the required file access permissions are set on these volumes.
- Start the DLS appliance container pod with the supplied deployment file nls-si-0-deployment.yaml.
$ kubectl create -f directory/nls-si-0-deployment.yaml
- directory
- The full path to the directory that contains the file nls-si-0-deployment.yaml.
2.6.4. Volume Mappings for a Containerized DLS Software Image
When a containerized DLS software image is deployed, several volume mappings are created for maintaining the state of the NVIDIA Licensing application in the DLS appliance.
The volume mappings that are created are as follows:
- configurations
- Contains the state of the DLS appliance container to enable its dynamic properties to be retrieved if the container fails.
- logs
- Contains log files created by the NVIDIA Licensing application in the DLS appliance.
- postgres-data
- Contains NVIDIA Licensing application data created by the PostgreSQL database. Because this volume contains information about available and checked out licenses, ensure that access to this volume is limited.
- rabbitmq_data
- Contains information about the active-active setup of nodes in an HA cluster of DLS instances.
Note: These volume mappings maintain the state of the NVIDIA Licensing application in the DLS appliance. Therefore, do not modify these volume mappings.
2.6.5. Troubleshooting Issues with Deploying the Containerized DLS Software Image
2.6.5.1. Containerized DLS Appliance Fails to Start on Kubernetes Platforms
When this issue occurs, the service enters a crash loop, container creating, pending sequence before the container enters an error state.
This issue might affect Kubernetes, Red Hat OpenShift Container Platform, or VMware Tanzu Application Platform. It does not affect Docker.
- Ensure that the file access permissions on the volumes allow write access by the database container and the DLS appliance container, for example
707 (rwx---rwx). - If the containerized DLS software image is deployed on a multinode cluster, ensure that the database container and the DLS appliance container are running on the same worker node.
- If the Kubernetes cluster does not dynamically provision persistent volumes when creating persistent volume claims, ensure that the persistent volumes are created manually with file access permissions that allow the database container and the DLS appliance container to write to them.
- Ensure that the versions of the database container and the DLS appliance container are identical.
2.6.5.2. Volume Mode Access for DLS Appliance Resources on Kubernetes Platforms Is Incorrect
The DLS application container and the PostgreSQL database container share a common volume for exchanging information between them. If the volume mode access is incorrect, start-up of only the first container pod to be started is successful. The remaining container pod fails to start because the volume is already mounted on the first container pod to be started.
This issue might affect Kubernetes, Red Hat OpenShift Container Platform, or VMware Tanzu Application Platform. It does not affect Docker.
- If both containers are deployed on a multinode cluster, ensure that the DLS application container and the PostgreSQL database container run on the same worker node.
- Ensure that the PostgreSQL database container pod is started before the DLS appliance container pod. For more information, refer to Deploying the Containerized DLS Software Image on Kubernetes Platforms.
2.6.5.3. Data Validation Errors Prevent the DLS Appliance Container Pod from Starting on Kubernetes
This issue occurs if port numbers are specified as references to environment variables in the deployment files. Because Kubernetes does not accept string values for port numbers, you cannot specify port numbers for Kubernetes by setting environment variables.
This issue might affect Kubernetes. It does not affect other supported container orchestration platforms. When this issue occurs, the following error messages are displayed:
            error: error validating ".": error validating data:[
ValidationError(Deployment.spec.template.spec.containers[0].ports[0].containerPort):
invalid type for io.k8s.api.core.v1.ContainerPort.containerPort: got "string", expected "integer",
ValidationError(Deployment.spec.template.spec.containers[0].ports[0].hostPort):
invalid type for io.k8s.api.core.v1.ContainerPort.hostPort: got "string", expected "integer",
ValidationError(Deployment.spec.template.spec.containers[0].ports[1].containerPort):
invalid type for io.k8s.api.core.v1.ContainerPort.containerPort: got "string", expected "integer",
ValidationError(Deployment.spec.template.spec.containers[0].ports[1].hostPort):
invalid type for io.k8s.api.core.v1.ContainerPort.hostPort: got "string", expected "integer",
ValidationError(Deployment.spec.template.spec.containers[0].ports[2].containerPort):
invalid type for io.k8s.api.core.v1.ContainerPort.containerPort: got "string", expected "integer",
ValidationError(Deployment.spec.template.spec.containers[0].ports[2].hostPort):
invalid type for io.k8s.api.core.v1.ContainerPort.hostPort: got "string", expected "integer",
ValidationError(Deployment.spec.template.spec.containers[0].ports[3].hostPort):
invalid type for io.k8s.api.core.v1.ContainerPort.hostPort: got "string", expected "integer"];
- Edit the deployment files to specify port numbers as integer values instead of references to environment variables. For instructions, refer to Specifying Port Numbers as Integer Values.
- Start the DLS appliance container pod with the supplied deployment file nls-si-0-deployment.yaml.
$ kubectl create -f directory/nls-si-0-deployment.yaml
- directory
- The full path to the directory that contains the file nls-si-0-deployment.yaml.
2.6.5.4. The Management Interface of the NVIDIA Licensing Application Fails to Load
When this issue occurs, the containerized DLS appliance starts correctly but the management interface of the NVIDIA Licensing application is not loaded into the browser.
- Ensure that the
DLS_DB_HOSTenvironment variable set to the IP address of the database container. - Ensure that the environment variables for port mappings set in the deployment files are correct and that the ports are open on the Kubernetes node.
- Ensure that the port specified by the
DLS_EXPOSED_HTTPS_PORTenvironment variable is open in the firewall on the node that is hosting the DLS appliance container. - If the Kubernetes cluster does not dynamically provision persistent volumes when creating persistent volume claims, ensure that the persistent volumes are created manually with file access permissions that allow the database container and the DLS appliance container to write to them.
- Ensure that the versions of the database container and the DLS appliance container are identical.
2.6.5.5. HA Configuration or Online Upgrade Fails
High availability (HA) configuration or online upgrade between two containerized DLS appliances fails if port mappings or volume configurations are incorrect.
- Ensure that the same ports are exposed and mapped internally for both containers. The following environment variables must be the same for both containers.
DLS_EXPOSED_HTTP_PORTDLS_EXPOSED_HTTPS_PORT
- Ensure that the
DLS_RABBITMQ_SSL_PORTenvironment variable is set to 5671 for both containers - Ensure that ports 5671, 8081 and 8084 are open on the containers within which the containerized DLS appliances are deployed.
- Ensure that Ports 8080 through 8085 are open on each worker node.
- Ensure that the sizes of the volumes rabbitmq-data, postgres-data, logs and configurations are equal to or exceed the minimum recommended storage space.
Volume Minimum Recommended Storage Space rabbitmq-data 2 GiB postgres-data 10 GiB logs 500 MiB configurations 100 MiB - Ensure that the file access permissions on the folders inside the rabbitmq-data volume allow write access by the containers.
2.6.5.6. Windows Client Cannot Return Licenses Because the Return Endpoint Is Unavailable
A licensed Windows client returns a license by sending an HTTP request to the DLS instance on port 80. If the container orchestrator within which a containerized DLS appliance is deployed cannot receive requests on this port, the client cannot return a license.
How to resolve this issue depends on whether you can control the port on which the container orchestrator listens for HTTP requests.
- If you can control the port on which the container orchestrator listens for HTTP requests from licensed clients, ensure that the
DLS_EXPOSED_HTTP_PORTenvironment variable is set to 80. - Otherwise, use a load balancer to do path based routing of all license return requests to the URL
https://dls-ip-address:dls-exposed-https-port/leasing/v1/lessor/shutdown- dls-ip-address
-
The IP address that is specified in the
DLS_PUBLIC_IPenvironment variable. - dls-exposed-https-port
-
The port number that is specified in the
DLS_EXPOSED_HTTPS_PORTenvironment variable.
For more information about these environment variables, refer to Setting Properties for a Containerized DLS Software Image.
2.6.5.7. Client Cannot Obtain License if Client Configuration Token Specifies the Domain Name
A configuration error for a containerized DLS instance can prevent a licensed client from obtaining a license if the client configuration token specifies a fully qualified domain name. However, this error does not prevent a client from obtaining a license if the client configuration token specifies an IP address.
- Set the
FQDNenvironment variable to the fully qualified domain name that is mapped to the IP address of the container in which the DLS software image is deployed.Ensure that this name can be resolved by licensed clients. Do not specify a name that can be resolved only by the container orchestrator.
- Restart the container in which the DLS appliance is deployed.
2.6.5.8. Node Health Information Is Missing from the Service Instance Page
Insufficient storage for a containerized DLS instance can prevent node health information from being displayed on the Service Instance page of the management interface of the NVIDIA Licensing application.
- Force reload the Service Instance page in the browser.
- If the node health information is still missing after the page is reloaded, check the amount of storage space available in the volumes created for the DLS appliance container. For more information about these volumes, refer to Volume Mappings for a Containerized DLS Software Image.
- If any volumes are full, resize the volumes and restart the container in which the DLS appliance is deployed.
2.7. Configuring User Accounts on a DLS Virtual Appliance
Each DLS software image is configured with a fixed set of user accounts. You cannot add other user accounts to the software image. Furthermore, modifications to the configured accounts are strictly controlled. Each account is provided for a specific purpose.
| User Account | Purpose |
|---|---|
dls_admin |
DLS administrator account. This account provides access through a web-based management interface to the NVIDIA Licensing application on a DLS virtual appliance. The DLS administrator user name can be changed from the preset dls_admin name. |
dls_diagnostics |
DLS diagnostics user account. This account provides access only to the log files for a DLS virtual appliance through the hypervisor console and secure shell (SSH). This account can be enabled during the registration of the DLS administrator user. It can also be enabled and disabled by changing the dls_admin user's settings in the My Info window.
Note:
Note: This account is not available for containerized DLS software images. |
dls_system |
DLS system user account. This account provides access to the VM that hosts a DLS virtual appliance through the hypervisor console. The dls_system user can perform only a limited number of predefined system administration tasks from the VM that is accessed through this account.
Note:
Note: This account is not available for containerized DLS software images. |
rsu_admin |
DLS sudo user account. This user account has the elevated privileges required to update and upgrade the GPL/LGPL v3 licensed Open Source Software (OSS) libraries within the DLS virtual appliance. This account provides no other access to a DLS virtual appliance. It is provided to comply with the terms of the GPL/LGPL v3 license under which some libraries in the operating system in the DLS virtual appliance are released. For information about how to create the DLS sudo user account, refer to NVIDIA Delegated License Service Release Notes.
Note:
Note: This account is not available for containerized DLS software images. |
2.7.1. Registering the DLS Administrator User
Each DLS virtual appliance is configured with a user account specifically for administering the DLS. This account provides access through a web-based management interface to the NVIDIA Licensing application on the appliance. Before administering a DLS virtual appliance, you must register this user to be able to access this management interface.
If you intend to configure a cluster of DLS instances, you need perform this task only for the DLS instance from which you will configure the cluster. The registration of the DLS administrator user is propagated from this instance to the other instance when you configure the cluster.
- Open a web browser and connect to the URL
https://dls-vm-ip-address.- dls-vm-ip-address
-
The IP address or, if defined, the fully qualified domain name of the VM on which the DLS virtual appliance is installed.
You can get the IP address from the management console of your hypervisor.
- On the Set Up page that opens, click NEW INSTALLATION.
- On the Register User page that opens, provide the credentials for the DLS administrator user.
Note:
Note: If the DLS administrator user has already been registered, the login page opens instead of the Register User page.
- Optional: If you want to change the user name from the preset name dls_admin, replace the text in the Username field with your choice of user name.
- Provide a password for the DLS administrator user and confirm the password. The password must be at least eight characters long and is case sensitive.
Note:Note: You can change the DLS administrator user name and password at any time after the DLS administrator user is registered. For instructions, refer to Changing the DLS Administrator User Name and Password.
- Determine whether you want to enable an additional user that will be able to access the log files for the DLS virtual appliance.
This additional user will have the user name dls_diagnostics and the password that you provide for the dls_admin user. The dls_diagnostics user will be able to access the log files for the DLS virtual appliance by logging in to the DLS virtual appliance from the hypervisor console.
Note:Note: The dls_diagnostics account is not available for containerized DLS software images.
- If you want to enable this additional user, ensure that the Create a diagnostic user option remains selected.
- Otherwise, deselect the Create a diagnostic user option.
Note:Note: You can enable or disable the
dls_diagnosticsuser at any time after the DLS administrator user is registered. Click View settings at the top right of any page in the NVIDIA Licensing application on the DLS virtual appliance. Then, in the My Info window that opens, change the setting of the Diagnotics user option. - Click REGISTER. The Register User page is refreshed to confirm that the user has been registered and displays a local reset secret to enable you to reset the user's password.
- Copy the local reset secret and store it securely, for example, by clicking the clipboard icon and pasting the local reset secret into a plain text file that is readable only by you. You will need this key to reset the DLS administrator user's password.
- Click CONTINUE TO LOGIN.
- On the login page that opens, type the user name of the DLS administrator user, provide the password that you set for this user, and click LOGIN.
If you want to use the virtual appliance for a single DLS instance, what to do next depends on whether you intend to use a static IP address for the virtual appliance that is hosting the DLS instance.
-
If you want to use the virtual appliance in an HA cluster of DLS instances, configure the cluster as explained in Configuring an HA Cluster of DLS Instances.
-
If you want to use a static IP address for the virtual appliance that is hosting the DLS instance, set the address as explained in Setting the Static IP Address of a DLS Virtual Appliance.
-
Otherwise, configure the DLS instance as explained in Configuring a Service Instance.
If you need to reset the DLS administrator user's password, follow the Forgot Password? link on the login page and, when prompted, type the local reset secret, provide a new password for this user, and confirm the new password.
2.7.2. Retrieving the DLS Administrator User's Reset Secret
If you need to reset the DLS administrator user's password but do not have the local reset secret, you can download a reset secret from the NVIDIA Licensing Portal.
- If you are not already logged in, log in to the NVIDIA Enterprise Application Hub and click NVIDIA LICENSING PORTAL to go to the NVIDIA Licensing Portal.
In the left navigation pane, click SERVICE INSTANCES.
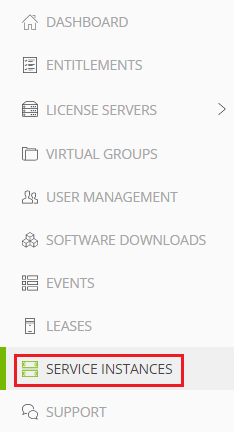
- In the list of service instances on the Service Instance page that opens, from the Actions menu for the DLS instance, choose Download Reset Secret. (Note that the menu is too narrow, so the text is truncated.)
- When prompted, click DOWNLOAD. A file named dls_local_reset_secret_mm-dd-yyyy-hh-mm-ss.tok is saved to your default downloads folder.
When resetting the DLS administrator user's password, upload the reset secret to the DLS instance.
2.7.3. Changing the DLS Administrator User Name and Password
If you choose not to change the DLS administrator user name when registering the DLS administrator user, you can change it at any time after the DLS administrator user is registered. You can also change the password for the DLS administrator user.
- Open a web browser and connect to the URL
https://dls-vm-ip-address.- dls-vm-ip-address
-
The IP address or, if defined, the fully qualified domain name of the VM on which the DLS virtual appliance is installed.
You can get the IP address from the management console of your hypervisor.
- At the top right of the Dashboard page in the NVIDIA Licensing application on the DLS appliance that opens, click View settings.
- In the My Info window that opens, click Change username/password.
- In the Change Username/Password window that opens, make the changes that you want and click CHANGE USERNAME/PASSWORD.
- If you want to change the user name, replace the text in the Username field with your choice of user name.
- In the Current password text-entry field, type the current password for the DLS administrator user.
- In the New password text-entry field, type the password that you want for the DLS administrator user. If you do not want to change the password, type the current password for the DLS administrator user. You cannot leave this field empty.
- In the Confirm new password text-entry field, type the password that you typed in the New password text-entry field.
2.7.4. Logging in to a DLS Virtual Appliance
Each DLS virtual appliance is configured with a user account specifically for administering the DLS. This account provides access through a web-based management interface to the NVIDIA Licensing application on the appliance.
Ensure that the DLS administrator user has been registered for the appliance as explained in Registering the DLS Administrator User.
- Open a web browser and connect to the URL
https://dls-vm-ip-address.- dls-vm-ip-address
-
The IP address or, if defined, the fully qualified domain name of the VM on which the DLS virtual appliance is installed.
You can get the IP address from the management console of your hypervisor.
- On the login page that opens, provide the user credentials for the DLS administrator user on the DLS virtual appliance and click LOGIN.
2.8. Configuring an HA Cluster of DLS Instances
To provide licensed clients with continued access to licenses if a DLS instance fails, you can configure a two-node highly available (HA) cluster of DLS instances in a failover configuration. A failover configuration consists of a primary instance, which is actively serving licenses to licensed clients, and a secondary instance, which acts as a backup for the primary instance.
If you are configuring an HA cluster of containerized DLS instances, you must deploy the containers that host the instances on two different Kubernetes clusters. To prevent the NVIDA Licensing application from behaving abnormally, do not deploy the containers on two different worker nodes in the same Kubernetes cluster. The application would behave abnormally because the orchestrator forwards requests to ports that are mapped onto the corresponding Kubernetes service.
If an attempt to configure an HA cluster of containerized DLS instances fails, refer to HA Configuration or Online Upgrade Fails for troubleshooting information.
2.8.1. Creating an HA Cluster of DLS Instances
Use the management interface of the NVIDIA Licensing application to convert a pair of newly created standalone DLS instances into an HA cluster of DLS instances.
Ensure that the following prerequisites are met:
- The DLS virtual appliances that will host the DLS instances to be configured in a cluster have been installed and started.
Note:
Note: The version of the both DLS virtual appliances must be identical. You cannot configure an HA cluster in which the versions of the virtual appliances are different.
- The DLS administrator user has been registered only on one virtual appliance. The registration of the DLS administrator user is propagated to the other instance when you configure the cluster.
- Log in to the DLS virtual appliance on which the DLS administrator user has been registered. After the cluster is configured, this DLS virtual appliance will initially host the primary DLS instance.
- In the left navigation pane, click SERVICE INSTANCE.
- On the Service Instance page that opens, under Node Configuration, set the Enable High Availability option. The text-entry field and the PING button are activated, and the CREATE HA CLUSTER button is deactivated.
- In the text-entry field, type the IP address or, if configured, the fully qualified domain name of the other virtual appliance to be configured in a cluster and click PING. After the cluster is configured, this DLS virtual appliance will initially host the secondary DLS instance.
- If the virtual appliance that will initially host the secondary DLS instance can be reached, the message
SUCCESSappears next to the PING button and the CREATE HA CLUSTER button is activated. - Otherwise, the message
FAILUREappears next to the PING button and the CREATE HA CLUSTER button remains deactivated.
- If the virtual appliance that will initially host the secondary DLS instance can be reached, the message
- Click CREATE HA CLUSTER to start the configuration and wait for it to complete. The Service Instance page displays the progress of the HA cluster configuration. The configuration process takes approximately 10 minutes to complete.
When the configuration is complete, the Service Instance page is updated to show the node health of the cluster.
If you intend to use static IP addresses for the virtual appliances that are hosting the DLS instances in the cluster, set the address of each virtual appliance as explained in Setting the Static IP Address of a DLS Virtual Appliance. Otherwise, configure the DLS instance on the virtual appliance that is hosting the primary DLS instance as explained in Configuring a Service Instance.
To fail over or change the roles of the DLS instances, restart the DLS virtual appliance that is hosting the primary DLS instance.
Note: If both instances in an HA cluster of DLS instances fail or are shut down at the same time, avoid a race condition by restarting only one instance and waiting until the startup of that instance is complete before starting the second instance.
2.8.2. Converting a Standalone DLS Instance into a Node in an HA Cluster
Any time after configuring a standalone DLS instance, you can convert the instance into a node in an HA cluster. You can also convert a node that became a standalone instance because the other node in a cluster was automatically removed by the DLS.
For information about automatic removal of a node, see Automatic Removal of a Node in an HA Cluster.
Ensure that a second DLS virtual appliance has been installed and started.
Note: The version of the second DLS virtual appliance and the version of the virtual appliance that is hosting the standalaone instance must be identical. You cannot configure an HA cluster in which the versions of the virtual appliances are different.
- Log in to the DLS virtual appliance that hosts the DLS instance that you want to convert. After the instance is converted, it will initially be the primary DLS instance.
- In the left navigation pane, click SERVICE INSTANCE.
- On the Service Instance page that opens, under Node Health, click CONFIGURE HIGH AVAILABILITY. The Configure High Availability section with a text-entry field and a button that is labeled PING are added to the page.
- In the text-entry field, type the IP address or, if configured, the fully qualified domain name of the second virtual appliance and click PING.
- If the second virtual appliance can be reached, the message
SUCCESSappears next to the PING button and the CREATE HA CLUSTER button is activated. - Otherwise, the message
FAILUREappears next to the PING button and the CREATE HA CLUSTER button remains deactivated.
- If the second virtual appliance can be reached, the message
- Click CREATE HA CLUSTER to start the configuration and wait for it to complete. The Service Instance page displays the progress of the HA cluster configuration. The configuration process takes approximately 10 minutes to complete.
When the configuration is complete, the Service Instance page is updated to show the node health of the cluster.
2.8.3. Removing a Node from an HA Cluster
You can remove the secondary node from an HA cluster. After the node is removed, the primary node is converted to a standalone DLS instance. You can perform this task to remove the secondary node even if it is down.
- Log in to the DLS virtual appliance that hosts the primary node in the cluster.
- In the left navigation pane, click SERVICE INSTANCE.
- On the Service Instance page that opens, under Node Health, click REMOVE adjacent to the DLS virtual appliance that hosts the secondary node in the cluster.
- When asked if you want to remove the node, click CONFIRM.
When the secondary node is removed, the primary node is converted to a standalone DLS instance. What happens to the secondary node depends on the type of platform that is hosting the nodes in the cluster:
- For a cluster of instances on VM-based DLS virtual appliances, the virtual appliance that hosts the node is shut down and all data on the node is removed.
- For a cluster of instances on different container orchestrators, the container that hosts the node is not shut down. You must shut down the container manually.
If both nodes fail or are shut down, you must restart the last node to fail or be shut down first. If you restart the first node to fail or be shut down first, the node will not be functional until the other node is started.
2.8.4. Automatic Removal of a Node in an HA Cluster
When the nodes in an HA cluster are unable to communicate, messages that a node cannot send are temporarily stored on the disk of the node. If the accumulation of messages causes the amount of free space on the disk to fall below a specific amount, the secondary node in the cluster is automatically removed from the cluster. The primary node is converted to a standalone DLS instance. The secondary node is removed to ensure that the standalone DLS instance can continue to serve licenses to clients.
After the secondary node has been removed, a critical event that warns of a shortage of disk space is shown on the node that was converted to a standalone DLS instance. You can convert the instance into a node in an HA cluster as explained in Converting a Standalone DLS Instance into a Node in an HA Cluster.
2.9. Configuring a DLS Virtual Appliance with a Third-Party Signed SSL Certificate
By default, a DLS virtual appliance is configured with a self-signed SSL certificate that is included in the DLS virtual appliance image from which the DLS virtual appliance is created. If necessary, you can replace the self-signed certificate with an SSL certificate that is signed by a third party, such as a certificate authority (CA).
To configure a DLS virtual appliance with a third-party signed SSL certificate, follow this sequence of instructions:
- Obtaining a Third-Party Signed SSL Certificate for a DLS Virtual Appliance
- Installing a Third-Party Signed SSL Certificate on a DLS Virtual Appliance
2.9.1. Obtaining a Third-Party Signed SSL Certificate for a DLS Virtual Appliance
Obtain a third-party signed SSL certificate by submitting a certificate signing request (CSR) to a suitable third party, such as a certificate authority (CA).
Ensure that the IP address of any DLS virtual appliance that will be configured with the certificate is mapped to the domain name that you will specify in the certificate.
For an HA cluster of DLS instances, you can choose to obtain a single wildcard domain certificate for all nodes in the cluster or one fully qualified domain name certificate for each node in the cluster.
For each certificate that you require, submit a certificate signing request (CSR) to a CA.
Ensure that each certificate that you request meets these requirements:
- The certificate must be a PEM text file (not in Java keystore format) and secured with a private key.
- The certificate and the private key must be in separate files.
- To ensure that web browsers trust the domain, the domain name must be part of the Subject Alternate Name (SAN) attribute, not the Common Name (CN) attribute of the CSR.
- The SAN attribute of the CSR must specify the fully qualified domain name of any DLS virtual appliance that will be configured with the certificate.
Do not specify an IP address in the SAN attribute of the CSR. A DLS virtual appliance cannot be configured with an SSL certificate that specifies an IP address.
- The certificate must use RSA, DSA, and DH keys that are at least 2048 bits long.
- The certificate must use ECC keys greater that are longer than 224 bits long.
- If the certificate chain of trust includes intermediate certificates, the certificate must be bundled with the intermediate certificates in the following order:
- Domain name certificate
- Intermediate certificates
- Root certificate
If necessary, contact the CA that will provide your certificate for information about how to request a certificate that meets these requirements or convert an existing certificate to meet these requirements.
2.9.2. Installing a Third-Party Signed SSL Certificate on a DLS Virtual Appliance
Ensure that you have obtained the SSL certificate that you are installing and its private key file.
If you are installing a wildcard domain certificate for all nodes in an HA cluster, perform this task from the primary node in the cluster only. The certificate is propagated automatically to the secondary node in the cluster. If you are installing one fully qualified domain name certificate for each node in the cluster, perform this task separately from each node.
- Log in to the DLS virtual appliance on which you are installing the SSL certificate.
- In the left navigation pane, click SERVICE INSTANCE.
- On the Service Instance page that opens, click SSL CONFIGURATION.
- In the SSL Certificate Configuration window that opens, specify the SSL certificate that you are installing and its private key file.
- If you are installing a wildcard domain certificate for all nodes in an HA cluster, set the Apply Wildcard option.
- Ensure that the Domain Name field contains the domain name that is specified in the certificate.
Note:
Note: The Domain Name field is case-sensitive. The case of the name in this field must match exactly the case of the name as specified in the certificate.
- Click Choose File adjacent to Certificate and in the file browser that opens, navigate to the folder that contains the SSL certificate and select the file.
- Click Choose File adjacent to Private Key and in the file browser that opens, navigate to the folder that contains the SSL certificate's private key and select the file.
- Click CONFIGURE.
2.10. Configuring a VM-Based DLS Virtual Appliance
A VM-based DLS virtual appliance strictly controls access to the underlying OS. Therefore, the management interface of the NVIDIA Licensing application enables you to perform configuration tasks that change the configuration of the underlying OS.
Note: You can perform these tasks only on a VM-based DLS virtual appliance. You cannot perform them on a containerized DLS software image. Instead, you can use standard interfaces of the OS on which the container orchestration platform is running to make equivalent changes for a containerized DLS software image.
2.10.1. Setting the Static IP Address of a DLS Virtual Appliance
You can use the management interface to the NVIDIA Licensing application to replace the existing IP address of the appliance with a new static IP address. The existing IP address can be an address assigned by DHCP or another static IP address.
Note: You can perform this task only on a VM-based DLS virtual appliance. You cannot perform this task on a containerized DLS software image. Instead, you can use standard interfaces of the OS on which the container orchestration platform is running to make this change.
The instance that the DLS virtual appliance is hosting must already be configured as a standalone DLS instance or as an instance in a HA cluster.
Note: You can set the static IP of the secondary node in an HA cluster from the primary node in the cluster.
- If you aren't logged in already, log in to the DLS virtual appliance.
- In the left navigation pane, click SERVICE INSTANCE.
- On the Service Instance page that opens, under Node Health, click CONFIGURE IP ADDRESS adjacent to the DLS virtual appliance for which you are setting a static IP address.
CAUTION:
Note:If the DLS virtual appliance for which you are setting a static IP address is a node in an HA cluster and the type of any node is unknown, do not attempt to set the static IP address. Any change to the static IP address is not propagated to the node whose type is unknown because the node is unreachable.
- In the Configure Node IP Address window that opens, provide the details of the IP address of the node and click UPDATE.
- In the Static IP address text-entry field, type the IP address that you want to assign to the DLS virtual appliance.
- In the Gateway text-entry field, type the IP address of the DLS virtual appliance's default gateway.
Note:
Note: If you leave the Gateway field empty, the DLS virtual appliance uses DHCP settings.
- In the Netmask Prefix text-entry field, type the subnet mask of the DLS virtual appliance's network in classless inter-domain routing (CIDR) format without the leading slash character (/). To get a subnet mask in CIDR format from its decimal equivalent, refer to the table on page 2 of IETF RFC 1878: Variable Length Subnet Table For IPv4. For example, the subnet mask in CIDR format of the decimal equivalent 255.255.255.0 is 24.
- In the first DNS Server text-entry field, type the IP address of the first DNS server to be used for name resolution.
- In the second DNS Server text-entry field, type the IP address of the second DNS server to be used for name resolution.
If you are setting the IP address of the instance that you are logged in to, your browser will be disconnected from the instance after the update is complete. In this situation, you will need to log in to the DLS appliance again at the IP address that you set.
Note:Note: Setting the IP address of an instance in an HA cluster causes a failover of the cluster. As a result of the failover, the roles of the primary and secondary instances in the cluster are reversed.
- If necessary, log in to the DLS virtual appliance again by connecting to the URL
https://dls-vm-static-ip-address.- dls-vm-static-ip-address
- The static IP address that you set for the DLS virtual appliance.
If the DLS instance hasn't already been configured and is a standalone instance or the primary instance in an HA cluster, configure the instance as explained in Configuring a Service Instance.
2.10.2. Changing the Host Name of a VM-Based DLS Virtual Appliance
The host name of a VM-based DLS virtual appliance is preset in the virtual appliance image. You can use the OS command hostnamectl to change the name if necessary.
Note: You can perform this task only on a VM-based DLS virtual appliance. You cannot perform this task on a containerized DLS software image. Instead, you can use standard interfaces of the OS on which the container orchestration platform is running to make this change.
- Use the hypervisor management console of the appliance to log in as the user dls_diagnostics to the VM that hosts the DLS virtual appliance.
- From a command shell, run the following command:
$ sudo -u root hostnamectl set-hostname new-hostname
- new-hostname
- Your choice of new host name for the VM-based DLS virtual appliance.
Note:Note: You can ignore any messages of the following form that might be displayed when you run the hostnamectl command:
sudo: unable to resolve host current-hostname: Name or service not known
- If prompted, enter the dls_diagnostics user's password.
2.10.3. Expanding the Disk Space on a DLS Virtual Appliance
You can use the management interface to the NVIDIA Licensing application to expand the disk space of the DLS virtual appliance.
Note: You can perform this task only on a VM-based DLS virtual appliance. You cannot perform this task on a containerized DLS software image. Instead, you can use standard interfaces of the OS on which the container orchestration platform is running to make this change.
Perform this task on the Hypervisor where your DLS appliance is installed.
- Turn off the virtual machine.
- Expand the virtual hard disk associated to the VM through the Hypervisor console.
- Right-click on the VM and navigate to the Edit Settings.
- Expand the disk space from the console.
- Click OK to confirm.
- Start the Virtual Machine.
- Login to the Virtual Machine as the
dls_systemuser through the Hypervisor console. - Run the following script:
/etc/adminscripts/expand_disk.sh
Information: you may need to update /etc/fstab
- Validate the disk size for the
/dev/mapper/vgnls--si--0-rootusing thedf -hcommand.
Note:
In the case of ESXi, Hyper V, and KVM, each DLS Virtual Machine should be imported from the respective image of the Hypervisor. If the Virtual Machines are cloned or created by snapshot, you will not be able to edit or expand the disk from the Hypervisor console.
2.10.4. Configuring NTP on a DLS Virtual Appliance
Network Time Protocol (NTP) Configuration is when the customer needs to sync the clock of their License Server to a desired time-keeping server.
Note: You can perform this task only on a VM-based DLS virtual appliance. You cannot perform this task on a containerized DLS software image. Instead, you can use standard interfaces of the OS on which the container orchestration platform is running to make this change.
- Open a web browser and connect to the URL
https://dls-vm-ip-address.- dls-vm-ip-address
-
The IP address or, if defined, the fully qualified domain name of the VM on which the DLS virtual appliance is installed.
You can get the IP address from the management console of your hypervisor.
- On the login page that opens, provide the user credentials for the DLS administrator user on the DLS virtual appliance and click LOGIN.
In the left navigation pane, click SERVICE INSTANCE.
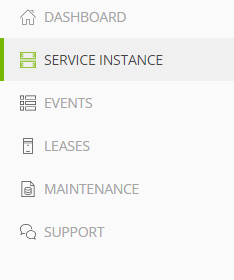
From the Actions menu, click NTP Server Configuration.
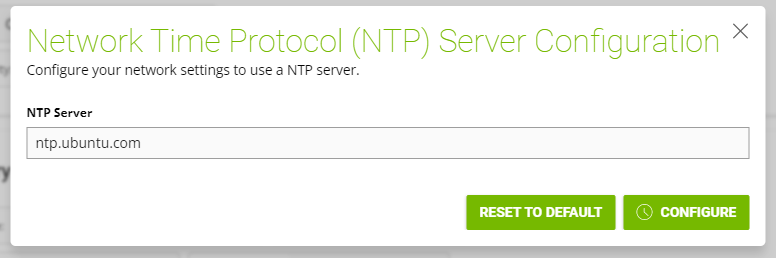
- Enter a valid IP address or domain name of the desired NTP server(s), separated by commas.
- Click Configure.
How you configure a service instance depends on whether the service is a Cloud License Service (CLS) instance or a Delegated License Service (DLS) instance.
DLS Instance Instructions
You administer and manage a DLS instance through the NVIDIA Licensing application on the virtual appliance that hosts the DLS instance and through the NVIDIA Licensing Portal.
Before configuring a DLS instance, ensure that the virtual appliance that will host the instance has been installed and configured as explained in Installing and Configuring the DLS Virtual Appliance.
To configure a DLS instance, follow this sequence of instructions:
- Optional: Changing the Name and Description of a DLS Instance
- Creating a License Server on the NVIDIA Licensing Portal
- Instructions for registering the DLS instance:
- Binding a License Server to a Service Instance
- Installing a License Server on a DLS Instance
3.1. Changing the Name and Description of a DLS Instance
By default, a DLS instance is created with the name DEFAULT_timestamp and the description ON_PREM_SERVICE_INSTANCE. To distinguish a DLS instance on the NVIDIA Licensing Portal when multiple DLS instances are configured, change these defaults to a meaningful name and the description.
Perform this task from the DLS virtual appliance.
- Log in to the DLS virtual appliance that is hosting the instance whose name and description you want to change.
- In the left navigation pane of the NVIDIA Licensing dashboard, click SERVICE INSTANCE.
- On the Service Instance page that opens, click EDIT.
- In the Edit Service Instance dialog box that opens, type your choice of name and description for the instance and click UPDATE.
The name and description of the instance are updated on the Service Instance page.Note:
Note: The instance name cannot contain special characters.
After changing the name of a DLS instance, follow the instructions in Creating a License Server on the NVIDIA Licensing Portal.
3.2. Creating a License Server on the NVIDIA Licensing Portal
To be able to allot licenses to an NVIDIA License System instance, you must create at least one license server on the NVIDIA Licensing Portal. Creating a license server defines the set of licenses to be allotted.
You can also create multiple servers on the NVIDIA Licensing Portal and distribute your licenses across them as necessary, for example to group licenses functionally or geographically.
- In the NVIDIA Licensing Portal, navigate to the organization or virtual group for which you want to create the license server.
- If you are not already logged in, log in to the NVIDIA Enterprise Application Hub and click NVIDIA LICENSING PORTAL to go to the NVIDIA Licensing Portal.
- Optional: If your assigned roles give you access to multiple virtual groups, click View settings at the top right of the page and in the My Info window that opens, select the virtual group from the Virtual Group drop-down list, and close the My Info window.
If no license servers have been created for your organization or virtual group, the NVIDIA Licensing Portal dashboard displays a message asking if you want to create a license server.
In the left navigation pane of the NVIDIA Licensing Portal dashboard, expand LICENSE SERVER and click CREATE SERVER. The Create License Server wizard is started.
If you are adding a license server to an organization or virtual group for which a license server has already been created, click CREATE SERVER.
The Create License Server wizard opens.
- On the Basic details page of the wizard, provide the details of your license server.
- Ensure that the Create legacy server option is not set. Setting this option creates a legacy NVIDIA vGPU software license server, not a license server for NVIDIA License System.
- In the Server Name field, enter your choice of name for the license server.
- In the Description field, enter a text description of the license server. This description is required and will be displayed on the details page for the license server that you are creating.
- Optional: If you want NVIDIA License System to automatically bind the license server to and install it on the default CLS instance, select the Express CLS Installation? option.
- Click Next: Select features.
- On the Select features page of the wizard, add the licenses for the products that you want to allot to this license server. For each product, add the licenses as follows:
- In the list of products, select the product for which you want to add licenses.
In the text-entry field in the ADDED column, enter the number of licenses for the product that you want to add.
- Click Next: Preview server creation.
On the Preview server creation page, click CREATE SERVER.
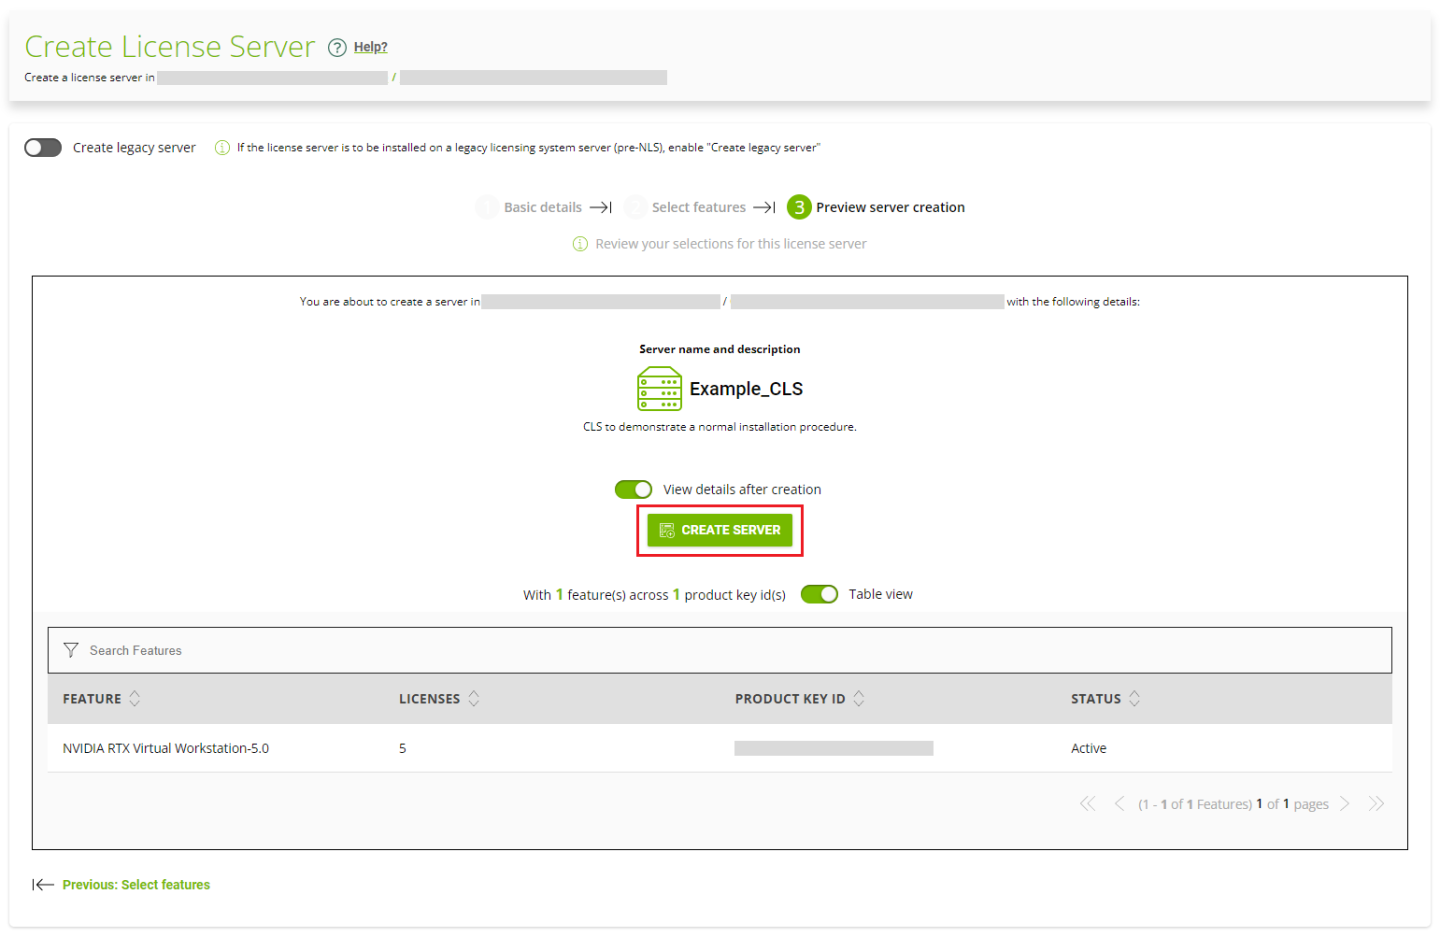
3.3. Registering an on-Premises DLS Instance with the NVIDIA Licensing Portal
A DLS instance is created automatically when the virtual appliance on which the instance resides is installed. However, to enable the instance to be bound to a license server, you must register the instance with the NVIDIA Licensing Portal.
Registering an on-premises DLS instance with the NVIDIA Licensing Portal involves the exchange of a DLS instance token between the instance and the NVIDIA Licensing Portal.
A DLS instance token is created by a DLS instance. It identifies the DLS instance to the NVIDIA Licensing Portal and enables it to locate the NVIDIA Licensing Portal. After downloading the token from the DLS instance, you must upload it to the NVIDIA Licensing Portal to complete the registration of the service instance.
- If you are not already logged in, log in to the NVIDIA Licensing application at the IP address of the VM on which the DLS virtual appliance is installed.
- In the left navigation pane of the NVIDIA Licensing dashboard, click SERVICE INSTANCES.
- On the Service Instance page that opens, click DOWNLOAD DLS INSTANCE TOKEN. A DLS instance token file that is named dls_instance_token_mm-dd-yyyy-hh-mm-ss.tok is downloaded.
- In the NVIDIA Licensing Portal, navigate to the organization or virtual group for which you are registering the service instance.
- If you are not already logged in, log in to the NVIDIA Enterprise Application Hub and click NVIDIA LICENSING PORTAL to go to the NVIDIA Licensing Portal.
- Optional: If your assigned roles give you access to multiple virtual groups, click View settings at the top right of the page and in the My Info window that opens, select the virtual group from the Virtual Group drop-down list, and close the My Info window.
On the Service Instances page, from the Actions menu, choose Upload on-premises (DLS) instance token.

- On Service Instances page that opens, click UPLOAD DLS INSTANCE TOKEN.
In the Upload DLS Instance Token window that opens, click SELECT INSTANCE TOKEN.
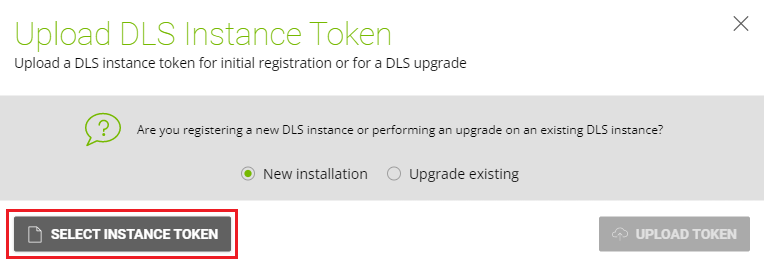
- In the file browser that opens, navigate to the folder that contains the DLS instance token file that is named dls_instance_token_mm-dd-yyyy-hh-mm-ss.tok that you downloaded and select the file.
- Back in the Upload DLS Instance Token window, select the For New Installation option and click UPLOAD INSTANCE TOKEN. The list of pending registrations is opened and the service instance identified by the DLS instance token that you uploaded is listed.
- In the list of pending registrations, follow the Register link for the service instance identified by the DLS instance token that you uploaded. The service instance is added to the list of registered service instances.
After registering an on-premises DLS instance with the NVIDIA Licensing Portal, follow the instructions in Binding a License Server to a Service Instance.
3.4. Registering a DLS Instance on a Classified Network with the NVIDIA Licensing Portal
If your DLS instance is on a classified network, you cannot download a DLS instance token to upload to the NVIDIA Licensing Portal to register the instance. Instead, you must register the instance by entering its details manually on the NVIDIA Licensing Portal. .
- If you are not already logged in, log in to the NVIDIA Licensing application at the IP address of the VM on which the DLS virtual appliance is installed.
- In the left navigation pane of the NVIDIA Licensing dashboard, click SERVICE INSTANCE.
- On the Service Instance page that opens, from the ACTIONS menu, choose Pre-Register Service Instance.
- In the Pre-Register DLS Service Instance window that opens, click PRE-REGISTER SERVICE INSTANCE.
- On the Service Instance page, note the information about the DLS instance that you will need when you register it by entering its details manually on the NVIDIA Licensing Portal.
- Service Instance ID
- Name
- Description
- In the NVIDIA Licensing Portal, navigate to the organization or virtual group for which you are registering the service instance.
- If you are not already logged in, log in to the NVIDIA Enterprise Application Hub and click NVIDIA LICENSING PORTAL to go to the NVIDIA Licensing Portal.
- Optional: If your assigned roles give you access to multiple virtual groups, select the virtual group for which you are registering the service instance from the list of virtual groups at the top right of the page.
In the left navigation pane of the NVIDIA Licensing Portal dashboard, click SERVICE INSTANCE.
- On Service Instances page that opens, click REGISTER DLS FOR CLASSIFIED N/W.
In the Register DLS Instance for Classified Network window that opens, enter the name, service instance ID, and description that you obtained in Step 5 and click REGISTER.
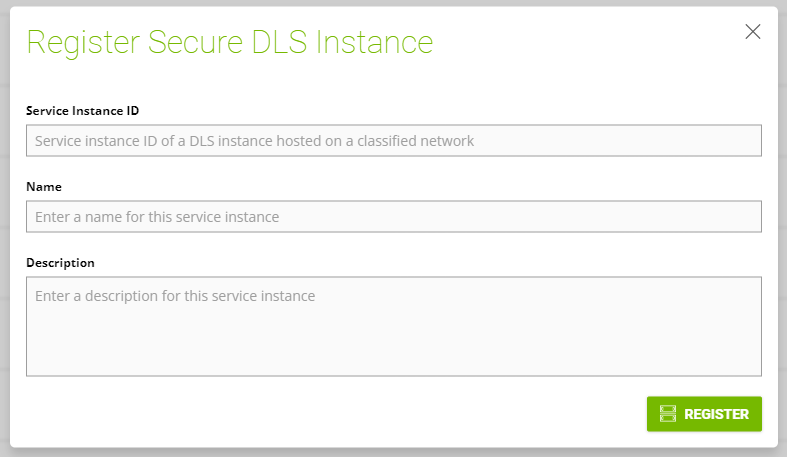
- Bind a license server to the DLS instance that you registered and install the license server on the virtual appliance that hosts DLS instance. For instructions, refer to the following topics:
- On the Service Instances page of the NVIDIA Licensing Portal, follow the Acknowledge Installation link for the DLS instance.
- When prompted to acknowledge installation of the license server file, click ACKNOWLEDGE.
3.5. Deleting a Service Instance
When a service instance is deleted, any license servers that are bound to and installed on the service instance are uninstalled and freed from it. Deleting a DLS instance on which license servers are installed forcibly removes all licensed products from the servers and returns the licensed products to their entitlements. This behavior enables you to recover licenses from a failed DLS instance.
If you are deleting a CLS instance on which license servers are installed, remove all licensed products from the servers as explained in Managing Licenses and Licensed Products on a License Server.
Perform this task on the NVIDIA Licensing Portal. The procedure for deleting a service instance is the same for CLS instances and DLS instances.
- In the NVIDIA Licensing Portal, navigate to the organization or virtual group to which the service instance belongs.
- If you are not already logged in, log in to the NVIDIA Enterprise Application Hub and click NVIDIA LICENSING PORTAL to go to the NVIDIA Licensing Portal.
- Optional: If your assigned roles give you access to multiple virtual groups, click View settings at the top right of the page and in the My Info window that opens, select the virtual group from the Virtual Group drop-down list, and close the My Info window.
In the left navigation pane, click SERVICE INSTANCE.
- In the list of service instances on the Service Instances page that opens, from the Actions menu for the service instance, choose Delete.
- When asked to confirm that you want to delete the service instance, click DELETE.
3.6. Binding a License Server to a Service Instance
Binding a license server to a service instance ensures that licenses on the server are available only from that service instance. As a result, the licenses are available only to the licensed clients that are served by the service instance to which the license server is bound.
You can bind multiple license servers to the same CLS instance but only one license server to the same DLS instance. If you want to use a different license server than the license server that was originally bound to a DLS instance, free the license sever as explained in Freeing a License Server from a Service Instance.
This task is necessary only if you are not using the default CLS instance.
- In the NVIDIA Licensing Portal, navigate to the organization or virtual group to which the license server belongs.
- If you are not already logged in, log in to the NVIDIA Enterprise Application Hub and click NVIDIA LICENSING PORTAL to go to the NVIDIA Licensing Portal.
- Optional: If your assigned roles give you access to multiple virtual groups, click View settings at the top right of the page and in the My Info window that opens, select the virtual group from the Virtual Group drop-down list, and close the My Info window.
- In the left navigation pane of the NVIDIA Licensing Portal dashboard, expand LICENSE SERVERS and click LIST SERVERS.
- In the list of license servers on the License Servers page that opens, from the Actions menu for the license server, choose Bind.
- In the Bind Service Instance pop-up window that opens, select the service instance to which you want to bind the license server and click BIND. The Bind Service Instance pop-up window confirms that the license server has been bound to the service instance.
After a license server has been bound to a service instance, the license server is freed from the service instance when the service instance is deleted. You can also free a license sever as explained in Freeing a License Server from a Service Instance.
3.7. Freeing a License Server from a Service Instance
If you want to move a license server to a different service instance, free the license server before binding it to and installing it on the new service instance. If you want to use a different license server than the license server that was originally bound to a DLS instance, free the license sever from the DLS instance first.
Ensure that one of the following prerequisites is met:
- The license server has not been installed on the service instance.
- No licenses on a license server that is already installed are checked out by licensed clients.
What happens if this prerequisite is not met depends on the type of the service instance:
- CLS instance: The NVIDIA Licensing Portal prevents the license server from being freed from the service instance.
- DLS instance: Because the instance is not connected to the NVIDIA Licensing Portal, the NVIDIA Licensing Portal allows the license server to be freed from the service instance. However, any attempt to install a license server on the service instance fails.
- In the NVIDIA Licensing Portal, navigate to the organization or virtual group to which the license server belongs.
- If you are not already logged in, log in to the NVIDIA Enterprise Application Hub and click NVIDIA LICENSING PORTAL to go to the NVIDIA Licensing Portal.
- Optional: If your assigned roles give you access to multiple virtual groups, click View settings at the top right of the page and in the My Info window that opens, select the virtual group from the Virtual Group drop-down list, and close the My Info window.
- In the left navigation pane of the NVIDIA Licensing Portal dashboard, expand LICENSE SERVERS and click LIST SERVERS.
- In the list of license servers on the License Servers page that opens, from the Actions menu for the license server, choose Unbind.
- When prompted to confirm that you want to unbind the license server, click UNBIND.
After freeing the license server, you can reuse it by following this sequence of instructions:
3.8. Installing a License Server on a Service Instance
After binding a license server to a service instance, you must install the license server on the service instance to make the licenses on the server available to the instance. If you change the licenses or licensed products on a license server that is bound to a DLS instance, you must update the instance with the latest version of the license server.
This task is necessary only if you are not using the default CLS instance.
After creating and installing a license server on a service instance, manage the licenses on the server by creating a client configuration token and, optionally, creating license pools and fulfillment conditions. For more information, see Managing Licenses on a License Server.
3.8.1. Installing a License Server on a DLS Instance
- In the NVIDIA Licensing Portal, navigate to the organization or virtual group for which the license server was created.
- If you are not already logged in, log in to the NVIDIA Enterprise Application Hub and click NVIDIA LICENSING PORTAL to go to the NVIDIA Licensing Portal.
- Optional: If your assigned roles give you access to multiple virtual groups, click View settings at the top right of the page and in the My Info window that opens, select the virtual group from the Virtual Group drop-down list, and close the My Info window.
- In the left navigation pane of the NVIDIA Licensing Portal dashboard, expand LICENSE SERVER and click LIST SERVERS.
- In the list of license servers on the License Servers page that opens, click the name of the license server that you want to install.
- In the License Server Details page that opens, from the Actions menu, choose Download.
- In the Download License File window that opens, click Download. A license server file that is named license_mm-dd-yyyy-hh-mm-ss.bin is downloaded.
- If you are not already logged in, log in to the NVIDIA Licensing application at the IP address of the VM on which the DLS virtual appliance is installed. If a license server has not been installed on the DLS virtual appliance, the NVIDIA Licensing dashboard displays a message asking if you want to install a license server.
- If you are updating the license server on the DLS virtual appliance, in the left navigation pane of the NVIDIA Licensing dashboard, click UPLOAD SERVER. If a license server has not been installed on the DLS virtual appliance, omit this step. The Server Upload page opens.
On the NVIDIA Licensing dashboard or the Server Upload page, click SELECT LICENSE SERVER FILE.
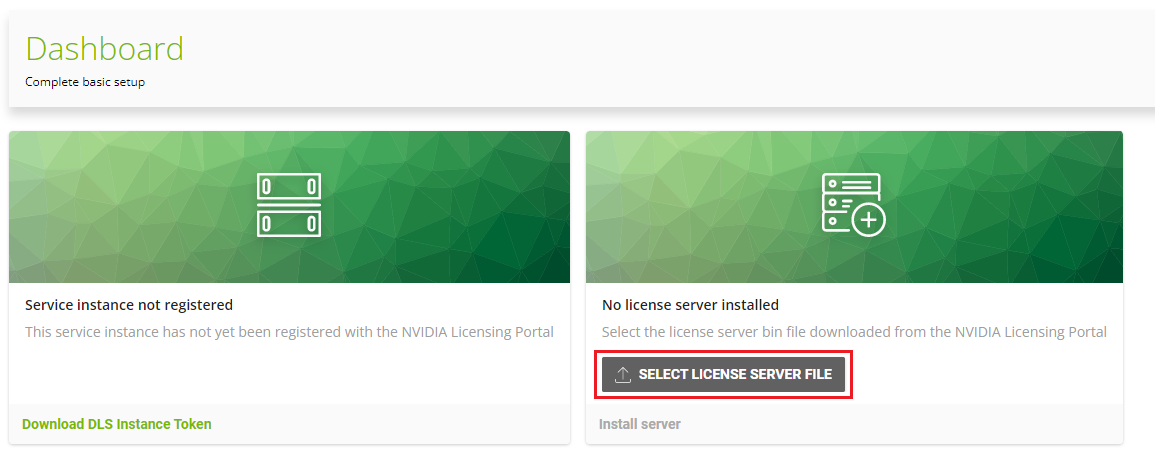
- In the file browser that opens, navigate to the folder that contains the license server file named license_mm-dd-yyyy-hh-mm-ss.bin that you downloaded and select the file.
- When asked if you want to install the selected file, click INSTALL.
NVIDIA Licensing dashboard is updated with the details of the license server that you installed.
After installing a license server on a service instance, you can manage the licenses to be served from the server by distributing them among a number of license pools and by defining fulfillment conditions for requests from licensed clients. In this way, you can reserve licenses for specific types of users.
For example:
- An organization in which some users are using graphics-intensive computer-aided design (CAD) tools, while other users are using only office productivity tools can create a pool of NVIDIA RTX Virtual Workstation licenses for the CAD tool users and a pool of GRID Virtual PC licenses for the users of office productivity tools.
- An organization in which some users are performing mission-critical tasks can create a reserve pool of licences available only to these users and a pool of licenses available to all users. By setting suitable fulfillment conditions, the organization can ensure that when the pool of licenses available to all users is exhausted, only license requests from users performing mission-critical tasks are fulfilled from the reserve pool.
When a license server is installed on a service instance, a single default license pool and a single default fulfillment condition are created on the server. The default license pool initially contains all licenses allotted to the server. The default fulfillment condition allows any client to be served from the default license pool. If you want all your licensed clients to be served licenses from the same license pool under the same conditions, you can generate a client configuration token without creating any license pools or fulfillment conditions. For more information about client configuration tokens, see Generating a Client Configuration Token.
4.1. Navigating to the License Server Details Page for a License Server
How to navigate to the License Server Details page for a license server depends on whether you are performing the task on the NVIDIA Licensing Portal on a DLS instance.
- If you are not already logged in, log in to the web user interface for administering the license server.
-
On the NVIDIA Licensing Portal, log in to the NVIDIA Enterprise Application Hub and click NVIDIA LICENSING PORTAL to go to the NVIDIA Licensing Portal.
The NVIDIA Licensing Portal dashboard opens.
-
On a DLS instance, log in to the NVIDIA Licensing application at the IP address of the VM on which the DLS virtual appliance is installed.
The License Server Details page for the license server on the DLS virtual appliance opens. No further action is required.
The remaining steps are required for the NVIDIA Licensing Portal only.
-
- If your assigned roles give you access to multiple virtual groups, click View settings at the top right of the page and in the My Info window that opens, select the virtual group from the Virtual Group drop-down list, and close the My Info window.
- In the left navigation pane of the NVIDIA Licensing Portal dashboard, expand LICENSE SERVER and click LIST SERVERS.
- In the list of license servers on the License Servers page that opens, click the name of the license server for which you want to manage licenses.
4.2. Managing License Pools
License pools enable you to divide the product features on a license server so that different categories of users are served licenses from different license pools. All licenses are served from a license pool. Only licenses on a license server that belong to a license pool are available to be served to license clients.
When a license server is installed on a service instance, a single default license pool is created on the server. The default license pool initially contains all licenses allotted to the server. You can subdivide the licenses on license server into any number of license pools. However, if you want to serve all licenses on a server from a single pool, you can use the default license pool without creating any additional license pools.
4.2.1. Creating a License Pool
If the only license pool on the license server is the initial default pool, return any licenses that you want to allocate to the license pool to the license server as explained in Managing Licenses and Licensed Products in a License Pool. When a license server is created, a default license pool that contains all licences on the server is created. When the default license pool contains all licences on the server, the CREATE LICENSE POOL button is inactive.
- Navigate to the License Server Details page of the license server on which you want to create the license pool. For instructions, see Navigating to the License Server Details Page for a License Server.
- In the License Server Details page that opens, disable the license server by clicking DISABLE SERVER and, when prompted, confirm that you want to disable the license server. When the license server is disabled, it cannot serve licenses to licensed clients.
- From the ACTIONS menu, choose Create Pool.
The Create License Pool pop-up window opens.
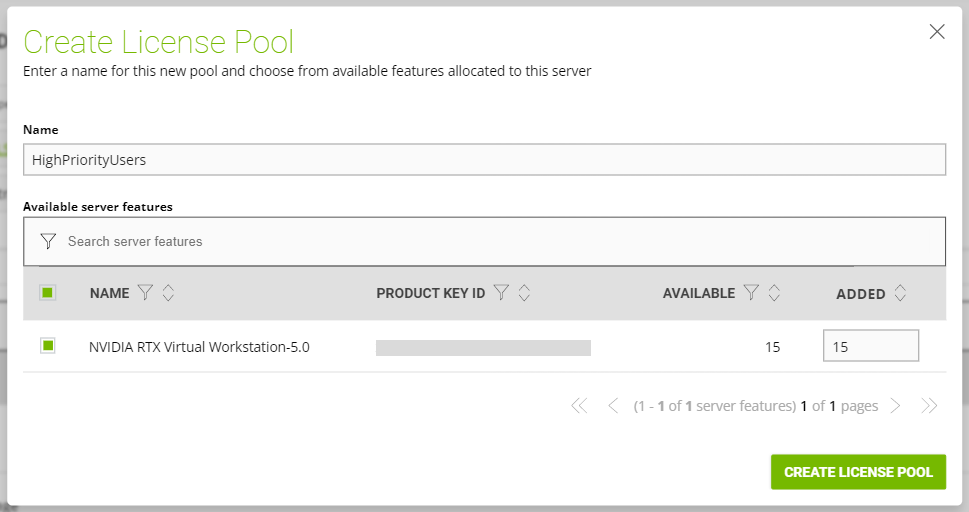
- In the License Pool Name field, enter your choice of name for the license pool. The name must be a list four characters long, may contain only letters and numbers, and must not contain any spaces or special characters.
- Add the licenses for the products that you want to allot to this license pool. For each product, add the licenses as follows:
- From the list of available features, select the product for which you want to add licenses. In the list of available features, only products on the license server that do not belong to another license pool are listed.
- In the text-entry field in the ADDED column, enter the number of licenses for the product that you want to add.
Click CREATE LICENSE POOL. The license pool is added to the list of license pools on the License Pools tab, in the License Server Details page.
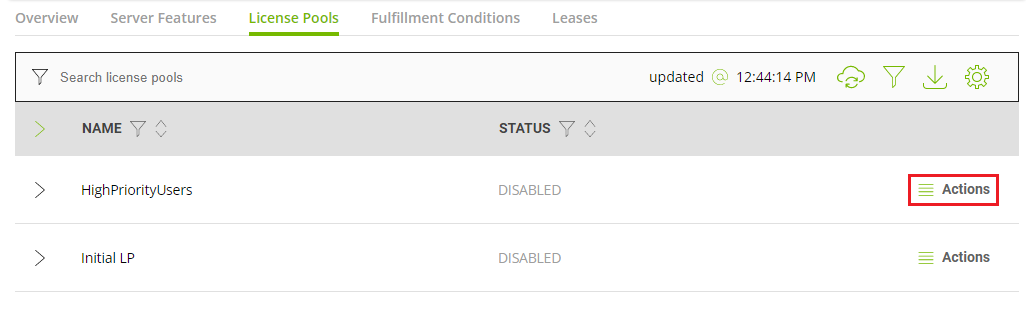
- On the Overview tab of the License Server Details page, enable the license server by clicking ENABLE SERVER and, when prompted, confirm that you want to enable the license server. The license server can now serve licenses to licensed clients.
After you create a license pool you can change the set of licenses in the pool as explained in the following topics:
4.2.2. Deleting a License Pool
When a license pool is deleted, all product features in the pool are returned to the license server to which the license pool belongs.
Ensure that no licenses in the pool are checked out by licensed clients. A license pool cannot be deleted while any of the licenses in the pool are checked out by a client.
- Navigate to the License Server Details page of the license server to which the license pool belongs. For instructions, see Navigating to the License Server Details Page for a License Server.
In the License Server Details page that opens, click the License Pools tab.
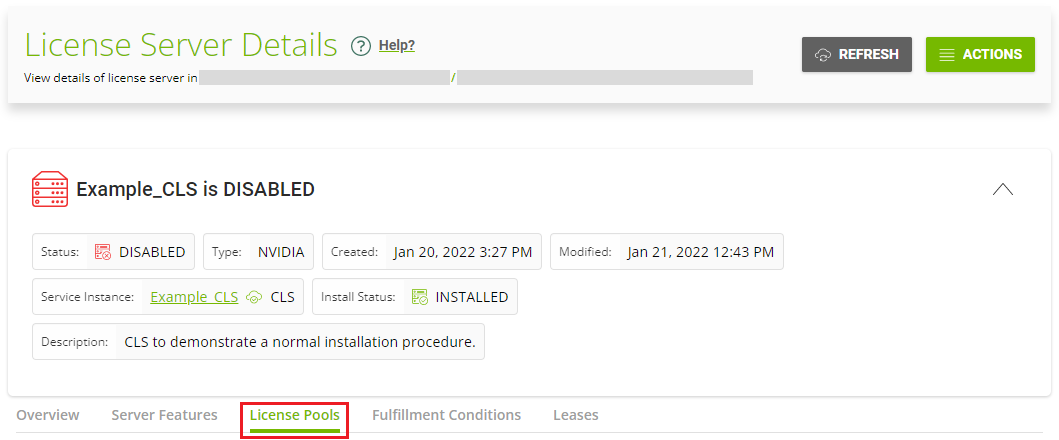
- In the list of license pools on the License Pools tab, from the Actions menu for the license pool, choose Disable. When the license pool is disabled, licenses cannot be served to licensed clients from the pool.
- When prompted, confirm that you want to disable the license pool.
- From the Actions menu for the license pool, choose Delete.
When asked if you want to delete the license pool, click DELETE LICENSE POOL.
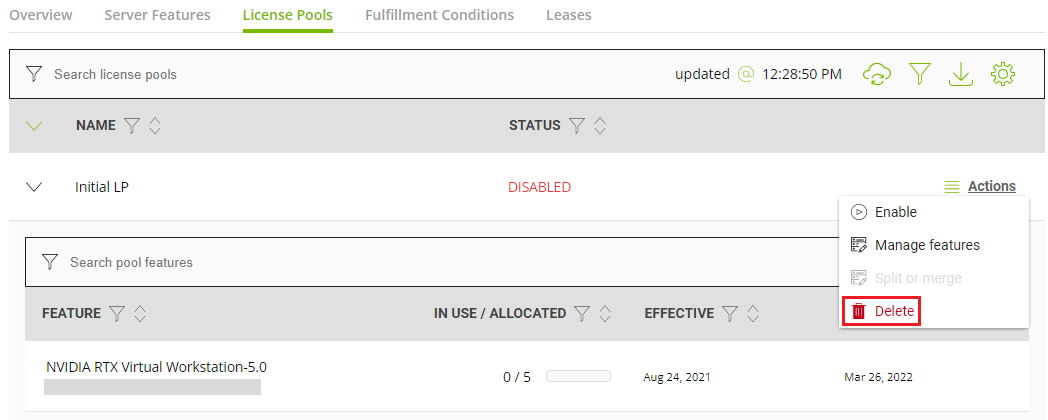
4.2.3. Managing Licenses and Licensed Products in a License Pool
Manage licenses in a license pool if you need to add or remove licenses for a specific product in the pool. You can also add and remove licensed products from a license pool. When a licensed product is removed from a license pool, all licenses are returned to the license server.
- Navigate to the License Server Details page of the license server to which the license pool belongs. For instructions, see Navigating to the License Server Details Page for a License Server.
In the License Server Details page that opens, click the License Pools tab.
- In the list of license pools on the License Pools tab, from the Actions menu for the license pool, choose Disable. When the license pool is disabled, licenses cannot be served to licensed clients from the pool.
- When prompted, confirm that you want to disable the license pool.
- Expand the license pool that contains the licenses you want to manage.
- From the Actions menu for the license pool, choose Manage features.
- In the Manage Licenses pop-up window that opens, add or remove licenses for the licensed products that you are interested in.
Add or remove licenses for each licensed product as follows:
- In the text-entry field in the ADDED column, enter the number of licenses for the product that you want to remain in the pool after updating licenses.
-
To add licenses to the pool, enter a number greater than the number already in the pool, but less than or equal to the total number of licenses available on the license server.
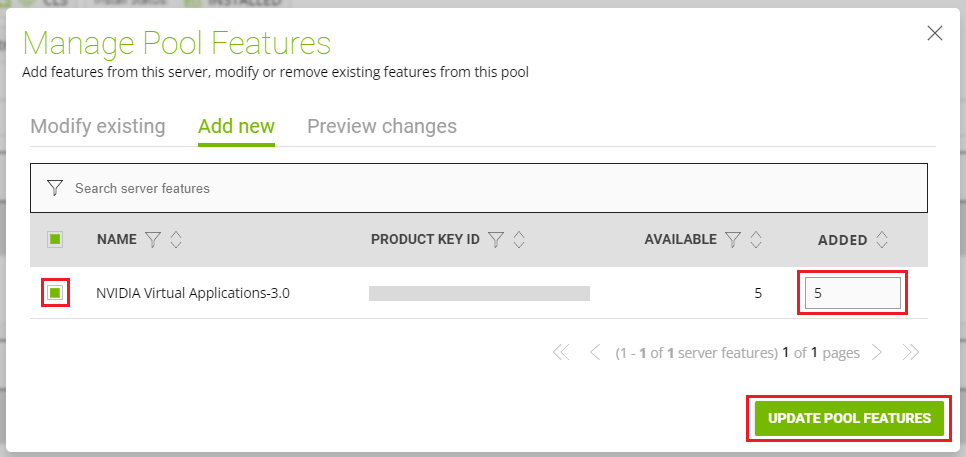
If you enter a number greater than the total number of licenses available, an error occurs.
-
To remove licenses from the pool, enter a number less than the number already allocated to the server but greater than 0.
For example, to remove 4 licenses from a pool that contains 10 licenses, leaving 6 licenses on the license server, enter the Licenses field to 6.
You cannot set the Licenses field to 0. You must leave at least 1 license in the license pool. If you want to remove all licenses for a product from the license pool, you must remove the product from the pool by clicking the trash can icon.
-
- Click ADD.
The product and number of licenses are added to the Features to Modify list.
- In the text-entry field in the ADDED column, enter the number of licenses for the product that you want to remain in the pool after updating licenses.
After adding or removing all the licenses and licensed products that you are interested in, click UPDATE POOL FEATURES.
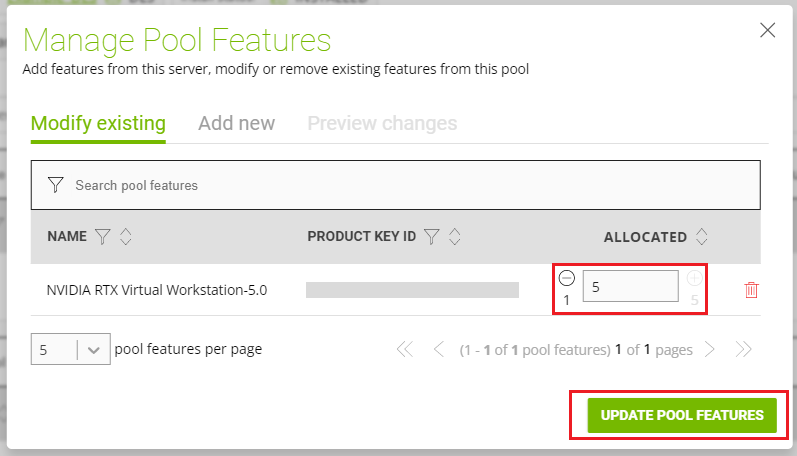
From the Actions menu for the license pool, choose Enable and, when prompted, confirm that you want to enable the license pool.
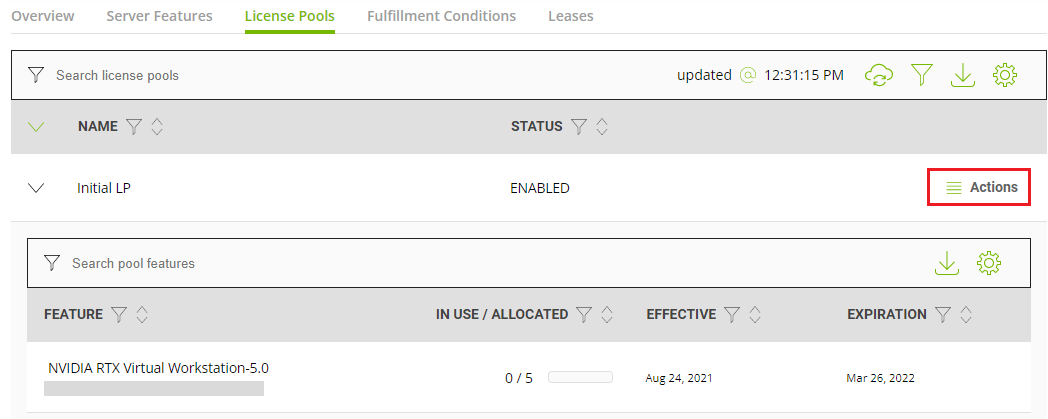
Licenses can now be served to licensed clients from the pool.
4.2.4. Merging Two License Pools
If you need to consolidate licenses in two pools into a single pool, you can merge the two pools. When you merge two license pools, all licenses in the pool that you select as the origin pool are migrated to the pool you select as the destination pool and the origin pool is deleted.
Ensure that no licenses in the origin pool are checked out by licensed clients.A license pool cannot be merged while any of the licenses in the pool are checked out by a client. If a license in the pool is checked out, the Split or merge command for the pool is dimmed and inactive.
- Navigate to the License Server Details page of the license server to which both the license pools belong. For instructions, see Navigating to the License Server Details Page for a License Server.
In the License Server Details page that opens, click the License Pools tab.
- In the list of license pools on the License Pools tab, from the Actions menu for the license pool, choose Disable. When the license pool is disabled, licenses cannot be served to licensed clients from the pool.
- When prompted, confirm that you want to disable the license pool.
- From the Actions menu for the origin license pool, choose Split or merge.
In the Split / Merge Pool Features pop-up window that opens, select the destination license pool, select the Merge all features? option and click MERGE POOL.
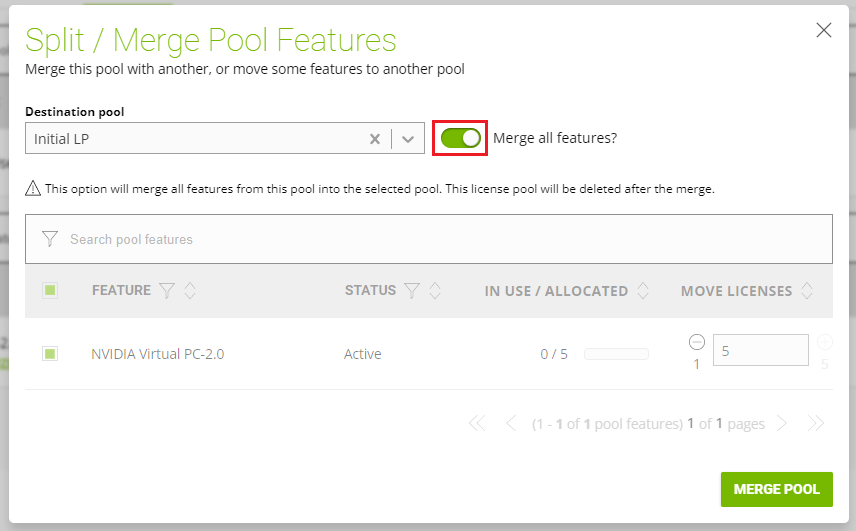
All licenses in the pool that you select as the origin pool are migrated to the pool you select as the destination pool and the origin pool is deleted.
4.2.5. Migrating Licenses Between License Pools
If demand for licenses from different pools changes, you can migrate licenses between pools to meet the changed demand.
Ensure that the following prerequisites are met:
- Both pools between which you will migrate licenses already exist. If you want to migrate licenses to a new pool, create the pool first.
- No licenses that want to migrate are checked out by licensed clients.
- Navigate to the License Server Details page of the license server to which both the license pools belong. For instructions, see Navigating to the License Server Details Page for a License Server.
In the License Server Details page that opens, click the License Pools tab.
- In the list of license pools on the License Pools tab, from the Actions menu for the license pool, choose Disable. When the license pool is disabled, licenses cannot be served to licensed clients from the pool.
- When prompted, confirm that you want to disable the license pool.
- From the Actions menu for the license pool that you disabled, choose Split or merge.
- From the Destination Pool drop-down list, select the license pool to which you want to migrate licenses.
- In the Split / Merge Pool Features pop-up window that opens, select the licenses that you want migrate.
Select the licenses for each licensed product as follows:
- In the list of products, select the licensed product for which you want to migrate licenses.
- In the text-entry field in the MOVE LICENSES column, enter the number of licenses for the product that you want to migrate. You must leave at least one license in the license pool from which you want to migrate licenses. If you want to remove all licenses for a product from the license pool, you must follow the instructions in Managing Licenses and Licensed Products in a License Pool.
- Click ADD.
The product and number of licenses are added to the Features to Move list.
Click SPLIT POOL FEATURES.
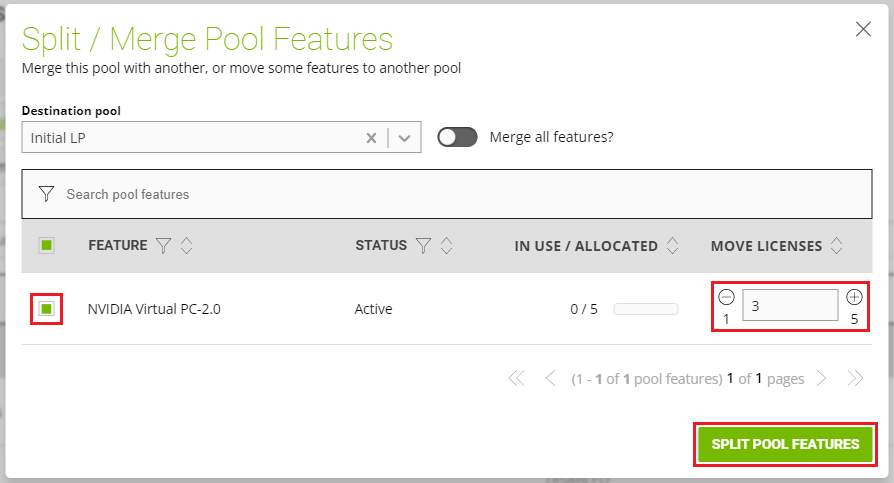
From the Actions menu for the license pool, choose Enable and, when prompted, confirm that you want to enable the license pool.
Licenses can now be served to licensed clients from the pool.
4.3. Managing Fulfillment Conditions
A fulfillment condition selects the license pools from which a license requested by a licensed client is served. It is a test that is applied to any request from a licensed client to determine if the request may be fulfilled from a specified set of license pools.
A fulfillment condition is bound to an ordered list of license pools. If a request satisfies the conditions of the test, the bound license pools are evaluated, in order, to determine if the request can be served from the pool.
A fulfillment condition may belong to only one license server. However, a license server may contain any number of fulfillment conditions. If a license server contains more than one fulfillment condition, the conditions are ordered. Every request from a licensed client is tested against each fulfillment condition in order either until the request can be fulfilled or has been tested against all the fulfillment conditions.
4.3.1. About Match Conditions
A match condition determines whether a request from a licensed client may be fulfilled from the license pools bound to a fulfillment condition. You must specify a match condition when you create or edit a fulfillment condition.
Reference Match
The Reference Match condition allows only clients that have been provisioned with the client configuration token associated with a fulfillment condition to be served. The client configuration token contains a unique identifier for the fulfillment condition. The client provides this unique identifier to the server whenever the client requests a license from the server.
Universal Match
The Universal Match condition allows any client to be served. It is the default fulfillment condition and is applied if more specific conditions are not met or they were unable to fulfill a request. Because this condition is the most general condition, it is the last condition to be evaluated.
Only one fulfillment condition for a license server may specify the Universal Match condition. If another fulfillment condition for the server specifies this match condition, it is absent from the Match Condition drop-down list.
4.3.2. Creating a Fulfillment Condition
- Navigate to the License Server Details page of the license server to which the service instance is bound. For instructions, see Navigating to the License Server Details Page for a License Server.
- In the License Server Details page that opens, disable the license server by clicking DISABLE SERVER and, when prompted, confirm that you want to disable the license server. When the license server is disabled, it cannot serve licenses to licensed clients.
- From the Actions menu, choose Create Condition.
The Create Fulfillment Condition wizard opens.
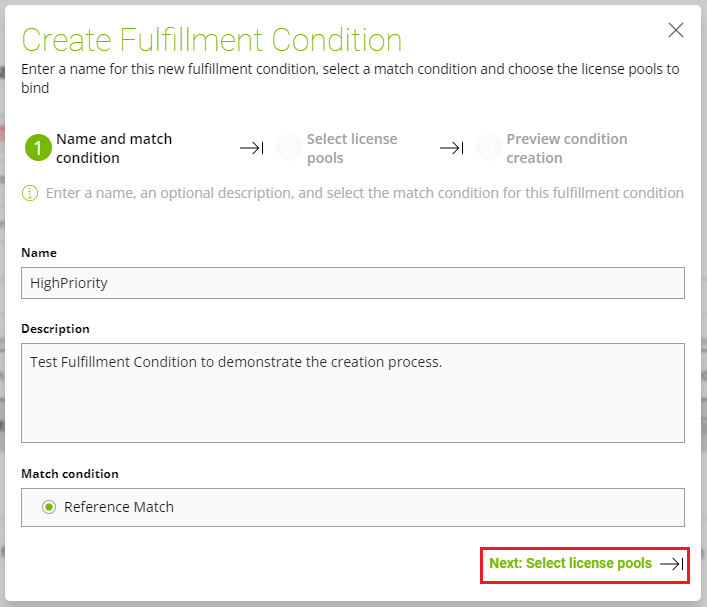
- In the Name field, enter your choice of name for the fulfillment condition.
- Optional: In the Description field, enter a text description of the fulfillment condition.
- Under Match Condition, select a match condition to determine which clients may be served licenses from the license pools bound to this fulfillment condition.
The following match conditions are defined:
Specify the sequence of license pools from which licenses will be served to clients.

Licenses are served in the order in which they appear in the Bound license pools list.
Note:Note: You can specify a license pool in the license pool bindings for any number of fulfillment conditions.
- In the License Pools list, select the license pools from which you want licenses to be served and click the right arrow icon. The license pools are moved to the Bound license pools list.
- In the Bound license pools list, adjust the order of the license pools as necessary by selecting each license pool that you need to move and clicking the up arrow and down arrow icons to move the license pool to its required position in the sequence.
Click CREATE FULFILLMENT CONDITION.
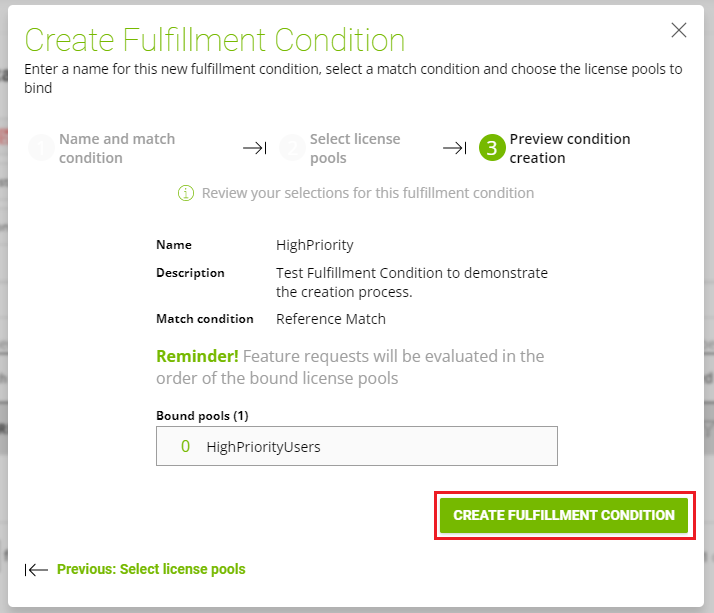
The fulfillment condition is added to the list of fulfillment conditions on the Fulfillment Conditions tab of the License Server Details page.
- On the Overview tab of the License Server Details page, enable the license server by clicking ENABLE SERVER and, when prompted, confirm that you want to enable the license server. The license server can now serve licenses to licensed clients.
4.3.3. Deleting a Fulfillment Condition
To be able to serve licenses, a license server must have at least one fulfillment condition. If you delete all the fulfillment conditions that belong to a license server, the license server is no longer able to serve licenses to clients.
Note: Deleting a fulfillment condition does not delete the license pools that are bound to the fulfillment condition. If you delete all fulfillment conditions to which a license pool is bound, licenses in the pool can no longer be served to clients.
- Navigate to the License Server Details page of the license server to which the service instance is bound. For instructions, see Navigating to the License Server Details Page for a License Server.
On the License Server Details page that opens, click the Fulfillment conditions tab.
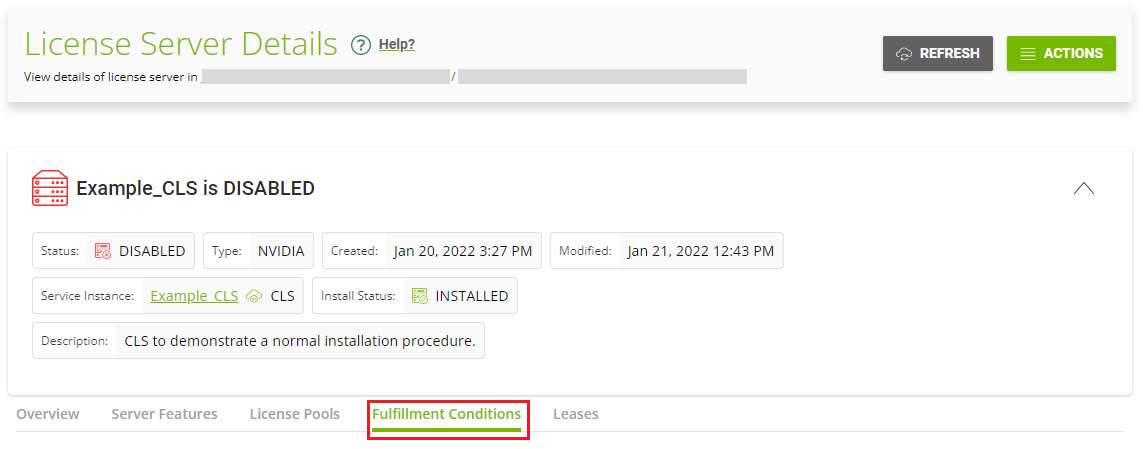
In the list of fulfillment conditions on the Fulfillment conditions tab, from the Actions menu for fulfillment condition that you want to delete, choose Disable.
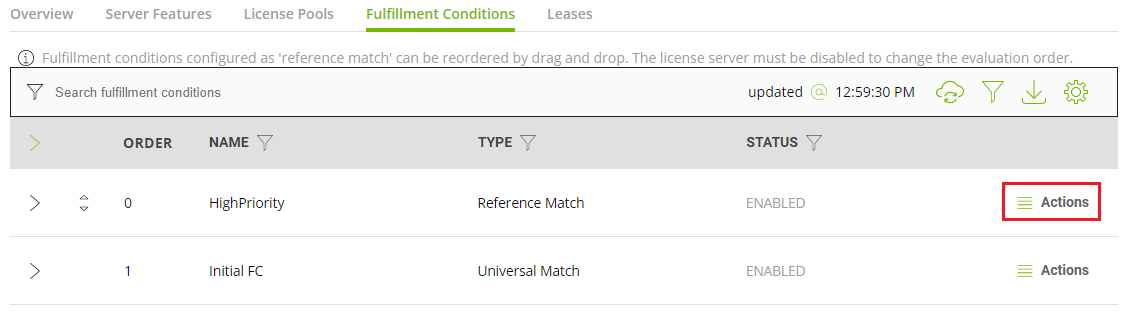
When the fulfillment condition is disabled, it cannot be used to fulfill requests for licenses from licensed clients.
- From the Actions menu for the fulfillment condition that you want to delete, choose Delete.
- When asked if you want to delete the fulfillment condition, click DELETE FULFILLMENT CONDITION.
After a fulfillment condition is deleted, it is ignored in requests that specify the condition. Furthermore, if a request specifies only deleted fulfillment conditions, the request won't be satisfied.
4.3.4. Editing a Fulfillment Condition
- Navigate to the License Server Details page of the license server to which the service instance is bound. For instructions, see Navigating to the License Server Details Page for a License Server.
On the License Server Details page that opens, click the Fulfillment conditions tab.
In the list of fulfillment conditions on the Fulfillment conditions tab, from the Actions menu for fulfillment condition that you want to delete, choose Disable.
When the fulfillment condition is disabled, it cannot be used to fulfill requests for licenses from licensed clients.
- From the Actions menu for the fulfillment condition that you want to edit, choose Edit. The Edit Fulfillment Condition wizard is started.
Use the Edit Fulfillment Condition wizard make the changes that you require.
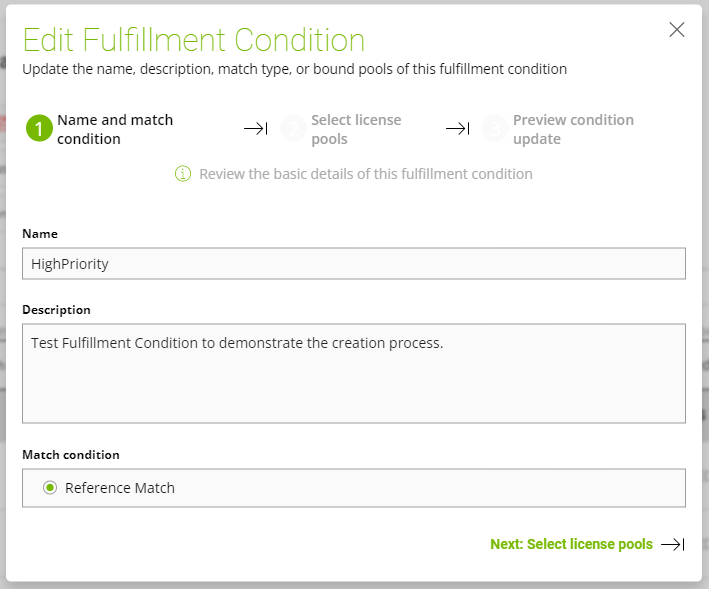
- In the Name field, edit the name for the fulfillment condition.
- In the Description field, edit the description of the fulfillment condition.
- Under Match Condition, select a new match condition to determine which clients may be served licenses from the license pools bound to this fulfillment condition.
Note:
Note: If you change the match condition, you must regenerate all client configuration tokens that specified the fulfillment condition and provision all affected licensed clients with the new token.
The following match conditions are defined:
- Click Next: Select license pools.
Modify the sequence of license pools from which licenses will be served to clients.
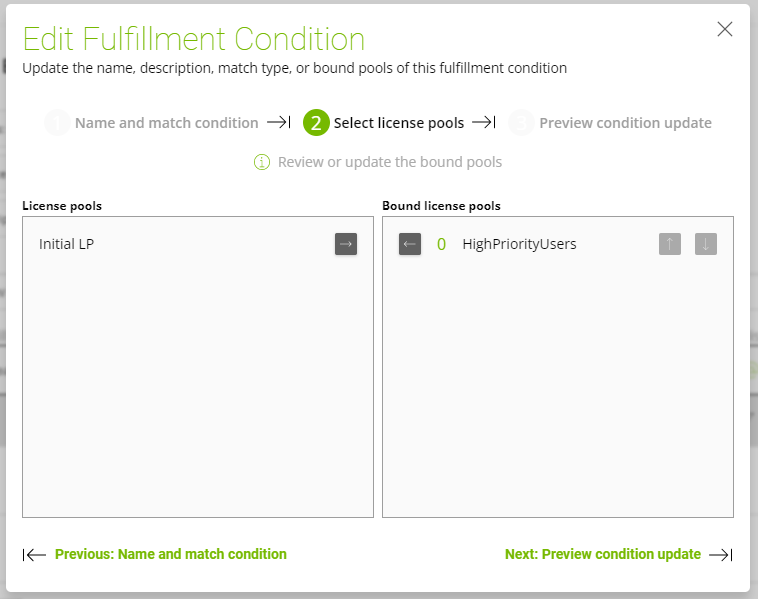
Use the left and right arrow icons to move selected license pools between the License Pools list and the Bound license pools list. Use the up and down arrow icons to adjust the order of the license pools in the Bound license pools list. Licenses are served in the order in which they appear in the Bound license pools list.
- Click Preview condition update.
Click EDIT FULFILLMENT CONDITION.
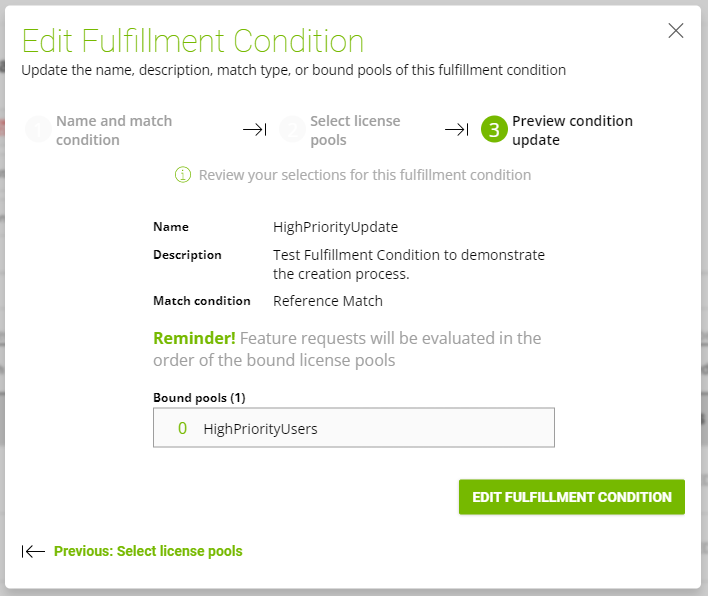
- From the Actions menu for fulfillment condition that you edited, choose Enable. The fulfillment condition can now be used to fulfill requests for licenses from licensed clients.
4.3.5. Changing the Order of Fulfillment Conditions
By default, fulfillment conditions that are configured with the Reference Match condition are tested in the order in which they were added to a license server. You can change this order if you want the fulfillment conditions to be tested in a specific order.
Ensure that the license server contains at least two fulfillment conditions that are configured with the Reference Match condition.
- Navigate to the License Server Details page of the license server to which the service instance is bound. For instructions, see Navigating to the License Server Details Page for a License Server.
- In the License Server Details page that opens, disable the license server by clicking DISABLE SERVER and, when prompted, confirm that you want to disable the license server. When the license server is disabled, it cannot serve licenses to licensed clients.
- Click REINDEX. The Reindex Fulfillment Conditions window opens.
- Rearrange your fulfillment conditions in the order that you want. Move each fulfillment condition that you want to move up or down in the processing order as follows:
- In the Fulfillment Conditions list, select the condition that you want to move.
Note:
Note: A fulfillment condition that is configured with the Universal Match condition is not displayed in this list because it is processed last.
When hovering your cursor over the up and down arrows, your cursor will change into a hand. Use the hand cursor to drag the condition to the position in the processing order that you want.
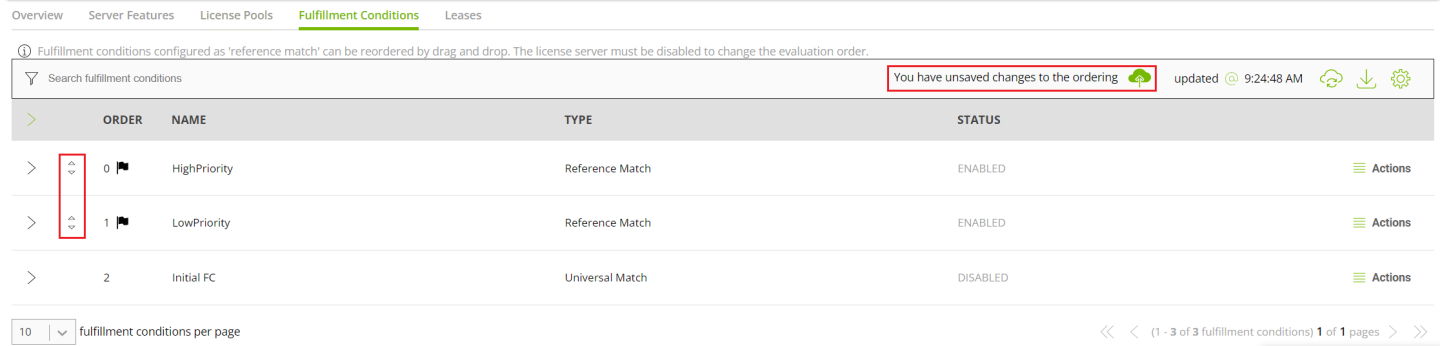
- In the Fulfillment Conditions list, select the condition that you want to move.
- After re-ordering the conditions, you will see the following alert: You have unsaved changes in the ordering. Click the alert to reindex the order of your fulfillment conditions. The order in which the fulfillment conditions are listed on the License Server Details page is updated to match the order that you specified.
- On the Overview tab of the License Server Details page, enable the license server by clicking ENABLE SERVER and, when prompted, confirm that you want to enable the license server. The license server can now serve licenses to licensed clients.
4.4. Generating a Client Configuration Token
A client configuration token identifies the service instance, license servers, and fulfillment conditions to be used to serve a license in response to a request from a licensed client. This information must be exchanged between a service instance and a licensed client to enable the service instance to serve licenses to the client.
After generating a client configuration token, you copy it to each licensed client that you want to use the token. Each client then provides data from the token back to the server whenever the client requests a license from the server.
A client configuration token is valid for 12 years after it is generated.
Create one client configuration token for each combination of license servers and fulfillment conditions that you want to use to serve licenses in response to requests from licensed clients.
After creating a client configuration token from a service instance, copy the client configuration token to each licensed client that you want to use the combination of license servers and fulfillment conditions specified in the token.
4.4.1. Generating a Client Configuration Token for a DLS Instance
- If you are not already logged in, log in to the NVIDIA Licensing application at the IP address of the VM on which the DLS instance resides.
- In the left navigation pane, click SERVICE INSTANCE.
On the Service Instance page that opens, from the Actions menu for the DLS instance for which you want to generate a client configuration token, choose Generate client configuration token.

- In the Generate Client Configuration Token pop-up window that opens, select the references that you want to include in the client configuration token.
From the list of scope references, select the scope references that you want to include.
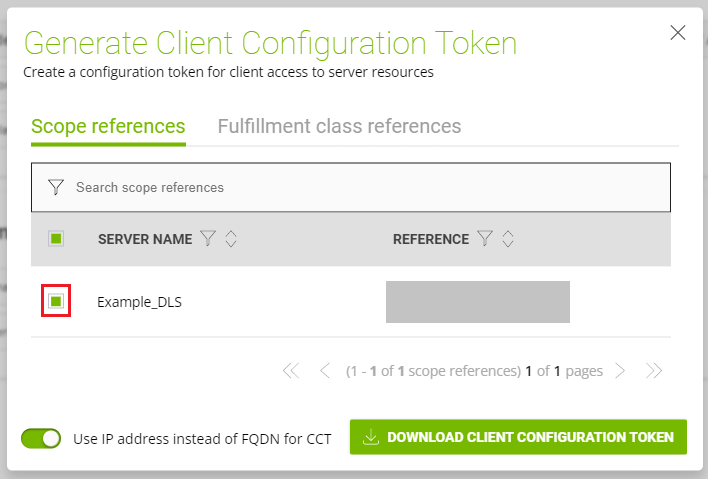
You must select at least one scope reference.
Each scope reference specifies the license server that will fulfil a license request.
Optional: Click the Fulfillment class references tab, and from the list of fulfillment class references, select the fulfillment class references that you want to include.
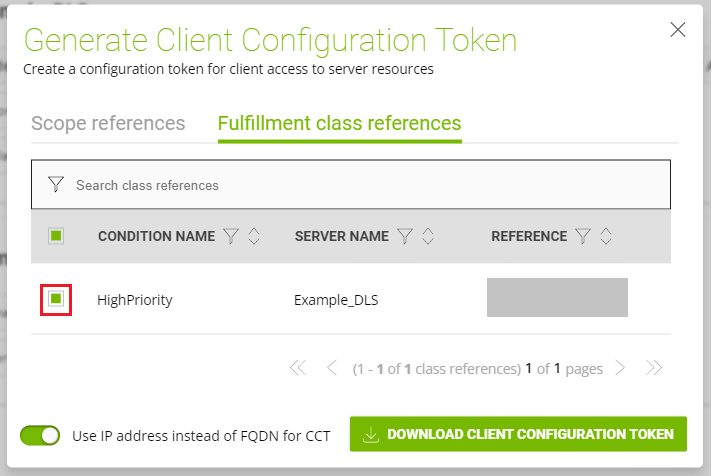
Including fulfillment class references is optional.
- Optional: If you want the service instance to be identified through its IP address instead of its fully qualified domain name, select the Use IP address instead of FQDN for CCT option.
- Click DOWNLOAD CLIENT CONFIGURATION TOKEN.
A file named client_configuration_token_mm-dd-yyyy-hh-mm-ss.tok is saved to your default downloads folder.
4.5. Disabling and Enabling a License Server, License Pool, or Fulfillment Condition
When modifying a license server, license pool, or fulfillment condition, you must disable it before modifying it. To ensure that service instance can serve licenses to licensed clients, you must ensure that its license servers, licence pools and fulfillment conditions are enabled.
You disable and enable a license server, license pool, or fulfillment condition from the relevant License Server Details page. For information about how to navigate to the License Server Details page, see Navigating to the License Server Details Page for a License Server.
- To disable a license server, navigate to the Overview tab of the License Server Details page for the license server. Then click DISABLE SERVER and, when prompted, confirm that you want to disable the license server. When the license server is disabled, it cannot serve licenses to licensed clients.
- To enable a license server, navigate to the Overview tab of the License Server Details page for the license server. Then click ENABLE SERVER and, when prompted, confirm that you want to enable the license server. The license server can now serve licenses to licensed clients.
- To disable a license pool, navigate to the License Pools tab of the License Server Details page for the license server to which the license pool belongs. Then from the Actions menu for the license pool, choose Disable. When the license pool is disabled, licenses cannot be served to licensed clients from the pool.
- To enable a license pool, navigate to the License Pools tab of the License Server Details page for the license server to which the license pool belongs. Then from the Actions menu for the license pool, choose Enable. Licenses can now be served to licensed clients from the pool.
- To disable a fulfillment condition, navigate to the Fulfillment conditions tab of the License Server Details page for the license server to which the fulfillment condition belongs. Then from the Actions menu for the fulfillment condition, choose Disable. When the fulfillment condition is disabled, it cannot be used to fulfill requests for licenses from licensed clients.
- To enable a fulfillment condition, navigate to the Fulfillment conditions tab of the License Server Details page for the license server to which the fulfillment condition belongs. Then from the Actions menu for the fulfillment condition, choose Enable. The fulfillment condition can now be used to fulfill requests for licenses from licensed clients.
4.6. Editing License Server Settings
License server settings control how a service instance handles licenses that have been served to licensed clients. You can edit the settings for an individual license server or for all license servers that are bound to a service instance. Any setting that you edit for an individual license server overrides the setting for license servers that are bound to the service instance.
- Open the Settings window of the individual license server or service instance for which you want to edit license server settings.
Scope Steps Individual license server - Navigate to the License Server Details page of the license server to which the service instance is bound.
For instructions, refer to Navigating to the License Server Details Page for a License Server.
- On the License Server Details page that opens, disable the license server by clicking DISABLE SERVER and, when prompted, confirm that you want to disable the license server.
When the license server is disabled, it cannot serve licenses to licensed clients.
- From the ACTIONS menu, choose Settings.
The Server Settings pop-up window opens.
All license servers bound to a DLS instance - If you are not already logged in, log in to the NVIDIA Licensing application on the VM or container in which the DLS appliance is installed or deployed.
- In the left navigation pane, click SERVICE INSTANCE.
- On the Service Instance Details page that opens,from the ACTIONS menu, choose Settings.
- In the Service Instance Settings pop-up window that opens, ensure that the License Server tab is selected.
- Navigate to the License Server Details page of the license server to which the service instance is bound.
- In the Settings pop-up window, edit the settings that you want to change and click SAVE SETTINGS.
- Individual license server only: View the Feature Overage setting.
- Maximum Allowed Feature Overage
- This setting cannot be changed from its preset value and is displayed for information only. For counted licenses, it is the maximum percentage of the number of licenses available that can be leased to license clients for a limited period of time when all available licenses are checked out. For example, if you have 100 concurrent user licenses and all licenses are checked out, up to an additional 10 licenses can leased to license clients for a limited period of time. During periods when overage allowances are being used, administrative warnings may be generated.
- In the left navigation pane of the Settings pop-up window, click Lease Period Settings and edit the following settings.
- Default Lease Period
- The default period of time for which a license remains valid at a licensed client after the license has been served to the client. At the end of the lease period, the license becomes invalid at the client and becomes available to be served to other licensed clients.
- Maximum Lease Period
- The maximum period of time for which a license remains valid at a licensed client after the license has been served to the client.
- Minimum Lease Period
- The minimum period of time for which a license remains valid at a licensed client after the license has been served to the client.
- In the left navigation pane of the Settings pop-up window, click Other Settings and edit the following settings.
- Default Renewal Period
-
The percentage of the lease period that must elapse before a licensed client can renew a license. By renewing a license before the lease period has elapsed, a licensed client can extend its license beyond the original expiration time of the license. Extending a license ensures that if a licensed client temporarily loses network connectivity to the licensing service, there is enough time for connectivity to be restored before the license expires.
For example, if the lease period is one day and the renewal period is 20%, the client attempts to renew its license every 4.8 hours. If network connectivity is lost, the loss of connectivity is detected during license renewal and the client has 19.2 hours in which to re-establish connectivity before its license expires.
- Offline Lease
- Enable or disable offline lease of licenses to clients. When offline lease of licenses to clients is enabled, clients can keep their licenses even when powered off.
- Individual license server only: View the Feature Overage setting.
- Individual license server only: On the License Server Details page, enable the license server by clicking ENABLE SERVER and, when prompted, confirm that you want to enable the license server. The license server can now serve licenses to licensed clients.
4.7. Manually Releasing Leases from a Server
This section will describe options to manually release licenses using the License Server GUI if immediate license freeing is needed.
In the example where a License Client VM has been un-gracefully stopped and deleted from existence, the license will remain in-use on the server and will not be freed until the lease has reached expiration. Because of this, manual admin release from the server is useful and these steps will describe the procedure.
4.7.1. Manual Release of Specific Clients Licensed to an NLS Service Instance
This section will describe how to locate and manually release specific VMs from the server.
Note:
There is a daily 10% rolling limit of client VMs that can be released manually. This 10% is based on total allocated license amount onto the server. (Example: 100 licenses allocated to the server, 10 Leases can be specifically manually released).
For DLS:
- Navigate to the DLS GUI and login with
dls_admin. - Navigate to the Leases tab from the left navigation pane.
Optional: Use the Search Bar to search for specific License Clients to release for. To filter, you can search by: ID, Feature Name, Client Origin Ref, Client Hostname, Client MAC Addresses, or Client IP Addresses.
- Click the red Release button to manually release the Virtual Machine.

- Click Force Release on the dialog that pops up.
For CLS:
- Navigate to the NVIDIA Licensing Portal and login.
- Navigate to the Leases tab from the left navigation pane.
- From the drop-down in the header, select the Service Instance from which held leases will be force released.
Optional: Use the Search Bar to search for specific License Clients to release for. To filter, you can search by: ID, Feature Name, Client Origin Ref, Client Hostname, Client MAC Addresses, or Client IP Addresses.
- Click the red Release button to manually release the Virtual Machine.
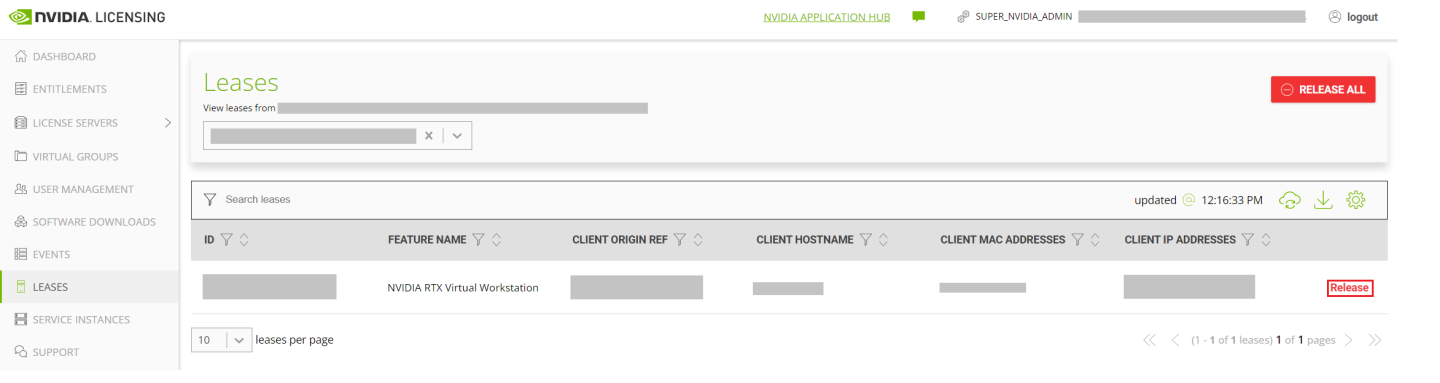
- Click Force Release on the dialog that pops up.
4.7.2. Manual Force Bulk Release of All Clients Licensed to an NLS Service Instance
This section will describe how to locate and force release all leases that are in-use on a given NVIDIA License System Service Instance.
Note:
There is a 30-day rolling limit of 2 Bulk Releases of licenses that can be executed from the server.
For DLS:
- Navigate to the DLS GUI and login with
dls_admin. - Navigate to the Leases tab from the left navigation pane.
- Click the red Release All button in the top-right corner.

- Click Force Release on the dialog that pops up.
For CLS:
- Navigate to the NVIDIA Licensing Portal and login.
- Navigate to the Leases tab from the left navigation pane.
- From the drop-down in the header, select the Service Instance from which held leases will be force released.
- Click the red Release All button in the top-right corner.
- Click Force Release on the dialog that pops up.
Perform these routine administration tasks as needed during the lifetime of the service instance.
5.1. Setting the Validity Period of a Lease Authorization Token for a Service Instance
You can set the validity period of a lease authorization token to either enhance performance or increase security. Increasing the validity period enhances performance by decreasing the frequency with which clients are authorized before the service instance grants a licensing request. Decreasing the expiration time increases security by increasing the frequency with which clients are authorized before the service instance grants a licensing request.
The default validity period is one hour. You can set the validity period to any value up to 24 hours.
5.1.1. Setting the Validity Period of a Lease Authorization Token for a DLS Instance
Perform this task on the NVIDIA Licensing application on the virtual appliance that hosts the DLS instance.
- Open a web browser and connect to the URL
https://dls-vm-ip-address.- dls-vm-ip-address
-
The IP address or, if defined, the fully qualified domain name of the VM on which the DLS virtual appliance is installed.
You can get the IP address from the management console of your hypervisor.
- On the login page that opens, provide the user credentials for the DLS administrator user on the DLS virtual appliance and click LOGIN.
In the left navigation pane of the NVIDIA Licensing dashboard, click SERVICE INSTANCE.
- On the Service Instance page that opens, click EDIT SETTINGS.
Select Service Instance Settings at the top of the window that opens, modify Auth Token Expiry Time as needed, then click SAVE SETTINGS.
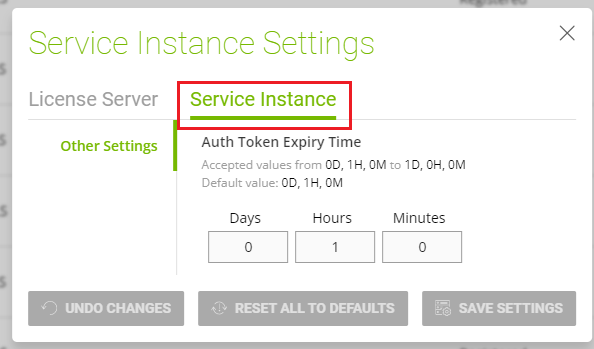
5.2. Migrating a DLS Instance
Migrating a DLS instance simplifies the upgrade of a DLS appliance. After installing a new version of the DLS appliance, you can transfer the license servers, user registration, IP address, and service instance from the existing DLS appliance to a new DLS appliance. However, event records on the existing DLS appliance are not migrated.
If you are upgrading the DLS appliance for the DLS instances in an HA cluster, migrate only the primary instance. During the migration process, all data is removed from the secondary DLS instance and the instance is removed from the cluster. After completing the migration process for the primary instance, you can configure an HA cluster from the new primary instance. Depending on the types of platforms that are hosting the existing DLS appliance and the new DLS appliance, NVIDIA License System enables you migrate a DLS instance online or offline.
- For migrations from a VM-based appliance to a container-based appliance, only offline migration is supported.
- For migrations from any type of platform to a VM-based appliance created from an instant clone, only offline migration is supported.
- For migrations between all other combinations of existing platform type and new platform type (VM to VM, container to container, and container to VM) both online and offline migration are supported.
Ensure that the port mappings for ports 8081 and 8084 are not changed from their defaults.
Note: If you are migrating a DLS 1.0.0 or 1.0.1 instance, the version shown on the VA Upgrade Job Progress page is 1.0.0 to preserve backwards compatibility.
After migrating a DLS 1.0.0 or 1.0.1 instance, you must change the password for the dls_admin user to enable or disable the dls_system user on the new instance.
5.2.1. Migrating a DLS Instance Online
You can migrate a DLS instance online if the new DLS virtual appliance is installed on a VM and the existing DLS virtual appliance can connect to the new DLS virtual appliance over IP.
If any of the following conditions is met, online migration is not supported and you must migrate the DLS instance offline as explained in Migrating a DLS Instance Offline:
- The new DLS appliance isn't yet installed on a VM or deployed in a container.
- The existing DLS appliance cannot connect to the new DLS appliance over IP.
- The DLS instance is being migrated from a VM-based appliance to a container-based appliance.
- The DLS instance is being migrated from an appliance based on any type of platform to a VM-based appliance created from an instant clone.
Migrating a Standalone DLS Instance Online
Before migrating a standalone DLS instance online, ensure that the following prerequisites are met:
- The new DLS appliance is installed on a VM or deployed in a container as explained in the following topics:
- If necessary, a static IP address has been assigned to the new DLS virtual appliance as explained in Setting the IP Address of a DLS Virtual Appliance from the Hypervisor.
- The existing DLS virtual appliance can connect to the new DLS virtual appliance over IP.
- The DLS administration user has not been registered on the new DLS virtual appliance.
To migrate a standalone DLS instance online, follow this sequence of instructions:
- Migrating Data from the Existing DLS Virtual Appliance
- Confirming the Migration on the new DLS Virtual Appliance
Migrating an HA Cluster of DLS Instances Online
Before migrating an HA cluster of DLS instances online, ensure that the following prerequisites are met:
- The new DLS appliance is installed on a VM or deployed in a container for the new primary instance and on a second VM or in a second container for the new secondary instance as explained in the following topics:
- If necessary, a static IP address has been assigned to the DLS virtual appliance for only the new primary instance as explained in Setting the IP Address of a DLS Virtual Appliance from the Hypervisor.
The virtual appliance for the new secondary DLS instance must have the same IP address as the virtual appliance for the current secondary instance. To avoid IP address conflicts, do not set the IP address for the new secondary DLS instance before starting the migration process.
- The DLS virtual appliance that hosts the current primary instance can connect over IP to the DLS virtual appliance for the new primary instance.
- The DLS administration user has not been registered on the DLS virtual appliance for either the primary instance or the secondary instance.
To migrate an HA cluster of DLS instances online, follow this sequence of instructions:
- Migrating Data from the Existing DLS Virtual Appliance
- Confirming the Migration on the new DLS Virtual Appliance
- If necessary, for the new secondary instance only: Setting the IP Address of a DLS Virtual Appliance from the Hypervisor
- Configuring an HA Cluster of DLS Instances
5.2.1.1. Migrating Data from the Existing DLS Virtual Appliance
Perform this task from the existing DLS virtual appliance.
For an HA cluster: Perform this task from the existing DLS virtual appliance that hosts the current primary instance.
- Log in to the existing DLS virtual appliance that hosts the DLS instance that you want to migrate.
- In the left navigation pane of the NVIDIA Licensing dashboard, click MAINTENANCE.
- On the Maintenance page that opens, scroll down to the On-Premises Virtual Appliance Upgrade section of the page.
- Ensure that the Offline Upgrade option is not set.
- In the text-entry field, type the IP address or fully qualified domain name of the new DLS virtual appliance and click MIGRATE.
- When asked if you want to proceed, click MIGRATE.
When the migration is complete, the DLS instance that you migrated is no longer able to serve licenses to clients.
Any time before you confirm the migration, you can enable the DLS instance that you migrated serve licenses to licensed clients again. If necessary, you can also repeat the data migration from the existing DLS instance.
Confirm the migration as explained in Confirming the Migration on the new DLS Virtual Appliance.
5.2.1.2. Confirming the Migration on the new DLS Virtual Appliance
After the data has been transferred, confirm the migration on the new DLS virtual appliance.
Perform this task from the new DLS virtual appliance.
- Log in to the new DLS virtual appliance as the DLS administrator user with the password of the DLS administrator user on the existing DLS virtual appliance.
- On the Dashboard page that opens, confirm that the installed license server was correctly migrated.
- In the left navigation pane of the NVIDIA Licensing dashboard, click MAINTENANCE.
- On the Maintenance page that opens, click ACKNOWLEDGE MIGRATION.
If the existing DLS virtual appliance is a VM-based virtual appliance, the results of this step are as follows:
- All data is removed from the DLS instance on the existing DLS virtual appliance and the appliance is shut down.
- The IP address of the new DLS virtual appliance is set to the IP address of the existing DLS virtual appliance.
As a result, your browser is disconnected from the new DLS virtual appliance. Setting the IP address of the new virtual appliance takes approximately two minutes.
- If the DLS instance is the primary instance in an HA cluster, all data is removed from the secondary DLS instance and the instance is removed from the cluster.
- If the existing DLS appliance is a container-based appliance, complete the following steps:
- Shut down the existing DLS appliance container.
- Reassign the IP address of the existing DLS appliance container to the new DLS appliance container or VM.
- If the DLS instance is the primary instance in an HA cluster, also shut down the DLS appliance container for the secondary instance.
- Log in to the new DLS virtual appliance again by connecting to the URL
https://dls-vm-static-ip-address.- dls-vm-static-ip-address
- The IP address that was set for the new DLS virtual appliance. This address is the IP address of the old DLS virtual appliance, which the new appliance has now acquired.
- Enable the new DLS virtual appliance to serve licenses to licensed clients.
- In the left navigation pane of the Maintenance page, click DASHBOARD.
- On the Dashboard page that opens, set the option to enable the license server.
- Ensure that the option to enable each license pool and fulfillment condition that you want to enable is set.
If you want to use the virtual appliance for a single DLS instance, no further action is required. The virtual appliance is ready for use.
If you want to use the virtual appliance in an HA cluster of DLS instances, perform the following sequence of tasks:
- If ncessary, set the IP address for the new secondary DLS instance as explained in Setting the IP Address of a DLS Virtual Appliance from the Hypervisor.
The virtual appliance for the new secondary DLS instance must have the same IP address as the virtual appliance for the original secondary instance.
- Configure the cluster as explained in Configuring an HA Cluster of DLS Instances.
5.2.2. Migrating a DLS Instance Offline
If the new DLS virtual appliance isn't yet installed on a VM or the existing DLS virtual appliance cannot connect to the new DLS virtual appliance over IP, migrate the DLS instance offline.
To migrate a DLS instance offline, follow this sequence of instructions:
- Registering the Migration of a DLS Instance with the NVIDIA Licensing Portal
- Generating an Upgrade File for the DLS Instance that You are Migrating
- Transferring Migration Data to the DLS Instance on an Upgraded Virtual Appliance
- For an HA cluster: Configuring an HA Cluster of DLS Instances
5.2.2.1. Registering the Migration of a DLS Instance with the NVIDIA Licensing Portal
Registering the migration of a DLS instance with the NVIDIA Licensing Portal involves the exchange of a binary migration file between the instance and the NVIDIA Licensing Portal. After creating the migration file and downloading it from the DLS instance, you must upload it to the NVIDIA Licensing Portal to complete the registration.
- Log in to the existing DLS virtual appliance that hosts the DLS instance that you want to migrate. The DLS instance must be either a standalone DLS instance or the primary node in an HA cluster.
- In the left navigation pane of the NVIDIA Licensing dashboard, click MAINTENANCE.
- On the Maintenance page that opens, scroll down to the On-Premises Virtual Appliance Upgrade section of the page.
- Set the Offline Upgrade option.
- Click GENERATE MIGRATION FILE. If the DLS instance is the primary instance in an HA cluster, all data is removed from the secondary DLS instance and the DLS virtual appliance that hosts the secondary instance is shut down.
- When asked if you want to proceed, click GENERATE.
The DLS instance on the existing DLS virtual appliance is no longer able to serve licenses to clients.
Modifications to the existing DLS virtual appliance are blocked until the offline migration process is complete.
- After the migration file has been generated, click DOWNLOAD MIGRATION FILE. A migration file that is named on_prem_migration_file_mm-dd-yyyy-hh-mm-ss.bin is saved to your downloads folder.
- After the migration file has been downloaded, click ACKNOWLEDGE DOWNLOAD. If the DLS virtual appliance that hosts the DLS instance is a VM-based virtual appliance, it is shut down.
- If the DLS appliance that hosts the DLS instance is a container-based appliance, shut it down.
- In the NVIDIA Licensing Portal, navigate to the organization or virtual group to which the DLS instance belongs.
- If you are not already logged in, log in to the NVIDIA Enterprise Application Hub and click NVIDIA LICENSING PORTAL to go to the NVIDIA Licensing Portal.
- Optional: If your assigned roles give you access to multiple virtual groups, select the virtual group to which the DLS instance belongs from the list of virtual groups at the top right of the page.
In the left navigation pane of the NVIDIA Licensing Portal dashboard, click SERVICE INSTANCES.
- In the list of service instances on the Service Instances page that opens, from the Actions menu for the DLS instance, choose Upload Migration File.
- In the Upload Migration File pop-up window that opens, click SELECT MIGRATION FILE.
- In the file browser that opens, navigate to the folder that contains the migration file that is named on_prem_migration_file_mm-dd-yyyy-hh-mm-ss.bin that you downloaded and select the file.
- Back in the Upload Migration File pop-up window, click UPLOAD.
Install or deploy the new DLS virtual appliance as explained in the following topics:
- Installing the DLS Virtual Appliance Image on a Supported Hypervisor
- Deploying a Containerized DLS Software Image
Then generate and upload the DLS instance token for the new virtual appliance to generate an upgrade file as explained in Generating an Upgrade File for the DLS Instance that You are Migrating.
5.2.2.2. Generating an Upgrade File for the DLS Instance that You are Migrating
After uploading the migration file for the DLS instance that you are migrating, you must generate an upgrade file for the instance. Generating the upgrade file involves generating and uploading the DLS instance token for the new virtual appliance that will host the migrated DLS instance.
Ensure that the following prerequisites are met:
- The new DLS appliance is installed on a VM or deployed in a container as explained in the following topics:
- If necessary, a static IP address has been assigned to the new DLS virtual appliance as explained in Setting the IP Address of a DLS Virtual Appliance from the Hypervisor.
- The DLS administration user has not been registered on the new DLS virtual appliance.
- Open a web browser and connect to the URL
https://dls-vm-ip-address.- dls-vm-ip-address
-
The IP address or, if defined, the fully qualified domain name of the VM on which the DLS virtual appliance is installed.
You can get the IP address from the management console of your hypervisor.
- On the Set Up page that opens, click UPGRADE.
- On the Virtual Appliance Upgrade page that opens, click DOWNLOAD DLS INSTANCE TOKEN. A DLS instance token file that is named dls_instance_token_mm-dd-yyyy-hh-mm-ss.tok is downloaded.
- Leave the Virtual Appliance Upgrade page open in the browser.
- In the NVIDIA Licensing Portal, navigate to the organization or virtual group for which you are registering the DLS instance.
- If you are not already logged in, log in to the NVIDIA Enterprise Application Hub and click NVIDIA LICENSING PORTAL to go to the NVIDIA Licensing Portal.
- Optional: If your assigned roles give you access to multiple virtual groups, select the virtual group for which you are registering the DLS instance from the list of virtual groups at the top right of the page.
In the left navigation pane of the NVIDIA Licensing Portal dashboard, click SERVICE INSTANCES.
- On the Service Instances page that opens, from the ACTIONS menu, choose Upload on-premises (DLS) instance token.
- In the Upload DLS Instance Token window that opens, click SELECT INSTANCE TOKEN.
- In the file browser that opens, navigate to the folder that contains the DLS instance token file that is named dls_instance_token_mm-dd-yyyy-hh-mm-ss.tok that you downloaded and select the file.
- Back in the Upload DLS Instance Token window, complete the generation of the upgrade file:
- Select the Upgrade existing option.
- From the drop-down list, select the DLS instance for which you previously uploaded the migration file.
- Click UPLOAD TOKEN.
An upgrade file is generated and the Download Upgrade File link is added for the selected DLS instance.
After registering the DLS instance on an upgraded virtual appliance with the NVIDIA Licensing Portal, follow the instructions in Transferring Migration Data to the DLS Instance on an Upgraded Virtual Appliance.
5.2.2.3. Transferring Migration Data to the DLS Instance on an Upgraded Virtual Appliance
- In the NVIDIA Licensing Portal, navigate to the organization or virtual group to which the DLS instance belongs.
- If you are not already logged in, log in to the NVIDIA Enterprise Application Hub and click NVIDIA LICENSING PORTAL to go to the NVIDIA Licensing Portal.
- Optional: If your assigned roles give you access to multiple virtual groups, select the virtual group to which the DLS instance belongs from the list of virtual groups at the top right of the page.
- In the list of service instances on the Service Instances page that opens, follow the Download Upgrade File link for the DLS instance. A file named dls_upgrade_mm-dd-yyyy-hh-mm-ss.bin is saved to your default downloads folder.
- Return to the Virtual Appliance Upgrade page of the NVIDIA Licensing application on the upgraded virtual appliance.
- On the Virtual Appliance Upgrade page, click UPLOAD UPGRADE FILE.
- In the Upload Upgrade File, click Choose File.
- In the file browser that opens, navigate to the folder that contains the upgrade file that is named dls_upgrade_mm-dd-yyyy-hh-mm-ss.bin that you downloaded and select the file.
- Back in the Upload Upgrade File, click UPLOAD.
When the upgrade is complete, update the IP address of the virtual appliance to the address given in the prompt as explained in Setting the Static IP Address of a DLS Virtual Appliance.
If you want to use the virtual appliance for a single DLS instance, no further action is required. The virtual appliance is ready for use.
If you want to use the virtual appliance in an HA cluster of DLS instances, configure the cluster as explained in Configuring an HA Cluster of DLS Instances.
5.3. Reconfiguring the Rsyslog Tool in a DLS Virtual Appliance
A VM-based DLS virtual appliance uses the Rsyslog tool for forwarding log messages in an IP network. If you want to export events and alerts for the DLS instance on the appliance to an external syslog or security information and event management (SIEM) server, you can reconfigure the Rsyslog tool in the appliance.
Note: You can perform this task only on a VM-based DLS virtual appliance. You cannot perform this task on a containerized DLS software image. Instead, you can use standard interfaces of the OS on which the container orchestration platform is running to make this change.
The format of each type of log message from a DLS virtual appliance is as follows:
- syslog messages are in the standard syslog format, with the fields in each message separated by a space:
timestamp hostname program-name message-text
- NLS service messages are formatted as JSON strings:
SEMANTIC:service-name: semantic-json-string
Note: Common Event Format (CEF) is not supported. However, you can configure the format or transfer the data to the SIEM server after the logs have been forwarded to the syslog server.
- Use the hypervisor management console of the appliance to log in as the user dls_diagnostics to the VM that hosts the DLS virtual appliance.
- Edit the file /etc/rsyslog.conf to update the address and port of the external syslog server.
- Restart the Rsyslog tool.
# sudo -u root /etc/adminscripts/restart_rsyslog.sh
5.4. Setting the Retention Period of Events on a DLS Instance
A DLS instance records events related to administration of the instance and the serving of licenses from the instance to licensed clients. These events are displayed on the Events page of the instance. You can control the number of events that are displayed on this page by setting the retention period of events on a DLS instance. Any event older than the retention period is deleted from the instance.
- Open a web browser and connect to the URL
https://dls-vm-ip-address.- dls-vm-ip-address
-
The IP address or, if defined, the fully qualified domain name of the VM on which the DLS virtual appliance is installed.
You can get the IP address from the management console of your hypervisor.
- On the login page that opens, provide the user credentials for the DLS administrator user on the DLS virtual appliance and click LOGIN.
- In the left navigation pane, click SERVICE INSTANCE.
- On the Service Instance Details page that opens, from the ACTIONS menu, choose Settings.
- In the Service Instance Settings pop-up window that opens, click the Service Instance tab.
- In the left navigation pane of the Service Instance Settings window, click Purge Settings, set the retention time in days for each type of event, and click SAVE SETTINGS.
5.5. Gathering License Usage Statistics
You can use license usage statistics to estimate the number of licenses that you need to purchase. These statistics are available only from DLS instances. They are not available from CLS instances.
Usage statistics require event data and if no events are available, the statistics might be incorrect. To ensure that the statistics gathered are correct, set the retention period for events to 90 as explained in Setting the Retention Period of Events on a DLS Instance.
- Open a web browser and connect to the URL
https://dls-vm-ip-address.- dls-vm-ip-address
-
The IP address or, if defined, the fully qualified domain name of the VM on which the DLS virtual appliance is installed.
You can get the IP address from the management console of your hypervisor.
- On the login page that opens, provide the user credentials for the DLS administrator user on the DLS virtual appliance and click LOGIN.
- In the left navigation pane of the NVIDIA Licensing dashboard, click METRICS.
- In the Metrics page that opens, specify the details of the statistics that you want to gather and click GET LICENSE UTILIZATION.
- Under Date range (up to 92 days), use the calendar widgets to set the start date and end date of the period during which you want to gather license usage statistics.
- From the Metric drop-down list, select the statistic that you want to gather.
- Under Features, select the licensed products for which you want to gather usage statistics.
- To exclude licenses in use that were checked out before the start date of the period during which you want to gather license usage statistics, select the Exclude prior leases option.
The statistics that you requested are added to the table at the bottom of the Metrics page.
- Optional: If you want a report in CSV format, create the report as follows:
- At the top right of the table at the bottom of the Metrics page, click the Export data icon.
- In the Export Data pop-up window that opens, specify the name of the CSV file to be exported and click EXPORT.
A .csv file is saved to your default downloads folder.
5.6. Hiding Organization and Virtual Group Information on a DLS Instance
You can use REST APIs to hide the organization and virtual group to which the licenses served by a DLS instance belong.
- Submit an HTTP POST request with basic authentication to log in to the DLS appliance that hosts the DLS instance as the DLS administrator user.
POST https://host:port/auth/v1/login
- host
- The IP address or fully qualified domain name of the VM or container that is hosting the DLS appliance.
- port
- The port on which the VM or container that is hosting the DLS appliance listens for HTTPS requests.
In the request, pass the user name and password of the DLS administrator user. The default user name is
dls_admin.The following example uses the curl command to log in to the DLS appliance
dls.example.comon port 8081 as the userdls_adminwith the passwordchangeit.curl -k --location --request POST 'https://dls.example.com:8081/auth/v1/login' \ --header 'Content-Type: application/json' \ --data-raw '{ "username": "dls_admin" "password": "changeit"}'
The response sets the authorization token in the LIC-TOKEN cookie and includes the token in the response body.
- Submit an HTTP PUT request to hide the organization and virtual group on the DLS instance.
PUT https://host/service_instance_manager/v1/config/hide-name-on-ui
- host
- The IP address or fully qualified domain name of the VM or container that is hosting the DLS appliance.
If the tool that you use to submit the request supports cookies, you can submit the request without the authorization token. Otherwise, you must pass the authorization token that was returned in the previous step in the header as a bearer token.
The following example uses the curl command to hide the organization and virtual group on the DLS instance on the appliance
dls.example.com. For clarity, the example shows only the placeholder token.curl -k --location --request PUT \ ' https://dls.example.com/service_instance_manager/v1/config/hide-name-on-ui' \ --header 'Authorization: Bearer token'
If the organization and virtual group are hidden after the DLS administrator user has logged in to the DLS appliance, the DLS administrator user must reload the web-based management interface to see the changes. To show the organization and virtual group again, submit a PUT request on the REST endpoint for hiding the organization and virtual group with the query parameter hide=false.
PUT https://host/service_instance_manager/v1/config/hide-name-on-ui?hide=false
5.7. Setting the Maximum Size of the PostgreSQL Database Volume
To limit disk usage by a container-based DLS appliance, you can set the maximum size of the PostgreSQL database volume postgres-data. The default maximum size is 10 GB.
Note: You can perform this task only on a containerized DLS software appliance. You cannot perform this task on a VM-based DLS virtual appliance.
- Log in to the DLS appliance for which you want to set the maximum size of the PostgreSQL database volume.
- In the left navigation pane of the NVIDIA Licensing dashboard, click SERVICE INSTANCE.
- In the Service Instance Details page that opens, from the ACTIONS menu, choose Settings.
- In the Service Instance Settings pop-up window that opens, click the Service Instance tab and in the left navigation bar, click Purge Settings.
- Under Container Volume Disk Allocation in GB, type the maximum size of the PostgreSQL database volume in GB and click SAVE SETTINGS.
5.8. Troubleshooting a DLS Instance
To facilitate troubleshooting, the DLS provides access to log files, event records, and the status of a DLS instance's internal services. If the DLS instance's internal services have failed, you can restart them from the NVIDIA Licensing application on the DLS virtaual appliance.
5.8.1. Log File Locations and Types for a DLS Virtual Appliance
The log files for a DLS virtual appliance contain diagnostic information to help with troubleshooting. The DLS administrator user and the dls_diagnostics user can access these log files through the hypervisor console or secure shell (SSH).
By default, the dls_diagnostics user account is disabled. This user account can be enabled during the registration of the DLS administrator user as explained in Registering the DLS Administrator User. It can also be enabled and disabled by changing the DLS administrator user's settings in the My Info window.
The log files for a DLS virtual appliance are in the locations in the following table.
| Log Message Type | Log File Location |
|---|---|
| NVIDIA License System licensing messages | /var/lib/docker/volumes/logs/_data/licensing |
| NVIDIA License System service messages | /var/lib/docker/volumes/logs/_data/op_log_archive |
| /var/lib/docker/volumes/logs/_data/op_log_capture | |
| /var/lib/docker/volumes/logs/_data/op_log_ingest | |
| DLS web server messages | /var/lib/docker/volumes/logs/_data/nginx |
DLS virtual appliance internal messages related to:
|
/var/lib/docker/volumes/logs/_data/rabbitmq_stdout.log |
| /var/lib/docker/volumes/logs/_data/rabbitmq_stderr.log |
Files in the following standard Linux directories contain log messages from the operating system:
- /tmp
- /var/log
- /var/tmp
5.8.2. Storing Log Files for a DLS Virtual Appliance on a Network File Share
Because the amount of disk space available in a DLS virtual appliance might be limited, the DLS virtual appliance does not retain all log messages generated during the lifetime of a DLS virtual appliance. If you want to retain all log messages, you can configure the virtual appliance to store log files for a DLS virtual appliance on a network file share.
If a virtual appliance is configured to store log files for a DLS virtual appliance on a network file share, it periodically aggregates the log files and moves them from the local disk of the DLS virtual appliance to the share.
Ensure that the following prerequisites are met:
- The network file share has been created on a network attached storage server that is accessible from the DLS virtual appliance.
- The DLS administrator user on the DLS virtual appliance is granted full access to the network file share.
- Log in to the DLS virtual appliance.
- In the left navigation pane, click SERVICE INSTANCE.
- On the Service Instance page that opens, from the Actions menu, choose LOG ARCHIVE SETTINGS.
- In the Network Share Configuration for Log Archival window that opens, provide the details of the network file share and click MOUNT.
- From the Platform drop-down list, select the OS that corresponds to the type of the share on the network attached storage server.
- For a share that corresponds to the Windows OS, such as a CIFS share, select Windows.
- For a share that corresponds to the UNIX OS, such as an NFS share, select Unix.
- In the Network Share Path text-entry field, type the path to the share on the network attached storage server in the following format:
//nas-server/file-path
- nas-server
- The IP address or fully qualified domain name of the network attached storage server on which the share has been created.
- file-path
- The full path to the share from the root of the file system on the network attached storage server. In the path, use the forward slash as the file separator, even if you selected Windows from the Platform drop-down list.
- If you selected Windows from the Platform drop-down list , provide the user name and password for the user on the network attached storage server that will access the share.
- From the Platform drop-down list, select the OS that corresponds to the type of the share on the network attached storage server.
The network file share is mounted at /var/log/licensing on the DLS virtual appliance. This mount point is preset in the DLS virtual appliance and cannot be changed.
5.8.3. Exporting and Importing Event Records from a DLS Instance
To help NVIDIA Enterprise Support personnel troubleshoot issues with a DLS instance, you can export event records from the DLS instance and import them into the NVIDIA Licensing Portal.
Note: The maximum size of a file that can be exported from a DLS instance or imported into the NVIDIA Licensing Portal is 250 MBytes.
Note: If no filters are selected, records will be exported for the last 7 days.
- Log in to the DLS virtual appliance that hosts the DLS instance.
- In the left navigation pane of the NVIDIA Licensing dashboard, click MAINTENANCE.
- Optional: Filter the events that you want to export.
- On the Maintenance page that opens, set the Show advanced filters option.
- Use the calendar widget that is added to the page to set the range of dates for which you want to export event records.
- Select the categories of event that you want to export.
- On the Maintenance page, click EXPORT EVENTS. An event log file that is named on-premises_export_mm-dd-yyyy-hh-mm-ss.log is saved to your downloads folder.
- In the NVIDIA Licensing Portal, navigate to the organization or virtual group to which the DLS instance belongs.
- If you are not already logged in, log in to the NVIDIA Enterprise Application Hub and click NVIDIA LICENSING PORTAL to go to the NVIDIA Licensing Portal.
- Optional: If your assigned roles give you access to multiple virtual groups, select the virtual group to which the DLS instance belongs from the list of virtual groups at the top right of the page.
- In the left navigation pane of the NVIDIA Licensing Portal dashboard, click DASHBOARD.
- On the Dashboard page that opens, under DLS data synchronization, click Import.
- In the file browser that opens, navigate to the folder that contains the event log file that is named on-premises_export_mm-dd-yyyy-hh-mm-ss.log that you downloaded and select the file.
- Optional: For each other event file that you want to import, click SELECT ANOTHER FILE, and navigate to and select the file.
- After selecting all the files that you want to import, click UPLOAD EVENTS.
5.8.4. Restarting a DLS Instance's Internal Services
If a DLS instance has failed because its internal services are no longer active, you can restart the inactive services to recover from the failure.
- Log in to the DLS virtual appliance that hosts the DLS instance. If the DLS instance is a node in an HA cluster, you must log in to the DLS virtual appliance that hosts the specific node. You cannot restart the internal services of the secondary node from the primary node or restart the internal services of the primary node from the secondary node.
- In the left navigation pane, click SERVICE INSTANCE.
- On the Service Instance page that opens, under Node Health, determine whether the status of any of the DLS instance's internal services is inactive. Status information is provided for the DLS instance's critical services and other services.
- If any set of services in not active, click RESTART for that set of services.
Note:
Note: You cannot restart a set of services that is active. The RESTART button for any set of active services is deactivated and dimmed.
After creating a license server on the NVIDIA Licensing Portal, you can add licenses to and remove licenses from the server, add new licensed products to and remove licensed products from the server, and delete the server when you no longer require it.
6.1. Where to Perform Tasks for Managing a License Server
Where to perform the tasks for managing a license server depends on the task and on the type of service instance on which the license server is installed.
| Task | CLS Instance | DLS Instance |
|---|---|---|
| Adding licenses to a license server | NVIDIA Licensing Portal | NVIDIA Licensing Portal |
| Removing licenses from a license server | NVIDIA Licensing Portal | The NVIDIA Licensing application on the virtual appliance that hosts the DLS instance |
| Adding licensed products to a license server | NVIDIA Licensing Portal | NVIDIA Licensing Portal |
| Removing licensed products from a license server | NVIDIA Licensing Portal | The NVIDIA Licensing application on the virtual appliance that hosts the DLS instance |
| Moving a license server to another virtual group | NVIDIA Licensing Portal | NVIDIA Licensing Portal |
| Deleting a license server | NVIDIA Licensing Portal | NVIDIA Licensing Portal |
Note: You cannot delete a license server that is bound to and installed on a DLS or CLS instance. You must first free the license server from the CLS or DLS instance. For instructions, refer to Freeing a License Server from a Service Instance.
6.2. Managing Licenses and Licensed Products on a License Server
Manage the licenses on a license server to add or remove individual licenses for a specific product on the license server. Manage the licensed products on a license server if you need to add or remove licensed products from a license server. When you add a licensed product to a license server, only one license for the product is allocated. When a licensed product is removed from a license server, all licenses that were allocated for the product are returned to the entitlement.
Ensure that any licensed products that you want to remove from a license server are not in a license pool. If necessary, return licensed products from a pool to the license server as explained in Managing Licenses and Licensed Products in a License Pool.
Where to perform this task depends on whether you are adding or removing licenses.
- If you are adding licenses, perform this task on the NVIDIA Licensing Portal irrespective on the type of service instance on which the license server is installed.
- If you are removing licenses, where to perform this task depends on the type of service instance on which the license server is installed:
- On a CLS instance, perform this task on the NVIDIA Licensing Portal.
- On a DLS instance, perform this task on the NVIDIA Licensing application on the virtual appliance that hosts the DLS instance.
- Navigate to the License Server Details page of the license server to which you want to add or from which you want to remove licenses. For instructions, see Navigating to the License Server Details Page for a License Server.
- In the License Server Details page that opens, disable the license server by clicking DISABLE SERVER and, when prompted, confirm that you want to disable the license server. When the license server is disabled, it cannot serve licenses to licensed clients.
- From the ACTIONS menu, choose Manage Features. The Manage Server Features pop-up window opens with the Modify existing tab active.
In the Manage Server Features pop-up window, you specify all the licenses and licensed products that you want to add or remove before confirming your changes by clicking UPDATE SERVER FEATURES.
- For each licensed product for which you want to add or remove licenses, specify the number of licenses for the product that you want to remain on the server after updating licenses. Use the text-entry field in the ALLOCATED column for this purpose.
-
To add licenses to the server, enter a number greater than the number already allocated to the server, but less than or equal to the total number of licenses available.
If you enter a number greater than the total number of licenses available, an error occurs.
-
To remove licenses from the server, enter a number less than the number already allocated to the server but greater than 0.
For example, to remove 4 licenses from a server to which 10 licenses are allocated, leaving 6 licenses allocated to the server, enter 6 in the Licenses field.
If you enter 0, an error occurs. You must leave at least one license on the license server. To remove all licenses for a product from the license server, remove the product from the server by clicking the trash can icon.
The number of licenses on the server remains unchanged until you confirm your changes by clicking UPDATE SERVER FEATURES.
-
- Remove each licensed product that you no longer want on the server by clicking the trash can icon next to the licensed product. The licensed product is removed from the list of licensed products on the Modify existing tab. However, the licensed product remains on the server until you confirm the change by clicking UPDATE SERVER FEATURES.
- Add any licensed products that you want to add to the license server.
- Click the Add new tab.
- In the list of licensed products on the Add new tab, select the licensed products that you want to add.
- After adding or removing all the licenses and licensed products that you are interested in, preview your changes by clicking Preview changes.
- After previewing your changes, click UPDATE SERVER FEATURES.
- On the Overview tab of the License Server Details page, enable the license server by clicking ENABLE SERVER and, when prompted, confirm that you want to enable the license server. The license server can now serve licenses to licensed clients.
If the license server is installed on a CLS instance, no further action is required. The license server and the NVIDIA Licensing Portal are automatically updated with your changes.
If the license server is installed on a DLS instance, you must ensure that the licenses on your license server and on the NVIDIA Licensing Portal are consistent.
- If you added licenses, download and install the updated license server to ensure that the correct licenses are available on the DLS instance. For detailed instructions, see Installing a License Server on a DLS Instance. Installing the updated license server does not affect the distribution of existing licenses among license pools.
- If you removed licenses, return the licenses to the entitlement on the NVIDIA Licensing Portal. For detailed instructions, see Returning Licenses from a License Server on a DLS Instance to the NVIDIA Licensing Portal.
6.3. Returning Licenses from a License Server on a DLS Instance to the NVIDIA Licensing Portal
After removing individual licenses or licensed products from a license server installed on a DLS instance, you must return them to the entitlement on the NVIDIA Licensing Portal. Returning them ensures that the licenses and products on your license server and on the NVIDIA Licensing Portal are consistent. The returned licenses and products are then available for use by other license servers.
- If you are not already logged in, log in to the NVIDIA Licensing application at the IP address of the VM on which the DLS virtual appliance is installed.
- In the left navigation pane of the NVIDIA Licensing dashboard, click MAINTENANCE.
- On the Maintenance page that opens, click Export Feature Return.
A license return file named on-premises_feature_return_mm-dd-yyyy-hh-mm-ss.bin is downloaded.Note:
Note: The Export Feature Return button is active only if individual licenses or licensed products have been removed from the license server.
- In the NVIDIA Licensing Portal, navigate to the organization or virtual group for which the license server was created.
- If you are not already logged in, log in to the NVIDIA Enterprise Application Hub and click NVIDIA LICENSING PORTAL to go to the NVIDIA Licensing Portal.
- Optional: If your assigned roles give you access to multiple virtual groups, select the virtual group for which the license server was created from the list of virtual groups at the top right of the page.
- In the list of license servers on the NVIDIA Licensing Portal dashboard, select the license server from which you want to return licenses or licensed products.
- In the License Server Details page that opens, from the Actions menu, choose Return Features.
- In the Return Features pop-up window that opens, click SELECT FEATURE RETURN FILE.
- In the file browser that opens, navigate to the folder that contains the license return file named on-premises_feature_return_mm-dd-yyyy-hh-mm-ss.bin that you downloaded and select the file.
- Back in the Return Features pop-up window, click RETURN FEATURES. The returned licenses and license products are added to the entitlements on the NVIDIA Licensing Portal.
6.4. Moving a License Server to Another Virtual Group
- In the NVIDIA Licensing Portal, navigate to the organization or virtual group to which the license server belongs.
- If you are not already logged in, log in to the NVIDIA Enterprise Application Hub and click NVIDIA LICENSING PORTAL to go to the NVIDIA Licensing Portal.
- Optional: If your assigned roles give you access to multiple virtual groups, click View settings at the top right of the page and in the My Info window that opens, select the virtual group from the Virtual Group drop-down list, and close the My Info window.
- In the left navigation pane of the NVIDIA Licensing Portal dashboard, expand LICENSE SERVERS and click LIST SERVERS.
- In the list of license servers on the License Servers page that opens, from the Actions menu for the license server, choose Move server. The Move License Server pop-up window opens and displays which licensed products can be moved and which licensed products cannot be moved because they are bound to a DLS instance or because licenses are checked out.
- In the Move License Server pop-up window, select the virtual group to which you want to move the license server and click MOVE SERVER. The licensed products on the license server that can be moved are moved to the selected virtual group.
6.5. Deleting a License Server
Note: You cannot delete a license server that is bound to and installed on a DLS or CLS instance. You must first free the license server from the CLS or DLS instance. For instructions, refer to Freeing a License Server from a Service Instance.
- In the NVIDIA Licensing Portal, navigate to the organization or virtual group for which you want to delete the license server.
- If you are not already logged in, log in to the NVIDIA Enterprise Application Hub and click NVIDIA LICENSING PORTAL to go to the NVIDIA Licensing Portal.
- Optional: If your assigned roles give you access to multiple virtual groups, click View settings at the top right of the page and in the My Info window that opens, select the virtual group from the Virtual Group drop-down list, and close the My Info window.
- In the list of license servers on the License Servers page that opens, click the name of the license server that you want to delete.
- In the License Server Details page that opens, from the Actions menu, choose Delete.
- When asked to confirm that you want to delete the license server, click DELETE LICENSE SERVER.
6.6. Editing Default Service Instances
A Default Service Instance is a Service Instance which has been designated as the Service Instance to use in the event of an Express CLS Installation. If no CLS Instance has been used for Express CLS Installation previously, one will be created during the first Express CLS Installation Process. NVIDIA License System Service Instance.
Only CLS-Bound Service Instances can be designated as Default.
For more information on Express CLS Installation, see Configuring a Service Instance.
To view which Service Instance has been designated as Default:
- In the NVIDIA Licensing Portal, navigate to the organization or virtual group for which you want to create the license server.
- If you are not already logged in, log in to the NVIDIA Enterprise Application Hub and click NVIDIA LICENSING PORTAL to go to the NVIDIA Licensing Portal.
- Optional: If your assigned roles give you access to multiple virtual groups, click View settings at the top right of the page and in the My Info window that opens, select the virtual group from the Virtual Group drop-down list, and close the My Info window.
If no license servers have been created for your organization or virtual group, the NVIDIA Licensing Portal dashboard displays a message asking if you want to create a license server.
From the left-side navigation pane, choose SERVICE INSTANCES.
From the Table view, under the Environment column, look for the green DEFAULT indicator.
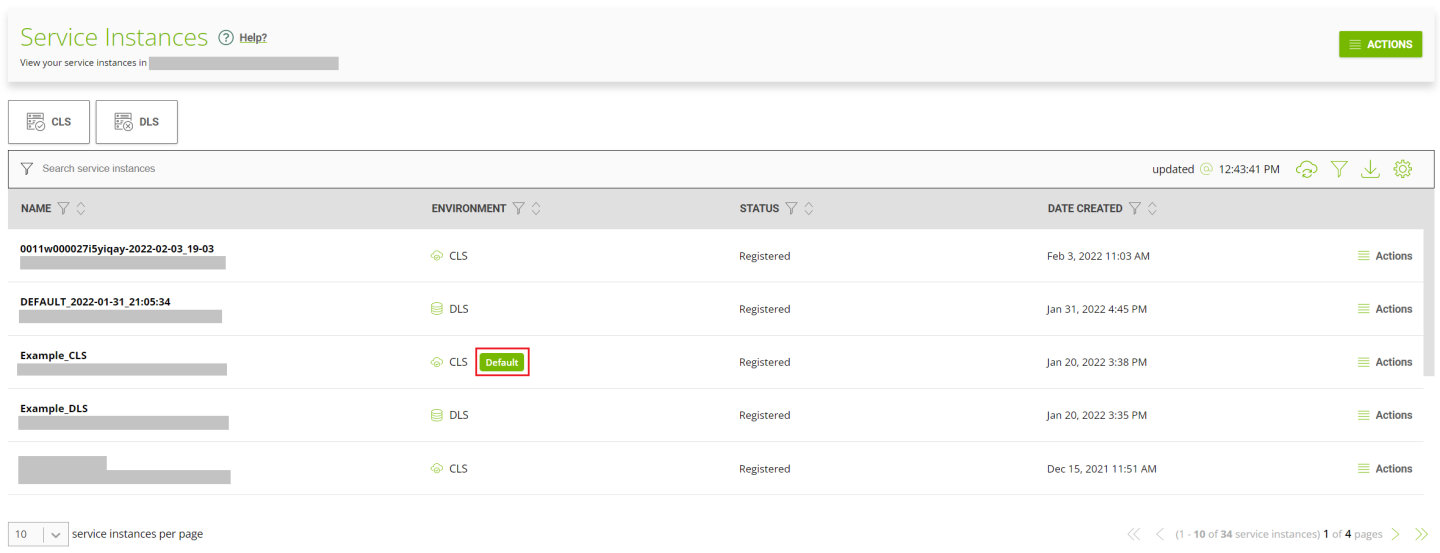
6.6.1. Edit the Service Instance Designated as Default
If you would like to change which Service Instance is bound as the Default, follow these steps.
- In the NVIDIA Licensing Portal, navigate to the organization or virtual group for which you want to create the license server.
- If you are not already logged in, log in to the NVIDIA Enterprise Application Hub and click NVIDIA LICENSING PORTAL to go to the NVIDIA Licensing Portal.
- Optional: If your assigned roles give you access to multiple virtual groups, click View settings at the top right of the page and in the My Info window that opens, select the virtual group from the Virtual Group drop-down list, and close the My Info window.
If no license servers have been created for your organization or virtual group, the NVIDIA Licensing Portal dashboard displays a message asking if you want to create a license server.
From the left-side navigation pane, choose SERVICE INSTANCES.
- From the Table view, find the CLS Service Instance that you would like to bind as the Default, or create a new one: Configuring a Service Instance.
- From the ACTIONS menu, select EDIT.
- On the dialog that pops up, select the toggle button to Mark as default.
- Click EDIT SERVICE INSTANCE.
Notice
This document is provided for information purposes only and shall not be regarded as a warranty of a certain functionality, condition, or quality of a product. NVIDIA Corporation (“NVIDIA”) makes no representations or warranties, expressed or implied, as to the accuracy or completeness of the information contained in this document and assumes no responsibility for any errors contained herein. NVIDIA shall have no liability for the consequences or use of such information or for any infringement of patents or other rights of third parties that may result from its use. This document is not a commitment to develop, release, or deliver any Material (defined below), code, or functionality.
NVIDIA reserves the right to make corrections, modifications, enhancements, improvements, and any other changes to this document, at any time without notice.
Customer should obtain the latest relevant information before placing orders and should verify that such information is current and complete.
NVIDIA products are sold subject to the NVIDIA standard terms and conditions of sale supplied at the time of order acknowledgement, unless otherwise agreed in an individual sales agreement signed by authorized representatives of NVIDIA and customer (“Terms of Sale”). NVIDIA hereby expressly objects to applying any customer general terms and conditions with regards to the purchase of the NVIDIA product referenced in this document. No contractual obligations are formed either directly or indirectly by this document.
NVIDIA products are not designed, authorized, or warranted to be suitable for use in medical, military, aircraft, space, or life support equipment, nor in applications where failure or malfunction of the NVIDIA product can reasonably be expected to result in personal injury, death, or property or environmental damage. NVIDIA accepts no liability for inclusion and/or use of NVIDIA products in such equipment or applications and therefore such inclusion and/or use is at customer’s own risk.
NVIDIA makes no representation or warranty that products based on this document will be suitable for any specified use. Testing of all parameters of each product is not necessarily performed by NVIDIA. It is customer’s sole responsibility to evaluate and determine the applicability of any information contained in this document, ensure the product is suitable and fit for the application planned by customer, and perform the necessary testing for the application in order to avoid a default of the application or the product. Weaknesses in customer’s product designs may affect the quality and reliability of the NVIDIA product and may result in additional or different conditions and/or requirements beyond those contained in this document. NVIDIA accepts no liability related to any default, damage, costs, or problem which may be based on or attributable to: (i) the use of the NVIDIA product in any manner that is contrary to this document or (ii) customer product designs.
No license, either expressed or implied, is granted under any NVIDIA patent right, copyright, or other NVIDIA intellectual property right under this document. Information published by NVIDIA regarding third-party products or services does not constitute a license from NVIDIA to use such products or services or a warranty or endorsement thereof. Use of such information may require a license from a third party under the patents or other intellectual property rights of the third party, or a license from NVIDIA under the patents or other intellectual property rights of NVIDIA.
Reproduction of information in this document is permissible only if approved in advance by NVIDIA in writing, reproduced without alteration and in full compliance with all applicable export laws and regulations, and accompanied by all associated conditions, limitations, and notices.
THIS DOCUMENT AND ALL NVIDIA DESIGN SPECIFICATIONS, REFERENCE BOARDS, FILES, DRAWINGS, DIAGNOSTICS, LISTS, AND OTHER DOCUMENTS (TOGETHER AND SEPARATELY, “MATERIALS”) ARE BEING PROVIDED “AS IS.” NVIDIA MAKES NO WARRANTIES, EXPRESSED, IMPLIED, STATUTORY, OR OTHERWISE WITH RESPECT TO THE MATERIALS, AND EXPRESSLY DISCLAIMS ALL IMPLIED WARRANTIES OF NONINFRINGEMENT, MERCHANTABILITY, AND FITNESS FOR A PARTICULAR PURPOSE. TO THE EXTENT NOT PROHIBITED BY LAW, IN NO EVENT WILL NVIDIA BE LIABLE FOR ANY DAMAGES, INCLUDING WITHOUT LIMITATION ANY DIRECT, INDIRECT, SPECIAL, INCIDENTAL, PUNITIVE, OR CONSEQUENTIAL DAMAGES, HOWEVER CAUSED AND REGARDLESS OF THE THEORY OF LIABILITY, ARISING OUT OF ANY USE OF THIS DOCUMENT, EVEN IF NVIDIA HAS BEEN ADVISED OF THE POSSIBILITY OF SUCH DAMAGES. Notwithstanding any damages that customer might incur for any reason whatsoever, NVIDIA’s aggregate and cumulative liability towards customer for the products described herein shall be limited in accordance with the Terms of Sale for the product.
VESA DisplayPort
DisplayPort and DisplayPort Compliance Logo, DisplayPort Compliance Logo for Dual-mode Sources, and DisplayPort Compliance Logo for Active Cables are trademarks owned by the Video Electronics Standards Association in the United States and other countries.
HDMI
HDMI, the HDMI logo, and High-Definition Multimedia Interface are trademarks or registered trademarks of HDMI Licensing LLC.
OpenCL
OpenCL is a trademark of Apple Inc. used under license to the Khronos Group Inc.
Trademarks
NVIDIA, the NVIDIA logo, NVIDIA Maxwell, NVIDIA Pascal, NVIDIA Turing, NVIDIA Volta, Quadro, and Tesla are trademarks or registered trademarks of NVIDIA Corporation in the U.S. and other countries. Other company and product names may be trademarks of the respective companies with which they are associated.
Copyright
© 2022 NVIDIA Corporation. All rights reserved.