Abstract
The Transfer Learning Toolkit for Intelligent Video Analytics Getting Started Guide provides instruction on using transfer learning for video and image analysis.
1. Overview
NVIDIA Transfer Learning Toolkit is a Python package that enables NVIDIA customers to fine-tune pre-trained models with their own data. Customers can then export these models for TensorRT based inference through an edge device.
- Classification
- Object Detection
- DetectNet_v2
- SSD
- FasterRCNN
- Download the model - Download pre-trained models.
- Evaluate the model - Evaluate models for target predictions.
- Train the model - Train or re-train data to create and refine models.
- Prune the model - Prune models to reduce size.
- Export the model - Export models for TensorRT inference.
2. Transfer Learning Toolkit Requirements
Using the Transfer Learning Toolkit requires the following:
Hardware Requirements
Minimum
- 4 GB system RAM
- 4 GB of GPU RAM
- Single core CPU
- 1 GPU
- 50 GB of HDD space
Recommended
- 32 GB system RAM
- 32 GB of GPU RAM
- 8 core CPU
- 4 GPUs
- 100 GB of SSD space
Software Requirements
- Ubuntu 18.04 LTS
- NVIDIA GPU Cloud account and API key - https://ngc.nvidia.com/
- docker-ce installed, https://docs.docker.com/install/linux/docker-ce/ubuntu/
- nvidia-docker2 installed, instructions: https://github.com/nvidia/nvidia-docker/wiki/Installation-(version-2.0)
- NVIDIA GPU driver v410.xx or above
Model Requirements
Classification
- Input size: 3 * H * W (W, H >= 16)
- Input format: JPG, JPEG, PNG
DetectNet_v2
- Input size: C * W * H (where C = 1 or 3, W > =480, H >=272 and W, H are multiples of 16)
- Image format: JPG, JPEG, PNG
- Label format: KITTI detection
SSD
- input size: C * W * H (where C = 1 or 3, W >= 128, H >= 128)
- image format: JPG, JPEG, PNG
- label format: KITTI detection
FasterRCNN
- input size: C * W * H (where C = 1 or 3; W > =480; H >=272 and W, H are multiples of 32)
- image format: JPG(.jpg), JPEG(.jpeg), PNG(.png). The images can be either RGB or gray-scale. Image extensions should be in lower case.
- label format: KITTI detection
Installation Prerequisites
- Install Docker. See: https://www.docker.com/.
- NVIDIA GPU driver v410.xx or above. Download from https://www.nvidia.com/Download/index.aspx?lang=en-us.
- Install NVIDIA Docker 2 from: https://github.com/NVIDIA/nvidia-docker.
Get an NGC API key
- NVIDIA GPU Cloud account and API key - https://ngc.nvidia.com/
- Go to NGC and click the Transfer Learning Toolkit container in the Catalog tab. This message is displayed, Sign in to access the PULL feature of this repository.
- Enter your email address and click Next or click Create an Account.
- Choose your organization when prompted for Organization/Team.
- Click Sign In.
- Select the Containers tab on the left navigation pane and click the Transfer Learning Toolkit tile.
Download the docker container
3. Installation
The Transfer Learning Toolkit (TLT) is available to download from the NGC. You must have an NGC account and an API key associated with your account. See the Installation Prerequisites section in Chapter 2 for details on creating an NGC account and obtaining an API key.
Running the Transfer Learning Toolkit
Use this procedure to run the Transfer Learning Toolkit.
- Run the toolkit: Run the toolkit using this command. The docker starts in the
/workplace folder by
default.
docker run --runtime=nvidia -it nvcr.io/nvidia/tlt-streamanalytics:<version> /bin/bash
- Access local directories: To access local directories from inside the docker
you need to mount them in the docker. Use this option, -v
<source_dir>:<mount_dir>, to mount local directories in the docker. For
example the command to run the toolkit mounting the
/home/<username>/tlt-experiments directory in your disk to the
/workspace/tlt-experiments in docker would be:
docker run --runtime=nvidia -it -v /home/<username>/tlt-experiments:/workspace/tlt-experiments nvcr.io/nvidia/tlt-streamanalytics:<version> /bin/bash
It is useful to mount separate volumes for the dataset and the experiment results so that they persist outside of the docker. In this way the data is preserved after the docker is closed. Any data that is generated to, or referred from a directory inside the docker, will be lost if it is not either copied out of the docker, or written to or read from volumes outside of the docker. - Use the examples: Examples using ResNet18 backbone for detecting objects with
either DetectNet_v2, SSD, or FasterRCNN architectures are available as Jupyter
Notebooks. To run the examples that are available, enable the jupyter
notebook included in the docker to run in your
browser:
docker run --runtime=nvidia -it -v /home/<username>/tlt-experiments:/workspace/tlt-experiments -p 8888:8888 tlt-streamanalytics:<version>
Go to the examples folder: cd examples/
Execute this command from inside the docker to start the jupyter notebook:
jupyter notebook --ip 0.0.0.0 --allow-root
Copy and paste the link produced from this command into your browser to access the notebook. The /workspace/examples folder will contain a demo notebook.
Downloading the models
The Transfer Learning Toolkit docker gives you access to a repository of pretrained models that can serve as a starting point when training deep neural networks. These models are hosted on the Nvidia GPU Cloud (NGC). The TLT docker interfaces with NGC via the NGC Catalog CLI. More information about the NGC Catalog CLI is available here. https://docs.nvidia.com/ngc/ngc-catalog-cli-user-guide/index.html". Please follow the instructions given here to configure the NGC CLI and download the models.
Configure the NGC API key
Using the NGC API Key obtained in Transfer Learning Toolkit Requirements, configure the enclosed ngc cli by executing this command and following the prompts:
ngc config set
Getting a list of models
Use this command to get a list of models that are hosted in the NGC model registry:
ngc registry model list <model_glob_string>
Here is an example of using this command:
ngc registry model list nvidia/iva/tlt_*_classification
Downloading a model
Use this command to download the model you have chosen from the NGC model registry:
ngc registry model download-version <ORG/model_name:version> -d <path_to_download_dir>
For example, use this command to download the resnet 18 classification model to the $USER_EXPERIMENT_DIR directory.
ngc registry model download-version nvidia/iva/tlt_resnet18_classification:1 -d $USER_EXPERIMENT_DIR/pretrained_resnet18

Downloaded 82.41 MB in 9s, Download speed: 9.14 MB/s
----------------------------------------------------
Transfer id: tlt_iva_classification_resnet18_v1 Download status: Completed.
Downloaded local path: /workspace/tlt-experiments/pretrained_resnet18/
tlt_resnet18_classification_v1
Total files downloaded: 2
Total downloaded size: 82.41 MB
Started at: 2019-07-16 01:29:53.028400
Completed at: 2019-07-16 01:30:02.053016
Duration taken: 9s seconds
4. Preparing input data structure
The chapter provides instructions on preparing your data for use by the Transfer Learning Toolkit (TLT).
Data input for classification
Classification expects a directory of images with the following structure, where each class has its own directory with the class name. The naming convention for train/val/test can be different, because the path of each set is individually specified in the spec file. See Specification file for classification for more information.
|--dataset_root:
    |--train
        |--audi:
            |--1.jpg
            |--2.jpg
        |--bmw:
            |--01.jpg
            |--02.jpg
    |--val
        |--audi:
            |--3.jpg
            |--4.jpg
        |--bmw:
            |--03.jpg
            |--04.jpg
    |--test
        |--audi:
            |--5.jpg
            |--6.jpg
        |--bmw:
            |--05.jpg
            |--06.jpg
Data input for object detection
The object detection apps in TLT expect data in KITTI file format. For DetectNet_v2 and SSD, this data is converted to TFRecords for training. TFRecords help iterate faster through the data. The steps to convert the data for TFRecords are covered in Conversion to TFRecords. For FasterRCNN, the KITTI format data may be ingested directly, and more on this is covered in Specification file for FasterRCNN.
KITTI file format
.
|--dataset root
  |-- images
      |-- 000000.jpg
      |-- 000001.jpg
            .
            .
      |-- xxxxxx.jpg
  |-- labels
      |-- 000000.txt
      |-- 000001.txt
            .
            .
      |-- xxxxxx.txt
  |-- kitti_seq_to_map.json
- The images directory contains the images to train on.
- The labels directory contains the labels to the corresponding images.
Details of this file are included in the Label files section.
Note: The images and labels have the same file id's before the extension. The image to label correspondence is maintained using this file name.
- kitti_seq_to_map.json: This file contains a sequence to frame id mapping for the frames in the images directory. This is an optional file, and is useful if the data needs to be split into N folds sequence wise. In case the data is to be split into a random 80:20 train:val split, then this file may be ignored.
Label files
A KITTI format label file is a simple text file containing one line per object. Each line has multiple fields. Here is a description of these fields:
| Num elements | Parameter name | Description | Type | Range | Example |
|---|---|---|---|---|---|
| 1 | Class names | The class to which the object belongs. | String | N/A | Person, car, Road_Sign |
| 1 | Truncation | How much of the object has left image boundaries. | Float | 0.0, 0.1 | 0.0 |
| 1 | Occlusion | Occlusion state [ 0 = fully visible, 1 = partly visible, 2 = largely occluded, 3 = unknown]. | Integer | [0,3] | 2 |
| 1 | Alpha | Observation Angle of object | Float | [-pi, pi] | 0.146 |
| 4 | Bounding box coordinates: [xmin, ymin, xmax, ymax] | Location of the object in the image | Float(0 based index) | [0 to image width],[0 to image_height], [top_left, image_width], [bottom_right, image_height] |
100 120 180 160 |
| 3 | 3-D dimension | Height, width, length of the object (in meters) | Float | N/A | 1.65, 1.67, 3.64 |
| 3 | Location | 3-D object location x, y, z in camera coordinates (in meters) | Float | N/A | -0.65,1.71, 46.7 |
| 1 | Rotation_y | Rotation ry around the Y-axis in camera coordinates | Float | [-pi, pi] | -1.59 |
car 0.00 0 -1.58 587.01 173.33 614.12 200.12 1.65 1.67 3.64 -0.65 1.71 46.70 -1.59
cyclist 0.00 0 -2.46 665.45 160.00 717.93 217.99 1.72 0.47 1.65 2.45 1.35 22.10 -2.35
pedestrian 0.00 2 0.21 423.17 173.67 433.17 224.03 1.60 0.38 0.30 -5.87 1.63 23.11 -0.03
This indicates that in the image there are 3 objects with parameters mentioned as above. Currently, for detection the toolkit only requires the class name and bbox coordinates fields to be populated. This is because the TLT training pipe supports training only for class and bbox coordinates. The remaining fields maybe set to 0. Here is a sample file for a custom annotated dataset:
car 0.00 0 0.00 587.01 173.33 614.12 200.12 0.00 0.00 0.00 0.00 0.00 0.00 0.00
cyclist 0.00 0 0.00 665.45 160.00 717.93 217.99 0.00 0.00 0.00 0.00 0.00 0.00 0.00
pedestrian 0.00 0 0.00 423.17 173.67 433.17 224.03 0.00 0.00 0.00 0.00 0.00 0.00 0.00
car 0.00 0 0.00 587.01 173.33 614.12 200.12 0.00 0.00 0.00 0.00 0.00 0.00 0.00
cyclist 0.00 0 0.00 665.45 160.00 717.93 217.99 0.00 0.00 0.00 0.00 0.00 0.00 0.00
pedestrian 0.00 0 0.00 423.17 173.67 433.17 224.03 0.00 0.00 0.00 0.00 0.00 0.00 0.00
Sequence mapping file
This is an optional json file that captures the mapping between the frames in images directory and the names of video sequences from which these frames were extracted. This information is needed while doing an N-fold split of the dataset. This way frames from one sequence doesn't repeat in other folds and one of the folds for could be used for validation. Here's an example of the json dictionary file.
{
  "video_sequence_name": [list of strings(frame idx)]
}
Here's an example of a kitti_seq_to_frames.json file with a sample dataset with six sequences.
{
  "2011_09_28_drive_0165_sync": ["003193", "003185", "002857", "001864", "003838",
  "007320", "003476", "007308", "000337", "004165", "006573"],
  "2011_09_28_drive_0191_sync": ["005724", "002529", "004136", "005746"],
  "2011_09_28_drive_0179_sync": ["005107", "002485", "006089", "000695"],
  "2011_09_26_drive_0079_sync": ["005421", "000673", "002064", "000783", "003068"],
  "2011_09_28_drive_0035_sync": ["005540", "002424", "004949", "004996", "003969"],
  "2011_09_28_drive_0117_sync": ["007150", "003797", "002554", "001509"]
}
Conversion to TFRecords
The SSD and DetectNet_v2 apps, as mentioned in Data input for object detection, require KITTI format data to be converted to TFRecords. To do so, the Transfer Learning Toolkit includes the tlt-dataset-convert tool. This tool requires a configuration file as input. Configuration file details and sample usage examples are included in the following sections.
Configuration file for dataset converter
The dataio conversion tool takes a spec file as input to define the parameters required to convert a KITTI format data to the TFRecords that the DetectNet_v2 tool ingests. This is a prototxt format file with two global parameters:
- kitti_config field: This is a nested prototxt configuration with multiple input parameters.
- image_directory_path: Path to the dataset root. This image_dir_name is appended to this path to get the input images, and must be the same path as mentioned in the experiment spec file
Here are descriptions of the configurable parameters for the kitti_config field:
A sample configuration file to convert the pascal voc dataset with 80% training data and 20 % validation data is mentioned below. This assumes that the data has been converted to KITTI format and is available for ingestion in the root directory path.
kitti_config {
  root_directory_path: "/workspace/tlt-experiments/data/VOCtrainval_11-May-2012/VOCdevkit/VOC2012"
  image_dir_name: "JPEGImages_kitti/test"
  label_dir_name: "Annotations_kitti/test"
  image_extension: ".jpg"
  partition_mode: "random"
  num_partitions: 2
  val_split: 20
  num_shards: 10
}
image_directory_path: "/workspace/tlt-experiments/data/VOCtrainval_11-May-2012/VOCdevkit/VOC2012"
Sample usage of the dataset converter tool
KITTI is the accepted dataset format for image detection. The KITTI dataset must be converted to the TFRecord file format before passing to detection training. Use this command to do the conversion:
tlt-dataset-convert [-h] -d DATASET_EXPORT_SPEC -o OUTPUT_FILENAME
                         [-f VALIDATION_FOLD]
You can use these optional arguments:
- -h, --help: Show this help message and exit
- -d, --dataset-export-spec: Path to the detection dataset spec containing config for exporting .tfrecords.
- -o output_filename: Output file name.
- -f, –validation-fold: Indicate the validation fold in 0-based indexing. This is required when modifying the training set but otherwise optional.
Here's an example of using the command with the dataset:
tlt-dataset-convert -d <path_to_tfrecords_conversion_spec> -o <path_to_output_tfrecords>
Output log from executing tlt-dataset-convert:
Using TensorFlow backend.
2019-07-16 01:30:59,073 - iva.detectnet_v2.dataio.build_converter - INFO - Instantiating a kitti converter
2019-07-16 01:30:59,243 - iva.detectnet_v2.dataio.kitti_converter_lib - INFO - Num images in
Train: 10786    Val: 2696
2019-07-16 01:30:59,243 - iva.detectnet_v2.dataio.kitti_converter_lib - INFO - Validation data in partition 0. Hence, while choosing the validationset during training choose validation_fold 0.
2019-07-16 01:30:59,251 - iva.detectnet_v2.dataio.dataset_converter_lib - INFO - Writing partition 0, shard 0
/usr/local/lib/python2.7/dist-packages/iva/detectnet_v2/dataio/kitti_converter_lib.py:265: VisibleDeprecationWarning: Reading unicode strings without specifying the encoding argument is deprecated. Set the encoding, use None for the system default.
2019-07-16 01:31:01,226 - iva.detectnet_v2.dataio.dataset_converter_lib - INFO - Writing partition 0, shard 1
. .
sheep: 242
bottle: 205
..
boat: 171
car: 418
2019-07-16 01:31:20,772 - iva.detectnet_v2.dataio.dataset_converter_lib - INFO - Writing partition 1, shard 0
..
2019-07-16 01:32:40,338 - iva.detectnet_v2.dataio.dataset_converter_lib - INFO - Writing partition 1, shard 9
2019-07-16 01:32:49,063 - iva.detectnet_v2.dataio.dataset_converter_lib - INFO -
Wrote the following numbers of objects:
sheep: 695
..
car: 1770

2019-07-16 01:32:49,064 - iva.detectnet_v2.dataio.dataset_converter_lib - INFO - Cumulative object statistics
2019-07-16 01:32:49,064 - iva.detectnet_v2.dataio.dataset_converter_lib - INFO -
Wrote the following numbers of objects:
sheep: 937
..
car: 2188
2019-07-16 01:32:49,064 - iva.detectnet_v2.dataio.dataset_converter_lib - INFO - Class map.
Label in GT: Label in tfrecords file
sheep: sheep
..

boat: boat
For the dataset_config in the experiment_spec, please use labels in the tfrecords file, while writing the classmap.


2019-07-16 01:32:49,064 - iva.detectnet_v2.dataio.dataset_converter_lib - INFO - Tfrecords generation complete.
5. Creating an experiment spec file
This chapter describes how to create a specification file for model training, inference and evaluation.
Specification file for classification
Here is an example of a specification file for model classification.
model_config {

  # Model architecture can be chosen from:
  # ['resnet', 'vgg', 'googlenet', 'alexnet', 'mobilenet_v1', 'mobilenet_v2', 'squeezenet']

  arch: "resnet"

  # for resnet --> n_layers can be [10, 18, 50]
  # for vgg --> n_layers can be [16, 19]

  n_layers: 18
  use_bias: True
  use_batch_norm: True
  all_projections: True
  use_pooling: False
  freeze_bn: False
  freeze_blocks: 0
  freeze_blocks: 1

  # image size should be "3, X, Y", where X,Y >= 16
  input_image_size: "3,224,224"
}

eval_config {
  eval_dataset_path: "/path/to/your/eval/data"
  model_path: "/path/to/your/model"
  top_k: 3
  conf_threshold: 0.5
  batch_size: 256
  n_workers: 8

}

train_config {
  train_dataset_path: "/path/to/your/train/data"
  val_dataset_path: "/path/to/your/val/data"
  pretrained_model_path: "/path/to/your/pretrained/model"
  # optimizer can be chosen from ['adam', 'sgd']

  optimizer: "sgd"
  batch_size_per_gpu: 256
  n_epochs: 80
  n_workers: 16

  # regularizer
  reg_config {
    type: "L2"
    scope: "Conv2D,Dense"
    weight_decay: 0.00005

  }

  # learning_rate

  lr_config {

    # "step" and "soft_anneal" are supported.

    scheduler: "soft_anneal"

    # "soft_anneal" stands for soft annealing learning rate scheduler.
    # the following 4 parameters should be specified if "soft_anneal" is used.
    learning_rate: 0.005
    soft_start: 0.056
    annealing_points: "0.3, 0.6, 0.8"
    annealing_divider: 10
    # "step" stands for step learning rate scheduler.
    # the following 3 parameters should be specified if "step" is used.
    # learning_rate: 0.006
    # step_size: 10
    # gamma: 0.1
  }
}
Specification file for DetectNet_v2
To do training, evaluation and inference for DetectNet_v2, several components need to be configured, each with their own parameters. The tlt-train and tlt-evaluate commands for a DetectNet_v2 experiment share the same configuration file. The tlt-infer command uses a separate configuration file.
- Model
- BBox ground truth truth generation
- Post processing module
- Cost function configuration
- Trainer
- Augmentation model
- Evaluator
- Dataloader
Model config
Core object detection can be configured using the model_config option in the spec file. Heare are the parameters:
Here's a sample model config to instantiate a resnet18 model with pretrained weights and freeze blocks 0 and 1, with all shortcuts being set to projection layers.
# Sample model config for to instantiate a resnet18 model with pretrained weights and freeze blocks 0, 1
# with all shortcuts having projection layers.
model_config {
  arch: "resnet"
  pretrained_model_file: <path_to_model_file>
  freeze_blocks: 0
  freeze_blocks: 1
  all_projections: True
  num_layers: 18
  use_pooling: False
  use_batch_norm: True
  dropout_rate: 0.0
  training_precision: {
    backend_floatx: FLOAT32
  }
  objective_set: {
    cov {}
    bbox {
      scale: 35.0
      offset: 0.5
    }
  }
}
BBox ground truth generator
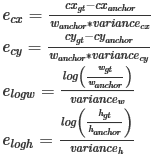
DetectNet_v2 generates 2 tensors, cov and bbox. The image is divided into a 16x16 grid cells. The cov tensor(short for coverage tensor) defines the number of gridcells that are covered by an object. The bbox tensor defines the normalized image coordinates of the object (x1, y1) top_left and (x2, y2) bottom right with respect to the grid cell. For best results, we assume the coverage area to be an ellipse within the bbox label, with the maximum confidence being assigned to the cells in the centre and reducing coverage outwards. Each class has its own coverage and bbox tensor, thus the shape of the tensors are:
- cov: Batch_size, Num_classes, image_height/16, image_width/16
- bbox: Batch_size, Num_classes * 4, image_height/16, image_width/16 (where 4 is the number of coordinates per cell)
The bbox_rasterizer has the following parameters that are configurable.
Here is a sample rasterizer config for a 3 class detector:
# Sample rasterizer configs to instantiate a 3 class bbox rasterizer
bbox_rasterizer_config {
  target_class_config {
    key: "car"
    value: {
      cov_center_x: 0.5
      cov_center_y: 0.5
      cov_radius_x: 0.4
      cov_radius_y: 0.4
      bbox_min_radius: 1.0
    }
  }
  target_class_config {
    key: "cyclist"
    value: {
      cov_center_x: 0.5
      cov_center_y: 0.5
      cov_radius_x: 0.4
      cov_radius_y: 0.4
      bbox_min_radius: 1.0
    }
  }
  target_class_config {
    key: "pedestrian"
    value: {
      cov_center_x: 0.5
      cov_center_y: 0.5
      cov_radius_x: 0.4
      cov_radius_y: 0.4
      bbox_min_radius: 1.0
    }
  }
  deadzone_radius: 0.67
}
Post processor
The post processor module generates renderable bboxes from the raw detection output. The process includes:
- Filtering out valid detections by thresholding objects using the confidence value in the coverage tensor
- value: containing a clustering_config parameters defining parameters for the DBSCAN clustering algorithm. The DBSCAN algorithm helps cluster the valid predictions to a box per object.
This section defines parameters that configure the post processor. For each class we train for, the postprocessing_config has a target_class_config element, which defines the clustering parameters for this class. The parameters for each target class include:
| Parameter | Datatype | Default | Description | Supported Values |
|---|---|---|---|---|
| key | string | - | The names of the class for which the post processor module is being configured. | |
| value | clustering _config proto | - | The nested clustering config proto parameter that configures the postprocessor module. The parameters for this module are defined in the next table. |
The clustering_config element configures the clustering block for this class. Here are the parameters for this element.
| Parameter | Datatype | Default | Description | Supported Values |
|---|---|---|---|---|
|
coverate _threshold |
float | - | The minimum threshold of the coverage tensor output to be considered as a valid candidate box for clustering. The 4 coordinates from the bbox tensor at the corresponding indices are passed for clustering. | |
| dbscan_epc | float | - | The maximum distance between two samples for one to be considered as in the neighborhood of the other. This is not a maximum bound on the distances of points within a cluster. The greater the eps, more boxes are grouped together. | |
|
dbscan _min_samples |
float | - | The total weight in a neighborhood for a point to be considered as a core point. This includes the point itself. | |
|
minimum _bounding _box_height |
int | - | Minimum height in pixels to consider as a valid detection post clustering. |
Here is an example of the definition of the postprocessor for a 3 class network learning for car, cyclist, and pedestrian:
postprocessing_config {
  target_class_config {
    key: "car"
    value: {
      clustering_config {
        coverage_threshold: 0.005
        dbscan_eps: 0.15
        dbscan_min_samples: 0.05
        minimum_bounding_box_height: 20
      }
    }
  }
  target_class_config {
    key: "cyclist"
    value: {
      clustering_config {
        coverage_threshold: 0.005
        dbscan_eps: 0.15
        dbscan_min_samples: 0.05
        minimum_bounding_box_height: 20
      }
    }
  }
  target_class_config {
    key: "pedestrian"
    value: {
      clustering_config {
        coverage_threshold: 0.005
        dbscan_eps: 0.15
        dbscan_min_samples: 0.05
        minimum_bounding_box_height: 20
      }
    }
  }
}
Cost function
This section helps you configure the cost function to include the classes that you are training for. For each class you want to train, add a new entry of the target classes to the spec file. NVIDIA recommends not changing the parameters within the spec file for best performance with these classes. The other parameters remain unchanged here.
cost_function_config {
  target_classes {
    name: "car"
    class_weight: 1.0
    coverage_foreground_weight: 0.05
    objectives {
      name: "cov"
      initial_weight: 1.0
      weight_target: 1.0
    }
    objectives {
      name: "bbox"
      initial_weight: 10.0
      weight_target: 10.0
    }
  }
  target_classes {
    name: "cyclist"
    class_weight: 1.0
    coverage_foreground_weight: 0.05
    objectives {
      name: "cov"
      initial_weight: 1.0
      weight_target: 1.0
    }
    objectives {
      name: "bbox"
      initial_weight: 10.0
      weight_target: 1.0
    }
  }
  target_classes {
    name: "pedestrian"
    class_weight: 1.0
    coverage_foreground_weight: 0.05
    objectives {
      name: "cov"
      initial_weight: 1.0
      weight_target: 1.0
    }
    objectives {
      name: "bbox"
      initial_weight: 10.0
      weight_target: 10.0
    }
  }
  enable_autoweighting: True
  max_objective_weight: 0.9999
  min_objective_weight: 0.0001
}
Trainer
Here are the parameters used to configure the trainer:
Here's a sample training_config block to configure a detectnet_v2 trainer:
training_config {
  batch_size_per_gpu: 16
  num_epochs: 80
  learning_rate {
    soft_start_annealing_schedule {
      min_learning_rate: 5e-6
      max_learning_rate: 5e-4
      soft_start: 0.1
      annealing: 0.7
    }
  }
  regularizer {
    type: L1
    weight: 3e-9
  }
  optimizer {
    adam {
      epsilon: 1e-08
      beta1: 0.9
      beta2: 0.999
    }
  }
  cost_scaling {
    enabled: False
    initial_exponent: 20.0
    increment: 0.005
    decrement: 1.0
  }
}
Augmentation module
The augmentation module provides some basic pre-processing and augmentation when training. The augmentation_config contains three elements :
- preprocessing: This nested field configures the input image and
ground truth label pre-processing module. It sets the shape of the input tensor to
the network. The ground truth labels are pre-processed to meet the dimensions of the
input image tensors. If the output image height and output image width of the
pre-processing block don't match with the dimensions of the input images in the
tfrecords, you either pad with zeros, or take random crops to fit the input
dimensions. If the images are cropped, then the labels are altered accordingly to
consider only objects in the crop. Currently, the entire input image and labels are
not resized to fit the input resolution. The parameters that configure the
preprocessing block include:
Parameter Datatype Default/Suggested value Description Supported Values output
_image
_width
int -- The width of the augmen-
tation
output. This is the same as the width of the network input and must be a multiple of 16.>480 output
_image
_height
int -- The height of the augmen-
tation
output. This is the same as the height of the network input and must be a multiple of 16.>272 output
_image
_channel
int 1, 3 The channel depth of the augmen-
tation
output. This is the same as the channel depth of the network input.1,3 min_bbox _height
float The minimum height of the object labels to be considered for training. min_bbox
_width
float The minimum width of the object labels to be considered for training - spatial_augmentation: This module supports basic spatial
augmentation such as flip, zoom and translate which may be configured.
Parameter Datatype Default/Suggested value Description Supported Values hflip
_probability
float 0.5 The probability to flip an input image horizontally. 0.0-1.0 vflip
_probability
float 0.0 The probability to flip an input image vertically. 0.0-1.0 zoom_min float 1.0 The minimum zoom scale of the input image. zoom_max float 1.0 The maximum zoom scale of the input image. translate _max_x
float 8.0 The maximum translation to be added across the x axis translate _max_y
float 8.0 The maximum translation to be added across the y axis - color_augmentation: This module configures the color space
transformations, such as color shift, hue_rotation, saturation shift, and contrast
adjustment.
Parameter Datatype Default/Suggested value Description Supported Values color_shift
_stddev
float 0.0 The standard devidation value for the color shift. 0.0-1.0 hue
_rotation
_max
float 25.0 The maximum rotation angle for the hue rotation matrix. 0.0-1.0 saturation
_shift_max
float 0.2 The maximum shift that changes the saturation. contrast
_scale_max
float 0.1 The slope of the contrast as rotated around the provided center. contrast
_center
float 0.5 The center around which the contrast is rotated. Ideally this is set to half of the maximum pixel value. (Since our input images are scaled between 0 and 1.0, we set this value to 0.5).
Here is a sample augmentation config element:
# Sample augementation config for
augmentation_config {
  preprocessing {
    output_image_width: 960
    output_image_height: 544
    output_image_channel: 3
    min_bbox_width: 1.0
    min_bbox_height: 1.0
  }
  spatial_augmentation {

    hflip_probability: 0.5
    vflip_probability: 0.0
    zoom_min: 1.0
    zoom_max: 1.0
    translate_max_x: 8.0
    translate_max_y: 8.0
  }
  color_augmentation {
    color_shift_stddev: 0.0
    hue_rotation_max: 25.0
    saturation_shift_max: 0.2
    contrast_scale_max: 0.1
    contrast_center: 0.5
  }
}
Configuring the evaluator
The evaluation_box_config field has these configurable inputs.
| Parameter | Datatype | Default/Suggested value | Description | Supported Value |
|---|---|---|---|---|
|
minimum _height |
float | 10 | Minimum height in pixels for a valid ground truth and prediction bbox. | |
|
minimum _width |
float | 10 | Minimum width in pixels for a valid ground truth and prediction bbox. | |
|
maximum _height |
float | 9999 | Maximum height in pixels for a valid ground truth and prediction bbox. | |
|
maximum _width |
float | 9999 | Maximum width in pixels for a valid ground truth and prediction bbox. |
# Sample evaluation config to run evaluation in integrate mode for the given 3 class model,
# at every 10th epoch starting from the epoch 1.
evaluation_config {
  average_precision_mode: INTEGRATE
  validation_period_during_training: 10
  first_validation_epoch: 1
  minimum_detection_ground_truth_overlap {
    key: "car"
    value: 0.7
  }
  minimum_detection_ground_truth_overlap {
    key: "person"
    value: 0.5
  }
  minimum_detection_ground_truth_overlap {
    key: "bicycle"
    value: 0.5
  }
  evaluation_box_config {
    key: "car"
    value {
      minimum_height: 4
      maximum_height: 9999
      minimum_width: 4
      maximum_width: 9999
    }
  }
  evaluation_box_config {
    key: "person"
    value {
      minimum_height: 4
      maximum_height: 9999
      minimum_width: 4
      maximum_width: 9999
    }
  }
  evaluation_box_config {
    key: "bicycle"
    value {
      minimum_height: 4
      maximum_height: 9999
      minimum_width: 4
      maximum_width: 9999
    }
  }
}
Dataloader
This section defines the parameters to configure the dataloader. Here, you define the path to the data you want to train on and the class mapping for classes in the dataset that the network is to be trained for. The parameters in the dataset config are:
- data_sources: Captures the path to the tfrecords to train on. This field
contains 2 parameters:
- tfrecords_path: Path to the individual tfrecords files. This path follows UNIX style pathname pattern extension, so we can provide a common pathname pattern that captures all the tfrecords files in that directory.
- image_directory_path: Path to the training data root from which the tfrecords was generated.
- image_extension: Extension of the images to be used.
- target_class_mapping: This parameter maps the class names in the tfrecords to the target class to be trained in the network. We instantiate n such elements for each source to target class mapping.
- validation_fold: In case of an n fold tfrecords, you define the index of the fold to use for validation. For sequence wise validation choose the validation fold in the range [0, N-1]. However, for a random split tfrecords, force the validation fold index to 0 as the tfrecord is just 2-fold.
dataset_config {
  data_sources: {
    tfrecords_path: "<path to the training tfrecords root/tfrecords train pattern>"
    image_directory_path: "<path to the training data source>"
  }
  image_extension: "jpg"
  target_class_mapping {
      key: "car"
      value: "car"
  }
  target_class_mapping {
      key: "automobile"
      value: "car"
  }
  target_class_mapping {
      key: "heavy_truck"
      value: "car"
  }
  target_class_mapping {
      key: "person"
      value: "pedestrian"
  }
  target_class_mapping {
      key: "rider"
      value: "cyclist"
  }
  validation_fold: 0
}
In this example the tfrecords is assumed to be multi-fold, and the fold number to validate on is defined. If you want to validate on a different tfrecords than those defined in the training set then, use the validation_data_source field to define this. In this case, remove the validation_fold field from the spec.
validation_data_source: {
    tfrecords_path: " <path to tfrecords to validate on>/tfrecords validation pattern>"
    image_directory_path: " <path to validation data source>"
}
Specification file for inference
This spec file for inference is used to set up the post processing block. Here are the parameters:
- dbscan_criterion: The criterion to cluster the bboxes. For this release, we only support "IOU" (Intersection over Union).
- dbscan_eps: The minimum distance between to bboxes to be considered in the same cluster.
- dbscan_min_samples: The minimum number of samples in a cluster.
- min_cov_to_cluster: This is the equivalent to the converage threshold described in the Post processor section. It acts as a first level filter to send valid bboxes to the clustering algorithm.
- min_obj_height: The minimum height in pixels to filter out noisy bboxes.
- target_classes: The list of classes the networks has been trained for. The order of the list must be the same as that during training.
- confidence_th: The confidence threshold to cluster out bboxes after
clustering.
- Typically 0.1 in mean_cov mode and 0.9 in aggregate_cov mode.
- confidence_model_kind: This parameter defines the way in which the bbox
confidence is computed. We support two modes.
- aggregate_cov: This is the total sum of the coverage confidences of the candidate boxes that were assigned to the cluster after dbscan.
-
mean_cov: This is the mean of the coverage confidences of the candidate boxes that were assigned to the cluster after dbscan.
Note: We suggest aggregate_cov mode to visualize better boxes.
- output_map: The class mapping from the target classes in the network to the labels that maybe output to the kitti labels file.
- color: The color of the bboxes for each class. This is important when visualizing the boxes.
- postproc_classes: This parameter is used incase you would like to filter out and visualize only a subset of classes.
- image_height: The height of the image at inference.
- image_width: The width of the image at inference.
- stride: This defines the ratio of the input_height to output_height of the feature map or input_width to the output width of the feature map. Only a stride of 16 for DetectNet_v2 models are currently supported. Therefore, the stride is 16 for all inferences.
Here's a usage example:
{
    "dbscan_criterion": "IOU",
    "dbscan_eps": {
        "bicycle": 0.4,
        "car": 0.25,
        "default": 0.15,
        "person": 0.4
    },
    "dbscan_min_samples": {
        "bicycle": 0.05,
        "car": 0.05,
        "default": 0.0,
        "person": 0.05
    },
    "min_cov_to_cluster": {
        "bicycle": 0.075,
        "car": 0.075,
        "default": 0.005,
        "person": 0.005
    },
    "min_obj_height": {
        "bicycle": 4,
        "car": 4,
        "person": 4,
        "default": 2
    },
    "target_classes": ["car", "bicycle", "person"],
    "confidence_th": {
        "car": 0.3,
        "bicycle": 0.3,
        "person": 0.2
    },
    "confidence_model": {
        "car": { "kind": "aggregate_cov"},
        "bicycle": { "kind": "aggregate_cov"},
        "person": { "kind": "aggregate_cov"},
        "default": { "kind": "aggregate_cov"}
    },
    "output_map": {
        "person" : "person",
        "car" : "car",
        "bicycle" : "bicycle"
    },
    "color": {
        "car": "green",
        "person": "magenta",
        "bicycle": "cyan"
    },
    "postproc_classes": ["car", "bicycle", "person"],
    "image_height": 384,
    "image_width": 1248,
    "stride": 16
}
Specification file for FasterRCNN
Here's a sample of the FasterRCNN spec file:
random_seed: 42
enc_key: "<your_enc_key>"
verbose: True
network_config {
input_image_config {
image_type: RGB
image_channel_order: 'bgr'
    size_min {
min:600
}
    image_channel_mean {
        key: 'b'
        value: 103.939
}
    image_channel_mean {
        key: 'g'
        value: 116.779
}
    image_channel_mean {
        key: 'r'
        value: 123.68
}
    image_scaling_factor: 1.0
}
feature_extractor: "vgg"
anchor_box_config {
scale: 128.0
scale: 256.0
scale: 512.0
ratio: 1.0
ratio: 0.5
ratio: 2.0
}
freeze_bn: True
freeze_blocks: 1
freeze_blocks: 2
roi_mini_batch: 256
rpn_stride: 16
conv_bn_share_bias: True
roi_pooling_config {
pool_size: 7
pool_size_2x: True
}
}
training_config {
kitti_data_config {
images_dir: '/workspace/tlt-experiments/data/voc0712trainval/images'
labels_dir: '/workspace/tlt-experiments/data/voc0712trainval/labels_kitti'
}
training_data_parser: 'raw_kitti'
data_augmentation {
use_augmentation: True
spatial_augmentation {
hflip_probability: 0.5
vflip_probability: 0.0
zoom_min: 1.0
zoom_max: 1.0
translate_max_x: 0
translate_max_y: 0
}
color_augmentation {
color_shift_stddev: 0.0
hue_rotation_max: 0.0
saturation_shift_max: 0.0
contrast_scale_max: 0.0
contrast_center: 0.5
}
}
num_epochs: 12
class_mapping {
key: 'horse'
value: 0
}
class_mapping {
key: "pottedplant"
value: 1
}
class_mapping {
key: "train"
value: 2
}
class_mapping {
key: "person"
value: 3
}
class_mapping {
key: "bird"
value: 4
}
class_mapping {
key: "car"
value: 5
}
class_mapping {
key: "chair"
value: 6
}
class_mapping {
key: "tvmonitor"
value: 7
}
class_mapping {
key: "bus"
value: 8
}
class_mapping {
key: "sofa"
value: 9
}
class_mapping {
key: "dog"
value: 10
}
class_mapping {
key: "motorbike"
value: 11
}
class_mapping {
key: "bicycle"
value: 12
}
class_mapping {
key: "sheep"
value: 13
}
class_mapping {
key: "boat"
value: 14
}
class_mapping {
key: "cat"
value: 15
}
class_mapping {
key: "bottle"
value: 16
}
class_mapping {
key: "diningtable"
value: 17
}
class_mapping {
key: "cow"
value: 18
}
class_mapping {
key: "aeroplane"
value: 19
}
class_mapping {
key: "background"
value: 20
}

pretrained_model: ""
pretrained_weights: "/workspace/tlt-experiments/data/vgg16_weights_tf_dim_ordering_tf_kernels.h5"
output_weights: "/workspace/tlt-experiments/faster_rcnn_exp/faster_rcnn_pascal_voc.tltw"
output_model: "/workspace/tlt-experiments/faster_rcnn_exp/faster_rcnn_pascal_voc.tlt"
rpn_min_overlap: 0.3
rpn_max_overlap: 0.7
classifier_min_overlap: 0.0
classifier_max_overlap: 0.5
gt_as_roi: False
std_scaling: 1.0
classifier_regr_std {
key: 'x'
value: 10.0
}
classifier_regr_std {
key: 'y'
value: 10.0
}
classifier_regr_std {
key: 'w'
value: 5.0
}
classifier_regr_std {
key: 'h'
value: 5.0
}

rpn_mini_batch: 256
rpn_pre_nms_top_N: 12000
rpn_nms_max_boxes: 2000
rpn_nms_overlap_threshold: 0.7
reg_config {
reg_type: 'L2'
weight_decay: 1e-4
}

optimizer {
adam {
lr: 0.00001
beta_1: 0.9
beta_2: 0.999
decay: 0.0
}
}

lr_scheduler {
step {
base_lr: 0.00001
gamma: 1.0
step_size: 30
}
}

lambda_rpn_regr: 1.0
lambda_rpn_class: 1.0
lambda_cls_regr: 1.0
lambda_cls_class: 1.0

inference_config {
images_dir: '/workspace/tlt-experiments/data/voc07test/images'
model: '/workspace/tlt-experiments/faster_rcnn_exp/faster_rcnn_pascal_voc.epoch12.tlt'
detection_image_output_dir: '/workspace/tlt-experiments/faster_rcnn_exp/infer_results_imgs'
labels_dump_dir: '/workspace/tlt-experiments/faster_rcnn_exp/infer_dump_labels'
rpn_pre_nms_top_N: 6000
rpn_nms_max_boxes: 300
rpn_nms_overlap_threshold: 0.7
bbox_visualize_threshold: 0.6
classifier_nms_max_boxes: 300
classifier_nms_overlap_threshold: 0.3
}
evaluation_config {
dataset {
images_dir : '/workspace/tlt-experiments/data/voc07test/images'
labels_dir: '/workspace/tlt-experiments/data/voc07test/labels_kitti'
}
data_parser: 'raw_kitti'
model: '/workspace/tlt-experiments/faster_rcnn_exp/faster_rcnn_pascal_voc.epoch12.tlt'
labels_dump_dir: '/workspace/tlt-experiments/faster_rcnn_exp/eval_dump_labels'
rpn_pre_nms_top_N: 6000
rpn_nms_max_boxes: 300
rpn_nms_overlap_threshold: 0.7
classifier_nms_max_boxes: 300
classifier_nms_overlap_threshold: 0.3
object_confidence_thres: 0.0001
use_voc07_11point_metric:True
}
}
network config
The network config(network_config) defines the model structure and its input format. This model is used for training, evaluation, and inference.
network_config {
input_image_config {
image_type: RGB
image_channel_order: 'bgr'
    size_min {
min:600
}
    image_channel_mean {
        key: 'b'
        value: 103.939
}
    image_channel_mean {
        key: 'g'
        value: 116.779
}
    image_channel_mean {
        key: 'r'
        value: 123.68
}
    image_scaling_factor: 1.0
}
feature_extractor: "vgg"
anchor_box_config {
scale: 128.0
scale: 256.0
scale: 512.0
ratio: 1.0
ratio: 0.5
ratio: 2.0
}
freeze_bn: True
freeze_blocks: 1
freeze_blocks: 2
roi_mini_batch: 256
rpn_stride: 16
conv_bn_share_bias: True
roi_pooling_config {
pool_size: 7
pool_size_2x: True
}
}
input image config
| Field | Description | Range of value | Default value |
|---|---|---|---|
| image_type | The image type, can be either RGB or gray-scale image | RGB or GRAYSCALE | RGB |
|
image_channel _order |
The image channel order | 'rgb' or 'bgr' if image_type is RGB, 'l' if image_type is GRAYSCALE | N/A |
| size_height_width | The height and width as the input dimension of the model | both sub-field height/width should be a positive integer and a multiple of 32 | N/A |
|
image_channel _mean |
Per-channel mean value to subtract by for the image preprocessing | should be a non-negative real number for each sub-field | 0.0 |
| image_scaling_factor | Scaling factor to divide by for the image preprocessing | should be a positive real number | N/A |
feature extractor
FasterRCNN supports 11 backbones.
| Field | Description | Range of value | Default value |
|---|---|---|---|
| feature_extractor | The feature extractor(backbone) for the FasterRCNN model |
ResNet series: resnet:10, resnet18, resnet:34, resnet:50, resnet:101, resnet:152. VGG series: vgg:16, vgg:19 GoogLeNet: googlenet MobileNet series: mobilenet_v1, mobilenet_v2 Here a notational convention is used. For a model that can have different number of layers, use a colon followed by the layer number as the suffix of the model name. For example, resnet: <layer_number> |
N/A |
anchor box config
| Field | Description | Range of value | Default value |
|---|---|---|---|
| anchor_box_config | The anchor boxes for FasterRCNN |
scale field should be a positive number, can repeat any number of times. ratio field should be a positive number, usually around 1.0, can repeat any number of times. the scale field and ratio field should be of the same length to be valid. |
N/A |
freeze BN
You can choose to freeze the BatchNormalization layers in the model during training. This is a common trick when training a FasterRCNN model
| Field | Description | Range of value | Default value |
|---|---|---|---|
| freeze_bn | Whether or not to freeze all the BatchNormalization layers in the model | True or False | False |
freeze blocks
You can choose to freeze some of the CNN blocks in the model to make the training more stable and/or easier to converge.
| Field | Description | Range of value | Default value |
|---|---|---|---|
| freeze_blocks | The list of block ID's to be frozen in the model during training. | list | [] |
You can divide the whole model into several blocks and optionally freeze a subset of it. For FasterRCNN you can only freeze the blocks that are before the ROI pooling layer. Any layer after the ROI pooling will not be frozen in any way. For different backbones, the number of blocks and the block ID for each block are different. It deserves some detailed info of how to specify the block ID's for each backbone.
- ResNet series: For the ResNet series, the block ID's valid for freezing is any subset of [0, 1, 2, 3](inclusive)
- VGG series: For the VGG series, the block ID's valid for freezing is any subset of [1, 2, 3, 4, 5](inclusive)
- GoogLeNet: For the GoogLeNet, the block ID's valid for freezing is any subset of [0, 1, 2, 3, 4, 5, 6, 7](inclusive)
- MobileNet V1: For the MobileNet V1, the block ID's valid for freezing is any subset of [0, 1, 2, 3, 4, 5, 6, 7, 8, 9, 10, 11](inclusive)
-
MobileNet V1: For the MobileNet V2, the block ID's valid for freezing is any subset of [0, 1, 2, 3, 4, 5, 6, 7, 8, 9, 10, 11, 12, 13](inclusive)
ROI mini batch
The ROI mini batch is the batch size for training the classifier after the ROI pooling layer.
| Field | Description | Range of value | Default value |
|---|---|---|---|
| roi_mini_batch | The batch size used to train the classifier after ROI pooling. | A positive integer, usually use 128, 256, etc. | N/A |
RPN stride
The cumulative stride from the model input to the RPN. This value is fixed(16) for current implementation.
conv_bn_share_bias
conv_bn_share_bias is a Boolean value to indicate whether or not to share the bias of the convolution layer and the BatchNormalization(BN) layer immediately after it. This is usually shared, but for FasterRCNN there is a caveat. During the training, you may want to freeze the BN layer to make the training process more stable. But once the BN layer is frozen and the bias is shared, the convolution layer before it will have no bias during the training. This loss of a degree-of-freedom can lead to some degradation of the model accuracy. To overcome this, you can force the convolution layer to have its own bias. If conv_bn_share_bias is set to False, the convolution layer itself will have a bias, otherwise it won't.
For MobileNet V1 or MobileNet V2, if you want to load pretrained weights in NGC for training or retraining, set the conv_bn_share_bias field in the experiment_spec file to True. For all other backbones, if you want to load the pretrained weights in NGC for training or retrain, set them to False. For all the backbones, if you do not use the pretrained weights in NGC, both settings for conv_bn_share_bias are acceptable.
ROI pooling config
The ROI pooling config for the ROI pooling layer. The implementation of ROI pooling layer is different from the original implementation in Caffe. Use TensorFlow's tf.image.crop_and_resize operation (possibly followed by a pooling operation) to implement it. Here are the parameters for this implementation:
| Field | Description | Range of value | Default value |
|---|---|---|---|
| roi_pooling_config | The config for the ROI pooling layer. | The pool_size sub-field is the output spatial size of this operation. The pool_size_2x sub-field is a Boolean value to indicate whether to do the crop_and_resize at 2*pool_size followed by a 2 x 2 pooling operation or do crop_and_resize directly at pool_size without pooling operation. For example, if pool_size = 7, and pool_size_2x=True, it means you do crop_and_resize to get a output that has spatial size of 14 x 14 and then do a 2 x 2 pooling operation to get the final output tensor. | N/A |
all_projections
The all_projections field is only useful for models that have shortcuts in them. These models include ResNet series and the MobileNet V2. If all_projections=True, all the pass-through shortcuts will be replaced by a projection layer that has the same number of output channels.
use_pooling
The use_pooling operation is only useful for VGG series and ResNet series. When use_pooling=True, use pooling in the model as the original implementation, otherwise use strided convolution to replace the pooling operations in the model. If you want to improve the inference FPS performance, you can try to set use_pooling=False.
training config
The training config defines the parameters needed for training, evaluation and inference.
training_config {
kitti_data_config {
images_dir : '<path_to_the_training_images_directory>'
labels_dir: '<path_to_the_training_KITTI_labels_directory>'
}
training_data_parser: 'raw_kitti'
data_augmentation {
use_augmentation: True
spatial_augmentation {
hflip_probability: 0.5
vflip_probability: 0.0
zoom_min: 1.0
zoom_max: 1.0
translate_max_x: 0
translate_max_y: 0
}
color_augmentation {
color_shift_stddev: 0.0
hue_rotation_max: 0.0
saturation_shift_max: 0.0
contrast_scale_max: 0.0
contrast_center: 0.5
}
}
num_epochs: 12
class_mapping {
key: 'Car'
value: 0
}
class_mapping {
key: 'Van'
value: 0
}
class_mapping {
key: "Pedestrian"
value: 1
}
class_mapping {
key: "Person_sitting"
value: 1
}
class_mapping {
key: 'Cyclist'
value: 2
}
class_mapping {
key: "background"
value: 3
}
class_mapping {
key: "DontCare"
value: -1
}
class_mapping {
key: "Truck"
value: -1
}
class_mapping {
key: "Misc"
value: -1
}
class_mapping {
key: "Tram"
value: -1
}
pretrained_model: "<path_to_the_pretrained_model>"
pretrained_weights: "<path_to_the_pretrained_weights>"
output_weights: "<path_to_the_output_weights_during_training>"
output_model: "<path_to_the_output_model_during_training>"
rpn_min_overlap: 0.3
rpn_max_overlap: 0.7
classifier_min_overlap: 0.0
classifier_max_overlap: 0.5
gt_as_roi: False
std_scaling: 1.0
classifier_regr_std {
key: 'x'
value: 10.0
}
classifier_regr_std {
key: 'y'
value: 10.0
}
classifier_regr_std {
key: 'w'
value: 5.0
}
classifier_regr_std {
key: 'h'
value: 5.0
}


rpn_mini_batch: 256
rpn_pre_nms_top_N: 12000
rpn_nms_max_boxes: 2000
rpn_nms_overlap_threshold: 0.7


reg_config {
reg_type: 'L2'
weight_decay: 1e-4
}


optimizer {
adam {
lr: 0.00001
beta_1: 0.9
beta_2: 0.999
decay: 0.0

}
}
lr_scheduler {
step {
base_lr: 0.00001
gamma: 1.0
step_size: 30
}
}

lambda_rpn_regr: 1.0
lambda_rpn_class: 1.0
lambda_cls_regr: 1.0
lambda_cls_class: 1.0

inference_config {
images_dir: '<path_to_the_inference_images_directory>'
model: '<path_to_the_model_to_do_inference_on>'
detection_image_output_dir: '<path_to_the_dumped_images_directory>'
labels_dump_dir: '<path_to_the_dumped_labels_directory>'
rpn_pre_nms_top_N: 6000
rpn_nms_max_boxes: 300
rpn_nms_overlap_threshold: 0.7
bbox_visualize_threshold: 0.6
classifier_nms_max_boxes: 300
classifier_nms_overlap_threshold: 0.3
}

evaluation_config {
dataset {
images_dir : '<path_to_the_evaluation_images_directory>'
labels_dir: '<path_to_the_evaluation_KITTI_labels_directory>'
}
data_parser: 'raw_kitti'
model: '<path_to_the_model_to_do_evaluation_on>'
labels_dump_dir: '<path_to_the_dumped_labels_directory>'
rpn_pre_nms_top_N: 6000
rpn_nms_max_boxes: 300
rpn_nms_overlap_threshold: 0.7
classifier_nms_max_boxes: 300
classifier_nms_overlap_threshold: 0.3
object_confidence_thres: 0.0001
use_voc07_11point_metric:False
}

}
kitti_data_config
kitti_data_config defines the dataset for training. It includes the images directory and the KITTI labels directory.
training_data_parser
The parser type for the training dataset. In this release, only raw_kitti is supported.
data_augmentation
Data augmentation for the training. It includes spatial augmentation and color augmentation. The data augmentation configuration has two parts: spatial augmentation and color augmentation. Spatial augmentation does some spatial transform to the input image and its label, while the color augmentation only applies some hue, saturation, and contrast to the input image. The label is untouched. A Boolean value that controls whether or not to activate data augmentation during training. A normalization is applied before augmentation because augmentation only applies to the normalized image in the range [0, 1]. Also, data augmentation happens before image preprocessing(subtracting mean value and scaling). Details of these sub-fields are given in this table:
| Field | Description | Range of value | Default value |
|---|---|---|---|
| use_augmentation | Whether or not to activate the data augmentation during training. | True or False | False |
|
spatial _augmentation |
Do random spatial transformation to input image and its label. Each sub-field's description given below. | ||
| hflip_probability: probability of flipping the image horizontally. | A float value in [0, 1] | 0 | |
| vflip_probability: probability of flipping the image vertically. | A float value in [0, 1] | 0 | |
| zoom_min: minimum zoom ratio to zoom the image. | Usually a float value surround 1.0 | 0 | |
| zoom_max: maximum zoom ratio to zoom the image. | Usually a float value surround 1.0 and should be no less than zoom_min. | 0 | |
| translate_max_x: maximum translation value in the horizontal direction. | non-negative integer value | 0 | |
| translate_max_y: maximum translation value in the vertical direction. | non-negative integer value | 0 | |
| color_augmentation | Apply hue/saturation/contrast transformation to the image, label is untouched. Description for each sub-field given below. | ||
| color_shift_stddev: An offset value to be added to the normalized input image. The image is normalized to the range [0, 1] before this. | A non-negative float value, usually not too large, e.g, 0.1. | The default value (0.0) is set by the Google protobuf compiler.If you don't provide a value, the default value of 0.0 results in no color shift | |
| hue_rotation_max: The maximum angle(in degree) to rotate the hue of input image. | A float value in [0, 360]. | 0 | |
| saturation_shift_max: The maximum value to be added to the saturation of input image. | A non-negative float value in [0, 1]. | 0 | |
| contrast_scale_max: The maximum scaling factor to change the contrast of input image. | A non-negative float value in [0, 1], 0 means on contrast change, 1 means the maximum contrast change. | 0 | |
| contrast_center: The center of the contrast scaling. Input image is subtracted by the contrast_center and then do random contrast scaling. | A non-negative float value in [0, 1], usually use 0.5. | 0 |
num_epochs
This field defines the number of epochs for training.
class_mapping
In some cases, the number of classes in the dataset labels is not exactly the number of classes you want to use to train the model. For example, you may want to group two different classes 'Car' and 'Van' into a single class in the training. You may want to filter out some specific classes in the dataset. For example, you have 'Car', 'Person', 'Cyclist', 'Truck' in the training dataset, but you want to ignore the 'Truck' class when you train the model. This is the rationale for the class_mapping field. The class_mapping maps each class name in the original dataset to an integer. If some classes are mapped to the same integer, it means they are grouped into a single class. For FasterRCNN, the class that mapped to the largest number is always the 'background' due to the implementation. Also, if you want to ignore some classes in the dataset, simply map them to -1. In the previous example, their 5 classes: 'Car', 'Van', 'Person', 'Cyclist', 'Truck' in the dataset. You want to group 'Car' and 'Van', so map them to 0. You also want to exclude 'Truck', so map Truck into -1. Finally, add a dummy 'background' class that is mapped to the largest number(3).
pretrained_model
The path to the pretrained model used to initialize the training model. The pretrained model can be either a Keras model or a TLT model. The suffix is used to identify the model types. If the model ends with '.hdf5' treat it as a Keras model; if it ends with '.tlt', treat it as a TLT model. If the model path neither ends with '.hdf5' nor ends with '.tlt' it will raise an error.
pretrained_weights
The path to the pretrained weights used to initialize the training model. This is similar to the pretrained model but more flexible in terms of the input dimension and the number of classes in the model head. When you use the pretrained model, you should limit the training model to have the same input dimension and number of classes as in the pretrained model. With pretrained weights, you can discard these limitations. Pretrained weights can be either a Keras weights(.h5) or a TLT weights(.tltw). If the pretrained weights do not end with either one of them, it will raise an error.
output_weights
Path to the output weights(TLT weights) as the checkpoint during training.
output_model
Path to the output model(TLT model) as the checkpoint during training.
rpn_min_overlap
The lower IoU threshold is used to map the anchor boxes to ground truth boxes. If the IoU of an anchor box and any ground truth box is below this threshold, this anchor box is treated as a negative anchor box.
rpn_max_overlap
The upper IoU threshold used to map the anchor boxes to ground truth boxes. If the IoU of an anchor box and at least one ground truth boxes is above this threshold, this anchor box is treated as a positive anchor box.
classifier_min_overlap
The lower IoU threshold to generate the proposal target. If the IoU of a ROI and a ground truth box is above the threshold and below the classifier_max_overlap, then this ROI is regarded as a negative ROI(background) when training the classifier.
classifier_max_overlap
If the IoU of a ROI and a ground truth box is above this threshold, then this ROI is regarded as a positive ROI and this ground truth box is treated as the target(ground truth) of this ROI when training the classifier.
gt_as_roi
A Boolean value to specify whether or not to include the ground truth boxes into the positive ROI to train the classifier.
std_scaling
The scaling factor to multiply by for the RPN regressor loss when training the RPN.
classifier_regr_std
The scaling factor to divide by for the classifier regressor loss when training the classifier.
rpn_mini_batch
The anchor batch size used to train the RPN.
rpn_pre_nms_top_N
The number of boxes to be retained before the NMS in RPN.
rpn_nms_max_boxes
The number of boxes to be retained after the NMS in RPN.
rpn_nms_overlap_threshold
The IoU threshold for the NMS in RPN.
regularizer config
Regularizer config for the model.
| Field | Description | Range of value | Default value |
|---|---|---|---|
| reg_config | Regularizer config for the model. |
The reg_type can be either 'l1', 'l2' or 'none'. The weight_decay is the penalty value of the regularizer. |
N/A |
optimizer
| Field | Description | Range of value | Default value |
|---|---|---|---|
| optimizer | The Optimizer used for the training. | sgd, rmsprop or adam | N/A |
Details for the optimizer.
| Field | Description | Range of value | Default value |
|---|---|---|---|
| adam | Adam optimizer |
sub-field lr: base learning rate sub-field beta_1: beta_1 param for adam sub-field beta_2: beta_2 param for adam sub-field epsilon: epsilon param for adam |
N/A |
| sgd | SGD optimizer |
sub-field lr: base learning rate sub-field momentum: momentum sub-field decay: decay for learning rate sub-field nesterov: whether to use nesterov momentum or not |
N/A |
| rmsprop | RMSProp optimizer | sub-field lr: learning rate | N/A |
learning rate scheduler
The learning rate scheduler for training. Two types of learning rate schedulers are supported: Step LR and SoftStartAnnealing. Step LR is the same as step scheduler in classification and SoftStartAnnealing is the same as soft_anneal in classification.
loss scaling
Four loss scaling factors: lambda_rpn_regr, lambda_rpn_class, lambda_cls_regr and lambda_cls_class are provided. These are weighting factors for the RPN regressor loss, RPN classification loss, classifier regressor loss and classifier classification loss, respectively. The default value for them is 1.0. The larger the scaling factor, the more emphasis on the corresponding loss.
inference config
The inference config parameters are similar to those in the training.
evaluation config
The evaluation config parameters are similar to those in the training. The use_voc07_11point_metric field specifies whether or not to use the PASCAL VOC 2007 11 point metric when computing the mAP. If set to false, the VOC 2012 metric will be used.
Specification file for SSD
For SSD, both training and evaluation require a specification file.
SSD config
ssd_config {
  aspect_ratios_global: "[1.0, 2.0, 0.5, 3.0, 0.33]"
  scales: "[0.1, 0.24166667, 0.38333333, 0.525, 0.66666667, 0.80833333, 0.95]"
  two_boxes_for_ar1: true
  clip_boxes: false
  loss_loc_weight: 1.0
  focal_loss_alpha: 0.25
  focal_loss_gamma: 2.0
  variances: "[0.1, 0.1, 0.2, 0.2]"
  arch: "resnet18"
  freeze_bn: True
  freeze_blocks: 0
  freeze_blocks: 1
}
aspect_ratios_global or aspect_ratios
aspect_ratios_global should be a 1-d array inside quotation marks. Anchor boxes of aspect ratios defined in aspect_ratios_global will be generated for each feature layer used for prediction. Example: "[1.0, 2.0, 0.5, 3.0, 0.33]"
aspect_ratios should be a list of lists inside quotation marks. The length of the outer list must be equivalent to the number of feature layers used for anchor box generation. And the i-th layer will have anchor boxes with aspect ratios defined in aspect_ratios[i]. Here's an example: "[[1.0,2.0,0.5], [1.0,2.0,0.5], [1.0,2.0,0.5], [1.0,2.0,0.5], [1.0,2.0,0.5], [1.0, 2.0, 0.5, 3.0, 0.33]]"
two_boxes_for_ar1
This setting is only relevant for layers that have 1.0 as aspect ratio. If two_boxes_for_ar1 is true, two boxes with be generated for aspect ratio 1. One whose scale is the scale for this layer and the other one whose scale is the geometric mean of the scale for this layer and the scale for the next layer.
Scales or combination of min_scale and max_scale
Scales should be a 1-d array inside quotation marks. It is a list of positive floats containing scaling factors per convolutional predictor layer. This list must be one element longer than the number of predictor layers, so if two_boxes_for_ar1 is true, the second aspect ratio 1.0 box for the last layer can have a proper scale. Except for the last element in this list, each positive float is the scaling factor for boxes in that layer. For example, if for one layer the scale is 0.1, then the generated anchor box with aspect ratio 1 for that layer (the first aspect ratio 1 box if two_boxes_for_ar1 is true) will have its height and width as 0.1*min(img_h, img_w).
min_scale and max_scale are two positive floats. If both of them appear in the config, the program can automatically generate the scales by evenly splitting the space between min_scale and max_scale.
clip_boxes
If true, all corner anchor boxes will be truncated so they are fully inside the feature images.
loss_loc_weight
This is a positive float controlling how much location regression loss should contribute to the final loss. The final loss is calculated as classification_loss + loss_loc_weight * loc_loss
focal_loss_alpha and focal_loss_gamma

focal_loss_alpha defines α and focal_loss_gamma defines γ in the formula. NVIDIA recommends α=0.25 and γ=2.0 if you don't know what values to use.
variances
Variances should be a list of 4 positive floats. The four floats, in order, represent variances for box center x, box center y, log box height, log box width. The box offset for box center (cx, cy) and log box size (height/width) w.r.t. anchor will be divided by their respective variance value. Therefore, larger variances result in less significant differences between two different boxes on encoded offsets. The formula for offset calculation is:
steps
An optional list inside quotation marks whose length is the number of feature layers for prediction. The elements should be floats or tuples/lists of two floats. Steps define how many pixels apart the anchor box center points should be. If element is a float, both vertical and horizontal margin is the same. Otherwise, the first value is step_vertical and the second value is step_horizontal. If steps are not provided, anchorboxes will be distributed uniformly inside the image.
offsets
An optional list of floats inside quotation marks whose length is the number of feature layers for prediction. The first anchor box will have offsets[i]*steps[i] pixels margin from the left and top borders. If offsets are not provided, 0.5 will be used as default value.
arch
A string indicating which feature extraction architecture you want to use. Currently, "resnet10" and "resnet18" are supported.
freeze_bn
Whether to freeze all batch normalization layers during training.
freeze_blocks
Optionally, you can have more than 1 freeze_blocks field. Weights of layers in those blocks will be freezed during training. See Model config for more information.
SSD training config
training_config {
  batch_size_per_gpu: 18
  num_epochs: 120
  learning_rate {
    soft_start_annealing_schedule {
      min_learning_rate: 5e-5
      max_learning_rate: 4e-2
      soft_start: 0.01
      annealing: 0.3
    }
  }
  regularizer {
    type: L1
    weight: 3.00000002618e-09
  }
}
batch_size_per_gpu
Batch size per GPU.
num_epochs
Number of epochs to use for training.
learning rate
- min_learning_rate: minimum learning late to be seen during the entire experiment
- max_learning_rate: maximum learning rate to be seen during the entire experiment
- soft start: Time to be lapsed before warm up ( expressed in percentage of progress between 0 and 1)
- annealing: Time to start annealing the learning rate
regularizer
This parameter configures the regularizer to be used while training and contains the following nested parameters.
- type: The type or regularizer to use. NVIDIA supports NO_REG, L1 or L2
- weight: The floating point value for regularizer weight
Note: NVIDIA suggests using L1 regularizer when training a network before pruning as L1 regularization helps making the network weights more prunable.
SSD evaluation config
eval_config {
  validation_period_during_training: 10
  averge_precision_mode: SAMPLE
  matching_iou_threshold: 0.5
}
validation_period_during_training
The number of training epoches per which one validation should run.
average_precision_mode
Average Precision (AP) calculation mode can be either SAMPLE or INTEGRATE. SAMPLE is used as VOC metrics for VOC 2009 or before. INTEGRATE is used for VOC 2010 or after that.
matching_iou_threshold
The lowest iou of predicted box and ground truth box that can be considered a match.
NMS config
nms_config {
 confidence_threshold: 0.05
 clustering_iou_threshold: 0.5
 top_k: 200
}
NMS config applies to NMS layer in training, validation, evaluation, inference and export.
confidence_threshold
Boxes with a confidence score less than confidence_threshold are discarded before applying NMS.
clustering_iou_threshold
IOU threshold below which boxes will go through NMS process
top_k
top_k boxes will be outputed after NMS keras layer. If the number of valid boxes is less than k, return array will be padded with boxes whose confidence score is 0.
augmentation config
augmentation_config {
  preprocessing {
    output_image_width: 1024
    output_image_height: 256
    crop_right: 1024
    crop_bottom: 256
    min_bbox_width: 1.0
    min_bbox_height: 1.0
  }
  spatial_augmentation {
    hflip_probability: 0.5
    vflip_probability: 0.0
    zoom_min: 0.7
    zoom_max: 1.8
    translate_max_x: 8.0
    translate_max_y: 8.0
  }
  color_augmentation {
    hue_rotation_max: 25.0
    saturation_shift_max: 0.20000000298
    contrast_scale_max: 0.10000000149
    contrast_center: 0.5
  }
}
See Augmentation module for more information.
dataset config
dataset_config {
  data_sources: {
    tfrecords_path: "/path/to/tfrecords/root/*"
    image_directory_path: "/path/to/dataset/root"
  }
  image_extension: "png"
  target_class_mapping {
      key: "car"
      value: "car"
  }
  target_class_mapping {
      key: "pedestrian"
      value: "pedestrian"
  }
  target_class_mapping {
      key: "cyclist"
      value: "cyclist"
  }
  target_class_mapping {
      key: "van"
      value: "car"
  }
  target_class_mapping {
      key: "person_sitting"
      value: "pedestrian"
  }
  validation_fold: 0
}
See Dataloader for more information.
6. Training the model
You can use the tlt-train command to train models with single and multiple GPUs. The NVIDIA Transfer Learning Toolkit provides a simple command line interface to train a deep learning model for classification and object detection. It includes the tlt-train command to do this. To speed up the training process, the tlt-train command supports multiGPU training. You can invoke a multi GPU training session by using the --gpus N option, where N is the number of GPUs you want to use. N must be less than the number of GPUs available in the given node for training.
Training a classification model
Use the tlt-train command to tune a pre-trained model:
tlt-train [-h] classification --gpus <num GPUs>
           -k <encoding key>
           -r <result directory>
           -e <spec file>
Required arguments:
- -r, --results_dir : Path to a folder where the experiment outputs should be written.
- -k, --key : User specific encoding key to save or load a .tlt model.
- -e, --experiment_spec_file: Path to the experiment spec file.
Optional arguments:
- --gpus : Number of GPUs to use and processes to launch for training. The default value is 1.
Here's an example of using the tlt-train command:
tlt-train classification -e /workspace/tlt_drive/spec/spec.cfg -r /workspace/output -k $YOUR_KEY
Output Log
Here's the output log from the successful use of this command:
Using TensorFlow backend.
..
_____________________________________________________________________________
Layer (type)                    Output Shape         Param #     Connected to
=============================================================================
input_1 (InputLayer)            (None, 3, 224, 224)  0
..
..
..
________________________________________________________________________________
predictions (Dense)             (None, 20)           10260       flatten_1[0][0]
================================================================================
Total params: 11,558,548
Trainable params: 11,546,900
Non-trainable params: 11,648
________________________________________________________________________________

Epoch 1/80
124/311 [==========>...................] - ETA: 49s - loss: 4.1188 - acc: 0.06592018-10-11 22:09:13.292358: W tensorflow/core/framework/allocator.cc:101] Allocation of 38535168 exceeds 10% of system memory.
Training a DetectNet_v2 model
After following the steps, go here to create TFRecords ingestible by the TLT training, and setting up a spec file. You are now ready to start training an object detection network.
DetectNet_v2 training command
tlt-train [-h] detectnet_v2
           -k <key>
           -r <result directory>
           -e <spec_file>
           [--gpus <num GPUs>]
Required arguments
- -r, --results_dir : Path to a folder where experiment outputs should be written.
- -k, –key : User specific encoding key to save or load a .tlt model.
- -e, --experiment_spec_file : Path to spec file. Absolute path or relative to working directory. (default: spec from spec_loader.py is used).
Optional arguments
- --gpus : Number of GPUs to use and processes to launch for training. The default value is 1.
- -h, --help : To print help message
Sample usage
Here is an example of command for a 2 GPU training:
tlt-train detectnet_v2 -e <path_to_spec_file>
                                 -r <path_to_experiment_output>
                                 -k <key_to_load_the_model>
                                 -n <name_string_for_the_model>
--gpus 2Output log
Here's an example of the output log:
Using TensorFlow backend.
2018-11-06 01:03:16.402006: I tensorflow/core/common_runtime/gpu/gpu_device.cc:1356] Found device 0 with properties:
name: TITAN X (Pascal) major: 6 minor: 1 memoryClockRate(GHz): 1.531
..
..
_______________________________________________________________________________
Layer (type)                    Output Shape         Param #     Connected to
===============================================================================
input_1 (InputLayer)            (None, 3, 544, 960)  0
..
===============================================================================
Total params: 11,555,983
Trainable params: 11,544,335
Non-trainable params: 11,648
..
..
2018-11-06 01:04:06,173 [INFO] tensorflow: Running local_init_op.
..
INFO:tensorflow:loss = 0.07203477, epoch = 0.0, step = 0
2018-11-06 01:05:14,270 [INFO] tensorflow: loss = 0.07203477, epoch = 0.0, step = 0
INFO:tensorflow:Saving checkpoints for step-1.
..
2018-11-06 01:05:44,920 [INFO] tensorflow: loss = 0.05362146, epoch = 0.0663716814159292, step = 15 (5.978 sec)
INFO:tensorflow:global_step/sec: 0.555544
..
Validation cost: 0.000268
Mean average_precision (in %): 73.9490

class name      average precision (in %)
------------  --------------------------
person                         83.5255
bag                            54.1475
face                           84.1741
Training a FasterRCNN model
Use this command to execute the FasterRCNN training command:
tlt-train [-h] faster_rcnn -e <experiment_spec>
Required arguments:
- -e, --experiment_spec_file : Experiment specification file to set up the evaluation experiment. This should be the same as training specification file.
Optional arguments:
- -h, --help : Show this help message and exit.
Sample usage
Here's an example of using the FasterRCNN training command:
tlt-train faster_rcnn -e <experiment_spec>
Here's a sample output log:
Using TensorFlow backend.
2019-07-04 08:43:12.677469: I tensorflow/core/platform/cpu_feature_guard.cc:141] Your CPU supports instructions that this TensorFlow binary was not compiled to use: AVX2 FMA
2019-07-04 08:43:12.970675: I tensorflow/core/common_runtime/gpu/gpu_device.cc:1433] Found device 0 with properties:
name: Tesla V100-SXM2-16GB major: 7 minor: 0 memoryClockRate(GHz): 1.53
pciBusID: 0000:85:00.0
totalMemory: 15.75GiB freeMemory: 15.44GiB
2019-07-04 08:43:12.970727: I tensorflow/core/common_runtime/gpu/gpu_device.cc:1512] Adding visible gpu devices: 0
2019-07-04 08:43:13.542863: I tensorflow/core/common_runtime/gpu/gpu_device.cc:984] Device interconnect StreamExecutor with strength 1 edge matrix:
2019-07-04 08:43:13.542924: I tensorflow/core/common_runtime/gpu/gpu_device.cc:990]      0
2019-07-04 08:43:13.542933: I tensorflow/core/common_runtime/gpu/gpu_device.cc:1003] 0:   N
2019-07-04 08:43:13.543743: I tensorflow/core/common_runtime/gpu/gpu_device.cc:1115] Created TensorFlow device (/job:localhost/replica:0/task:0/device:GPU:0 with 14935 MB memory) -> physical GPU (device: 0, name: Tesla V100-SXM2-16GB, pci bus id: 0000:85:00.0, compute capability: 7.0)
2019-07-04 08:43:13,555 [INFO] /app/iva/common/py_image.binary.runfiles/ai_infra/iva/faster_rcnn/scripts/train.py: valid_class_mapping: {u'Cyclist': 2, u'Car': 0, u'background': 3, u'Pedestrian': 1}
WARNING:tensorflow:From /app/iva/common/py_image.binary.runfiles/pip_deps2__tensorflow_gpu_1_13_1/extracted/tensorflow/python/framework/op_def_library.py:263: colocate_with (from tensorflow.python.framework.ops) is deprecated and will be removed in a future version.
Instructions for updating:
Colocations handled automatically by placer.
2019-07-04 08:43:13,563 [WARNING] tensorflow: From /app/iva/common/py_image.binary.runfiles/pip_deps2__tensorflow_gpu_1_13_1/extracted/tensorflow/python/framework/op_def_library.py:263: colocate_with (from tensorflow.python.framework.ops) is deprecated and will be removed in a future version.
Instructions for updating:
Colocations handled automatically by placer.
2019-07-04 08:43:14,284 [INFO] /app/iva/common/py_image.binary.runfiles/ai_infra/iva/faster_rcnn/scripts/train.py: Base featuremap: activation_13/Relu:0
________________________________________________________________________________
Layer (type)                    Output Shape         Param #     Connected to
================================================================================
input_1 (InputLayer)            (None, 3, 384, 1280) 0
________________________________________________________________________________

..
________________________________________________________________________________
add_7 (Add)                     (256, 512, 7, 7)     0           block_4a_bn_2[0][0]
                                                                 block_4a_bn_shortcut[0][0]
________________________________________________________________________________
activation_15 (Activation)      (256, 512, 7, 7)     0           add_7[0][0]
________________________________________________________________________________
block_4b_conv_1 (Conv2D)        (256, 512, 7, 7)     2359808     activation_15[0][0]
________________________________________________________________________________
block_4b_bn_1 (BatchNormalizati (256, 512, 7, 7)     2048        block_4b_conv_1[0][0]
________________________________________________________________________________
activation_16 (Activation)      (256, 512, 7, 7)     0           block_4b_bn_1[0][0]
________________________________________________________________________________
block_4b_conv_2 (Conv2D)        (256, 512, 7, 7)     2359808     activation_16[0][0]
________________________________________________________________________________
block_4b_conv_shortcut (Conv2D) (256, 512, 7, 7)     262656      activation_15[0][0]
________________________________________________________________________________
block_4b_bn_2 (BatchNormalizati (256, 512, 7, 7)     2048        block_4b_conv_2[0][0]
________________________________________________________________________________
block_4b_bn_shortcut (BatchNorm (256, 512, 7, 7)     2048        block_4b_conv_shortcut[0][0]
________________________________________________________________________________
add_8 (Add)                     (256, 512, 7, 7)     0           block_4b_bn_2[0][0]
                                                                 block_4b_bn_shortcut[0][0]
________________________________________________________________________________
2019-07-04 08:43:14,937 [INFO] /app/iva/common/py_image.binary.runfiles/ai_infra/iva/faster_rcnn/scripts/train.py: training example num: 6481
2019-07-04 08:43:15,579 [INFO] /app/iva/common/py_image.binary.runfiles/ai_infra/iva/faster_rcnn/scripts/train.py: Starting training
2019-07-04 08:43:15,579 [INFO] /app/iva/common/py_image.binary.runfiles/ai_infra/iva/faster_rcnn/scripts/train.py: Epoch 1/12
Training an SSD model
tlt-train [-h] ssd -e <experiment_spec>
                   -r <output_dir>
                   -k <key>
                   -m <pretrained_model>
                   --gpus <num_gpus>
Required arguments:
- -r, --results_dir: Path to the folder where the experiment output is written.
- -k, --key: Provide the encryption key to decrypt the model.
- -e, --experiment_spec_file: Experiment specification file to set up the evaluation experiment. This should be the same as training specification file.
Optional arguments:
- --gpus num_gpus: Number of GPUs to use and processes to launch for training. The default = 1.
- -m, --resume_model_weights: Path to a pre-trained model or model to continue training.
- --initial_epoch: Epoch number to resume from.
- -h, --help: Show this help message and exit.
tlt-train ssd --gpus 2 -e /path/to/spec.txt -r /path/to/result -k $KEY
Here's a sample output log:
Using TensorFlow backend.
2019-07-08 17:36:56.866657: I tensorflow/core/platform/cpu_feature_guard.cc:141] Your CPU supports instructions that this TensorFlow binary was not compiled to use: AVX2 FMA
2019-07-08 17:36:56.866840: I tensorflow/core/platform/cpu_feature_guard.cc:141] Your CPU supports instructions that this TensorFlow binary was not compiled to use: AVX2 FMA
2019-07-08 17:36:57.259900: I tensorflow/compiler/xla/service/service.cc:150] XLA service 0x65046d0 executing computations on platform CUDA. Devices:
2019-07-08 17:36:57.259958: I tensorflow/compiler/xla/service/service.cc:158]   StreamExecutor device (0): TITAN Xp, Compute Capability 6.1
2019-07-08 17:36:57.259975: I tensorflow/compiler/xla/service/service.cc:158]   StreamExecutor device (1): TITAN Xp, Compute Capability 6.1
2019-07-08 17:36:57.264088: I tensorflow/core/platform/profile_utils/cpu_utils.cc:94] CPU Frequency: 3298305000 Hz
2019-07-08 17:36:57.264882: I tensorflow/compiler/xla/service/service.cc:150] XLA service 0x656e670 executing computations on platform Host. Devices:
2019-07-08 17:36:57.264916: I tensorflow/compiler/xla/service/service.cc:158]   StreamExecutor device (0): <undefined>, <undefined>
2019-07-08 17:36:57.265106: I tensorflow/core/common_runtime/gpu/gpu_device.cc:1433] Found device 0 with properties:
name: TITAN Xp major: 6 minor: 1 memoryClockRate(GHz): 1.582
pciBusID: 0000:01:00.0
totalMemory: 11.91GiB freeMemory: 10.81GiB
2019-07-08 17:36:57.265131: I tensorflow/core/common_runtime/gpu/gpu_device.cc:1512] Adding visible gpu devices: 0
2019-07-08 17:36:57.269875: I tensorflow/core/common_runtime/gpu/gpu_device.cc:984] Device interconnect StreamExecutor with strength 1 edge matrix:
2019-07-08 17:36:57.269894: I tensorflow/core/common_runtime/gpu/gpu_device.cc:990]      0
2019-07-08 17:36:57.269903: I tensorflow/core/common_runtime/gpu/gpu_device.cc:1003] 0:   N
2019-07-08 17:36:57.269991: I tensorflow/core/common_runtime/gpu/gpu_device.cc:1115] Created TensorFlow device (/job:localhost/replica:0/task:0/device:GPU:0 with 10515 MB memory) -> physical GPU (device: 0, name: TITAN Xp, pci bus id: 0000:01:00.0, compute capability: 6.1)]
_______________________________________________________________________________
activation_2 (Activation)       (18, 64, 64, 256)    0           block_1a_bn_1[0][0]
_______________________________________________________________________________
block_1a_conv_2 (Conv2D)        (18, 64, 64, 256)    36928       activation_2[0][0]
_______________________________________________________________________________
block_1a_conv_shortcut (Conv2D) (18, 64, 64, 256)    4160        activation_1[0][0]
_______________________________________________________________________________
block_1a_bn_2 (BatchNormalizati (18, 64, 64, 256)    256         block_1a_conv_2[0][0]
_______________________________________________________________________________
block_1a_bn_shortcut (BatchNorm (18, 64, 64, 256)    256         block_1a_conv_shortcut[0][0]
_______________________________________________________________________________
add_1 (Add)                     (18, 64, 64, 256)    0           block_1a_bn_2[0][0]
                                                                 block_1a_bn_shortcut[0][0]
...
...
_______________________________________________________________________________
conf_reshape_0 (Reshape)        (18, 24576, 1, 3)    0           permute_1[0][0]
_______________________________________________________________________________
conf_reshape_1 (Reshape)        (18, 6144, 1, 3)     0           permute_3[0][0]
_______________________________________________________________________________
conf_reshape_2 (Reshape)        (18, 1536, 1, 3)     0           permute_5[0][0]
_______________________________________________________________________________
conf_reshape_3 (Reshape)        (18, 384, 1, 3)      0           permute_7[0][0]
_______________________________________________________________________________
conf_reshape_4 (Reshape)        (18, 96, 1, 3)       0           permute_9[0][0]
_______________________________________________________________________________
conf_reshape_5 (Reshape)        (18, 24, 1, 3)       0           permute_11[0][0]
_______________________________________________________________________________
..

ssd_predictions (Reshape)       (18, 32760, 15)      0           concatenate_1[0][0]
================================================================================
Total params: 18,866,812
Trainable params: 18,852,092
Non-trainable params: 14,720
________________________________________________________________________________
2019-07-08 17:37:30,754 [INFO] /usr/local/lib/python2.7/dist-packages/iva/ssd/scripts/train.pyc: Number of images in the training dataset:    6142
2019-07-08 17:37:30,754 [INFO] /usr/local/lib/python2.7/dist-packages/iva/ssd/scripts/train.pyc: Number of images in the validation dataset:      1339

Epoch 1/120
171/171 [======================================================] - 94s 547ms/step - loss: 2.3210
...
Number of images in the evaluation dataset: 1339
()
Producing predictions batch-wise: 100% 75/75 [00:36<00:00,  2.57it/s]
Matching predictions to ground truth, class 1/3.: 100% 131693/131693 [00:10<00:00, 12953.23it/s]
Matching predictions to ground truth, class 2/3.: 100% 15162/15162 [00:00<00:00, 26290.28it/s]
Matching predictions to ground truth, class 3/3.: 100% 36838/36838 [00:01<00:00, 19611.29it/s]
Computing precisions and recalls, class 1/3
Computing precisions and recalls, class 2/3
Computing precisions and recalls, class 3/3
Computing average precision, class 1/3
Computing average precision, class 2/3
Computing average precision, class 3/3
2019-07-08 17:55:12,060 [INFO] /usr/local/lib/python2.7/dist-packages/iva/ssd/scripts/train.pyc: car           AP    0.815
2019-07-08 17:55:12,060 [INFO] /usr/local/lib/python2.7/dist-packages/iva/ssd/scripts/train.pyc: cyclist       AP    0.136
2019-07-08 17:55:12,061 [INFO] /usr/local/lib/python2.7/dist-packages/iva/ssd/scripts/train.pyc: pedestrian    AP    0.433
2019-07-08 17:55:12,061 [INFO] /usr/local/lib/python2.7/dist-packages/iva/ssd/scripts/train.pyc:               mAP   0.462
7. Evaluating the model
Once the model has been trained, using the experiment config file, and by following the steps to train a model, the next step would be to evaluate this model on a test set to measure the accuracy of the model. The TLT toolkit includes the tlt-evaluate command to do this. Each of the 4 apps, namely Classification, DetectNet_v2, SSD and FasterRCNN support evaluate. The sample usage for this command, along with some example command line invocations are mentioned below.
The classification app computes evaluation loss, Top-k accuracy, precision and recall as metrics. Meanwhile, tlt-evaluation for DetectNet_v2, FasterRCNN and SSD computes the Average Precision per class and the mean Average Precision metrics as defined in the Pascal VOC challenge. We support both sample and integrate mode to calculate average precision. The former was used in VOC challenges before 2010 while the latter was used from 2010 onwards.
When training is complete, the model is stored in the output directory of your choice in $OUTPUT_DIR. Evaluate a model using the tlt-evaluate command:
tlt-evaluate {classification,detectnet_v2,faster_rcnn,ssd} [-h] [<arguments for classification/detectnet_v2/faster_rcnn/ssd>]
Required arguments:
- {classification, detectnet_v2, faster_rcnn, ssd}
Choose whether you are evaluating a classification, detectnet_v2, ssd, or faster_rcnn model.
Optional arguments: These arguments vary depending upon Classification, DetectNet_v2, SSD and Faster_RCNN models.
Evaluating a classification model
Execute tlt-evaluate on a classification model.
tlt-evaluate classification [-h] -e <experiment_spec_file> -k <key>
Required arguments
- -e, --experiment_spec_file: Path to the experiment spec file..
- -k, –key : Provide the encryption key to decrypt the model .
Optional arguments
- -h, --help : show this help message and exit.
If you followed the example in Training a classification model, you can run the evaluation:
tlt-evaluate classification -e classification_spec.cfg -k $YOUR_KEY
The resulting log file will be similar to this:
Using TensorFlow backend.
..
..
______________________________________________________________________________
Layer (type)                    Output Shape         Param #     Connected to
==============================================================================
input_1 (InputLayer)            (None, 3, 224, 224)  0
______________________________________________________________________________
conv1 (Conv2D)                  (None, 64, 112, 112) 9472        input_1[0][0]
______________________________________________________________________________
..
..
..
predictions (Dense)             (None, 20)           10260       flatten[0][0]
===============================================================================
Total params: 11,558,548
Trainable params: 11,546,900
Non-trainable params: 11,648
_______________________________________________________________________________

Found 3345 images belonging to 20 classes.
..
..
Evaluation Loss: 1.67691540718
Evaluation Top K accuracy: 0.828101634979
Evaluation precision: 0.616197168827
Evaluation recall: 0.366816133261
Evaluating a DetectNet_v2 model
Execute tlt-evaluate on a DetectNet_v2 model.
tlt-evaluate detectnet_v2 [-h] -e <experiment_spec>
                               -m <model_file>
                               -k <key>
                               [--use_training_set]
Required arguments:
- -e, --experiment_spec_file: Experiment spec file to set up the evaluation experiment. This should be the same as training spec file.
- -m, --model: Path to the model file to use for evaluation.
- -k, -–key : Provide the encryption key to decrypt the model.
Optional arguments
- -h, --help : show this help message and exit.
- --use_training_set: Set this flag to run evaluation on training + validation dataset.
If you have followed the example in Training a detection model, you may now evaluate the model using the following command.
tlt-evaluate detectnet_v2 -e <path to training spec file>
                          -m <path to the model>
-k <key to load the model>Use these steps to evaluate on a test set with ground truth labeled:
- Create tfrecords for this training set by following the steps listed in the data input section.
- Update the dataloader configuration part of the training spec file to include the newly generated tfrecords. For more information on the dataset config, please refer to Create an experiment spec file.
dataset_config {
  data_sources: {
    tfrecords_path: "<path to training tfrecords root>/<tfrecords_name*>"
    image_directory_path: "<path to training data root>"
  }
  image_extension: "jpg"
  target_class_mapping {
      key: "car"
      value: "car"
  }
  target_class_mapping {
      key: "automobile"
      value: "car"
  }
  ..
  ..
  ..
  target_class_mapping {
      key: "person"
      value: "pedestrian"
  }
  target_class_mapping {
      key: "rider"
      value: "cyclist"
  }
  validation_data_source: {
    tfrecords_path: "<path to testing tfrecords root>/<tfrecords_name*>"
    image_directory_path: "<path to testing data root>"
  }
}
The rest of the experiment spec file remains the same as the training spec file.
Sample output log
Here's an example of the output:
Using TensorFlow backend.
..
..
packages/iva/detectnet_v2/evaluation/build_evaluator.pyc: Found 1802 samples in validation set
_______________________________________________________________________________
Layer (type)                    Output Shape         Param #     Connected to
===============================================================================
input_1 (InputLayer)            (None, 3, 544, 960)  0
_______________________________________________________________________________
conv1 (Conv2D)                  (None, 64, 272, 480) 9472        input_1[0][0]
_______________________________________________________________________________
bn_conv1 (BatchNormalization)   (None, 64, 272, 480) 256         conv1[0][0]
_______________________________________________________________________________
activation_1 (Activation)       (None, 64, 272, 480) 0           bn_conv1[0][0]
_______________________________________________________________________________
..
..
________________________________________________________________________________
activation_17 (Activation)      (None, 512, 34, 60)  0               add_8[0][0]
________________________________________________________________________________
dropout_1 (Dropout)             (None, 512, 34, 60)  0       activation_17[0][0]
________________________________________________________________________________
output_bbox (Conv2D)            (None, 12, 34, 60)   6156        dropout_1[0][0]
________________________________________________________________________________
output_cov (Conv2D)             (None, 3, 34, 60)    1539        dropout_1[0][0]
================================================================================
Total params: 11,555,983
Trainable params: 11,544,335
Non-trainable params: 11,648
________________________________________________________________________________

INFO:tensorflow:Graph was finalized.
2018-10-22 19:55:24,136 [INFO] tensorflow: Graph was finalized.
..
..
Validation cost: 0.000268
Mean average_precision (in %): 73.9490

class name      average precision (in %)
------------  --------------------------
person                         83.5255
bag                            54.1475
face                           84.1741
Time taken to run /usr/local/lib/python2.7/dist-packages/iva/detectnet_v2/scripts/train.pyc:main: 0:45:45.071311.
Evaluating a FasterRCNN model
To run evaluation for a faster_rcnn model use this command:
tlt-evaluate faster_rcnn [-h] -e <experiment_spec>
- -e, --experiment_spec_file : Experiment spec file to set up the evaluation experiment. This should be the same as training spec file.
Here's a sample output log:
Using TensorFlow backend.

2019-05-29 07:59:14.442525: I tensorflow/core/platform/cpu_feature_guard.cc:141] Your CPU supports instructions that this TensorFlow binary was not compiled to use: AVX2 FMA
2019-05-29 07:59:14.687355: I tensorflow/core/common_runtime/gpu/gpu_device.cc:1433] Found device 0 with properties:

name: Tesla V100-SXM2-16GB major: 7 minor: 0 memoryClockRate(GHz): 1.53
pciBusID: 0000:06:00.0
totalMemory: 15.75GiB freeMemory: 15.44GiB

2019-05-29 07:59:14.687423: I tensorflow/core/common_runtime/gpu/gpu_device.cc:1512] Adding visible gpu devices: 0
2019-05-29 07:59:15.241007: I tensorflow/core/common_runtime/gpu/gpu_device.cc:984] Device interconnect StreamExecutor with strength 1 edge matrix:
2019-05-29 07:59:15.241067: I tensorflow/core/common_runtime/gpu/gpu_device.cc:990]      0
2019-05-29 07:59:15.241075: I tensorflow/core/common_runtime/gpu/gpu_device.cc:1003] 0:   N
2019-05-29 07:59:15.242055: I tensorflow/core/common_runtime/gpu/gpu_device.cc:1115] Created TensorFlow device (/job:localhost/replica:0/task:0/device:GPU:0 with 14935 MB memory) -> physical GPU (device: 0, name: Tesla V100-SXM2-16GB, pci bus id: 0000:06:00.0, compute capability: 7.0)
2019-05-29 07:59:15,261 [INFO] /app/iva/faster_rcnn/launcher/py_image.binary.runfiles/ai_infra/iva/faster_rcnn/scripts/test.py: {0: u'Car', 1: u'Pedestrian', 2: u'Cyclist', 3: u'background'}

2019-05-29 07:59:15,262 [INFO] /app/iva/faster_rcnn/launcher/py_image.binary.runfiles/ai_infra/iva/faster_rcnn/scripts/test.py: Loading kpi test model...

WARNING:tensorflow:From /app/iva/faster_rcnn/launcher/py_image.binary.runfiles/pip_deps2__tensorflow_gpu_1_13_1/extracted/tensorflow/python/framework/op_def_library.py:263: colocate_with (from tensorflow.python.framework.ops) is deprecated and will be removed in a future version.
Instructions for updating:

Colocations handled automatically by placer.

2019-05-29 07:59:15,330 [WARNING] tensorflow: From /app/iva/faster_rcnn/launcher/py_image.binary.runfiles/pip_deps2__tensorflow_gpu_1_13_1/extracted/tensorflow/python/framework/op_def_library.py:263: colocate_with (from tensorflow.python.framework.ops) is deprecated and will be removed in a future version.
Instructions for updating:

Colocations handled automatically by placer.

2019-05-29 07:59:17,649 [INFO] /app/iva/faster_rcnn/launcher/py_image.binary.runfiles/ai_infra/iva/faster_rcnn/scripts/test.py: Done!
2019-05-29 07:59:17,748 [INFO] /app/iva/faster_rcnn/launcher/py_image.binary.runfiles/ai_infra/iva/faster_rcnn/scripts/test.py: 0/1000
2019-05-29 07:59:24.976197: I tensorflow/stream_executor/dso_loader.cc:152] successfully opened CUDA library libcublas.so.10.0 locally
2019-05-29 07:59:27,428 [INFO] /app/iva/faster_rcnn/launcher/py_image.binary.runfiles/ai_infra/iva/faster_rcnn/scripts/test.py: Elapsed time = 9.67983293533
2019-05-29 07:59:28,407 [INFO] /app/iva/faster_rcnn/launcher/py_image.binary.runfiles/ai_infra/iva/faster_rcnn/scripts/test.py: 1/1000
2019-05-29 07:59:28,534 [INFO] /app/iva/faster_rcnn/launcher/py_image.binary.runfiles/ai_infra/iva/faster_rcnn/scripts/test.py: Elapsed time = 0.126852035522
2019-05-29 07:59:28,615 [INFO] /app/iva/faster_rcnn/launcher/py_image.binary.runfiles/ai_infra/iva/faster_rcnn/scripts/test.py: 2/1000
2019-05-29 07:59:28,731 [INFO] /app/iva/faster_rcnn/launcher/py_image.binary.runfiles/ai_infra/iva/faster_rcnn/scripts/test.py: Elapsed time = 0.116088151932
2019-05-29 07:59:28,794 [INFO] /app/iva/faster_rcnn/launcher/py_image.binary.runfiles/ai_infra/iva/faster_rcnn/scripts/test.py: 3/1000
...
...
2019-07-03 02:38:19,946 [INFO] /app/iva/common/py_image.binary.runfiles/ai_infra/iva/faster_rcnn/scripts/test.py: 999/1000
2019-07-03 02:38:20,049 [INFO] /app/iva/common/py_image.binary.runfiles/ai_infra/iva/faster_rcnn/scripts/test.py: Elapsed time = 0.103152036667
2019-07-03 02:38:20,053 [INFO] /app/iva/common/py_image.binary.runfiles/ai_infra/iva/faster_rcnn/scripts/test.py: Cyclist AP: 0.68731839316, precision: 0.7, recall: 0.72850678733, TP: 161.0, FP: 69.0, FN: 60.0
2019-07-03 02:38:20,072 [INFO] /app/iva/common/py_image.binary.runfiles/ai_infra/iva/faster_rcnn/scripts/test.py: Car AP: 0.837039752906, precision: 0.853330184223, recall: 0.847724073205, TP: 3613.0, FP: 621.0, FN: 649.0
2019-07-03 02:38:20,074 [INFO] /app/iva/common/py_image.binary.runfiles/ai_infra/iva/faster_rcnn/scripts/test.py: Pedestrian AP: 0.564051624343, precision: 0.674321503132, recall: 0.606003752345, TP: 323.0, FP: 156.0, FN: 210.0
2019-07-03 02:38:20,075 [INFO] /app/iva/common/py_image.binary.runfiles/ai_infra/iva/faster_rcnn/scripts/test.py: mAP = 0.696136590137
Evaluating an SSD model
To run evaluation for an SSD model use this command:
tlt-evaluate ssd [-h] -e <experiment_spec_file> -m <model_file> -k <key>
- -e, --experiment_spec_file : Experiment spec file to set up the evaluation experiment. This should be the same as training spec file.
- -m, --model : Path to the model file to use for evaluation.
- -k, --key : Provide the key to load the model.
Here's a sample output log:
Using TensorFlow backend.
2019-07-23 18:05:23.625666: I tensorflow/core/platform/cpu_feature_guard.cc:141] Your CPU supports instructions that this TensorFlow binary was not compiled to use: AVX2 FMA
...
Instructions for updating:
Use eager execution and:
`tf.data.TFRecordDataset(path)`
target/truncation is not updated to match the crop areaif the dataset contains target/truncation.
target/truncation is not updated to match the crop areaif the dataset contains target/truncation.
target/truncation is not updated to match the crop areaif the dataset contains target/truncation.
...
...
2019-07-23 18:06:03,638 [INFO] /usr/local/lib/python2.7/dist-packages/iva/ssd/scripts/evaluate.pyc: Number of images in the validation dataset:   2696
Number of images in the evaluation dataset: 2696
()
Producing predictions batch-wise:   0%|                  | 0/22 [00:00<?, ?it/s]2019-07-23 18:06:12.764148: I tensorflow/stream_executor/dso_loader.cc:152] successfully opened CUDA library libcublas.so.10.0 locally
Producing predictions batch-wise: 100%|#########| 22/22 [00:22<00:00,  1.88it/s]
Matching predictions to ground truth, class 1/3.: 100%|#| 245/245 [00:00<00:00, 26717.40it/s]
Matching predictions to ground truth, class 2/3.: 100%|#| 25954/25954 [00:00<00:00, 41923.85it/s]
Matching predictions to ground truth, class 3/3.: 100%|#| 120686/120686 [00:06<00:00, 19488.45it/s]
Computing precisions and recalls, class 1/3
Computing precisions and recalls, class 2/3
Computing precisions and recalls, class 3/3
Computing average precision, class 1/3
Computing average precision, class 2/3
Computing average precision, class 3/3
2019-07-23 18:06:36,688 [INFO] /usr/local/lib/python2.7/dist-packages/iva/ssd/scripts/evaluate.pyc: bicycle       AP    0.001
2019-07-23 18:06:36,688 [INFO] /usr/local/lib/python2.7/dist-packages/iva/ssd/scripts/evaluate.pyc: car           AP    0.0
2019-07-23 18:06:36,689 [INFO] /usr/local/lib/python2.7/dist-packages/iva/ssd/scripts/evaluate.pyc: person        AP    0.07
2019-07-23 18:06:36,689 [INFO] /usr/local/lib/python2.7/dist-packages/iva/ssd/scripts/evaluate.pyc:               mAP   0.02
8. Using inference on a model
The tlt-infer command runs the inference on a specified set of input images. In the classification mode, tlt-infer provides class label output over command line for a single image or a csv file containing the image path and the corresponding labels for multiple images. In DetectNet_v2, SSD or FasterRCNN mode, tlt-infer produces output images with bounding boxes rendered on them after inference. Optionally, you can also serialize the output meta-data in kitti_format.
Running inference on a classification model
Execute tlt-infer on a classification model trained on the Transfer Learning Toolkit.
tlt-infer classification [-h]
                          -m <model>
                          -i <image>
                          -d <image  dir>
                         [-b <batch size>]
                          -k <key>
                          -cm <classmap>
Here are the parameters of the tlt-infer tool:
Required arguments
- -m, --model : Path to the pretrained model (TLT model).
- -i, --image : A single image file for inference.
- -d, --image_dir : The directory of input images for inference.
- -k, --key : Key to load model.
- -cm, --class_map : The json file that specifies the class index and label mapping.
Optional arguments
- --batch_size : Inference batch size, default: 1
-
-h, --help : show this help message and exit
Sample output using single image mode
Single Image Mode
_____________________________________________________________________________
Layer (type)                    Output Shape         Param #     Connected to
=============================================================================
input_1 (InputLayer)            (None, 3, 224, 224)  0
_____________________________________________________________________________
conv1 (Conv2D)                  (None, 16, 112, 112) 2368        input_1[0][0]
_____________________________________________________________________________
...
...
_____________________________________________________________________________
2018-11-05 18:46:16,248 [INFO] root: Current predictions: [[2.0956191e-04 4.7424308e-08 6.0529976e-07 1.5379728e-05 4.9668059e-05
  2.3047665e-05 8.3990363e-07 2.1063986e-06 3.9042366e-06 9.8465785e-07
  7.9830796e-05 8.4068454e-08 1.3434786e-06 1.6271177e-05 1.1729119e-06
  9.9955863e-01 2.9604094e-05 2.6558594e-06 3.4933796e-06 7.3329272e-07]]
2018-11-05 18:46:16,248 [INFO] root: Class label = 15
2018-11-05 18:46:16,248 [INFO] root: Class name = mercedes
Execution using -d or directory mode
A result.csv file is created and stored in the directory you specify using -d. The result.csv has the following format, where the second column shows the file path and third shows the predicted class name.
0,/home/tmp/1.jpg,A
0,/home/tmp/2.jpg,B
0,/home/tmp/3.jpg,C
Running inference on a DetectNet_v2 model
The tlt-infer tool for object detection networks which may be used to visualize bboxes, or generate frame by frame kitti format labels on a single image or a directory of images. An example of the command for this tool is shown here:
tlt-infer detectnet_v2 [-h] -m <path to model file> -i <path to inference input> -o <path to output directory>
					   -bs <batch size> -cp <path to cluster params file> -k <encryption key>
					   [--kitti_dump] [-lw LINE_WIDTH]
					   [-g <gpu to run inference>] [--disable_overlay]
					   [--output_nodes <output_cov_blob,output_bbox_blob>]
Required parameters
- -m, --model: TLT model file path
- -i, --inference_input: The directory of input images or a single image for inference.
- -o, --inference_output: The directory to the output images and labels. The annotated images are in inference_output/images_annotated and labels are in inference_output/labels
- -bs, --batch_size: Inference batch size
- -cp, --cluster_params_file: Bbox post processing json file.
- -lw, --line_width: Overlay linewidth
- -k, --enc_key: Key to load model
Optional parameters
- -g, --gpu_set: GPU index to choose. The default is 0.
Note: Inference is not a multiple GPU process. This process only allows the user to choose which GPU to run inference on, in case there are multiple GPU's in the machine.
- --output_nodes: Comma separated list of output nodes, default=output_cov,output_bbox
- --kitti_dump: Flag to enable KITTI dump
- --disable_overlay : Flag to disable image overlay
This clusterfile is suitable for use with our uploaded pretrained models in NGC.
The tool automatically generates bbox rendered images in output_path/images_annotated. In order to get the bbox labels in KITTI format, please set the --kitti-dump flag. This will generate the output in output_path/labels.
Here's a sample output log:
Using TensorFlow backend.

2018-11-05 16:56:08.557935: I tensorflow/core/common_runtime/gpu/gpu_device.cc:1356] Found device 0 with properties:

name: TITAN Xp major: 6 minor: 1 memoryClockRate(GHz): 1.582

pciBusID: 0000:02:00.0

..

..

Layer (type)                 Output Shape              Param #

=================================================================

input_1 (InputLayer)         (None, 3, 384, 1240)      0

..

..

0it [00:00, ?it/s]

  0%|                                                    | 0/32 [00:00<?, ?it/s]

  3%|█▍                                          | 1/32 [00:00<00:04,  7.50it/s]

  ..

100%|███████████████████████████████████████████| 23/23 [00:03<00:00,  7.18it/s]

1it [00:10, 10.85s/it]

  0%|                                                    | 0/32 [00:00<?, ?it/s]

  3%|█▍                                          | 1/32 [00:00<00:03,  7.92it/s]

  ..

100%|███████████████████████████████████████████| 32/32 [00:04<00:00,  6.87it/s]

2it [00:19,  9.67s/it]

..

..

5it [00:40,  8.07s/it]

2018-11-05 16:56:52,571 [INFO] iva.detectnet_v2.scripts.inference: Inference complete
Running inference on a FasterRCNN model
The tlt-infer tool for FasterRCNN networks can be used to visualize bboxes, or generate frame by frame KITTI format labels on a directory of images. You can execute this tool from the command line as shown here:
tlt-infer faster_rcnn [-h] -e <experiment_spec>
Required arguments:
- -e, --experiment_spec_file: Path to the experiment specification file for FasterRCNN training.
Here's a sample output log:
Using TensorFlow backend.
2019-05-29 08:19:42.667096: I tensorflow/core/platform/cpu_feature_guard.cc:141] Your CPU supports instructions that this TensorFlow binary was not compiled to use: AVX2 FMA
2019-05-29 08:19:42.927812: I tensorflow/core/common_runtime/gpu/gpu_device.cc:1433] Found device 0 with properties:
name: Tesla V100-SXM2-16GB major: 7 minor: 0 memoryClockRate(GHz): 1.53
pciBusID: 0000:85:00.0
totalMemory: 15.75GiB freeMemory: 15.44GiB
2019-05-29 08:19:42.927857: I tensorflow/core/common_runtime/gpu/gpu_device.cc:1512] Adding visible gpu devices: 0
2019-05-29 08:19:43.446058: I tensorflow/core/common_runtime/gpu/gpu_device.cc:984] Device interconnect StreamExecutor with strength 1 edge matrix:
2019-05-29 08:19:43.446106: I tensorflow/core/common_runtime/gpu/gpu_device.cc:990]      0
2019-05-29 08:19:43.446114: I tensorflow/core/common_runtime/gpu/gpu_device.cc:1003] 0:   N
2019-05-29 08:19:43.446984: I tensorflow/core/common_runtime/gpu/gpu_device.cc:1115] Created TensorFlow device (/job:localhost/replica:0/task:0/device:GPU:0 with 14935 MB memory) -> physical GPU (device: 0, name: Tesla V100-SXM2-16GB, pci bus id: 0000:85:00.0, compute capability: 7.0)
2019-05-29 08:19:43,459 [INFO] /app/iva/faster_rcnn/launcher/py_image.binary.runfiles/ai_infra/iva/faster_rcnn/scripts/inference.py: {0: u'Car', 1: u'Pedestrian', 2: u'Cyclist', 3: u'background'}
2019-05-29 08:19:43,460 [INFO] /app/iva/faster_rcnn/launcher/py_image.binary.runfiles/ai_infra/iva/faster_rcnn/scripts/inference.py: Loading test model...
WARNING:tensorflow:From /app/iva/faster_rcnn/launcher/py_image.binary.runfiles/pip_deps2__tensorflow_gpu_1_13_1/extracted/tensorflow/python/framework/op_def_library.py:263: colocate_with (from tensorflow.python.framework.ops) is deprecated and will be removed in a future version.
Instructions for updating:
Colocations handled automatically by placer.
2019-05-29 08:19:43,495 [WARNING] tensorflow: From /app/iva/faster_rcnn/launcher/py_image.binary.runfiles/pip_deps2__tensorflow_gpu_1_13_1/extracted/tensorflow/python/framework/op_def_library.py:263: colocate_with (from tensorflow.python.framework.ops) is deprecated and will be removed in a future version.
Instructions for updating:
Colocations handled automatically by placer.
2019-05-29 08:19:45,819 [INFO] /app/iva/faster_rcnn/launcher/py_image.binary.runfiles/ai_infra/iva/faster_rcnn/scripts/inference.py: Done!
2019-05-29 08:20:02,271 [INFO] /app/iva/faster_rcnn/launcher/py_image.binary.runfiles/ai_infra/iva/faster_rcnn/scripts/inference.py: 000008.png
2019-05-29 08:20:09.102160: I tensorflow/stream_executor/dso_loader.cc:152] successfully opened CUDA library libcublas.so.10.0 locally
2019-05-29 08:20:09,768 [INFO] /app/iva/faster_rcnn/launcher/py_image.binary.runfiles/ai_infra/iva/faster_rcnn/scripts/inference.py: Elapsed time = 7.49691820145
2019-05-29 08:20:09,798 [INFO] /app/iva/faster_rcnn/launcher/py_image.binary.runfiles/ai_infra/iva/faster_rcnn/scripts/inference.py: Image 000008.png processed.
2019-05-29 08:20:09,798 [INFO] /app/iva/faster_rcnn/launcher/py_image.binary.runfiles/ai_infra/iva/faster_rcnn/scripts/inference.py: 000010.png
2019-05-29 08:20:09,918 [INFO] /app/iva/faster_rcnn/launcher/py_image.binary.runfiles/ai_infra/iva/faster_rcnn/scripts/inference.py: Elapsed time = 0.120166063309
2019-05-29 08:20:09,946 [INFO] /app/iva/faster_rcnn/launcher/py_image.binary.runfiles/ai_infra/iva/faster_rcnn/scripts/inference.py: Image 000010.png processed.
2019-05-29 08:20:09,946 [INFO] /app/iva/faster_rcnn/launcher/py_image.binary.runfiles/ai_infra/iva/faster_rcnn/scripts/inference.py: 000012.png
2019-05-29 08:20:10,082 [INFO] /app/iva/faster_rcnn/launcher/py_image.binary.runfiles/ai_infra/iva/faster_rcnn/scripts/inference.py: Elapsed time = 0.13534784317
2019-05-29 08:20:10,111 [INFO] /app/iva/faster_rcnn/launcher/py_image.binary.runfiles/ai_infra/iva/faster_rcnn/scripts/inference.py: Image 000012.png processed.
2019-05-29 08:20:10,111 [INFO] /app/iva/faster_rcnn/launcher/py_image.binary.runfiles/ai_infra/iva/faster_rcnn/scripts/inference.py: 000035.png
Running inference on an SSD model
The tlt-infer tool for SSD networks can be used to visualize bboxes, or generate frame by frame KITTI format labels on a directory of images. Here's an example of using this tool:
tlt-infer ssd  -i <input directory>
               -o <output annotated image directory>
               -e <experiment spec file>
               -m <model file>
               [-l <output label directory>]
               [-t <visualization threshold>]
               -k <key>
Required arguments
- -m, --model : Path to the pretrained model (TLT model).
- -i, --in_image_dir : The directory of input images for inference.
- -o, --out_image_dir : The directory path to output annotated images.
- -k, --key : Key to load model.
- -e, --config_path : Path to an experiment spec file for training.
Optional arguments
- -t, --draw_conf_thres : Threshold for drawing a bbox. default: 0.3
- -h, --help : Show this help message and exit
- -l, --out_label_dir : The directory to output KITTI labels.
Here's a sample output log:
Using TensorFlow backend.
2019-05-29 08:19:42.667096: I tensorflow/core/platform/cpu_feature_guard.cc:141] Your CPU supports instructions that this TensorFlow binary was not compiled to use: AVX2 FMA
2019-05-29 08:19:42.927812: I tensorflow/core/common_runtime/gpu/gpu_device.cc:1433] Found device 0 with properties:
name: Tesla V100-SXM2-16GB major: 7 minor: 0 memoryClockRate(GHz): 1.53
pciBusID: 0000:85:00.0
totalMemory: 15.75GiB freeMemory: 15.44GiB
2019-05-29 08:19:42.927857: I tensorflow/core/common_runtime/gpu/gpu_device.cc:1512] Adding visible gpu devices: 0
2019-05-29 08:19:43.446058: I tensorflow/core/common_runtime/gpu/gpu_device.cc:984] Device interconnect StreamExecutor with strength 1 edge matrix:
2019-05-29 08:19:43.446106: I tensorflow/core/common_runtime/gpu/gpu_device.cc:990]      0
2019-05-29 08:19:43.446114: I tensorflow/core/common_runtime/gpu/gpu_device.cc:1003] 0:   N
2019-05-29 08:19:43.446984: I tensorflow/core/common_runtime/gpu/gpu_device.cc:1115] Created TensorFlow device (/job:localhost/replica:0/task:0/device:GPU:0 with 14935 MB memory) -> physical GPU (device: 0, name: Tesla V100-SXM2-16GB, pci bus id: 0000:85:00.0, compute capability: 7.0)
...
...
anchor_reshape_5 (Reshape)      (None, 24, 1, 8)     0           ssd_anchor_5[0][0]
________________________________________________________________________________
mbox_conf_sigmoid (Activation)  (None, 32760, 1, 20) 0           mbox_conf[0][0]
________________________________________________________________________________
mbox_loc (Concatenate)          (None, 32760, 1, 4)  0           loc_reshape_0[0][0]
                                                                 loc_reshape_1[0][0]
                                                                 loc_reshape_2[0][0]
                                                                 loc_reshape_3[0][0]
                                                                 loc_reshape_4[0][0]
                                                                 loc_reshape_5[0][0]
________________________________________________________________________________
mbox_priorbox (Concatenate)     (None, 32760, 1, 8)  0           anchor_reshape_0[0][0]
                                                                 anchor_reshape_1[0][0]
                                                                 anchor_reshape_2[0][0]
                                                                 anchor_reshape_3[0][0]
                                                                 anchor_reshape_4[0][0]
                                                                 anchor_reshape_5[0][0]
________________________________________________________________________________
concatenate_3 (Concatenate)     (None, 32760, 1, 32) 0           mbox_conf_sigmoid[0][0]
                                                                 mbox_loc[0][0]
                                                                 mbox_priorbox[0][0]
________________________________________________________________________________
ssd_predictions (Reshape)       (None, 32760, 32)    0           concatenate_3[0][0]
================================================================================
Total params: 7,961,848
Trainable params: 7,958,376
Non-trainable params: 3,472
________________________________________________________________________________
WARNING:tensorflow:From ./ssd/box_coder/output_decoder_layer.py:83: to_float (from tensorflow.python.ops.math_ops) is deprecated and will be removed in a future version
Instructions for updating:
Use tf.cast instead.
2019-08-04 00:01:14,444 [WARNING] tensorflow: From ./ssd/box_coder/output_decoder_layer.py:83: to_float (from tensorflow.python.ops.math_ops) is deprecated and will be removed in a future version.
Instructions for updating:
Use tf.cast instead.
100%|##########| 4952/4952 [03:35<00:00, 22.99it/s]
9. Pruning the model
Pruning removes parameters from the model to reduce the model size without compromising the integrity of the model itself using the tlt-prune command.
tlt-prune [-h] -pm <pretrained_model>
               -o <output_dir> -k <key>
               [-n <normalizer>]
               [-eq <equalization_criterion>]
               [-pg <pruning_granularity>]
               [-pth <pruning threshold>]
               [-nf <min_num_filters>]
               [-el [<excluded_list>]
- -pm, --pretrained_model : Path to pretrained model.
- -o, --output_dir : Path to output checkpoints.
- -k, --key : Key to load a .tlt model
Optional arguments
- -h, --help: Show this help message and exit.
- -n, –normalizer : `max` to normalize by dividing each norm by the maximum norm within a layer; `L2` to normalize by dividing by the L2 norm of the vector comprising all kernel norms. (default: `max`)
- -eq, --equalization_criterion : Criteria to equalize the stats of inputs to an element wise op layer, or depth-wise convolutional layer. This parameter is useful for resnets and mobilenets. Options are [arithmetic_mean, geometric_mean, union, intersection]. (default: `union`)
- -pg, -pruning_granularity: Number of filters to remove at a time. (default:8).
- -pth : Threshold to compare normalized norm against.
(default:0.1)
Note: NVIDIA recommends changing the threshold to keep the number of parameters in the model to within 10-20% of the original unpruned model.
- -nf, --min_num_filters : Minimum number of filters to keep per layer. (default:16)
- -el, --excluded_layers: List of excluded_layers. Examples: -i item1 item2 (default: [])
After pruning, the model needs to be retrained. See Re-training the pruned model.
Using the Prune command
Here's an example of using the tlt-prune command:
tlt-prune -pm /workspace/output/weights/resnet_003.tlt \
              -o /workspace/output/weights/resnet_003_pruned \
              -eq union \
              -pth 0.7 -k $KEY
Using this command produces a log similar to this:
Using TensorFlow backend.
2018-10-12 00:12:38.772343: I tensorflow/core/common_runtime/gpu/gpu_device.cc:1356] Found device 0 with properties:
name: TITAN Xp major: 6 minor: 1 memoryClockRate(GHz): 1.582
pciBusID: 0000:01:00.0
totalMemory: 11.91GiB freeMemory: 10.58GiB
..
..
..
2018-10-12 00:12:45,132 [INFO] modulus.pruning.pruning: Pruning model and appending pruned nodes to new graph
2018-10-12 00:13:10,642 [INFO] /usr/local/lib/python2.7/dist-packages/iva/common/tlt_prune.pyc: Pruning ratio: 0.0194629982936
Re-training the pruned model
Once the model has been pruned, there might be a slight decrease in accuracy. This happens because some previously useful weights may have been removed. In order to regain the accuracy, NVIDIA recommends that you retrain this pruned model over the same dataset. To do this, use the tlt-train command as documented in Training the model, with an updated spec file that points to the newly pruned model as the pretrained model file. For detectnet_v2, it is important that the user set the load_graph option under model_config to true to import the pruned graph. All the other parameters may be retained in the spec file from the previous training.
10. Exporting the model
The Transfer Learning Toolkit includes the tlt-export command to export and prepare TLT models for Deploying to DeepStream. The tlt-export command optionally generates the calibration cache for TensorRT INT8 engine calibration.
Exporting the model decouples the training process from inference and allows conversion to TensorRT engines outside the TLT environment. TensorRT engines are specific to each hardware configuration and should be generated for each unique inference environment, but the same exported TLT model may be used universally.
INT8 mode overview
TensorRT engines can be generated in INT8 mode to improve performance, but require a calibration cache at engine creation-time. The calibration cache is generated using a calibration tensor file, if tlt-export is run with the --data_type flag set to int8. Pre-generating the calibration information and caching it removes the need for calibrating the model on the inference machine. Moving the calibration cache is usually much more convenient than moving the calibration tensorfile, since it is a much smaller file and can be moved with the exported model. Using the calibration cache also speeds up engine creation as building the cache can take several minutes to generate depending on the size of the Tensorfile and the model itself.
- Providing a calibration tensorfile generated using the tlt-int8-tensorfile command
- Pointing the tool to a directory of images that you want to use to calibrate the
model
NVIDIA recommends using the first option, because the tlt-int8-tensorfile command uses the data generators to produce the training data. This ensures that all the preprocessing steps have been done, and you get the best representation of the inputs to the network. If you decide to use the second option, you must run the preprocessing offline before feeding these images to the calibration tool for optimum performance.
Generating an INT8 tensorfile using the tlt-int8-tensorfile command
The INT8 tensorfile is a binary file that contains the preprocessed training samples, which maybe used to calibrate the model. In this release, TLT only supports calibration tensorfile generation for DetectNet_v2 and classification models.
Here's an example of using the tlt-int8-tensorfile command to generate a calibration tensorfile for a DetectNet_v2 model.
tlt-int8-tensorfile {classification, detectnet_v2} [-h]
                       -e <path to training experiment spec file>
                       -o <path to output tensorfile>
                       -m <maximum number of batches to serialize>
                       [--use_validation_set]
Positional arguments:
classification or detectnet_v2
Required arguments:
- -e, --experiment_spec_file: Path to the experiment spec file. (Only required for SSD and FasterRCNN.)
- -o, --output_path: Path to the output tensorfile that will be created.
- -m, --max_batches: Number of batches of input data to be serialized.
Optional argument
- --use_validation_set: Flag to use validation dataset instead of training set.
Here's a sample command to invoke the tlt-int8-tensorfile command for a classification model.
tlt-int8-tensorfile classification -e $SPECS_DIR/classification_retrain_spec.cfg
                                   -m 10
                                   -o $USER_EXPERIMENT_DIR/export/calibration.tensor
Exporting the model using tlt-export
Here's an example of the command line arguments of the tlt-export command:
tlt-export [-h] -k <key>
                --export_module <module to export>
                --outputs <comma separated output tensor names>
                [--data_type <trt engine datatype>]
                [-o <path to output file>]
                [--input_dims <input dims>]
                [--generate_tensorfile]
                [--cal_data_file <path to tensor file>
                [--cal_cache_file <path to output calibration file>]
                [--batches <Number of batches to calibrate over>]
                [--cal_batch_size <batch size to calibrate>]
                [--max_batch_size <maximum trt batch size>]
                [--max_workspace_size <maximum workspace size]
                [–experiment_spec <path to experiment spec file>]
                input_file
Required arguments:
- -i: Path to the model exported using tlt-export.
- -k: API key used to download the model with tlt-pull.
- --export_module: Which app to export, can be classification, detectnet_v2, faster_rcnn or ssd.
- -O: Comma-separated list of output blob names.
- For classification use: predictions/Softmax
- For DetectNet_v2: output_bbox/BiasAdd,output_cov/Sigmoid
- For FasterRCNN: dense_class/Softmax,dense_regress/BiasAdd,proposal
- For SSD: NMS
Optional arguments:
- -o, --output_file : Path to save the exported model to. The default is ./<input_file>.etlt.
- --data_type: Desired engine data type, generates calibration cache if in INT8 mode. The options are: {fp32, fp16, int8} The default value is fp32.
INT8 export mode required arguments:
- --cal_data_file: Tensorfile generated from tlt-int8-tensorfile for calibrating the engine.
- --cal_image_dir: Directory of images to use for calibration.
- --input_dims: Comma separated list of input dimensions in CHW order. If data_file is provided, the the input dims will be inferred from it.
- --generate_tensorfile: Boolean flag to generate a calibration tensorfile from a directory of images. This is a beta feature and is currently useful, only to export FasterRCNN and DetectNet_v2 models in INT8 mode. When invoked, the tool looks at the directory mentioned in the --cal_image_dir parameter for images and applies the necessary preprocessing to generate a tensorfile at the path mentioned in the --cal_data_file parameter, which is in turn used for calibration. This flag is currently not expected to work for classification. The number of batches in the tensorfile generated is obtained from the value set to the --batches parameter, and the batch_size is obtained from the value set to the --cal_batch_size parameter. Be sure that the directory mentioned in --cal_image_dir has at least cal_batch_size * batches number of images in it. The valid image extensions are jpg, jpeg and png. In this case, the --input_dims parameter should also be set, to the calibration tensorfile data dimensions.
INT8 export optional arguments:
- --cal_cache_file: Path to save the calibration cache file. The default value is ./cal.bin.
- --batches: Number of batches to use for calibration and inference testing.The default value is 10.
- --cal_batch_size: Batch size to use for calibration. The default value is 8.
- --max_batch_size: Maximum batch size of TensorRT engine. The default value is 16.
- --max_workspace_size : Maximum workspace size of TensorRT engine. The default value is: 1073741824 = 1<<30)
- --experiment_spec: The experiment_spec for training/inference/evaluation. This is used to generate the graphsurgeon config script for FasterRCNN from the experiment_spec, only useful for FasterRCNN.
Exporting a model
Here's a sample command to export a DetectNet_v2 model in INT8 mode:
tlt-export $USER_EXPERIMENT_DIR/experiment_dir_retrain/weights/resnet18_detector_pruned.tlt \
           -o $USER_EXPERIMENT_DIR/experiment_dir_final/resnet18_detector.etlt \
           --outputs output_cov/Sigmoid,output_bbox/BiasAdd \
           -k $KEY \
           --input_dims 3,512,512 \
           --max_workspace_size 1100000 \
           --export_module detectnet_v2 \
           --cal_data_file $USER_EXPERIMENT_DIR/experiment_dir_final/calibration.tensor \
           --data_type int8 \
           --batches 10 \
           --cal_cache_file $USER_EXPERIMENT_DIR/experiment_dir_final/calibration.bin
Here's an example of a successful export:
Using TensorFlow backend.
2018-11-02 18:59:43,347 [INFO] iva.common.tlt-export: Loading model from resnet10_kitti_multiclass_v1.tlt
..
2018-11-02 18:59:47,572 [INFO] tensorflow: Restoring parameters from /tmp/tmp8crUBp.ckpt
INFO:tensorflow:Froze 82 variables.
2018-11-02 18:59:47,701 [INFO] tensorflow: Froze 82 variables.
Converted 82 variables to const ops.
2018-11-02 18:59:48,123 [INFO] iva.common.tlt-export: Converted model was saved into resnet10_kitti_multiclass_v1.etlt
2018-11-02 18:59:48,123 [INFO] iva.common.tlt-export: Input node: input_1
2018-11-02 18:59:48,124 [INFO] iva.common.tlt-export: Output node(s): ['output_bbox/BiasAdd', 'output_cov/Sigmoid']
Here's a sample command using the generate_tensorfile option for a FasterRCNN model:
tlt-export $USER_EXPERIMENT_DIR/data/faster_rcnn/frcnn_kitti_retrain.epoch12.tlt \
          -o $USER_EXPERIMENT_DIR/data/faster_rcnn/frcnn_kitti_retrain.int8.etlt \
          --outputs dense_class/Softmax,dense_regress/BiasAdd,proposal \
          -e $SPECS_DIR/frcnn_kitti_retrain_spec.txt \
          --enc_key $KEY \
          --input_dims 3,384,1280 \
          --export_module faster_rcnn \
          --cal_image_dir  $USER_EXPERIMENT_DIR/data/KITTI/val/image_2 \
          --data_type int \
          --cal_batch_size 8 \
          --batches 10 \
          --generate_tensorfile \
          --cal_cache_file $USER_EXPERIMENT_DIR/data/faster_rcnn/cal.bin
11. Deploying to DeepStream
The deep learning and computer vision models that you train are meant for deployment on edge devices, such as a Jetson Xavier, Jetson Nano or a Tesla T4. Some of these devices may not be as rich in compute resources or power, as the larger servers where the Transfer Learning Toolkit (TLT) docker maybe hosted. To facilitate this diversity of computational platforms, TLT has been designed to integrate with DeepStream video analytics. To deploy a model trained by TLT to DeepStream you can:
- Generate a device specific optimized TensorRT engine, using tlt-converter which may then be ingested by DeepStream
- Integrate the model directly in the DeepStream environment using the exported model file generated by tlt-export.
Machine specific optimizations are done as part of the engine creation process, so a distinct engine should be generated for each environment and hardware configuration. If the inference environment's TensorRT or CUDA libraries are updated – including minor version updates – new engines should be generated. Running an engine that was generated with a different version of TensorRT and CUDA is not supported and will cause unknown behavior that affects inference speed, accuracy, and stability, or it may fail to run altogether.
Generating an engine using tlt-converter
Setup and Execution
The tlt-converter is a tool that is provided with the Transfer Learning Toolkit to facilitate the deployment of TLT trained models on TensorRT and/or Deepstream. For deployment platforms with an x86 based CPU and discrete GPU's, the tlt-converter is distributed within the TLT docker. Therefore, it is suggested to use the docker to generate the engine. However, this requires that the user adhere to the same minor version of TensorRT as distributed with the docker. The TLT docker includes TensorRT version 5.1 for JetPack 4.2.2 and TensorRT version 6.0.1 for JetPack 4.2.3 / 4.3. In order to use the engine with a different minor version of TensorRT, it would be best to copy over the converter from /opt/nvidia/tools/tlt-converter to the target machine and follow the instructions mentioned below to run it and generate a TensorRT engine.
For the Jetson platform, the tlt-converter for JetPack 4.2.2 and JetPack 4.2.3 / 4.3 is available to download in the dev zone. Once the tlt-converter is downloaded, please follow the instructions below to generate a TensorRT engine.
- Install the open ssl package using the command: sudo apt-get install libssl-dev
- Install TensorRT for the respective target machine from here.
- Deploying SSD and Faster RCNN requires custom plugins that are currently not available with TensorRT GA. Therefore, inorder to deploy these models, please follow the instructions on how to build the TRT Open Source Software repo and replace the system lib /usr/lib/aarch64-linux-gnu/libnvinfer_plugin.so.5.x.x with the newly built lib libnvinfer_plugin.so.5.x.x.
- For Jetson devices, TensorRT should come pre-installed with the JetPack.
- Locate the tlt-converter inside the inference environment and add its parent directory to the system path.
- Run the tlt-converter using the sample command below and generate the engine.
Using the tlt-converter
tlt-converter [-h] -k <encryption_key>
              -d <input_dimensions>
              -o <comma separated output nodes>
              [-c <path to calibration cache file>]
              [-e <path to output engine>]
              [-b <calibration batch size>]
              [-m <maximum batch size of the TRT engine>]
              [-t <engine datatype>]
              [-w <maximum workspace size of the TRT Engine>]
              [-i <input dimension ordering>]
              input_file
Required arguments:
- input_file: Path to the model exported using tlt-export.
- -k: The API key used to configure the ngc cli to download the models.
- -d: Comma-separated list of input dimensions that should match the dimensions used for tlt-export. Unlike tlt-export this cannot be inferred from calibration data.
- -o: Comma-separated list of output blob names that should match the
output configuration used for tlt-export. For classification use:
predictions/Softmax.
- For detection: output_bbox/BiasAdd,output_cov/Sigmoid
- For FasterRCNN: dense_class/Softmax,dense_regress/BiasAdd, proposal
- For SSD: NMS
Optional arguments:
- -e: Path to save the engine to. (default: ./saved.engine)
- -t: Desired engine data type, generates calibration cache if in INT8 mode. The default value is fp32.The options are {fp32, fp16, int8}
- -w: Maximum workspace size for the TensorRT engine. The default value is 1<<30.
- -i: Input dimension ordering, all other tlt command use NCHW. The default value is nchw. The options are {nchw, nhwc, nc}.
INT8 Mode Arguments:
- -c: Path to calibration cache file, only used in INT8 mode. The default value is ./cal.bin.
- -b: Batch size used during the tlt-export step for INT8 calibration cache generation. (default: 8).
- -m: Maximum batch size of TensorRT engine. The default value is 16.
Sample output log
Sample log for exporting a resnet10 detectnet_v2 model.
Here's a sample:
export API_KEY=<NGC API key used to download the original model>
export OUTPUT_NODES=output_bbox/BiasAdd,output_cov/Sigmoid
export INPUT_DIMS=3,384,124
export D_TYPE=fp32
export ENGINE_PATH=resnet10_kitti_multiclass_v1.engine
export MODEL_PATH=resnet10_kitti_multiclass_v1.etlt

tlt-converter -k $API_KEY \
              -o $OUTPUT_NODES \
              -d $INPUT_DIMS \
              -e $ENGINE_PATH \
              $MODEL_PATH

[INFO] UFFParser: parsing input_1
[INFO] UFFParser: parsing conv1/kernel
[INFO] UFFParser: parsing conv1/convolution
[INFO] UFFParser: parsing conv1/bias
[INFO] UFFParser: parsing conv1/BiasAdd
[INFO] UFFParser: parsing bn_conv1/moving_variance
..
..
..
[INFO] Tactic 4 scratch requested: 1908801536, available: 16
[INFO] Tactic 5 scratch requested: 55567168, available: 16
[INFO] --------------- Chose 1 (0)
[INFO] Formats and tactics selection completed in 5.0141 seconds.
[INFO] After reformat layers: 16 layers
[INFO] Block size 490733568
[INFO] Block size 122683392
[INFO] Block size 122683392
[INFO] Block size 30670848
[INFO] Block size 16
[INFO] Total Activation Memory: 766771216
[INFO] Data initialization and engine generation completed in 0.0412826 seconds
Integrating the exported model directly to DeepStream
The DeepStream video analytics from V4.0 supports direct integration of Classification and DetectNet_v2 exported models in to the deepstream sample app. The documentation for the DeepStream 4.0 SDK is provided here [https://docs.nvidia.com/metropolis/index.html]. For FasterRCNN and SSD, the integration to DeepStream is a beta feature.
In order to integrate the models with DeepStream, you need the following:
- An exported .etlt model file
- A calibration cache file (if the engine is run in int 8 mode for quicker and more optimized inferences)
- A labels.txt file containing the labels for classes in the order in which the networks produces outputs
- A sample config_infer_*.txt file to conifgure the nvinfer element in DeepStream. The nvinfer element handles, everything related to TensorRT optimization and engine creation in DeepStream.
Integrating a Classification model
- Label file
- DeepStream configuration file
Label file
The label file is a text file, containing the names of the classes that the TLT model is trained to classify against. The order in which the classes are listed must match the order in which the model predicts the output. This order maybe deduced from the classmap.json file, that is generated by TLT. This file is a simple dictionary containing the class_name to index map. For example, in the sample classification sample notebook file included with the tlt-docker, the classmap.json file generated for pascal voc would look like this:
{"sheep": 16,"horse": 12,"bicycle": 1, "aeroplane": 0, "cow": 9,
 "sofa": 17, "bus": 5, "dog": 11, "cat": 7, "person": 14, "train": 18,
 "diningtable": 10, "bottle": 4, "car": 6, "pottedplant": 15,
 "tvmonitor": 19, "chair": 8, "bird": 2, "boat": 3, "motorbike": 13}
The 0th index corresponds to aeroplane, the 1st index corresponds to bicycle, etc. up to 19 which corresponds to tvmonitor. Here is a sample label.txt file, classification_labels.txt.
aeroplane
bicycle
bird
boat
bottle
bus
car
cat
chair
cow
diningtable
dog
horse
motorbike
..
..
tvmonitor
DeepStream configuration file
To run this model in the sample DeepStream app, you must modify the existing config_infer_secondary_*.txt to point to this model. Here's a sample config file, config_infer_secondary.txt:
[property]
gpu-id=0
# preprocessing parameters: These are the same for all classification models generated by TLT.
net-scale-factor=1.0
offsets=123.67;116.28;103.53
model-color-format=1
batch-size=30

# Model specific paths. These need to be updated for every classfication model.
int8-calib-file=/path/to/int8/cache.bin
labelfile-path=/path/to/label/file.txt
tlt-encoded-model=/path/ to/ exported/ file.etlt
tlt-model-key=<ngc_api_key>
input-dims=c;h;w;0 # where c = number of channels, h = height of the model input, w = width of model input, 0: implies CHW format.
uff-input-blob-name=input_1
output-blob-names=predictions/Softmax #output node name for classification

## 0=FP32, 1=INT8, 2=FP16 mode
network-mode=0
# process-mode: 2 - inferences on crops from primary detector, 1 - inferences on whole frame
process-mode=2
interval=0
network-type=1 # defines that the model is a classifier.
gie-unique-id=1
classifier-threshold=0.2
Integrating a DetectNet_v2 model
- Label file
- DS configuration file
Label file
The label file is a text file, containing the names of the classes that the DetectNet_v2 model is trained to detect. The order in which the classes are listed here must match the order in which the model predicts the output. This order is derived from the order the objects are instantiated in the cost_function_config field of the DetectNet_v2 experiment config file. Here's an example, of the DetectNet_v2 sample notebook file included with the tlt-docker, the cost_function_config parameter looks like this:
cost_function_config {
  target_classes {
    name: "sheep"
    class_weight: 1.0
    coverage_foreground_weight: 0.05
    objectives {
      name: "cov"
      initial_weight: 1.0
      weight_target: 1.0
    }
    objectives {
      name: "bbox"
      initial_weight: 10.0
      weight_target: 1.0
    }
  }
  target_classes {
    name: "bottle"
    class_weight: 1.0
    coverage_foreground_weight: 0.05
    objectives {
      name: "cov"
      initial_weight: 1.0
      weight_target: 1.0
    }
    objectives {
      name: "bbox"
      initial_weight: 10.0
      weight_target: 1.0
    }
  }
  target_classes {
    name: "horse"
    class_weight: 1.0
    coverage_foreground_weight: 0.05
    objectives {
      name: "cov"
      initial_weight: 1.0
      weight_target: 1.0
    }
    objectives {
      name: "bbox"
      initial_weight: 10.0
      weight_target: 1.0
    }
  }
  ..
  ..
  target_classes {
    name: "boat"
    class_weight: 1.0
    coverage_foreground_weight: 0.05
    objectives {
      name: "cov"
      initial_weight: 1.0
      weight_target: 1.0
    }
    objectives {
      name: "bbox"
      initial_weight: 10.0
      weight_target: 1.0
    }
  }
  target_classes {
    name: "car"
    class_weight: 1.0
    coverage_foreground_weight: 0.05
    objectives {
      name: "cov"
      initial_weight: 1.0
      weight_target: 1.0
    }
    objectives {
      name: "bbox"
      initial_weight: 10.0
      weight_target: 1.0
    }
  }
  enable_autoweighting: False
  max_objective_weight: 0.9999
  min_objective_weight: 0.0001
}
Here's an example of the corresponding, classification_labels.txt:
sheep
bottle
horse
..
..
boat
car
DeepStream configuration file
To run this model in the sample deepstream app, you must modify the existing config_infer_primary.txt file to point to this model. Here's a sample config file, config_infer_primary.txt
[property]
gpu-id=0
# preprocessing parameters.
net-scale-factor=0.0039215697906911373
model-color-format=0

# model paths.
int8-calib-file=/path/ to/ int8/ cache.bin
labelfile-path=/path/ to/ labels.txt
tlt-encoded-model=/path/ to/ detectnet_v2/ exported/ file.etlt
tlt-model-key=<ngc api key to decode the model>
input-dims=c;h;w;0 # where c = number of channels, h = height of the model input, w = width of model input, 0: implies CHW format.
uff-input-blob-name=input_1
batch-size=4
## 0=FP32, 1=INT8, 2=FP16 mode
network-mode=0
num-detected-classes=3
interval=0
gie-unique-id=1
is-classifier=0
output-blob-names=output_cov/Sigmoid;output_bbox/BiasAdd
#enable_dbscan=0

[class-attrs-all]
threshold=0.2
group-threshold=1
## Set eps=0.7 and minBoxes for enable-dbscan=1
eps=0.2
#minBoxes=3
roi-top-offset=0
roi-bottom-offset=0
detected-min-w=0
detected-min-h=0
detected-max-w=0
detected-max-h=0
Integrating an SSD model
To run an SSD model in DeepStream, you need a label file and a DeepStream configuration file. In addition, you need to compile the SSD DeepStream plugin and sample app, because SSD is still in Beta.
A DeepStream sample with documentation on how to run inference using the trained SSD models from TLT is provided on github at: https://github.com/NVIDIA-AI-IOT/deepstream_4.x_apps.
Download and compile the required app
- SSD requires batchTilePlugin. This plugin is available in the TensorRT open source repo, but not in TensorRT 5.1.5. Please clone the TensorRT OSS repository from https://github.com/NVIDIA/TensorRT, checkout the branch release/5.1 and follow the instructions to build the libnvinfer_plugin. After building the libnvinfer_plugin.*, please replace the libnvinfer_plugin.* in <TensorRT_install_path>/lib with libraries built from the github repo.
- Additional DeepStream plugins are required to integrate the SSD model into DeepStream. It is available here: https://github.com/NVIDIA-AI-IOT/deepstream_4.x_apps.
- Replace /Your_deepstream_SDK_v4.0_xxxxx_path with your actual DeepStream SDK 4.0 path in deepstream_4.x_apps/nvdsinfer_customparser_ssd_uff/Makefile and in deepstream_4.x_apps/Makefile.
- Compile the plugin and sample app.
Label file
The label file is a text file, containing the names of the classes that the SSD model is trained to detect. The order in which the classes are listed here must match the order in which the model predicts the output. This order is derived from the order the objects are instantiated in the dataset_config field of the SSD experiment config file. For example, if the dataset_config is:
dataset_config {
  data_sources: {
    tfrecords_path: "/workspace/tlt-experiments/tfrecords/pascal_voc/pascal_voc*"
    image_directory_path: "/workspace/tlt-experiments/data/VOCdevkit/VOC2012"
  }
  image_extension: "jpg"
  target_class_mapping {
    key: "car"
    value: "car"
  }
  target_class_mapping {
    key: "person"
    value: "person"
  }
  target_class_mapping {
    key: "bicycle"
    value: "bicycle"
  }
  validation_fold: 0
}
Here's an example of the corresponding classification_lables.txt file is:
car
person
bicycle
DeepStream configuration file
Here's a sample config file, config_infer_secondary.txt:
[property]
gpu-id=0
net-scale-factor=1.0
offsets=103.939;116.779;123.68
model-color-format=1
labelfile-path=/path/to/labels.txt
tlt-encoded-model=/path/to/ssd/exported/file.etlt
tlt-model-key=<key to decode the model>
input-dims=c;h;w;0 # where c = number of channels, h = height of the model input, w = width of model input, 0: implies CHW format.
uff-input-blob-name=Input
batch-size=1

## 0=FP32, 1=INT8, 2=FP16 mode
network-mode=0
num-detected-classes=<num of classes to detect>
interval=0
gie-unique-id=1
is-classifier=0
#network-type=0

output-blob-names=NMS
parse-bbox-func-name=NvDsInferParseCustomSSDUff
custom-lib-path=./nvdsinfer_customparser_ssd_uff/libnvds_infercustomparser_ssd_uff.so

[class-attrs-all]
roi-top-offset=0
roi-bottom-offset=0
detected-min-w=0
detected-min-h=0
detected-max-w=0
detected-max-h=0
Integrating a FasterRCNN model
To run a FasterRCNN model in DeepStream, you need a label file and a DeepStream configure file. In addition, you need to compile FasterRCNN DeepStream plugin and sample app, because FasterRCNN is still in Beta.
A DeepStream sample with documentation on how to run inference using the trained FasterRCNN models from TLT is provided on github at: https://github.com/NVIDIA-AI-IOT/deepstream_4.x_apps.
Download and compile the required app
- FasterRCNN requires two TensorRT plugins to run. They are the cropAndResizePlugin and the proposalPlugin. Currently, these plugins are not included in the TensorRT 5.1GA (5.1.5.0) installation package, but they can be obtained from the TensorRT Open Source Software (OSS) in GitHub and checkout the branch release/5.1. Please follow the installation guide here, compile the open sourced plugins, and replace the libnvinfer_plugin.* in the installation directory with the one built from TensorRT OSS.
- To integrate FasterRCNN model into DeepStream, additional DeepStream plugin is required. It is available here: https://github.com/NVIDIA-AI-IOT/deepstream_4.x_apps.
- Replace /Your_deepstream_SDK_v4.0_xxxxx_path with your actual DeepStream SDK 4.0 path in deepstream_4.x_apps/nvdsinfer_customparser_frcnn_uff/Makefile and deepstream_4.x_apps/Makefile.
- Compile the plugin and sample app.
Label file
The label file is a text file, containing the names of the classes that the FasterRCNN model is trained to detect. The order in which the classes are listed here must match the order in which the model predicts the output. This order is derived from the order the objects are instantiated in the class_mapping field of the FasterRCNN experiment specification file. For example, if the class_mapping label file is:
class_mapping {
key: 'Car'
value: 0
}
class_mapping {
key: 'Van'
value: 0
}
class_mapping {
key: "Pedestrian"
value: 1
}
class_mapping {
key: "Person_sitting"
value: 1
}
class_mapping {
key: 'Cyclist'
value: 2
}
class_mapping {
key: "background"
value: 3
}
class_mapping {
key: "DontCare"
value: -1
}
class_mapping {
key: "Truck"
value: -1
}
class_mapping {
key: "Misc"
value: -1
}
class_mapping {
key: "Tram"
value: -1
}
The example of the corresponding label_file_frcnn.txt file is:
Car
Pedestrian
Cyclist
background
DeepStream configuration file
Here's a sample config file:
[property]
gpu-id=0
net-scale-factor=1.0
offsets=<image mean values as in the training spec file> # e.g.: 103.939;116.779;123.68
model-color-format=1
labelfile-path=</path/to/labels.txt>
tlt-encoded-model=</path/to/etlt/model>
tlt-model-key=<key to decode the model>
uff-input-dims=<c;h;w;0> # 3;272;480;0. Where c = number of channels, h = height of the model input, w = width of model input, 0: implies CHW format
uff-input-blob-name=<input_blob_name> # e.g.: input_1
batch-size=<batch size> e.g.: 1
## 0=FP32, 1=INT8, 2=FP16 mode
network-mode=0
num-detected-classes=<number of classes to detect(including background)> # e.g.: 5
interval=0
gie-unique-id=1
is-classifier=0
#network-type=0
output-blob-names=<output_blob_names> e.g.: dense_regress/BiasAdd;dense_class/Softmax;proposal
parse-bbox-func-name=NvDsInferParseCustomFrcnnUff
custom-lib-path=./nvdsinfer_customparser_frcnn_uff/libnvds_infercustomparser_frcnn_uff.so

[class-attrs-all]
roi-top-offset=0
roi-bottom-offset=0
detected-min-w=0
detected-min-h=0
detected-max-w=0
detected-max-h=0
Notices
Notice
THE INFORMATION IN THIS GUIDE AND ALL OTHER INFORMATION CONTAINED IN NVIDIA DOCUMENTATION REFERENCED IN THIS GUIDE IS PROVIDED “AS IS.” NVIDIA MAKES NO WARRANTIES, EXPRESSED, IMPLIED, STATUTORY, OR OTHERWISE WITH RESPECT TO THE INFORMATION FOR THE PRODUCT, AND EXPRESSLY DISCLAIMS ALL IMPLIED WARRANTIES OF NONINFRINGEMENT, MERCHANTABILITY, AND FITNESS FOR A PARTICULAR PURPOSE. Notwithstanding any damages that customer might incur for any reason whatsoever, NVIDIA’s aggregate and cumulative liability towards customer for the product described in this guide shall be limited in accordance with the NVIDIA terms and conditions of sale for the product.
THE NVIDIA PRODUCT DESCRIBED IN THIS GUIDE IS NOT FAULT TOLERANT AND IS NOT DESIGNED, MANUFACTURED OR INTENDED FOR USE IN CONNECTION WITH THE DESIGN, CONSTRUCTION, MAINTENANCE, AND/OR OPERATION OF ANY SYSTEM WHERE THE USE OR A FAILURE OF SUCH SYSTEM COULD RESULT IN A SITUATION THAT THREATENS THE SAFETY OF HUMAN LIFE OR SEVERE PHYSICAL HARM OR PROPERTY DAMAGE (INCLUDING, FOR EXAMPLE, USE IN CONNECTION WITH ANY NUCLEAR, AVIONICS, LIFE SUPPORT OR OTHER LIFE CRITICAL APPLICATION). NVIDIA EXPRESSLY DISCLAIMS ANY EXPRESS OR IMPLIED WARRANTY OF FITNESS FOR SUCH HIGH RISK USES. NVIDIA SHALL NOT BE LIABLE TO CUSTOMER OR ANY THIRD PARTY, IN WHOLE OR IN PART, FOR ANY CLAIMS OR DAMAGES ARISING FROM SUCH HIGH RISK USES.
NVIDIA makes no representation or warranty that the product described in this guide will be suitable for any specified use without further testing or modification. Testing of all parameters of each product is not necessarily performed by NVIDIA. It is customer’s sole responsibility to ensure the product is suitable and fit for the application planned by customer and to do the necessary testing for the application in order to avoid a default of the application or the product. Weaknesses in customer’s product designs may affect the quality and reliability of the NVIDIA product and may result in additional or different conditions and/or requirements beyond those contained in this guide. NVIDIA does not accept any liability related to any default, damage, costs or problem which may be based on or attributable to: (i) the use of the NVIDIA product in any manner that is contrary to this guide, or (ii) customer product designs.
Other than the right for customer to use the information in this guide with the product, no other license, either expressed or implied, is hereby granted by NVIDIA under this guide. Reproduction of information in this guide is permissible only if reproduction is approved by NVIDIA in writing, is reproduced without alteration, and is accompanied by all associated conditions, limitations, and notices.
Trademarks
NVIDIA, the NVIDIA logo, and cuBLAS, CUDA, cuDNN, cuFFT, cuSPARSE, DIGITS, DGX, DGX-1, DGX Station, GRID, Jetson, Kepler, NVIDIA GPU Cloud, Maxwell, NCCL, NVLink, Pascal, Tegra, TensorRT, Tesla and Volta are trademarks and/or registered trademarks of NVIDIA Corporation in the United States and other countries. Other company and product names may be trademarks of the respective companies with which they are associated.