Registry
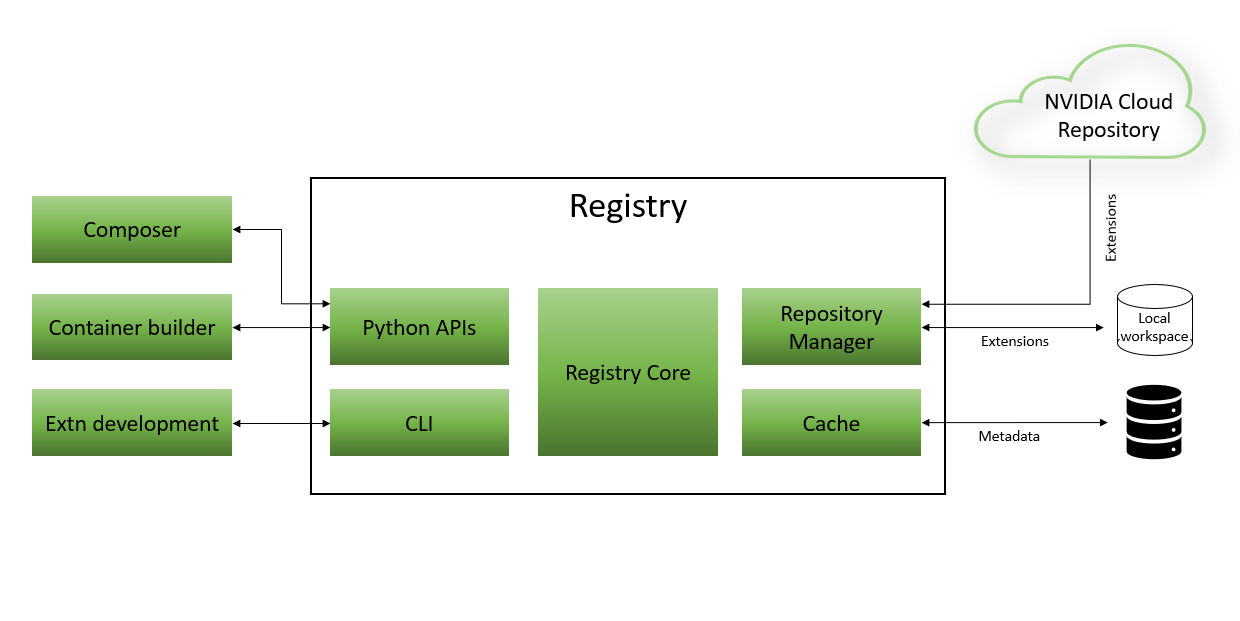
The Registry is an integral part of the Graph Composer ecosystem and is responsible for communication between various tools. Two types of interfaces are provided by Registry:
Python APIs
Python APIs are used by Composer and Container Builder while Development Workflow uses Registry Command Line Interface through Bazel.
In the backend, Registry communicates with Nvidia Cloud repository and Local workspace for extension management while it uses local database as cache of extension metadata.
Below sections explains components of Registry
Python APIs
Python APIs are not released in EA but directly integrated in Composer and Container Builder
CLI
Refer to Registry Command Line Interface
Repository Manager
Repository manager is responsible to communicating with NVIDIA Cloud repository or local workspace based on operation or arguments to operation.
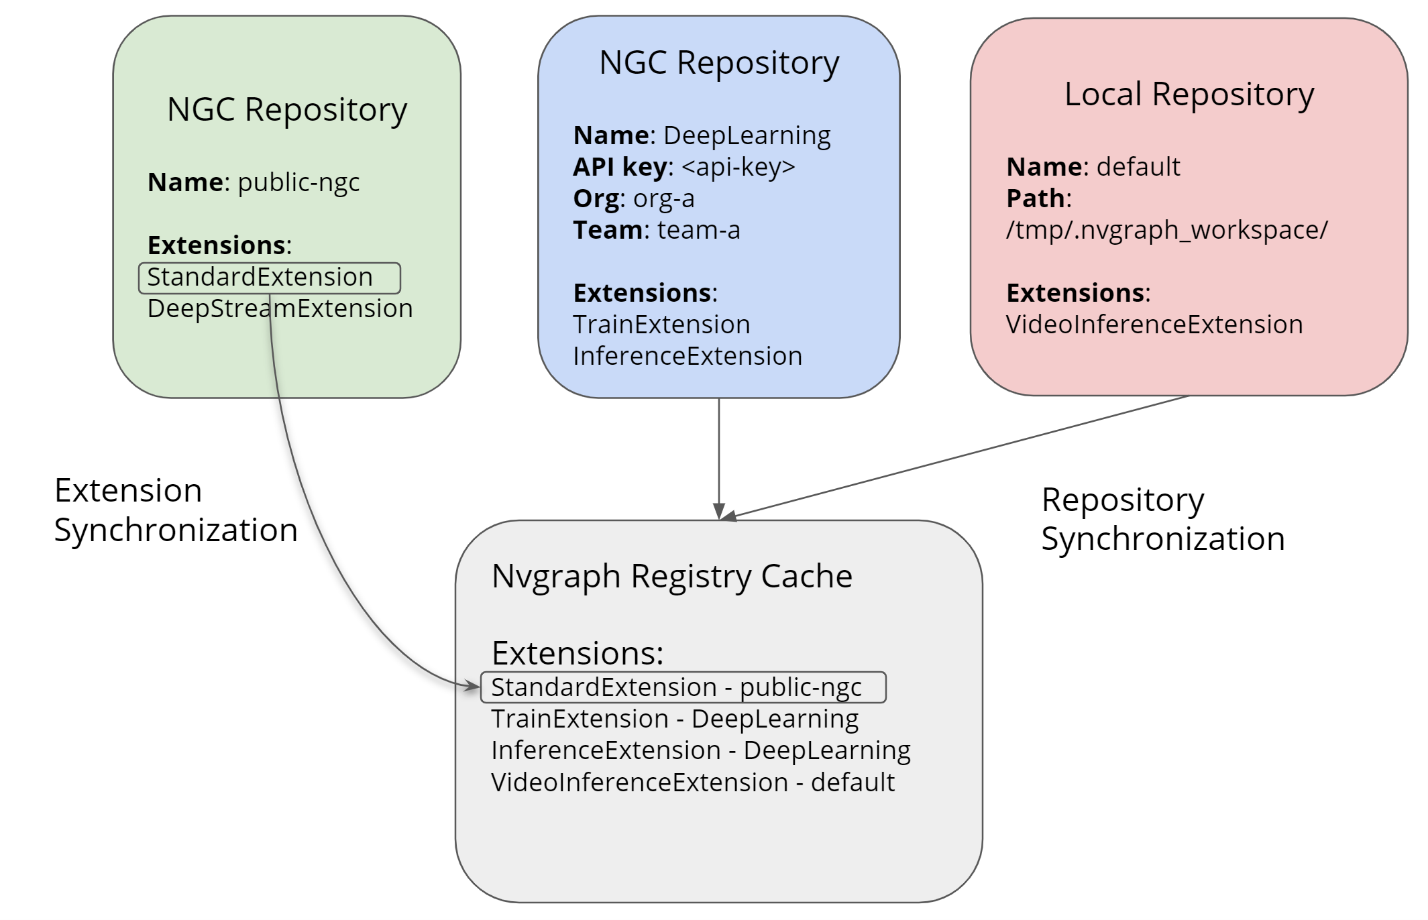
NVIDIA Cloud Repository
Extensions from Nvidia for public access are published in Nvidia Cloud repository. External users can access these extensions using registry repo sync -n ngc-public command. This command downloads all published extensions metadata to Cache on local disk.
Local Workspace
Local workspace is provided for Development Workflow. Registry stores current development version of extension in local workspace. Default workspace path used by Registry is /tmp/nvgraph_workspace. It stores only one version so it will overwrite whenever user updates version of extension and adds it to registry.
Note
Update NVGRAPH_REGISTRY_ROOT environment variable to change local workspace path.
Cache
Graph Composer workflow depends on extensions which is a collection of components as per Graph Specification. Extensions must be added to registry before those can be accessed by Composer. Extension workflow can be described using below steps
Impl
In the development workflow for Graph Composer, the registry is responsible for parsing an extension library and extracting the metadata of the related extensions and components. This can be achieved by adding a call to the bazel registration rule provided by the registry module. The registration process also provides the ability to add some additional information regarding the extension itself which may not be available in the binary. These include metadata like NGC labels, url to the source repository of the extension, headers and data files related to the extension etc. The target related metadata like OS, arch, and distribution along with any other compute stack dependencies(like CUDA) which are needed during deployment must also be provided.
The next stage in the development workflow is being able to share an extension with other developers and peers which can be achieved using NGC (Nvidia GPU cloud). To publish an extension to NGC, a user account must be setup and an API key must be generated which is equivalent to the credentials for the NGC account. This API key along with the along with team and org which the user account has access to must be configured using the registry CLI tool. Once this has been setup, the registry CLI tool can be used to publish/import/sync extensions to and from NGC.
The deployment workflow in nvgraphs start with creating the graphs. The registry interacts with the composer to provide the metadata generated during the registration and synchronization process which is useful for graph creation. The registry maintains this information in its cache locally and its readily available for composer. The extensions present in the local cache can be either added by registering the extension locally or by importing them via NGC. The registry does maintain the source repository of an extension which would be used during deployment.
Once the graph is created using the composer, it can be deployed locally on the bare metal host or in a containerized application via the container builder. The registry parses the graph file and prepares a manifest of all the extensions and their dependent extensions along with an archive package for deployment.
Components of Registry
This section provides details of the components of the NvGraph Registry.
Registry Repositories
A registry repository is a collection of extensions and their corresponding files including extension metadata, headers, extension shared library and any additional binary and data files that are required for deployment. There are two types of registry repositories - Local and NGC repository.
Local Repository
A local repository is present locally to the user’s development environment. The “default” repository is a type of local repository and is used by the registry to keep track of all the extensions added registered locally via the bazel registration rule. The default repository is the only local repository which the registry manages internally.
Registry also provides the option to specify the location on the filesystem which its supposed use for storing contents of the default repository. If not specifically configured, registry will use “/tmp/.nvgraph_workspace/” path to store the contents of the default repository. This can also be verified using the “repo info” command in the CLI tool
“default” repository is always enabled in the registry and its name is reserved. It cannot be removed using the CLI tool and any other NGC repository cannot have the same name.
NGC Repository
An NGC repository is hosted on the NGC platform. Extensions can be published to NGC over time to be shared with other developers who can use these extensions in their graph or also develop their own extensions on top of them.
The NGC catalog is a collection of software provided by NVIDIA and other third-party vendors. More details regarding the NGC catalog can be found here. “public-ngc” is a type of NGC repository which corresponds to the extensions published to the NGC catalog. Like the “default” local repository, the public-ngc repository is always enabled. “public-ngc” is a reserved name for an NGC repository, neither can it be removed using the CLI tool nor can any other NGC repositories be added with the same name.
NGC private registry is also supported by the nvgraph registry. The CLI tool can be used to add an NGC repository which corresponds to a specific organization and optionally a team as well. Organizations with NGC private registry accounts can use this feature to share extensions with developers in their organization. Details on how to setup orgs and team in NGC private registry can be found here.
NGC repository can be setup using the repo add ngc CLI command along with the following inputs:
API key used to authenticate communication with the NGC server
Name of the organization that the user has access to.
(Optional) A name of a team that the user has access to.
Specifying a team within an NGC org is not mandatory and extensions can be published/removed to/from the org directly. Once a repository has been added, the operation can be verified using the repo info command in the CLI tool.
The public-ngc repository is accessible to everyone and API key, org and team information are not needed to use these extensions.
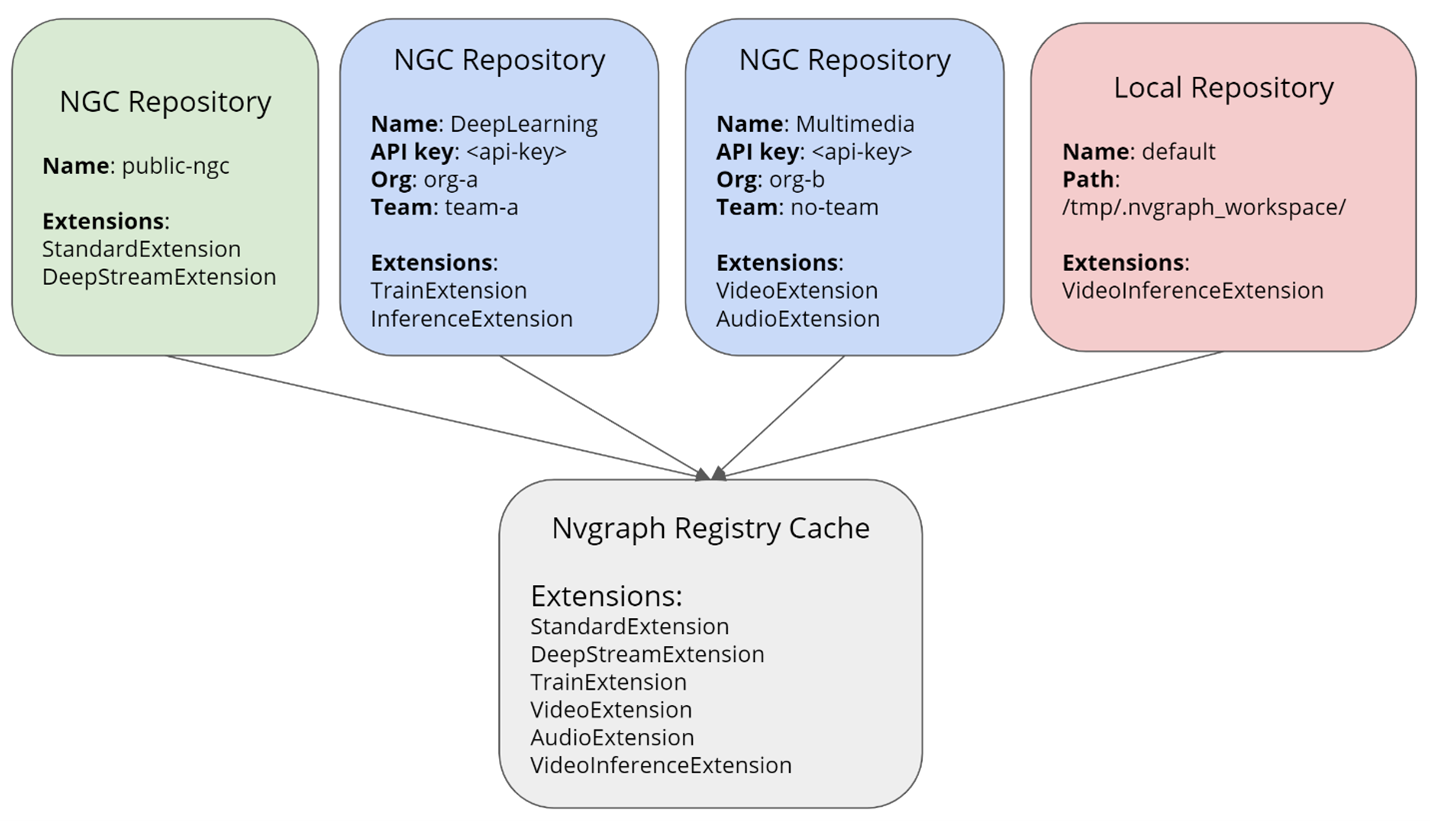
Registry Cache
The registry cache is a collection of metadata of various extensions and their components. An extension can be added to registry cache in two methods.
Extension registration
An extension can be added to the registry cache by registering the extension locally with the registry. This method is commonly used to register extensions which are in development and is required to be used with the rest of the nvgraph tools. An extension can be registered via the “register_extension” bazel rule provided in the registry module. More details regarding the “register_extension” rule can be found in the User Guide document. During registration, the registry parses the extension library along with the corresponding extension manifest and generates a metadata file in YAML format containing all the information regarding the extension which is needed by composer and the registry itself.
Extension synchronization
At the end of the development phase, extensions can be published to an NGC repository. More information regarding the steps to publish an extension can be found in “Publishing an extension” section below. Once an extension has been published their extensions to a NGC repository, it can by other users who have access to that NGC repository. To sync an extension metadata into local cache, the NGC repository must be added to the nvgraph registry first. The
repo syncorextn synccommands can then we be used to either synchronize the entire repository or specific extensions one at a time. More details regarding these commands can be found in “Interacting with the NGC” section below.
It is not advisable to upload the same extension to multiple NGC repositories. It is easier to search, maintain and deploy extensions if they are grouped logically based on their purpose and uploaded to specific repositories which host’s other similar extensions. Internally, in an organization, each team can create a “team” in NGC private registry which can be used to share extensions with members of that specific team or across different teams. Administrator instructions on how to setup orgs and teams In NGC private registry can be found here.
Here are some key takeaways about the nvgraph registry cache:
Registry maintains only a single repository as the source for any extension in cache. When an extension is added to the registry via the bazel registration call, the source in the cache is added as the “default” repository. Similarly, when an extension is synchronized from an NGC repository, the source gets updated as that particular NGC repository.
While synchronizing entire NGC repositories, in case of conflicts that arise when the same extension is found in another repository (default or NGC) added by the user, the registry follows these rules to determine whether an extension should be added/updated in the local cache.
If the extension already present in the local cache is from the default repository, then it is not imported while synchronizing the entire repository.
If the extension present in local cache is from any of the NGC repositories, be it the public catalog or a private repository, the extension source would be overwritten to point to the new recently synchronized repository.
Synchronizing specific extensions from a repository always overwrite the existing source repository even if it was added by the default repository.
Registry Configuration
The registry works as a service interconnecting various tools in the nvgraph ecosystem. To perform some of these operations, the registry needs to be configured as a prerequisite. To publish extensions to NGC, the user needs to add an NGC repository which includes the following information.
API key used to authenticate communication with the NGC server
Name of the organization that the user account has access to.
(Optional) A name of a team that the user account has access to.
A new NGC repository can be added using the “repo add ngc” CLI command and specify a name for each of the NGC repositories. Once this has been setup successfully, the user can use the name of this repository to interact with the corresponding NGC private registry resources. This information is saved in a reusable configuration file maintained by the registry. Users are neither allowed to create multiple NGC repositories with the same name nor allowed to add the same org (and/or team) with different repository names.
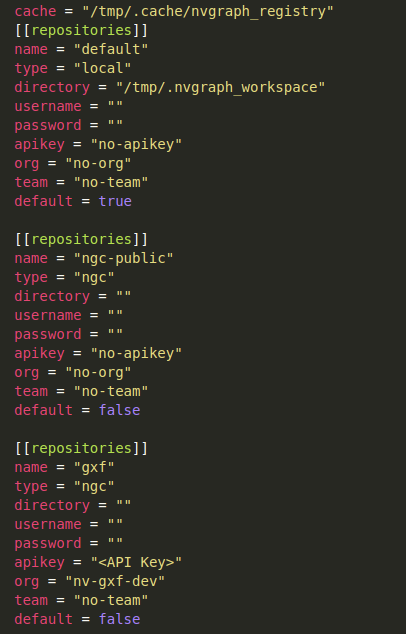
By default, the registry uses /tmp/.cache/nvgraph_registry and /tmp/.nvgraph_workspace paths for cache and default repository respectively. Here /tmp/ is considered as the nvgraph registry root which is configurable using the NVGRAPH_REGISTRY_ROOT environment variable. Optionally, the CLI tool can be used to with cache --set command to set a specific path just for the registry cache.
Registry uses TOML format for its configuration file which is stored in the path /home/<user-name>/.config/nvgraph/registry.toml and a sample configuration file for looks as below:
Interacting with the Registry
Extension Registration
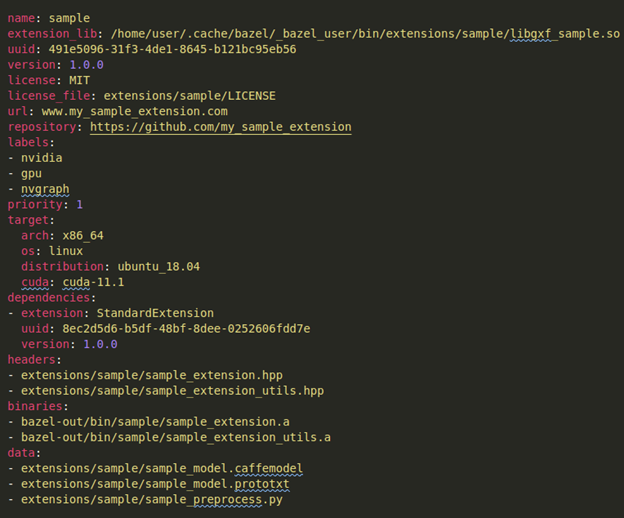
Extension registration adds a new extension to the registry’s cache and default repository. To register a new extension with the registry, the user needs to provide all the details regarding the extension to the registry in a manifest file in YAML format. This manifest is autogenerated by the registry via the register_extension rule and does not have to be created manually. The YAML document used for the manifest can have the following fields:
Mandatory fields:
name- Name of the extension target, as specified in thenv_gxf_cc_extension(…)rule used to build the extension.extension_library– Path to the extension library complied using thenv_gxf_cc_extension(…)ruleuuid– Universally unique identifier used to register the extension. Format should follow the standard uuid conventionversion– Extension version. A string that specifies the version of the extension in the following format MAJOR.MINOR.PATCH. Extension developers are expected to follow the semantic versioning concept where a new update in version should follow these guidelines:MAJOR version update when there are API-breaking changes
MINOR version update when features are added in backward compatible manner
PATCH version update when bugs are fixed in backward compatible manner
license– Extension license. A string naming the type of license associated with the extension. For example – MIT, Apache-2.0, BSD.license_file– Path to a text file which has the complete licensing terms and specifications.
Optional fields:
url– A link to the web address of the extension projectrepository– A link to the web address of the extension source codelabels– A list of strings which can be used to categorize the extension in NGC. For example,[“nvidia”, “gpu”, “nvgraph”]priority– A value between 0-100 used to indicate the priority of the extension to be used during deployment.target– Target configuration for the extension variant. A dictionary containing the following keys -arch,osanddistribution. An optionalcudakey may also be included to indicate a specific CUDA version that the extension depends on.cuda-nonewould be used in case nothing else is specified. Accepted values:arch – x86_64, aarch64, sbsa
os – linux
distribution – ubuntu_18.04 and ubuntu_20.04
dependencies– A list of dictionaries containing “extension”, “uuid” and “version” of the dependent repositories. For example:extension: StandardExtension uuid: 8ec2d5d6-b5df-48bf-8dee-0252606fdd7e version: 1.0.0
headers– A list of strings containing the paths to the header files of the extension. If specified, the headers would be uploaded to the extension interface in NGC when it’s published.binaries– A list of strings containing the paths to any optional binary files the extension needs during deployment. If specified, the binaries would be uploaded to the extension’s variant in NGC when it’s publisheddata– A list of strings containing the paths to any optional data files the extension needs during deployment. If specified, the data files would be uploaded to the extension’s variant in NGC when it’s published.
Here is a sample manifest generated by the registry rule with values for all the fields in the list above:
Once the call to register_extension rule has been made, the manifest file shown above would be auto generated and the registry CLI tool would be invoked with the extn add command along with the corresponding arguments. This rule further adds this extension to the registry’s local cache and updates the default repository with the extension library, manifest, metadata, and any of the optional files that were specified during registration.
The registration process also generates an output file which contains metadata regarding the extension’s interface. More specifically, it contains information regarding various components and the parameters used in those components, header files, dependencies, labels, author, description etc. The registry maintains a copy of this extension in its local cache and default repository while also outputting a copy of it in the bazel cache. Along with the extension metadata file, the registry also generates a target.yaml file which contains the variant specific information about the extension. This file is stored in the default repository and published to NGC along with rest of the files for that variant. These files are used for the registry’s internal bookkeeping and users are not expected to interact with them directly.
Here are the guidelines for registering an extension:
x86_64 version of an extension must be registered first before any cross complied (aarch64) variant of the extension is registered. Since the cross complied extension cannot be queried for the extension interface (types of components and parameters) the registry considers the x86_64 variant of the extension as the reference for its interface. In case the cache and/or default repository has been cleaned since the extension was previously registered, the x86_64 variant of the extension must be registered again to repopulate the cache and default repository.
If the extension getting registered depends on other extensions in the source code then it must be listed as a dependency in the “dependencies” field. Specifically, the registration target name of the dependent extension must be listed as the dependency so that registry can query the dependent extension’s metadata for its uuid, name and version.
If the same extension variant is registered twice, the previously registered variant in the default repository is removed and updated with the contents in the new manifest. Similarly, registering any of the x86_64 variants will update the extension interface in registry cache and hence it is important that extensions interface remains the same across all the variants of the same extension and version.
Registering an extension and its variants is only supported on linux x86_64 platforms.
Interacting with NGC
NGC is one the integral parts of the nvgraph ecosystem and the registry. Once an extension has been developed, NGC is used to collaborate and share the extension with other developers. Users can interact with NGC via the registry CLI tool using various CLI commands. Here’s a list of all the operations involving NGC
Synchronizing a repository
Once an NGC repository has been populated successfully with various extensions and their variants, the entire repository can be synchronized to the registry’s cache. This is useful to create and deploy graphs without having to build the extensions and its variants locally.
To synchronize a repository, the repository has to be added to the registry using the steps mentioned above in “Registry Configuration” section. The repo sync command in the registry CLI tool to populate the registry’s local cache with all the extensions from the NGC repository. In case there are multiple versions of the same extension which has been published, the latest version of the extension would be synchronized.
Here are the guidelines for synchronizing a repository
In the case when registry finds an extension in its cache which was registered locally using
extn addcommand the same extension would not be downloaded from NGC. Default repository always has the higher priority when there are conflicts that arise from the same extension being uploaded to multiple repositories.In the case when registry finds an extension in its cache which was synchronized from another NGC repository, the new repository being synchronized has higher priority and the previous instance of the extension would be removed from the cache.
Publishing an extension
From the nvgraph registry’s perspective, an extension consists of an interface and multiple variants, each specific to a target configuration. Using the sample extension from above, the extension and two of its variants can be visualized as below.
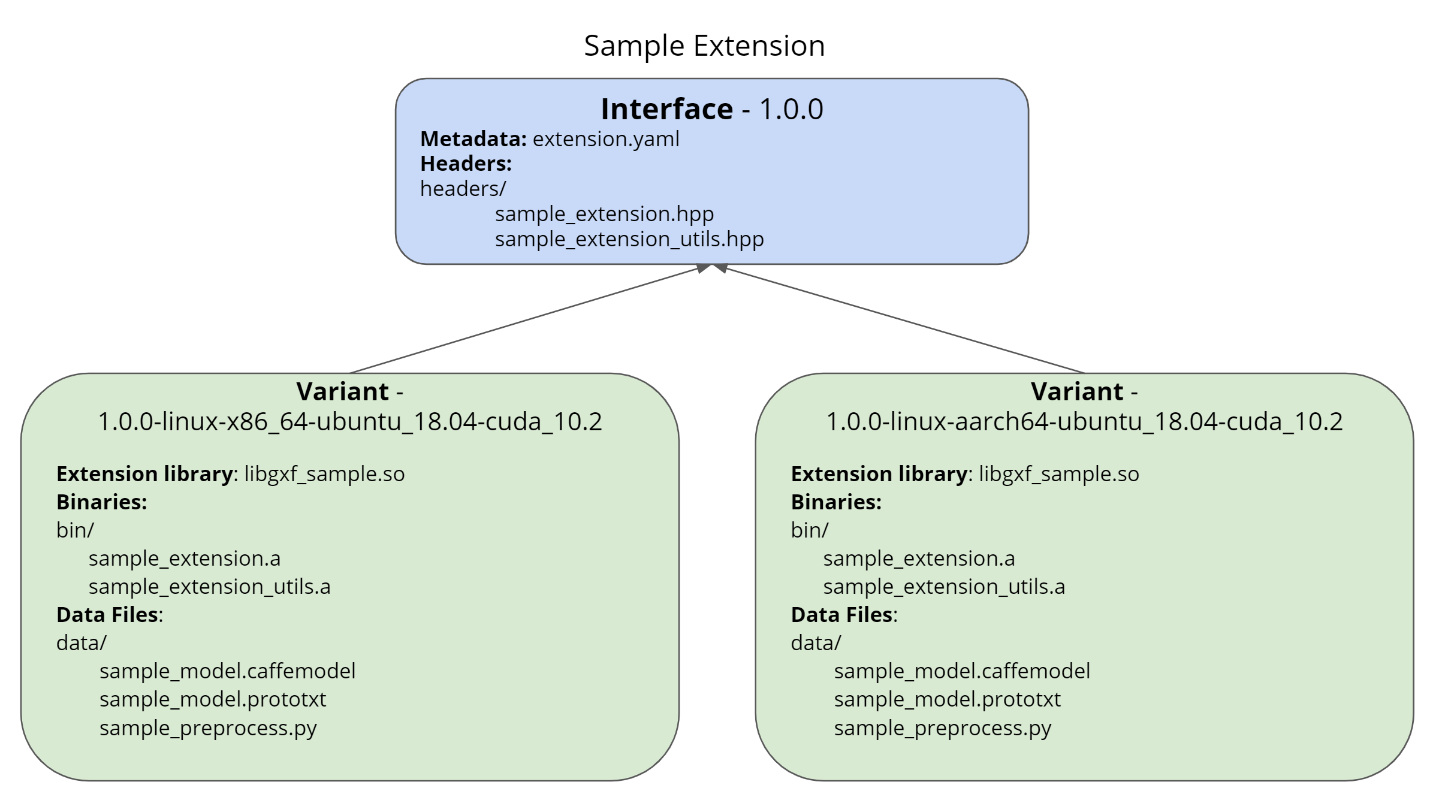
An extension interface consists of:
An extension metadata file which is generated by the registry during extension registration
Any optional headers exposed by the extensions which can be used for developing other extensions on top of it.
An extension interface serves as the basis for all interactions with that extension through the nvgraph tools such as registry, composer, and container builder. The extension headers are considered to be identical across all the variants for that version of the extension.
An extension variant consists of:
Shared libraries of the extension implementation which are built for specific targets configurations.
Any optional binary files which the extension would need during deployment.
Any optional data files like deep learning models, scripts and files etc
An extension variant is a collection of files along with the extension library itself complied for a specific target and any optional compute stack elements. The key variables which define a variant is the target configuration viz arch (architecture), os (operating system) and distribution (distro/flavor). The target configuration, as noted above in Extension Registration, is a mandatory attribute of the extension manifest file. An optional cuda version specification can also be added to the target configuration. The optional data and binary files can be chosen to be different for each variant based on the need and this has to be specified in the bazel rule during extension registration for that variant.
Here are the guidelines for publishing an extension:
It involves publishing an extension interface and then publishing an extension variant for each variant present in the local default repository.
Publishing an extension interface is the first step towards adding the extension in the remote NGC repository. This step can be viewed equivalent to creating the extension in NGC. An extension interface can be published using the
extn publish interfacecommand in the registry CLI tool.An extension interface for a specific version of the extension must be published only once for all of its variants of that version of the extension.
An extension variant can be published using the
extn publish variantcommand in the registry CLI tool.An extension variant cannot be published before the extension interface has been published to that NGC repository.
Each extension variant must be unique for that version of the extension and any number of variants can be published for a specific version of an extension.
There is no specific order in which variants must be published.
There are no time specific limitations on when the variant has to be published after publishing the extension interface.
Publishing an extension and its variants is only supported on linux x86_64 platforms
Removing an extension
Extensions published to NGC can also be removed and steps involved are exactly the inverse of the steps that were performed to publish the extension.
To completely remove a specific version of the extension from NGC, all the variants for that extension must be removed but in no specific order. A single extension variant can be removed using “extn remove variant” CLI command. The extension interface can then be removed using the extn remove interface CLI command.
Here are some guidelines for removing an extension:
To update the contents of a single variant in NGC, only that variant corresponding to that specific version of the extension can be removed and published again provided there are no changes in the extension interface.
There are no time specific limitations on when an extension variant can be removed, after it has been published.
There are no time specific limitations on when the extension interface must be removed after removing all of its variants.
If an extension interface has to be updated in NGC, then all of its variants have to be removed followed by the extension interface. The new extension interface and all the variants would then have to be published again following the same steps as before.
Synchronizing an extension
To use an extension from an NGC repository or the “default” repository, it is not mandatory to synchronize the entire repository.
To synchronize a specific extension:
The repository must be added to the registry using the steps mentioned above in “Registry Configuration” section.
Use the
extn synccommand in the CLI tool to synchronize a particular version of the extension to the registry cache.This can now be verified using the
extn list –r <repo-name>CLI command.extn synccommand can also be used to force synchronize an extension from a NGC repository even when the same extension has been added to the local default repository usingextn addcommand. The default repository priority is not considered when individual extensions are synchronized.
Importing an extension
There may be scenarios when the extension files need to be downloaded from NGC. This can be achieved by using the extn import CLI command. To import an extension into a local directory:
The repository must be added to the registry using the steps mentioned above in “Registry Configuration” section.
Use either
repo syncorextn syncCLI commands to synchronize the extension to cache. This is needed for the registry to recognize the presence of that particular extension in its source repository.Use the
extn importCLI command and specify the name of the NGC repository, version of the extension along with the variant arguments and path to a local directory to import the extension archive.
Refreshing the registry cache
Once multiple repositories have been added and synchronized to the registry, there may have been newer versions and variants of the extension which have been uploaded to the registry over time. To fetch the latest versions of all the extensions from their source repositories, the cache --refresh CLI command can be used.
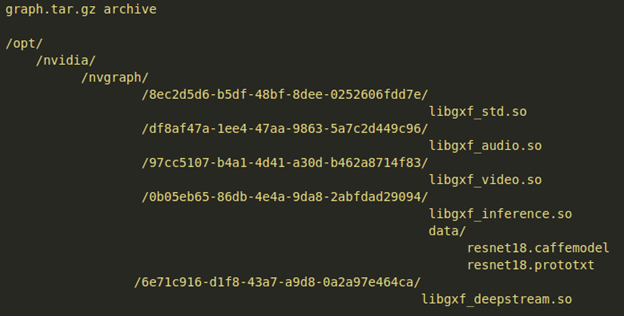
Installing graphs for deployment
The registry can also be used to deploy graphs locally or containerize the graph using container builder. To execute a graph using gxe, the registry provides a functionality to prepare a manifest and a corresponding archive package containing all the extensions that are required.
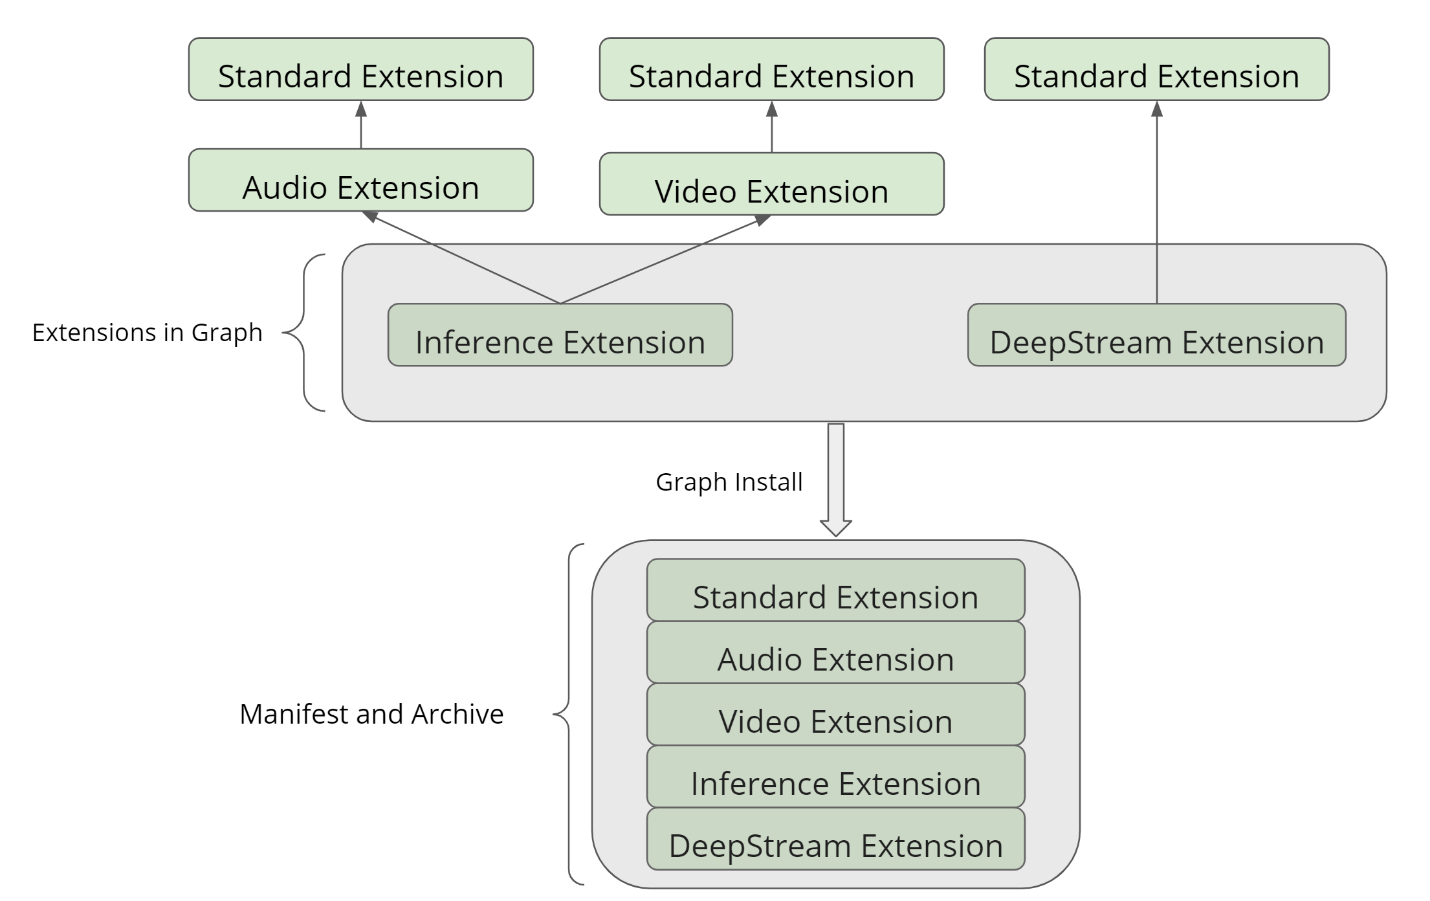
An example manifest for the sample graph above is shown here:

An example archive for the sample graph above is shown here:
To install a graph:
Create a graph using the nvgraph composer and save it to the local filesystem.
Use the
graph installcommand in the CLI tool along with the arguments that specify the variant of the extensions that should be used to for deployment.The output of the graph install command is a gxe manifest along with an archive which contains all the extension libraries and files that were packaged with the extension variant.
There’s an option to unpack the deployment package in a local directory which can be used to run the graph locally. Use registry CLI tool with
graph install --helpto view all the arguments that are supported.All the extensions used in the graph must be present in the registry’s local cache to install the graph successfully. The version of the extension used in the graph must also match the versions of the extension found in the registry cache.
Suppose an extension A is listed as a dependency for extension B and extension C. If a graph is created using extensions B and extension C, it needs to be ensured that both B and C are dependent on the same version of extension A and that version of extension A should be synchronized with the registry to install the graph. Using multiple versions of the same extension in a graph is not supported and is not advisable to create such dependencies.
The registry performs version management while installing graphs to ensure the latest versions of extensions are being deployed. Suppose a graph was created using version 1.0.0 of extension A, while there was a newer version of extension 1.1.0 available during
graph installstage. It is ensured only the latest minor.patch version corresponding to the same major of the extension is added in the archive.