AI NVR#
We provide an AI infused Network Video Recorder (AI-NVR) as a sample application built using the Jetson Platform Services for Jetson stack. The application is downloaded as a docker compose package (within compressed tar file) and can be installed based on instructions provided in the setup section.
AI NVR Production Feature Summary#
While the Quick Start Guide provided instructions for a functional but limited installation, this section describes various additional functionalities that can be leveraged from the Jetson Platform Services for Jetson stack, and are instrumental in building a production quality system. These include:
Device security through use of firewall and encrypted storage
System monitoring support
These features are available as foundation services presented to user as Linux services, and can be enabled as relevant to their use case.
Software Configuration#
The AI NVR application illustrates best practices for configuring and instantiating various pieces in the Jetson Platform Services for Jetson stack, including:
VST for camera discovery, stream ingestion, storage and streaming. Notable configuration for VST includes: Ethernet inference using which camera discovery should occur, ‘aging policy’ for storage governing the watermark level when video will be deleted, number of concurrent WebRTC streams to be supported (based on hardware decoder aka nvdec limit)
DeepStream for real-time perception using PeopleNet 2.6. We run Inference on the DLA to enable use of GPU for other purposes (tracking, inference in analytics etc). Further inference interval is set to ‘1’ to enable support of larger stream count based on available compute in the DLA.
Analytics deployment configuration Configuration parameters specifies the spatial and temporal buffers in the implementation of line crossing and region of interest . This defines the tradeoff between latency and accuracy that the user can make based on their use case.
As part of foundation services:
Ingress has been configured with routes for various microservices. As a user brings in their own custom microservices into their application, this configuration can be extended accordingly.
Redis has been configured to enable snapshot that preserves state across restarts.
Firewall has been configured to allow outgoing traffic from the IoT Gateway microservice and for webRTC streaming.
Storage has been configured with disk quotas for each microservice so that any particular microservice cannot monopolize the available storage. User can further modify or extend this file depending on their software stack.
Docker Compose#
To deploy the Jetson Platform Services based systems on a Jetson device, we use Docker compose. Compose is a tool for defining and running multi-container Docker applications. It allows you to easily manage and orchestrate all your application stack into a single unit of deployment. Docker compose reads one or more yaml files containing the infrastructure configuration, then spins up your container environments.
Microservice config in docker compose: Yaml configuration files are at the core of docker compose. A deployment should contain one or more configuration files. Each block in the configuration file represents a microservice deployment setup. Here is a sample service configuration.
emdx-analytics-01:
  image: nvcr.io/nvidia/jps/emdx-analytics:jps_v1.2.8
  user: "2001:150"
  network_mode: "host"
  logging:
    driver: "json-file"
    options:
      max-size: "8192m"
      max-file: "3"
  environment:
    CONFIG_LOCATION: "/config"
    INSTANCE_ID: emdx-analytics-01
    PORT: 6001
    LOGS_DIR: /logs
  volumes:
    - ./config/emdx-analytics:/config
    - /data/emdx-volume:/data/emdx-volume
    - /data/logging-volume:/logs
  restart: always
  container_name: emdx-analytics-01
  depends_on:
    moj-http-based-init-emdx-analytics:
      condition: service_completed_successfully
  deploy:
    resources:
      limits:
        memory: 512M
    restart_policy:
      condition: always
Main attributes
image: refers to the location/image-repositoriry of your container
environment: This is the section where you can define the environmental variable to inject into the container
volumes: you can mount a file or folder into the container using this attribute. The mounted asset will be available in both the host machine and inside the container
restart: This option defines the behavior if the container exits with error.
command: This is the command to start you application if there are any
depend_on: This attribute is used to define the startup sequence. Any service that must start before the service defined here should be listed here
network_mode: this is the network configuration of the container. In our reference deployments, we run all containers on the host network. Use of host networking makes all containers run in the same network namespace as the host Jetson system, and hence are able to access each other. Note that for security considerations while going to production, this has to be used in conjunction with the firewall foundation service to prevent authorized access to device APIs
init containers & startup sequence
As mentioned in the previous section, it is sometimes important for a container to wait for certain conditions such as an available database connection before starting. In such cases, the container will make sure the db connection is checked before the service can starts. An init container can be used to achieve this. It will initially run to check the database connection, and until the connection is established (or other defined conditions) it will exit and allow the main service to start. In the sample configuration we shared, emdx-analytics depends on another service. To make sure it starts before the emdx-analytics does, we have created an init container called moj-http-based-init-emdx-analytics.
moj-http-based-init-emdx-analytics:
  image: nvcr.io/nvidia/jps/jps-init-container:v1.0.2_arm64v8
  network_mode: "host"
  environment:
    ENDPOINTS: "5000/api/core/healthz" # sample values "30000/v1/sensor/help,30080/ingess/api/tz"
  deploy:
    restart_policy:
      condition: on-failure
This moj-http-based-init-emdx-analytics container makes an api call to some endpoint (localhost:5000/api/core/healthz) in a loop until the request is successful. Then it will exit. This init container is meant to run only once in the lifetime of the container.
Creating your custom docker compose package
Lets go through a simple example of integrating a new app service to the microservices stack.
Step 1: Create a work environment and compose.yaml file or use an existing one. This compose.yaml will contain our service configuration.
sh-3.2$ mkdir test-app
sh-3.2$ cd test-app
sh-3.2$ touch compose.yaml
Step 2: Edit the compose.yaml to add your service configuration.
version: '2'
services:
  test-app:
  image: remove-repository-image:v1.0
  user: "0:0"
  network_mode: "host"
  environment:
    APP-PORT: 8080
  volumes:
    - ./config/test-app/app.cfg:/opt/test-app/config/app.cfg
  restart: always
  container_name: test-app
  command: sh -c '/opt/test-app/start.sh'
  deploy:
    Restart_policy:
      condition: always
Step 3: Mount the configuration into the container. If your service requires a configuration, you can define your configuration and mount it into the container as we did.
- /config/test-app/app.cfg:/opt/test-app/config/app.cfg
Step 4: To expose your service through ingress, create an ingress config file: test-app-nginx.cfg.
sh-3.2$ cd test-app
sh-3.2$ touch config/test-app-nginx.cfg
Edit the test-app-nginx.cfg file and make sure that no other service is running on the host on the same port.
location /app-prefix/ {
  rewrite ^/app-prefix/?(.*)$ /$1 break;
  proxy_set_header Host $host;
  proxy_set_header X-Real-IP $remote_addr;
  proxy_set_header X-Forwarded-For $proxy_add_x_forwarded_for;
  access_log /var/log/nginx/access.log timed_combined;
  proxy_pass http://localhost:8080;
}
location: refers to the prefix for your ustream api. This prefix must be unique across all configurations. rewrite: this directive is used to rewrite the URL proxy_set_header: set request header to forward to upstream server access_log: where we should be logging proxy_pass: specifies the destination host and port of the upstream server
Step 5: Copy your ingress config from the config directory to the ingress config folder. You can find more instructions on how to use this config in the ingress section of the foundation services documentation.
sh-3.2$ cd test-app
sh-3.2$ cp config/test-app-nginx.cfg /opt/nvidia/jetson/services/ingress/config
Step 6: Start the app service and start ingress.
sh-3.2$ cd test-app
sh-3.2$ sudo docker compose -f compose.yaml up -d --force-recreate
sh-3.2$ sudo systemctl restart jetson-ingress
Folder struct:

AI-NVR full setup#
Prerequisites#
Preparation before Setup
If you are using a Jetson devkit, go through following list to acquire the necessary hardware components and get access to the software components. If using a partner (ODM) device, check their setup instructions to identify and acquire appropriate components.
Required Hardware
Orin AGX devkit or
Jetson Orin NX 16GB or 8GB devkit (self built) with 128GB(min) NVMe drive or
Jetson Orin Nano 8GB devkit with 128GB(min) NVMe drive
SATA drive(s): 2 TB or more
SATA power supply and cable connected to the SATA power supply
SATA PCIe controller suitable for Orin AGX. If not available, a USB to SATA controller may be used
USB to SATA controller for Orin NX / Orin Nano
An NVMe drive may be used instead of SATA for Orin AGX. Samsung 980 PRO MZ-V8P2T0B - SSD - 2 TB or more - PCIe 4.0 x4
Cat 6 Ethernet Cable x 4
USB to Ethernet Adapter, CableCreation USB 3.0 to 10/100/1000 Gigabit Wired LAN Network Adapter Compatible with Windows PC and more
IP Camera: Suggested camera to use is Amcrest UltraHD 4K (8MP) Outdoor Bullet POE IP Camera, 3840x2160, 98ft NightVision, 2.8mm Lens, IP67 Weatherproof, MicroSD Recording, White (IP8M-2496EW-V2)
TP-Link AC1200 Gigabit WiFi Router (Archer A6) - Dual Band MU-MIMO Wireless Internet Router, 4 x Antennas, OneMesh and AP mode, Long Range Coverage
PoE switch: TP-Link TL-SG1210MPE V2 - switch - 10 ports - smart
Ubuntu 20.04 or 22.04 Desktop/Laptop
USB-C flashing cable
Monitor, Keyboard, Mouse
The mobile app is recommended to be run on Android phones running Android version 13, but it is supposed to work from Android version 8
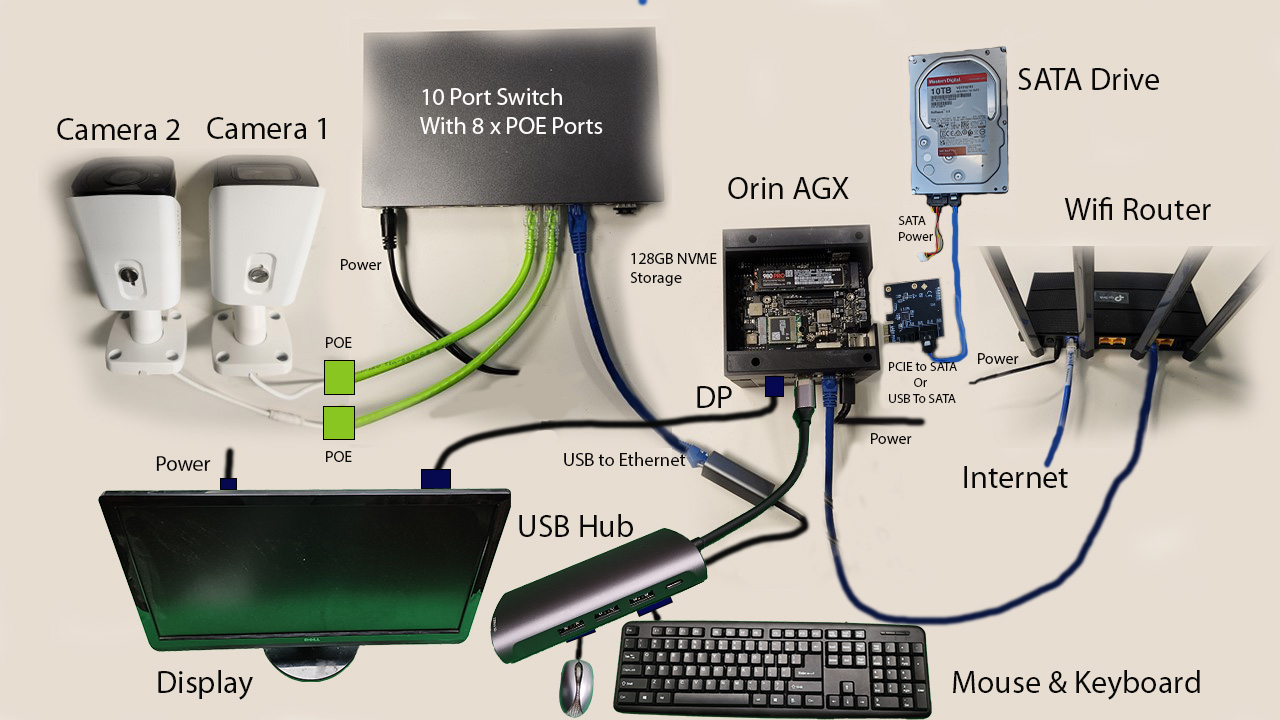
The Orin AGX hardware setup is shown in the image below:
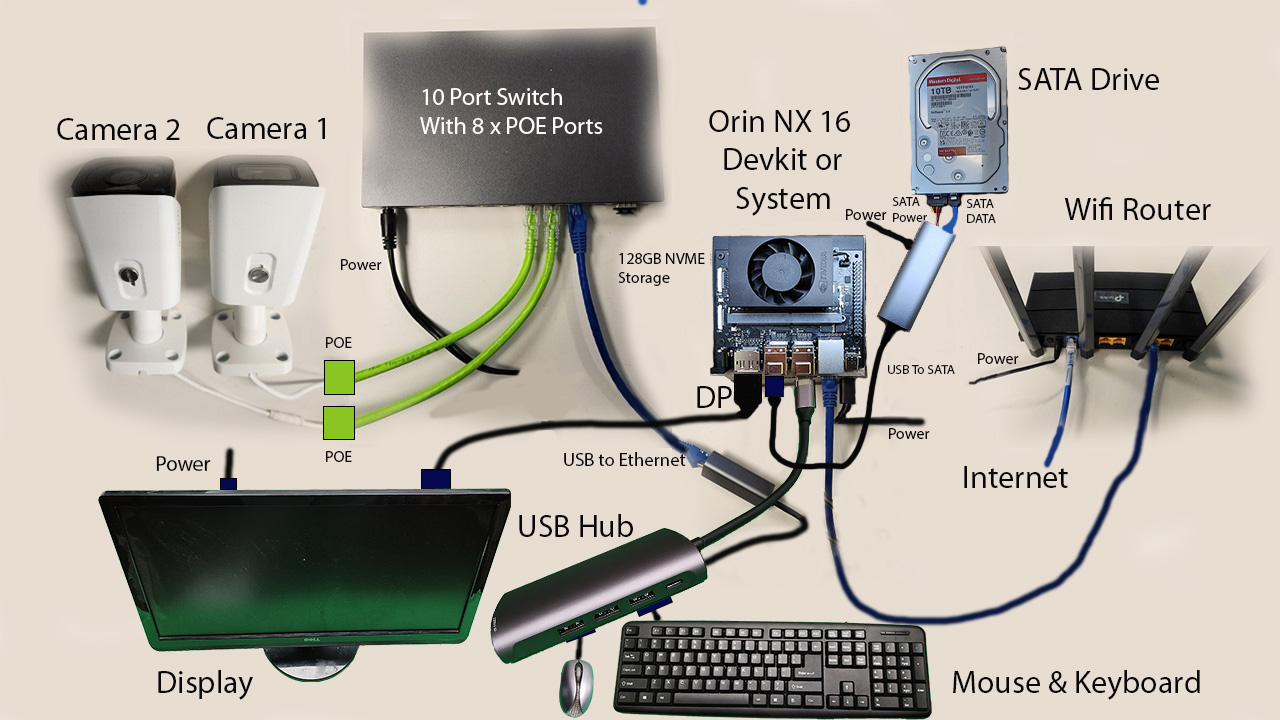
The Orin NX / Orin Nano hardware setup is shown in the image below:
NGC API key
Get access to NGC and obtain the API key through steps documented in the Quick Start Guide.
Hardware Setup#
Now proceed to setting up the hardware for the Jetson devkits as described here. If using a partner (ODM) device, follow the instructions provided by them to setup their device and connect to cameras and other peripherals.
Hardware Setup Steps
Connecting SATA drives
Orin AGX devkit: Ensure device is powered off. Insert the PCIe controller card into the PCIe slot (located inside the magnetic black side panel) checking for proper placement of card in the slot. Connect it to the SATA drive(s) with the data cable. Connect the power supply to the SATA drive(s) using the power connector cable. Switch on the power supply to the drive(s), then power on the device.
Orin NX / Orin Nano devkit: Ensure device is powered off. Attach the SATA drive(s) to the power adapter, aligning the power and data ports. Connect the USB cable from the power adapter to one of the device USB ports. Switch on the power supply to the drive(s), then power on the device.
Connecting NVMe drive (option for AGX)
If you do not have SATA components available, an NVMe drive for storage may be used for Orin AGX. Turn Off the system and unscrew the screw and place the NVMe drive in the NVMe slot and screw the screw back.
Networking setup*
The system needs two separate ethernet ports. The ethernet port available on the device is connected to the external network. A USB based ethernet adaptor is used for connecting to the PoE switch. This adapter’s ethernet port is then connected to the POE switch uplink port.
For video streaming to the mobile app, it should be connected to the same local network as the Jetson. If there is no available WiFi on the network you are connecting Jetson to, use a WiFi router to connect to that network, and then connect the mobile device to that.
Connecting cameras
Connect the cameras to one of the available POE ports. Note that while AI NVR supports connecting up to 16 H.265 cameras for AGX and 8 H.265 cameras for NX16, the number of ports on the PoE switch may limit the number of cameras you can connect.
Refer to Quick Start Guide for information about supported stream count and system resource utilization.
Refer to VST for list of supported cameras.
Connect monitor, keyboard & mouse to Jetson
Connect a monitor using the DP port, or using DP-TO-HDMI dongle to connect using HDMI, or DP-TO-DP cable for using DisplayPort. Attach USB hub to the free USB port on the device and connect keyboard and mouse to it.
Connect Jetson to Host
Connect the host (Ubuntu Desktop/Laptop) to the Jetson devkit USB-C flashing port using the USB cable.
Software Setup#
Software Setup Steps
AI-NVR App
Follow the steps in the Quick Start Guide to get NGC access, flash with BSP image (if needed), install foundation services and ai_nvr application bundle.
Some additional setup steps needed are:
Storage Service
Copy the storage quota file from app bundle directory to jetson-configs directory:
sudo cp ai_nvr/config/storage-quota.json /opt/nvidia/jetson-configsNote that the storage service will detect any attached drives and initialize them for storage filesystem. If you want to use only specific drives, then list them in /opt/nvidia/jetson-configs/jetson-storage.conf. Refer to Storage.
Networking Service
If you are using a Partner (ODM) device, check how the network interfaces are named and which are connected to the camera(s). By default “eth1” is the camera interface, but if using a different one or more than one, then update /opt/nvidia/jetson-configs/jetson-camif.conf. Refer to Networking.
Monitoring Services
If you want to use monitoring services, then uncomment all the lines in the ingress config file (otherwise keep them commented out):
/opt/nvidia/jetson/services/ingress/config/platform-nginx.conf
NVStreamer App
Setup NVStreamer (optional, if you want to stream video files in addition to, or in lieu of camera feed). Refer to the Quick Start Guide for setting up NVStreamer on your Jetson Orin device.
Mobile App
Install the AI-NVR mobile app from the Google Play Store. There are two ways to use the mobile app - one is direct access and other is through cloud. Access via cloud not supported for this release.
Run AI-NVR Application#
The AI NVR reference application depends on various foundation services, which need to enabled and run before running the AI NVR application. For details of each of the foundation services, please see the Overview. As quick reference the steps are outlined below.
Start Services
Start the required services:
sudo systemctl enable jetson-storage --now
sudo systemctl enable jetson-networking --now
Reboot system:
sudo systemctl enable jetson-redis --now
You may also start other optional services like monitoring, if you want to:
sudo systemctl enable jetson-monitoring --now
sudo systemctl enable jetson-sys-monitoring --now
sudo systemctl enable jetson-gpu-monitoring --now
After above foundation services have been started, then start the ingress and vst services:
sudo systemctl enable jetson-ingress --now
sudo systemctl enable jetson-vst --now
Note
Any of these services can be disabled & stopped as follows:
sudo systemctl disable <service-name> --now
Start Application
Launch the application from the downloaded bundle. Note that the docker compose launch command depends on the device it is running on:
cd ai_nvr
Orin AGX:
sudo docker compose -f compose_agx.yaml up -d --force-recreate
Orin NX16:
sudo docker compose -f compose_nx16.yaml up -d --force-recreate
Orin NX8:
sudo docker compose -f compose_nx8.yaml up -d --force-recreate
Orin Nano:
sudo docker compose -f compose_nano.yaml up -d --force-recreate
You can check that containers are running as expected by running the docker ps command.
Note
If needed, the application services can be stopped as follows
cd ai_nvr
Orin AGX:
sudo docker compose -f compose_agx.yaml down --remove-orphans
Orin NX16:
sudo docker compose -f compose_nx16.yaml down --remove-orphans
Orin NX8:
sudo docker compose -f compose_nx8.yaml down --remove-orphans
Orin Nano:
sudo docker compose -f compose_nano.yaml down --remove-orphans
Add streams to VST
Add camera or NVStreamer video stream to VST. Ensure that the stream can be viewed from the VST Reference Web App through the Live Streams tab. Refer to the Usage & Configuration for the detailed steps.
Exposed Ports
Ports |
Services |
|---|---|
30080 |
Ingress |
5000 |
Emdx |
81 |
VST |
3000 |
Grafana |
8081 |
Monitoring |
9091 |
Pushgateway |
View video overlay & analytics
The VST webUI offers capability to draw, view and delete the Region of Interests (ROI) and Tripwires (TW) on video streams as part of its Analytics feature. These can then be viewed as overlays on the video stream, along with live results from Analytics microservice.
See Reference Web App for more information on how to configure and use this feature.
Use mobile app
Refer to AI-NVR Mobile Application User Guide for a rich Android based client to interact with the AI-NVR system and view video, analytics and alerts generated by the Jetson Platform Services.
The AI-NVR mobile app enables users to access the full AI-NVR device functionality. The mobile app is distributed by NVIDIA through the Play Store. The mobile app has two launcher entry points. One is for direct access to the AI-NVR device, and one is for remote access to the device through the cloud.
Option A: Direct access
The device is accessed directly from the mobile app using device IP address. You will be presented with a dialog window to enter the IP address of the device. Once the IP address is submitted, the app will launch the UI with the list of cameras connected to the device.
Option B: Cloud based access
Not supported for this release.
Supported Stream Count#
Number of streams (cameras) supported by an Jetson Platform Services based application depends on a variety of factors including:
Hardware platform used (Orin AGX, Orin NX16, Orin NX8, Orin Nano)
Model used: PeopleNet 2.6 is an unpruned model offering superior accuracy at the expense of higher resource utilization. Model architecture, use of pruning and quantization techniques impact utilization and hence supported stream count
DeepStream configuration: configuration attributes impacting resource utilization include inference interval, type of tracker used, streammux/inference/tracker intervals
Stream resolution and encoding: these determine decoder limits as H.265 supports larger decode limit than H.265 (26 versus 14 for 1080p resolution)
Number of webRTC concurrent stream: webRTC streaming consumes memory, and for the devices with smaller available RAM the memory consumed at higher stream counts can be a bottleneck
Ultimately, processing more streams than the system supports results in saturation of potentially any of system resources including GPU, DLA, RAM, memory bandwidth, decode/encoder utilization. Inputting more streams than system can support will result in drop in FPS of underlying DeepStream pipeline to under real-time performance (typically 30 fps), thereby the system dropping frames. Utilization of these resources can be identified by use of the tegrastats utility.
The AI-NVR reference application showcased in this quickstart guide can support stream count as below based on using PeopleNet 2.6 model using DLA based inference and NVDCF tracker with accuracy config running on PVA on Orin AGX, Orin NX16, and Orin NX8. Orin Nano configs utilize the GPU.
16 H.265 streams on Orin AGX developer kit (with 32GB RAM)
8 H.265 streams on Orin NX16
4 H.265 streams on Orin NX8
4 H.265 streams on Orin Nano
These numbers are based on inference running on DLA, and tracker on combination of PVA and GPU on Orin AGX, Orin NX16, and Orin NX8 - thereby sparing GPU for running additional AI. As Orin Nano does not have these hardware accelerators, tasks are run on GPU instead.
Also note that image pre-processing operations, including scaling for inference and tracking, is configured to run on GPU instead of the VIC for the Orin AGX platform due to current issue with pipeline freeze when using VIC outlined in Troubleshooting
In addition to the above, we were able to launch webRTC streaming for 2 streams on both Orin AGX and Orin NX16 with good streaming quality.
One aspect to note is that one instance of the hardware decoder is each used by:
DeepStream processing each video stream from VST
Every webRTC stream instance launched between the mobile app (client) and the Jetson device
So the sum of the above has to be within the supported decoder stream count. Developers could apportion the number between the two usages as needed.
The utilization metrics for various system resources on Orin is show in the table below.
Platform |
Stream Count |
CPU |
RAM |
GPU |
VIC |
DLA0/1 (avg) |
PVA |
|---|---|---|---|---|---|---|---|
Orin AGX 32GB |
16 |
57% |
9,877 MB |
64% |
NA% |
74% |
17% |
Orin NX16 |
8 |
53% |
7,972 MB |
35% |
52% |
56% |
19% |
Orin NX8 |
4 |
34% |
3,198 MB |
7% |
49% |
61% |
6% |
Orin Nano 8GB |
4 |
72% |
3,274 MB |
60% |
52% |
N/A% |
N/A% |
Note the remaining available GPU enabling simultaneous execution of other AI workloads.
Use the tegrastats utility to monitor if any of the system resources are approaching full utilization for your scenarios, which would lead to drop in FPS and streaming quality.