Usage & Configuration#
Reference Web App#
Default URL: http://<IP_address>:30080/vst
VST deployment can be verified using a web-based application binary. Please note: at this point the web-based application is only available for Chrome browser running on Linux, Windows or MacOS. The UI can be accessed on any viewing machine on local subnet. The following instructions refer to same host. Substitute ‘localhost’ with IP address of your viewing machine.
Launch Chrome browser
In the address bar enter
http://<IP_address>:<port_number>
The VST web-based UI allows for seamless and hassle-free discovery of most ONVIF-S compliant cameras.
Although a relatively short list of models are guaranteed to work with VST release, any fully ONVIF-S compliant camera you might already have purchased should work with this release as well. Contact us if your cameras are not working.
VST will auto-discover, and attempt to communicate with any ONVIF-S camera attached downstream of the host. Once discovered, VST will attempt to communicate with the camera, to retrieve its settings and parameters, and populate the web UI.
There is a good chance that your camera has been secured by a custom username and password prior to the first VST use. In such a case (even though the camera would be discovered) VST might not be able to communicate with it immediately.
This short guide will explain how to ensure that you can see live and recorded content from new or previously used ONVIF-S cameras.
Open a web browser (Chrome is required for best video streaming experience) at
http://<IP_address>:<port>.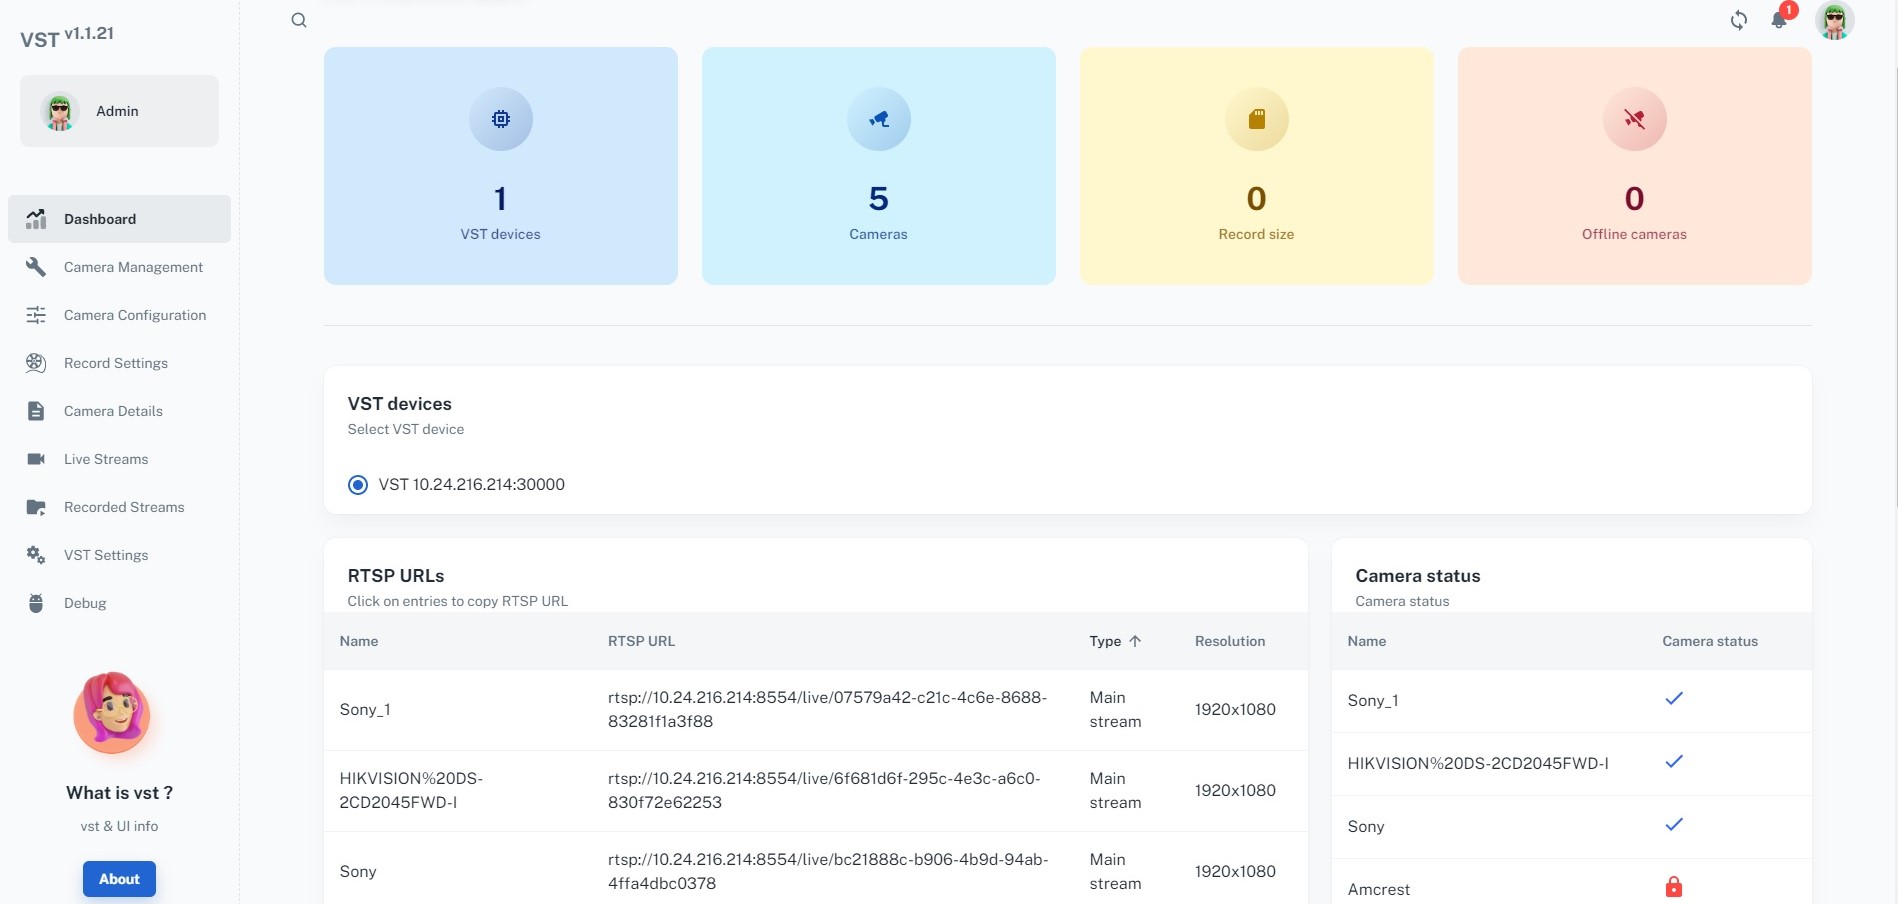
As the page opens, it shows overall health of VST, information about VST Devices, Camera discovered, Record Size. Also it shows the vital information about cameras such as Record Status, Camera Status etc.
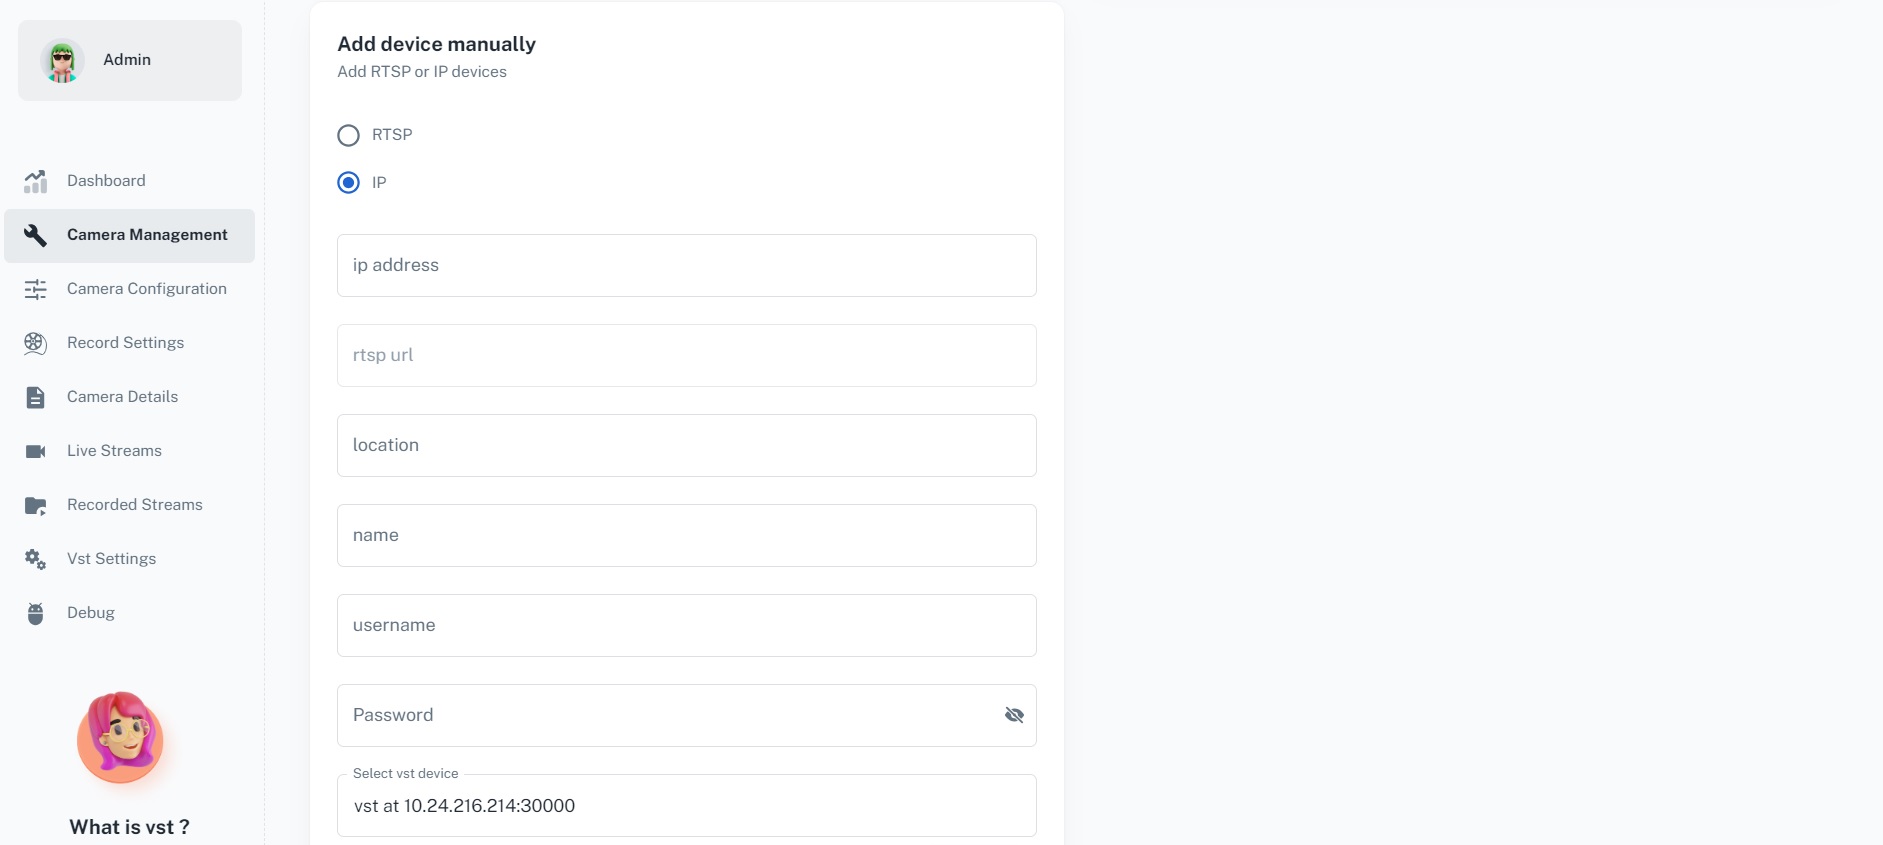
VST also offers capability to add cameras / devices manually. You can add cameras with RTSP URL or IP Address, to add camera manually, navigate to ‘Camera Management’ tab then scroll down to ‘Add device manually’ section and add the camera details and click ‘Submit’ as displayed in the following image. If VST is able to communicate with the RTSP URL or IP Address then it is expected that the camera shows up in Camera List.
Cameras that had been discovered will be listed. If VST discovered the camera, but was not able to communicate with it, the camera status indicates a lock icon. If the lock icon appears, navigate to ‘Camera Management’ tab, and click on ‘Camera Credentials’ section as displayed in the following image:
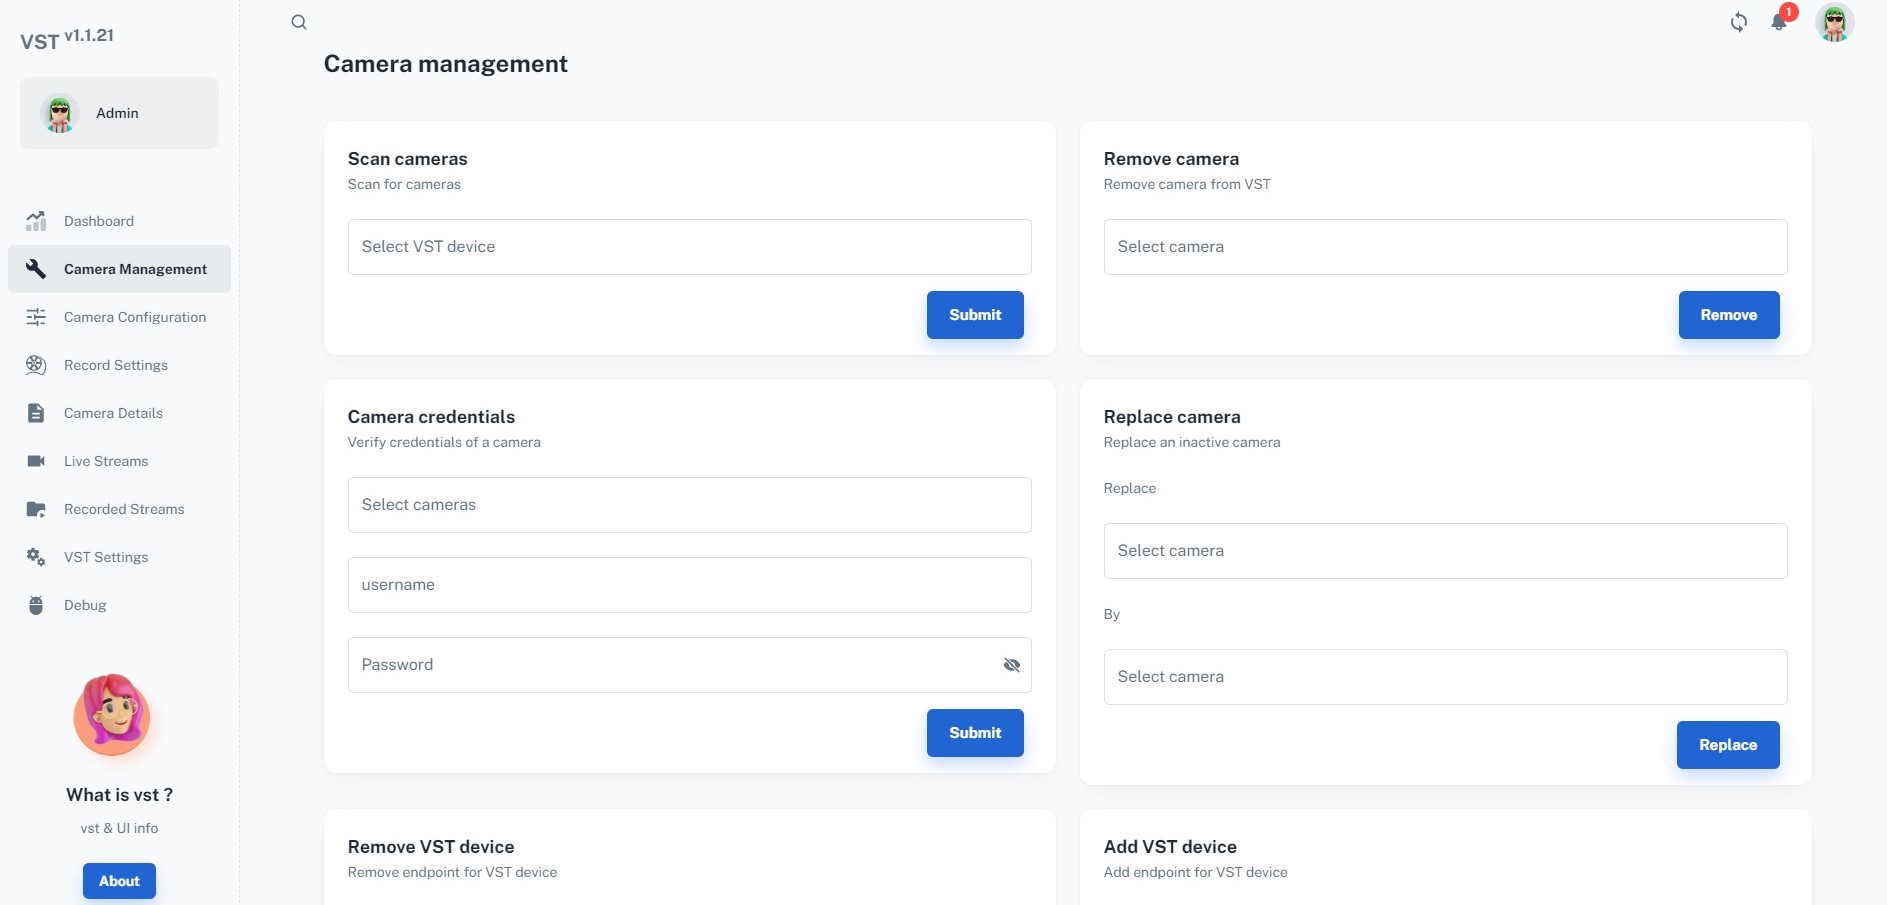
Click on the ‘Select cameras’ drop down list, and select the camera that cannot be streamed from. Then input that camera’s username and password, and click ‘Submit’. An instantaneous message box will confirm if your credentials are valid. Repeat the same procedure for all cameras that cannot be streamed from.
It should now be possible to stream from all the cameras attached to VST.
If you do not remember your camera’s custom username or password, you might need to perform a hardware factory reset for that camera, re-start VST, and consult that camera’s guide to set its username and password again.
VST is now aware of usernames and passwords for all cameras, and is ready to stream live video from the auto-discovered ONVIF-S sources.
Navigate back to the ‘Live Streams’ tab, click on the center drop-down list, and select the first camera on the list. A black rectangle will appear on the UI, and the camera’s IP address will be displayed on top of the drop-down list. Repeat the same with up to max cameras supported. You should see a screen similar to the following:
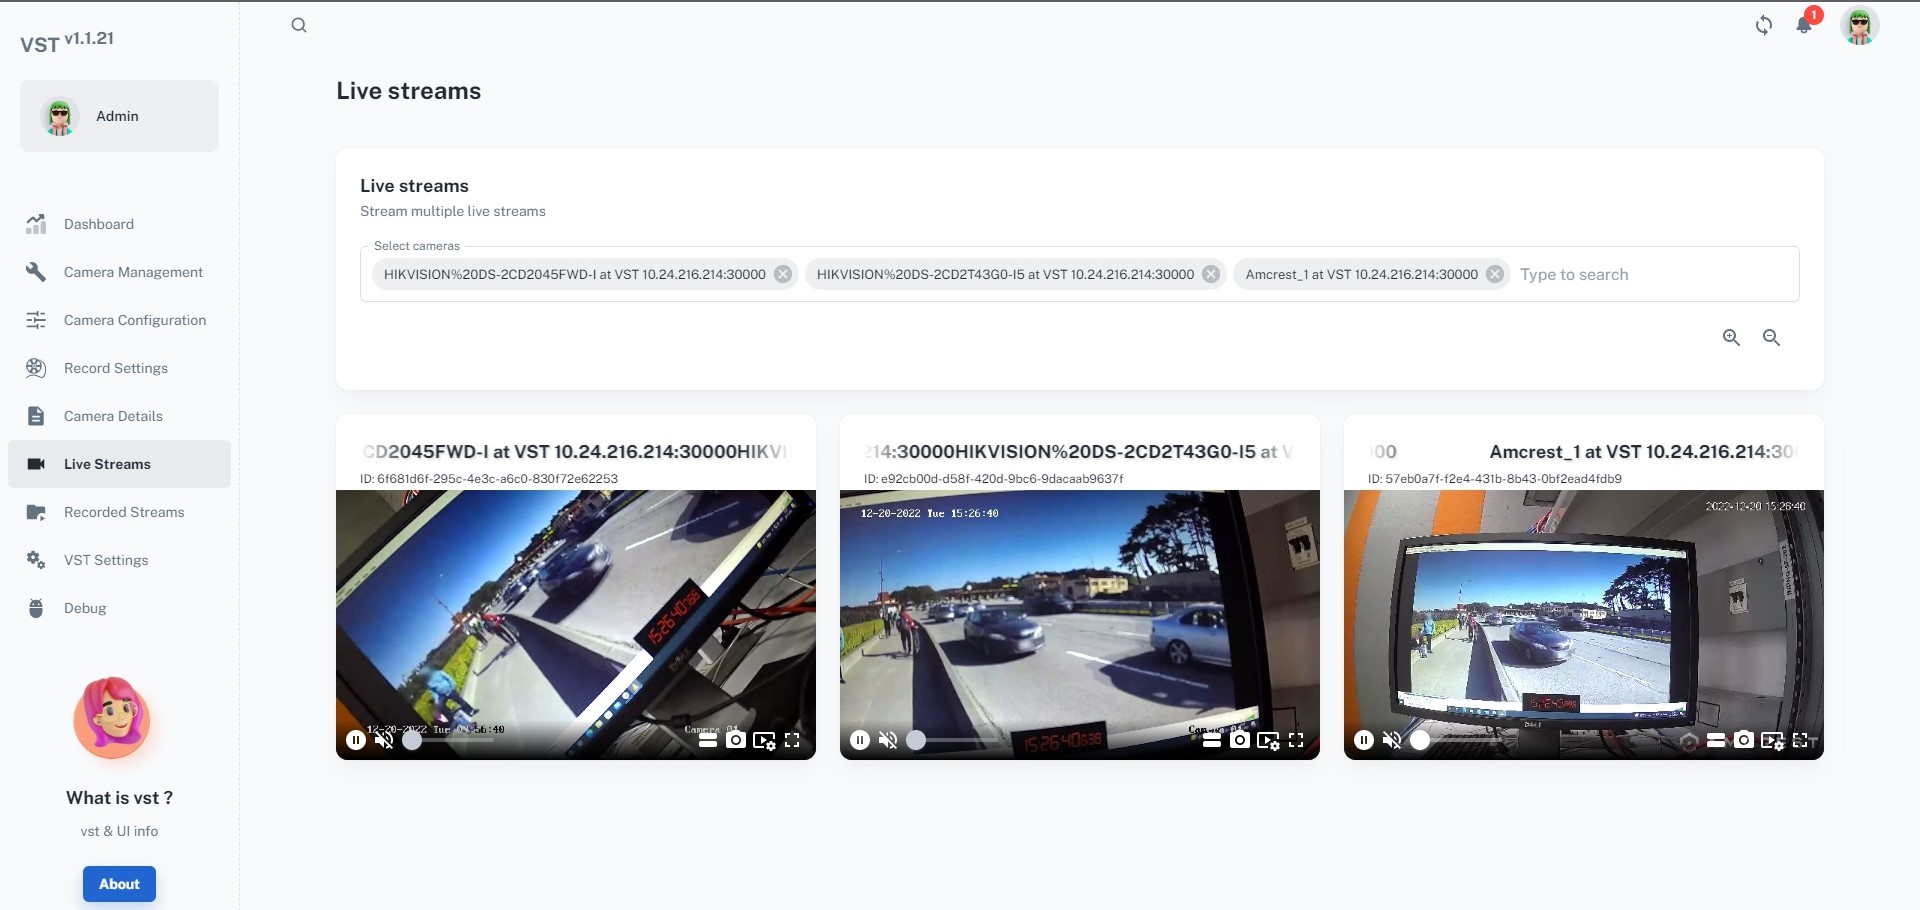
From here on, you can control each of the video streams independently. Click on each triangle to see live video from your camera.
Note
It can take a few seconds for the VST to commence live streaming. If you see a constantly revolving crescent for a prolonged amount of time - please try to restart the browser (please note: VST has been tested extensively with Chrome and we are aware of existing problems while streaming through alternative browsers). On Jetson ORIN Nano the WebRTC resolution is restricted to maximum of 480p due to limited resources available on the platform.
The VST WebUI now includes additional options as part of its Analytics feature. The VST webUI offers capability to draw, view and delete the Region of Interests (ROI) and tripwires (TW).
Firstly to enable the GEM drawing in VST you need to configure three VST Config parameters.
"enable_gem_drawing": true,
"analytic_server_address": "http://<ip_address>:<ingress_port>/emdx",
"overlay_text_font_type": "DejaVuSansMono.ttf"
Set
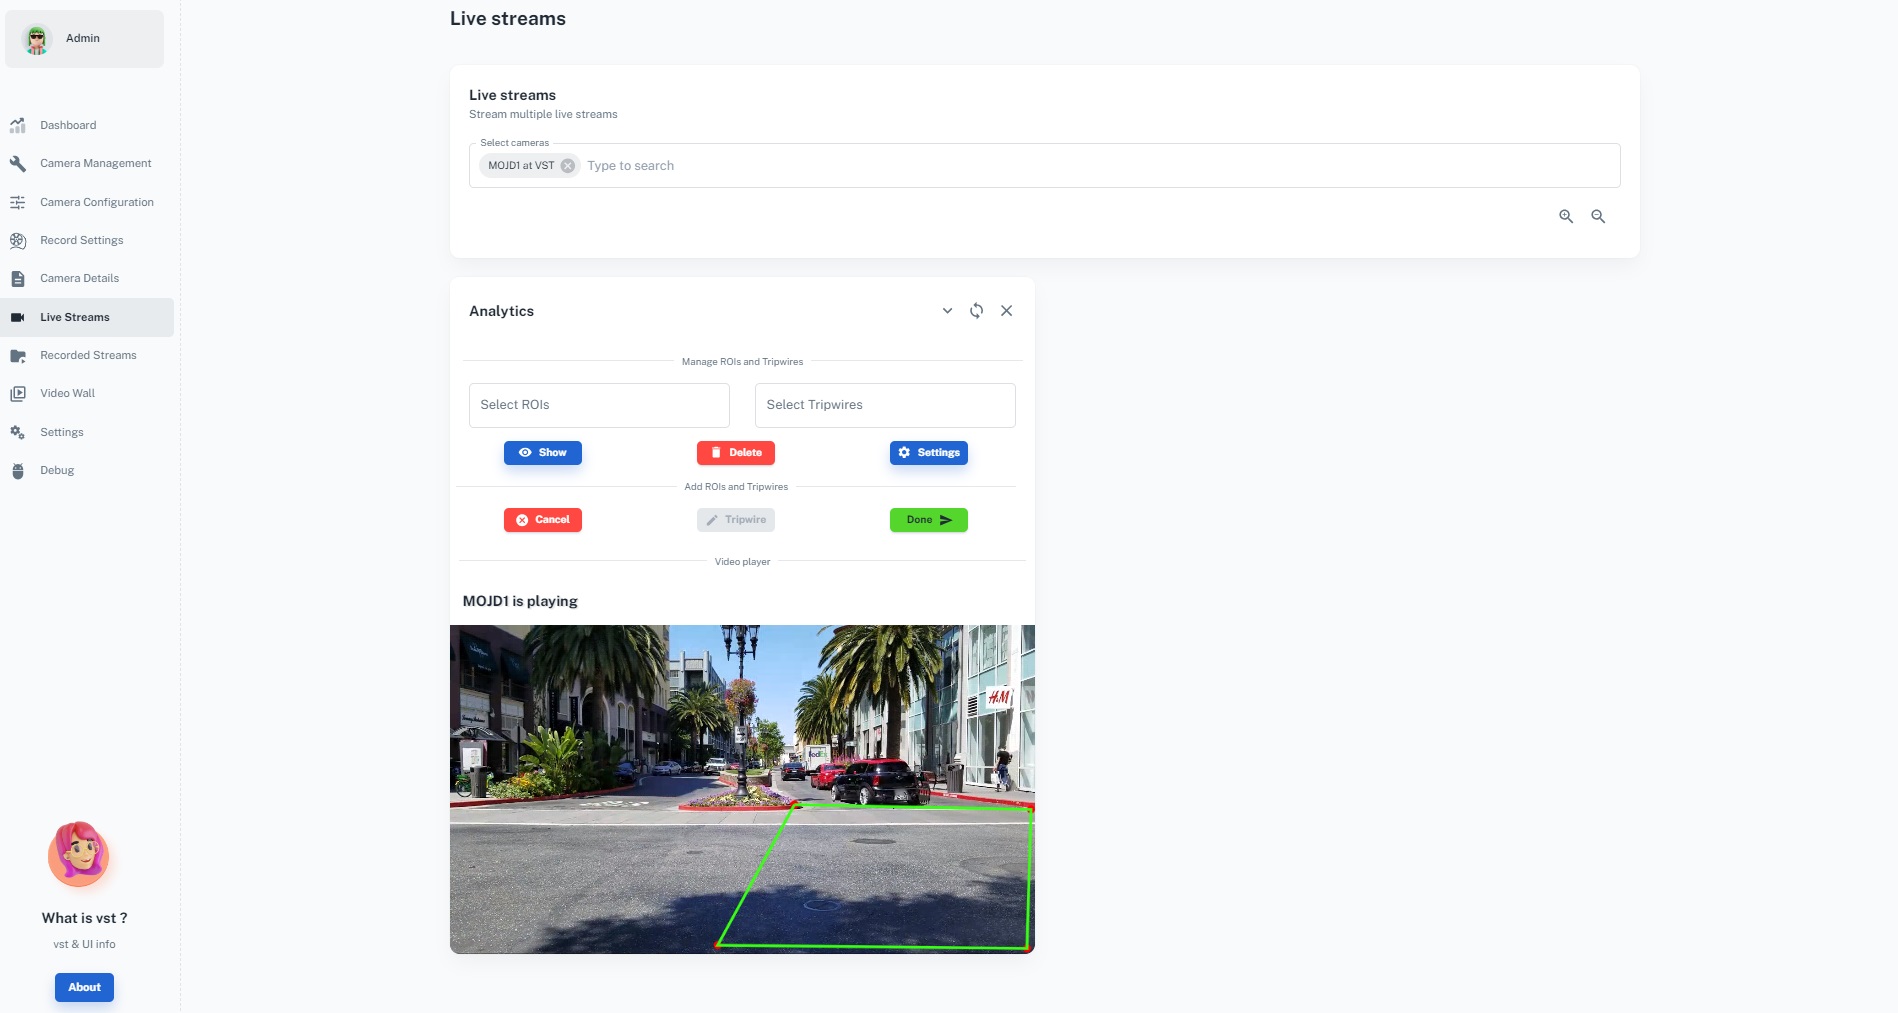
enable_gem_drawingtotrue,analytic_server_addressto corresponding ip address of Jetson device and ingress port andoverlay_text_font_typeto desired font type, refer /usr/share/fonts/truetype/ for more fontsTo draw a new ROI or TW navigate to the ‘Live Streams’ tab, click on the center drop-down list and select the camera where you want to add the ROI or TW. An ‘Analytics’ option will appear in the drop-down menu. Click on it to see more options. Under the ‘Add ROIs and Tripwires’ section, click on the ‘ROI’ button to draw a new ROI. Click on the video frame to start drawing the ROI. Ensure that you connect the start and end points of your ROI. Once done, click on the ‘Done’ button and assign a meaningful name to the ROI. Your screen should look similar to the following:
To create a new TW, click on the ‘Tripwire’ button under the ‘Add ROIs and Tripwires’ section. Click on the video frame to start drawing the TW. Place four points followed by an arrow to indicate the direction of the TW. Once done, click on the ‘Done’ button and assign a meaningful name to the TW. Your screen should look similar to the following:

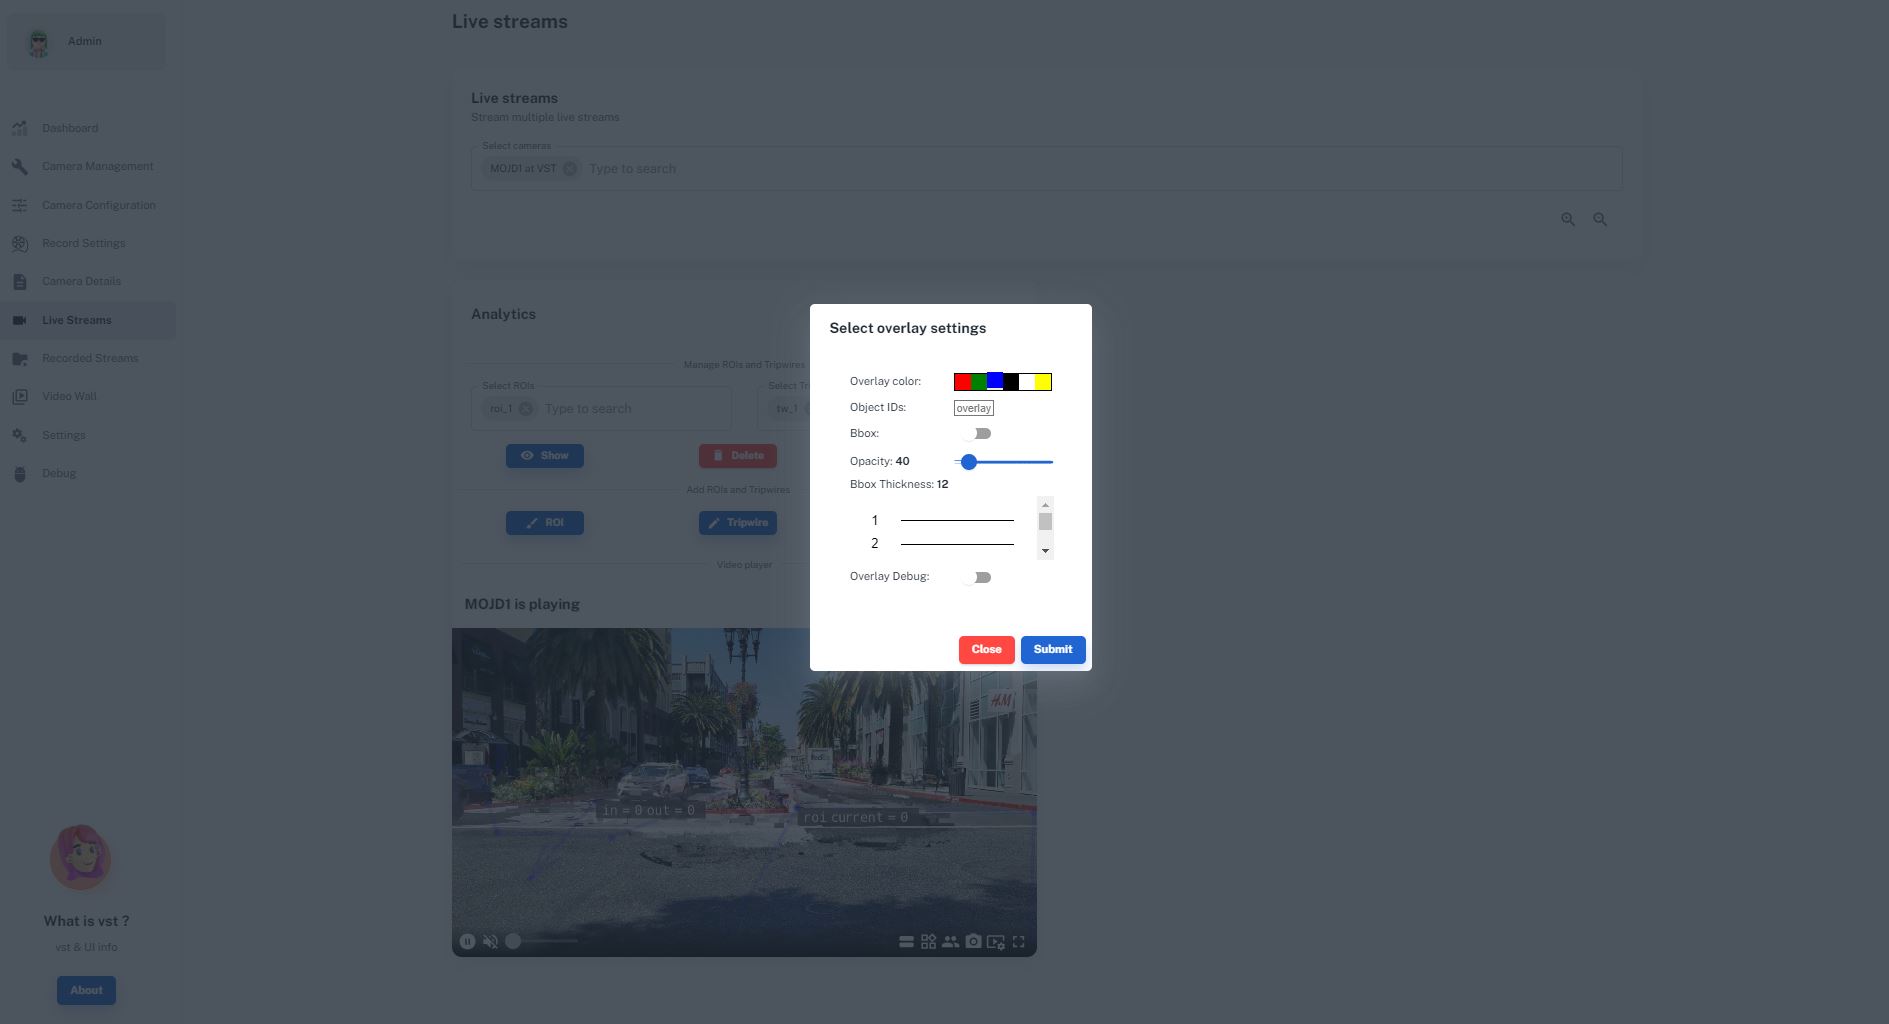
To view existing ROIs and/or TWs, select them under the ‘Manage ROIs and Tripwires’ section and click on the ‘Show’ button. The ROIs and TWs will be displayed on the video frame. You can customize the color, opacity, and thickness of the ROIs and TWs using the ‘Settings’ button. Your screen should look similar to the following:

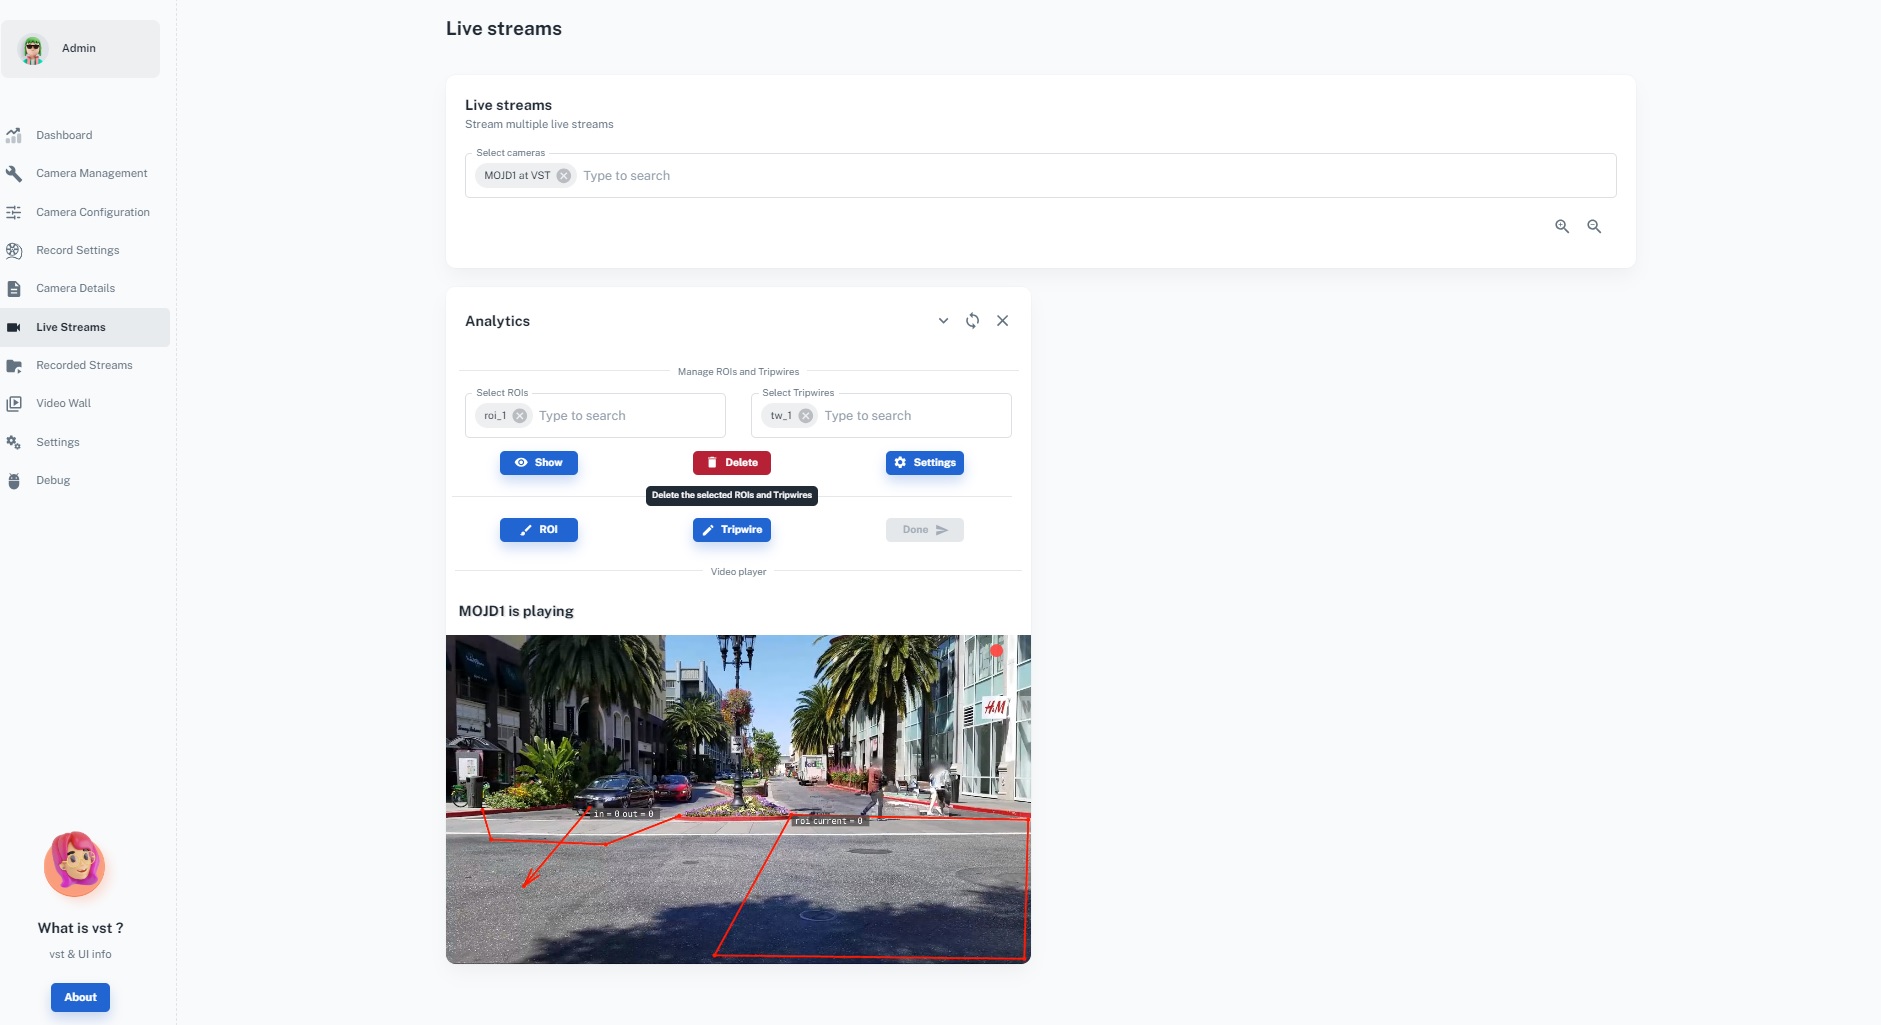
To delete existing ROIs and/or TWs, select them under the ‘Manage ROIs and Tripwires’ section and click on the ‘Delete’ button. The selected ROIs and TWs will be removed from the video frame and the list. Your screen should look similar to the following:
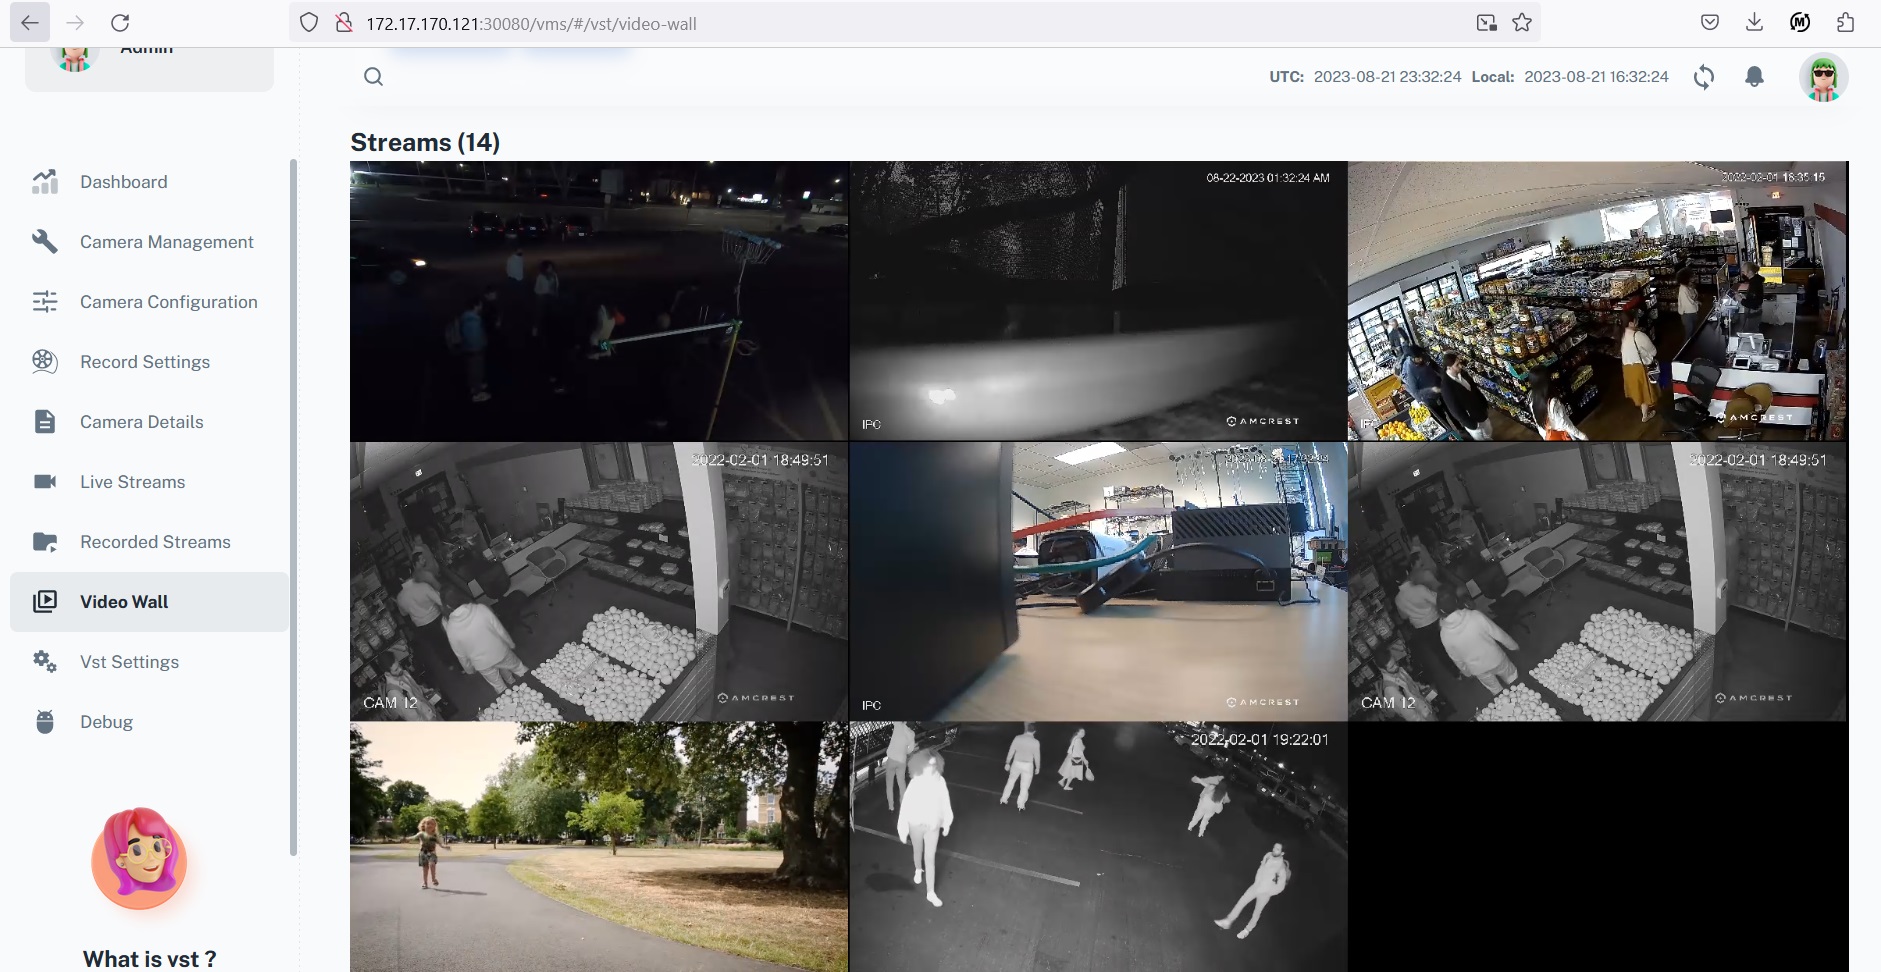
Now that you are able to stream live video, it is time create a Video Wall. Navigate to the ‘Video Wall’ tab, click on the center drop-down list, and select any number of cameras on the list or click on ‘Select All’ and then click ‘Start’. A black rectangle will appear on the UI, and then a grid of selected streams will appear. You should see a screen similar to the following:
Note
It can take a few seconds for the VST to commence Video Wall streaming. If you see a constantly revolving crescent for a prolonged amount of time - please check if cameras are correctly configured.
Now that you are able to stream live video and create a video wall, it is time to try out recording. Navigate to the ‘Record Settings’ tab, and select camera from drop down list:
Note
All recordings will be saved to your local storage; older recordings will be overwritten with newer ones automatically should VST run out of the disk space).
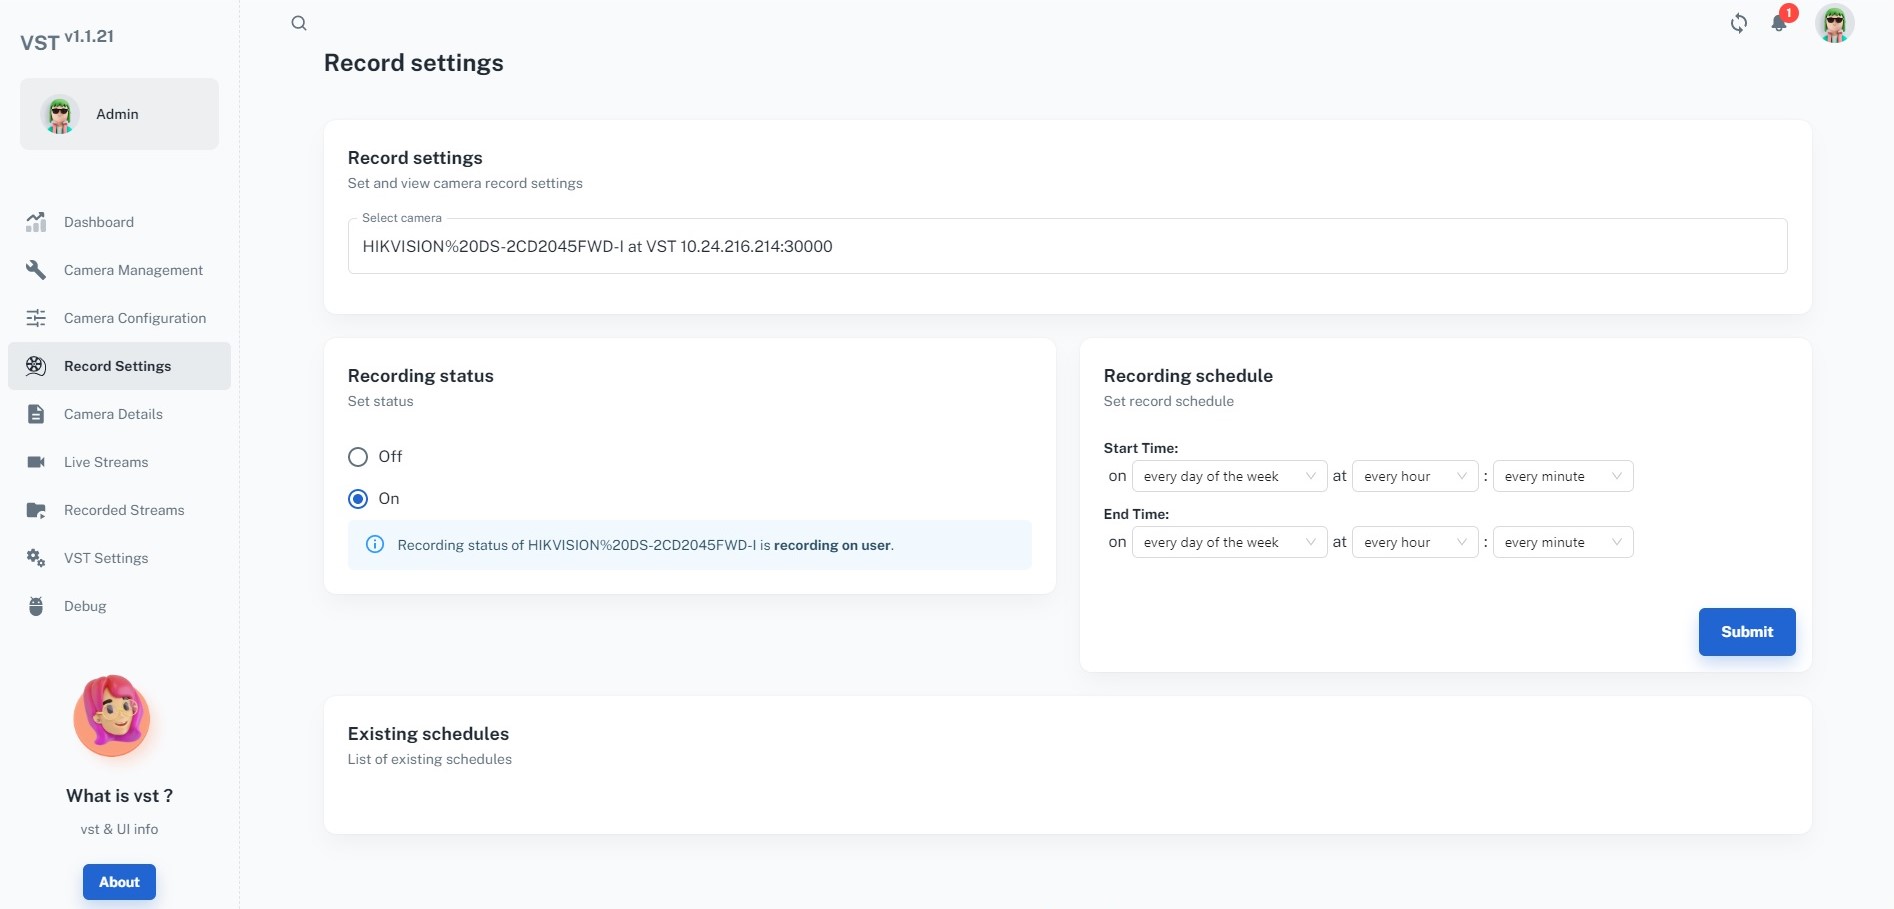
You can select a particular camera from the drop down list and set recording of that camera only.
You can also configure Event Based recording and length of record segment (before and after event) by enabling ‘“event_recording”’ and ‘“event_record_length_secs”’ in config parameter in ‘vst_config.json’ file. Events can be triggered using API Refer API
Each camera can be assigned a separate recording schedule.
Click on the ‘Live Streams’ tab again, and verify a red dot is displayed at the top right of the live video.
Click on the ‘Recorded Streams’ tab, you can use a scrubber at the bottom of the video stream to go back in time and play back the recorded content for cameras the recordings are available.
Click back on the ‘Live Streams’ tab to go back to view the live feeds.
Recorded videos will be stored at directory set to ‘“video_path”’ config parameter in ‘“storage_config_file”’ (Storage Config.) config parameter in ‘vst_config.json’ file and default video directory path is located at installation path inside ‘vst_video’ directory.
Note
The vst_storage.json file is created by BSP that is used by VST to determine storage available for videos.
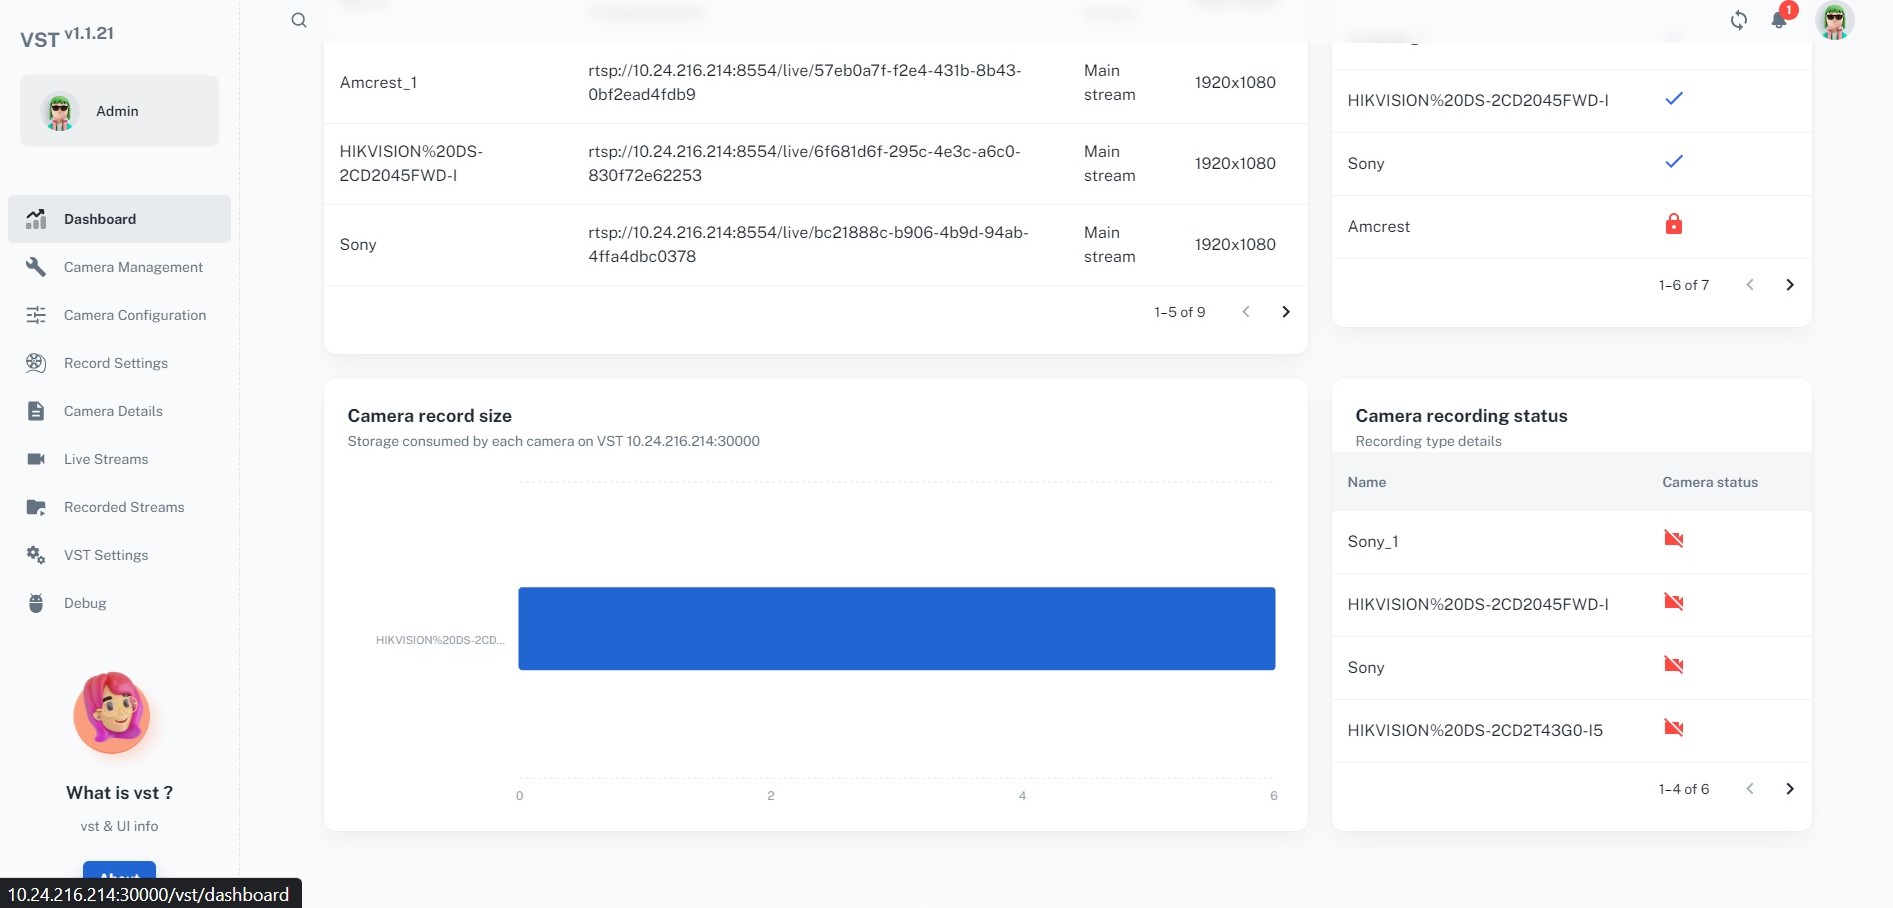
You can examine the amount of disk space used by clicking on ‘Dashboard’ tab:
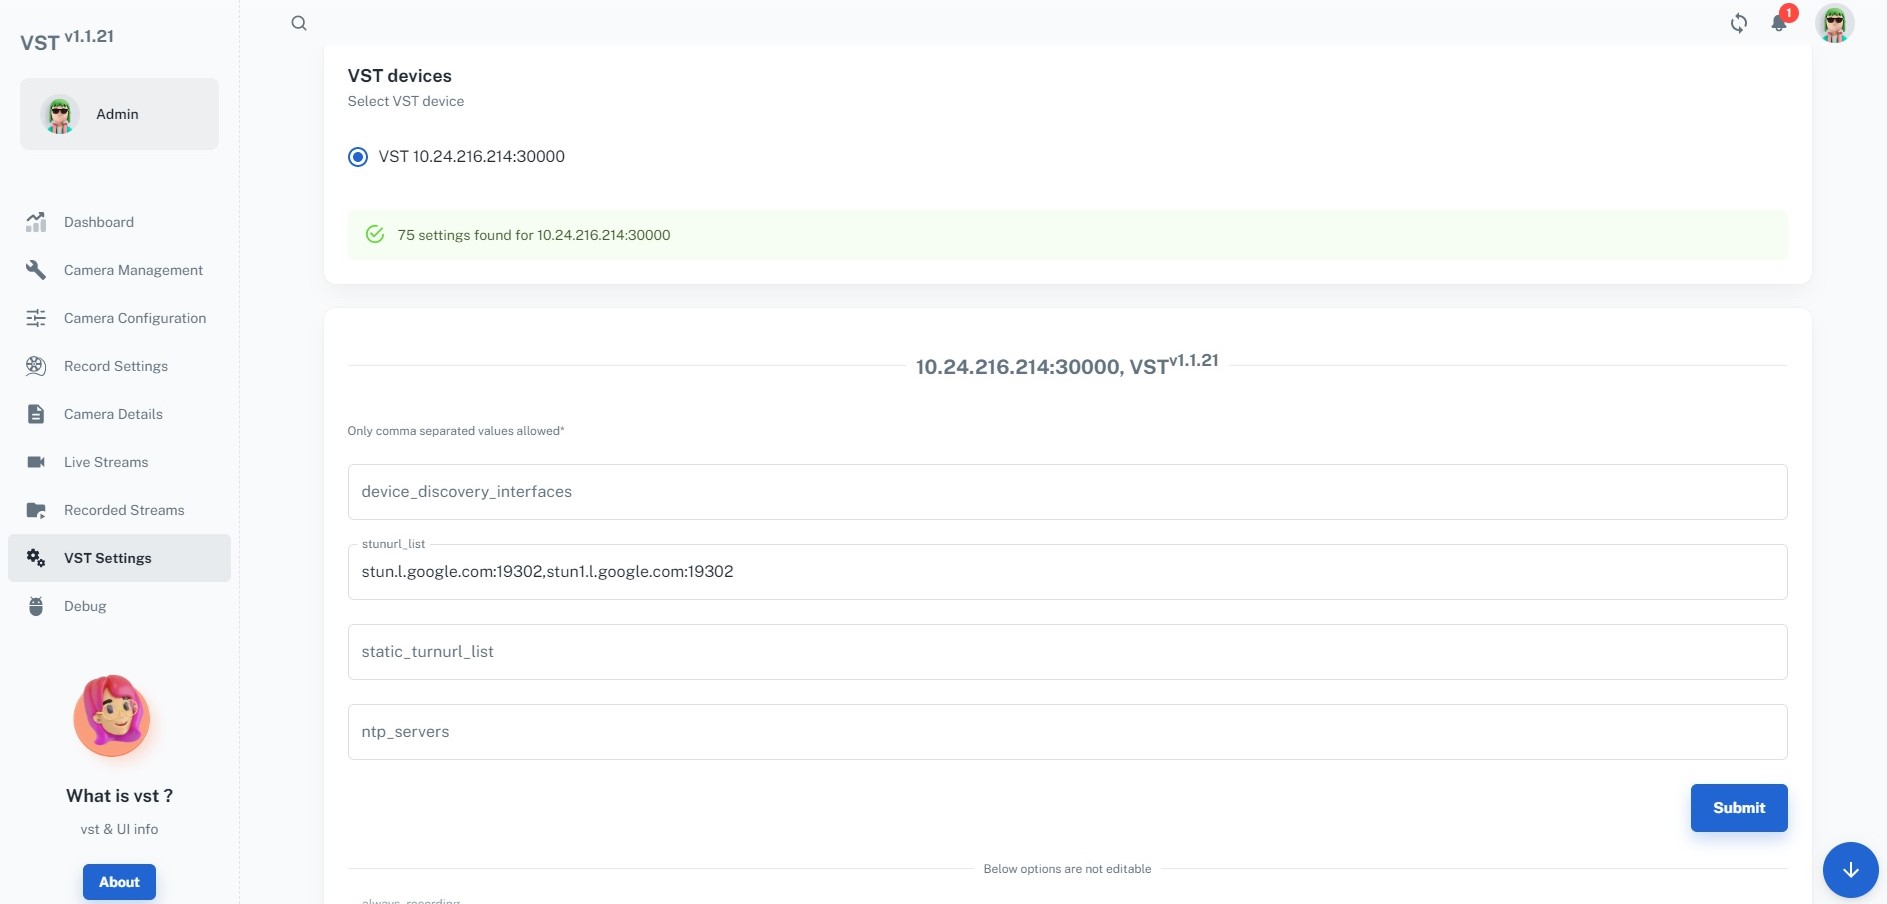
The active VST configuration can be viewed from the ‘VST Settings’ tab:
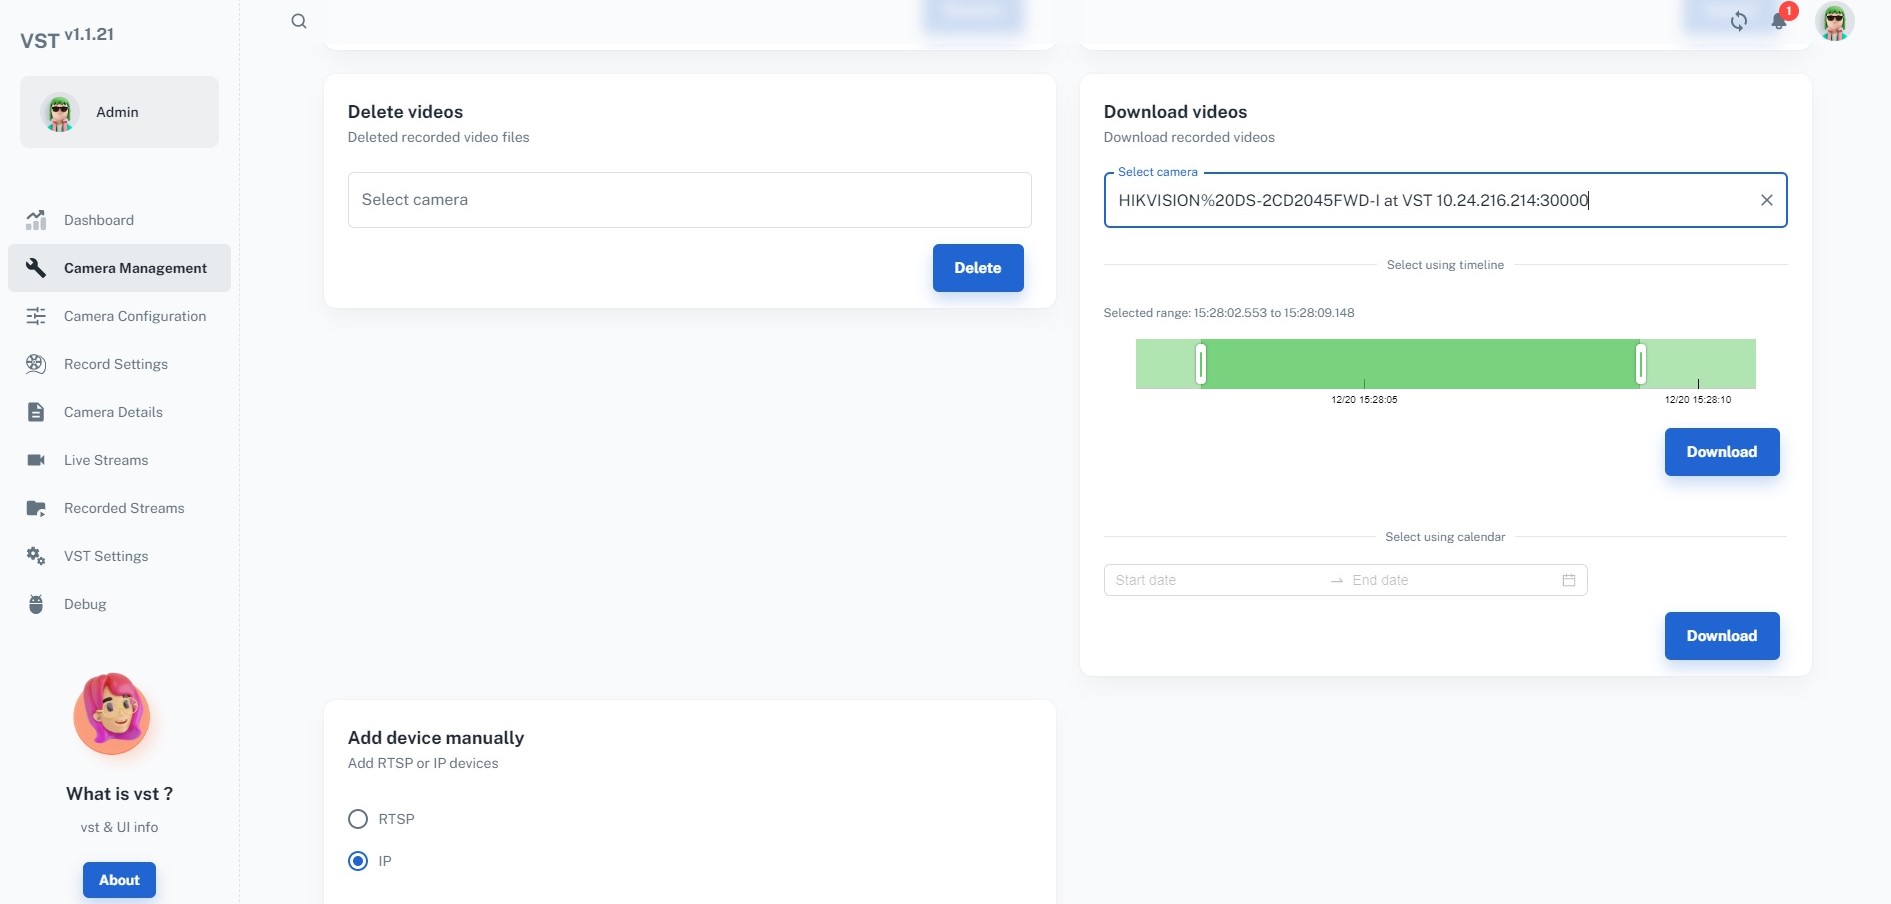
To download recorded video, select ‘Download videos’ option in ‘Camera Management’ tab. Then choose the device and corresponding timeline.
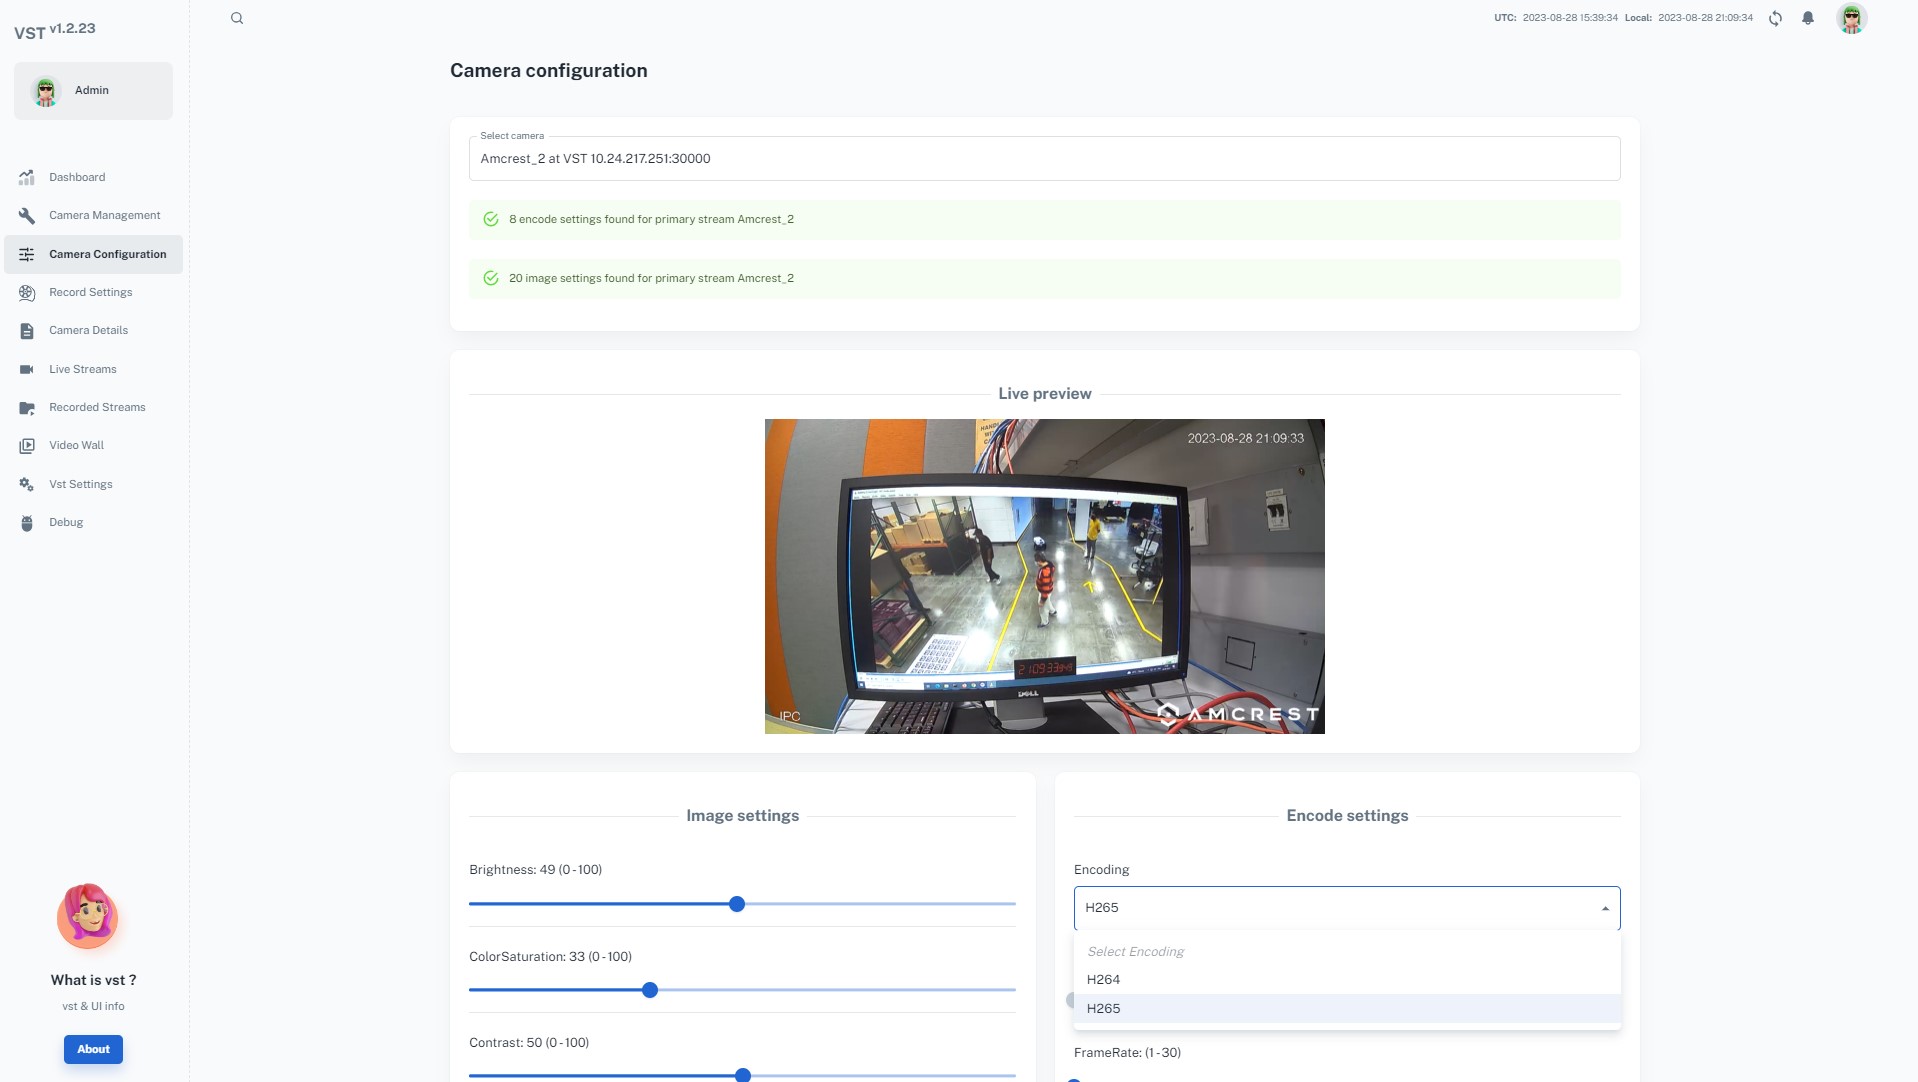
VST supports both H.264 and H.265 encoding formats for recording stream, live and recorded playback. To change encoding formats between H264 and H265 for an ONVIF S-profile camera, kindly use the camera’s web page. To change encoding formats for Amcrest cameras, use ‘Camera Configuration’ tab, select Amcrest camera from drop down menu and under ‘Encode Settings’ section change the Encoding format.
Finally, the ‘Debug’ tab will allow you to create and examine a debug package. It will come handy if you ever need to contact us. Enjoy the VST experience!
Refer to the Components & Customization for comprehensive list of APIs and its usage.