Deploying#
This section describes how to install the software components for your MNNVL system.
Follow these instructions to configure an MNNVL compute tray on each compute tray in the MNNVL rack.
Operating System Requirements#
The MNNVL compute trays use NVIDIA Grace, ARM-based, CPUs.
NVIDIA provides guides for installing Linux distributions on Grace CPU platforms at the following links:
NVIDIA Grace Software with Red Hat Enterprise Linux 9 Installation Guide
NVIDIA Grace Software with SUSE Linux Enterprise Server 15 Installation Guide
Important
Before installing NVIDIA software follow the directions from your manufacturer to update all system firmware.
Installing NVIDIA Software#
The following steps describe how to install the NVIDIA software packages on Ubuntu 24.04.
Important
Follow these directions for each compute tray in the MNNVL rack.
Remove Existing Packages#
Remove any existing NVIDIA packages:
$ sudo apt purge nvidia-*
$ sudo apt purge cuda*
$ sudo apt purge libxnvctrl0
$ sudo apt purge glx-*
Note
These packages are not installed on a new Ubuntu 24.04 install. The apt command will not find the packages when running apt purge.
Clean the Local APT Cache#
Clean and reset the existing APT cache, run the following commands.
$ sudo apt autoremove
$ sudo apt autoclean
Unload the Kernel Modules#
Unload the kernel modules, run the following commands.
$ sudo modprobe -r mods
$ sudo modprobe -r nvidia_uvm
$ sudo modprobe -r nvidia_drm
$ sudo modprobe -r nvidia_modeset
$ sudo modprobe -r nvidia_vgpu_vfio
$ sudo modprobe -r nvidia_peermem
$ sudo modprobe -r nvidia
$ sudo modprobe -r nvidiafb
Install the NVIDIA Linux Kernel and Packages#
For optimal performance, the Grace-Blackwell systems require the NVIDIA-specific Linux kernel.
Note
If you use a custom kernel refer to the NVIDIA Grace Platform Support Software Patches and Congurations for a list of kernel customizations required for the Grace CPU.
Remove the existing Linux image, headers and modules.
sudo apt purge linux-image-$(uname -r) linux-headers-$(uname -r) linux-modules-$(uname -r)
Install the NVIDIA Linux kernel.
sudo apt update
sudo apt install linux-nvidia-64k-hwe-24.04
Important
Change the 24.04 value to match your Ubuntu version.
Hold the kernel version
apt-mark hold linux-nvidia-64k-hwe-24.04
Important
Change the 24.04 value to match your Ubuntu version.
Reboot the system to load the new NVIDIA kernel.
sudo reboot
Install the Kernel Build Packages#
Install packages required to install the NVIDIA drivers:
sudo apt update -y && sudo apt install -y gcc dkms make
Install DOCA Host#
The DOCA Host package provides the OS drivers for the BlueField-3 and ConnectX adapters.
Remove older versions of DOCA and adapter drivers.
Note
If there were no drivers previously installed the ofed_uninstall.sh script won’t be found.
$ for f in $( dpkg --list | grep -E 'doca|flexio|dpa-gdbserver|dpa-stats|dpaeumgmt' | awk '{print $2}' ); do echo $f ; apt remove --purge $f -y ; done
$ /usr/sbin/ofed_uninstall.sh --force
$ sudo apt-get autoremove -y
Install the DOCA host Debian package and update APT.
Tip
DOCA packages can be downloaded from the NVIDIA website at
https://developer.nvidia.com/doca-downloads?deployment_platform=Host-Server&deployment_package=DOCA-Host&target_os=Linux&Architecture=arm64-sbsa&Profile=doca-all&Distribution=Ubuntu
$ sudo dpkg -i doca-host_3.0.0-058000-25.04-ubuntu2404_arm64.deb
$ sudo apt-get update
Install the
doca-extrapackage to enable NVIDIA kernel support.
sudo apt install -y doca-extra
Rebuild the kernel headers with
doca-kernel-support.
rm -rf /tmp/DOCA*
sudo /opt/mellanox/doca/tools/doca-kernel-support
The doca-kernel-support command generates a new Debian package file, install this file using dpkg -i <package_file>.
For example:
$ sudo /opt/mellanox/doca/tools/doca-kernel-support
doca-kernel-support: Built single package: /tmp/DOCA.EuUfkWfV7Z/doca-kernel-repo-2.9.0-1.kver.5.14.0.356.el9.arm.deb
doca-kernel-support: Done
$ dpkg -i /tmp/DOCA.EuUfkWfV7Z/doca-kernel-repo-2.9.0-1.kver.5.14.0.356.el9.arm.deb
Set the DOCA-HOST APT package preference.
Set the DOCA-HOST APT package preference to 600, to match the CUDA repo preference.
This ensures APT installs the correct DOCA software packages from CUDA and DOCA repos.
cat <<'EOF' | sudo tee /etc/apt/preferences.d/doca-host-repository-pin-600
Package: *
Pin: release l=DOCA-HOST
Pin-Priority: 600
EOF
Update APT and install the
doca-allhost profile.
sudo apt update
sudo apt -y install doca-all
Note
doca-kernel-support does not support customized or unofficial kernels. Refer to Installing Software on Host for more information about the installation.
Install IMEX and the NVIDIA GPU Driver#
Note
Contact NVIDIA for access to the Blackwell GPU driver and IMEX packages.
Installing the driver and IMEX packages with APT requires installing a local APT repository and configuring APT to prefer the local repository for those packages.
Important
The following are example filenames. Check your specific release for the correct filenames and versions.
Install the NVIDIA GPU driver and IMEX package from the .run files provided by NVIDIA.
Tip
Replace the version in the example with the version in your software release bundle.
sudo ./NVIDIA-Linux-aarch64-570.26.run  --dkms -q -s -m=kernel-open
sudo ./nvidia-imex-aarch64-570.26.run
Configure the NVIDIA Software Packages#
This section details the configuration options for the GPU driver and IMEX application.
Enable Profiling#
Enable profiling for all users by applying the settings to /etc/modprobe.d/nvprofiling.conf.
echo 'options nvidia NVreg_RestrictProfilingToAdminUsers=0' | sudo tee /etc/modprobe.d/nvprofiling.conf
Enable the IMEX Control Channel#
Configure IMEX to automatically enable the IMEX control channel by configuring /etc/modprobe.d/nvidia.conf.
$ cat /etc/modprobe.d/nvidia.conf

options nvidia NVreg_CreateImexChannel0=1
Note
Multitenent MNNVL systems require more complex IMEX configuration beyond the scope of this document.
Refer to the IMEX documentation for more information.
After changing the nvidia.conf file, rebuild the initramfs.
On Ubuntu:
sudo update-initramfs -u -k all
On RHEL:
dracut --regenerate-all -f
Configure IMEX Peers#
Create the file /etc/nvidia-imex/nodes_config.cfg with the management Ethernet interface IP address of all nodes in the cluster.
Here is an example /etc/nvidia-imex/nodes_config.cfg file:
Note
Place one IP address per line, with no other information.
10.114.228.6
10.114.228.7
10.114.228.8
10.114.228.9
10.114.228.10
10.114.228.11
10.114.228.12
10.114.228.13
10.114.228.14
Note
IMEX can use any compute tray IP address, as long as there is connectivty between all IP addresses in the configuration.
Enable the NVIDIA Persistence Daemon#
Configure the NVIDIA persistence daemon by editing the
/etc/systemd/system/nvidia-persistenced.servicefile.
$ cat /etc/systemd/system/nvidia-persistenced.service
[Unit]
Description=NVIDIA Persistence Daemon
Wants=syslog.target

[Service]
Type=forking
PIDFile=/var/run/nvidia-persistenced/nvidia-persistenced.pid
Restart=always
ExecStart=/usr/bin/nvidia-persistenced --verbose
ExecStopPost=/bin/rm -rf /var/run/nvidia-persistenced

[Install]
WantedBy=multi-user.target
Enable and start the daemon by running the following command:
$ sudo systemctl enable nvidia-persistenced.service
Enable the IMEX Daemon#
Enable the IMEX service to start at boot:
sudo systemctl enable nvidia-imex.service
Rebuild the initramfs#
After changing the IMEX configuration rebuild the initramfs.
sudo update-initramfs -u -k all
Reboot the Compute Tray#
Reboot the compute tray to complete the driver and application configurations.
sudo reboot
Switch Tray Software#
Each NVLink switch tray runs a local instance of the NVOS software. The NVLink switches ship from the factory with NVOS preinstalled.
NVOS contains all the required software and firmware components.
Tip
Refer to your manufacturer for the lastest version of NVOS and upgrade instructions.
To show the firmware information for the platform firmware components, run the following command.
$ nv show platform firmware
Here is an example output:
The actual firmware version on your system might be different.
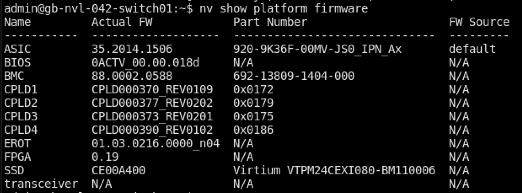
Figure 2 nv show platform firmware output#
Enable the NVLink Cluster#
The NVIDIA Management Controller (NMX-C) service runs on a single NVLink switch. NMX-C manages the network configuration for all NVLink switches.
Enable the NMX-C service on one NVLink switch.
nv set cluster state enabled
nv config apply
nv config save
On a compute or management node download and install
GRPCurlUsing
grpcurlcreate a gRPC connection, replacing127.0.0.1with the NVLink switch management IP address.
grpcurl -plaintext -d \
"{ \"gatewayId\": \"nvidia-bringup\", \
\"major_version\": \"PROTO_MSG_MAJOR_VERSION\", \
\"minor_version\": \"PROTO_MSG_MINOR_VERSION\" }" \
127.0.0.1:9371 nmx_c.NMX_Controller.Hello
After creating the gRPC connection, configure the FM topology, again replacing
127.0.0.1with the NVLink switch management IP address.
grpcurl -plaintext -d \
'{ \"gatewayId\": \"nvidia-bringup\", \
\"staticConfig\": {  \"configKeyVals\": \
{ \"configKeyVal\": [ { \"configFileName\": \
\"fm_config\", \"key\": \"MNNVL_TOPOLOGY\", \
\"value\": \"gb200_nvl72r1_c2g4_topology\"}]}}}' \
127.0.0.1:9371 nmx_c.NMX_Controller.SetStaticConfig
Note
If the gRPC option isn’t possible, use the NVOS CLI to generate an FM configuration file.
nv action generate sdn config app nmx-controller type fm_config
Download the generated file and edit the MNNVL_TOPOLOGY to MNNVL_TOPOLOGY=gb200_nvl72r1_c2g4_topology
Upload the configuration file back to the switch and install it with the command
nv action install sdn config app nmx-controller type fm_config files <FILENAME>
After configuring FM, enable the cluster and save the configuration.
nv set cluster state enabled
nv config apply
nv config save
Start the NMX-C application.
nv action start cluster app nmx-controlle
Verify the cluster and NMX-C application are running.
nv show cluster apps running