Pretraining Megatron Core Datasets with NeMo AutoModel#
Introduction#
Pretraining builds a base large language model (LLM) by training a randomly initialized model to predict the next token across massive, unlabeled datasets.
Robust pretraining establishes a foundation of linguistic competence and world knowledge that scales with data, parameters, and compute. This base model then serves as the necessary starting point for later fine-tuning or domain-specific adaptation.
NeMo AutoModel provides an end-to-end recipe to run LLM pretraining with Hugging Face–native models and Megatron-Core style datasets.
Model and Dataset Context#
In this guide, we pretrain OpenAI’s GPT2-124M model on a FineWeb-Edu subset of 10 billion tokens.
About the FineWeb-Edu Dataset#
FineWeb-Edu is a dataset consisting of 1.3T tokens of educational web pages filtered from the larger FineWeb dataset. The educational web pages were filtered from the main dataset using a fine-tuned Bert-like classifier. Further reading on the filtering process can be found here.
Here’s a glimpse of what the data looks like:
{
"id": "<urn:uuid:673b1bf6-2c30-40ae-992b-c387d00a836a>",
"dump": "CC-MAIN-2013-20",
"text": "No. 24; Updated March 2011
Click here to download and print a PDF version of this document.
Parents are usually the first to recognize that their child has a problem with emotions or behavior. Still, the decision to seek professional help can be difficult and painful for a parent. The first step is to gently try to talk to the child. An honest open talk about feelings can often help. Parents may choose to consult with the child's physicians, teachers, members of the clergy, or other adults who know the child well. These steps may resolve the problems for the child and family.
Following are a few signs which may indicate that a child and adolescent psychiatric evaluation will be useful ...",
"url": "http://aacap.org/page.ww?name=When+to+Seek+Help+for+Your+Child§ion=Facts+for+Families",
"date": null,
"file_path": "s3://commoncrawl/crawl-data/CC-MAIN-2013-20/segments/1368696381249/warc/CC-MAIN-20130516092621-00000-ip-10-60-113-184.ec2.internal.warc.gz",
"language": "en",
"language_score": 0.927742,
"token_count": 755,
"score": 3.375,
"int_score": 3,
}
Download the FineWeb-Edu Dataset#
For this guide, we use the FineWeb-Edu 10BT sample—a collection of approximately 10 billion tokens randomly drawn from the full FineWeb-Edu dataset. To prepare the data, run the following commands:
# run this inside the AutoModel directory

git clone https://github.com/facebookresearch/lingua.git
cd lingua
pip install -r requirements.txt
python setup/download_prepare_hf_data.py fineweb_edu_10bt <MEMORY> --data_dir <DATA_DIR> --seed 42 --nchunks 1
cd ..
mv lingua/fineweb_edu .
Replace <MEMORY> with the amount of system memory allocated to terashuf (the tool used for sample shuffling), and set <DATA_DIR> to the root directory where the data will be stored. You can run the following example command:
python setup/download_prepare_hf_data.py fineweb_edu_10bt 16 --data_dir ./fineweb_edu --seed 42 --nchunks 1
The expected directory structure is like this:
$ tree fineweb_edu/
fineweb_edu/
├── fineweb_edu_10bt
│   ├── datatrove
│   │   ├── completions
│   │   │   ├── 00000
│   │   │   ├── 00001
│   │   │   ├── 00002
│   │   │   ├── 00003
│   │   │   ├── 00004
│   │   │   ├── 00005
│   │   │   │   ...
│   │   │   └── 00063
│   │   ├── executor.json
│   │   ├── logs
│   │   │   ├── task_00000.log
│   │   │   ├── task_00001.log
│   │   │   ├── task_00002.log
│   │   │   ├── task_00003.log
│   │   │   ├── task_00004.log
│   │   │   ├── task_00005.log
│   │   │   │   ...
│   │   │   └── task_00063.log
│   │   ├── stats
│   │   │   ├── 00000.json
│   │   │   ├── 00001.json
│   │   │   ├── 00002.json
│   │   │   ├── 00003.json
│   │   │   ├── 00004.json
│   │   │   ├── 00005.json
│   │   │   │   ...
│   │   │   └── 00063.json
│   │   └── stats.json
│   ├── fineweb_edu_10bt.chunk.00000.jsonl
│   │   ...
│   ├── fineweb_edu_10bt.chunk.00013.jsonl
│   ├── sample
│   │   └── 10BT
│   │       ├── 000_00000.parquet
│   │       │   ...
│   │       └── 013_00000.parquet
│   └── terashuf
│       ├── LICENSE
│       ├── Makefile
│       ├── README.md
│       ├── terashuf
│       └── terashuf.cc
└── fineweb_edu_10bt_shuffled
    ├── fineweb_edu_10bt.chunk.00.jsonl
    └── fineweb_edu_10bt.val.jsonl
Preprocess to a Megatron Core Dataset#
NeMo AutoModel provides tooling to perform the task of tokenizing and saving in the Megatron Core dataset format. You can use it as follows:
uv run tools/preprocess_megatron_dataset.py --input "fineweb_edu/fineweb_edu_10bt/fineweb_edu_10bt.chunk.*.jsonl" --json-keys text --output-prefix processed_data --output-path fineweb_edu/megatron_gpt2/ --workers 8 --pretrained-model-name-or-path openai-community/gpt2 --append-eod
The directory should look like this:
$ tree fineweb_edu/megatron_gpt2/
fineweb_edu/megatron_gpt2/
├── processed_data_0_text_document.bin
├── processed_data_0_text_document.idx
├── processed_data_10_text_document.bin
├── processed_data_10_text_document.idx
├── processed_data_11_text_document.bin
├── processed_data_11_text_document.idx
├── processed_data_12_text_document.bin
├── processed_data_12_text_document.idx
├── processed_data_13_text_document.bin
├── processed_data_13_text_document.idx
├── processed_data_1_text_document.bin
├── processed_data_1_text_document.idx
├── processed_data_2_text_document.bin
├── processed_data_2_text_document.idx
├── processed_data_3_text_document.bin
├── processed_data_3_text_document.idx
├── processed_data_4_text_document.bin
├── processed_data_4_text_document.idx
├── processed_data_5_text_document.bin
├── processed_data_5_text_document.idx
├── processed_data_6_text_document.bin
├── processed_data_6_text_document.idx
├── processed_data_7_text_document.bin
├── processed_data_7_text_document.idx
├── processed_data_8_text_document.bin
├── processed_data_8_text_document.idx
├── processed_data_9_text_document.bin
└── processed_data_9_text_document.idx

1 directory, 28 files
Tip
Replace --workers with the amount of CPU cores you’d like to use to tokenize in parallel.
Use a Recipe for Pretraining#
This example demonstrates how to perform pretraining on a large language model using NVIDIA’s NeMo AutoModel library. We use the LLM training recipe, specifically TrainFinetuneRecipeForNextTokenPrediction, which orchestrates the pretraining process — including loading, dataset preparation, optimizer setup, distributed training, checkpointing, and logging.
What is a Recipe?#
A recipe in NeMo AutoModel is a self-contained orchestration module that wires together all components needed to perform a specific task (e.g., pretraining). Think of it as the equivalent of a Trainer class, but highly modular, stateful, and reproducible.
The TrainFinetuneRecipeForNextTokenPrediction class is one such recipe. It inherits from BaseRecipe and implements:
setup(): builds all training components from the configrun_train_validation_loop(): executes training + validation stepsMisc: Checkpoint handling, logging, and RNG setup.
Recipe Config Example#
Below is the configuration from examples/llm_pretrain/megatron_pretrain_gpt2.yaml:
# Copyright (c) 2025, NVIDIA CORPORATION.  All rights reserved.
#
# Licensed under the Apache License, Version 2.0 (the "License");
# you may not use this file except in compliance with the License.
# You may obtain a copy of the License at
#
#     http://www.apache.org/licenses/LICENSE-2.0
#
# Unless required by applicable law or agreed to in writing, software
# distributed under the License is distributed on an "AS IS" BASIS,
# WITHOUT WARRANTIES OR CONDITIONS OF ANY KIND, either express or implied.
# See the License for the specific language governing permissions and
# limitations under the License.


# To run this recipe, please use the following command:
# torchrun --nproc-per-node=8 examples/llm_pretrain/pretrain.py --config examples/llm_pretrain/megatron_pretrain_gpt2.yaml
# Adjust --nproc-per-node to the number of GPUs available on your host machine.

# The model section is responsible for configuring the model we want to finetune.
# Since we want to use the GPT2-124M model, we pass `openai-community/gpt2` to the
# `pretrained_model_name_or_path` option.
model:
  _target_: nemo_automodel.NeMoAutoModelForCausalLM.from_config
  config:
    _target_: transformers.AutoConfig.from_pretrained
    pretrained_model_name_or_path: openai-community/gpt2

# As mentioned earlier, we are using the FineWeb-Edu dataset. NeMo AutoModel provides the MegatronPretraining
# class which prepares the dataset by loading, packing, and shuffling. We use the "train" split for
# training.
dataset:
  _target_: nemo_automodel.components.datasets.llm.megatron_dataset.MegatronPretraining
  paths: fineweb_edu/megatron_gpt2/processed_data_*_text_document*  # REPLACE THIS
  index_mapping_dir: fineweb_edu/megatron_gpt2/mapping_dir  # REPLACE THIS
  tokenizer:
    _target_: nemo_automodel._transformers.auto_tokenizer.NeMoAutoTokenizer.from_pretrained
    pretrained_model_name_or_path: openai-community/gpt2
  seq_length: 1024
  split: "0.99, 0.01, 0.00"  # train, validation, test
  splits_to_build: "train"  # has to be one of train, validation, test

dataloader:
  _target_: torchdata.stateful_dataloader.StatefulDataLoader
  collate_fn: torch.utils.data.default_collate
  dataloader_type: "single"  # or "cyclic"

# Similarly, for validation we use the "validation" split
validation_dataset:
  _target_: nemo_automodel.components.datasets.llm.megatron_dataset.MegatronPretraining
  paths: fineweb_edu/megatron_gpt2/processed_data_*_text_document*  # REPLACE THIS
  index_mapping_dir: fineweb_edu/megatron_gpt2/mapping_dir  # REPLACE THIS
  tokenizer:
    _target_: nemo_automodel._transformers.auto_tokenizer.NeMoAutoTokenizer.from_pretrained
    pretrained_model_name_or_path: openai-community/gpt2
  seq_length: 1024
  split: "0.99, 0.01, 0.00"  # train, validation, test
  splits_to_build: "validation"  # has to be one of train, validation, test
  num_val_samples: 1024

step_scheduler:
  global_batch_size: 512
  local_batch_size: 32
  ckpt_every_steps: 1000 # checkpoints state every 1000 steps
  val_every_steps: 250  # validates every 250 steps
  num_epochs: 1
  max_steps: 18500

dist_env:
  backend: nccl
  timeout_minutes: 1

rng:
  _target_: nemo_automodel.components.training.rng.StatefulRNG
  seed: 1111
  ranked: true

checkpoint:
  enabled: true
  checkpoint_dir: checkpoints/
  model_save_format: torch_save # torch_save or safetensors
  save_consolidated: false # saves the model in a consolidated safetensors format. Requires model_save_format to be safetensors.

# For distributed processing, we use FSDP2.
distributed:
  strategy: fsdp2
  dp_size: null
  dp_replicate_size: null  # dp_shard_size = dp_size / dp_replicate_size when set. For DDP use strategy: ddp.
  tp_size: 1
  cp_size: 1
  sequence_parallel: false

loss_fn:
  _target_: nemo_automodel.components.loss.masked_ce.MaskedCrossEntropy

dataloader:
  _target_: torchdata.stateful_dataloader.StatefulDataLoader
  collate_fn: torch.utils.data.default_collate

validation_dataloader:
  _target_: torchdata.stateful_dataloader.StatefulDataLoader
  collate_fn: torch.utils.data.default_collate

# We will use the standard AdamW optimizer, but you can specify any optimizer you want, by changing
# the import path using the _target_ option.
optimizer:
  _target_: torch.optim.AdamW
  betas: [0.9, 0.95]
  lr: 0.0006
  weight_decay: 0.1

# We will use a cosine LR schedule with 700 warm-up steps.
# This means the LR will linearly increase to a maximum of 6e-4, after which
# it will decay to 0 over the course of training.
lr_scheduler:
  lr_decay_style: cosine
  lr_warmup_steps: 700
  min_lr: 0.0

# Uncomment and configure for W&B logging
# wandb:
#   project: <your_wandb_project>
#   entity: <your_wandb_entity>
#   name: <your_wandb_exp_name>
#   save_dir: <your_wandb_save_dir>
Tip
If you want to add weights to the dataset blends, you can do so by passing in a list. For example, paths: ["30", "fineweb_edu/megatron_gpt2/processed_data_0_text_document", "70", "fineweb_edu/megatron_gpt2/processed_data_1_text_document"].
Load Large Models#
In distributed training, the typical model-loading pipeline has each GPU load the entire model and then retain only the shard it needs. This approach becomes problematic when the model size exceeds the memory capacity of a single GPU. For instance, a 70B-parameter model requires about 140GB of memory for its parameters when using the BF16 data type (2 bytes per parameter). Since most widely used GPUs are limited to 80GB, the full model cannot be directly loaded onto a single device.
In these scenarios, you can pass is_meta_device: true in the model config. The model will then be instantiated using PyTorch’s Meta device which loads no data, but stores all other parameter metadata necessary for sharding the model. Once the model is sharded, the model weights will be populated by only loading the weights required by the respective model shard.
Run the Pretraining Recipe#
Assuming you saved, or plan to use, the provided config at examples/llm_pretrain/megatron_pretrain_gpt2.yaml:
uv run torchrun --nproc-per-node=2 examples/llm_pretrain/pretrain.py --config examples/llm_pretrain/megatron_pretrain_gpt2.yaml
Sample Output#
You should see step‑wise logs reporting loss, memory usage, and tokens per second. Checkpoints will be saved under the checkpoints/ directory as configured.
$ uv run torchrun --nproc-per-node=2 examples/llm_pretrain/pretrain.py --config examples/llm_pretrain/megatron_pretrain_gpt2.yaml
cfg-path: examples/llm_pretrain/megatron_pretrain_gpt2.yaml
cfg-path: examples/llm_pretrain/megatron_pretrain_gpt2.yaml
> initializing torch distributed with 2 workers.
2025-09-01 07:13:17 | INFO | nemo_automodel.components.loggers.log_utils | Setting logging level to 20
2025-09-01 07:13:17 | INFO | root | Experiment_details:
2025-09-01 07:13:17 | INFO | root | Timestamp: '2025-09-01T07:13:17'
2025-09-01 07:13:17 | INFO | root | User: root
2025-09-01 07:13:17 | INFO | root | Host: 9126f6644eca
2025-09-01 07:13:17 | INFO | root | World size: 2
2025-09-01 07:13:17 | INFO | root | Backend: nccl
2025-09-01 07:13:17 | INFO | root | Recipe: TrainFinetuneRecipeForNextTokenPrediction
2025-09-01 07:13:17 | INFO | root | Model name: null
2025-09-01 07:13:17 | INFO | root | Recipe config:
2025-09-01 07:13:17 | INFO | root |   step_scheduler:
2025-09-01 07:13:17 | INFO | root |     global_batch_size: 512
2025-09-01 07:13:17 | INFO | root |     local_batch_size: 32
2025-09-01 07:13:17 | INFO | root |     ckpt_every_steps: 1000
2025-09-01 07:13:17 | INFO | root |     val_every_steps: 250
2025-09-01 07:13:17 | INFO | root |     num_epochs: 1
2025-09-01 07:13:17 | INFO | root |     max_steps: 18500
2025-09-01 07:13:17 | INFO | root |   dist_env:
2025-09-01 07:13:17 | INFO | root |     backend: nccl
2025-09-01 07:13:17 | INFO | root |     timeout_minutes: 1
2025-09-01 07:13:17 | INFO | root |   rng:
2025-09-01 07:13:17 | INFO | root |     _target_: <class 'nemo_automodel.components.training.rng.StatefulRNG'>
2025-09-01 07:13:17 | INFO | root |     seed: 1111
2025-09-01 07:13:17 | INFO | root |     ranked: True
2025-09-01 07:13:17 | INFO | root |   model:
2025-09-01 07:13:17 | INFO | root |     _target_: <bound method _BaseNeMoAutoModelClass.from_config of <class 'nemo_automodel._transformers.auto_model.NeMoAutoModelForCausalLM'>>
2025-09-01 07:13:17 | INFO | root |     config:
2025-09-01 07:13:17 | INFO | root |       _target_: <bound method AutoConfig.from_pretrained of <class 'transformers.models.auto.configuration_auto.AutoConfig'>>
2025-09-01 07:13:17 | INFO | root |       pretrained_model_name_or_path: openai-community/gpt2
2025-09-01 07:13:17 | INFO | root |   checkpoint:
2025-09-01 07:13:17 | INFO | root |     enabled: True
2025-09-01 07:13:17 | INFO | root |     checkpoint_dir: checkpoints/
2025-09-01 07:13:17 | INFO | root |     model_save_format: torch_save
2025-09-01 07:13:17 | INFO | root |     save_consolidated: False
2025-09-01 07:13:17 | INFO | root |   distributed:
2025-09-01 07:13:17 | INFO | root |     strategy: fsdp2
2025-09-01 07:13:17 | INFO | root |     dp_size: None
2025-09-01 07:13:17 | INFO | root |     dp_replicate_size: None
2025-09-01 07:13:17 | INFO | root |     tp_size: 1
2025-09-01 07:13:17 | INFO | root |     cp_size: 1
2025-09-01 07:13:17 | INFO | root |     sequence_parallel: False
2025-09-01 07:13:17 | INFO | root |   loss_fn:
2025-09-01 07:13:17 | INFO | root |     _target_: <class 'nemo_automodel.components.loss.masked_ce.MaskedCrossEntropy'>
2025-09-01 07:13:17 | INFO | root |   dataset:
2025-09-01 07:13:17 | INFO | root |     _target_: <class 'nemo_automodel.components.datasets.llm.megatron_dataset.MegatronPretraining'>
2025-09-01 07:13:17 | INFO | root |     paths: fineweb_edu/megatron_gpt2/processed_data_*_text_document*
2025-09-01 07:13:17 | INFO | root |     index_mapping_dir: fineweb_edu/megatron_gpt2/mapping_dir
2025-09-01 07:13:17 | INFO | root |     tokenizer:
2025-09-01 07:13:17 | INFO | root |       _target_: <bound method AutoTokenizer.from_pretrained of <class 'transformers.models.auto.tokenization_auto.AutoTokenizer'>>
2025-09-01 07:13:17 | INFO | root |       pretrained_model_name_or_path: openai-community/gpt2
2025-09-01 07:13:17 | INFO | root |     seq_length: 1024
2025-09-01 07:13:17 | INFO | root |     split: (0.99, 0.01, 0.0)
2025-09-01 07:13:17 | INFO | root |     splits_to_build: train
2025-09-01 07:13:17 | INFO | root |   dataloader:
2025-09-01 07:13:17 | INFO | root |     _target_: <class 'torchdata.stateful_dataloader.stateful_dataloader.StatefulDataLoader'>
2025-09-01 07:13:17 | INFO | root |     collate_fn: <function default_collate at 0x76c3155f8720>
2025-09-01 07:13:17 | INFO | root |   validation_dataset:
2025-09-01 07:13:17 | INFO | root |     _target_: <class 'nemo_automodel.components.datasets.llm.megatron_dataset.MegatronPretraining'>
2025-09-01 07:13:17 | INFO | root |     paths: fineweb_edu/megatron_gpt2/processed_data_*_text_document*
2025-09-01 07:13:17 | INFO | root |     index_mapping_dir: fineweb_edu/megatron_gpt2/mapping_dir
2025-09-01 07:13:17 | INFO | root |     tokenizer:
2025-09-01 07:13:17 | INFO | root |       _target_: <bound method AutoTokenizer.from_pretrained of <class 'transformers.models.auto.tokenization_auto.AutoTokenizer'>>
2025-09-01 07:13:17 | INFO | root |       pretrained_model_name_or_path: openai-community/gpt2
2025-09-01 07:13:17 | INFO | root |     seq_length: 1024
2025-09-01 07:13:17 | INFO | root |     split: (0.99, 0.01, 0.0)
2025-09-01 07:13:17 | INFO | root |     splits_to_build: validation
2025-09-01 07:13:17 | INFO | root |     num_val_samples: 1024
2025-09-01 07:13:17 | INFO | root |   validation_dataloader:
2025-09-01 07:13:17 | INFO | root |     _target_: <class 'torchdata.stateful_dataloader.stateful_dataloader.StatefulDataLoader'>
2025-09-01 07:13:17 | INFO | root |     collate_fn: <function default_collate at 0x76c3155f8720>
2025-09-01 07:13:17 | INFO | root |   optimizer:
2025-09-01 07:13:17 | INFO | root |     _target_: <class 'torch.optim.adamw.AdamW'>
2025-09-01 07:13:17 | INFO | root |     betas: [0.9, 0.95]
2025-09-01 07:13:17 | INFO | root |     lr: 0.0006
2025-09-01 07:13:17 | INFO | root |     weight_decay: 0.1
2025-09-01 07:13:17 | INFO | root |   lr_scheduler:
2025-09-01 07:13:17 | INFO | root |     lr_decay_style: cosine
2025-09-01 07:13:17 | INFO | root |     lr_warmup_steps: 700
2025-09-01 07:13:17 | INFO | root |     min_lr: 0.0
2025-09-01 07:13:17 | INFO | root | Library versions:
2025-09-01 07:13:17 | INFO | root | - nemo_automodel: 0.2.0rc0 (/opt/Automodel/nemo_automodel/__init__.py)
2025-09-01 07:13:17 | INFO | root | - transformers: 4.55.4 (/opt/venv/lib/python3.12/site-packages/transformers/__init__.py)
2025-09-01 07:13:17 | INFO | root | - torch: 2.8.0+cu128 CUDA 12.8
2025-09-01 07:13:27 | INFO | root | Patched model with SDPA method= [<SDPBackend.CUDNN_ATTENTION: 3>, <SDPBackend.FLASH_ATTENTION: 1>, <SDPBackend.EFFICIENT_ATTENTION: 2>, <SDPBackend.MATH: 0>]
2025-09-01 07:13:27 | INFO | root | Model summary:
2025-09-01 07:13:27 | INFO | root | --------------------------------
2025-09-01 07:13:27 | INFO | root | Trainable parameters: 124,439,808
2025-09-01 07:13:27 | INFO | root | Total parameters: 124,439,808
2025-09-01 07:13:27 | INFO | root | Trainable parameters percentage: 100.00%
2025-09-01 07:13:27 | INFO | root | Param L2 norm: 234.2000
2025-09-01 07:13:27 | INFO | root | --------------------------------
/opt/venv/lib/python3.12/site-packages/torch/distributed/distributed_c10d.py:4807: UserWarning: No device id is provided via `init_process_group` or `barrier `. Using the current device set by the user.
  warnings.warn(  # warn only once
2025-09-01 07:13:28 | INFO | nemo_automodel.components.datasets.llm.megatron.gpt_dataset | Let split_matrix = [(0, 0.99), (0.99, 1.0), None]
2025-09-01 07:13:28 | INFO | nemo_automodel.components.datasets.llm.megatron.builder | Building GPTDataset splits with sizes=[9472000, 37888, None] and config=[random_seed: 1234, sequence_length: 1024, blend: [['fineweb_edu/megatron_gpt2/processed_data_0_text_document', 'fineweb_edu/megatron_gpt2/processed_data_10_text_document', 'fineweb_edu/megatron_gpt2/processed_data_11_text_document', 'fineweb_edu/megatron_gpt2/processed_data_12_text_document', 'fineweb_edu/megatron_gpt2/processed_data_13_text_document', 'fineweb_edu/megatron_gpt2/processed_data_1_text_document', 'fineweb_edu/megatron_gpt2/processed_data_2_text_document', 'fineweb_edu/megatron_gpt2/processed_data_3_text_document', 'fineweb_edu/megatron_gpt2/processed_data_4_text_document', 'fineweb_edu/megatron_gpt2/processed_data_5_text_document', 'fineweb_edu/megatron_gpt2/processed_data_6_text_document', 'fineweb_edu/megatron_gpt2/processed_data_7_text_document', 'fineweb_edu/megatron_gpt2/processed_data_8_text_document', 'fineweb_edu/megatron_gpt2/processed_data_9_text_document'], None], blend_per_split: None, split: 0.99, 0.01, 0.0, num_dataset_builder_threads: 1, path_to_cache: fineweb_edu/megatron_gpt2/mapping_dir, mmap_bin_files: True, tokenizer: openai-community/gpt2, mid_level_dataset_surplus: 0.005, reset_position_ids: False, reset_attention_mask: False, eod_mask_loss: False, create_attention_mask: False, drop_last_partial_validation_sequence: True, add_extra_token_to_sequence: True, split_matrix: [(0, 0.99), (0.99, 1.0), None]]
2025-09-01 07:13:28 | INFO | nemo_automodel.components.datasets.llm.megatron.indexed_dataset | Loading index file fineweb_edu/megatron_gpt2/processed_data_0_text_document.idx
2025-09-01 07:13:28 | INFO | nemo_automodel.components.datasets.llm.megatron.indexed_dataset | Extracting sequence lengths
2025-09-01 07:13:28 | INFO | nemo_automodel.components.datasets.llm.megatron.indexed_dataset | Extracting sequence pointers
2025-09-01 07:13:28 | INFO | nemo_automodel.components.datasets.llm.megatron.indexed_dataset | Extracting document indices
2025-09-01 07:13:28 | INFO | nemo_automodel.components.datasets.llm.megatron.indexed_dataset | Sequences: 713000 | Documents: 713000
2025-09-01 07:13:28 | INFO | nemo_automodel.components.datasets.llm.megatron.gpt_dataset | Build and save the GPTDataset train indices
2025-09-01 07:13:28 | INFO | nemo_automodel.components.datasets.llm.megatron.gpt_dataset | > total number of samples: 728328
2025-09-01 07:13:28 | INFO | nemo_automodel.components.datasets.llm.megatron.gpt_dataset | > total number of epochs: 1
2025-09-01 07:13:28 | INFO | nemo_automodel.components.datasets.llm.megatron.indexed_dataset | Loading index file fineweb_edu/megatron_gpt2/processed_data_10_text_document.idx
2025-09-01 07:13:28 | INFO | nemo_automodel.components.datasets.llm.megatron.indexed_dataset | Extracting sequence lengths
2025-09-01 07:13:28 | INFO | nemo_automodel.components.datasets.llm.megatron.indexed_dataset | Extracting sequence pointers
2025-09-01 07:13:28 | INFO | nemo_automodel.components.datasets.llm.megatron.indexed_dataset | Extracting document indices
2025-09-01 07:13:28 | INFO | nemo_automodel.components.datasets.llm.megatron.indexed_dataset | Sequences: 734000 | Documents: 734000
2025-09-01 07:13:28 | INFO | nemo_automodel.components.datasets.llm.megatron.gpt_dataset | Build and save the GPTDataset train indices
2025-09-01 07:13:28 | INFO | nemo_automodel.components.datasets.llm.megatron.gpt_dataset | > total number of samples: 725047
2025-09-01 07:13:28 | INFO | nemo_automodel.components.datasets.llm.megatron.gpt_dataset | > total number of epochs: 1
2025-09-01 07:13:28 | INFO | nemo_automodel.components.datasets.llm.megatron.indexed_dataset | Loading index file fineweb_edu/megatron_gpt2/processed_data_11_text_document.idx
2025-09-01 07:13:28 | INFO | nemo_automodel.components.datasets.llm.megatron.indexed_dataset | Extracting sequence lengths
2025-09-01 07:13:28 | INFO | nemo_automodel.components.datasets.llm.megatron.indexed_dataset | Extracting sequence pointers
2025-09-01 07:13:28 | INFO | nemo_automodel.components.datasets.llm.megatron.indexed_dataset | Extracting document indices
2025-09-01 07:13:28 | INFO | nemo_automodel.components.datasets.llm.megatron.indexed_dataset | Sequences: 724000 | Documents: 724000
2025-09-01 07:13:28 | INFO | nemo_automodel.components.datasets.llm.megatron.gpt_dataset | Build and save the GPTDataset train indices
2025-09-01 07:13:28 | INFO | nemo_automodel.components.datasets.llm.megatron.gpt_dataset | > total number of samples: 726124
2025-09-01 07:13:28 | INFO | nemo_automodel.components.datasets.llm.megatron.gpt_dataset | > total number of epochs: 1
2025-09-01 07:13:28 | INFO | nemo_automodel.components.datasets.llm.megatron.indexed_dataset | Loading index file fineweb_edu/megatron_gpt2/processed_data_12_text_document.idx
2025-09-01 07:13:28 | INFO | nemo_automodel.components.datasets.llm.megatron.indexed_dataset | Extracting sequence lengths
2025-09-01 07:13:28 | INFO | nemo_automodel.components.datasets.llm.megatron.indexed_dataset | Extracting sequence pointers
2025-09-01 07:13:28 | INFO | nemo_automodel.components.datasets.llm.megatron.indexed_dataset | Extracting document indices
2025-09-01 07:13:28 | INFO | nemo_automodel.components.datasets.llm.megatron.indexed_dataset | Sequences: 745000 | Documents: 745000
2025-09-01 07:13:28 | INFO | nemo_automodel.components.datasets.llm.megatron.gpt_dataset | Build and save the GPTDataset train indices
2025-09-01 07:13:28 | INFO | nemo_automodel.components.datasets.llm.megatron.gpt_dataset | > total number of samples: 723682
2025-09-01 07:13:28 | INFO | nemo_automodel.components.datasets.llm.megatron.gpt_dataset | > total number of epochs: 1
2025-09-01 07:13:28 | INFO | nemo_automodel.components.datasets.llm.megatron.indexed_dataset | Loading index file fineweb_edu/megatron_gpt2/processed_data_13_text_document.idx
2025-09-01 07:13:28 | INFO | nemo_automodel.components.datasets.llm.megatron.indexed_dataset | Extracting sequence lengths
2025-09-01 07:13:28 | INFO | nemo_automodel.components.datasets.llm.megatron.indexed_dataset | Extracting sequence pointers
2025-09-01 07:13:28 | INFO | nemo_automodel.components.datasets.llm.megatron.indexed_dataset | Extracting document indices
2025-09-01 07:13:28 | INFO | nemo_automodel.components.datasets.llm.megatron.indexed_dataset | Sequences: 738000 | Documents: 738000
2025-09-01 07:13:28 | INFO | nemo_automodel.components.datasets.llm.megatron.gpt_dataset | Build and save the GPTDataset train indices
2025-09-01 07:13:28 | INFO | nemo_automodel.components.datasets.llm.megatron.gpt_dataset | > total number of samples: 725268
2025-09-01 07:13:28 | INFO | nemo_automodel.components.datasets.llm.megatron.gpt_dataset | > total number of epochs: 1
2025-09-01 07:13:28 | INFO | nemo_automodel.components.datasets.llm.megatron.indexed_dataset | Loading index file fineweb_edu/megatron_gpt2/processed_data_1_text_document.idx
2025-09-01 07:13:28 | INFO | nemo_automodel.components.datasets.llm.megatron.indexed_dataset | Extracting sequence lengths
2025-09-01 07:13:28 | INFO | nemo_automodel.components.datasets.llm.megatron.indexed_dataset | Extracting sequence pointers
2025-09-01 07:13:28 | INFO | nemo_automodel.components.datasets.llm.megatron.indexed_dataset | Extracting document indices
2025-09-01 07:13:28 | INFO | nemo_automodel.components.datasets.llm.megatron.indexed_dataset | Sequences: 727000 | Documents: 727000
2025-09-01 07:13:28 | INFO | nemo_automodel.components.datasets.llm.megatron.gpt_dataset | Build and save the GPTDataset train indices
2025-09-01 07:13:28 | INFO | nemo_automodel.components.datasets.llm.megatron.gpt_dataset | > total number of samples: 726263
2025-09-01 07:13:28 | INFO | nemo_automodel.components.datasets.llm.megatron.gpt_dataset | > total number of epochs: 1
2025-09-01 07:13:28 | INFO | nemo_automodel.components.datasets.llm.megatron.indexed_dataset | Loading index file fineweb_edu/megatron_gpt2/processed_data_2_text_document.idx
2025-09-01 07:13:28 | INFO | nemo_automodel.components.datasets.llm.megatron.indexed_dataset | Extracting sequence lengths
2025-09-01 07:13:28 | INFO | nemo_automodel.components.datasets.llm.megatron.indexed_dataset | Extracting sequence pointers
2025-09-01 07:13:28 | INFO | nemo_automodel.components.datasets.llm.megatron.indexed_dataset | Extracting document indices
2025-09-01 07:13:28 | INFO | nemo_automodel.components.datasets.llm.megatron.indexed_dataset | Sequences: 730000 | Documents: 730000
2025-09-01 07:13:28 | INFO | nemo_automodel.components.datasets.llm.megatron.gpt_dataset | Build and save the GPTDataset train indices
2025-09-01 07:13:28 | INFO | nemo_automodel.components.datasets.llm.megatron.gpt_dataset | > total number of samples: 726543
2025-09-01 07:13:28 | INFO | nemo_automodel.components.datasets.llm.megatron.gpt_dataset | > total number of epochs: 1
2025-09-01 07:13:28 | INFO | nemo_automodel.components.datasets.llm.megatron.indexed_dataset | Loading index file fineweb_edu/megatron_gpt2/processed_data_3_text_document.idx
2025-09-01 07:13:28 | INFO | nemo_automodel.components.datasets.llm.megatron.indexed_dataset | Extracting sequence lengths
2025-09-01 07:13:28 | INFO | nemo_automodel.components.datasets.llm.megatron.indexed_dataset | Extracting sequence pointers
2025-09-01 07:13:28 | INFO | nemo_automodel.components.datasets.llm.megatron.indexed_dataset | Extracting document indices
2025-09-01 07:13:28 | INFO | nemo_automodel.components.datasets.llm.megatron.indexed_dataset | Sequences: 725000 | Documents: 725000
2025-09-01 07:13:28 | INFO | nemo_automodel.components.datasets.llm.megatron.gpt_dataset | Build and save the GPTDataset train indices
2025-09-01 07:13:28 | INFO | nemo_automodel.components.datasets.llm.megatron.gpt_dataset | > total number of samples: 726632
2025-09-01 07:13:28 | INFO | nemo_automodel.components.datasets.llm.megatron.gpt_dataset | > total number of epochs: 1
2025-09-01 07:13:28 | INFO | nemo_automodel.components.datasets.llm.megatron.indexed_dataset | Loading index file fineweb_edu/megatron_gpt2/processed_data_4_text_document.idx
2025-09-01 07:13:28 | INFO | nemo_automodel.components.datasets.llm.megatron.indexed_dataset | Extracting sequence lengths
2025-09-01 07:13:28 | INFO | nemo_automodel.components.datasets.llm.megatron.indexed_dataset | Extracting sequence pointers
2025-09-01 07:13:28 | INFO | nemo_automodel.components.datasets.llm.megatron.indexed_dataset | Extracting document indices
2025-09-01 07:13:28 | INFO | nemo_automodel.components.datasets.llm.megatron.indexed_dataset | Sequences: 732000 | Documents: 732000
2025-09-01 07:13:28 | INFO | nemo_automodel.components.datasets.llm.megatron.gpt_dataset | Build and save the GPTDataset train indices
2025-09-01 07:13:28 | INFO | nemo_automodel.components.datasets.llm.megatron.gpt_dataset | > total number of samples: 726860
2025-09-01 07:13:28 | INFO | nemo_automodel.components.datasets.llm.megatron.gpt_dataset | > total number of epochs: 1
2025-09-01 07:13:28 | INFO | nemo_automodel.components.datasets.llm.megatron.indexed_dataset | Loading index file fineweb_edu/megatron_gpt2/processed_data_5_text_document.idx
2025-09-01 07:13:28 | INFO | nemo_automodel.components.datasets.llm.megatron.indexed_dataset | Extracting sequence lengths
2025-09-01 07:13:28 | INFO | nemo_automodel.components.datasets.llm.megatron.indexed_dataset | Extracting sequence pointers
2025-09-01 07:13:28 | INFO | nemo_automodel.components.datasets.llm.megatron.indexed_dataset | Extracting document indices
2025-09-01 07:13:28 | INFO | nemo_automodel.components.datasets.llm.megatron.indexed_dataset | Sequences: 726000 | Documents: 726000
2025-09-01 07:13:28 | INFO | nemo_automodel.components.datasets.llm.megatron.gpt_dataset | Build and save the GPTDataset train indices
2025-09-01 07:13:28 | INFO | nemo_automodel.components.datasets.llm.megatron.gpt_dataset | > total number of samples: 727143
2025-09-01 07:13:28 | INFO | nemo_automodel.components.datasets.llm.megatron.gpt_dataset | > total number of epochs: 1
2025-09-01 07:13:28 | INFO | nemo_automodel.components.datasets.llm.megatron.indexed_dataset | Loading index file fineweb_edu/megatron_gpt2/processed_data_6_text_document.idx
2025-09-01 07:13:28 | INFO | nemo_automodel.components.datasets.llm.megatron.indexed_dataset | Extracting sequence lengths
2025-09-01 07:13:28 | INFO | nemo_automodel.components.datasets.llm.megatron.indexed_dataset | Extracting sequence pointers
2025-09-01 07:13:28 | INFO | nemo_automodel.components.datasets.llm.megatron.indexed_dataset | Extracting document indices
2025-09-01 07:13:28 | INFO | nemo_automodel.components.datasets.llm.megatron.indexed_dataset | Sequences: 735000 | Documents: 735000
2025-09-01 07:13:28 | INFO | nemo_automodel.components.datasets.llm.megatron.gpt_dataset | Build and save the GPTDataset train indices
2025-09-01 07:13:29 | INFO | nemo_automodel.components.datasets.llm.megatron.gpt_dataset | > total number of samples: 725603
2025-09-01 07:13:29 | INFO | nemo_automodel.components.datasets.llm.megatron.gpt_dataset | > total number of epochs: 1
2025-09-01 07:13:29 | INFO | nemo_automodel.components.datasets.llm.megatron.indexed_dataset | Loading index file fineweb_edu/megatron_gpt2/processed_data_7_text_document.idx
2025-09-01 07:13:29 | INFO | nemo_automodel.components.datasets.llm.megatron.indexed_dataset | Extracting sequence lengths
2025-09-01 07:13:29 | INFO | nemo_automodel.components.datasets.llm.megatron.indexed_dataset | Extracting sequence pointers
2025-09-01 07:13:29 | INFO | nemo_automodel.components.datasets.llm.megatron.indexed_dataset | Extracting document indices
2025-09-01 07:13:29 | INFO | nemo_automodel.components.datasets.llm.megatron.indexed_dataset | Sequences: 732000 | Documents: 732000
2025-09-01 07:13:29 | INFO | nemo_automodel.components.datasets.llm.megatron.gpt_dataset | Build and save the GPTDataset train indices
2025-09-01 07:13:29 | INFO | nemo_automodel.components.datasets.llm.megatron.gpt_dataset | > total number of samples: 726076
2025-09-01 07:13:29 | INFO | nemo_automodel.components.datasets.llm.megatron.gpt_dataset | > total number of epochs: 1
2025-09-01 07:13:29 | INFO | nemo_automodel.components.datasets.llm.megatron.indexed_dataset | Loading index file fineweb_edu/megatron_gpt2/processed_data_8_text_document.idx
2025-09-01 07:13:29 | INFO | nemo_automodel.components.datasets.llm.megatron.indexed_dataset | Extracting sequence lengths
2025-09-01 07:13:29 | INFO | nemo_automodel.components.datasets.llm.megatron.indexed_dataset | Extracting sequence pointers
2025-09-01 07:13:29 | INFO | nemo_automodel.components.datasets.llm.megatron.indexed_dataset | Extracting document indices
2025-09-01 07:13:29 | INFO | nemo_automodel.components.datasets.llm.megatron.indexed_dataset | Sequences: 182101 | Documents: 182101
2025-09-01 07:13:29 | INFO | nemo_automodel.components.datasets.llm.megatron.gpt_dataset | Build and save the GPTDataset train indices
2025-09-01 07:13:29 | INFO | nemo_automodel.components.datasets.llm.megatron.gpt_dataset | > total number of samples: 182792
2025-09-01 07:13:29 | INFO | nemo_automodel.components.datasets.llm.megatron.gpt_dataset | > total number of epochs: 1
2025-09-01 07:13:29 | INFO | nemo_automodel.components.datasets.llm.megatron.indexed_dataset | Loading index file fineweb_edu/megatron_gpt2/processed_data_9_text_document.idx
2025-09-01 07:13:29 | INFO | nemo_automodel.components.datasets.llm.megatron.indexed_dataset | Extracting sequence lengths
2025-09-01 07:13:29 | INFO | nemo_automodel.components.datasets.llm.megatron.indexed_dataset | Extracting sequence pointers
2025-09-01 07:13:29 | INFO | nemo_automodel.components.datasets.llm.megatron.indexed_dataset | Extracting document indices
2025-09-01 07:13:29 | INFO | nemo_automodel.components.datasets.llm.megatron.indexed_dataset | Sequences: 729000 | Documents: 729000
2025-09-01 07:13:29 | INFO | nemo_automodel.components.datasets.llm.megatron.gpt_dataset | Build and save the GPTDataset train indices
2025-09-01 07:13:29 | INFO | nemo_automodel.components.datasets.llm.megatron.gpt_dataset | > total number of samples: 726153
2025-09-01 07:13:29 | INFO | nemo_automodel.components.datasets.llm.megatron.gpt_dataset | > total number of epochs: 1
/opt/venv/lib/python3.12/site-packages/torch/distributed/distributed_c10d.py:4807: UserWarning: No device id is provided via `init_process_group` or `barrier `. Using the current device set by the user.
  warnings.warn(  # warn only once
2025-09-01 07:13:29 | INFO | nemo_automodel.components.datasets.llm.megatron.builder | Build and save the BlendedDataset indices
2025-09-01 07:13:29 | INFO | nemo_automodel.components.datasets.llm.megatron.builder |  Build and save the dataset and dataset sample indexes
2025-09-01 07:13:29 | INFO | root | Instantiating MegatronPretrainingSampler with total_samples: 9472000
2025-09-01 07:13:29 | INFO | nemo_automodel.components.datasets.llm.megatron.gpt_dataset | Let split_matrix = [(0, 0.99), (0.99, 1.0), None]
2025-09-01 07:13:29 | INFO | nemo_automodel.components.datasets.llm.megatron.builder | Building GPTDataset splits with sizes=[9472000, 1024, None] and config=[random_seed: 1234, sequence_length: 1024, blend: [['fineweb_edu/megatron_gpt2/processed_data_0_text_document', 'fineweb_edu/megatron_gpt2/processed_data_10_text_document', 'fineweb_edu/megatron_gpt2/processed_data_11_text_document', 'fineweb_edu/megatron_gpt2/processed_data_12_text_document', 'fineweb_edu/megatron_gpt2/processed_data_13_text_document', 'fineweb_edu/megatron_gpt2/processed_data_1_text_document', 'fineweb_edu/megatron_gpt2/processed_data_2_text_document', 'fineweb_edu/megatron_gpt2/processed_data_3_text_document', 'fineweb_edu/megatron_gpt2/processed_data_4_text_document', 'fineweb_edu/megatron_gpt2/processed_data_5_text_document', 'fineweb_edu/megatron_gpt2/processed_data_6_text_document', 'fineweb_edu/megatron_gpt2/processed_data_7_text_document', 'fineweb_edu/megatron_gpt2/processed_data_8_text_document', 'fineweb_edu/megatron_gpt2/processed_data_9_text_document'], None], blend_per_split: None, split: 0.99, 0.01, 0.0, num_dataset_builder_threads: 1, path_to_cache: fineweb_edu/megatron_gpt2/mapping_dir, mmap_bin_files: True, tokenizer: openai-community/gpt2, mid_level_dataset_surplus: 0.005, reset_position_ids: False, reset_attention_mask: False, eod_mask_loss: False, create_attention_mask: False, drop_last_partial_validation_sequence: True, add_extra_token_to_sequence: True, split_matrix: [(0, 0.99), (0.99, 1.0), None]]
2025-09-01 07:13:29 | INFO | nemo_automodel.components.datasets.llm.megatron.indexed_dataset | Loading index file fineweb_edu/megatron_gpt2/processed_data_0_text_document.idx
2025-09-01 07:13:29 | INFO | nemo_automodel.components.datasets.llm.megatron.indexed_dataset | Extracting sequence lengths
2025-09-01 07:13:29 | INFO | nemo_automodel.components.datasets.llm.megatron.indexed_dataset | Extracting sequence pointers
2025-09-01 07:13:29 | INFO | nemo_automodel.components.datasets.llm.megatron.indexed_dataset | Extracting document indices
2025-09-01 07:13:29 | INFO | nemo_automodel.components.datasets.llm.megatron.indexed_dataset | Sequences: 713000 | Documents: 713000
2025-09-01 07:13:29 | INFO | nemo_automodel.components.datasets.llm.megatron.gpt_dataset | Build and save the GPTDataset valid indices
2025-09-01 07:13:29 | INFO | nemo_automodel.components.datasets.llm.megatron.gpt_dataset | > total number of samples: 7221
2025-09-01 07:13:29 | INFO | nemo_automodel.components.datasets.llm.megatron.gpt_dataset | > total number of epochs: 1
2025-09-01 07:13:29 | INFO | nemo_automodel.components.datasets.llm.megatron.indexed_dataset | Loading index file fineweb_edu/megatron_gpt2/processed_data_10_text_document.idx
2025-09-01 07:13:29 | INFO | nemo_automodel.components.datasets.llm.megatron.indexed_dataset | Extracting sequence lengths
2025-09-01 07:13:29 | INFO | nemo_automodel.components.datasets.llm.megatron.indexed_dataset | Extracting sequence pointers
2025-09-01 07:13:29 | INFO | nemo_automodel.components.datasets.llm.megatron.indexed_dataset | Extracting document indices
2025-09-01 07:13:29 | INFO | nemo_automodel.components.datasets.llm.megatron.indexed_dataset | Sequences: 734000 | Documents: 734000
2025-09-01 07:13:29 | INFO | nemo_automodel.components.datasets.llm.megatron.gpt_dataset | Build and save the GPTDataset valid indices
2025-09-01 07:13:29 | INFO | nemo_automodel.components.datasets.llm.megatron.gpt_dataset | > total number of samples: 7215
2025-09-01 07:13:29 | INFO | nemo_automodel.components.datasets.llm.megatron.gpt_dataset | > total number of epochs: 1
2025-09-01 07:13:29 | INFO | nemo_automodel.components.datasets.llm.megatron.indexed_dataset | Loading index file fineweb_edu/megatron_gpt2/processed_data_11_text_document.idx
2025-09-01 07:13:29 | INFO | nemo_automodel.components.datasets.llm.megatron.indexed_dataset | Extracting sequence lengths
2025-09-01 07:13:29 | INFO | nemo_automodel.components.datasets.llm.megatron.indexed_dataset | Extracting sequence pointers
2025-09-01 07:13:29 | INFO | nemo_automodel.components.datasets.llm.megatron.indexed_dataset | Extracting document indices
2025-09-01 07:13:29 | INFO | nemo_automodel.components.datasets.llm.megatron.indexed_dataset | Sequences: 724000 | Documents: 724000
2025-09-01 07:13:29 | INFO | nemo_automodel.components.datasets.llm.megatron.gpt_dataset | Build and save the GPTDataset valid indices
2025-09-01 07:13:29 | INFO | nemo_automodel.components.datasets.llm.megatron.gpt_dataset | > total number of samples: 7502
2025-09-01 07:13:29 | INFO | nemo_automodel.components.datasets.llm.megatron.gpt_dataset | > total number of epochs: 1
2025-09-01 07:13:29 | INFO | nemo_automodel.components.datasets.llm.megatron.indexed_dataset | Loading index file fineweb_edu/megatron_gpt2/processed_data_12_text_document.idx
2025-09-01 07:13:29 | INFO | nemo_automodel.components.datasets.llm.megatron.indexed_dataset | Extracting sequence lengths
2025-09-01 07:13:29 | INFO | nemo_automodel.components.datasets.llm.megatron.indexed_dataset | Extracting sequence pointers
2025-09-01 07:13:29 | INFO | nemo_automodel.components.datasets.llm.megatron.indexed_dataset | Extracting document indices
2025-09-01 07:13:29 | INFO | nemo_automodel.components.datasets.llm.megatron.indexed_dataset | Sequences: 745000 | Documents: 745000
2025-09-01 07:13:29 | INFO | nemo_automodel.components.datasets.llm.megatron.gpt_dataset | Build and save the GPTDataset valid indices
2025-09-01 07:13:29 | INFO | nemo_automodel.components.datasets.llm.megatron.gpt_dataset | > total number of samples: 7209
2025-09-01 07:13:29 | INFO | nemo_automodel.components.datasets.llm.megatron.gpt_dataset | > total number of epochs: 1
2025-09-01 07:13:29 | INFO | nemo_automodel.components.datasets.llm.megatron.indexed_dataset | Loading index file fineweb_edu/megatron_gpt2/processed_data_13_text_document.idx
2025-09-01 07:13:29 | INFO | nemo_automodel.components.datasets.llm.megatron.indexed_dataset | Extracting sequence lengths
2025-09-01 07:13:29 | INFO | nemo_automodel.components.datasets.llm.megatron.indexed_dataset | Extracting sequence pointers
2025-09-01 07:13:29 | INFO | nemo_automodel.components.datasets.llm.megatron.indexed_dataset | Extracting document indices
2025-09-01 07:13:29 | INFO | nemo_automodel.components.datasets.llm.megatron.indexed_dataset | Sequences: 738000 | Documents: 738000
2025-09-01 07:13:29 | INFO | nemo_automodel.components.datasets.llm.megatron.gpt_dataset | Build and save the GPTDataset valid indices
2025-09-01 07:13:29 | INFO | nemo_automodel.components.datasets.llm.megatron.gpt_dataset | > total number of samples: 7453
2025-09-01 07:13:29 | INFO | nemo_automodel.components.datasets.llm.megatron.gpt_dataset | > total number of epochs: 1
2025-09-01 07:13:29 | INFO | nemo_automodel.components.datasets.llm.megatron.indexed_dataset | Loading index file fineweb_edu/megatron_gpt2/processed_data_1_text_document.idx
2025-09-01 07:13:29 | INFO | nemo_automodel.components.datasets.llm.megatron.indexed_dataset | Extracting sequence lengths
2025-09-01 07:13:29 | INFO | nemo_automodel.components.datasets.llm.megatron.indexed_dataset | Extracting sequence pointers
2025-09-01 07:13:29 | INFO | nemo_automodel.components.datasets.llm.megatron.indexed_dataset | Extracting document indices
2025-09-01 07:13:29 | INFO | nemo_automodel.components.datasets.llm.megatron.indexed_dataset | Sequences: 727000 | Documents: 727000
2025-09-01 07:13:29 | INFO | nemo_automodel.components.datasets.llm.megatron.gpt_dataset | Build and save the GPTDataset valid indices
2025-09-01 07:13:29 | INFO | nemo_automodel.components.datasets.llm.megatron.gpt_dataset | > total number of samples: 7492
2025-09-01 07:13:29 | INFO | nemo_automodel.components.datasets.llm.megatron.gpt_dataset | > total number of epochs: 1
2025-09-01 07:13:29 | INFO | nemo_automodel.components.datasets.llm.megatron.indexed_dataset | Loading index file fineweb_edu/megatron_gpt2/processed_data_2_text_document.idx
2025-09-01 07:13:29 | INFO | nemo_automodel.components.datasets.llm.megatron.indexed_dataset | Extracting sequence lengths
2025-09-01 07:13:29 | INFO | nemo_automodel.components.datasets.llm.megatron.indexed_dataset | Extracting sequence pointers
2025-09-01 07:13:29 | INFO | nemo_automodel.components.datasets.llm.megatron.indexed_dataset | Extracting document indices
2025-09-01 07:13:29 | INFO | nemo_automodel.components.datasets.llm.megatron.indexed_dataset | Sequences: 730000 | Documents: 730000
2025-09-01 07:13:29 | INFO | nemo_automodel.components.datasets.llm.megatron.gpt_dataset | Build and save the GPTDataset valid indices
2025-09-01 07:13:29 | INFO | nemo_automodel.components.datasets.llm.megatron.gpt_dataset | > total number of samples: 7464
2025-09-01 07:13:29 | INFO | nemo_automodel.components.datasets.llm.megatron.gpt_dataset | > total number of epochs: 1
2025-09-01 07:13:29 | INFO | nemo_automodel.components.datasets.llm.megatron.indexed_dataset | Loading index file fineweb_edu/megatron_gpt2/processed_data_3_text_document.idx
2025-09-01 07:13:29 | INFO | nemo_automodel.components.datasets.llm.megatron.indexed_dataset | Extracting sequence lengths
2025-09-01 07:13:29 | INFO | nemo_automodel.components.datasets.llm.megatron.indexed_dataset | Extracting sequence pointers
2025-09-01 07:13:29 | INFO | nemo_automodel.components.datasets.llm.megatron.indexed_dataset | Extracting document indices
2025-09-01 07:13:29 | INFO | nemo_automodel.components.datasets.llm.megatron.indexed_dataset | Sequences: 725000 | Documents: 725000
2025-09-01 07:13:29 | INFO | nemo_automodel.components.datasets.llm.megatron.gpt_dataset | Build and save the GPTDataset valid indices
2025-09-01 07:13:29 | INFO | nemo_automodel.components.datasets.llm.megatron.gpt_dataset | > total number of samples: 7362
2025-09-01 07:13:29 | INFO | nemo_automodel.components.datasets.llm.megatron.gpt_dataset | > total number of epochs: 1
2025-09-01 07:13:29 | INFO | nemo_automodel.components.datasets.llm.megatron.indexed_dataset | Loading index file fineweb_edu/megatron_gpt2/processed_data_4_text_document.idx
2025-09-01 07:13:29 | INFO | nemo_automodel.components.datasets.llm.megatron.indexed_dataset | Extracting sequence lengths
2025-09-01 07:13:29 | INFO | nemo_automodel.components.datasets.llm.megatron.indexed_dataset | Extracting sequence pointers
2025-09-01 07:13:29 | INFO | nemo_automodel.components.datasets.llm.megatron.indexed_dataset | Extracting document indices
2025-09-01 07:13:29 | INFO | nemo_automodel.components.datasets.llm.megatron.indexed_dataset | Sequences: 732000 | Documents: 732000
2025-09-01 07:13:29 | INFO | nemo_automodel.components.datasets.llm.megatron.gpt_dataset | Build and save the GPTDataset valid indices
2025-09-01 07:13:29 | INFO | nemo_automodel.components.datasets.llm.megatron.gpt_dataset | > total number of samples: 7520
2025-09-01 07:13:29 | INFO | nemo_automodel.components.datasets.llm.megatron.gpt_dataset | > total number of epochs: 1
2025-09-01 07:13:29 | INFO | nemo_automodel.components.datasets.llm.megatron.indexed_dataset | Loading index file fineweb_edu/megatron_gpt2/processed_data_5_text_document.idx
2025-09-01 07:13:29 | INFO | nemo_automodel.components.datasets.llm.megatron.indexed_dataset | Extracting sequence lengths
2025-09-01 07:13:29 | INFO | nemo_automodel.components.datasets.llm.megatron.indexed_dataset | Extracting sequence pointers
2025-09-01 07:13:29 | INFO | nemo_automodel.components.datasets.llm.megatron.indexed_dataset | Extracting document indices
2025-09-01 07:13:29 | INFO | nemo_automodel.components.datasets.llm.megatron.indexed_dataset | Sequences: 726000 | Documents: 726000
2025-09-01 07:13:29 | INFO | nemo_automodel.components.datasets.llm.megatron.gpt_dataset | Build and save the GPTDataset valid indices
2025-09-01 07:13:29 | INFO | nemo_automodel.components.datasets.llm.megatron.gpt_dataset | > total number of samples: 7326
2025-09-01 07:13:29 | INFO | nemo_automodel.components.datasets.llm.megatron.gpt_dataset | > total number of epochs: 1
2025-09-01 07:13:29 | INFO | nemo_automodel.components.datasets.llm.megatron.indexed_dataset | Loading index file fineweb_edu/megatron_gpt2/processed_data_6_text_document.idx
2025-09-01 07:13:29 | INFO | nemo_automodel.components.datasets.llm.megatron.indexed_dataset | Extracting sequence lengths
2025-09-01 07:13:29 | INFO | nemo_automodel.components.datasets.llm.megatron.indexed_dataset | Extracting sequence pointers
2025-09-01 07:13:29 | INFO | nemo_automodel.components.datasets.llm.megatron.indexed_dataset | Extracting document indices
2025-09-01 07:13:29 | INFO | nemo_automodel.components.datasets.llm.megatron.indexed_dataset | Sequences: 735000 | Documents: 735000
2025-09-01 07:13:29 | INFO | nemo_automodel.components.datasets.llm.megatron.gpt_dataset | Build and save the GPTDataset valid indices
2025-09-01 07:13:29 | INFO | nemo_automodel.components.datasets.llm.megatron.gpt_dataset | > total number of samples: 7498
2025-09-01 07:13:29 | INFO | nemo_automodel.components.datasets.llm.megatron.gpt_dataset | > total number of epochs: 1
2025-09-01 07:13:29 | INFO | nemo_automodel.components.datasets.llm.megatron.indexed_dataset | Loading index file fineweb_edu/megatron_gpt2/processed_data_7_text_document.idx
2025-09-01 07:13:29 | INFO | nemo_automodel.components.datasets.llm.megatron.indexed_dataset | Extracting sequence lengths
2025-09-01 07:13:29 | INFO | nemo_automodel.components.datasets.llm.megatron.indexed_dataset | Extracting sequence pointers
2025-09-01 07:13:29 | INFO | nemo_automodel.components.datasets.llm.megatron.indexed_dataset | Extracting document indices
2025-09-01 07:13:29 | INFO | nemo_automodel.components.datasets.llm.megatron.indexed_dataset | Sequences: 732000 | Documents: 732000
2025-09-01 07:13:29 | INFO | nemo_automodel.components.datasets.llm.megatron.gpt_dataset | Build and save the GPTDataset valid indices
2025-09-01 07:13:29 | INFO | nemo_automodel.components.datasets.llm.megatron.gpt_dataset | > total number of samples: 7531
2025-09-01 07:13:29 | INFO | nemo_automodel.components.datasets.llm.megatron.gpt_dataset | > total number of epochs: 1
2025-09-01 07:13:29 | INFO | nemo_automodel.components.datasets.llm.megatron.indexed_dataset | Loading index file fineweb_edu/megatron_gpt2/processed_data_8_text_document.idx
2025-09-01 07:13:29 | INFO | nemo_automodel.components.datasets.llm.megatron.indexed_dataset | Extracting sequence lengths
2025-09-01 07:13:29 | INFO | nemo_automodel.components.datasets.llm.megatron.indexed_dataset | Extracting sequence pointers
2025-09-01 07:13:29 | INFO | nemo_automodel.components.datasets.llm.megatron.indexed_dataset | Extracting document indices
2025-09-01 07:13:29 | INFO | nemo_automodel.components.datasets.llm.megatron.indexed_dataset | Sequences: 182101 | Documents: 182101
2025-09-01 07:13:29 | INFO | nemo_automodel.components.datasets.llm.megatron.gpt_dataset | Build and save the GPTDataset valid indices
2025-09-01 07:13:29 | INFO | nemo_automodel.components.datasets.llm.megatron.gpt_dataset | > total number of samples: 1912
2025-09-01 07:13:29 | INFO | nemo_automodel.components.datasets.llm.megatron.gpt_dataset | > total number of epochs: 1
2025-09-01 07:13:29 | INFO | nemo_automodel.components.datasets.llm.megatron.indexed_dataset | Loading index file fineweb_edu/megatron_gpt2/processed_data_9_text_document.idx
2025-09-01 07:13:29 | INFO | nemo_automodel.components.datasets.llm.megatron.indexed_dataset | Extracting sequence lengths
2025-09-01 07:13:29 | INFO | nemo_automodel.components.datasets.llm.megatron.indexed_dataset | Extracting sequence pointers
2025-09-01 07:13:29 | INFO | nemo_automodel.components.datasets.llm.megatron.indexed_dataset | Extracting document indices
2025-09-01 07:13:29 | INFO | nemo_automodel.components.datasets.llm.megatron.indexed_dataset | Sequences: 729000 | Documents: 729000
2025-09-01 07:13:29 | INFO | nemo_automodel.components.datasets.llm.megatron.gpt_dataset | Build and save the GPTDataset valid indices
2025-09-01 07:13:29 | INFO | nemo_automodel.components.datasets.llm.megatron.gpt_dataset | > total number of samples: 7462
2025-09-01 07:13:29 | INFO | nemo_automodel.components.datasets.llm.megatron.gpt_dataset | > total number of epochs: 1
2025-09-01 07:13:29 | INFO | nemo_automodel.components.datasets.llm.megatron.builder | Build and save the BlendedDataset indices
2025-09-01 07:13:29 | INFO | nemo_automodel.components.datasets.llm.megatron.builder |  Build and save the dataset and dataset sample indexes
2025-09-01 07:13:29 | INFO | root | Instantiating MegatronPretrainingSampler with total_samples: 1024
2025-09-01 07:13:29 | INFO | nemo_automodel.recipes.llm.train_ft | Building LR scheduler with total_steps=18500, warmup_steps=700, decay_style=cosine
2025-09-01 07:13:29 | INFO | nemo_automodel.components.optim.scheduler | learning rate decay style: cosine
2025-09-01 07:13:29 | INFO | root | Model Part 0:
2025-09-01 07:13:29 | INFO | root | FSDPGPT2LMHeadModel(
2025-09-01 07:13:29 | INFO | root |   (transformer): GPT2Model(
2025-09-01 07:13:29 | INFO | root |     (wte): Embedding(50257, 768)
2025-09-01 07:13:29 | INFO | root |     (wpe): Embedding(1024, 768)
2025-09-01 07:13:29 | INFO | root |     (drop): Dropout(p=0.1, inplace=False)
2025-09-01 07:13:29 | INFO | root |     (h): ModuleList(
2025-09-01 07:13:29 | INFO | root |       (0-11): 12 x FSDPGPT2Block(
2025-09-01 07:13:29 | INFO | root |         (ln_1): LayerNorm((768,), eps=1e-05, elementwise_affine=True)
2025-09-01 07:13:29 | INFO | root |         (attn): GPT2Attention(
2025-09-01 07:13:29 | INFO | root |           (c_attn): Conv1D(nf=2304, nx=768)
2025-09-01 07:13:29 | INFO | root |           (c_proj): Conv1D(nf=768, nx=768)
2025-09-01 07:13:29 | INFO | root |           (attn_dropout): Dropout(p=0.1, inplace=False)
2025-09-01 07:13:29 | INFO | root |           (resid_dropout): Dropout(p=0.1, inplace=False)
2025-09-01 07:13:29 | INFO | root |         )
2025-09-01 07:13:29 | INFO | root |         (ln_2): LayerNorm((768,), eps=1e-05, elementwise_affine=True)
2025-09-01 07:13:29 | INFO | root |         (mlp): GPT2MLP(
2025-09-01 07:13:29 | INFO | root |           (c_fc): Conv1D(nf=3072, nx=768)
2025-09-01 07:13:29 | INFO | root |           (c_proj): Conv1D(nf=768, nx=3072)
2025-09-01 07:13:29 | INFO | root |           (act): NewGELUActivation()
2025-09-01 07:13:29 | INFO | root |           (dropout): Dropout(p=0.1, inplace=False)
2025-09-01 07:13:29 | INFO | root |         )
2025-09-01 07:13:29 | INFO | root |       )
2025-09-01 07:13:29 | INFO | root |     )
2025-09-01 07:13:29 | INFO | root |     (ln_f): LayerNorm((768,), eps=1e-05, elementwise_affine=True)
2025-09-01 07:13:29 | INFO | root |   )
2025-09-01 07:13:29 | INFO | root |   (lm_head): Linear(in_features=768, out_features=50257, bias=False)
2025-09-01 07:13:29 | INFO | root | )
2025-09-01 07:13:29 | INFO | root | Optimizer:
2025-09-01 07:13:29 | INFO | root | AdamW (
2025-09-01 07:13:29 | INFO | root | Parameter Group 0
2025-09-01 07:13:29 | INFO | root |     amsgrad: False
2025-09-01 07:13:29 | INFO | root |     betas: [0.9, 0.95]
2025-09-01 07:13:29 | INFO | root |     capturable: False
2025-09-01 07:13:29 | INFO | root |     decoupled_weight_decay: True
2025-09-01 07:13:29 | INFO | root |     differentiable: False
2025-09-01 07:13:29 | INFO | root |     eps: 1e-08
2025-09-01 07:13:29 | INFO | root |     foreach: None
2025-09-01 07:13:29 | INFO | root |     fused: None
2025-09-01 07:13:29 | INFO | root |     lr: 5.9999999999999995e-05
2025-09-01 07:13:29 | INFO | root |     maximize: False
2025-09-01 07:13:29 | INFO | root |     weight_decay: 0.1
2025-09-01 07:13:29 | INFO | root | )
2025-09-01 07:13:29 | INFO | root | LR scheduler:
2025-09-01 07:13:29 | INFO | root | OptimizerParamScheduler(
2025-09-01 07:13:29 | INFO | root |     optimizer: AdamW
2025-09-01 07:13:29 | INFO | root |     learning_rate:
2025-09-01 07:13:29 | INFO | root |         init_lr: 5.9999999999999995e-05
2025-09-01 07:13:29 | INFO | root |         max_lr: 0.0006
2025-09-01 07:13:29 | INFO | root |         min_lr: 0.0
2025-09-01 07:13:29 | INFO | root |         warmup_steps: 700
2025-09-01 07:13:29 | INFO | root |         decay_steps: 18500
2025-09-01 07:13:29 | INFO | root |         decay_style: cosine
2025-09-01 07:13:29 | INFO | root |     weight_decay:
2025-09-01 07:13:29 | INFO | root |         start_wd: 0.1
2025-09-01 07:13:29 | INFO | root |         end_wd: 0.1
2025-09-01 07:13:29 | INFO | root |         incr_steps: 18500
2025-09-01 07:13:29 | INFO | root |         incr_style: constant
2025-09-01 07:13:29 | INFO | root |     current_step: 0
2025-09-01 07:13:29 | INFO | root | )
2025-09-01 07:13:29 | INFO | root | Step scheduler:
2025-09-01 07:13:29 | INFO | root | - Gradient accumulation steps: 8
2025-09-01 07:13:29 | INFO | root | - Checkpoint every steps: 1000
2025-09-01 07:13:29 | INFO | root | - Current Epoch: 0
2025-09-01 07:13:29 | INFO | root | - Number of epochs: 1
2025-09-01 07:13:29 | INFO | root | - Validation every steps: 250
2025-09-01 07:13:29 | INFO | root | - Max train steps: 18500
2025-09-01 07:13:33 | INFO | root | step 1 | epoch 0 | loss 10.9521 | grad_norm 12.9375 | lr 6.08e-05 | mem 38.39 GiB | tps 132005.57(66002.79/gpu) | num_label_tokens 524288
2025-09-01 07:13:37 | INFO | root | step 2 | epoch 0 | loss 10.1146 | grad_norm 6.0312 | lr 6.15e-05 | mem 38.63 GiB | tps 146246.38(73123.19/gpu) | num_label_tokens 524288
2025-09-01 07:13:41 | INFO | root | step 3 | epoch 0 | loss 9.7842 | grad_norm 3.0781 | lr 6.23e-05 | mem 38.63 GiB | tps 145236.76(72618.38/gpu) | num_label_tokens 524288
2025-09-01 07:13:44 | INFO | root | step 4 | epoch 0 | loss 9.6514 | grad_norm 2.2812 | lr 6.31e-05 | mem 38.63 GiB | tps 144882.21(72441.11/gpu) | num_label_tokens 524288
2025-09-01 07:13:48 | INFO | root | step 5 | epoch 0 | loss 9.5964 | grad_norm 2.2188 | lr 6.39e-05 | mem 38.63 GiB | tps 144711.55(72355.78/gpu) | num_label_tokens 524288
For each training batch, the fine-tuning recipe logs the current loss, along with current peak memory usage and tokens per second (TPS).
As training progresses, you should observe the model loss beginning to converge. To verify your results, you can compare your convergence curves against the baseline benchmarks provided in the llm.c repository.
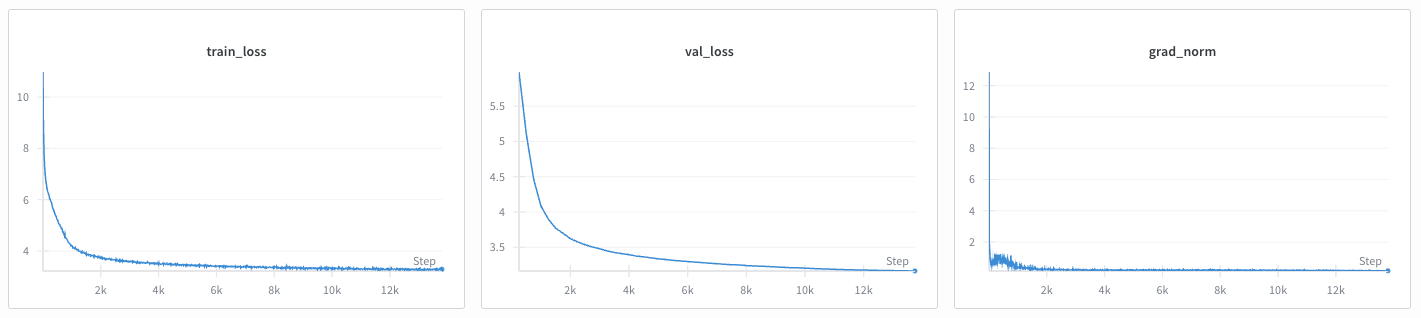
Example of GPT-2 training convergence on FineWeb-Edu-10B.#