Appendix: BIOS Configuration in 8.0.1xxx Software Version
Entering the BIOS can be done in two ways.
Locally (preferred) by connecting a VGA monitor and a USB keyboard to the Skyway appliance
Remotely via IPMI interface, requiring IPMI to be accessible. See section “Enabling Remote Access to Serial Console via IPMI,” below.
Run the command (user and password should be “admin” by default):
To enter the Skyway BIOS, reboot the Skyway appliance and press <DEL> during bootup until the BIOS window pops up.
ipmitool -I lanplus -H <IPMI_CONTROLLER_IP> -U <user> -P <password> sol activate
Example:
ipmitool -I lanplus -H skyway-
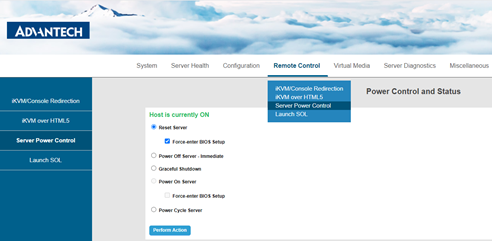
60-ilo -U admin -P admin sol activate(Optional) Alternatively, to enter the web UI of the IPMI controller, type its address into the browser. User and password should be “admin” by default. In the web UI, under “Remote Control” tab, select “Server Power Control." Then select “Reset Server," check the “Force-enter BIOS Setup” checkbox, and press “Perform Action."
Inside the BIOS, configure the following:
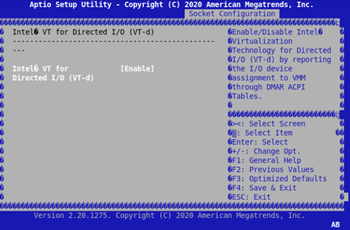
Enable Virtualization (see image below):
Go to “Socket Configuration” tab → “IIO Configuration”
Set the value of “Intel VT for Direct I/O (VT-d)” to “Enable”
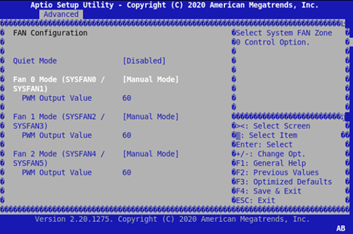
Configure Fan speed (see image below):
Go to “Advanced” tab → “IT8528 HW Monitor”→ “FAN Configuration”
Select a fan to configure and change its mode to “Manual Mode”. The fan speed is controlled by the “PWM Output Value”, use the +/- keys to increment/decrement this value, allowed range is 20-100%.
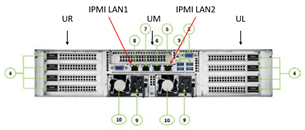
The fans correspond to the following:
Fan 0: CPU, memory, middle cage (UM)
Fan 1: left card cage (UL)
Fan 2: right card cage (UR)
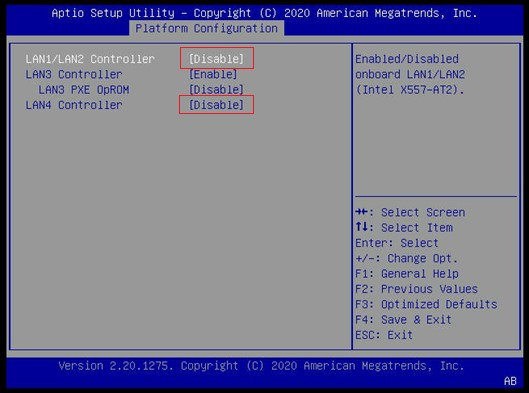
Disable LAN ports 1-4 and keep only LAN3 enabled.
Go to "Platform Configuration" → "PCH Configuration" → "Networking"
Disable LAN1/LAN2 Controller and LAN4 Controller
Save and reset:
Go to “Save & Exit” tab and then select “Save Changes and Reset”
Connect a VGA monitor and USB keyboard directly to the Skyway appliance.
To enter the BIOS, reboot the Skyway appliance, and press <DEL> during bootup until the BIOS window pops up.
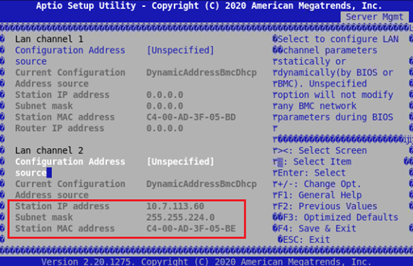
Go to “Server Mgmt.” tab → “BMC network configuration”
The “Station IP address” is the address of the IPMI controller. May need to configure DHCP to provide a lease for the MAC address. The Skyway appliance has 2 LAN ports that can be used for IPMI, see image below.

Use the following IPMI command to remotely access serial console (user and password should be “admin” by default):
ipmitool -I lanplus -H <IPMI_CONTROLLER_IP> -U <user> -P <password> sol activate
Example:
ipmitool -I lanplus -H
10.7.113.60-U admin -P admin sol activateConfigure Console Redirection . This configuration allows to use remote IPMI to see all serial output that comes after the initial boot, useful for monitoring the OS init flow.
Go to “Advanced” tab → “Serial Port Console Redirection” → Under “Serial Communication via IPMI COM”
Set “Console Redirection” to “Enabled”
ImportantAt this point, make sure to disconnect the VGA monitor and USB keyboard, or else the following error may appear:
TSC_DEADLINE disabled due to Errata; Please update microcode to version : 0xffffffff or later