Bare Metal (InfiniBand)
In bare metal deployment, a whole bare metal machine is used to do the compute work, instead of virtual machines. From the Openstack Nova point of view, a bare metal machine is equal to a virtual machine, yet, different configuration steps are required for deployment. Before following the instructions in this chapter, please read the latest Red Hat Bare Metal Provisioning Manual.
The following sections detail the steps required to deploy a bare metal node, and use it to create a bare metal tenant instance
Make sure you follow the Undercloud Installation and Configuration section, and then edit the file with the following configuration:
vi ~/bm-infiniband.yaml
Add the following lines to the file:
            resource_registry:
  'OS::TripleO::Services::NeutronAgentsIBConfig': ../../deployment/neutron/neutron-agents-ib-config-container-puppet.yaml
  'OS::TripleO::NodeUserData': >-
    /usr/share/openstack-tripleo-heat-templates/firstboot/userdata_root_password.yaml
parameter_defaults:
  NtpServer:
    - 0.asia.pool.ntp.org
    - 1.asia.pool.ntp.org
  NeutronMechanismDrivers:
    - mlnx_sdn_assist
    - openvswitch # openvswitch is case of mixed IB/ETH env
  MultiInterfaceEnabled: true
  BindNormalPortsPhysnet: ibnet
  MultiInterfaceDriverMappings:
    - 'ibnet:ipoib,datacentre:openvswitch' # openvswitch is case of mixed IB/ETH env
  IPoIBPhysicalInterface: ib0
  NeutronPhysicalDevMappings:
    - 'ibnet:ib0'
  NeutronNetworkVLANRanges: 'datacentre:10:99,ibnet:100:200'
Preparing the Container Images
See Preparing the Container Images.
Following the undercloud configuration, deploy the overcloud, using the appropriate templates and yaml files from heat templates, as shown in the following example:
            openstack overcloud deploy \
    --templates /usr/share/openstack-tripleo-heat-templates \
    -r ~/roles_data.yaml\
    --timeout 240 \
    -e /usr/share/openstack-tripleo-heat-templates/environments/disable-telemetry.yaml \
    -e /usr/share/openstack-tripleo-heat-templates/environments/podman.yaml\
    --validation-warnings-fatal \
    -e /home/stack/cloud-names.yaml \
    -e /home/stack/overcloud_storage_params.yaml\
    -e /home/stack/containers-prepare-parameter.yaml \
    -e /usr/share/openstack-tripleo-heat-templates/environments/network-isolation.yaml \
    -e /usr/share/openstack-tripleo-heat-templates/environments/net-single-nic-with-vlans.yaml \
    -e /home/stack/network-environment.yaml \
    -e /home/stack/nic_configs/network.yaml \
    -e /home/stack/overcloud-selinux-config.yaml \
    -e /usr/share/openstack-tripleo-heat-templates/environments/services/ironic.yaml\
    -e /usr/share/openstack-tripleo-heat-templates/environments/services/neutron-ovs.yaml \
    -e /home/stack/tripleo-heat-templates/environments/neutron-ml2-mlnx-sdn.yaml\
    -e ~/bm-infiniband.yaml
Once the overcloud is deployed, the bare metal node should be prepared on the overcloud and deployed as a server.
Creating a Provision Network
To maintain and deploy the bare metal nodes, the provisioning network should be added. To create it, use the following commands:
            openstack network create --share --provider-network-type vlan --provider-physical-network ibnet --provider-segment 100 provisioning
openstack subnet create --network provisioning --subnet-range 10.10.10.0/24 --gateway 10.10.10.1  --allocation-pool start=10.10.10.100,end=10.10.10.200 provisioning-subnet
Upon completion of the command, pkeys above 0x8064 will be automatically created in UFM. Login to the UFM webUI, and add the UFM server IB port GUID into the pkey.
Creating a Tenant Network
To create a tenant network, run:
            openstack network create --share --provider-network-type vlan --provider-physical-network ibnet --provider-segment 200 tenant
openstack subnet create --network tenant --subnet-range 192.0.3.0/24 --allocation-pool start=192.0.3.10,end=192.0.3.20 tenant-subnet
Creating a Bare Metal Nodes Inventory
Finally, the bare metal node configuration must be performed. Add the bare metal nodes information to a new file: "~/bm-nodes.yaml". Include the IB Adapter GUID collected in the previous steps for each server as a "client-id" parameter with a prefix of ff:00:00:00:00:00:02:00:00:02:c9:00:<GUID>. For example:
            nodes:
    - name: node-0
      driver: ipmi
      network_interface: neutron
      driver_info:
        ipmi_address: "10.209.225.81"
        ipmi_username: "ADMIN"
        ipmi_password: "ADMIN"
      resource_class: baremetal
      properties:
        cpu_arch: x86_64
        local_gb: 930
        memory_mb: '32768'
        cpus: 24
      ports:
        - address: "ec:0d:9a:bf:54:d4"
          pxe_enabled: true
          extra:
            client-id: "ff:00:00:00:00:00:02:00:00:02:c9:00:ec:0d:9a:03:00:bf:54:d4"
          physical_network: "ibnet"
Adding the Nodes to the Overcloud
At this stage, the node must be added to the overcloud. This can be done by executing the following commands in the overcloud:
            source overcloudrc
openstack baremetal create bm-nodes.yaml
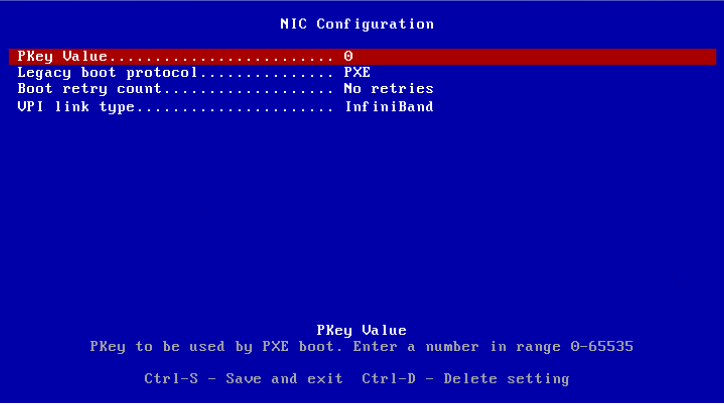
Setting the Provisioning Network Pkey in the Node BIOS for PXE Boot
By pressing CTRL+S at the Flexboot stage, a CX configuration page opens, where you can navigate to the menu demonstrated in the following figure, and set the pkey value. In this example, the value is set to 100.
Setting the Ironic Images and Network to the Bare Metal Node
For the node to work as a server, the images must be set to it. To do so, execute the following in the overcloud:
            DEPLOY_KERNEL=$(openstack image show ironic-deploy-kernel -f value -c id)
DEPLOY_RAMDISK=$(openstack image show ironic-deploy-ram -f value -c id)
PROV_NET=$(openstack network show provisioning -f value -c id)
for uuid in $(openstack baremetal node list --provision-state enroll -f value -c UUID);
do
    openstack baremetal node set $uuid \
        --driver-info deploy_kernel=$DEPLOY_KERNEL \
        --driver-info deploy_ramdisk=$DEPLOY_RAMDISK \
        --driver-info cleaning_network=$PROV_NET \
        --driver-info provisioning_network=$PROV_NET \
        --driver-info rescuing_network=$PROV_NET
    openstack baremetal node manage $uuid --wait &&
        openstack baremetal node provide $uuid
done
Create a Flavor
Execute the following commands in the overcloud:
            source overcloudrc
openstack flavor create --ram 1024 --disk 20 --vcpus 1 baremetal
openstack flavor set baremetal --property resources:CUSTOM_BAREMETAL=1
openstack flavor set baremetal --property resources:VCPU=0
openstack flavor set baremetal --property resources:MEMORY_MB=0
openstack flavor set baremetal --property resources:DISK_GB=0
Execute the following command in the overcloud:
openstack server create --image baremetal-image --flavor baremetal --network tenant instance-0