BareMetal Provision with Bluefield
BlueField® SmartNIC adapters accelerate a wide range of applications through flexible data and control-plane offloading. Enabling a more efficient use of compute resources, BlueField adapters empower the CPU to focus on running applications rather than on networking or security processing. Additionally, as software-defined adapters, BlueField SmartNICs ensure the ultimate flexibility by adapting to future protocols and features through simple software updates.
Network Interface Cards | Firmware Version | BFB |
BlueField-2 | 24.28.2006 | CentOS 7.6 (3.1) |
Mellanox BlueField SmartNIC supports the following Features:
Mellanox ASAP2 Accelerated Switching and Packet Processing® for Open vSwitch (OVS) delivers flexible, highly efficient virtual switching and routing capabilities. OVS accelerations can be further enhanced using BlueField processing and memory. For example, the scale of OVS actions can be increased by utilizing BlueField internal memory, and more OVS actions and vSwitch/vRouter implementations can be supported.
Network overlay technology (VXLAN) offload, including encapsulation and decapsulation, allows the traditional offloads to operate on the tunneled protocols, and offload Network Address Translation (NAT) routing capabilities.
Starting from a fresh RHEL Bare Metal server, install and configure the undercloud according to the official TripleOinstallation documentation.
Follow this link for TripleO instructions to prepare bare metal overcloud.
Add provisioning network to network_data.yaml.
- name: OcProvisioning vip:
truename_lower: oc_provisioning vlan:215ip_subnet:'172.16.4.0/24'allocation_pools: [{'start':'172.16.4.1','end':'172.16.4.2'}] ipv6_subnet:'fd00:fd00:fd00:7000::/64'ipv6_allocation_pools: [{'start':'fd00:fd00:fd00:7000::10','end':'fd00:fd00:fd00:700 addresses 0:ffff:ffff:ffff:fffe'}] mtu:1500
Add provisioning network to controller.yaml (under ovs_bridge mlnx-br config).
              vlan_id:
   get_param: OcProvisioningNetworkVlanID
   ip_netmask:
   get_param: OcProvisioningIpSubnet
Install the latest operating system on BlueField according to the BlueField Installation Guide. Please use BFB RHEL 7.6 and above.
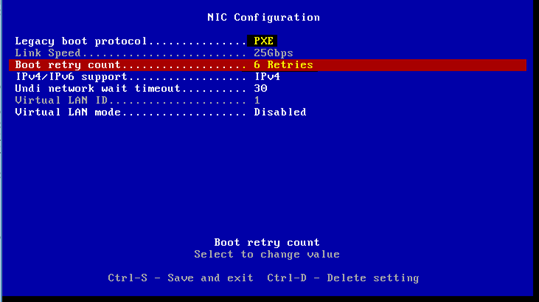
Enable PXE boot and set PXE retries on the BlueField FlexBoot.
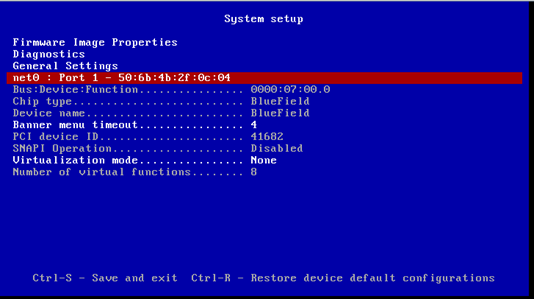
Bluefield has several operation modes. For proper operation, Bluefield must be configured as an embedded function, where the embedded Arm system controls the NIC resources and datapath.
Make sure the following is configured in the Bluefield host:
$ mlxconfig -d /dev/mst/mt41682_pciconf0 q | grep -E
"ECPF|CPU"INTERNAL_CPU_MODEL EMBEDDED_CPU(1) ECPF_ESWITCH_MANAGER ECPF(1) ECPF_PAGE_SUPPLIER ECPF(1)In case of a different configuration, run the following command, and power the host:
$ mst start $ mlxconfig -d /dev/mst/mt41682_pciconf0 s INTERNAL_CPU_MODEL=
1For security and isolation purposes, it is possible to restrict the host from performing operations that can compromise the SmartNIC. See Restricting-Smart-NIC-Host.
To run OpenStack service as a container, the image and a starting script will be required.
Pull the image to the docker repository.
If the host has access to https://hub.docker.com/, the container can be pulled directly. Pull the image from the docker repository:
BlueField$ docker pull mellanox/centos-binary-neutron-openvswitch-agent-ussuri-aarch64:latest
If the host has no access to https://hub.docker.com/, the container should be pulled on another server, saved and pushed to the host. Pull the image on another server:
            host_with_internet$ docker pull mellanox/centos-binary-neutron-openvswitch-agent-ussuri-aarch64:latest

host_with_internet$ docker save mellanox/centos-binary-neutron-

openvswitch-agent-ussuri-aarch64:latest > /tmp/centos-binary-neutron-openvswitch-agent-ussuri-aarch64.tar

host_with_internet$ scp /tmp/centos-binary-neutron-openvswitch-agent-ussuri-aarch64.tar BlueField:/tmp

BlueField$ docker load -i /tmp/centos-binary-neutron-openvswitch-agent-ussuri-aarch64.tar
Download neutron_ovs_agent_launcher.sh.
BlueField$ curl https:
//raw.githubusercontent.com/Mellanox/neutron-openvswitch-agent-builder/ussuri/neutron_ovs_agent_launcher.sh -o /root/neutron_ovs_agent_launcher.shBlueField$ chmod +x /root/neutron_ovs_agent_launcher.shCreate the container. Use the following script to create and start the container:
BlueField$ curl https:
//raw.githubusercontent.com/Mellanox/neutron-openvswitch-agent-builder/ussuri/neutron_ovs_agent_start.sh -o /root/neutron_ovs_agent_start.shBlueField$ chmod +x /root/neutron_ovs_agent_start.sh BlueField$ /root/neutron_ovs_agent_start.sh
Create VLAN interface with InternalApi VLAN in BlueField. Inside BlueField, create a network script in /etc/sysconfig/network-scripts/.
            vi /etc/sysconfig/network-scripts/ifcfg-p0.<InternalApi vlan>
DEVICE=p0.<InternalApi vlan>
BOOTPROTO=none
ONBOOT=yes
IPADDR=<InternalApi free IP>
PREFIX=<InternalApi Subnet>
VLAN=yes
Add the script to add an Uplink representor to the br-phys (bridge for VLAN).
            DEVICE=p0
TYPE=OVSPort
DEVICETYPE=ovs
OVS_BRIDGE=br-phys
ONBOOT=yes
Add the script to configure the Bluefield OOB port:
vi /etc/sysconfig/network-scripts/ifcfg-oob_net0 NAME=
"oob_net0"DEVICE="oob_net0"NM_CONTROLLED="yes"PEERDNS="yes"ONBOOT="yes"BOOTPROTO="dhcp"TYPE=EthernetCopy the /etc/hosts from the controller node to each of the BlueField hosts:
$ rsync -av /etc/hosts co-bm-
2-arm:/etc/hostsUpdate the /etc/hosts on the controller and on BlueField. The IP address and the hostname of all Bluefield hosts in the cluster should look like the following:
172.16.2.251co-bm-1-arm.localdomain co-bm-1-arm172.16.1.251co-bm-1-arm.storage.localdomain co-bm-1-arm.storage172.16.2.251co-bm-1-arm.internalapi.localdomain co-bm-1-arm.internalapi172.16.0.251co-bm-1-arm.tenant.localdomain co-bm-1-arm.tenant192.168.24.251co-bm-1-arm.ctlplane.localdomain co-bm-1-arm.ctlplane172.16.2.252co-bm-2-arm.localdomain co-bm-2-arm172.16.1.252co-bm-2-arm.storage.localdomain co-bm-2-arm.storage172.16.2.252co-bm-2-arm.internalapi.localdomain co-bm-2-arm.internalapi172.16.0.252co-bm-2-arm.tenant.localIt is required for the provision network, which is usually a flat or a VLAN network.
Restart the network service:
$ systemctl restart network
Get Neutron configuration to the BlueField:
Copy the Neutron configuration from the controller to the BlueField in the /var/lib/config-data/puppet-generated/neutron/etc/neutron/ directory.
Copy the following files to BlueField:
            etc/neutron/neutron.conf
etc/neutron/plugins/ml2/ml2_conf.ini
etc/neutron/plugins/ml2/openvswitch_agent.ini
Update the Neutron configuration. On the BlueField, changes must be made to set the correct values for the BlueField host:
In the /etc/neutron/neutron.conf file, change the following:
            bind_host=<Bluefield IP>
host=<Bluefield hostname>
In the /etc/neutron/plugins/ml2/ openvswitch_agent.ini file, change the following:
            ovs]baremetal_smartnic=True
[securitygroup]
firewall_driver=openvswitch
Update the openvsiwtch with hw-offload enable:
$ systemctl enable openvswitch.service $ ovs-vsctl set Open_vSwitch . other_config:hw-offload=
true$ systemctl restart openvswitch.service $ docker restart neutron_ovs_agent
VXLAN Tenant Network Configuration in BlueField
Create a VLAN interface with a tenant VLAN on BlueField by creating a network script in /etc/sysconfig/network-scripts/:
            vi /etc/sysconfig/network-scripts/ifcfg-p0.<Tenant vlan>
DEVICE=p0.<Tenant vlan>
BOOTPROTO=none
ONBOOT=yes
IPADDR=<Tenant free IP>
PREFIX=<Tenant Subnet>
VLAN=yes
Restart the network service:
$ systemctl restart network
In the BlueField, edit the /etc/neutron/plugins/ml2/openvswitch_agent.ini file, as follows:
            [ovs]
local_ip=[BlueField vxlan tunnel ip]
[agent]
l2_population=True
arp_responder=True
In the BlueField, restart the neutron OVS agent:
$ docker restart neutron_ovs_agent
In the controller, update the /var/lib/config-data/puppet-generated/neutron/etc/neutron/plugins/ml2/ml2_conf.ini file, as follows:
mechanism_drivers=openvswitch,l2population
In the controller, restart the neutron API:
$ podman restart neutron_api
Lag Configuration
LAG configuration allows the bare metal host to output traffic through a single network interface. Traffic arbitration is done in the internal Bluefield host.
The steps consist of setting up LAG over Uplink representors in BlueField, and connecting the bond device to the the physical OVS bridge (br-phys) utilizing linux bonding module. These configurations are persisted using network scripts, but any other persistent network configuration mechanism is acceptable.
Similarly to the instructions in Network Configuration in BlueField, over the bond it is required to:
Configure the VLAN interface to be used for OpenStack API traffic
Connect the bond to OVS
Enable hardware offload in OVS
Restart neutron_ovs_agent_container
Bond device network script:
# network script
forbond device cat << EOF > /etc/sysconfig/network-scripts/ifcfg-bond0 DEVICE=bond0 NAME=bond0 TYPE=Bond BONDING_MASTER=yes ONBOOT=yes BOOTPROTO=none BONDING_OPTS="mode=active-backup miimon=100"NM_CONTROLLED="no"EOF # network scriptforvlan device over bondforAPI traffic cat << EOF > /etc/sysconfig/network-scripts/ifcfg-bond0.<InternalApi vlan> DEVICE=bond0.<InternalApi vlan> BOOTPROTO=none ONBOOT=yes IPADDR=<InternalApi free IP> PREFIX=<InternalApi Subnet> VLAN=yesUplink representors network scripts:
# network script
forfirst uplink representor $ cat << EOF > /etc/sysconfig/network-scripts/ifcfg-p0 DEVICE=p0 NAME=p0 TYPE=Ethernet BOOTPROTO=none ONBOOT=yes MASTER=bond0 SLAVE=yes NM_CONTROLLED="no"EOF # network scriptforsecond uplink representor $ cat << EOF > /etc/sysconfig/network-scripts/ifcfg-p1 DEVICE=p1 NAME=p1 TYPE=Ethernet BOOTPROTO=none ONBOOT=yes MASTER=bond0 SLAVE=yes NM_CONTROLLED="no"EOFTo apply configuration invoke without reboot:
$ systemctl restart network
Connect bond0 to the bridge:
$ ovs-vsctl add-port br-phys bond0
A bare metal environment needs at least two networks: provisioning network and tenant network.
Create a provisioning network.
openstack network create --share --provider-network-type vlan --provider-physical-network datacentre --provider-segment
215provisioning openstack subnet create --network provisioning --subnet-range172.16.4.0/24--gateway172.16.4.6--allocation-pool start=172.16.4.201,end=172.16.4.250provisioning-subnetOpen the following port in the default security group of the provisioning network:
ADMIN_SECURITY_GROUP_ID=$(openstack security group list --project admin -f value -c ID) openstack security group rule create ${ADMIN_SECURITY_GROUP_ID} --protocol udp --dst-port
67--egress --description DHCP67 openstack security group rule create ${ADMIN_SECURITY_GROUP_ID} --protocol udp --dst-port68--ingress --description DHCP68 openstack security group rule create ${ADMIN_SECURITY_GROUP_ID} --protocol udp --dst-port69--egress --description TFTP69 openstack security group rule create ${ADMIN_SECURITY_GROUP_ID} --protocol tcp --dst-port6385--egress --description Ironic6385 openstack security group rule create ${ADMIN_SECURITY_GROUP_ID} --protocol tcp --dst-port9999--ingress --description Ironic9999 openstack security group rule create ${ADMIN_SECURITY_GROUP_ID} --protocol tcp --dst-port9999--egress --description Ironic9999 openstack security group rule create ${ADMIN_SECURITY_GROUP_ID} --protocol tcp --dst-port3260--ingress --description IscsiDeploy3260 openstack security group rule create ${ADMIN_SECURITY_GROUP_ID} --protocol tcp --dst-port80--egress --description DirectDeploy80 openstack security group rule create ${ADMIN_SECURITY_GROUP_ID} --protocol tcp --dst-port8088--egress --description DirectDeploy8088 openstack security group rule create ${ADMIN_SECURITY_GROUP_ID} --protocol tcp --dst-port443--egress --description DirectDeploy443 SERVICE_SECURITY_GROUP_ID=$(openstack security group list --project service -f value -c ID) openstack security group rule create ${SERVICE_SECURITY_GROUP_ID} --protocol udp --dst-port67--egress --description DHCP67 openstack security group rule create ${SERVICE_SECURITY_GROUP_ID} --protocol udp --dst-port68--ingress --description DHCP68 openstack security group rule create ${SERVICE_SECURITY_GROUP_ID} --protocol udp --dst-port69--egress --description TFTP69 openstack security group rule create ${SERVICE_SECURITY_GROUP_ID} --protocol tcp --dst-port6385--egress --description Ironic6385 openstack security group rule create ${SERVICE_SECURITY_GROUP_ID} --protocol tcp --dst-port9999--ingress --description Ironic9999 openstack security group rule create ${SERVICE_SECURITY_GROUP_ID} --protocol tcp --dst-port9999--egress --description Ironic9999 openstack security group rule create ${SERVICE_SECURITY_GROUP_ID} --protocol tcp --dst-port3260--ingress --description IscsiDeploy3260 openstack security group rule create ${SERVICE_SECURITY_GROUP_ID} --protocol tcp --dst-port80--egress --description DirectDeploy80 openstack security group rule create ${SERVICE_SECURITY_GROUP_ID} --protocol tcp --dst-port8088--egress --description DirectDeploy8088 openstack security group rule create ${SERVICE_SECURITY_GROUP_ID} --protocol tcp --dst-port443--egress --description DirectDeploy443Create a tenant network.
openstack network create tenant-net openstack subnet create --network tenant-net --subnet-range
192.0.3.0/24--allocation-pool start=192.0.3.10,end=192.0.3.20tenant-subnet
To create a bare metal flavor, run the following command:
            openstack flavor create --ram 1024 --disk 20 --vcpus 1 baremetal
openstack flavor set baremetal --property resources:CUSTOM_BAREMETAL=1
openstack flavor set baremetal --property resources:VCPU=0
openstack flavor set baremetal --property resources:MEMORY_MB=0
openstack flavor set baremetal --property resources:DISK_GB=0
Create the baremetal.yaml file:
nodes: - name: node-
1driver: ipmi driver_info:nullipmi_address: host-ilo ipmi_username: admin ipmi_password: admin resource_class: baremetal network_interface: neutron properties:nullcpu_arch: x86_64 local_gb:419cpus:24memory_mb:131072capabilities:'boot_option:local'ports: - address:'50:6b:4b:2f:0b:f4'pxe_enabled:trueis_smartnic:truephysical_network: datacentre local_link_connection: hostname: BF-BM port_id: pf0hpfCreate a baremetal node:
$ openstack baremetal node create -f baremetal.yaml
Specify the deployment kernel and deployment ramdisk on each node:
            KERNEL_UUID=`openstack image show bm-deploy-kernel -f value -c id`
INITRAMFS_UUID=`openstack image show bm-deploy-ramdisk -f value -c id`
openstack baremetal node set NODE_UUID --driver-info deploy_kernel=KERNEL_UUID --driver-info deploy_ramdisk=INITRAMFS_UUID
Set the node to available state:
$ ironic node-set-provision-state node-
1manage $ ironic node-set-provision-state node-1provideBoot the Bare Metal Instance
To boot the bare metal instance, run the following command:
openstack server create --flavor baremetal --image bm_centos --nic net-id=tenant-net node-
1