Modes of Operation
The NVIDIA® BlueField® DPU has several modes of operation:
DPU mode or embedded function (ECPF) ownership where the embedded Arm system controls the NIC resources and data path (default)
Restricted mode which is an extension of the ECPF ownership with additional restrictions on the host side
NIC mode where the DPU behaves exactly like an adapter card from the perspective of the external host
Separated host mode (symmetric model)
This mode, known also as Embedded CPU Function Ownership (ECPF) mode, is the default mode for BlueField DPU.
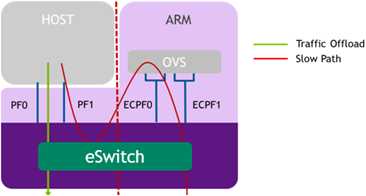
In DPU mode, the NIC resources and functionality are owned and controlled by the embedded Arm subsystem. All network communication to the host flows through a virtual switch control plane hosted on the Arm cores, and only then proceeds to the host. While working in this mode, the DPU is the trusted function managed by the data center and host administrator—to load network drivers, reset an interface, bring an interface up and down, update the firmware, and change the mode of operation on the DPU device.
A network function is still exposed to the host, but it has limited privileges. In particular:
The driver on the host side can only be loaded after the driver on the DPU has loaded and completed NIC configuration.
All ICM (Interface Configuration Memory) is allocated by the ECPF and resides in the DPU's memory.
The ECPF controls and configures the NIC embedded switch which means that traffic to and from the host (DPU) interface always lands on the Arm side.

When the server and DPU are initiated, the networking to the host is blocked until the virtual switch on the DPU is loaded. Once it is loaded, traffic to the host is allowed by default.
There are two ways to pass traffic to the host interface: Either using representors to forward traffic to the host (every packet to/from the host would be handled also by the network interface on the embedded Arm side), or push rules to the embedded switch which allows and offloads this traffic.
Configuring DPU Mode from Separated Host Mode
To enable this mode:
Start MST driver set service:
$ mst start
Identify the MST device:
$ mst status -v
Output example:
            ...
DEVICE_TYPE             MST                         PCI			RDMA            NET                       NUMA
BlueField(rev:0)        /dev/mst/<device>.1  		37:00.1   	mlx5_1          net-ens1f1                0

BlueField(rev:0)        /dev/mst/<device>    		37:00.0  	mlx5_0          net-ens1f0                0
Run the following commands on the Arm:
$ mlxconfig -d /dev/mst/<device> s INTERNAL_CPU_MODEL=1
Power cycle the server.
WarningIf OVS bridges ovsbr1 and ovsbr2 are not created (you may verify that using command ovs-vsctl show), make sure field CREATE_OVS_BRIDGES is set to "yes" in /etc/mellanox/mlnx-ovs.conf.
Restricted mode is a specialization of Embedded mode and implements an additional layer of security where the host system administrator is prevented from accessing the DPU from the host. Once Restricted mode is enabled, the data center administrator should control the DPU entirely though the Arm cores and/or BMC connection instead of through the host.
For security and isolation purposes, it is possible to restrict the host from performing operations that can compromise the DPU. The following operations can be restricted individually when changing the DPU host to Restricted mode:
Port ownership – the host cannot assign itself as port owner
Hardware counters – t he host does not have access to hardware counters
Tracer functionality is blocked
RShim interface is blocked
FW flash is restricted
Enabling Host Restriction
Start the MST service.
Set restricted mode. From the Arm side, run:
$ mlxprivhost -d /dev/mst/<device> r --disable_rshim --disable_tracer --disable_counter_rd --disable_port_owner
WarningIf RShim is disabled, power cycle is required.
WarningP ower cycle is required if any --disable_* flags are used.
Disabling Host Restriction
To disable host restriction, set the mode to privileged. Run:
$ mlxprivhost -d /dev/mst/<device> p
The configuration takes effect immediately.
If you are reverting from rshim-disabled mode, system power cycle is required.
P ower cycle is required when reverting to privileged mode if host restriction has been applied using any --disable_* flags.
Prior to configuring NIC Mode, refer to known issue # 3048250.
In this mode, the DPU behaves exactly like an adapter card from the perspective of the external host. The ECPFs on the Arm side are not functional in this mode but the user is still able to access the Arm system and update mlxconfig options.
To enable DPU NIC mode:
Run the following from the x86 host side:
            $ mst start
$ mlxconfig -d /dev/mst/<device> s INTERNAL_CPU_MODEL=1 \
INTERNAL_CPU_PAGE_SUPPLIER=1 \
INTERNAL_CPU_ESWITCH_MANAGER=1 \
INTERNAL_CPU_IB_VPORT0=1 \
INTERNAL_CPU_OFFLOAD_ENGINE=1
WarningTo restrict RShim PF (optional), make sure to configure INTERNAL_CPU_RSHIM=1 as part of the mlxconfig command.
Power cycle the host
Multi-host is not supported when the DPU is operating in NIC mode.
To obtain firmware BINs for NVIDIA® BlueField®-2 devices, refer to the BlueField-2 firmware download page.
If RShim is disabled, then power cycle is mandatory.
To change from back from NIC mode to DPU (ECPF) mode:
Install and start the RShim driver on the host.
Disable NIC mode. Run:
            $ mst start
$ mlxconfig -d /dev/mst/<device> s INTERNAL_CPU_MODEL=1 \
INTERNAL_CPU_PAGE_SUPPLIER=0 \
INTERNAL_CPU_ESWITCH_MANAGER=0 \
INTERNAL_CPU_IB_VPORT0=0 \
INTERNAL_CPU_OFFLOAD_ENGINE=0
$ mlxfwreset -d /dev/mst/<device> r
WarningIf INTERNAL_CPU_RSHIM=1, then make sure to configure INTERNAL_CPU_RSHIM=0 as part of the mlxconfig command.
If RShim is enabled, then power cycle is mandatory.
The following are the supported MLNX_OFED versions for when the DPU is operating in NIC mode:
|
Distribution |
Version |
Kernel |
|
RHEL/CentOS 8.4 |
8.4 |
4.18.0-305 |
|
Ubuntu 20.04 |
20.04 |
5.4.0-26 |
|
Ubuntu 22.04 |
22.04 |
5.15 |
|
Debian |
10.8 |
4.19.0-14 |
|
RHEL/CentOS 7.6 |
7.6 |
3.10.0-957 |
|
RHEL/CentOS 8.0 |
8 |
4.18.0-80 |
|
RHEL/CentOS 8.2 |
8.2 |
4.18.0-193 |
|
Ubuntu 18.04 |
18.04 |
4.15.0-20 |
|
RHEL/CentOS 8.5 |
8.5 |
4.18.0-348 |
|
RHEL/CentOS 8.6 |
8.6 |
4.18.0-359 |
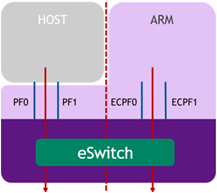
In Separated mode, a network function is assigned to both the Arm cores and the host cores. The ports/functions are symmetric in the sense that traffic is sent to both physical functions simultaneously. Each one of those functions has its own MAC address, which allows one to communicate with the other, and can send and receive Ethernet and RDMA over Converged Ethernet (RoCE) traffic. There is an equal bandwidth share between the two functions.
There is no dependency between the two functions. They can operate simultaneously or separately. The host can communicate with the embedded function as two separate hosts, each with its own MAC and IP addresses (configured as a standard interface).
In Separated mode, the host administrator is a trusted actor who can perform all configuration and management actions related to either network function.

This mode enables the same operational model of a SmartNIC (that does not have a separated control plane). In this case, the Arm control plane can be used for different functions but does not have any control on the host steering functions.
The limitations of this mode are as follows:
Switchdev (virtual switch offload) mode is not supported on either of the functions
SR-IOV is only supported on the host side
Configuring Separated Host Mode from DPU Mode
On the server host, follow these steps:
Enable separated host mode. Run:
            $ mst start
$ mlxconfig -d /dev/mst/<device> s INTERNAL_CPU_MODEL=0
Power cycle.
Verify configuration. Run:
            $ mst start
$ mlxconfig -d /dev/mst/<device> q | grep -i model
Remove OVS bridges configuration from the Arm-side. Run:
$ ovs-vsctl list-br | xargs -r -l ovs-vsctl del-br