VirtIO-net Emulated Devices
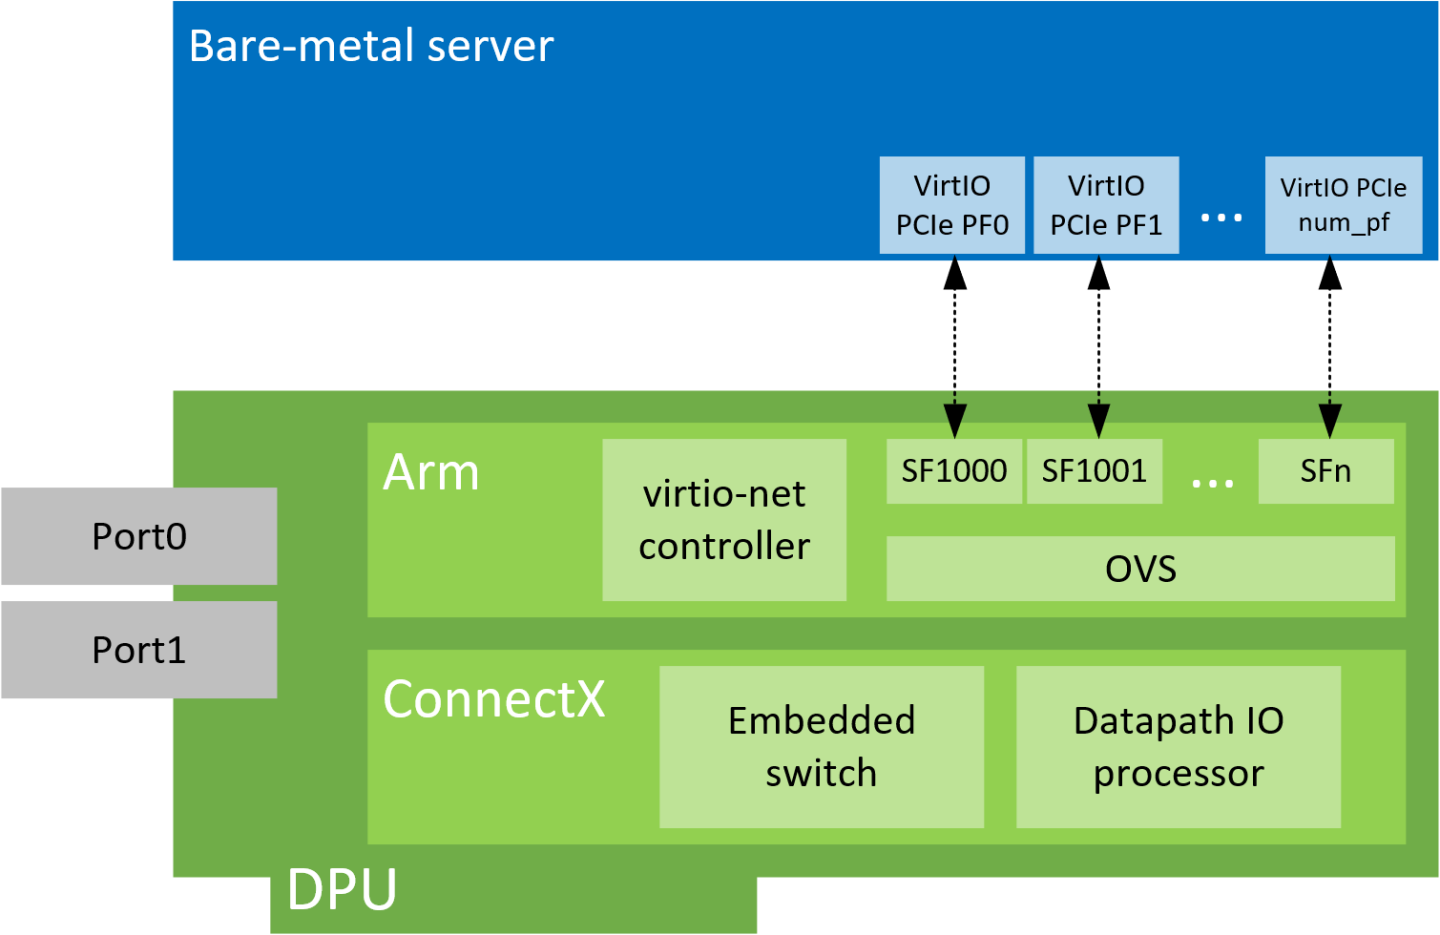
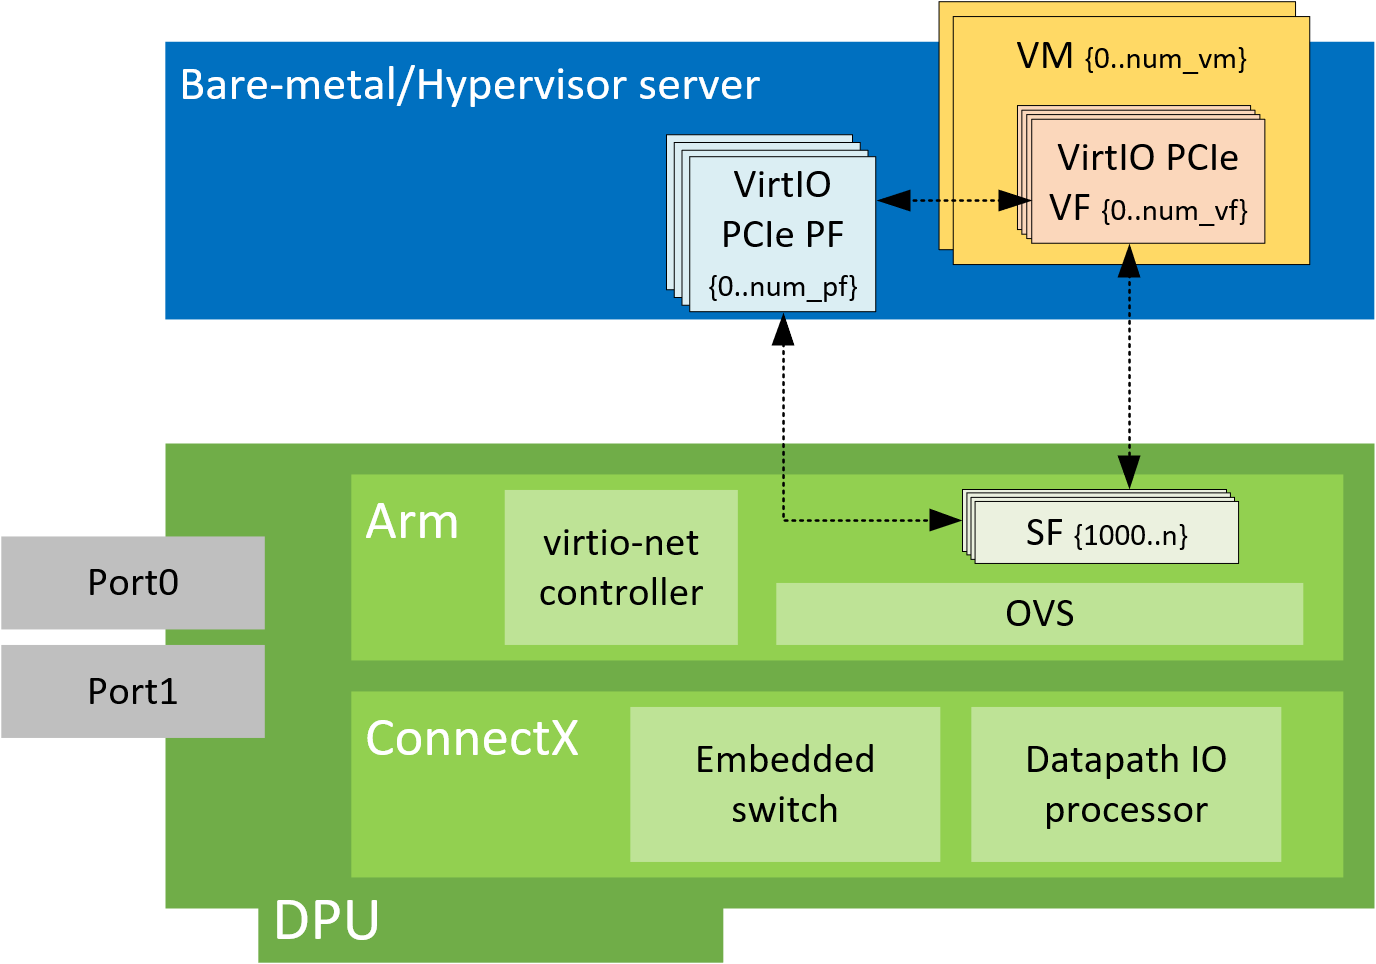
Virtio-net device emulation enables users to create VirtIO-net emulated PCIe devices in the system where the NVIDIA® BlueField® DPU is connected. This is done by the virtio-net-controller software module present in the DPU. Virtio-net emulated devices allow users to hot plug up to 31 virtio-net PCIe PF Ethernet NIC devices or 504 virtio-net PCIe VF Ethernet NIC devices in the host system where the DPU is plugged in.
Currently, VirtIO specification v1.0 is supported.
DPU software also enables users to create virtio block PCIe PF and SR-IOV PCIe VF devices. This is covered in the NVIDIA BlueField SNAP and virtio-blk SNAP Documentation.
Virtio-net-controller is a systemd service running on the DPU, with a user interface frontend to communicate with the background service. An SF representor is created for each virtio-net device created on the host. Virtio-net controller only uses an SF number ≥1000. Refer to section "Scalable Functions" for more information.
SF representor name is determined by udev rules. The default name is in the format of <prefix><pf_num><sf_num>. For example: en3f0pf0sf1001.
Each virtio-net PF/VF requires a dedicated SF and it should be reserved from mlxconfig (see section "VirtIO-net PF Device Configuration"). However, since an SF is a shared resource on the system, there may be other application-created SFs as well. In that case, PF_TOTAL_SF must be updated to consider those SFs. Otherwise, virtio-net is not able to create enough configured PF/VF.
Since the controller provides hardware resources and acknowledges (ACKs) the request from the host's virtio driver, it is mandatory to reboot the host OS first and the DPU second. This also applies to reconfiguring a controller from the DPU (e.g., reconfiguring LAG); unloading the virtio-net driver from guest side is recommended.
SystemD Service
Controller systemd service is enabled by default and runs automatically if VIRTIO_NET_EMULATION_ENABLE is true from mlxconfig.
To check controller service status, run:
$ systemctl status virtio-net-controller.service
To reload the service, make sure to unload virtio-net/virtio-pcie drivers on host. Then run:
$ systemctl restart virtio-net-controller.service
To monitor log output of the controller service, run:
$ journalctl -u virtio-net-controller -f
The controller service has an optional configuration file which allows users to customize several parameters. The configuration file should be defined on the DPU at the following path /opt/mellanox/mlnx_virtnet/virtnet.conf.
This file is read every time the controller starts. Dynamic change of virtnet.conf is not supported. It is defined as a JSON format configuration file. The currently supported options are:
ib_dev_p0 – RDMA device (e.g., mlx5_0) used to create SF on port 0. This port is the EMU manager when is_lag is 0. Default value is mlx5_0.
ib_dev_p1 – RDMA device (e.g., mlx5_1) used to create SF on port 1. Default value is mlx5_1.
ib_dev_lag – RDMA LAG device (e.g., mlx5_bond_0) used to create SF on LAG. Default value is mlx5_bond_0. This port is EMU manager when is_lag is 1. ib_dev_lag and ib_dev_p0/ib_dev_p1 cannot be configured simultaneously.
ib_dev_for_static_pf – the RDMA device (e.g., mlx5_0) which the static virtio PF is created on
is_lag – specifies whether LAG is used. Note that if LAG is used, make sure to use the correct IB dev for static PF.
static_pf –
mac_base – base MAC address for static PFs. MACs are automatically assigned with the following pattern: pf_mac→pf_0, pf_mac+1→pf_1, etc.
NoteNote that the controller does not validate the MAC address (other than its length). The user must ensure MAC is valid and unique.
features – virtio spec-defined feature bits for static PFs. If unsure, leave features out of the JSON file and a default value is automatically assigned.
vf –
mac_base – base MAC address for static PFs. MACs are automatically assigned with the following pattern: pf_mac→pf_0, pf_mac+1→pf_1, etc.
features – virtio spec-defined feature bits for static VFs. If unsure, leave features out of the JSON file and a default value is automatically assigned.
vfs_per_pf – number of VFs to create on each PF. This is mandatory if mac_base is specified.
NoteThis value does not equal VIRTIO_NET_EMULATION_NUM_VF in mlxconfig. vfs_per_pf ≤ VIRTIO_NET_EMULATION_NUM_VF.
qp_num – number of QPs for each VF. If not specified, then the QP number assigned is taken from its parent PF.
recovery – specifies whether recovery is enabled. If unspecified, recovery is enabled by default. To disable it, set recovery to 0.
sf_pool_percent – determines the initial SF pool size as the percentage of PF_TOTAL_SF of mlxconfig. Valid range: [0, 100]. For instance, if the value is 5, it means an SF pool with 5% of PF_TOTAL_SF is created. 0 means no SF pool is reserved beforehand (default).
NotePF_TOTAL_SF is shared by all applications. User must ensure the percent request is guaranteed or else the controller will not be able to reserve the requested SFs resulting in failure.
sf_pool_force_destroy – specifies whether to destroy the SF pool. When set to 1, the controller destroys the SF pool when stopped/restarted (and the SF pool is recreated if sf_pool_percent is not 0 when starting), otherwise it does not. Default value is 0.
For example, the following definition has all static PFs using mlx5_0 (port 0) as the data path device in a non-lag configuration:
            {
  "ib_dev_p0": "mlx5_0",
  "ib_dev_p1": "mlx5_1",
  "ib_dev_for_static_pf": "mlx5_0",
  "is_lag": 0,
  "recovery": 1,
  "sf_pool_percent": 0,
  "sf_pool_force_destroy": 0,
  "static_pf": {
    "mac_base": "11:22:33:44:55:66",
    "features": "0x230047082b"
  },
  "vf": {
    "mac_base": "CC:48:15:FF:00:00",
    "features": "0x230047082b",
    "vfs_per_pf": 100,
    "qp_num": 4
  }
}
The following is an example for LAG configuration:
            {
  "ib_dev_lag": "mlx5_bond_0",
  "ib_dev_for_static_pf": "mlx5_bond_0",
  "is_lag": 1,
  "recovery": 1,
  "sf_pool_percent": 0,
  "sf_pool_force_destroy": 0
}
User Frontend
To communicate with the service, a user frontend program (virtnet) is installed on the DPU. Run the following command to check its usage:
            # virtnet -h
usage: virtnet [-h] [-v] {hotplug,unplug,list,query,modify,log} ...

Nvidia virtio-net-controller command line interface v1.0.9

positional arguments:
  {hotplug,unplug,list,query,modify,log}
                        ** Use -h for sub-command usage
    hotplug             hotplug virtnet device
    unplug              unplug virtnet device
    list                list all virtnet devices
    query               query all or individual virtnet device(s)
    modify              modify virtnet device
    log                 set log level

optional arguments:
  -h, --help            show this help message and exit
  -v, --version         show program's version number and exit
Note that each positional argument has its own help menu as well. For example:
            # virtnet log -h
usage: virtnet log [-h] -l {info,err,debug}
optional arguments:
  -h, --help            show this help message and exit
  -l {info,err,debug}, --level {info,err,debug}
                        log level: info/err/debug
To operate a particular device, either the VUID or device index can be used to locate the device. Both attributes can be fetched from command "virtnet list". For example, to modify the MAC of a specific VF, you may run either of the following commands:
# virtnet modify -p 0 –v 0 device -m 0C:C4:7A:FF:22:98
Or:
# virtnet modify -u <VUID-string> device -m 0C:C4:7A:FF:22:98
The following modify options require unbinding the virtio device from virtio-net driver in the guest OS:
MAC
MTU
Features
Msix_num
max_queue_size
For example:
On the guest OS:
$ echo "bdf of virtio-dev" > /sys/bus/pci/drivers/virtio-pci/unbind
On the Arm side:
$ virtnet modify ...
On the guest OS:
$ echo "bdf of virtio-dev" > /sys/bus/pci/drivers/virtio-pci/bind
Controller Recovery
It is possible to recover the control and data planes if communications are interrupted so the original traffic can resume.
Recovery depends on the JSON files stored in /opt/mellanox/mlnx_virtnet/recovery where there is a file that corresponds to each device (either PF or VF). The following is an example of the data stored in these files:
            {
  "port_ib_dev": "mlx5_0",
  "pf_id": 0,
  "function_type": "pf",
  "bdf_raw": 26624,
  "device_type": "hotplug",
  "mac": "0c:c4:7a:ff:22:93",
  "pf_num": 0,
  "sf_num": 2000,
  "mq": 1
}
These files should not be modified under normal circumstances. However, if necessary, advanced users may tune settings to meet their requirements. Users are responsible for the validity of the recovery files and should only perform this when the controller is not running.
Controller recovery is enabled by default and does not need user configuration or intervention unless a system reset is needed or BlueField configuration is changed (i.e., any of the mlxconfig options PCI_SWITCH_EMULATION_NUM_PORT, VIRTIO_NET_EMULATION_NUM_VF, or VIRTIO_NET_EMULATION_NUM_PF). To this end, the files under /opt/mellanox/mlnx_virtnet/recovery must be deleted.
The first time LAG is configured with a controller, recover files must be cleaned up to ensure the controller does not try to recover devices with the previous IB parent device.
Controller Live Update
Live update minimizes network interface down time by performing online upgrade of the virtio-net controller without necessitating a full restart.
To perform a live update, you must install a newer version of the controller either using the rpm or deb package (depending on the OS distro used). Run:
|
For Ubuntu/Debian |
|
|
For CentOS/RedHat |
|
It is recommended to use the following command to verify the versions of the controller currently running and the one just installed:
virtnet version
If the versions that are correct, issue the following command to start the live update process:
            virtnet update --start
virtnet update -s
If an error appears regarding the "update" command not being supported, this implies that the controller version you are trying to install is too old. Reinstalling the proper version will resolve this issue.
During the update process, the following command may be used to check the update status:
            virtnet update status
virtnet update -t
During the update, all existing virtnet commands (e.g., list, query, modify) are still supported. VF creation/deletion works as well.
When the update process completes successfully, the command virtnet update status will reflect the status accordingly.
If a device is actively migrating, the existing virtnet commands will appear as "migrating" for that specific device so that user can retry later.
This section covers managing virtio-net PCIe PF devices using virtio-net controller.

VirtIO-net PF Device Configuration
Run the following command on the DPU:
$ mlxconfig -d /dev/mst/mt41686_pciconf0 s INTERNAL_CPU_MODEL=1
Add the following kernel boot parameters to the Linux boot arguments:
pci=realloc
Cold reboot the host system.
Apply the following configuration on the DPU:
            $ mst start
$ mlxconfig -d /dev/mst/mt41686_pciconf0 s PF_BAR2_ENABLE=0 PER_PF_NUM_SF=1
$ mlxconfig -d /dev/mst/mt41686_pciconf0 s \
PCI_SWITCH_EMULATION_ENABLE=1 \
PCI_SWITCH_EMULATION_NUM_PORT=16 \
VIRTIO_NET_EMULATION_ENABLE=1 \
VIRTIO_NET_EMULATION_NUM_VF=0 \
VIRTIO_NET_EMULATION_NUM_PF=0 \
VIRTIO_NET_EMULATION_NUM_MSIX=10 \
SRIOV_EN=0 \
PF_SF_BAR_SIZE=10 \
PF_TOTAL_SF=64
$ mlxconfig -d /dev/mst/mt41686_pciconf0.1 s \
PF_SF_BAR_SIZE=10 \
PF_TOTAL_SF=64
Cold reboot the host system a second time.
Creating Modern Hotplug VirtIO-net PF Device
Virtio emulated network PCIe devices are created and destroyed using virtio-net-controller application console. When this application is terminated, all created virtio-net emulated devices are hot unplugged.
Create a hotplug virtio-net device. Run:
$ virtnet hotplug -i mlx5_0 -f 0x0 -m 0C:C4:7A:FF:22:93 -t 1500 -n 3 -s 1024
NoteThe maximum number of virtio-net queues is bound by the minimum of the following numbers:
VIRTIO_NET_EMULATION_NUM_MSIX from the command mlxconfig -d <mst_dev> q
max_virtq from the command virtnet list
This creates one hotplug virtio-net device with MAC address 0C:C4:7A:FF:22:93, MTU 1500, and 3 virtio queues with a depth of 1024 entries. This device is uniquely identified by its index. This index is used to query and update device attributes. If the device is created successfully, an output appears similar to the following:
            {
  "bdf": "85:00.0",
  "vuid": "VNETS1D0F0",
  "id": 3,
  "sf_rep_net_device": "en3f0pf0sf2000",
  "mac": "0C:C4:7A:FF:22:93"
}
Add the representor port of the device to the OVS bridge and bring it up. Run:
            $ ovs-vsctl add-port <bridge> en3f0pf0sf2000
$ ip link set dev en3f0pf0sf2000 up
Once steps 1-3 are completed, virtio-net device should be available in the host system.
To query all the device configurations of virtio-net device that you created, run:
$ virtnet query –p 0
To list all the virtio-net devices, run:
$ virtnet list
To modify device attributes, for example, changing its MAC address, run:
$ virtnet modify -p 0 device -m 0C:C4:7A:FF:22:98
Once usage is complete, to hot-unplug a virtio-net device, run:
$ virtnet unplug -p 0
Creating Transitional Hotplug VirtIO-net PF Device
A transitional device is a virtio device which supports drivers conforming to virtio specification 1.x and legacy drivers operating under virtio specification 0.95 (i.e., legacy mode) so that servers with old Linux kernels can still utilize virtio-based technology.
Run the following command on the DPU:
            $ mst start
$ mlxconfig -d /dev/mst/mt41686_pciconf0 s \
  VIRTIO_NET_EMULATION_PF_PCI_LAYOUT=1 \
  VIRTIO_EMULATION_HOTPLUG_TRANS=1
Add the following parameters to the Linux boot arguments on the guest OS (host OS or VM) side:
virtio_pci.force_legacy=1 intel_iommu=off
Refer to the known limitations below.
Cold reboot the host system.
If virtio_pci is a kernel module rather than built-in from the guest OS, run the following command after both the host and DPU OSes are up:
            modprobe –rv virtio_pci
modprobe –v virtio_pci force_legacy=1
To create a transitional hotplug virtio-net device. Run the following command on the DPU (with additional -l/--legacy):
$ virtnet hotplug -i mlx5_0 -f 0x0 -m 0C:C4:7A:FF:22:93 -t 1500 -n 3 -s 1024 -l
Proceed from step 2 of section "Creating Modern Hotplug VirtIO-net PF Device" for the rest of configuration.
Known limitations:
AMD CPU is not supported.
Only kernel versions 3.10 and above are supported. intel_iommu=off is not required for kernel 5.1 and above.
An x86-64 system has only 64K I/O port space which is shared by all peripherals. The virtio transitional device uses I/O BAR. The hotplug device is under one PCIe bridge which is at the emulated PCIe switch downstream port. According to the PCIe specification, the granularity for the bridge I/O window is 4K bytes. If the system cannot satisfy the I/O resource demands by the emulated PCIe switch (depending on the port number of the PCIe switch), the I/O BAR allocation will fail. One hot-plug device requires one emulated PCIe switch port. Each emulated PCIe switch port takes 4K bytes of I/O space if the transitional virtio device is supported. Use cat /proc/ioports to check how many I/O port resources are allocated for the host bridge which contains the NIC. The number of supported hotplug transitional virtio device equals: (allocated I/O port space – 4k) / 4k.
This section covers managing virtio-net PCIe SR-IOV VF devices using virtio-net-controller.

Virtio-net SR-IOV VF Device Configuration
Virtio-net SR-IOV VF is only supported with statically configured PF, hot-plugged PF is not currently supported.
On the DPU, make sure virtio-net-controller service is enabled so that it starts automatically. Run:
systemctl status virtio-net-controller.service
On the host, enable SR-IOV. Please refer to MLNX_OFED documentation under Features Overview and Configuration > Virtualization > Single Root IO Virtualization (SR-IOV) > Setting Up SR-IOV for instructions on how to do that. Make sure the parameters "intel_iommu=on iommu=pt pci=realloc" exist in grub.conf file.
It is recommended to add pci=assign-busses to the boot command line when creating more than 127 VFs. Without this option, the following errors might appear from host and the virtio driver will not probe these devices.
            pci 0000:84:00.0: [1af4:1041] type 7f class 0xffffff
pci 0000:84:00.0: unknown header type 7f, ignoring device
Run the following command on the DPU:
mst start && mlxconfig -d /dev/mst/mt41686_pciconf0 s INTERNAL_CPU_MODEL=1
Add the following kernel boot parameters to the Linux boot arguments:
intel_iommu=on iommu=pt pci=realloc
Cold reboot the host system.
Apply the following configuration on the DPU in three steps to support up to 125 VFs per PF (500 VFs in total).
-
$ mst start && mlxconfig -d /dev/mst/mt41686_pciconf0 s PF_BAR2_ENABLE=0 PER_PF_NUM_SF=1
-
            $ mlxconfig -d /dev/mst/mt41686_pciconf0 s \
PCI_SWITCH_EMULATION_ENABLE=0 \
PCI_SWITCH_EMULATION_NUM_PORT=0 \
VIRTIO_NET_EMULATION_ENABLE=1 \
VIRTIO_NET_EMULATION_NUM_VF=126 \
VIRTIO_NET_EMULATION_NUM_PF=4 \
VIRTIO_NET_EMULATION_NUM_MSIX=4 \
SRIOV_EN=1 \
PF_SF_BAR_SIZE=8 \
PF_TOTAL_SF=508 \
NUM_OF_VFS=0
-
$ mlxconfig -d /dev/mst/mt41686_pciconf0.1 s PF_TOTAL_SF=1 PF_SF_BAR_SIZE=8
-
Cold reboot the host system.
Creating Virtio-net SR-IOV VF Devices
On the host, make sure the static virtio network device presents. Run:
            # lspci | grep -i virtio
85:00.3 Network controller: Red Hat, Inc. Virtio network device
On the host, make sure virtio_pci and virtio_net are loaded. Run:
# lsmod | grep virtio
The net device should be created:
            # ethtool -i p7p3
driver: virtio_net
version: 1.0.0
firmware-version:
expansion-rom-version:
bus-info: 0000:85:00.3
supports-statistics: no
supports-test: no
supports-eeprom-access: no
supports-register-dump: no
supports-priv-flags: no
To create SR-IOV VF devices on the host, run:
# echo 2 > /sys/bus/pci/drivers/virtio-pci/0000\:85\:00.3/sriov_numvfs
NoteWhen the number of VFs created is high, SR-IOV enablement may take several minutes.
2 VFs should be created from the host:
            # lspci | grep -i virt
85:00.3 Network controller: Red Hat, Inc. Virtio network device
85:04.5 Network controller: Red Hat, Inc. Virtio network device
85:04.6 Network controller: Red Hat, Inc. Virtio network device
From the DPU virtio-net controller, run the following command to get VF information.
            # virtnet list
{
    "vf_id": 0,
    "parent_pf_id": 0,
    "function_type": "VF",
    "vuid": "VNETS0D0F2VF1",
    "bdf": "83:00.6",
    "sf_num": 3000,
    "sf_parent_device": "mlx5_0",
    "sf_rep_net_device": "en3f0pf0sf3000",
    "sf_rep_net_ifindex": 19,
    "sf_rdma_device": "mlx5_7",
    "sf_vhca_id": "0x192",
    "msix_config_vector": "0x0",
    "num_msix": 10,
    "max_queues": 4,
    "max_queues_size": 256,
    "net_mac": "5A:94:07:04:F6:1C",
    "net_mtu": 1500
},
You may use the pci-bdf to match the PF/VF on the host to the information showing on DPU.
To query all the device configurations of the virtio-net device of that VF, run:
$ virtnet query -p 0 -v 0
Add the corresponding SF representor to the OVS bridge and bring it up. Run:
            # ovs-vsctl add-port <bridge> en3f0pf0sf1004
# ip link set dev en3f0pf0sf1004 up
Now the VF is functional.
NoteWhen port MTU (p0/p1 of the DPU) is changed after the controller is started, you must restart controller service. It is not recommended to use jumbo MTUs because that may lead to performance degradation.
To destroy SR-IOV VF devices on the host, run:
# echo 0 > /sys/bus/pci/drivers/virtio-pci/0000\:85\:00.3/sriov_numvfs
NoteWhen the command returns from the host OS, it does not necessarily mean the controller finished its operations. Look at controller log from the DPU and make sure you see a log like below before removing virtio kernel modules or recreate VFs.
# virtio-net-controller[3544]: [INFO] virtnet.c:617:virtnet_device_vfs_unload: PF(0): Unload (4) VFs finished
Once VFs are destroyed, created SFs from the DPU side are not destroyed but are saved into the SF pool to be reused later.
Transitional VirtIO-net VF Device Support
Transitional virtio-net VF devices are not currently supported.
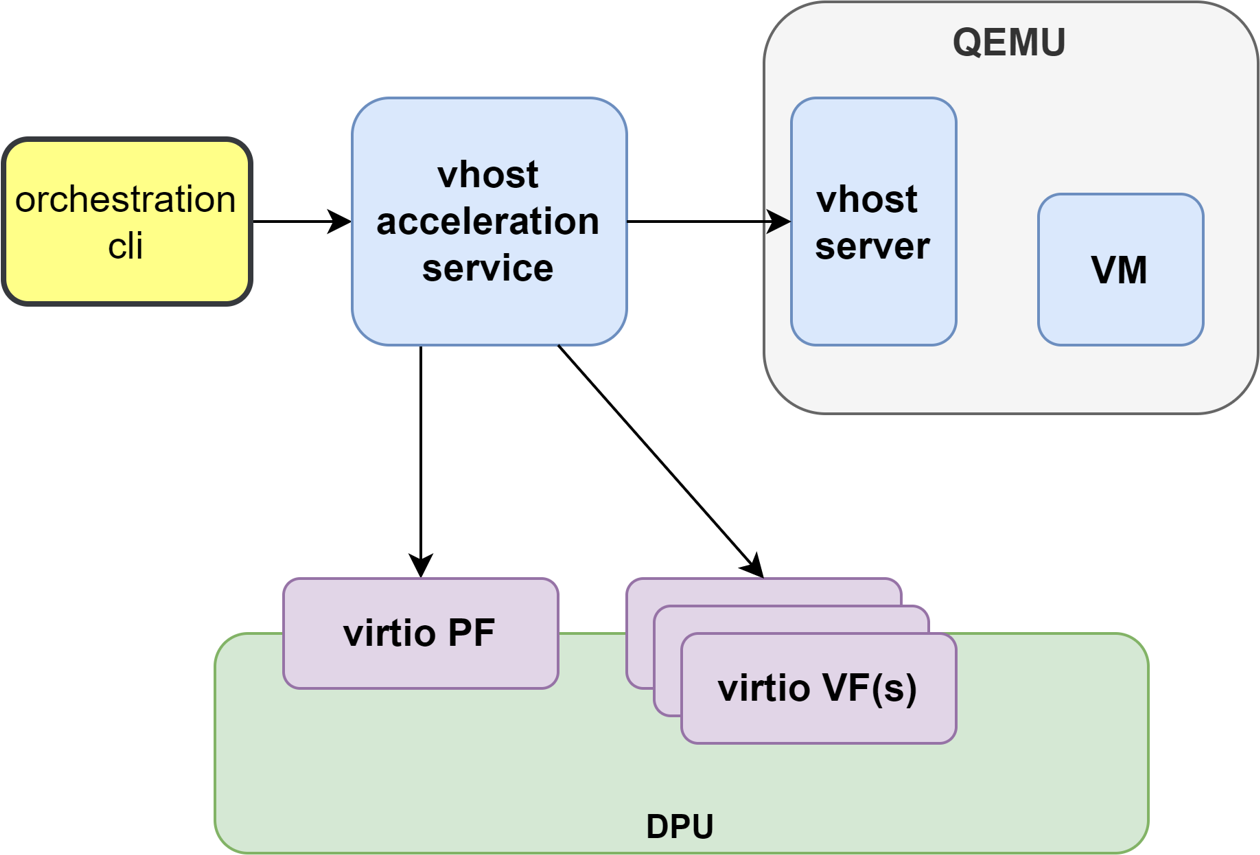
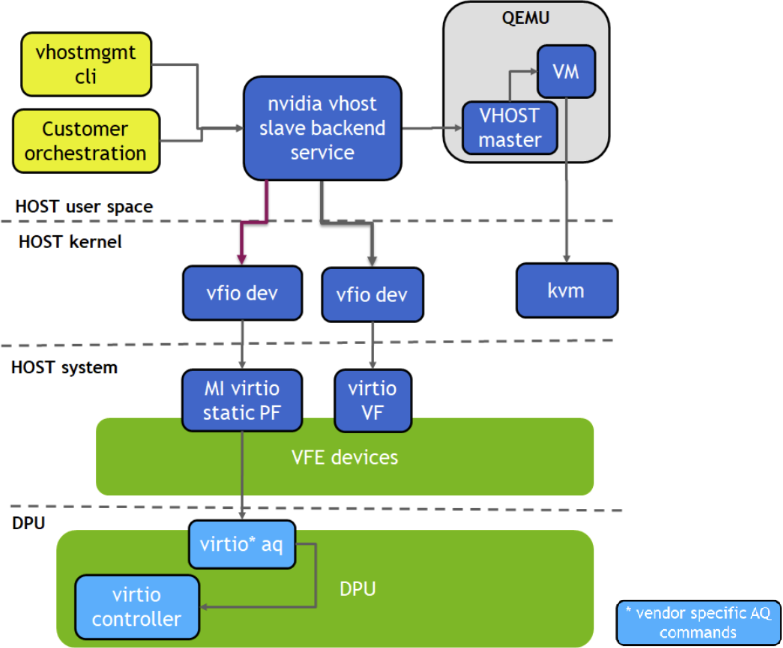
Virtio VF PCIe devices can be attached to the guest VM using vhost acceleration software stack. This enables performing live migration of guest VMs.

This section describes the steps to enable VM live migration using virtio VF PCIe devices along with vhost acceleration software.

Prerequisites
Minimum hypervisor kernel version – Linux kernel 5.7 (for VFIO SR-IOV support)
Install vHost Acceleration Software Stack
Vhost acceleration software stack is built using open-source BSD licensed DPDK.
To install vhost acceleration software:
Clone the software source code.
git clone https:
//github.com/Mellanox/dpdk-vhost-vfeInfoLatest release tag is vfe-1.0.
Build software:
            apt-get install libev-dev
yum install -y numactl-devel libev-devel
meson build -Dexamples=vdpa
ninja -C build
To install QEMU:
Upstream QEMU later then 8.1 can be used or the following QEMU.
Clone QEMU sources.
git clone https:
//github.com/Mellanox/qemu -b stable-8.1-presetupInfoLatest release tag is vfe-0.4.
Build QEMU.
            mkdir bin
cd bin
../configure --target-list=x86_64-softmmu --enable-kvm
make -j24
Configure vHost and DPU System
Set the DPU nvconfig.
            mlxconfig -d /dev/mst/mt41686_pciconf0 s \
VIRTIO_NET_EMULATION_ENABLE=1 VIRTIO_NET_EMULATION_NUM_PF=1 VIRTIO_NET_EMULATION_NUM_VF=16 \
VIRTIO_BLK_EMULATION_ENABLE=1 VIRTIO_BLK_EMULATION_NUM_PF=1 VIRTIO_BLK_EMULATION_NUM_VF=16 \
VIRTIO_NET_EMULATION_NUM_MSIX=64 VIRTIO_BLK_EMULATION_NUM_MSIX=64 NUM_VF_MSIX=64
Cold reboot the system after above configuration.
Setup the hypervisor system:
Configure hugepages and libvirt VM XML (see OVS Hardware Offloads Configuration for information on doing that).
Add a virtio-net interface and a virtio-blk interface in VM XML.
            <qemu:commandline>
<qemu:arg value='-chardev'/>
<qemu:arg value='socket,id=char0,path=/tmp/vfe-net0,server=on'/>
<qemu:arg value='-netdev'/>
<qemu:arg value='type=vhost-user,id=vdpa,chardev=char0,queues=4'/>
<qemu:arg value='-device'/>
<qemu:arg value='virtio-net-pci,netdev=vdpa,mac=00:00:00:00:33:00,page-per-vq=on,rx_queue_size=1024,tx_queue_size=1024,mq=on'/>
<qemu:arg value='-chardev'/>
<qemu:arg value='socket,id=char1,path=/tmp/vfe-blk0,server=on'/>
<qemu:arg value='-device'/>
<qemu:arg value='vhost-user-blk-pci,chardev=char1,page-per-vq=on,num-queues=4,disable-legacy=on,disable-modern=off'/>
</qemu:commandline>
Create block device on the DPU:
            spdk_rpc.py bdev_null_create Null0 1024 512
snap_rpc.py controller_virtio_blk_create --pf_id 0 --bdev_type spdk mlx5_0 --bdev Null0 --num_queues 1 --admin_q --force_in_order
On BlueField-3 SNAP:
            spdk_rpc.py bdev_null_create Null0 1024 512
snap_rpc.py virtio_blk_controller_create --pf_id 0 --bdev Null0 --num_queues 1 --admin_q --force_in_order
Run vHost Acceleration Service
Bind the virtio PF devices to vfio-pci driver:
            modprobe vfio vfio_pci
echo 1 > /sys/module/vfio_pci/parameters/enable_sriov

echo 0x1af4 0x1041 > /sys/bus/pci/drivers/vfio-pci/new_id
echo 0x1af4 0x1042 > /sys/bus/pci/drivers/vfio-pci/new_id

echo 0000:af:00.2 > /sys/bus/pci/drivers/vfio-pci/bind
echo 0000:af:00.3 > /sys/bus/pci/drivers/vfio-pci/bind

lspci -vvv -s 0000:af:00.3 | grep "Kernel driver"
Kernel driver in use: vfio-pci
lspci -vvv -s 0000:af:00.2 | grep "Kernel driver"
Kernel driver in use: vfio-pci
Enable SR-IOV and create a VF(s):
            echo 1 > /sys/bus/pci/devices/0000:af:00.2/sriov_numvfs
echo 1 > /sys/bus/pci/devices/0000:af:00.3/sriov_numvfs

lspci | grep Virtio
af:00.2 Ethernet controller: Red Hat, Inc. Virtio network device
af:00.3 Non-Volatile memory controller: Red Hat, Inc. Virtio block device
af:04.5 Ethernet controller: Red Hat, Inc. Virtio network device
af:05.1 Non-Volatile memory controller: Red Hat, Inc. Virtio block device
Add a VF representor to the OVS bridge on the DPU:
            virtnet query -p 0 -v 0 | grep sf_rep_net_device
"sf_rep_net_device": "en3f0pf0sf3000",

 ovs-vsctl add-port ovsbr1 en3f0pf0sf3000
Run the vhost acceleration software service:
            cd dpdk-vhost-vfe
sudo ./build/app/dpdk-vfe-vdpa -a 0000:00:00.0 --log-level=.,8 --vfio-vf-token=cdc786f0-59d4-41d9-b554-fed36ff5e89f -- --client
Provision the virtio-net PF and VF.
            cd dpdk-vhost-vfe

python ./app/vfe-vdpa/vhostmgmt mgmtpf -a 0000:af:00.2
# Wait on virtio-net-controller finishing handle PF FLR

# On DPU, change VF MAC address or other device options
virtnet modify -p 0 -v 0 device -m 00:00:00:00:33:00
python ./app/vfe-vdpa/vhostmgmt vf -a 0000:af:04.5 -v /tmp/vfe-net0
Provision the virtio-blk PF and VF.
            cd dpdk-vhost-vfe

python ./app/vfe-vdpa/vhostmgmt mgmtpf -a 0000:af:00.3
# Wait on SNAP controller to finish handling PF FLR

# On DPU, the user must create a VF device controller before adding the VF device to the
# vhostmgmt upon pf or vf device delete from vhostmgmt, or vhostmgmt restart:
#       For BlueField-3, the VF controller is automatically recreated
#       For BlueField-2, the VF controller must be manually recreated
# Use snap_rpc.py controller_list to check for controller exsistence and create controller if it's not there
snap_rpc.py controller_virtio_blk_create mlx5_0 --pf_id 0 --vf_id 0 --bdev_type spdk --bdev Null0 --force_in_order
python ./app/vfe-vdpa/vhostmgmt vf -a 0000:af:05.1 -v /tmp/vfe-blk0
NoteIf the SR-IOV is disabled and reenabled, the user must re-provision the VFs.
Start the VM
virsh start <domain-name>
Simple Live Migration
Prepare two identical hosts and perform the provisioning of the virtio device to DPDK on both.
Boot the VM on one server:
virsh migrate --verbose --live --persistent gen-l-vrt-440-162-CentOS-7.4 qemu+ssh://gen-l-vrt-439/system --unsafe
Remove Device
When finished with using the virtio device, use following commands to remove them from DPDK:
            python ./app/vfe-vdpa/vhostmgmt vf -r 0000:af:04.5
python ./app/vfe-vdpa/vhostmgmt mgmtpf -r 0000:af:00.2

python ./app/vfe-vdpa/vhostmgmt vf -r 0000:af:05.1
python ./app/vfe-vdpa/vhostmgmt mgmtpf -r 0000:af:00.3