HowTo Configure RoCE PVRDMA Namespace in VMware vSphere 7.0
Created on Jun 8, 2020
Introduction
This document describes how to enable RoCE PVRDMA Namespace in VMware vSphere 7.0 with NVIDIA ConnectX network cards.
This guide assumes the following software and drivers are installed:
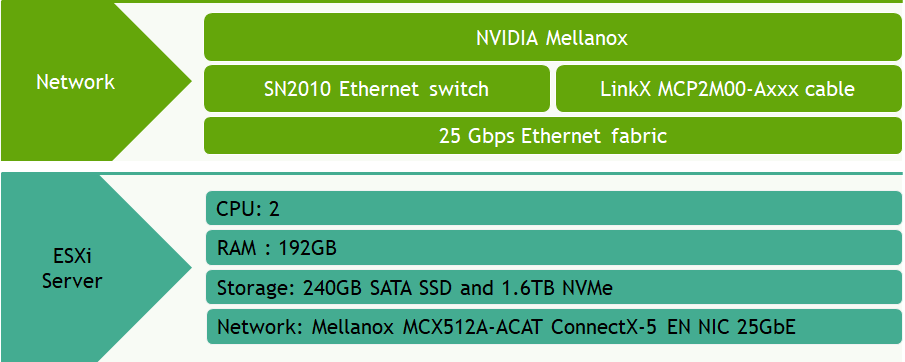
VMware ESXi 7.0.0, build 15843807
vCenter 7.0.0, build 15952599
Distributed Switch 7.0.0
ConnectX® Ethernet Driver for VMware® ESXi Server 4.17.13.1-1vmw.670.2.48.13006603
VM Guest OS: Redhat 8.3 or 7.5 with linux kernel 5.5 RDMA features
VM Hardware Version: 20
References
Solution Overview
Setup
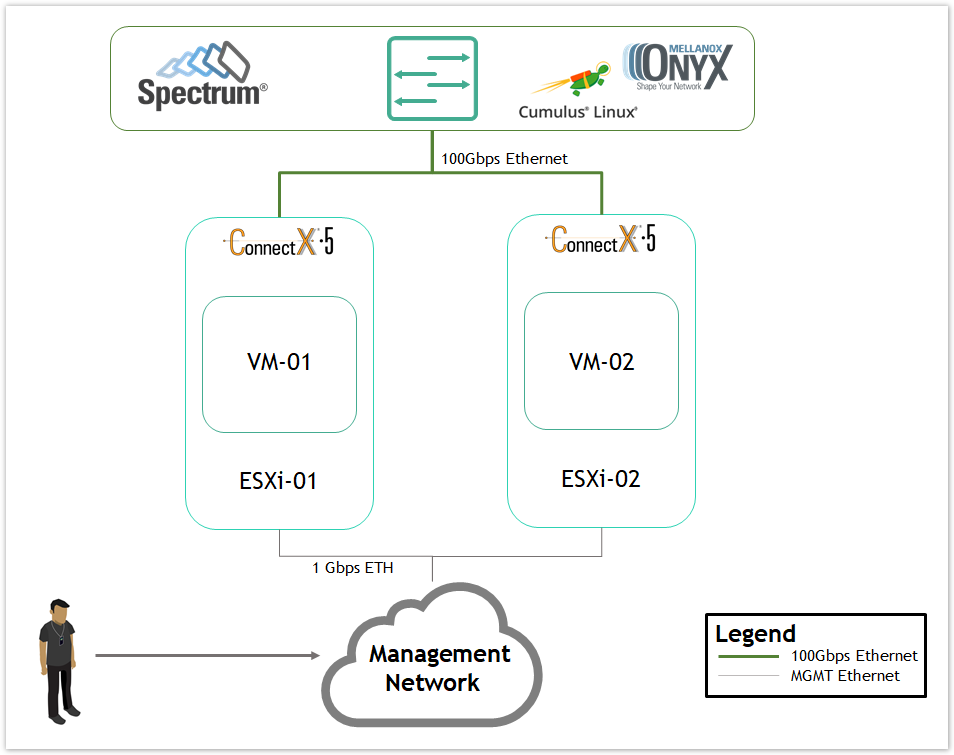
Solution Logical Design
Bill of Materials
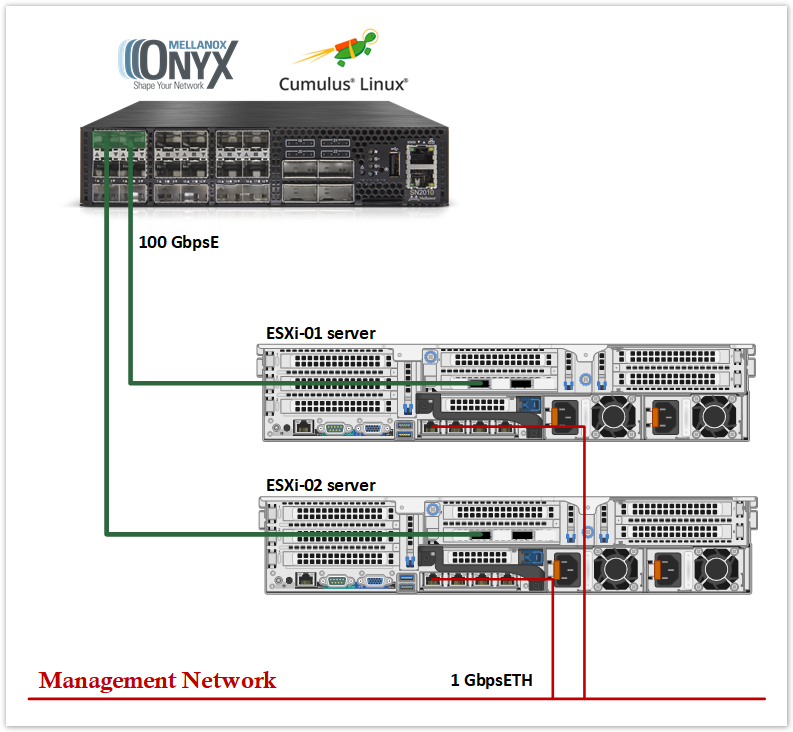
Solution Physical Network Wiring
Configuration
Network Configuration
This table provides details of the ESXi server names and their network configuration.
|
ESXi Server |
Server Name |
IP and NICs |
|
|
High-Speed Ethernet Network |
Management Network 192.168.1.0 |
||
|
ESXi-01 |
sl01w01esx11 |
none |
eno0: From DHCP (reserved) |
|
ESXi-02 |
sl01w01esx12 |
none |
eno0: From DHCP (reserved) |
This table provides details of the VM names and their network configuration.
|
VM |
Server Name |
IP and NICs |
|
|
High-Speed Ethernet Network |
Management Network 192.168.1.0 |
||
|
VM-01 |
pvrdma-ns-vm01 |
192.168.11.51 |
eno0: From DHCP (reserved) |
|
VM-02 |
pvrdma-ns-vm02 |
192.168.11.52 |
eno0: From DHCP (reserved) |
ESXi Host Configuration
Prerequisites
To set up an SR-IOV environment, the following is required:
SR-IOV must be enabled in the BIOS of the specific server. Each server has different BIOS configuration options for virtualization. As an example for BIOS configuration, please refer to HowTo Set Dell PowerEdge R730 BIOS parameters to support SR-IOV.
Install Mellanox Firmware Tools (MFT) on ESXi server. That procedure is described in How-to: Install NVIDIA Firmware Tools (MFT) on VMware ESXi 6.7/7.0..
Installer privileges: The installation requires administrator privileges on the target machine.
Checking Host Configurations
Enable SSH Access to ESXi server.
Log into ESXi vSphere Command-Line Interface with root permissions.
Verify that the host is equipped with a NVIDIA adapter card/s. Run:
ESXi Console
~ lspci | grep Mellanox
NoteNote: In this instance, NVIDIA card is using vmnic4,5,6 and 7.
Verify that the logical RDMA devices are currently registered on the system. Run:
ESXi Console
~ esxcli rdma device list
Or verify that they are registered in the vSphere Web Client:
Launch the vSphere Web Client and connect to a vCenter Server instance.
Right-click the ESXi server from the Inventory Lists area, then click Configure > Networking > RDMA adapters.

Deployment
Before starting with the deployment process, we need to create a vSphere Distributed Switch (vDS)
Creating a vDS
To create a new vDS:
Launch the vSphere Web Client and connect to a vCenter Server instance.
On the vSphere Web Client home screen, select the vCenter object from the list on the left.
Hover over the Distributed Switches from the Inventory Lists area, then click New Distributed Switch (see image below) to launch the New vDS creation wizard:
Provide a name for the new distributed switch and select the location within the vCenter inventory where you would like to store the new vDS (a data center object or a folder). Click NEXT.

Select the version of the vDS to create.

Specify the number of uplink ports as 2, check the Create a default port group box and give a name to that group.

Click Finish.

Adding Hosts to vDS
To add an ESXi host to an existing vDS:
Launch the vSphere Web Client, and connect to a vCenter Server instance.
Navigate to the list of distributed switches.
Right-click the new distributed switch in the list of objects and select Add and Manage Hosts from the Actions menu.

Select the Add hosts button and click Next.

Click the New hosts green plus icon to add an ESXi host. This opens the Select New Host dialog box.
From the list of new hosts, tick the boxes with the names of each ESXi host you want to add to the vDS.

Click OK when you are done, and then click NEXT to continue.

In the next Manage physical adapters screen Configure vmnic4 in each ESXi host as an Uplink 1 for vDS and click NEXT.


In the next Manage VMkernel adapters and Migrate VM networking screen click NEXT to continue.


Click FINISH.

Create and Attach the VMkernel Adapter
To create and attach the VMkernel adapter to vDS port group:
In the vSphere Web Client, navigate to the host.
In the Configure tab, expand the Networking subheading.
Go to VMkernel adapters section.
Click the Add Networking... button to create a new VMkernel adapter vmk1.

In the Select connection type screen, select VMkernel Network Adapter. Click NEXT.

In the next Select target device screen, click the Select an existing networking option, click BROWSE ... and select sl01w01vds01-NS-PG port group. Click OK.


NEXT to continue.

In the next Port Properties screen select vMotion, c lick NEXT.

Provide an IPv4 address and Subnet mask for the VMkernel adapter vmk1:

Click NEXT and FINISH.

Repeat the Create and attach the VMkernel adapter steps for the second ESXi host.
Configure an ESXi Host for PVRDMA Namespace
To use PVRDMA in vSphere 7.0, your environment must meet several configuration requirements.
To configure an ESXi host for PVRDMA, follow the below steps.
Tag a VMkernel Adapter for PVRDMA
To tag a VMkernel adapter, select it and enable it for PVRDMA Namespace communication by following these steps:
In the vSphere Web Client, navigate to the host.
On the Configure tab, expand the System subheading and click Advanced System Settings.
Locate Net.PVRDMAvmknic and click Edit.

Enter the value of the VMkernel adapter that you want to use (for this example we used vmk1) and click OK.
 Warning
Optional:
You can use ESXI CLI to Tag a vmknic created on DVS that the VRDMA will use for TCP channel by running the following command line:
ESXi Console
esxcli system settings advanced set -o /Net/PVRDMAVmknic -s vmk1
Enable Firewall Rule for PVRDMA
To enable the firewall rule for PVRDMA in the security profile of the ESXi host follow these steps:
In the vSphere Web Client, navigate to the host.
In the Configure tab, expand the System subheading.
Go to Firewall section and click Edit.

Scroll to the pvrdma rule and check the relevant box next to it:

Click OK to finish.
WarningOptional:
You can use ESXI CLI to enable the pvrdma firewall rule with the following command line:
ESXi Console
esxcli network firewall ruleset set -e true -r pvrdma
Enter Maintenance Mode the ESXi host.
Download and Install Mellanox Firmware Tools (MFT) by following the procedure described in How-to: Install NVIDIA Firmware Tools (MFT) on VMware ESXi 6.7/7.0..
WarningYou can use MFT tools version 4.14.2 for ESXi 7.0.
Update FW and Driver by following the procedures described in How-to: Firmware update for NVIDIA ConnectX-5/6 adapter on VMware ESXi 6.5 and above. and How-to: NVIDIA ConnectX driver upgrade on VMware ESXi 6.7/7.0 and above.
WarningYou can use FW version 16.27.2008 and Driver version 4.19.70.1 and above.
Print the current status of NVIDIA devices.
ESXi Console
/opt/mellanox/bin/mst status
Example output:

Set MKEY_BY_NAME flag with 1 using MFT on ConnectX adapter on both ESXi.
NoteNo need to set the MKEY_BY_NAME flag with 1 from Linux kernel 5.9+ as there was a kernel patch that added support for it.
ESXi Console
/opt/mellanox/bin/mlxconfig -d mt4119_pciconf0 set MKEY_BY_NAME=1
WarningSetting MKEY_BY_NAME=1 will cause PCI passthru of the NIC or any VFs to be unusable, as the Linux driver does not recognize the firmware option.
Open VF using module parameters. Firmware and BIOS must be configured for SR-IOV.
ESXi Console
esxcli system module parameters set -m nmlx5_core -p "max_vfs=2,2"
NoteFor more information about VFs enabling, SR-IOV please see following document: How-to: Configure NVIDIA ConnectX-5/6 adapter in SR-IOV mode on VMware ESXi 6.7/7.0 and above.
Reboot ESXi host.
Get the opened VFs by running the following command in the CLI:
ESXi Console
esxcli hardware pci pcipassthru list
Example:

Or, if using the vSphere Web Client:
Navigate to the host.
In the Configure tab, expand the Hardware subheading.
Go to PCI Devices section.

Move the opened VF from user space to kernel space by running the following commands in the CLI. We need to move a minimum of two VF (required by vMotion).
ESXi Console
            esxcli hardware pci pcipassthru set -d 0000:13:00.2 -e 0 -a
esxcli hardware pci pcipassthru set -d 0000:13:00.3 -e 0 -a
Or, if using the vSphere Web Client:
Navigate to the host.
In the Configure tab, expand the Hardware subheading.
Go to PCI Devices section.
In the top corner click on "CONFIGURE PASSTHROUGH", and uncheck VFs to move ownership to the VMkernel.

Exit from Maintenance Mode the ESXi host.
Assign PVRDMA Adapter to Virtual Machine
To enable a virtual machine to exchange data using RDMA, you must associate the VM with a PVRDMA network adapter. To do so:
Locate the VM in the vSphere Web Client.
Select a data center, folder, cluster, resource pool, or a host and click on the VMs tab.
Click Virtual Machines and double-click the VM from the list.
Power off the VM.
In the Summary tab of the VM, expand the VM Hardware subheading and click Edit Settings.
Click ADD NEW DEVICE in the Virtual Hardware tab, select Network Adapter from the list, and click OK.

Expand the New Network* section and connect the VM to a distributed port group. Click on Browse to select the port group.

Select PVRDMA as the Adapter Type.

Expand the Memory section, check the box next to Reserve all guest memory (All locked).

Click OK to close the dialog window.
Power on the virtual machine.
Configure Guest OS for PVRDMA
This step assumes a procedure to assign a PVRDMA Adapter to a Virtual Machine with Red Hat/CentOS 7.5 or later only.
In our lab, Red Hat installation includes an Infrastructure Server with following add-ons: Debugging Tools, Infiniband Support, Development Tools, and System Administration Tools.
To configure a guest OS for PVRDMA, you need to install a PVRDMA driver. The i nstallation process depends on the ESXi version, VM tools and guest OS version:
|
Guest OS: CentOS 7.5 and later VM hardware version 17 ESXi v7.0.0 |
|
|
Guest OS: Ubuntu 18.04 and later VM hardware version 17 ESXi v7.0.0 |
|
Verification
On ESXi Host
ESXi Console
            [root@sl01w01esx11:~] vsish
/> cd /vmkModules/vrdma/pvrdmaDevices/
/vmkModules/vrdma/pvrdmaDevices/> dir
2114737_0/
/vmkModules/vrdma/pvrdmaDevices/> cat /vmkModules/vrdma/pvrdmaDevices/2114737_0/properties
/> cat /vmkModules/vrdma/pvrdmaDevices/2114737_0/properties
PVRDMA Device Properties {
VMM leader ID of VM:2114737
adapter index:0
MAC address:00:50:56:a1:50:19
Physical HCA available:1
Namespace allocated:1
SRQ support enabled:1
MR Key extension enabled:1
Phys handles enabled:1
Prefer RoCE v1 over v2:0
RoCE version:2
Active MTU:1024
Namespace allocated:1 must be 1.
On VM
VM Console
            dmesg
...

[176904.512175] vmw_pvrdma 0000:13:00.1: device version 20, driver version 20
[176904.512239] vmw[root@localhost ~]# dmesg_pvrdma 0000:13:00.1: paired device to ens224f0
[176904.512333] vmw_pvrdma 0000:13:00.1: irq 70 for MSI/MSI-X
[176904.512358] vmw_pvrdma 0000:13:00.1: irq 71 for MSI/MSI-X
[176904.512383] vmw_pvrdma 0000:13:00.1: irq 72 for MSI/MSI-X
[176904.582977] vmw_pvrdma 0000:13:00.1: attached to device
The logs must contain this line:
vmw_pvrdma 0000:13:00.1: device version 20, driver version 20.
Deployment Verification
T o test the communication using PVRDMA, we will use a Perftest. This is a collection of tests written over uverbs intended for use as a performance micro-benchmark.
The tests may be used for hardware or software tuning as well as for functional testing.
To install and run the benchmark:
Install Perftest:
VM Console
            cd
wget https://github.com/linux-rdma/perftest/archive/master.zip
unzip master.zip
cd perftest-master/
./autogen.sh
./configure
make


modprobe ib_core
modprobe ib_uverbs
modprobe ib_cm
modprobe rdma_cm
modprobe rdma_ucm
WarningThe InfiniBand packages aren't part of linux kernel 5.4. In this case you need to install following packages before you install perftest:
rdma-core
libtool
libibverbs-dev
librdmacm-dev
libibumad-dev
libpci-dev
Check the network interface name:
VM Console
            ifconfig
...
ens224f0: flags=4163<UP,BROADCAST,RUNNING,MULTICAST> mtu 1500
Add Static IP configuration to the network interface. Modify /etc/sysconfig/network-scripts/ifcfg-ens224f0.
Add to file
            DEVICE=ens224f0
BOOTPROTO=none
ONBOOT=yes
PREFIX=24
IPADDR=192.168.11.51
Repeat steps 1-3 for the second VM.
On the first VM ("Server"), run the following:
VM01
            systemctl disable firewall
systemctl stop firewalld
systemctl disable firewalld
firewall-cmd --state
./ib_write_bw -x 0 -d vmw_pvrdma0 --report_gbits
On second VM ("Client"), run the following:
VM02
            ./ib_write_bw -x 0 -F 192.168.11.51 -d vmw_pvrdma0 --report_gbits
************************************

* Waiting for client to connect... *
************************************
-------------------------------------------------------------------------------- -------
RDMA_Write BW Test
Dual-port : OFF Device : vmw_pvrdma0
Number of qps : 1 Transport type : IB
Connection type : RC Using SRQ : OFF
CQ Moderation : 100
Mtu : 1024[B]
Link type : Ethernet
GID index : 0
Max inline data : 0[B]
rdma_cm QPs : OFF
Data ex. method : Ethernet
-------------------------------------------------------------------------------- -------
local address: LID 0000 QPN 0x0004 PSN 0xfb9486 RKey 0x000005 VAddr 0x007f68c62 a1000
GID: 254:128:00:00:00:00:00:00:02:80:86:255:254:170:101:146
remote address: LID 0000 QPN 0x0002 PSN 0xe72165 RKey 0x000003 VAddr 0x007f2ab4 361000
GID: 254:128:00:00:00:00:00:00:02:80:86:255:254:170:58:174
-------------------------------------------------------------------------------- -------
#bytes #iterations BW peak[Gb/sec] BW average[Gb/sec] MsgRate[Mpps]
65536  5000          90.56           90.39            0.172405
-------------------------------------------------------------------------------- -------
Done!
About Author

|
Boris Kovalev Boris Kovalev has worked for the past several years as a Solutions Architect, focusing on NVIDIA Networking/Mellanox technology, and is responsible for complex machine learning, Big Data and advanced VMware-based cloud research and design. Boris previously spent more than 20 years as a senior consultant and solutions architect at multiple companies, most recently at VMware. He has written multiple reference designs covering VMware, machine learning, Kubernetes, and container solutions which are available at the Mellanox Documents website. |