QSG for Build and Run Vector Packet Processing (VPP) Applications Over NVIDIA SmartNICs
Created on Jul 17, 2020
Scope
This Quick Start Guide (QSG) demonstrates how to build and install FD.io Vector Packet Processing (VPP) using NVIDIA ConnectX NIC, and how to evaluate VPP performance using TRex traffic generator achieving full line rate.
Abbreviations and Acronyms
|
Term |
Definition |
Term |
Definition |
|
VPP |
Vector Packet Processing |
DPDK |
Data Plane Development Kit |
|
NIC |
Network Interface |
DAC |
Direct Attach Copper |
|
PMD |
Poll Mode Driver |
TG |
Traffic generator |
|
DUT |
Device Under Test |
MPPS |
Millions packets per second |
References
NVIDIA DPDK Poll Mode Driver (PMD)
DPDK Data Plane Development Kit
VPP - How_To_Optimize_Performance_(System_Tuning)
Installing TRex in a few steps using Nvidia ConnectX adapters.
Introduction
VPP is an open source code project which delivers high performances for network packet processing. Its platform is built on a ‘packet processing graph’ modular approach which applies to packet vector and is integrated with DPDK Data Plane Development Kit plugin, achieving fast I/O.
NVIDIA ConnectX Smart Network Interfaces Card (SmartNIC) family together with NVIDIA DPDK Poll Mode Driver (PMD) constitute an ideal hardware and software stack for VPP to match high performances.
This document walks you through the steps on how to compile VPP code with Nvidia DPDK PMD, run VPP and measure performances for L3 IPv4 routing using TRex traffic generator.
Solution Architecture
Logical Design
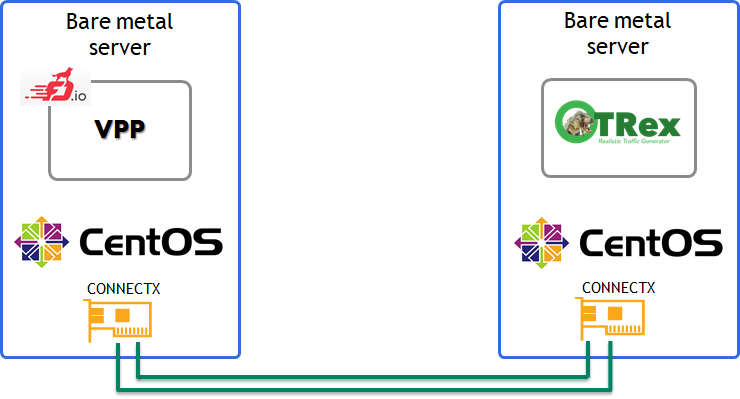
The simplest setup is used here: 2 bare metal servers connected back-to-back.
Single TRex server connected to single VPP server with 2 ethernet Direct Attach Copper (DAC) cables.
Software Stack Components
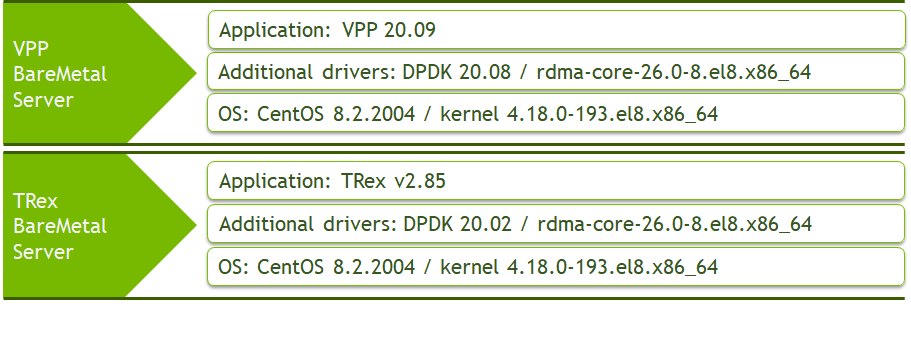
Bill of Materials
Deployment and Configuration
Wiring

IPv4 Routing Scheme
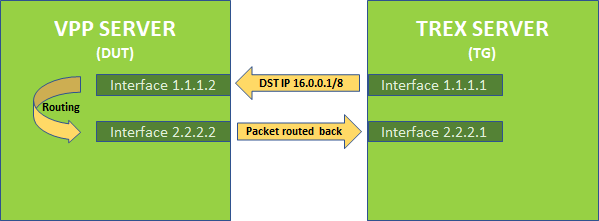
VPP server is set with the two interfaces 1.1.1.2/24 and 2.2.2.2/24
TRex server is set with the two interfaces 1.1.1.1/24 and 2.2.2.1/2
Route for subnet 16.0.0.0/8 is set for VPP server to route back IP 16.0.0.1 packet to TRex server
Host
BIOS Settings
For Trex and VPP servers.
Set the electricity power saving to performance mode.
Set the VT-D flag on.
Set the Turbo-boost on.
GRUB File Settings
For Trex and VPP servers - edit grub file with the following parameters.
intel_iommu=on iommu=pt default_hugepagesz=1G hugepagesz=1G hugepages=32 intel_idle.max_cstate=0 processor.max_cstate=0 intel_pstate=disable nohz_full=<core-list> rcu_nocbs=<core-list> rcu_nocb_poll isolcpus=<core-list>
For more information on each parameter, please visit How_To_Optimize_Performance_(System_Tuning).
Building and Configuring VPP with L3 Routes
Install the prerequisite packages.
yum install git make gcc nasm rdma-core-devel libmnl-devel epel-release dnf-plugins-core -y
yum config-manager --set-enabled powertools
Download the VPP source code.
            git clone https://github.com/FDio/vpp
git checkout origin/stable/2009
Install the VPP depended building packages.
            cd $HOME-PATH/vpp
make install-dep
Compile VPP with NVIDIA DPDK PMD.
            cd $HOME-PATH/vpp
make build-release DPDK_MLX5_PMD=y
cp $HOME-PATH//vpp/build-root/install-vpp-native/external/lib/librte_pmd_mlx5_glue.so* /usr/lib/
cp $HOME-PATH//vpp/build-root/install-vpp-native/external/lib/librte_pmd_mlx5_glue.so* /usr/lib64/
Configure the VPP configuration file $HOME-PATH/vpp/src/vpp/conf/startup.conf.
Set the main VPP application core: main-core 1
Set the number of data plane workers cores: corelist-workers 2-9
Set the number of RX queues: num-rx-queues 8
Set the number of TX queues: num-tx-queues 8
Set the first interface: dev 0000:61:00.0.
To find interface pci slot number, use this command:lspci | grep "Mellanox" | cut -d " " -f 1
Set the second interface: dev 0000:61:00.0.
To find interface pci slot number use this command:lspci | grep "Mellanox" | cut -d " " -f 1
"Uncomment" parameter 'no-multi-seg' to improve performances.
NoteIt is recommended to set an equal number of queues and cores.
See example file:
startup.conf
            unix {
  nodaemon
  log /var/log/vpp/vpp.log
  full-coredump
  cli-listen /run/vpp/cli.sock
  gid vpp
}

api-trace {
## This stanza controls binary API tracing. Unless there is a very strong reason,
## please leave this feature enabled.
  on
## Additional parameters:
##
## To set the number of binary API trace records in the circular buffer, configure nitems
##
## nitems ##
## To save the api message table decode tables, configure a filename. Results in /tmp/## Very handy for understanding api message changes between versions, identifying missing
## plugins, and so forth.
##
## save-api-table }

api-segment {
  gid vpp
}

socksvr {
  default
}

cpu {
	## In the VPP there is one main thread and optionally the user can create worker(s)
	## The main thread and worker thread(s) can be pinned to CPU core(s) manually or automatically

	## Manual pinning of thread(s) to CPU core(s)

	## Set logical CPU core where main thread runs, if main core is not set
	## VPP will use core 1 if available
	main-core 1

	## Set logical CPU core(s) where worker threads are running
	corelist-workers 2-9

	## Automatic pinning of thread(s) to CPU core(s)

	## Sets number of CPU core(s) to be skipped (1 ... N-1)
	## Skipped CPU core(s) are not used for pinning main thread and working thread(s).
	## The main thread is automatically pinned to the first available CPU core and worker(s)
	## are pinned to next free CPU core(s) after core assigned to main thread
	# skip-cores 4

	## Specify a number of workers to be created
	## Workers are pinned to N consecutive CPU cores while skipping "skip-cores" CPU core(s)
	## and main thread's CPU core
	# workers 2

	## Set scheduling policy and priority of main and worker threads

	## Scheduling policy options are: other (SCHED_OTHER), batch (SCHED_BATCH)
	## idle (SCHED_IDLE), fifo (SCHED_FIFO), rr (SCHED_RR)
	# scheduler-policy fifo

	## Scheduling priority is used only for "real-time policies (fifo and rr),
	## and has to be in the range of priorities supported for a particular policy
	# scheduler-priority 50
}

# buffers {
	## Increase number of buffers allocated, needed only in scenarios with
	## large number of interfaces and worker threads. Value is per numa node.
	## Default is 16384 (8192 if running unpriviledged)
	# buffers-per-numa 128000

	## Size of buffer data area
	## Default is 2048
	# default data-size 2048
# }

dpdk {
	## Change default settings for all interfaces
	dev default {
		## Number of receive queues, enables RSS
		## Default is 1
		num-rx-queues 8

		## Number of transmit queues, Default is equal
		## to number of worker threads or 1 if no workers treads
		num-tx-queues 8

		## Number of descriptors in transmit and receive rings
		## increasing or reducing number can impact performance
		## Default is 1024 for both rx and tx
		# num-rx-desc 512
		# num-tx-desc 512

		## VLAN strip offload mode for interface
		## Default is off
		# vlan-strip-offload on

		## TCP Segment Offload
		## Default is off
		## To enable TSO, 'enable-tcp-udp-checksum' must be set
		# tso on

		## Devargs
                ## device specific init args
                ## Default is NULL
		# devargs safe-mode-support=1,pipeline-mode-support=1

		## rss-queues
		## set valid rss steering queues
		# rss-queues 0,2,5-7
	}

	## Whitelist specific interface by specifying PCI address
	dev 0000:61:00.0
	dev 0000:61:00.1
	## Blacklist specific device type by specifying PCI vendor:device
        ## Whitelist entries take precedence
	# blacklist 8086:10fb

	## Set interface name
	# dev 0000:02:00.1 {
	#	name eth0
	# }

	## Whitelist specific interface by specifying PCI address and in
	## addition specify custom parameters for this interface
	# dev 0000:02:00.1 {
	#	num-rx-queues 2
	# }

	## Change UIO driver used by VPP, Options are: igb_uio, vfio-pci,
	## uio_pci_generic or auto (default)
	# uio-driver vfio-pci

	## Disable multi-segment buffers, improves performance but
	## disables Jumbo MTU support
	no-multi-seg

	## Change hugepages allocation per-socket, needed only if there is need for
	## larger number of mbufs. Default is 256M on each detected CPU socket
	# socket-mem 2048,2048

	## Disables UDP / TCP TX checksum offload. Typically needed for use
	## faster vector PMDs (together with no-multi-seg)
	# no-tx-checksum-offload

	## Enable UDP / TCP TX checksum offload
	## This is the reversed option of 'no-tx-checksum-offload'
	# enable-tcp-udp-checksum
}

## node variant defaults
#node {

## specify the preferred default variant
#	default	{ variant avx512 }

## specify the preferred variant, for a given node
#	ip4-rewrite { variant avx2 }

#}


# plugins {
	## Adjusting the plugin path depending on where the VPP plugins are
	#path /root/vpp/build-root/install-vpp-native/vpp/lib/vpp_plugins

	## Disable all plugins by default and then selectively enable specific plugins
	#plugin default { disable }
	#plugin dpdk_plugin.so { enable }
	# plugin acl_plugin.so { enable }

	## Enable all plugins by default and then selectively disable specific plugins
	# plugin dpdk_plugin.so { disable }
	# plugin acl_plugin.so { disable }
# }

## Statistics Segment
# statseg {
    # socket-name , name of the stats segment socket
    #     defaults to /run/vpp/stats.sock
    # size [KMG], size of the stats segment, defaults to 32mb
    # per-node-counters on | off, defaults to none
    # update-interval , sets the segment scrape / update interval
# }
Add VPP group:
groupadd vpp
Run VPP binary:
$HOME-PATH/vpp/build-root/build-vpp-native/vpp/bin/./vpp -c $HOME-PATH/vpp/src/vpp/conf/startup.conf
Configure VPP with L3 interfaces and routes - make sure to configure L3 IPv4 interfaces with the correct IPs.
This document sets the first interface to be 1.1.1.2/24 and second interface to 2.2.2.2/24.## Start VPP CLI ## $HOME-PATH/vpp/build-root/build-vpp-native/vpp/bin/./vppctl ## Set 2 L3 interfaces with IP and subnet ## vppctl set int ip address HundredGigabitEthernet61/0/0 1.1.1.2/24 vppctl set interface state HundredGigabitEthernet61/0/0 up vppctl set int ip address HundredGigabitEthernet61/0/1 2.2.2.2/24 vppctl set interface state HundredGigabitEthernet61/0/1 up ## Set static route ## vppctl ip route add 16.0.0.0/8 via 1.1.1.1 HundredGigabitEthernet61/0/0
Installing TRex Server with L3 Interfaces
For building the TRex server, please follow the steps in the following guide: Installing TRex in a few steps using Nvidia ConnectX adapters.
Make sure to configure L3 IPv4 interfaces with the correct IPs.
This document sets the first interface to be 1.1.1.1/24 and the second interface to 2.2.2.1/24.
Installation process example:
            ./dpdk_setup_ports.py -i
By default, IP based configuration file will be created. Do you want to use MAC based config? (y/N)n
+----+------+---------+-------------------+-----------------------------------------+-----------+----------+----------+
| ID | NUMA |   PCI   |        MAC        |                  Name                   |  Driver   | Linux IF |  Active  |
+====+======+=========+===================+=========================================+===========+==========+==========+
| 0  | 0    | 02:00.0 | 38:63:bb:33:16:28 | NetXtreme BCM5719 Gigabit Ethernet PCIe | tg3       | eno1     | *Active* |
+----+------+---------+-------------------+-----------------------------------------+-----------+----------+----------+
| 1  | 0    | 02:00.1 | 38:63:bb:33:16:29 | NetXtreme BCM5719 Gigabit Ethernet PCIe | tg3       | eno2     |          |
+----+------+---------+-------------------+-----------------------------------------+-----------+----------+----------+
| 2  | 0    | 02:00.2 | 38:63:bb:33:16:2a | NetXtreme BCM5719 Gigabit Ethernet PCIe | tg3       | eno3     |          |
+----+------+---------+-------------------+-----------------------------------------+-----------+----------+----------+
| 3  | 0    | 02:00.3 | 38:63:bb:33:16:2b | NetXtreme BCM5719 Gigabit Ethernet PCIe | tg3       | eno4     |          |
+----+------+---------+-------------------+-----------------------------------------+-----------+----------+----------+
| 4  | 0    | 08:00.0 | ec:0d:9a:8a:28:3a | MT28800 Family [ConnectX-5 Ex]          | mlx5_core | ens1f0   |          |
+----+------+---------+-------------------+-----------------------------------------+-----------+----------+----------+
| 5  | 0    | 08:00.1 | ec:0d:9a:8a:28:3b | MT28800 Family [ConnectX-5 Ex]          | mlx5_core | ens1f1   |          |
+----+------+---------+-------------------+-----------------------------------------+-----------+----------+----------+
Please choose even number of interfaces from the list above, either by ID , PCI or Linux IF
Stateful will use order of interfaces: Client1 Server1 Client2 Server2 etc. for flows.
Stateless can be in any order.
Enter list of interfaces separated by space (for example: 1 3) : 4 5

For interface 4, assuming loopback to it's dual interface 5.
Putting IP 1.1.1.1, default gw 2.2.2.2 Change it?(y/N).y
Please enter IP address for interface 4: 1.1.1.1
Please enter default gateway for interface 4: 1.1.1.2
For interface 5, assuming loopback to it's dual interface 4.
Putting IP 2.2.2.2, default gw 1.1.1.1 Change it?(y/N).y
Please enter IP address for interface 5: 2.2.2.1
Please enter default gateway for interface 5: 2.2.2.2
Print preview of generated config? (Y/n)y
### Config file generated by dpdk_setup_ports.py ###

- version: 2
  interfaces: ['08:00.0', '08:00.1']
  port_info:
      - ip: 1.1.1.1
        default_gw: 1.1.1.2
      - ip: 2.2.2.1
        default_gw: 2.2.2.2

  platform:
      master_thread_id: 0
      latency_thread_id: 6
      dual_if:
        - socket: 0
          threads: [1,2,3,4,5,12,13,14,15,16,17]


Save the config to file? (Y/n)y
Default filename is /etc/trex_cfg.yaml
Press ENTER to confirm or enter new file:
File /etc/trex_cfg.yaml already exist, overwrite? (y/N)y
Saved to /etc/trex_cfg.yaml.
Verification
Configure TRex to generate L3 UDP packets:
Copy this file to TRex home directory udp_1pkt_simple.py
Get into TRex console and generate the packets.
            $TREX-HOME-PATH/./trex-console
trex>start -f udp_1pkt_simple.py -m 1mpps -p 0
where:
|
Parameter |
Description |
|
-f |
Loads the desired script that constructs the packet format |
|
-m |
Specifies the packet rate |
|
-p |
Specifies which TRex port to use |
3. Check that the packets are routed back to TRex:
In "tui" terminal, validate that port 0 is sending packets and port 1 is receiving packets.
trex>tui
Appendix
Performance Testing
This graph shows the maximum number of packets per second and bandwidth using CPU Model Platinum 8168 CPU @ 2.70GHz.

NVIDIA Gen3 ConnectX 100G NIC can provide 148Mpps, achieving full line rate when using packet size of 64Byte.
Stronger CPU will gain better performances.
Viewing extended DPDK performance report is available on the DPDK official site: perf-reports
Authors

|
Amir Zeidner For the past several years, Amir has worked as a Solutions Architect primarily in the Telco space, leading advanced solutions to answer 5G, NFV, and SDN networking infrastructures requirements. Amir’s expertise in data plane acceleration technologies, such as Accelerated Switching and Network Processing (ASAP²) and DPDK, together with a deep knowledge of open source cloud-based infrastructures, allows him to promote and deliver unique end-to-end NVIDIA Networking solutions throughout the Telco world. |