QSG for Configuring TRex in a few steps using Nvidia ConnectX adapters
Scope
Using TRex with Nvidia ConnectX network adapters is generally straightforward, especially for users familiar with Linux and networking tools.
This document provides a Quick Start Guide (QSG) that outlines the process in a few clear steps, making it accessible even for those without deep expertise in DPDK or advanced networking.
Introduction
TRex is an open-source, high-performance traffic generator developed by Cisco. It is designed to generate realistic network traffic for testing and benchmarking network devices and services.
It supports L3-L7 both stateful and stateless traffic generation, making it suitable for a wide range of testing scenarios, from simple throughput tests to complex application-level simulations.
The software is optimized for high performance by using DPDK, which allows direct access to network hardware, bypassing the typical Linux networking stack for greater speed and efficiency.
With Nvidia ConnectX adapters TRex achieves high bandwidth by leveraging several key hardware and software features:
- DPDK Integration: TRex is built on DPDK (Data Plane Development Kit), which allows it to bypass the Linux kernel and interact directly with the network adapter hardware. Nvidia ConnectX adapters are highly optimized for DPDK, enabling TRex to efficiently transmit and receive packets at very high rates.
- Line-Rate Performance: A ConnectX Ethernet card can easily generate up to 100Gbps of bandwidth, and newer models (like ConnectX-7 and ConnectX-8) support even higher data rates, up to 400Gbps and 800Gbs respectively. This makes them ideal for demanding network testing scenarios.
- Low Latency and High Efficiency: The architecture of ConnectX adapters is designed for low-latency, high-throughput networking, which is critical for realistic traffic generation and accurate device benchmarking.
References
- Nvidia NICs - Nvidia ethernet adapters
- Nvidia LinkX cables - Nvidia interconnect
- Nvidia DPDK - Nvidia DPDK
- TRex documentation - TRex Documentation
Solution Architecture
Key Components and Technologies
NVIDIA ConnectX SmartNICs
10/25/40/50/100/200 and 400G Ethernet Network Adapters
The industry-leading NVIDIA® ConnectX® family of smart network interface cards (SmartNICs) offer advanced hardware offloads and accelerations.
NVIDIA Ethernet adapters enable the highest ROI and lowest Total Cost of Ownership for hyperscale, public and private clouds, storage, machine learning, AI, big data, and telco platforms.
NVIDIA LinkX Cables
The NVIDIA® LinkX® product family of cables and transceivers provides the industry’s most complete line of 10, 25, 40, 50, 100, 200, and 400GbE in Ethernet and 100, 200 and 400Gb/s InfiniBand products for Cloud, HPC, hyperscale, Enterprise, telco, storage and artificial intelligence, data center applications.
NVIDIA PMDs
NVIDIA Poll Mode Driver (PMD) is an open-source upstream driver, embedded within dpdk.org releases, designed for fast packet processing and low latency by providing kernel bypass for receive and send and by avoiding the interrupt processing performance overhead.
Software Stack Components
Logical Design
Back to back server installation connecting device under test server running testpmd and Trex traffic generator server.
This document demonstrate unidirectional traffic going out through first Trex port and looped back by Testpmd application to the second Trex port.

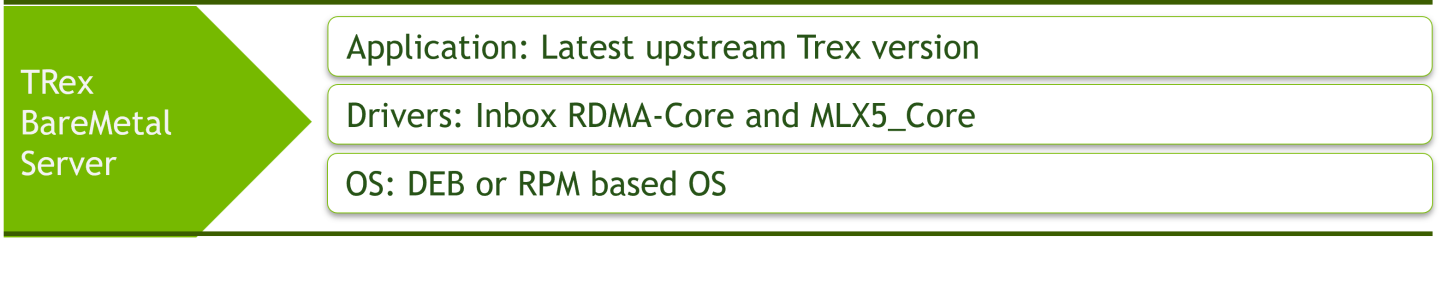
Deployment and Configuration
Perquisite development tools
For DEB based OS distribution.
sudo apt-get install build-essential automake autoconf subversion libssl-dev libtool
For RPM based OS distribution.
sudo yum groupinstall 'Development Tools'
Install RDMA-CORE
For DEB based OS distribution.
sudo apt install libibverbs-dev ibverbs-utils librdmacm-dev
For RPM based OS distribution.
sudo yum install rdma-core-devel
Install and compile Trex
            sudo git clone https://github.com/cisco-system-traffic-generator/trex-core.git
sudo cd trex-core/linux_dpdk
sudo ./b configure --no-ofed-check
sudo ./b build
Setup Trex ports and device under test peer ports
In this example Nvidia ConnectX6-DX ports with IDs of 4 and 5 are selected.
Each Trex ConnectX6-DX port is configured with destination MAC address of Testpmd peer port it is connected to.
            sudo cd trex-core/scripts/
sudo ./dpdk_setup_ports.py -i
By default, IP based configuration file will be created. Do you want to use MAC based config? (y/N)y
+----+------+---------+-------------------+--------------------------------------------------------------+-----------+-----------+----------+
| ID | NUMA |   PCI   |        MAC        |                             Name                             |  Driver   | Linux IF  |  Active  |
+====+======+=========+===================+==============================================================+===========+===========+==========+
| 0  | 0    | 02:00.0 | b8:83:03:45:ee:78 | NetXtreme BCM5719 Gigabit Ethernet PCIe                      | tg3       | eno1      | *Active* |
+----+------+---------+-------------------+--------------------------------------------------------------+-----------+-----------+----------+
| 1  | 0    | 02:00.1 | b8:83:03:45:ee:79 | NetXtreme BCM5719 Gigabit Ethernet PCIe                      | tg3       | eno2      |          |
+----+------+---------+-------------------+--------------------------------------------------------------+-----------+-----------+----------+
| 2  | 0    | 02:00.2 | b8:83:03:45:ee:7a | NetXtreme BCM5719 Gigabit Ethernet PCIe                      | tg3       | eno3      |          |
+----+------+---------+-------------------+--------------------------------------------------------------+-----------+-----------+----------+
| 3  | 0    | 02:00.3 | b8:83:03:45:ee:7b | NetXtreme BCM5719 Gigabit Ethernet PCIe                      | tg3       | eno4      |          |
+----+------+---------+-------------------+--------------------------------------------------------------+-----------+-----------+----------+
| 4  | 0    | 61:00.0 | b8:ce:f6:09:f9:f0 | MT43244 BlueField-3 integrated ConnectX-7 network controller | mlx5_core | ens2f0np0 |          |
+----+------+---------+-------------------+--------------------------------------------------------------+-----------+-----------+----------+
| 5  | 0    | 61:00.1 | b8:ce:f6:09:f9:f1 | MT43244 BlueField-3 integrated ConnectX-7 network controller | mlx5_core | ens2f1np1 |          |
+----+------+---------+-------------------+--------------------------------------------------------------+-----------+-----------+----------+
Please choose an even number of interfaces from the list above, either by ID, PCI or Linux IF
Stateful will use order of interfaces: Client1 Server1 Client2 Server2 etc. for flows.
Stateless can be in any order.
Enter list of interfaces separated by space (for example: 1 3) : 4 5

For interface 4, assuming loopback to its dual interface 5.
Destination MAC is b8:ce:f6:09:f9:f1. Change it to MAC of DUT? (y/N).y
Please enter a new destination MAC of interface 4: 04:3f:72:fc:51:7e
For interface 5, assuming loopback to its dual interface 4.
Destination MAC is b8:ce:f6:09:f9:f0. Change it to MAC of DUT? (y/N).y
Please enter a new destination MAC of interface 5: 04:3f:72:fc:51:7f
Print preview of generated config? (Y/n)y
### Config file generated by dpdk_setup_ports.py ###

- version: 2
  interfaces: ['61:00.0', '61:00.1']
  port_info:
      - dest_mac: 04:3f:72:fc:51:7e
        src_mac:  b8:ce:f6:09:f9:f0
      - dest_mac: 04:3f:72:fc:51:7f
        src_mac:  b8:ce:f6:09:f9:f1

  platform:
      master_thread_id: 0
      latency_thread_id: 47
      dual_if:
        - socket: 0
          threads: [1,2,3,4,5,6,7,8,9,10,11,12,13,14,15,16,17,18,19,20,21,22,23,24,25,26,27,28,29,30,31,32,33,34,35,36,37,38,39,40,41,42,43,44,45,46]


Save the config to file? (Y/n)y
Default filename is /etc/trex_cfg.yaml
Press ENTER to confirm or enter new file:
File /etc/trex_cfg.yaml already exist, overwrite? (y/N)y
Saved to /etc/trex_cfg.yaml.
Run TRex server.
Count the number of threads automatically listed in previous step (this example counts 46 threads).
Enter the number of threads to the following command (-c <number_of_threads>).
nohup ./t-rex-64 --no-ofed-check -i -c 46 &
Testing example
Run Testpmd
This testpmd command line example uses 16 cores and queues with corresponding core bit mask.
--eth-peer=0,<mac_address> set the first testpmd port with destination MAC address of Trex peer port it is connected to.
--eth-peer=1, set the second testpmd port with destination MAC address of Trex peer port it is connected to.
./dpdk-testpmd -c 0x1FFFF000000 -m 4096 -a 0000:b1:00.0,mprq_en=1 -a 0000:b1:00.1,mprq_en=1 -- --burst=64 --txd=1024 --rxd=1024 --mbcache=512 --rxq=16 --txq=16 --nb-cores=16 --rss-udp --forward-mode=io --eth-peer=0,b8:ce:f6:09:f9:f0 --eth-peer=1,b8:ce:f6:09:f9:f1 -a -i
Start Trex test
Upload Trex script
Upload file benchmark_udp_1pkt_simple.py to trex-core/scripts/stl/ directory.
This script is capable of sending various packet lengths with range of source UDP ports.
benchmark_udp_1pkt_simple.py
            from trex_stl_lib.api import *
import argparse

class STLS1(object):

    def create_stream (self, packet_len, stream_count):
        base_pkt = Ether()/IP(src="16.0.0.1",dst="48.0.0.1")/UDP(sport=4337)
        base_pkt_len = len(base_pkt)
        base_pkt /= 'x' * max(0, packet_len - base_pkt_len)
        packets = []
        vm = STLScVmRaw( [
                                STLVmFlowVar(name="v_port",
                                                min_value=4337,
                                                  max_value=5337,
                                                  size=2, op="inc"),
                                STLVmWrFlowVar(fv_name="v_port",
                                            pkt_offset= "UDP.sport" ),
                                STLVmFixChecksumHw(l3_offset="IP",l4_offset="UDP",l4_type=CTRexVmInsFixHwCs.L4_TYPE_UDP),

                            ]
                        )
        for i in range(stream_count):
            packets.append(STLStream(
                packet = STLPktBuilder(pkt = base_pkt, vm = vm),
                mode = STLTXCont()
                ))
        return packets

    def get_streams (self, tunables, **kwargs):
        parser = argparse.ArgumentParser(description='Argparser for {}'.format(os.path.basename(__file__)),
                                         formatter_class=argparse.ArgumentDefaultsHelpFormatter)
        parser.add_argument('--packet_len',
                            type=int,
                            default=64,
                            help="The packets length in the stream")
        parser.add_argument('--stream_count',
                            type=int,
                            default=1,
                            help="The number of streams")
        args = parser.parse_args(tunables)
        # create 1 stream
        return self.create_stream(args.packet_len - 4, args.stream_count)

# dynamic load - used for trex console or simulator
def register():
    return STLS1()
Start Trex console
From trex-core/scripts/ directory.
            sudo ./trex-console

Using 'python3' as Python interpreter
Connecting to RPC server on localhost:4501                   [SUCCESS]
Connecting to publisher server on localhost:4500             [SUCCESS]
Acquiring ports [0, 1]:                                      [SUCCESS]

Server Info:
Server version:   v3.06 @ STL
Server mode:      Stateless
Server CPU:       46 x Intel(R) Xeon(R) Platinum 8168 CPU @ 2.70GHz
Ports count:      2 x 200Gbps @ MT43244 BlueField-3 integrated ConnectX-7 network controller

-=TRex Console v3.0=-

Type 'help' or '?' for supported actions

trex>
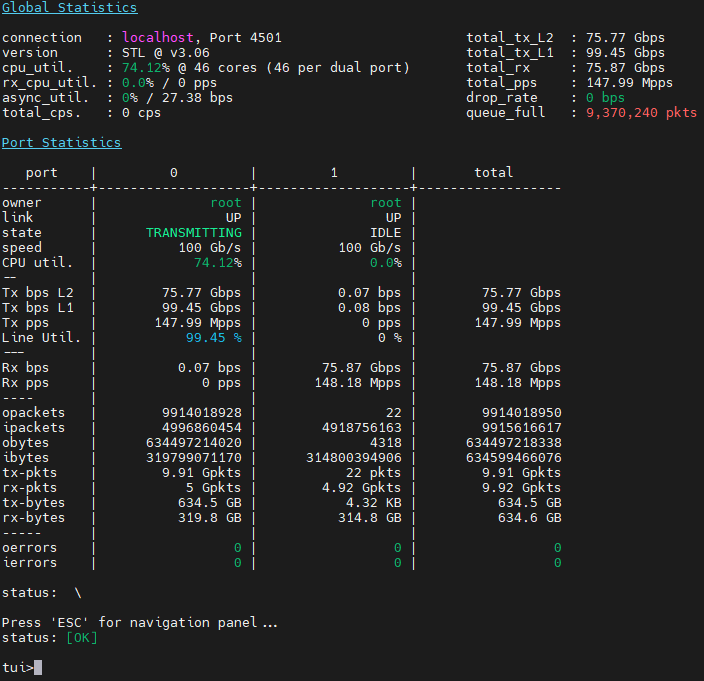
Start sending traffic
This example sends UDP packets at size of 64Bytes while utilizing 100% of line rate.
Packets are sent through port 0 and return to port 1 accomplishing unidirectional test.
trex>start -f stl/benchmark_udp_1pkt_simple.py -p 0 -m 100% -t packet_len=64
Output example
Of ~148Mpps and ~100Gbs with link speed of 100Gbs
Authors

|
Amir Zeidner For the past several years, Amir has worked as a Solutions Architect primarily in the Telco space, leading advanced solutions to answer 5G, NFV, and SDN networking infrastructures requirements. Amir’s expertise in data plane acceleration technologies, such as Accelerated Switching and Network Processing (ASAP²) and DPDK, together with a deep knowledge of open source cloud-based infrastructures, allows him to promote and deliver unique end-to-end NVIDIA Networking solutions throughout the Telco world. |
This document is provided for information purposes only and shall not be regarded as a warranty of a certain functionality, condition, or quality of a product. NVIDIA Corporation (“NVIDIA”) makes no representations or warranties, expressed or implied, as to the accuracy or completeness of the information contained in this document and assumes no responsibility for any errors contained herein. NVIDIA shall have no liability for the consequences or use of such information or for any infringement of patents or other rights of third parties that may result from its use. This document is not a commitment to develop, release, or deliver any Material (defined below), code, or functionality. NVIDIA reserves the right to make corrections, modifications, enhancements, improvements, and any other changes to this document, at any time without notice. Customer should obtain the latest relevant information before placing orders and should verify that such information is current and complete. NVIDIA products are sold subject to the NVIDIA standard terms and conditions of sale supplied at the time of order acknowledgement, unless otherwise agreed in an individual sales agreement signed by authorized representatives of NVIDIA and customer (“Terms of Sale”). NVIDIA hereby expressly objects to applying any customer general terms and conditions with regards to the purchase of the NVIDIA product referenced in this document. No contractual obligations are formed either directly or indirectly by this document.