RDG for Accelerating Apache Spark 3.0 with RAPIDS Accelerator over RoCE Network
Created on Jun 14, 2020
Introduction
This Reference Deployment Guide (RDG) demonstrates a multi-node cluster deployment procedure of GPU and Network Accelerated Apache Spark 3.0 with RAPIDS Accelerator for Apache Spark over Mellanox NVIDIA RoCE/UCX end-to-end 25 Gb/s Ethernet solution.
This RDG provides installation guide of a pre-built Spark 3.0 cluster of three physical nodes running Ubuntu 18.04 and includes step-by-step procedure to prepare the network for RoCE traffic using Mellanox recommended settings on both host and switch sides.
The HDFS cluster includes 2 datanodes and 1 namenode server.
Abbreviation and Acronym List
|
Term |
Definition |
|
AOC |
Active Optical Cable |
|
DAC |
Direct Attach Copper cable |
|
DHCP |
Dynamic Host Configuration Protocol |
|
DNS |
Domain Name System |
|
GDR |
GPUDirect |
|
GPU |
G raphics Processing Unit |
|
OFED |
OpenFabrics Enterprise Distribution |
|
MPI |
Message Passing Interface |
|
NGC |
NVIDIA GPU Cloud |
|
RDG |
Reference Deployment Guide |
|
RDMA |
Remote Direct Memory Access |
|
RoCE |
RDMA over Converged Ethernet |
|
GPU |
G raphics Processing Unit |
|
UCX |
Unified Communication X |
References
Key Components and Technologies
NVIDIA ® T4 GPU The NVIDIA ® T4 GPU accelerates diverse cloud workloads, including high-performance computing, deep-learning training and inference, machine learning, data analytics, and graphics.
Based on the NVIDIA Turing ™ architecture and packaged in an energy-efficient 70-watt, small PCIe form factor, T4 is optimized for mainstream computing environments and features multi-precision Turing Tensor Cores and new RT Cores. Combined with accelerated containerized software stacks from NGC, T4 delivers revolutionary performance at scale.
NVIDIA Cumulus Linux
Cumulus Linux is the only open network OS that allows you to affordably build and efficiently operate your network like the world’s largest data center operators, unlocking web-scale networking for businesses of all sizes.
NVIDIA Mellanox Ethernet Network Interface Cards e nable the highest performance and efficiency for data center hyper-scale, public and private clouds, storage, machine learning and deep learning, artificial intelligence, big data and Telco platforms and applications.
NVIDIA Mellanox Spectrum Open Ethernet Switches
The Mellanox Spectrum® switch family provides the most efficient network solution for the ever-increasing performance demands of data center applications. The Spectrum product family includes a broad portfolio of Top-of-Rack (TOR) and aggregation switches that range from 16 to 128 physical ports, with Ethernet data rates of 1GbE, 10GbE, 25GbE, 40GbE, 50GbE, 100GbE and 200GbE per port. Spectrum Ethernet switches are ideal to build cost-effective and scalable data center network fabrics that can scale from a few nodes to tens-of-thousands of nodes.NVIDIA Mellanox LinkX Ethernet Cables and Transceivers
Mellanox LinkX® cables and transceivers make 100Gb/s deployments as easy and as universal as 10Gb/s links. Because Mellanox offers one of industry’s broadest portfolio of 10, 25, 40, 50,100 and 200Gb/s Direct Attach Copper cables (DACs), Copper Splitter cables, Active Optical Cables (AOCs) and Transceivers, every data center reach from 0.5m to 10km is supported. To maximize system performance, Mellanox tests every product in an end-to-end environment ensuring a Bit Error Rate of less than 1e-15. A BER of 1e-15 is 1000x better than many competitors.Spark GPU Scheduling Overview
Spark 3.0 now supports GPU scheduling as long as you are using a cluster manager that supports it. You can have Spark request GPUs and assign them to task. The exact configs you use will vary depending on your cluster manager.

About RAPIDS
The RAPIDS suite of open source software libraries and APIs provide the ability to execute end-to-end data science and analytics pipelines entirely on GPUs. Licensed under Apache 2.0, RAPIDS is incubated by NVIDIA® based on extensive hardware and data science experience. RAPIDS utilizes NVIDIA CUDA® primitives for low-level compute optimization, and exposes GPU parallelism and high-bandwidth memory speed through user-friendly Python interfaces.
RAPIDS also focuses on common data preparation tasks for analytics and data science. This includes a familiar dataframe API that integrates with a variety of machine learning algorithms for end-to-end pipeline accelerations without paying typical serialization costs. RAPIDS also includes support for multi-node, multi-GPU deployments, enabling vastly accelerated processing and training on much larger dataset sizes.
RAPIDS Accelerator For Apache Spark
As data scientists shift from using traditional analytics to leveraging AI applications that better model complex market demands, traditional CPU-based processing can no longer keep up without compromising either speed or cost. The growing adoption of AI in analytics has created the need for a new framework to process data quickly and ensure cost efficiency with GPUs.
The RAPIDS Accelerator for Apache Spark combines the power of the RAPIDS cuDF library and the scale of the Spark distributed computing framework. The RAPIDS Accelerator library also has a built-in accelerated shuffle based on UCX that can be configured to leverage GPU-to-GPU communication and RDMA capabilities.Documentation on the current release can be found here.
As of Apache Spark release 3.0 users can schedule GPU resources and can replace the backend for many SQL and dataframe operations so that they are accelerated using GPUs.
The plugin requires no API changes from the user, and it will replace SQL operations it supports with GPU operations.
If the plugin doesn't support an operation, it will fall back to using the Spark CPU version.
This release supports the use of the UCX communication library. UCX provides optimized interconnect capabilities to accelerate Spark.
The plugin does not work with RDD operations.
To enable this GPU acceleration, you will need:
- Spark 3.0, cudf jars, spark rapids plugin jar, a GPU discovery script
- Run on a cluster that has nodes that comply with the requirements for CUDF
- The data for a partition must fit into GPU memory if it runs on the GPU
Unified Communication X
Unified Communication X (UCX) provides an optimized communication layer for Message Passing (MPI), PGAS/OpenSHMEM libraries and RPC/data-centric applications.
UCX utilizes high-speed networks for extra-node communication, and shared memory mechanisms for efficient intra-node communication.

Mellanox GPUDirect RDMA
The latest advancement in GPU-GPU communications is GPUDirect RDMA. This new technology provides a direct P2P (Peer-to-Peer) data path between the GPU Memory directly to/from the Mellanox HCA devices. This provides a significant decrease in GPU-GPU communication latency and completely offloads the CPU, removing it from all GPU-GPU communications across the network.

Setup Overview
Before we start, make sure to familiarize with the Apache Cluster multi-node cluster architecture, see Overview - Spark 3.0 Documentation for more info.
This guide does not cover the server’s storage aspect. You should configure the servers with the storage components suitable for your use case (Data Set size)
Spark Deployment Methods
There are multiple ways to deploy Spark and Spark Rapids Plugin:
Local mode - this is for dev/testing only, not for production
Standalone Mode
On a YARN cluster
On a Kubernetes cluster
This guide provides the deployment with Spark 3.0 on YARN bare metal cluster.
For a deploy Spark 3.0 on Kubernetes cluster, please refer to this link.
Setup Logical Design

Bill of Materials (BoM)
The following hardware setup is used in the distributed Spark 3.0/HDFS configuration described in this guide:

Deployment Guide
Physical Network
Connectivity

Network Configuration
In this reference design we will use a single port per server.
In case of dual port NIC we will wire the 1st port to an Ethernet switch and leave the 2nd port unused.
Each server is connected to an SN2410 switch by a 25GbE DAC cable.
The switch port connectivity in our case is as follows:
Port 1 – connected to the Namenode Server
Ports 2,3 – connected to Worker Servers
The below table provides server names with network configuration:
|
Server Type |
Server Name |
IP and NICs |
|
|
Internal Network - 25 GigE |
Management Network - 1 GigE |
||
|
Node 01 (master) |
sl-spark-n01 |
ens3f0: 192.168.11.71 |
eno0: 192.168.1.71 |
|
Node 02 |
sl-spark-n02 |
ens3f0: 192.168.11.72 |
eno0: 192.168.1.72 |
|
Node 03 |
sl-spark-n03 |
ens3f0: 192.168.11.73 |
eno0: 192.168.1.73 |
Network Switch Configuration for RoCE transport
NVIDIA Cumulus Network OS
We will accelerate Spark networking by using RoCE transport through the UCX library.
In this deployment the network is configured to be lossless in order to get higher results.
For lossless configuration and for NVIDIA Cumulus version 4.1.1 and above r un:
Switch console
            # net add interface swp1-32 storage-optimized pfc
# net commit
In case you have a NVIDIA Mellanox Onyx Network OS
If you are not familiar with Mellanox switch software, follow the HowTo Get Started with Mellanox switches guide. For more information, please refer to the Mellanox Onyx User Manual at https://docs.mellanox.com/category/onyx.
First we need to update the switch OS to the latest ONYX software version. For more details go to HowTo Upgrade MLNX-OS Software on Mellanox switch systems.
For lossless configuration and for Mellanox Onyx version 3.8.2004 and above r un:
Switch console
# switch (config) #roce lossless
(PFC+ECN) to run RoCE on lossless fabric, run the "roce" command
To see the RoCE configuration run:
Switch console
# show roce
To monitor the RoCE counters run:
Switch console
# show interface ethernet counters roce
Master and Worker Servers Installation and Configuration
Add a SPARK User and Grant Root Privileges on the Master and Worker Servers
To add a user, run the the following command:
Server Console
# adduser sparkuser
To grant the user root privileges, run:
Server Console
# visudo
The command above leads you to the /etc/sudoers.tmp file, where you can view the following code:
Server Console
            # User privilege specification
root    ALL=(ALL:ALL) ALL
After the root user line, you will add your new user with the same format for you to grant admin privileges.
Server Console
sparkuser ALL=(ALL:ALL)ALL
Once you’ve added the permission, save and exit the file by using the following process. (In Ubuntu 18.04, nano is the default editor, so we need to use the ctrl+x, y keystrokes to save and exit the file.)
Hold `ctrl` and press `x`. At the prompt, press `y` and then hit `enter` to save and exit the file.
Now this user will be able to run commands (like update, using the sudo) :
Server Console
# su - sparkuser
Updating Ubuntu Software Packages on the Master and Worker Servers
To update/upgrade Ubuntu software packages, run the the following commands:
Server Console
            > sudo apt-get update            # Fetches the list of available update
> sudo apt-get upgrade -y        # Strictly upgrades the current packages
Installing General Dependencies on the Master and Worker Servers
To install general dependencies, run the commands below or copy-paste each line.
Server Console
> sudo apt-get install git wget scala maven openssh-server openssh-client
Running LLDP service on the Master and Worker Servers
To run LLDP service on server, run the commands below or copy-paste each line.
Server Console
            > sudo service lldpd start
> sudo systemctl enable lldpd
Installing Java 8 (Recommended Oracle Java) on the Master and Worker Servers
To install Java 8 software packages, run the the following commands:
Server Console
            > sudo apt-get install python-software-properties
> sudo add-apt-repository ppa:webupd8team/java
> sudo apt-get update
> sudo apt-get install oracle-java8-installer
Adding Entries to Host files on the Master and Worker Servers
To edit the host files:
Server Console
> sudo vim /etc/hosts
Now add entries of namenoder (master) and worker servers.
Example:
Server Console
            127.0.0.1 localhost
127.0.1.1 sl-spark-n01.vwd.clx sl-spark-n01

# The following lines are desirable for IPv6 capable hosts
::1 localhost ip6-localhost ip6-loopback
ff02::1 ip6-allnodes
ff02::2 ip6-allrouters
192.168.11.71 sl-spark-n01l
192.168.11.72 sl-spark-n02l
192.168.11.73 sl-spark-n03l
Configuring SSH
We will configure passwordless SSH access from Master to all Slave nodes.
Install OpenSSH Server-Client on both Master and Slaves nodes
Server Console
> sudo apt-get install openssh-server openssh-client
On Master node - Generate Key Pairs
Server Console
> sudo ssh-keygen -t rsa -P ""
Copy the content of .ssh/id_rsa.pub file on master to .ssh/authorized_keys file on all nodes (Master and Slave nodes)
Server Console
            > cp /home/sparkuser/.ssh/id_rsa.pub /home/sparkuser/.ssh/authorized_keys
> scp /home/sparkuser/.ssh/authorized_keys sparkuser@192.168.1.72:/home/sparkuser/.ssh/authorized_keys
> scp /home/sparkuser/.ssh/authorized_keys sparkuser@192.168.1.73:/home/sparkuser/.ssh/authorized_keys
Set the permissions for your user with the chmod command:
Server Console
> chmod 0600 ~/.ssh/authorized_keys
The new user is now able to SSH without needing to enter a password every time. Verify everything is set up correctly by using the sparkuser user to SSH to localhost and all Slave nodes from Master node:
Server Console
            > ssh sl-spark-n01l
> ssh sl-spark-n02l
> ssh sl-spark-n03l
Install the NVIDIA Drivers
The last NVIDIA drivers must be installed. To install them, you can use the Ubuntu built (when installing the additional drivers) after updating the driver packages.
Go to NVIDIA’s website (https://www.nvidia.co.uk/Download/index.aspx?lang=uk). Select your Product, OS and CUDA version.

Download the driver's latest version.

Once you accept the download, please follow the steps listed below.
Server Console
            sudo dpkg -i nvidia-driver-local-repo-ubuntu1804-440.95.01_1.0-1_amd64.deb
sudo apt-get update
sudo apt-get install cuda-drivers
Once installed using additional drivers, restart your computer.
Server Console
sudo reboot
Verify the Installation
Make sure the NVIDIA driver can work properly with the installed GPU card.
Server Console
lsmod | grep nvidia

Run the nvidia-debugdump utility to collect internal GPU information.
Server Console
nvidia-debugdump -l

Run the nvidia-smi utility to check the NVIDIA System Management Interface.
Server Console
nvidia-smi

Installing MLNX_OFED for Ubuntu on the Master and Workers
This section describes how to install and test MLNX_OFED for Linux package on a single host machine with Mellanox ConnectX®-5 adapter card installed.
For more information click on Mellanox OFED for Linux User Manual.
Verify that the system has a Mellanox network adapter (HCA/NIC) installed:
Server Console
lspci -v | grep Mellanox
The following example shows a system with an installed Mellanox HCA:

The Mellanox Technologies Ltd. public repository provides all packages required for InfiniBand, Ethernet and RDMA.
Subscribe your system to the Mellanox Technologies repository by downloading and installing Mellanox Technologies GPG-KEY.
Server Console
sudo wget -qO - https://www.mellanox.com/downloads/ofed/RPM-GPG-KEY-Mellanox | sudo apt-key add -
Download the repository configuration file of the desired product.
Go to the main repository https://linux.mellanox.com/public/repo
Choose the repository that suits your needs (mlnx_ofed, mlnx_en or mlnx_rdma_minimal).
Choose your Operating System Under the "latest" folder
Download the repository configuration file "mellanox_mlnx_ofed.repo" or "mellanox_mlnx_ofed.list"
The commands below provide examples of how to configure a 'mlnx_ofed' repository for Ubuntu18.04.
Server Console
            cd /etc/apt/sources.list.d/
sudo wget https://linux.mellanox.com/public/repo/mlnx_ofed/latest/ubuntu18.04/mellanox_mlnx_ofed.list
Remove the distribution InfiniBand packages
Server Console
sudo apt-get remove libipathverbs1 librdmacm1 libibverbs1 libmthca1 libopenmpi-dev openmpi-bin openmpi-common openmpi-doc libmlx4-1 rdmacm-utils ibverbs-utils infiniband-diags ibutils perftest
NoteSince the distro InfiniBand packages conflict with the packages included in the MLNX_OFED/MLNX_EN driver, make sure that all distro InfiniBand RPMs are uninstalled.
Installing Mellanox OFED
After setting up a repository, install the following metadata package:
Server Console
apt-get install mlnx-ofed-all
Firmware update.
All the installation options above do not automatically update the firmware on your system.
To update the firmware to the version included in the configured repository, you can either:Install the "mlnx-fw-updater" package:
Server Console
apt-get install mlnx-fw-updater
Update the firmware to the latest version available on Mellanox Technologies’ website. (www.mellanox.com -> Support/Education -> Firmware Downloads).
Instruction on how to update the firmware are available in the MLNX_ODED User Manual section “Updating Firmware After Installation”.
Reboot after the installation finished successfully:
Server Console
reboot
Check that the port modes are Ethernet: ConnectX®-5 ports can be individually configured to work as Infiniband or Ethernet ports
Server Console
ibv_devinfo
This is the desired configuration:

If you see the following - You need to change the interfaces port type to Ethernet - next optional step

Change the mode to Ethernet. (optional step)
To change the interfaces port type to Ethernet mode, use the mlxconfig command after the driver is loaded.
a. Start mst and see ports names:
Server Console
            mst start
mst status
b. Change the port mode to Ethernet:
Server Console
            mlxconfig -d /dev/mst/mt4121_pciconf0 s LINK_TYPE_P1=2
    Port 1 set to ETH mode
reboot
c. Query Ethernet devices and print information on them that is available for use from userspace:
Server Console
ibv_devinfo
d. Run the ibdev2netdev utility to see all the associations between the Ethernet devices and the InfiniBand devices/ports:
Server Console
ibdev2netdev
e. Configure the network interface:
Server Console
ifconfig ens3f0 192.168.11.71 netmask 255.255.255.0
f. Insert the lines below to the /etc/netplan/01-netcfg.yam file after the following lines:
Server Console
vim /etc/netplan/01-netcfg.yaml
The new lines:
Sample
            ens3f0:
   dhcp4: no
   address:
       - 192.168.11.71/24
Example:

g. Check the network configuration is set correctly:
Server Console
ifconfig -a
Lossless Fabric with L3 (DSCP) Configuration
This post provides a configuration example for Mellanox devices installed with MLNX_OFED running RoCE over a lossless network, in DSCP-based QoS mode.
For this configuration you need to know what is your network interface (for example ens3f0) and its parent Mellanox device (for example mlx5_0).
To get the information, run the ibdev2netdev command:
Shell
            # ibdev2netdev
#s# add output here
Configuration:
Shell
            # mlnx_qos -i ens3f0 --trust dscp
# echo 106 > /sys/class/infiniband/mlx5_0/tc/1/traffic_class
# cma_roce_tos -d mlx5_0 -t 106
# sysctl -w net.ipv4.tcp_ecn=1
# mlnx_qos -i ens3f0 --pfc 0,0,0,1,0,0,0,0
Installing Mellanox OFED GPUDirect RDMA
The below listed software are required for this component. The software needs to be installed and running:
NVIDIA compatible driver.
MLNX_OFED (latest).
Please check with NVIDIA support for the above NVIDIA driver and other relevant information.
Download last nv_peer_memory:
Server Console
            # cd
# git clone https://github.com/Mellanox/nv_peer_memory
Build source packages (src.rpm for RPM based OS and tarball for DEB based OS), use the build_module.sh script:
Node cli
            # ./build_module.sh


Building source rpm for nvidia_peer_memory...
Building debian tarball for nvidia-peer-memory...


Built: /tmp/nvidia_peer_memory-1.0-9.src.rpm
Built: /tmp/nvidia-peer-memory_1.0.orig.tar.gz
Install the built packages:
Node cli
            # cd /tmp
# tar xzf /tmp/nvidia-peer-memory_1.0.orig.tar.gz
# cd nvidia-peer-memory-1.0
# dpkg-buildpackage -us -uc
# dpkg -i <path to generated deb files>
( e.g. dpkg -i nv-peer-memory_1.0-9_all.deb nv-peer-memory-dkms_1.0-9_all.deb )
After a successful installation:
nv_peer_mem.ko kernel module is installed.
Service file /etc/init.d/nv_peer_mem to control the kernel module by start/stop/status will be added.
/etc/infiniband/nv_peer_mem.conf configuration file to control whether kernel module will be loaded on boot (default value is YES).
Important Note:
Use nvidia-smi topo -m to make sure that this is the case:

We recommend that both the NIC and the GPU are physically placed on the same PCI switch (to achieve better performance):

Installing Open Fabrics Enterprise Distribution (OFED) Performance Tests
Perftools is a collection of tests written over uverbs intended for use as a performance micro-benchmark. The tests may be used for HW or SW tuning as well as for functional testing. The collection contains a set of bandwidth and latency benchmarks such as:
Send - ib_send_bw and ib_send_lat
RDMA Read - ib_read_bw and ib_read_lat
RDMA Write - ib_write_bw and ib_write_lat
RDMA Atomic - ib_atomic_bw and ib_atomic_lat
Native Ethernet (when working with MOFED2) - raw_ethernet_bw, raw_ethernet_lat.
To install perftools, run the following commands:
Server Console
            cd
git clone https://github.com/linux-rdma/perftest
cd perftest/
make clean
./autogen.sh
./configure --prefix=/usr --libdir=/usr/lib64 --sysconfdir=/etc CUDA_H_PATH=/usr/local/cuda/include/cuda.h
make
We will run a RDMA Write - ib_write_bw bandwidth stress benchmark over RoCE.
|
Server |
ib_write_bw -a -d mlx5_0 & |
|
Client |
ib_write_bw -a -F $server_IP -d mlx5_0 --report_gbits |


For running a GPUDirect benchmark over, run the benchmark with --use_cuda=<GPU number>.
|
Server |
ib_write_bw -a -d mlx5_0 --use_cuda=0 & |
|
Client |
ib_write_bw -a -F $server_IP -d mlx5_0 --use_cuda=0 --report_gbits |


Installing Unified Communication X(UCX)
Unified Communication X (UCX) provides an optimized communication layer for Message Passing (MPI), PGAS/OpenSHMEM libraries and RPC/data-centric applications.
UCX utilizes high-speed networks for inter-node communication, and shared memory mechanisms for efficient intra-node communication.
To install UCX, go to https://github.com/openucx/ucx/releases/tag/v1.8.1-rc4. In addition, download and install a deb package.
Server Console
            cd
wget https://github.com/openucx/ucx/releases/download/v1.8.1/ucx-v1.8.1-ubuntu18.04-mofed5.0-cuda10.2.deb
sudo dpkg -i ucx-v1.8.1-ubuntu18.04-mofed5.0-cuda10.2.deb
Validate UCX
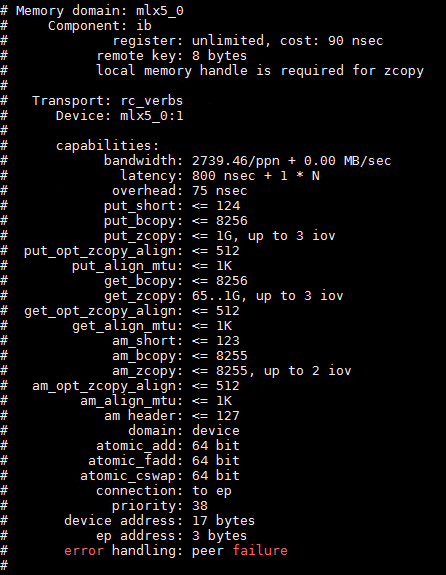
To validate UCX you can run the ucx_info command:
Server Console
ucx_info -d | less


In addition, you may run a UCX benchmark by running the following commands:
Over TCP
|
Server |
CX_NET_DEVICES=mlx5_0:1 UCX_TLS=cuda,cuda_copy,tcp ucx_perftest -m cuda -s 1000000 -t tag_lat |
|
Client |
CX_NET_DEVICES=mlx5_0:1 UCX_TLS=cuda,cuda_copy,tcp ucx_perftest -m cuda -s 1000000 -t tag_lat sl-spark-n01l |
Sample results:

......

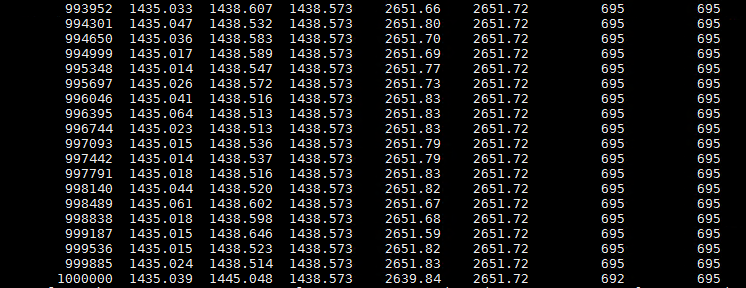
Over RC (RDMA Reliable Connected)
|
Server |
UCX_NET_DEVICES=mlx5_0:1 UCX_RNDV_SCHEME=get_zcopy UCX_TLS=cuda,cuda_copy,rc ucx_perftest -m cuda -s 1000000 -t tag_lat |
|
Client |
UCX_NET_DEVICES=mlx5_0:1 UCX_RNDV_SCHEME=get_zcopy UCX_TLS=cuda,cuda_copy,rc ucx_perftest -m cuda -s 1000000 -t tag_lat sl-spark-n01l |
Sample results:
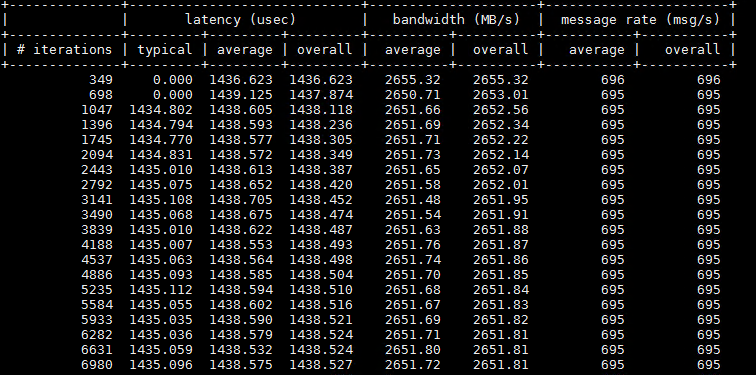
.....
Install Nvidia Toolkit 10.2 (CUDA)
Prerequisites
Verify you have a CUDA-Capable GPU
Check that your GPU is listed in Your GPU Compute Capability section on https://developer.nvidia.com/cuda-gpus#computeVerify the System has the correct Kernel headers and that the Kernel development packages are installed.
Installation Process
Install CUDA by running the following commands:
Server Console
            wget https://developer.download.nvidia.com/compute/cuda/repos/ubuntu1804/x86_64/cuda-ubuntu1804.pin
sudo mv cuda-ubuntu1804.pin /etc/apt/preferences.d/cuda-repository-pin-600
wget http://developer.download.nvidia.com/compute/cuda/10.2/Prod/local_installers/cuda-repo-ubuntu1804-10-2-local-10.2.89-440.33.01_1.0-1_amd64.deb
sudo dpkg -i cuda-repo-ubuntu1804-10-2-local-10.2.89-440.33.01_1.0-1_amd64.deb
sudo apt-key add /var/cuda-repo-10-2-local-10.2.89-440.33.01/7fa2af80.pub
sudo apt-get updatesudo apt-get -y install cuda
Post-installation Action
Mandatory Actions - env configuration
Some actions must be taken after the installation before the CUDA Toolkit and Driver can be used.
The “PATH” variable needs to include /usr/local/cuda-10.2/bin
In addition, when using the .run file installation method, the “LD_LIBRARY_PATH” variable needs to contain /usr/local/cuda-10.2/lib64.
Update your bash file.
Server Console
sudo vim ~/.bashrc
This will open your bash file in a text editor where you will scroll to the bottom and add the below lines:
Server Console
            sudo export CUDA_HOME=/usr/local/cuda-10.2
sudo export PATH=/usr/local/cuda-10.2/bin${PATH:+:${PATH}}
sudo export LD_LIBRARY_PATH=/usr/local/cuda-10.2/lib64${LD_LIBRARY_PATH:+:${LD_LIBRARY_PATH}}
Once you save and close the text file, you can return to your original terminal and type this command to reload your .bashrc file.
Server Console
source ~/.bashrc
Check that the paths have been properly modified.
Server Console
            echo $CUDA_HOME
echo $PATH
echo $LD_LIBRARY_PATH
Recommended Actions - Integrity Check
The actions below are recommended in order to verify the integrity of the installation.
Install Writable Samples (http://docs.nvidia.com/cuda/cuda-installation-guide-linux/index.html#install-samples)
In order to modify, compile, and run the samples, the samples must be installed with “write” permissions. A convenient installation script is provided:Server Console
sudo cuda-install-samples-10.2.sh ~
This script installs the cuda-samples-10-2 package into your home directory.
Verify the installation procedure is successful (http://docs.nvidia.com/cuda/cuda-installation-guide-linux/index.html#verify-installation) before continuing.
It is important to verify that the CUDA toolkit can find and communicate correctly with the CUDA-capable hardware. To do this, you need to compile and run some of the included sample programs.Verify the NVIDIA CUDA Toolkit can query GPU devices properly.
You should compile the sources from ~/NVIDIA_CUDA-10.2_Samples/1_Utilities/deviceQuery directory. The resulting binaries are placed under ~/NVIDIA_CUDA-10.2_Samples/bin.Server Console
            cd ~/NVIDIA_CUDA-10.2_Samples/1_Utilities/deviceQuery/
sudo make
cd ~/NVIDIA_CUDA-10.2_Samples
sudo ./bin/x86_64/linux/release/deviceQuery
Run the bandwidthTest program to ensure that the system and the CUDA-capable device are able to communicate properly.
Server Console
            cd ~/NVIDIA_CUDA-9.1_Samples//1_Utilities/bandwidthTest/
sudo make
cd ~/NVIDIA_CUDA-9.1_Samples/
sudo ./bin/x86_64/linux/release/bandwidthTest
Note that the device description and results of bandwidthTest may vary from system to system.
The important point is that the second-to-last line confirms that all necessary tests passed.
If the tests did not pass, ensure you have a CUDA-capable NVIDIA GPU on your system and make sure it is properly installed.
If you run into difficulties with the link step (such as libraries not being found), consult the Linux Release Notes found in the doc folder in the CUDA Samples directory.
Application Deployment and Configuration
Download and Install Hadoop
Download Hadoop
Installing a Hadoop cluster typically involves unpacking the software on all the machines in the cluster.
Download hadoop-3.2.1.tar.gz from the link to the Master Node machine to install it on.
Server Console
            cd /opt/
wget https://downloads.apache.org/hadoop/common/hadoop-3.2.1/hadoop-3.2.1.tar.gz
Once the download is complete, extract the files to initiate the Hadoop installation:
Server Console
tar -zxvf hadoop-3.2.1.tar.gz
The Hadoop binary files are now located within the /opt/ hadoop-3.2.1 directory.
Make symbolic link for hadoop-3.2.1 folder and s et the permissions for your user to hadoop-3.2.1 and hadoop folders :
Server Console
            sudo ln -s hadoop-3.2.1/ hadoop
sudo chown -R user hadoop
sudo chown -R user hadoop-3.2.1/
Configure Hadoop Environment Variables (bashrc)
Edit the .bashrc shell configuration file:
Server Console
sudo vim .bashrc
Define the Hadoop environment variables by adding the following content to the end of the file:
Server Console
            #Hadoop Related Options
export HADOOP_HOME=/opt/hadoop
export HADOOP_INSTALL=$HADOOP_HOME
export HADOOP_MAPRED_HOME=$HADOOP_HOME
export HADOOP_COMMON_HOME=$HADOOP_HOME
export HADOOP_HDFS_HOME=$HADOOP_HOME
export YARN_HOME=$HADOOP_HOME
export HADOOP_COMMON_LIB_NATIVE_DIR=$HADOOP_HOME/lib/native
export PATH=$PATH:$HADOOP_HOME/sbin:$HADOOP_HOME/bin
export HADOOP_OPTS=”-Djava.library.path=$HADOOP_HOME/lib/native”
Once you save and close the text file, you can return to your original terminal and type this command to reload your .bashrc file.
Server Console
source ~/.bashrc
Check that the paths have been properly modified.
Server Console
            echo $HADOOP_HOME
echo $PATH
echo $YARN_HOME
Configuration Changes in hadoop-env.sh file
The hadoop-env.sh file serves as a master file to configure YARN, HDFS and Hadoop-related project settings.
When setting up a multi-node Hadoop cluster, you need to define which Java implementation is to be utilized. Edit the hadoop-env.sh file:
Server Console
sudo vim $HADOOP_HOME/etc/hadoop/hadoop-env.sh
Un-comment the $JAVA_HOME variable (i.e., remove the # sign) and add the full path to the OpenJDK installation on your system.
We have installed the OpenJDK version 8.
Add the following line:
Server Console
export JAVA_HOME=/usr/lib/jvm/java-8-openjdk-amd64
The path needs to match with the location of the Java installation on your system.

Configuration Changes in core-site.xml file
The core-site.xml file defines HDFS and Hadoop core properties.
We need to specify the URL for your NameNode, and the temporary directory Hadoop uses for the map and reduce process.
Open the core-site.xml file in a text editor:
Server Console
sudo vim $HADOOP_HOME/etc/hadoop/core-site.xml
Add the following configuration to override the default values for the temporary directory and add your HDFS URL to replace the default local file system setting:
Server Console
            <?xml version="1.0" encoding="UTF-8"?>
<?xml-stylesheet type="text/xsl" href="configuration.xsl"?>
<!--
Licensed under the Apache License, Version 2.0 (the "License");
you may not use this file except in compliance with the License.
You may obtain a copy of the License at

http://www.apache.org/licenses/LICENSE-2.0

Unless required by applicable law or agreed to in writing, software
distributed under the License is distributed on an "AS IS" BASIS,
WITHOUT WARRANTIES OR CONDITIONS OF ANY KIND, either express or implied.
See the License for the specific language governing permissions and
limitations under the License. See accompanying LICENSE file.
-->

<!-- Put site-specific property overrides in this file. -->

<configuration>
<property>
  <name>fs.defaultFS</name>
  <value>hdfs://sl-spark-n01l:9123</value>
</property>
<property>
  <name>hadoop.tmp.dir</name>
  <value>/data/hadoop_tmp/</value>
</property>

</configuration>
Do not forget to create directory in the location you specified for your temporary data.
In our environment we will create a /hadoop_tmp/ directory on a /dev/nvme0n1p1/data mounted NVMe local drive.
Server Console
sudo mkdir /data/hadoop_tmp/
Configuration Changes in the hdfs-site.xml File
The properties in the hdfs-site.xml file govern the location for storing node metadata, fsimage file, and edit log file. Configure the file by defining the NameNode and DataNode information.
In addition, the default dfs.replication value of 3 needs to be changed to 1 to match the single node setup.
Use the following command to edit the hdfs-site.xml file:
Server Console
sudo vim $HADOOP_HOME/etc/hadoop/hdfs-site.xml
Add the following configuration to the file:
Server Console
            <?xml version="1.0" encoding="UTF-8"?>
<?xml-stylesheet type="text/xsl" href="configuration.xsl"?>
<!--
Licensed under the Apache License, Version 2.0 (the "License");
you may not use this file except in compliance with the License.
You may obtain a copy of the License at

http://www.apache.org/licenses/LICENSE-2.0

Unless required by applicable law or agreed to in writing, software
distributed under the License is distributed on an "AS IS" BASIS,
WITHOUT WARRANTIES OR CONDITIONS OF ANY KIND, either express or implied.
See the License for the specific language governing permissions and
limitations under the License. See accompanying LICENSE file.
-->

<!-- Put site-specific property overrides in this file. -->

<configuration>

<property>
  <name>dfs.namenode.secondary.http-address</name>
  <value>sl-spark-n01l</value>
</property>

<property>
  <name>dfs.namenode.rpc-bind-host</name>
  <value>sl-spark-n01l</value>
</property>

<property>
  <name>dfs.namenode.https-bind-host</name>
  <value>sl-spark-n01l</value>
</property>

<property>
  <name>dfs.namenode.servicerpc-bind-host</name>
  <value>sl-spark-n01l</value>
</property>

<property>
  <name>dfs.namenode.datanode.registration.ip-hostname-check</name>
  <value>false</value>
</property>

<property>
  <name>dfs.replication</name>
  <value>1</value>
</property>

<property>
  <name>dfs.datanode.directoryscan.throttle.limit.ms.per.sec</name>
  <value>1000</value>
</property>

<property>
  <name>dfs.datanode.dns.interface</name>
  <value>ens3f0</value>
</property>

<property>
  <name>dfs.permissions</name>
  <value>false</value>
</property>

<property>
  <name>dfs.client.use.datanode.hostname</name>
  <value>true</value>
</property>

</configuration>
Configuration Changes in the mapred-site.xml File
Use the following command to edit the mapred-site.xml file:
Server Console
sudo vim $HADOOP_HOME/etc/hadoop/mapred-site.xml
Add the following configuration:
Server Console
            <?xml version="1.0"?>
<?xml-stylesheet type="text/xsl" href="configuration.xsl"?>
<!--
Licensed under the Apache License, Version 2.0 (the "License");
you may not use this file except in compliance with the License.
You may obtain a copy of the License at

http://www.apache.org/licenses/LICENSE-2.0

Unless required by applicable law or agreed to in writing, software
distributed under the License is distributed on an "AS IS" BASIS,
WITHOUT WARRANTIES OR CONDITIONS OF ANY KIND, either express or implied.
See the License for the specific language governing permissions and
limitations under the License. See accompanying LICENSE file.
-->

<!-- Put site-specific property overrides in this file. -->

<configuration>

<property>
  <name>mapreduce.framework.name</name>
  <value>yarn</value>
</property>
<property>
  <name>mapreduce.map.memory.mb</name>
  <value>40960</value>
</property>
<property>
  <name>mapreduce.reduce.memory.mb</name>
  <value>81920</value>
</property>
<property>
  <name>mapreduce.map.java.opts</name>
  <value>-Xmx3072m</value>
</property>
<property>
  <name>mapreduce.reduce.java.opts</name>
  <value>-Xmx6144m</value>
</property>
<property>
  <name>yarn.app.mapreduce.am.env</name>
  <value>HADOOP_MAPRED_HOME=/opt/hadoop/</value>
</property>
<property>
  <name>mapreduce.map.env</name>
  <value>HADOOP_MAPRED_HOME=/opt/hadoop/</value>
</property>
<property>
  <name>mapreduce.reduce.env</name>
  <value>HADOOP_MAPRED_HOME=/opt/hadoop/</value>
</property>

</configuration>
Configuration Changes in the yarn-site.xml File
The yarn-site.xml file is used to define settings relevant to YARN. It contains configurations for the Node Manager, Resource Manager, Containers, Application Master and Configure YARN to support GPU isolation: https://hadoop.apache.org/docs/r3.1.3/hadoop-yarn/hadoop-yarn-site/UsingGpus.html
Use the following command to edit the yarn-site.xml file:
Server Console
sudo vim $HADOOP_HOME/etc/hadoop/yarn-site.xml
Add the following configuration:
Server Console
            <?xml version="1.0"?>
<!--
Licensed under the Apache License, Version 2.0 (the "License");
you may not use this file except in compliance with the License.
You may obtain a copy of the License at

http://www.apache.org/licenses/LICENSE-2.0

Unless required by applicable law or agreed to in writing, software
distributed under the License is distributed on an "AS IS" BASIS,
WITHOUT WARRANTIES OR CONDITIONS OF ANY KIND, either express or implied.
See the License for the specific language governing permissions and
limitations under the License. See accompanying LICENSE file.
-->
<configuration>

<!-- Site specific YARN configuration properties -->

<property>
  <name>yarn.resourcemanager.hostname</name>
  <value>sl-spark-n01l</value>
</property>

<property>
  <name>yarn.scheduler.maximum-allocation-vcores</name>
  <value>32</value>
</property>

<property>
  <name>yarn.nodemanager.log.retain-seconds</name>
  <value>100800</value>
</property>

<property>
  <name>yarn.nodemanager.resource.cpu-vcores</name>
  <value>32</value>
</property>

<property>
  <name>yarn.nodemanager.resource.memory-mb</name>
  <value>94000</value>
</property>

<property>
  <name>yarn.scheduler.maximum-allocation-mb</name>
  <value>93000</value>
</property>
<property>
  <name>yarn.nodemanager.pmem-check-enabled</name>
  <value>false</value>
</property>
<property>
  <name>yarn.nodemanager.vmem-check-enabled</name>
  <value>false</value>
</property>
<property>
  <name>yarn.nodemanager.disk-health-checker.enable</name>
  <value>false</value>
</property>
<property>
  <name>yarn.log-aggregation-enable</name>
  <value>false</value>
</property>
<property>
  <name>yarn.nodemanager.aux-services</name>
  <value>mapreduce_shuffle</value>
</property>
<property>
  <name>yarn.nodemanager.aux-services.mapreduce.shuffle.class</name>
  <value>org.apache.hadoop.mapred.ShuffleHandler</value>
</property>
<property>
  <name>yarn.nodemanager.disk-health-checker.max-disk-utilization-per-disk-percentage</name>
  <value>100</value>
</property>
<property>
 <name>yarn.nodemanager.resource-plugins</name>
 <value>yarn.io/gpu</value>
</property>


<!--<property>
<name>yarn.nodemanager.delete.debug-delay-sec</name>
<value>400</value>
</property>
-->

<!--
<property>
<name>yarn.nodemanager.local-dirs</name>
<value>/dev/shm/spark/</value>
</property>
-->
</configuration>
Copy hadoop directory from the NameNode to DataNodes
If you don't use a shared directory you need to copy the /opt/hadoop-3.2.1 directory from the NameNode to DataNodes, make symbolic link hadoop to t he /opt/hadoop-3.2.1 directory and set permissions to sparkuser.
Copy the content of /opt/hadoop-3.2.1 file on NameNode to /opt/hadoop-3.2.1 file on all DataNodes:
Server Console
            scp -r /opt/hadoop-3.2.1 sparkuser@192.168.11.72:/opt/hadoop-3.2.1
scp -r /opt/hadoop-3.2.1 sparkuser@192.168.11.73:/opt/hadoop-3.2.1
Make a symbolic link for hadoop-3.2.1 directory and s et the permissions to sparkuser to the hadoop-3.2.1 and the hadoop directores on all DataNodes :
Server Console
            ssh sl-spark-n02l
cd /opt
sudo ln -s hadoop-3.2.1/ hadoop
sudo chown -R user hadoop
sudo chown -R user hadoop-3.2.1/
exit
ssh sl-spark-n03l
cd /opt
sudo ln -s hadoop-3.2.1/ hadoop
sudo chown -R user hadoop
sudo chown -R user hadoop-3.2.1/
exit
Starting the Hadoop Cluster
Make YARN cgroup Directory
Make a YARN cgroup directory by running following command on NameNode and on all DataNodes :
Server Console
sudo mkdir -p /sys/fs/cgroup/devices/hadoop-yarn
Format HDFS NameNode
Format the Namenode before using it for the first time. As the sparkuser user runs the below command to format the Namenode.
Server Console
hdfs namenode -format
Put GPUs in Exclusive Mode
All GPUs need to be configured in EXCLUSIVE_PROCESS mode to run Spark with the Rapids Plugin on YARN as long as you run your Spark application on nodes with GPUs.
Without this we won't have a way to ensure that only one executor is accessing a GPU at once. Note, it does not matter if GPU scheduling support is enabled.
On all your YARN nodes, ensure the GPUs are in EXCLUSIVE_PROCESS mode
Run nvidia-smi to see how many GPUs and get the indexes of the GPUs
Set each GPU index to EXCLUSIVE_PROCESS mode:
nvidia-smi -c EXCLUSIVE_PROCESS -i $<GPU index>
Sample:
Server Console
            sudo nvidia-smi -c EXCLUSIVE_PROCESS -i 0
sudo nvidia-smi -c EXCLUSIVE_PROCESS -i 1
To remove GPU from the EXCLUSIVE_PROCESS mode, run following command to each GPU:
nvidia-smi -c 0 -i $<GPU index>
Start Hadoop Cluster
Once the Namenode has been formatted,start the HDFS using the start-dfs.sh script. Navigate NameNodeOnly to the /opt/hadoop/sbin directory and execute the following commands to start the NameNode and DataNodes:
Server Console
            cd /opt/hadoop
./start-dfs.sh
The system takes a few moments to initiate the necessary nodes.
Run the following command on NameNode and DataNodes to check if all the HDFS daemons are active and running as Java processes:
Server Console
jps
On NameNode:

On DataNodes:

Once the namenode, datanodes and secondary namenode are up and running, start the YARN resource and nodemanagers by executing the yarn start script i.e. start-yarn.sh on NameNodeOnly:
Server Console
./start-yarn.sh
As with the previous command, the output informs you that the processes are starting.
You can use the start-all.sh script to start HDFS and YARN together.
Type the below command on NameNode and DataNodes to check if all the HDFS and YARN daemons are active and running as Java processes:
Server Console
jps
If everything is working as intended, the resulting list of running Java processes contains all the HDFS and YARN daemons.
On NameNode:

On DataNode:

To stop the YARN and the HDFS and restart them, run following commands:
Server Console
            cd /opt/hadoop
./stop-all.sh

rm -rf /opt/hadoop/logs/*
./start-all.sh
jps
You have successfully installed Hadoop cluster.
Install Apache Spark
Downloading Apache Spark (Master Node)
Go to Downloads | Apache Spark and download the Apache Spark™ by choose a Spark release and package type the spark-3.0.0-bin-hadoop3.2.tgz file and copy the file to the /opt folder.

Optional: You can download the Spark by running following commands:
cd /opt
wget http://mirror.cogentco.com/pub/apache/spark/spark-3.0.0/spark-3.0.0-bin-hadoop3.2.tgz
Set Up Apache Spark
Extract the compressed file using the tar command:
Server Console
tar -xvf spark-3.0.0-bin-hadoop3.2.tgz
Make symbolic link for spark-3.0.0-bin-hadoop3.2 folder and s et the permissions for your user to spark-3.0.0-bin-hadoop3.2 and spark folders :
Server Console
            sudo ln -s spark-3.0.0-bin-hadoop3.2/ spark
sudo chown -R user spark
sudo chown -R user spark-3.0.0-bin-hadoop3.2/
Configure Spark Environment Variables (bashrc)
Edit the .bashrc shell configuration file:
Server Console
sudo vim .bashrc
Define the Spark environment variables by adding the following content to the end of the file:
Server Console
            #Spark Related Options
echo "export SPARK_HOME=/opt/spark"
echo "export PATH=$PATH:$SPARK_HOME/bin:$SPARK_HOME/sbin"
echo "export PYSPARK_PYTHON=/usr/bin/python3"
Once you save and close the text file, you can return to your original terminal and type this command to reload your .bashrc file.
Server Console
$ source ~/.bashrc
Check that the path have been properly modified.
Server Console
            echo $SPARK_HOME
echo $PATH
echo $PYSPARK_PYTHON
Run a sample Spark job in local mode to ensure Spark is working
Server Console
SPARK_HOME/bin/run-example SparkPi 10
Install the Spark Rapids Plugin jars
Create /opt/sparkRapidsPlugin and s et the permissions for your user to the directory :
Server Console
            sudo mkdir -p /opt/sparkRapidsPlugin
sudo chown -R sparkuser sparkRapidsPlugin
Download the 2 jars from the link above and put them into the /opt/sparkRapidsPlugin directory. Make sure to pull the cudf jar version for the cuda version you are running 10.2.
In case, you want to use stable cuDF and RAPIDS plugins versions, you can download them from: https://github.com/NVIDIA/spark-rapids/blob/branch-0.2/docs/version/stable-release.md Today 22/7/2020 are stable versions: cudf-0.14-cuda10-2 and rapids-4-spark_2.12-0.1.0
In our environment we will use last for today versions.
To download cuDF plugin run following commands:
Server Console
            cd /opt/sparkRapidsPlugin
wget https://oss.sonatype.org/service/local/repositories/snapshots/content/ai/rapids/cudf/0.15-SNAPSHOT/cudf-0.15-20200710.084843-7-cuda10-2.jar
To download RAPIDS plugin for Apache Spark, run the following commands:
Server Console
            sudo git clone https://github.com/NVIDIA/spark-rapids.git
cd spark-rapids/
sudo git checkout 8f038ae
sudo mvn package -DskipTests
sudo cp dist/target/rapids-4-spark_2.12-0.2.0-SNAPSHOT.jar /opt/sparkRapidsPlugin/rapids-4-spark_2.12-0.2.0-SNAPSHOT.jar
sudo cp /opt/spark-rapids/integration_tests/target/rapids-4-spark-integration-tests_2.12-0.2.0-SNAPSHOT.jar /opt/sparkRapidsPlugin/rapids-4-spark-integration-tests_2.12-0.2.0-SNAPSHOT.jar
Install the GPU Discovery Script
Download the getGpusResource.sh script and install on all the nodes.
Put it into a local folder. You may put it in the same directory as the plugin jars (/opt/sparkRapidsPlugin in our example)
Add GPU addresses to the getGpusResource.sh script. See the Example (we will provide two GPUs that we have):
Server Console
vim /opt/sparkRapidsPlugin/getGpusResource.sh
Sample output:
Sample
            #!/usr/bin/env bash

#
# Licensed to the Apache Software Foundation (ASF) under one or more
# contributor license agreements. See the NOTICE file distributed with
# this work for additional information regarding copyright ownership.
# The ASF licenses this file to You under the Apache License, Version 2.0
# (the "License"); you may not use this file except in compliance with
# the License. You may obtain a copy of the License at
#
# http://www.apache.org/licenses/LICENSE-2.0
#
# Unless required by applicable law or agreed to in writing, software
# distributed under the License is distributed on an "AS IS" BASIS,
# WITHOUT WARRANTIES OR CONDITIONS OF ANY KIND, either express or implied.
# See the License for the specific language governing permissions and
# limitations under the License.
#

# This script is a basic example script to get resource information about NVIDIA GPUs.
# It assumes the drivers are properly installed and the nvidia-smi command is available.
# It is not guaranteed to work on all setups so please test and customize as needed
# for your environment. It can be passed into SPARK via the config
# spark.{driver/executor}.resource.gpu.discoveryScript to allow the driver or executor to discover
# the GPUs it was allocated. It assumes you are running within an isolated container where the
# GPUs are allocated exclusively to that driver or executor.
# It outputs a JSON formatted string that is expected by the
# spark.{driver/executor}.resource.gpu.discoveryScript config.
#
# Example output: {"name": "gpu", "addresses":["0","1","2","3","4","5","6","7"]}

echo {\"name\": \"gpu\", \"addresses\":[\"0\", \"1\"]}
Running Apache Spark shell on YARN with RAPIDS/UCX
YARN requires Spark, the Spark Rapids Plugin jars and discovery script to be installed on a launcher(Master) node. YARN handles shipping them to the nodes as needed.
To running Apache Spark shell with RAPIDS and UCX plugins we will create new start-shell.sh file in the /opt/sparkRapidsPlugin directory.
Server Console
vim /opt/sparkRapidsPlugin start-shell.sh
In our use case we are using the following configs when running Spark on YARN.
Server Console
            export YARN_CONF_DIR=/opt/hadoop/

/opt/spark/bin/spark-shell \
--master yarn \
--num-executors 6 \
--executor-memory 40G \
--driver-memory 2G \
--conf spark.executor.cores=4 \
--conf spark.task.cpus=1 \
--conf spark.task.resource.gpu.amount=0.25 \
--conf spark.executor.resource.gpu.amount=1 \
--conf spark.rapids.sql.concurrentGpuTasks=1 \
--conf spark.rapids.memory.pinnedPool.size=2G \
--conf spark.locality.wait=0s \
--conf spark.yarn.maxAppAttempts=1 \
--conf spark.sql.shuffle.partitions=150 \
--conf spark.sql.files.maxPartitionBytes=212MB \
--conf spark.rapids.sql.batchSizeBytes=212M \
--conf spark.scheduler.minRegisteredResourcesRatio=1.0 \
--conf spark.rapids.shuffle.ucx.bounceBuffers.device.count=15 \
--conf spark.rapids.shuffle.ucx.bounceBuffers.host.count=25 \
--conf spark.plugins=com.nvidia.spark.SQLPlugin \
--conf spark.resources.discoveryPlugin=com.nvidia.spark.ExclusiveModeGpuDiscoveryPlugin \
--conf spark.shuffle.manager=com.nvidia.spark.RapidsShuffleManager \
--conf spark.rapids.shuffle.transport.enabled=true \
--conf spark.executorEnv.UCX_RNDV_SCHEME=get_zcopy \
--conf spark.executorEnv.UCX_LOG_LEVEL=debug \
--conf spark.driver.extraClassPath=/usr/lib/:rapids-4-spark_2.12-0.2.0-SNAPSHOT.jar:rapids-4-spark-integration-tests_2.12-0.2.0-SNAPSHOT.jar:cudf-0.15-20200710.084843-7-cuda10-2.jar \
--conf spark.executor.extraClassPath=/usr/lib/:rapids-4-spark_2.12-0.2.0-SNAPSHOT.jar:rapids-4-spark-integration-tests_2.12-0.2.0-SNAPSHOT.jar:cudf-0.15-20200710.084843-7-cuda10-2.jar \
--conf spark.plugins=com.nvidia.spark.SQLPlugin \
--conf spark.executor.resource.gpu.discoveryScript=./getGpusResources.sh \
--files ./getGpusResources.sh \
--jars /opt/sparkRapidsPlugin/rapids-4-spark_2.12-0.2.0-SNAPSHOT.jar,/opt/sparkRapidsPlugin/rapids-4-spark-integration-tests_2.12-0.2.0-SNAPSHOT.jar,/opt/sparkRapidsPlugin/cudf-0.15-20200710.084843-7-cuda10-2.jar
Run the start-shell.sh script.
Server Console
bash ./start-shell.sh
Example Join Operation:
Once you have started your spark shell you can run the following commands to do a basic join and look at the UI to see that it runs on the GPU.
Server Console
            val df = sc.makeRDD(1 to 10000000, 6).toDF
val df2 = sc.makeRDD(1 to 10000000, 6).toDF
df.select( $"value" as "a").join(df2.select($"value" as "b"), $"a" === $"b").count
Go to the Spark UI and click on the application you ran and on the “SQL” tab. If you click the operation “count at ...”, you should see the graph of Spark Execs and some of those should have the label Gpu... For instance, in the screenshot below you will see GpuRowToColumn, GpuFilter, GpuColumnarExchange, those all indicate things that would run on the GPU.
Stop Apache Spark shell.
To stop Apache Spark shell click on "CTRL-C".
Example TPCH Application
To run TPCH application, please download the generated dataset and run following commands:
Server Console
            sudo git clone https://github.com/databricks/tpch-dbgen.git
cd tpch-dbgen
sudo make
sudo dbgen -s 30
sudo hdfs dfs -put *.tbl
Create 3 new files spark-submit-tcp.sh, spark-submit-rc.sh, spark-submit-rc-ucx.sh in the /opt/sparkRapidsPlugin directory.
Server Console
            sudo vim /opt/sparkRapidsPlugin/spark-submit-tcp.sh
sudo vim /opt/sparkRapidsPlugin/spark-submit-rc.sh
sudo vim /opt/sparkRapidsPlugin/spark-submit-rc-ucx.sh
For TCP without GPU/RAPIDS/UCX running we are using the spark-submit-tcp.sh file with the following configs when running Spark on YARN.
Server Console
            export YARN_CONF_DIR=/opt/hadoop/
/opt/spark/bin/spark-submit \
--master yarn \
--num-executors 6 \
--executor-memory 40G \
--driver-memory 2G \
--conf spark.executor.memory=4G \
--conf spark.executor.cores=15 \
--conf spark.task.cpus=1 \
--conf spark.locality.wait=0s \
--conf spark.sql.files.maxPartitionBytes=512m \
--conf spark.sql.shuffle.partitions=100 \
--conf spark.driver.extraClassPath=//usr/lib/:rapids-4-spark_2.12-0.2.0-SNAPSHOT.jar:rapids-4-spark-integration-tests_2.12-0.2.0-SNAPSHOT.jar:cudf-0.15-20200710.084843-7-cuda10-2.jar \
--conf spark.executor.extraClassPath=/usr/lib/:rapids-4-spark_2.12-0.2.0-SNAPSHOT.jar:rapids-4-spark-integration-tests_2.12-0.2.0-SNAPSHOT.jar:cudf-0.15-20200710.084843-7-cuda10-2.jar \
--jars /opt/sparkRapidsPlugin/rapids-4-spark_2.12-0.2.0-SNAPSHOT.jar,/opt/sparkRapidsPlugin/rapids-4-spark-integration-tests_2.12-0.2.0-SNAPSHOT.jar,/opt/sparkRapidsPlugin/cudf-0.15-20200710.084843-7-cuda10-2.jar \
com.nvidia.spark.rapids.tests.tpch.CSV 22
For RDMA/RC with GPU/RAPIDS and without UCX running we are using the spark-submit-rc.sh file with the following configs when running Spark on YARN.
Server Console
            export YARN_CONF_DIR=/opt/hadoop/
/opt/spark/bin/spark-submit \
--master yarn \
--num-executors 6 \
--executor-memory 40G \
--driver-memory 2G \
--conf spark.executor.cores=4 \
--conf spark.task.cpus=1 \
--conf spark.task.resource.gpu.amount=0.25 \
--conf spark.executor.resource.gpu.amount=1 \
--conf spark.rapids.sql.concurrentGpuTasks=1 \
--conf spark.rapids.memory.pinnedPool.size=2G \
--conf spark.locality.wait=0s \
--conf spark.yarn.maxAppAttempts=1 \
--conf spark.sql.shuffle.partitions=150 \
--conf spark.sql.files.maxPartitionBytes=212MB \
--conf spark.rapids.sql.batchSizeBytes=212M \
--conf spark.scheduler.minRegisteredResourcesRatio=1.0 \
--conf spark.plugins=com.nvidia.spark.SQLPlugin \
--conf spark.resources.discoveryPlugin=com.nvidia.spark.ExclusiveModeGpuDiscoveryPlugin \
--conf spark.shuffle.manager=com.nvidia.spark.RapidsShuffleManager \
--conf spark.driver.extraClassPath=//usr/lib/:rapids-4-spark_2.12-0.2.0-SNAPSHOT.jar:rapids-4-spark-integration-tests_2.12-0.2.0-SNAPSHOT.jar:cudf-0.15-20200710.084843-7-cuda10-2.jar \
--conf spark.executor.extraClassPath=/usr/lib/:rapids-4-spark_2.12-0.2.0-SNAPSHOT.jar:rapids-4-spark-integration-tests_2.12-0.2.0-SNAPSHOT.jar:cudf-0.15-20200710.084843-7-cuda10-2.jar \
--conf spark.executor.resource.gpu.discoveryScript=./getGpusResources.sh \
--files ./getGpusResources.sh \
--jars /opt/sparkRapidsPlugin/rapids-4-spark_2.12-0.2.0-SNAPSHOT.jar,/opt/sparkRapidsPlugin/rapids-4-spark-integration-tests_2.12-0.2.0-SNAPSHOT.jar,/opt/sparkRapidsPlugin/cudf-0.15-20200710.084843-7-cuda10-2.jar \
com.nvidia.spark.rapids.tests.tpch.CSV 22
For RDMA/RC with GPU/RAPIDS and UCX running we are using the spark-submit-rc-ucx.sh file with the following configs when running Spark on YARN.
Server Console
            export YARN_CONF_DIR=/opt/hadoop/
/opt/spark/bin/spark-submit \
--master yarn \
--num-executors 6 \
--executor-memory 40G \
--driver-memory 2G \
--conf spark.executor.cores=4 \
--conf spark.task.cpus=1 \
--conf spark.task.resource.gpu.amount=0.25 \
--conf spark.executor.resource.gpu.amount=1 \
--conf spark.rapids.sql.concurrentGpuTasks=1 \
--conf spark.rapids.memory.pinnedPool.size=2G \
--conf spark.locality.wait=0s \
--conf spark.yarn.maxAppAttempts=1 \
--conf spark.sql.shuffle.partitions=150 \
--conf spark.sql.files.maxPartitionBytes=212MB \
--conf spark.rapids.sql.batchSizeBytes=212M \
--conf spark.scheduler.minRegisteredResourcesRatio=1.0 \
--conf spark.rapids.shuffle.ucx.bounceBuffers.device.count=15 \
--conf spark.rapids.shuffle.ucx.bounceBuffers.host.count=25 \
--conf spark.plugins=com.nvidia.spark.SQLPlugin \
--conf spark.resources.discoveryPlugin=com.nvidia.spark.ExclusiveModeGpuDiscoveryPlugin \
--conf spark.shuffle.manager=com.nvidia.spark.RapidsShuffleManager \
--conf spark.executorEnv.UCX_TLS=cuda_copy,cuda_ipc,tcp,rc \
--conf spark.executorEnv.UCX_RNDV_SCHEME=get_zcopy \
--conf spark.executorEnv.UCX_LOG_LEVEL=debug \
--conf spark.rapids.shuffle.transport.enabled=true \
--conf spark.driver.extraClassPath=//usr/lib/:rapids-4-spark_2.12-0.2.0-SNAPSHOT.jar:rapids-4-spark-integration-tests_2.12-0.2.0-SNAPSHOT.jar:cudf-0.15-20200710.084843-7-cuda10-2.jar \
--conf spark.executor.extraClassPath=/usr/lib/:rapids-4-spark_2.12-0.2.0-SNAPSHOT.jar:rapids-4-spark-integration-tests_2.12-0.2.0-SNAPSHOT.jar:cudf-0.15-20200710.084843-7-cuda10-2.jar \
--conf spark.executor.resource.gpu.discoveryScript=./getGpusResources.sh \
--files ./getGpusResources.sh \
--jars /opt/sparkRapidsPlugin/rapids-4-spark_2.12-0.2.0-SNAPSHOT.jar,/opt/sparkRapidsPlugin/rapids-4-spark-integration-tests_2.12-0.2.0-SNAPSHOT.jar,/opt/sparkRapidsPlugin/cudf-0.15-20200710.084843-7-cuda10-2.jar \
com.nvidia.spark.rapids.tests.tpch.CSV 22
Done!
Appendix
General Recommendations
Fewer large input files are better than many of small files. You may not have control over this but it is worth knowing.
Larger input sizes spark.sql.files.maxPartitionBytes=512m are generally better as long as things fit into the GPU.
The GPU does better with larger data chunks as long as they fit into memory. When using the default spark.sql.shuffle.partitions=200 it may be beneficial to make this smaller. Base this on the amount of data the task is reading. Start with 512MB / task.
Out of GPU Memory.
GPU out of memory can show up in multiple ways. You can see an error that it is out of memory or it can also manifest as it just crashes. Generally this means your partition size is too big, go back to the Configuration section for the partition size and/or the number of partitions. Possibly reduce the number of concurrent gpu tasks to 1. The Spark UI may give you a hint at the size of the data. Look at either the input data or the shuffle data size for the stage that failed.
RAPIDS Accelerator for Apache Spark Tuning Guide
Tuning a Spark job’s configuration settings from the defaults can often improve job performance, and this remains true for jobs leveraging the RAPIDS Accelerator plugin for Apache Spark.
This document provides guidelines on how to tune a Spark job’s configuration settings for improved performance when using the RAPIDS Accelerator plugin.
Monitoring
Since the plugin runs without any API changes, the easiest way to see what is running on the GPU is to look at the "SQL" tab in the Spark Web UI. The SQL tab only shows up after you have actually executed a query. Go to the SQL tab in the UI, click on the query you are interested in and it shows a DAG picture with details. You can also scroll down and twist the "Details" section to see the text representation.
If you want to look at the Spark plan via the code you can use the explain() function call. For example: query.explain() will print the physical plan from Spark and you can see what nodes were replaced with GPU calls.
Debugging
For now, the best way to debug is how you would normally do it on Spark. Look at the UI and log files to see what failed. If you got a seg fault from the GPU find the hs_err_pid.log file. To make sure your hs_err_pid.log file goes into the YARN application log, you may add in the config: --conf spark.executor.extraJavaOptions="-XX:ErrorFile=<LOG_DIR>/hs_err_pid_%p.log"
If you want to see why an operation didn’t run on the GPU, you can turn on the configuration: --conf spark.rapids.sql.explain=NOT_ON_GPU. A log message will then be output to the Driver log as to why a Spark operation isn’t able to run on the GPU.
Authors

|
Boris Kovalev Boris Kovalev has worked for the past several years as a Solutions Architect, focusing on NVIDIA Networking/Mellanox technology, and is responsible for complex machine learning, Big Data and advanced VMware-based cloud research and design. Boris previously spent more than 20 years as a senior consultant and solutions architect at multiple companies, most recently at VMware. He has written multiple reference designs covering VMware, machine learning, Kubernetes, and container solutions which are available at the Mellanox Documents website. |

|
Peter Rudenko Peter Rudenko is a software engineer on the NVIDIA High Performance Computing (HPC) team who focuses on accelerating data intensive applications, developing the UCX communication X library, and other big data solutions. |