RDG for Kubernetes Cluster Deployment for ML and HPC Workloads with NVIDIA GPU Virtualization and VMware PVRDMA Technologies
Created on Aug 15, 2019
Introduction
This is a reference deployment guide (RDG) for RoCE accelerated Machine Learning (ML) and HPC applications on Kubernetes (k8s) cluster with NVIDIA vGPU and VMware PVRDMA technologies, NVIDIA ConnectX®-4/5 VPI PCI Express Adapter Cards and NVIDIA Spectrum switches with NVIDIA Onyx software.
This document describes the process of building a K8s cluster with 1 Kubernetes master node, and 4 worker nodes.
This guide assumes the following software and drivers are installed:
VMware ESXi 6.7 Update 2, build 13006603
VMware vCenter 6.7 Update 2, build 13007421
NVIDIA Virtual GPU Software v9.0
Distributed Switch 6.6.0
ConnectX® Ethernet Driver for VMware® ESXi Server 4.17.13.1-1vmw.670.2.48.13006603
SN2700 Open Ethernet Switch with NVIDIA Onyx
CentOS 7.6 as Virtual Machine OS
Kubernetes v1.15
Kubeflow MPI Operator v1alpha2
References
Using GPUs with Virtual Machines on vSphere – Part 3: Installing the NVIDIA GRID Technology
Recommended Network Configuration Examples for RoCE Deployment
GitHub - uber/horovod: Distributed training framework for TensorFlow, Keras, PyTorch, and MXNet
Components Overview
NVIDIA Virtual GPU (vGPU™)
NVIDIA vGPU software products enable GPU virtualization for graphics and compute workloads. In this reference design, the NVIDIA Virtual Compute Server license was used. Virtual Compute Server gives data center administrators the option to run AI workloads on GPU servers in virtualized environments for improved security, utilization and manageability. IT administrators can use hypervisor virtualization tools like VMware vSphere, including vCenter and vMotion, to manage all their data center applications, including compute-intensive AI applications running on NVIDIA GPUs. NVIDIA Virtual Compute Server provides features like GPU sharing, so multiple virtual machines can be powered by a single GPU, and GPU aggregation, so one or multiple GPUs can power a virtual machine.

Remote Direct Memory Access for Virtual Machines
vSphere 6.5 (and later) introduces support for Remote Direct Memory Access (RDMA) communication between virtual machines that have ParaVirtualized RDMA (PVRDMA) network adapters.
RDMA
RDMA allows direct memory access from the memory of one computer to the memory of another computer without involving the operating system or CPU. The transfer of memory is offloaded to the RDMA-capable Host Channel Adapter (HCA). The PVRDMA network adapter provides remote direct memory access in a virtual environment.
Using RDMA in vSphere
In vSphere, a virtual machine can use a PVRDMA network adapter to communicate with other virtual machines that utilize PVRDMA devices. The virtual machines must be connected to the same vSphere Distributed Switch. The PVRDMA device automatically selects the method of communication between the virtual machines.
For virtual machines that run on the same ESXi host with or without a physical RDMA device, the data transfer is a memcpy between the two virtual machines. The physical RDMA hardware is not used in this case.
For virtual machines that reside on different ESXi hosts and that have a physical RDMA connection, the physical RDMA devices must be uplinks on the distributed switch. In this case, the communication between the virtual machines by way of PVRDMA uses the underlying physical RDMA devices.
For two virtual machines that run on different ESXi hosts, when at least one of the hosts does not have a physical RDMA device, the communication falls back to a TCP-based channel and the performance is reduced.
PVRDMA Architecture

Accelerating Virtual Machine Data

Kubernetes
Kubernetes (K8s) is an open-source container orchestration system for deployment automation, scaling, and management of containerized applications.
Kubeflow MPI Operator
Kubeflow is a Cloud Native platform for machine learning based on Google’s internal machine learning pipelines. The Kubeflow MPI Operator makes it easy to run allreduce-style distributed training.
Please refer to the official docs at kubeflow.org.
Docker
Docker is a computer program that performs operating-system-level virtualization. It is used for running software packages called containers, isolated from each other and bundle their own applications, tools, libraries and configuration files. Docker containers are created from images that specify their precise contents and can communicate with each other.
All containers are run by a single operating-system kernel, and are thus more lightweight than virtual machines.
TensorFlow
TensorFlow is an open source software library developed by the Google Brain team to conduct machine learning and deep neural networks research.
The library performs numerical computation by using data flow graphs, where the nodes in the graph represent mathematical operations and the graph edges represent the multi-dimensional data arrays (tensors) which communicate between the nodes.
TensorFlow supports Cuda & cuDNN(req. registration).
Horovod
Horovod is a distributed training framework for TensorFlow, Keras, PyTorch, and MXNet. The goal of Horovod is to make distributed Deep Learning fast and easy to use.
vSphere Distributed Switch
A vSphere Distributed Switch provides centralized management and monitoring of the networking configuration of all hosts that are associated with the switch. You must set up a distributed switch on a vCenter Server system, and its settings will be propagated to all hosts that are associated with the switch.
NVIDIA’s Machine Learning
NVIDIA Ethernet solutions accelerate many of the world’s leading artificial intelligence and machine learning platforms and wide range of applications, ranging from security, finance, and image and voice recognition, to self-driving cars and smart cities. NVIDIA solutions enable companies and organizations such as Baidu, NVIDIA, JD.com, Facebook, PayPal and more to leverage machine learning platforms to enhance their competitive advantage.
In this post we will show how to build most efficient Machine Learning cluster enhanced by RoCE over 100 Gbps Ethernet network.
Solution Overview
Setup
Before you start, make sure you are familiar with VMware vSphere and vCenter deploy and manage procedures.
This guide does not contain step-by-step instructions for performing all of the required standard vSphere and vCenter installation and configuration tasks because they often depend on customer requirements.
Make sure you are aware of the Kubernetes and Kubeflow MPI Operator, and the Uber Horovod distributed training framework (see GitHub - uber/horovod: Distributed training framework for TensorFlow, Keras, PyTorch, and MXNet for more info).
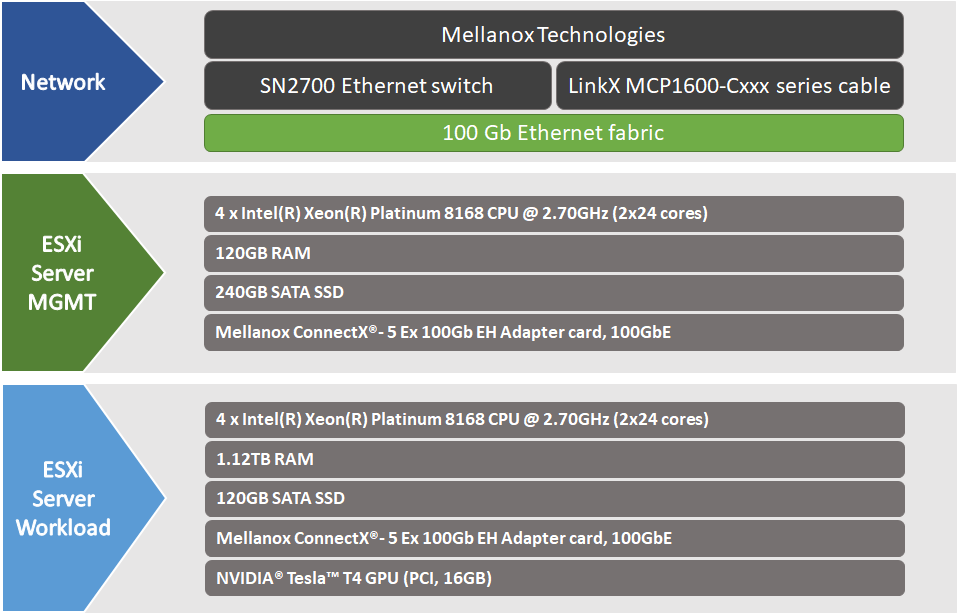
The below hardware specifications are used in this solution.
Solution Logical Design

Workload ESXi Logical Design

Bill of Materials
This document does not cover the Management Cluster ESXi server configuration. Make sure to configure at least one ESXi server for vCenter and Kubernetes Master VMs.
This document does not cover storage components. Make sure to configure your storage components to match your requirements.
The below table specifies the hardware components used in this solution :

Physical Network Wiring

Configuration
Network and Security Configuration
Before starting the configuration process make sure that the below requirements are met:
Full network connectivity between all Kubernetes Virtual Machines by VMs Management network
Full network connectivity between all Worker Kubernetes Virtual Machines by High-Speed Ethernet network
Certain ports are open on your machines:
For Kubernetes cluster see here
CNI ports. As example Calico requires TCP port 179 for inbound and outbound traffic
The port 7070, which is the default port number used by NVIDIA GRID License Server
The port 28250 (incoming/outgoing), which is the default port number used by PVRDMA
vSphere Network Architecture - Management Cluster

vSphere Network Architecture - Workload Cluster

The below table provides details of Workload Cluster ESXi server names and their network configuration:
|
ESXi Server |
Server Name |
IP and NICs |
|
|
High-Speed Ethernet Network 192.168.0.0/24 |
Management Network 172.16.31.0/24 |
||
|
ESXi-m01 |
sc2esx21 |
none |
eno0: From DHCP (reserved) |
|
ESXi-w01 |
sc2esx24 |
vmk3: 192.168.0.24 |
eno0: From DHCP (reserved) |
|
ESXi-w02 |
sc2esx25 |
vmk3: 192.168.0.25 |
eno0: From DHCP (reserved) |
|
ESXi-w03 |
sc2esx26 |
vmk3: 192.168.0.26 |
eno0: From DHCP (reserved) |
|
ESXi-w04 |
sc2esx27 |
vmk3: 192.168.0.27 |
eno0: From DHCP (reserved) |
The below table provides details of VM names and their network configuration:
|
VM |
Server Name |
IP and NICs |
|
|
High-Speed Ethernet Network 192.168.0.0/24 |
Management Network 172.16.7.0/24 |
||
|
VM-01 |
sckubw01 |
192.168.0.51 |
eno0: From DHCP (reserved) |
|
VM-02 |
sckubw02 |
192.168.0.52 |
eno0: From DHCP (reserved) |
|
VM-03 |
sckubw03 |
192.168.0.53 |
eno0: From DHCP (reserved) |
|
VM-04 |
sckubw04 |
192.168.0.54 |
eno0: From DHCP (reserved) |
|
VM-vCenter |
sc2vc03 |
none |
eno0: From DHCP (reserved) |
|
VM-K8sMaster |
sckubm01 |
none |
eno0: From DHCP (reserved) |
Host Configuration
All Worker Nodes must have the same configuration and the same PCIe card placement.
Before configuring the host, make sure the following hardware and software requirements are met:
Server platform with an adapter card based on NVIDIA ConnectX®-4/5 HCA devices.
A NVIDIA switch from NVIDIA Scale-Out SN2000 Ethernet Switch Series.
VMware vSphere 6.7 u2 Cluster installed and configured.
VMware vCenter 6.7 u2 installed and configured.
GPU card from the supported NVIDIA GPUs list.
Licensed NVIDIA GRID (including the VIB for vSphere and the Guest OS driver)
NTP installed and activated on all Hosts and VMs.
Installer Privileges. The installation process requires administrator privileges on the target machine.
Virtual Machine Configuration
Master Node Configuration
VMware recommends a Kubernetes Master Node of at least 2 nodes with the following resource allocations to support up to 50 nodes:
|
k8s Nodes |
CPU |
Memory |
Disk |
|
Up to 50 |
4 |
16 GB |
50 GB SSD |
In this solution, we will install only one Kubernetes Master None.
For Kubernetes deployments on VMware vSphere, the Master Node size recommendations apply to virtual machines hosted on the vSphere hypervisor. You should base the size for these VMs based on your anticipated workloads, growth, and system requirements.
Worker Node Requirements
Sizing worker nodes is heavily dependent on your workloads. These nodes must meet the the basic requirements for installing Kubernetes using kubeadm and your application requirements (more information can be found here).
|
CPU |
Memory |
Disk |
|
4 |
24 GB |
50 GB SSD |
For vSphere-based deployments, use the worker node sizing guidelines above as a starting point.
Since most vSphere-based deployments will likely end up with multiple worker nodes hosted on a single hypervisor, worker node sizing must account for the overall impact of hypervisor/hardware failure, the number of nodes that may be affected, and the number of workloads on these nodes.
It is recommended to find a balance between scaling up and scaling out the worker nodes.
Virtual Machine OS
In this solution we are using CentOS 7.6 for all Kubernetes Nodes.
Deployment
Workload Cluster Host and VM Configuration
PVRDMA Configuration
To utilise PVRDMA in vSphere 6.5/6.7, your environment must meet the following Configuration Requirements.
To configure PVRDMA adapter for ESXi host, see How-to Configure PVRDMA in VMware vSphere 6.5/6.7.
vGPU Deployment and Configuration
NVIDIA vGPU is available as a licensed product on supported Tesla GPUs. For a list of recommended server platforms and supported GPUs, see the release notes for supported hypervisors at NVIDIA Virtual GPU Software Documentation.
A trial licenses are available for PoC environments. It can be downloaded from https://www.nvidia.com/en-us/data-center/virtual-gpu-technology/ (click “FREE TRIAL”).
To use NVIDIA vGPU software drivers for vSphere deployment, follow Installing and Configuring the NVIDIA Virtual GPU Manager for VMware vSphere section in NVIDIA's official VIRTUAL GPU SOFTWARE User Guide . You can also refer to Using GPUs with Virtual Machines on vSphere – Part 3: Installing the NVIDIA GRID Technology on VMware blogs.
Installing NVIDIA Container Toolkit
To install the NVIDIA Container Toolkit on CentOS 7.6 OS run the following command line:
VM Console
            distribution=$(. /etc/os-release;echo $ID$VERSION_ID)
curl -s -L https://nvidia.github.io/nvidia-docker/$distribution/nvidia-docker.repo | sudo tee /etc/yum.repos.d/nvidia-docker.repo
yum install -y nvidia-container-toolkit
systemctl restart docker
Application Deployment and Configuration
Kubernetes Cluster Deployment
You can create a single control-plane cluster using one of the below options:
Cluster Deployment Verification
To v erify that the Kubernetes cluster is running, executing the following command on the Master Node:
kubectl get nodes -o wide
Install Kubeflow MPI Operator
To install Kubeflow MPI Operator, run the following command on a Kubernetes Master VM:
Kubernetes Master VM Console
            curl https://raw.githubusercontent.com/Mellanox/mpi-operator/single_deploy/deploy/mpi-operator.yaml -O
kubectl apply -f mpi-operator.yaml
Running the Application
Before you start, make sure you are familiar with the following:
Getting started with Kubeflow and MPI Operator
To create a MPI job:
Define an MPIJob config file. Below is an example of how to run a distributed TensorFlow training job with Horovod framework and RoCE acceleration:
Kubernetes Master VM Console
            apiVersion: kubeflow.org/v1alpha2
kind: MPIJob
metadata:
  name: tensorflow-benchmarks
spec:
  slotsPerWorker: 1
  cleanPodPolicy: Running
  mpiReplicaSpecs:
    Launcher:
      replicas: 1
      template:
         spec:
           containers:
           - image: mpioperator/tensorflow-benchmarks:latest
             name: tensorflow-benchmarks
             command:
             - mpirun
             - --allow-run-as-root
             - -np
             - "4"
             - -bind-to
             - none
             - -map-by
             - slot
             - -x
             - NCCL_DEBUG=INFO
             - -x
             - NCCL_IB_DISABLE=0
             - -x
             - NCCL_IB_GDR_LEVEL=0
             - -x
             - HOROVOD_MPI_THREADS_DISABLE=1
             - -x
             - LD_LIBRARY_PATH
             - -x
             - PATH
             - -mca
             - pml
             - ob1
             - -mca
             - btl
             - ^openib
             - python
             - scripts/tf_cnn_benchmarks/tf_cnn_benchmarks.py
             - --model=resnet50
             - --batch_size=32
             - --variable_update=horovod
             - --use_fp16
             - --xla=True
             - --num_batches=10000
    Worker:
      replicas: 4
      template:
        spec:
          containers:
          - image: mpioperator/tensorflow-benchmarks:latest
            name: tensorflow-benchmarks
            securityContext:
              privileged: true
            volumeMounts:
            - mountPath: /dev/infiniband
              name: infiniband
            resources:
              limits:
                nvidia.com/gpu: 1
         volumes:
         - name: infiniband
           hostPath:
             path: /dev/infiniband
WarningSee Tensorflow benchmark example config file for launching a multi-node TensorFlow benchmark training job. Please see the tensorflow-benchmarks-roce.yaml (TBD) file adapted for our environment and includes all 4 nodes.
To change job so that it would run on TCP, modify the following parameters:
NCCL_IB_DISABLE=0 to NCCL_IB_DISABLE=1and
HOROVOD_MPI_THREADS_DISABLE=1 to HOROVOD_MPI_THREADS_DISABLE=0Deploy the MPIJob resource to start the training session with the following command:
Kubernetes Master VM Console
kubectl create -f tensorflow-benchmarks-roce.yaml
Once the MPIJob resource is created, you can monitor the job status from the "Status" section. You can also see the created pods matching the specified number of GPUs.
Below is a sample output of a successful job:Kubernetes Master VM Console
kubectl get -o yaml mpijob tensorflow-benchmarks-roce
The training session should run for 100 steps and takes a few minutes on a GPU cluster. You can inspect the logs to see the training progress.
When the job starts, access the logs from the launcher pod using the following command:Kubernetes Master VM Console
            PODNAME=$(kubectl get pods -l mpi_job_name=tensorflow-benchmarks,mpi_role_type=launcher -o name)
kubectl logs -f ${PODNAME}
Performance Testing
The following are the results of our performance tests:


Done!
Authors
|

|
Boris Kovalev Boris Kovalev has worked for the past several years as a Solutions Architect, focusing on NVIDIA Networking/Mellanox technology, and is responsible for complex machine learning, Big Data and advanced VMware-based cloud research and design. Boris previously spent more than 20 years as a senior consultant and solutions architect at multiple companies, most recently at VMware. He has written multiple reference designs covering VMware, machine learning, Kubernetes, and container solutions which are available at the Mellanox Documents website. |