RDG for NVIDIA Network Accelerated Red Hat OpenShift Container Platform over VMware vSphere
Created on Aug 14, 2022
Scope
The following Reference Deployment Guide (RDG) demonstrates the process of deploying and configuring NVIDIA accelerated networking with Red Hat OpenShift Container Platform (OCP) cluster version 4.10.18. The deployment is performed on a single VMware vSphere 7.0.3 cluster over NVIDIA® accelerated end-to-end 25/100 Gbp/s Ethernet solution. This setup is capable of running RDMA and DPDK-based applications. VMware’s vSAN over RDMA will be used as a shared storage for the Red Hat OpenShift Container Platform workloads.
Abbreviations and Acronyms
|
Term |
Definition |
Term |
Definition |
|
DAC |
Direct Attached Cable |
RDMA |
Remote Direct Memory Access |
|
DHCP |
Dynamic Host Configuration Protocol |
RoCE |
RDMA over Converged Ethernet |
|
DPDK |
Data Plane Development Kit |
SDN |
Software-Defined Network |
|
CNI |
Container Network Interface |
SDS |
Software-Defined Storage |
|
IB |
InfiniBand |
SR-IOV |
Single Root I/O Virtualization |
|
NFD |
Node Feature Discovery Operator |
VDS |
vSphere Distributed Switch |
|
NOS |
Network Operation System |
VF |
Virtual Function |
|
OCP |
Red Hat® OpenShift Container Platform® |
VM |
Virtual Machine |
Introduction
Provisioning Red Hat OCP cluster for running RDMA and DPDK-based workloads over VMware vSphere environment may prove to be challenging. Proper design, software and hardware components selection could be a gating task toward a successful deployment.
This guide provides step-by-step instructions on how to deploy a Red Hat OCP cluster by using OCP Assisted Installer on a single vSphere cluster, including technology overview, design, components selection and deployment steps. The Assisted Installer is a user-friendly installation solution offered on the Red Hat Hybrid Cloud Console . The Assisted Installer focuses on bare metal and vSphere infrastructures.
VMware’s vSANoRDMA is now fully qualified, and available as of the ESXi 7.0 U2 release, making it ready for deployments.
In this document, we will be using the NVIDIA Network Operator, which is responsible for deploying and configuring, with a Host Device Network mode. This allows to run RDMA and DPDK workloads on an OCP Cluster Worker Node.
References
Solution Architecture
Key Components and Technologies
NVIDIA Spectrum Ethernet Switches
Flexible form-factors with 16 to 128 physical ports, supporting 1GbE through 400GbE speeds.
Based on a ground-breaking silicon technology optimized for performance and scalability, NVIDIA Spectrum switches are ideal for building high-performance, cost-effective, and efficient Cloud Data Center Networks, Ethernet Storage Fabric, and Deep Learning Interconnects.
NVIDIA combines the benefits of NVIDIA Spectrum™ switches, based on an industry-leading application-specific integrated circuit (ASIC) technology, with a wide variety of modern network operating system choices, including NVIDIA Cumulus® Linux , SONiC and NVIDIA Onyx®.
NVIDIA® Cumulus® Linux is the industry's most innovative open network operating system that allows you to automate, customize, and scale your data center network like no other.
NVIDIA ConnectX SmartNICs
10/25/40/50/100/200 and 400G Ethernet Network Adapters
The industry-leading NVIDIA® ConnectX® family of smart network interface cards (SmartNICs) offer advanced hardware offloads and accelerations.
NVIDIA Ethernet adapters enable the highest ROI and lowest Total Cost of Ownership for hyperscale, public and private clouds, storage, machine learning, AI, big data, and telco platforms.
The NVIDIA® LinkX® product family of cables and transceivers provides the industry’s most complete line of 10, 25, 40, 50, 100, 200, and 400GbE in Ethernet and 100, 200 and 400Gb/s InfiniBand products for Cloud, HPC, hyperscale, Enterprise, telco, storage and artificial intelligence, data center applications.
RDMA is a technology that allows computers in a network to exchange data without involving the processor, cache or operating system of either computer.
Like locally based DMA, RDMA improves throughput and performance and frees up compute resources.
( RoCE ) or InfiniBand over Ethernet ( IBoE ) [1] is a network protocol that allows remote direct memory access (RDMA) over an Ethernet network. It does this by encapsulating an InfiniBand (IB) transport packet over Ethernet.
Red Hat® OpenShift Container Platform® is an enterprise-ready Kubernetes container platform built for an open hybrid cloud strategy. It provides a consistent application platform to manage hybrid cloud, multicloud, and edge deployments.
An analog to the NVIDIA GPU Operator, the NVIDIA Network Operator simplifies scale-out network design for Kubernetes by automating aspects of network deployment and configuration that would otherwise require manual work. It loads the required drivers, libraries, device plugins, and CNIs on any cluster node with an NVIDIA network interface. Paired with the NVIDIA GPU Operator, the Network Operator enables GPUDirect RDMA, a key technology that accelerates cloud-native AI workloads by orders of magnitude. The NVIDIA Network Operator uses Kubernetes CRD and the Operator Framework to provision the host software needed for enabling accelerated networking.
Logical Design
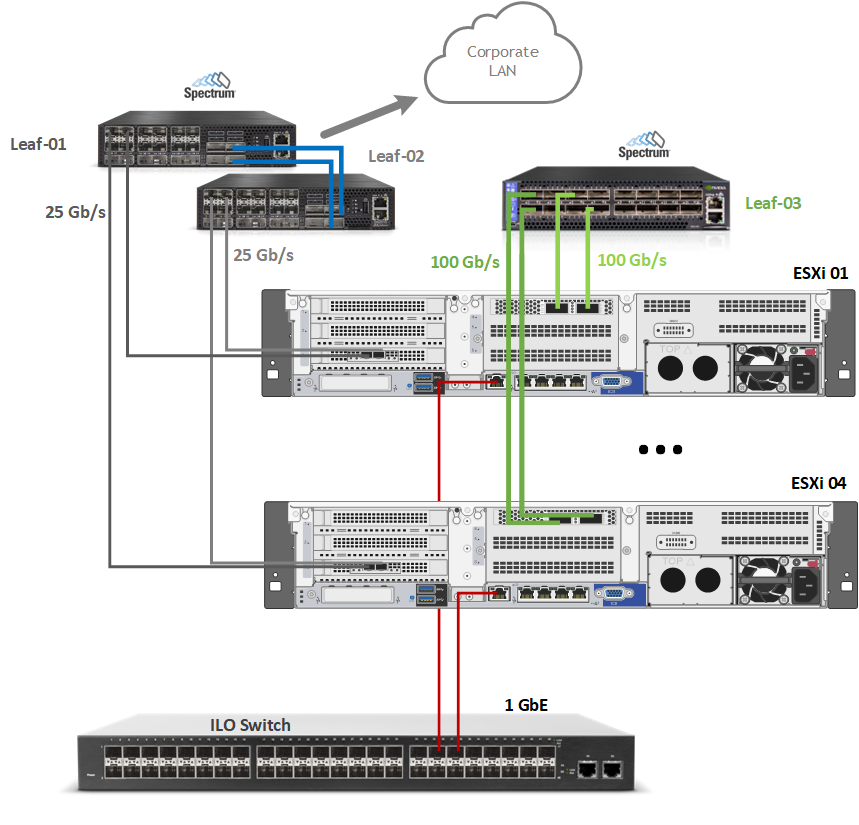
The described setup uses one vSphere cluster that includes 4 ESXi servers connected to two NVIDIA® Spectrum® SN2010 Ethernet switches (Management, Ingress and Egress traffic), and one NVIDIA® Spectrum® SN2100 Ethernet switch (High speed vSAN, RDMA and DPDK traffic).
vCenter, Infra Node and Router VMs will be placed on the same cluster.
For production design, it is recommended to place a vCenter, Infra Node and Router VMs in a separate management cluster. This recommendation applies for VMware Validated Design (VVD) and VMware Cloud Foundation (VCF), which is based on VVD.

Network Design
The Cluster networking is configured with the following networks:
Corporate (Management) Network (VLAN 1610 - 192.168.1.x/24)
The network responsible for connectivity between the ESXi VMkernel Management interface, vCenter and other Management VMs.
WarningDHCP and DNS services are required. The components installation and configuration are not covered in this guide.
vMotion Network (VLAN 1611 – 192.168.11.0/24)
This is where the ESXi vMotion VMkernel interfaces will reside.OCP Network (VLAN 1677 - 192.168.77.0/24) – OpenShift Management network.
vSAN Network (VLAN 1630 – 192.168.30.0/24)
This is where the ESXi vSAN VMkernel interfaces will reside.RDMA Network (VLAN 1631 – 192.168.3.0/24)
This is where the ESXi vSAN VMkernel interfaces will reside.
vSphere Distributed Switches Design

Internet access for the OCP
In our guide, an OCP cluster is deployed in a non-Air Gap environment and Internet access is required.
OpenShift Container Platform Networking

Software Stack Components
This guide assumes that the following software and drivers are installed:
VMware ESXi 7.0.3, build 17630552
VMware vCenter 7.0.3, build 17694817
Distributed Switch 7.0.3
RedHat OCP 4.10.18
NVIDIA® ConnectX® Driver for VMware ESXi Server v4.21.71.101
NVIDIA® ConnectX®-6DX FW version 22.32.2004
NVIDIA® ConnectX®-6LX FW version 26.32.1010
Network Operating System (NOS): NVIDIA Cumulus™ v 5.1
Bill of Materials
The following hardware setup is utilized in the vSphere environment described in this guide:

Cluster Compute/Storage:
|
VM |
CPU |
MEM |
DISK |
|
Compute Cluster vCenter (based on Small) |
4 |
20GB |
48GB |
|
Infra Node |
2 |
4GB |
50GB |
|
Control Node x 3 |
8 |
32GB |
120GB |
|
Worker Node x 3 |
8 |
32GB |
120GB |
Deployment and Configuration
The following topics are outside the scope of this document:
ESXi Installation
vCenter Installation
Virtual Data Center Configuration
vSphere Cluster Configuration
Adding ESXi Hosts to Clusters
Sample of our lab environment:
Wiring
This document covers highly available VMware vSphere cluster deployment.
Network/Fabric
Prerequisites
Switch OS
NVIDIA® Cumulus® Linux v5.1Network adapter
NVIDIA ConnectX-6 Lx and ConnectX-6 Dx adapter cards.
Latest firmware and Driver versions. For more information, please see:
Hosts Network Configuration
This table provides details on the ESXi server, switches names and their network configuration.
|
Server |
Server Name |
IP and NICs |
|
|
High-Speed Ethernet Network |
Management Network |
||
|
ESXi-01 |
sl01w01esx11 |
vmk1: 192.168.11.111 (vMotion) vmk2: 192.168.130.111 (vSAN) |
vmk0: 192.168.1.111 From Corporate DHCP (reserved) |
|
ESXi-02 |
sl01w01esx12 |
vmk1: 192.168.11.112 (vMotion) vmk2: 192.168.130.112 (vSAN) |
vmk0: 192.168.1.11 2 From Corporate DHCP (reserved) |
|
ESXi-03 |
sl01w01esx13 |
vmk1: 192.168.11.113(vMotion) vmk2: 192.168.130.113 (vSAN) |
vmk0: 192.168.1.11 3 From Corporate DHCP (reserved) |
|
ESXi-04 |
sl01w01esx14 |
vmk1: 192.168.11.114(vMotion) vmk2: 192.168.130.114 (vSAN) |
vmk0: 192.168.1.11 4 From Corporate DHCP (reserved) |
|
Leaf-01 |
clx-swx-033 |
- |
192.168.1.233 |
|
Leaf-02 |
clx-swx-034 |
- |
192.168.1.234 |
|
Higt-Speed-01 |
clx-swx-035 |
- |
192.168.1.235 |
|
vCenter (VM) |
sl01w01vc01 |
- |
192.168.1.25 From Corporate DHCP (reserved) |
|
Infra Node (VM) |
sl01w01depl |
- |
192.168.77.201 |
|
Router Node (VM) |
sl01w01pfsense |
- |
WAN - 192.168.1.202 LAN - 192.168.77.254 |
|
Control Node 01 (VM) |
control01 |
- |
192.168.77.11 From Infra Node DHCP (reserved) |
|
Control Node 01 (VM) |
control02 |
- |
192.168.77.12 From Infra Node DHCP (reserved) |
|
Control Node 01 (VM) |
control03 |
- |
192.168.77.13 From Infra Node DHCP (reserved) |
|
Worker Node 01 (VM) |
worker01 |
- |
192.168.77.21 From Infra Node DHCP (reserved) |
|
Worker Node 02 (VM) |
worker02 |
- |
192.168.77.22 From Infra Node DHCP (reserved) |
|
Worker Node 03 (VM) |
worker03 |
- |
192.168.77.23 From Infra Node DHCP (reserved) |
Network Switch Configuration
ESXi to Leaf Connection

Port Channel and VLAN Configuration
Run the following commands on both Leaf NVIDIA SN2010
switches in the Supervisor Cluster to configure port channel and VLAN
.
Sample for Leaf-01 switch configuration (named clx-swx-033)
:
Switch console
            cumulus@clx-swx-033:mgmt:~$sudo nv set system hostname clx-swx-033
cumulus@clx-swx-033:mgmt:~$sudo nv set interface lo ip address 10.10.10.1/32
cumulus@clx-swx-033:mgmt:~$sudo nv set interface swp1-22 type swp
cumulus@clx-swx-033:mgmt:~$sudo nv set interface swp1-4 bridge domain br_default
cumulus@clx-swx-033:mgmt:~$sudo nv set bridge domain br_default vlan 1610
cumulus@clx-swx-033:mgmt:~$sudo nv set bridge domain br_default vlan 1611
cumulus@clx-swx-033:mgmt:~$sudo nv set bridge domain br_default vlan 1677
cumulus@clx-swx-033:mgmt:~$sudo nv set vrf default router static 0.0.0.0/0 address-family ipv4-unicast
cumulus@clx-swx-033:mgmt:~$sudo nv set interface peerlink bond member swp21-22
cumulus@clx-swx-033:mgmt:~$sudo nv set mlag mac-address 44:38:39:BE:EF:AA
cumulus@clx-swx-033:mgmt:~$sudo nv set mlag backup 10.10.10.2
cumulus@clx-swx-033:mgmt:~$sudo nv set mlag peer-ip linklocal
cumulus@clx-swx-033:mgmt:~$sudo nv config apply
cumulus@clx-swx-033:mgmt:~$sudo nv config save
Sample for L eaf-02 switch configuration (named clx-swx-034 ) :
Switch console
            cumulus@clx-swx-034:mgmt:~$sudo nv set system hostname clx-swx-034
cumulus@clx-swx-034:mgmt:~$sudo nv set interface lo ip address 10.10.10.2/32
cumulus@clx-swx-034:mgmt:~$sudo nv set interface swp1-22 type swp
cumulus@clx-swx-034:mgmt:~$sudo nv set interface swp1-4 bridge domain br_default
cumulus@clx-swx-034:mgmt:~$sudo nv set bridge domain br_default vlan 1610
cumulus@clx-swx-034:mgmt:~$sudo nv set bridge domain br_default vlan 1611
cumulus@clx-swx-034:mgmt:~$sudo nv set bridge domain br_default vlan 1677
cumulus@clx-swx-034:mgmt:~$sudo nv set vrf default router static 0.0.0.0/0 address-family ipv4-unicast
cumulus@clx-swx-034:mgmt:~$sudo nv set interface peerlink bond member swp21-22
cumulus@clx-swx-034:mgmt:~$sudo nv set mlag mac-address 44:38:39:BE:EF:AA
cumulus@clx-swx-034:mgmt:~$sudo nv set mlag backup 10.10.10.1
cumulus@clx-swx-034:mgmt:~$sudo nv set mlag peer-ip linklocal
cumulus@clx-swx-034:mgmt:~$sudo nv config apply
cumulus@clx-swx-034:mgmt:~$sudo nv config save
Port Channel and VLAN Configuration on High Speed NVIDIA SN2100 Switch
Run the following commands on the High Speed switch in the vSphere Cluster to configure port channel and VLAN .
Sample for the Higt-Speed-01(clx-swx-035):
Switch console
            cumulus@clx-swx-035:mgmt:~$sudo nv set system hostname clx-swx-035
cumulus@clx-swx-035:mgmt:~$sudo nv set interface swp1-16 type swp
cumulus@clx-swx-035:mgmt:~$sudo nv set interface swp1-16 bridge domain br_default
cumulus@clx-swx-035:mgmt:~$sudo nv set bridge domain br_default vlan 1630
cumulus@clx-swx-035:mgmt:~$sudo nv set bridge domain br_default vlan 1631
cumulus@clx-swx-035:mgmt:~$sudo nv set qos roce enable on
cumulus@clx-swx-035:mgmt:~$sudo nv config apply
cumulus@clx-swx-035:mgmt:~$sudo nv config save
Enable RDMA over Converged Ethernet Lossless (with PFC and ETS) on a High Speed SN2100 Switch
RoCE transport is utilized to accelerate vSAN networking. To get the highest possible results, the network is configured to be lossless.
Run the following commands on the High-Speed switch to configure a lossless network for NVIDIA Cumulus:
Switch console
            cumulus@clx-swx-035:mgmt:~$sudo nv set qos roce enable on
cumulus@clx-swx-035:mgmt:~$sudo nv config apply
cumulus@clx-swx-035:mgmt:~$sudo nv config save
To check RoCE configuration, run the following command:
Switch console
            cumulus@leaf-01:mgmt:~$sudo nv show qos roce

                    operational  applied   description
------------------  -----------  --------  ------------------------------------------------------
enable                           on        Turn the feature 'on' or 'off'.  The default is 'off'.
mode                lossless     lossless  Roce Mode
cable-length        100          100       Cable Length(in meters) for Roce Lossless Config
congestion-control
  congestion-mode   ECN                    Congestion config mode
  enabled-tc        0,3                    Congestion config enabled Traffic Class
  max-threshold     1.43 MB                Congestion config max-threshold
  min-threshold     146.48 KB              Congestion config min-threshold
pfc
  pfc-priority      3                      switch-prio on which PFC is enabled
  rx-enabled        enabled                PFC Rx Enabled status
  tx-enabled        enabled                PFC Tx Enabled status
trust
  trust-mode        pcp,dscp               Trust Setting on the port for packet classification


RoCE PCP/DSCP->SP mapping configurations
===========================================
        pcp  dscp                     switch-prio
    --  ---  -----------------------  -----------
    0   0    0,1,2,3,4,5,6,7          0
    1   1    8,9,10,11,12,13,14,15    1
    2   2    16,17,18,19,20,21,22,23  2
    3   3    24,25,26,27,28,29,30,31  3
    4   4    32,33,34,35,36,37,38,39  4
    5   5    40,41,42,43,44,45,46,47  5
    6   6    48,49,50,51,52,53,54,55  6
    7   7    56,57,58,59,60,61,62,63  7


RoCE SP->TC mapping and ETS configurations
=============================================
        switch-prio  traffic-class  scheduler-weight
    --  -----------  -------------  ----------------
    0   0            0              DWRR-50%
    1   1            0              DWRR-50%
    2   2            0              DWRR-50%
    3   3            3              DWRR-50%
    4   4            0              DWRR-50%
    5   5            0              DWRR-50%
    6   6            6              strict-priority
    7   7            0              DWRR-50%


RoCE pool config
===================
        name                   mode     size   switch-priorities  traffic-class
    --  ---------------------  -------  -----  -----------------  -------------
    0   lossy-default-ingress  Dynamic  50.0%  0,1,2,4,5,6,7      -
    1   roce-reserved-ingress  Dynamic  50.0%  3                  -
    2   lossy-default-egress   Dynamic  50.0%  -                  0,6
    3   roce-reserved-egress   Dynamic  inf    -                  3


Exception List
=================
        description
ESXi Host and vSphere Cluster Configuration
Prerequisites
Host BIOS
Verify that an SR-IOV supported server platform is being used and review the BIOS settings in the server platform vendor documentation to enable SR-IOV in the BIOS.
Verify that VT-d/IOMMU is enabled in the BIOS.Physical server configuration
All ESXi servers must have the same PCIe placement for the NIC and expose the same interface name.
Experience with Kubernetes/OpenShift
Familiarization with the Kubernetes Cluster architecture is essential.
Privileges
Verify that you have an account privilege to read and create the required resources. Using an account that has global administrative privileges is the simplest way to access all the necessary permissions on the cluster. For more information, see Chapter 20. Installing on vSphere OpenShift Container Platform Container Platform 4.10 | Red Hat Customer PortalVerify that NTP is configured and works properly in your environment.


Create and configure 2 VMware VDS by using the following document - How-to: Configure a vSphere Distributed Switch with NVIDIA network fabric.
Two VDS will be used in the environment:
SL-WL01-DS01 with the following port groups:
SL-WL01-MGMT-VLAN1610-DPG
SL-WL01-vMotion-VLAN611-DPG
SL-WL01-OCP-VLAN1677-DPG
SL-WL01-DS02 with the following port groups:
SL-WL01-vSAN-VLAN1630-DPG
SL-WL01-RDMA-VLAN1631-DPG
Sample:

Create and configure a VMware vSAN RDMA cluster by using the following document - RDG: VMware vSAN over RoCE on VMware vSphere 7.0 U3.
Enable SR-IOV on an ESXi host
NVIDIA Network Operator leverages Kubernetes CRDs and Operator SDK to manage networking-related components to enable fast networking and RDMA for workloads in the OCP cluster. The fast network is a secondary network of the K8s cluster for applications that require high bandwidth or low latency.
In OCP Cluster it is possible to use Dynamic DirectPath I/O to assign a multiple PCI passthrough or SR-IOV devices to a Kubernetes Workload VM.To make it work, enable SR-IOV capability on a ConnectX-6 Dx network adapter.
To Enable SR-IOV:Launch the vSphere Web Client , and connect to a vCenter Server instance.
Navigate to a an ESXi host, and select Configure → Hardware → PCI Devices. Click on ALL PCI DEVICES. Click on Filter.

Type Mellanox and click on Vendor Name.

Select a ConnectX-6 Dx NIC.

Click on CONFIGURE SR-IOV.

Enable SR-IOV, and set the number of Virtual functions (VF). Click OK.

Click on PASSTHROUGH-ENABLED DEVICES to verify that 8 VFs were enabled.

Create 6 VMs for 3 Control and 3 Worker OpenShift Clusters with the following configuration:
On the Customize hardware tab, click VM Options → Advanced.
Click Boot Options. Set the Boot Delay to 9999 milliseconds.

Scroll down and click Edit Configuration. On the Configuration Parameters window, click Add Configuration Params. Define the following parameter name and value:
disk.EnableUUID: Specify TRUE.


Click OK twice for Control VMs.
For worker VM, click OK. Go back to the Virtual Hardware tab and add an additional SR-IOV Network Adapter by clicking on ADD NEW DEVICE and selecting Network Adapter.

On New Network click on Browse...
Select an RDMA network port group. Click OK.
Open New Network and select Adapter Type: SR-IOV passthrough and Physical Function (for example, vmnic4 was configured previously with VFs). Click OK.

OCP Cluster Installation
Infra node Prerequisites
DHCP and DNS services are required for OCP installation. In this case, an Infra Node is used to run the services.
An additional ntp-servers configuration is required for a DHCP service on an OCP management network.
The components installation and configuration are not covered in this guide.
For more information, see
Networking requirements for user-provisioned infrastructure.
The OCP cluster installation requires two VIP addresses:
The API address is used to access the cluster API.
The Ingress address is used for cluster ingress traffic.
These IP addresses must be provided to the installation program when installing the OCP cluster.
In our environment, we use the following IPs and DNS records:
|
Component |
IP |
Record |
Description |
|
Kubernetes API |
192.168.77.210 |
api.ocp4.vwd.clx |
A DNS A/AAAA or CNAME record, and a DNS PTR record, to identify the API load balancer. These records must be resolvable by both clients external to the cluster and from all the nodes within the cluster. |
|
Ingress |
192.168.77.211 |
*.apps.ocp4.vwd.clx |
A wildcard DNS A/AAAA or CNAME record that refers to the application ingress load balancer. The application ingress load balancer targets the machines that run the Ingress Controller PODs. The Ingress Controller PODs run on the compute machines by default. These records must be resolvable by both clients external to the cluster and from all the nodes within the cluster. For example, console-openshift-console.apps.ocp4.vwd.clx is used as a wildcard route to the OCP console. |
|
control01 |
192.168.77.11 |
control01.ocp4.vwd.clx |
DNS A/AAAA or CNAME records and DNS PTR records to identify each machine for the control plane nodes. These records must be resolvable by the nodes within the cluster. |
|
control02 |
192.168.77.12 |
control02.ocp4.vwd.clx |
DNS A/AAAA or CNAME records and DNS PTR records to identify each machine for the control plane nodes. These records must be resolvable by the nodes within the cluster. |
|
control03 |
192.168.77.13 |
control03.ocp4.vwd.clx |
DNS A/AAAA or CNAME records and DNS PTR records to identify each machine for the control plane nodes. These records must be resolvable by the nodes within the cluster. |
|
worker01 |
192.168.77.21 |
worker01.ocp4.vwd.clx |
DNS A/AAAA or CNAME records and DNS PTR records to identify each machine for the worker nodes. These records must be resolvable by the nodes within the cluster. |
|
worker02 |
192.168.77.22 |
worker02.ocp4.vwd.clx |
DNS A/AAAA or CNAME records and DNS PTR records to identify each machine for the worker nodes. These records must be resolvable by the nodes within the cluster. |
|
worker03 |
192.168.77.23 |
worker03.ocp4.vwd.clx |
DNS A/AAAA or CNAME records and DNS PTR records to identify each machine for the worker nodes. These records must be resolvable by the nodes within the cluster. |
Generating an SSH Public Key
To generate a key, please run the following command on the
Infra Node
:
Infra Node Console
# ssh-keygen
OCP Cluster Deployment
You can install the OpenShift Container Platform on vSphere by using the Assisted Installer, an Installer-Provisioned or User-Provisioned Infrastructure.
This document describes OCP on-premises VMs installation using the Assisted Installer.
Follow the steps outlined in the section to install OpenShift on vSphere.
Open a web browser on Infra Node (in this case, AlmaLinux with UI is used), connect the Red Hat Hybrid Cloud site and log into the console with your credentials.


Using the left menu bar, select OpenShift:

Click on Create Cluster.

Select Datacenter and scroll down the window.

Select vSphere.

Select the Assisted Installer installation type.

In the Cluster details open window, provide Cluster Name and Base Domain. From the drop list, select the OpenShift version that you wish to install, and click on Next.
Example:

In the Host discovery window, click on Add hosts.

In the Add hosts window, select the Full Image file option. Generate, copy and paste an SSH public key (the key was generated in Infra Node in our case), a nd click on Generate Discovery ISO.
Examples:


In the opened window, click on Download Discovery ISO.

Login to the vCenter.

Navigate to your control01 VM.

Attach the Download Discovery ISO to your VM.


Launch Remote Console.

And Power On a VM.

Click ESC, and select CD-ROM Drive in the Boot Menu.

Click Enter.

Repeat Steps 12-17 for 5 additional VMs .
Go back to the RedHat Hybrid Cloud Console web page. After 1-2 minutes, you will be able to see all 6 hosts in "Ready" status.
Review the CPU, Memory and Disk hosts configuration.
Select Role for each H ost and click Next .
Example:

In the Networking opened window, provide the Machine network, API IP and Ingress IP. Click Next.
Example:

Review the configuration and click on Install cluster.

The OCP Installation process will start and will take approximately 30 minutes.


Once the installation process is complete, you will be able to Download the kubeconfig file.

Copy the file on your Infra Node to the /root/.kube/config file.
Infra Node Console
            [root@sl01lw01depl ~]# cp kubeconfig /root/.kube/config
[oot@sl01lw01depl ~]# export KUBECONFIG=/root/.kube/config
To connect to the installed cluster, use the following provided information:

To verify that the OCP cluster is installed properly, open the Infra Node console and open a web browser with the provided Web Console URL, Username and Password.

Make sure that the Cluster Status is ok.

Using the left menu bar, expand the Compute section and select the Nodes Status. 

Click on
each node
to see that all PODs on the node are running without errors.


To check the cluster status from the ssh console:
Go to the Infra Node ssh console, and run the following command to see the nodes status:
Infra Node Console
            [root@sl01lw01depl ocp4-helpernode]# oc get nodes -o wide
NAME                     STATUS   ROLES    AGE   VERSION           INTERNAL-IP     EXTERNAL-IP   OS-IMAGE                                                        KERNEL-VERSION                 CONTAINER-RUNTIME
control01.ocp4.vwd.clx   Ready    master   2d    v1.23.5+3afdacb   192.168.77.11   <none>        Red Hat Enterprise Linux CoreOS 410.84.202206080346-0 (Ootpa)   4.18.0-305.49.1.el8_4.x86_64   cri-o://1.23.3-3.rhaos4.10.git5fe1720.el8
control02.ocp4.vwd.clx   Ready    master   2d    v1.23.5+3afdacb   192.168.77.12   <none>        Red Hat Enterprise Linux CoreOS 410.84.202206080346-0 (Ootpa)   4.18.0-305.49.1.el8_4.x86_64   cri-o://1.23.3-3.rhaos4.10.git5fe1720.el8
control03.ocp4.vwd.clx   Ready    master   2d    v1.23.5+3afdacb   192.168.77.13   <none>        Red Hat Enterprise Linux CoreOS 410.84.202206080346-0 (Ootpa)   4.18.0-305.49.1.el8_4.x86_64   cri-o://1.23.3-3.rhaos4.10.git5fe1720.el8
worker01.ocp4.vwd.clx    Ready    worker   2d    v1.23.5+3afdacb   192.168.77.21   <none>        Red Hat Enterprise Linux CoreOS 410.84.202206080346-0 (Ootpa)   4.18.0-305.49.1.el8_4.x86_64   cri-o://1.23.3-3.rhaos4.10.git5fe1720.el8
worker02.ocp4.vwd.clx    Ready    worker   2d    v1.23.5+3afdacb   192.168.77.22   <none>        Red Hat Enterprise Linux CoreOS 410.84.202206080346-0 (Ootpa)   4.18.0-305.49.1.el8_4.x86_64   cri-o://1.23.3-3.rhaos4.10.git5fe1720.el8
worker03.ocp4.vwd.clx    Ready    worker   2d    v1.23.5+3afdacb   192.168.77.23   <none>        Red Hat Enterprise Linux CoreOS 410.84.202206080346-0 (Ootpa)   4.18.0-305.49.1.el8_4.x86_64   cri-o://1.23.3-3.rhaos4.10.git5fe1720.el8
To see all running cluster operators status, run the following command:
Infra Node Console
            [root@sl01lw01depl ocp4-helpernode]# oc get clusteroperators
NAME                                       VERSION   AVAILABLE   PROGRESSING   DEGRADED   SINCE   MESSAGE
authentication                             4.10.18   True        False         False      135m
baremetal                                  4.10.18   True        False         False      2d
cloud-controller-manager                   4.10.18   True        False         False      2d
cloud-credential                           4.10.18   True        False         False      2d
cluster-autoscaler                         4.10.18   True        False         False      2d
config-operator                            4.10.18   True        False         False      2d
console                                    4.10.18   True        False         False      2d
csi-snapshot-controller                    4.10.18   True        False         False      2d
dns                                        4.10.18   True        False         False      2d
etcd                                       4.10.18   True        False         False      2d
image-registry                             4.10.18   True        False         False      2d
ingress                                    4.10.18   True        False         False      2d
insights                                   4.10.18   True        False         False      2d
kube-apiserver                             4.10.18   True        False         False      2d
kube-controller-manager                    4.10.18   True        False         False      2d
kube-scheduler                             4.10.18   True        False         False      2d
kube-storage-version-migrator              4.10.18   True        False         False      2d
machine-api                                4.10.18   True        False         False      2d
machine-approver                           4.10.18   True        False         False      2d
machine-config                             4.10.18   True        False         False      2d
marketplace                                4.10.18   True        False         False      2d
monitoring                                 4.10.18   True        False         False      2d
network                                    4.10.18   True        False         False      2d
node-tuning                                4.10.18   True        False         False      2d
openshift-apiserver                        4.10.18   True        False         False      2d
openshift-controller-manager               4.10.18   True        False         False      24h
openshift-samples                          4.10.18   True        False         False      2d
operator-lifecycle-manager                 4.10.18   True        False         False      2d
operator-lifecycle-manager-catalog         4.10.18   True        False         False      2d
operator-lifecycle-manager-packageserver   4.10.18   True        False         False      2d
service-ca                                 4.10.18   True        False         False      2d
storage                                    4.10.18   True        False         False      2d
To see all running PODs status, run the following command:
Infra Node Console
[root@sl01lw01depl ocp4-helpernode]# oc get pod --all-namespaces
NAMESPACE NAME READY STATUS RESTARTS AGE
assisted-installer assisted-installer-controller-5zh8w 0/1 Completed 0 2d
openshift-apiserver-operator openshift-apiserver-operator-6756c64b88-njtk8 1/1 Running 2 (2d ago) 2d
openshift-apiserver apiserver-7c48bcb965-6cqp5 2/2 Running 0 2d
openshift-apiserver apiserver-7c48bcb965-mg7t5 2/2 Running 0 2d
openshift-apiserver apiserver-7c48bcb965-rvt8j 2/2 Running 0 2d
openshift-authentication-operator authentication-operator-6ddbbdbf46-w5n2w 1/1 Running 2 (2d ago) 2d
openshift-authentication oauth-openshift-6c775fd8f6-6cxxd 1/1 Running 0 2d
openshift-authentication oauth-openshift-6c775fd8f6-k6nxq 1/1 Running 0 2d
openshift-authentication oauth-openshift-6c775fd8f6-pd4cm 1/1 Running 0 2d
openshift-cloud-controller-manager-operator cluster-cloud-controller-manager-operator-7db699cb4f-wdh7d 2/2 Running 4 (2d ago) 2d
openshift-cloud-credential-operator cloud-credential-operator-67f75477db-mczvd 2/2 Running 0 2d
openshift-cluster-machine-approver machine-approver-697c6c67f-6thpm 2/2 Running 2 (2d ago) 2d
openshift-cluster-node-tuning-operator cluster-node-tuning-operator-59cdb46c9-s82qc 1/1 Running 1 (2d ago) 2d
openshift-cluster-node-tuning-operator tuned-92q5b 1/1 Running 0 2d
openshift-cluster-node-tuning-operator tuned-jsgls 1/1 Running 0 2d
openshift-cluster-node-tuning-operator tuned-lg5rc 1/1 Running 0 2d
openshift-cluster-node-tuning-operator tuned-nvrg6 1/1 Running 0 2d
openshift-cluster-node-tuning-operator tuned-pf6fh 1/1 Running 0 2d
openshift-cluster-node-tuning-operator tuned-wz9s6 1/1 Running 0 2d
openshift-cluster-samples-operator cluster-samples-operator-b6fc87b94-hslfp 2/2 Running 0 2d
openshift-cluster-storage-operator cluster-storage-operator-7857f978b8-6q6jt 1/1 Running 1 (2d ago) 2d
openshift-cluster-storage-operator csi-snapshot-controller-5b97674c78-m7s9b 1/1 Running 0 2d
openshift-cluster-storage-operator csi-snapshot-controller-5b97674c78-n9ffn 1/1 Running 1 (2d ago) 2d
openshift-cluster-storage-operator csi-snapshot-controller-operator-856bb56b5d-zj2gx 1/1 Running 1 (2d ago) 2d
openshift-cluster-storage-operator csi-snapshot-webhook-7f447d57f7-4g8l4 1/1 Running 0 2d
openshift-cluster-storage-operator csi-snapshot-webhook-7f447d57f7-xtldm 1/1 Running 0 2d
openshift-cluster-version cluster-version-operator-688999f8cd-nm9xm 1/1 Running 0 2d
openshift-config-operator openshift-config-operator-57c79476d7-r6nfq 1/1 Running 2 (2d ago) 2d
openshift-console-operator console-operator-c74b55d67-m9g7w 1/1 Running 0 2d
openshift-console console-5846db579c-6z5f5 1/1 Running 1 (2d ago) 2d
openshift-console console-5846db579c-xczc5 1/1 Running 1 (2d ago) 2d
openshift-console downloads-6cdbd64fbb-89dt4 1/1 Running 0 2d
openshift-console downloads-6cdbd64fbb-8v942 1/1 Running 0 2d
openshift-controller-manager-operator openshift-controller-manager-operator-b4c944d9f-r7x7w 1/1 Running 2 (2d ago) 2d
openshift-controller-manager controller-manager-lwc2w 1/1 Running 0 24h
openshift-controller-manager controller-manager-p62j5 1/1 Running 0 24h
openshift-controller-manager controller-manager-x2qt9 1/1 Running 0 24h
openshift-dns-operator dns-operator-5f65cf6746-g52zd 2/2 Running 0 2d
openshift-dns dns-default-4l48f 2/2 Running 0 2d
openshift-dns dns-default-8fdhq 2/2 Running 0 2d
openshift-dns dns-default-gqd5h 2/2 Running 0 2d
openshift-dns dns-default-j6bv5 2/2 Running 0 2d
openshift-dns dns-default-lqbv4 2/2 Running 0 2d
openshift-dns dns-default-nhdxz 2/2 Running 0 2d
openshift-dns node-resolver-2p8cv 1/1 Running 0 2d
openshift-dns node-resolver-5522q 1/1 Running 0 2d
openshift-dns node-resolver-5gw9c 1/1 Running 0 2d
openshift-dns node-resolver-7c2sf 1/1 Running 0 2d
openshift-dns node-resolver-b68qq 1/1 Running 0 2d
openshift-dns node-resolver-njm5b 1/1 Running 0 2d
openshift-etcd-operator etcd-operator-6d6ff5499d-6fnts 1/1 Running 2 (2d ago) 2d
openshift-etcd etcd-control01.ocp4.vwd.clx 4/4 Running 0 2d
openshift-etcd etcd-control02.ocp4.vwd.clx 4/4 Running 0 2d
openshift-etcd etcd-control03.ocp4.vwd.clx 4/4 Running 0 2d
openshift-etcd etcd-quorum-guard-54c99fcc95-4dl45 1/1 Running 0 2d
openshift-etcd etcd-quorum-guard-54c99fcc95-gsbjq 1/1 Running 0 2d
openshift-etcd etcd-quorum-guard-54c99fcc95-zs8cw 1/1 Running 0 2d
openshift-etcd installer-2-control02.ocp4.vwd.clx 0/1 Completed 0 2d
openshift-etcd installer-3-retry-1-control01.ocp4.vwd.clx 0/1 Completed 0 2d
openshift-etcd installer-5-control03.ocp4.vwd.clx 0/1 Completed 0 2d
openshift-etcd installer-6-control01.ocp4.vwd.clx 0/1 Completed 0 2d
openshift-etcd installer-6-control02.ocp4.vwd.clx 0/1 Completed 0 2d
openshift-etcd installer-6-control03.ocp4.vwd.clx 0/1 Completed 0 2d
openshift-etcd installer-7-control01.ocp4.vwd.clx 0/1 Completed 0 2d
openshift-etcd installer-7-control02.ocp4.vwd.clx 0/1 Completed 0 2d
openshift-etcd installer-7-control03.ocp4.vwd.clx 0/1 Completed 0 2d
openshift-image-registry cluster-image-registry-operator-5959746b9-mw5x9 1/1 Running 1 (2d ago) 2d
openshift-image-registry image-pruner-27688320-g48f6 0/1 Completed 0 38h
openshift-image-registry image-pruner-27689760-kp96s 0/1 Completed 0 14h
openshift-image-registry node-ca-7z6nj 1/1 Running 0 2d
openshift-image-registry node-ca-9m8sx 1/1 Running 0 2d
openshift-image-registry node-ca-jmq9w 1/1 Running 0 2d
openshift-image-registry node-ca-sl87m 1/1 Running 0 2d
openshift-image-registry node-ca-z7clg 1/1 Running 0 2d
openshift-image-registry node-ca-zs99s 1/1 Running 0 2d
openshift-ingress-canary ingress-canary-5r6qh 1/1 Running 0 2d
openshift-ingress-canary ingress-canary-l8q6j 1/1 Running 0 2d
openshift-ingress-canary ingress-canary-zpbcd 1/1 Running 0 2d
openshift-ingress-operator ingress-operator-7899578f6-tvbzr 2/2 Running 4 (2d ago) 2d
openshift-ingress router-default-547bcf454b-hn5gh 1/1 Running 0 2d
openshift-ingress router-default-547bcf454b-z2lk9 1/1 Running 0 2d
openshift-insights insights-operator-7d4cc4cf88-vn9px 1/1 Running 1 (2d ago) 2d
openshift-kni-infra coredns-control01.ocp4.vwd.clx 2/2 Running 0 2d
openshift-kni-infra coredns-control02.ocp4.vwd.clx 2/2 Running 0 2d
openshift-kni-infra coredns-control03.ocp4.vwd.clx 2/2 Running 0 2d
openshift-kni-infra coredns-worker01.ocp4.vwd.clx 2/2 Running 0 2d
openshift-kni-infra coredns-worker02.ocp4.vwd.clx 2/2 Running 0 2d
openshift-kni-infra coredns-worker03.ocp4.vwd.clx 2/2 Running 0 2d
openshift-kni-infra haproxy-control01.ocp4.vwd.clx 2/2 Running 0 2d
openshift-kni-infra haproxy-control02.ocp4.vwd.clx 2/2 Running 0 2d
openshift-kni-infra haproxy-control03.ocp4.vwd.clx 2/2 Running 0 2d
openshift-kni-infra keepalived-control01.ocp4.vwd.clx 2/2 Running 0 2d
openshift-kni-infra keepalived-control02.ocp4.vwd.clx 2/2 Running 0 2d
openshift-kni-infra keepalived-control03.ocp4.vwd.clx 2/2 Running 0 2d
openshift-kni-infra keepalived-worker01.ocp4.vwd.clx 2/2 Running 0 2d
openshift-kni-infra keepalived-worker02.ocp4.vwd.clx 2/2 Running 0 2d
openshift-kni-infra keepalived-worker03.ocp4.vwd.clx 2/2 Running 0 2d
openshift-kube-apiserver-operator kube-apiserver-operator-5f76847f99-84k6k 1/1 Running 2 (2d ago) 2d
openshift-kube-apiserver installer-10-control02.ocp4.vwd.clx 0/1 Completed 0 29h
openshift-kube-apiserver installer-11-control01.ocp4.vwd.clx 0/1 Completed 0 29h
openshift-kube-apiserver installer-11-control02.ocp4.vwd.clx 0/1 Completed 0 29h
openshift-kube-apiserver installer-11-control03.ocp4.vwd.clx 0/1 Completed 0 29h
openshift-kube-apiserver installer-12-control01.ocp4.vwd.clx 0/1 Completed 0 25h
openshift-kube-apiserver installer-12-control02.ocp4.vwd.clx 0/1 Completed 0 25h
openshift-kube-apiserver installer-12-control03.ocp4.vwd.clx 0/1 Completed 0 25h
openshift-kube-apiserver installer-13-control01.ocp4.vwd.clx 0/1 Completed 0 24h
openshift-kube-apiserver installer-13-control02.ocp4.vwd.clx 0/1 Completed 0 24h
openshift-kube-apiserver installer-13-control03.ocp4.vwd.clx 0/1 Completed 0 24h
openshift-kube-apiserver installer-9-control01.ocp4.vwd.clx 0/1 Completed 0 30h
openshift-kube-apiserver installer-9-control02.ocp4.vwd.clx 0/1 Completed 0 30h
openshift-kube-apiserver installer-9-control03.ocp4.vwd.clx 0/1 Completed 0 30h
openshift-kube-apiserver kube-apiserver-control01.ocp4.vwd.clx 5/5 Running 0 24h
openshift-kube-apiserver kube-apiserver-control02.ocp4.vwd.clx 5/5 Running 0 24h
openshift-kube-apiserver kube-apiserver-control03.ocp4.vwd.clx 5/5 Running 0 24h
openshift-kube-apiserver kube-apiserver-guard-control01.ocp4.vwd.clx 1/1 Running 0 2d
openshift-kube-apiserver kube-apiserver-guard-control02.ocp4.vwd.clx 1/1 Running 0 2d
openshift-kube-apiserver kube-apiserver-guard-control03.ocp4.vwd.clx 1/1 Running 0 2d
openshift-kube-apiserver revision-pruner-10-control01.ocp4.vwd.clx 0/1 Completed 0 29h
openshift-kube-apiserver revision-pruner-10-control02.ocp4.vwd.clx 0/1 Completed 0 29h
openshift-kube-apiserver revision-pruner-10-control03.ocp4.vwd.clx 0/1 Completed 0 29h
openshift-kube-apiserver revision-pruner-11-control01.ocp4.vwd.clx 0/1 Completed 0 29h
openshift-kube-apiserver revision-pruner-11-control02.ocp4.vwd.clx 0/1 Completed 0 29h
openshift-kube-apiserver revision-pruner-11-control03.ocp4.vwd.clx 0/1 Completed 0 29h
openshift-kube-apiserver revision-pruner-12-control01.ocp4.vwd.clx 0/1 Completed 0 25h
openshift-kube-apiserver revision-pruner-12-control02.ocp4.vwd.clx 0/1 Completed 0 25h
openshift-kube-apiserver revision-pruner-12-control03.ocp4.vwd.clx 0/1 Completed 0 25h
openshift-kube-apiserver revision-pruner-13-control01.ocp4.vwd.clx 0/1 Completed 0 24h
openshift-kube-apiserver revision-pruner-13-control02.ocp4.vwd.clx 0/1 Completed 0 24h
openshift-kube-apiserver revision-pruner-13-control03.ocp4.vwd.clx 0/1 Completed 0 24h
openshift-kube-apiserver revision-pruner-9-control01.ocp4.vwd.clx 0/1 Completed 0 30h
openshift-kube-apiserver revision-pruner-9-control02.ocp4.vwd.clx 0/1 Completed 0 30h
openshift-kube-apiserver revision-pruner-9-control03.ocp4.vwd.clx 0/1 Completed 0 30h
openshift-kube-controller-manager-operator kube-controller-manager-operator-8569749977-7bdf2 1/1 Running 2 (2d ago) 2d
openshift-kube-controller-manager installer-5-control02.ocp4.vwd.clx 0/1 Completed 0 2d
openshift-kube-controller-manager installer-6-control03.ocp4.vwd.clx 0/1 Completed 0 2d
openshift-kube-controller-manager installer-6-retry-1-control01.ocp4.vwd.clx 0/1 Completed 0 2d
openshift-kube-controller-manager installer-6-retry-1-control02.ocp4.vwd.clx 0/1 Completed 0 2d
openshift-kube-controller-manager installer-7-control01.ocp4.vwd.clx 0/1 Completed 0 2d
openshift-kube-controller-manager installer-7-control03.ocp4.vwd.clx 0/1 Completed 0 2d
openshift-kube-controller-manager installer-7-retry-1-control02.ocp4.vwd.clx 0/1 Completed 0 2d
openshift-kube-controller-manager kube-controller-manager-control01.ocp4.vwd.clx 4/4 Running 0 2d
openshift-kube-controller-manager kube-controller-manager-control02.ocp4.vwd.clx 4/4 Running 1 (2d ago) 2d
openshift-kube-controller-manager kube-controller-manager-control03.ocp4.vwd.clx 4/4 Running 2 (2d ago) 2d
openshift-kube-controller-manager kube-controller-manager-guard-control01.ocp4.vwd.clx 1/1 Running 0 2d
openshift-kube-controller-manager kube-controller-manager-guard-control02.ocp4.vwd.clx 1/1 Running 0 2d
openshift-kube-controller-manager kube-controller-manager-guard-control03.ocp4.vwd.clx 1/1 Running 0 2d
openshift-kube-controller-manager revision-pruner-7-control01.ocp4.vwd.clx 0/1 Completed 0 2d
openshift-kube-controller-manager revision-pruner-7-control02.ocp4.vwd.clx 0/1 Completed 0 2d
openshift-kube-controller-manager revision-pruner-7-control03.ocp4.vwd.clx 0/1 Completed 0 2d
openshift-kube-scheduler-operator openshift-kube-scheduler-operator-78bdb8d5df-jj7mc 1/1 Running 2 (2d ago) 2d
openshift-kube-scheduler installer-6-control02.ocp4.vwd.clx 0/1 Completed 0 2d
openshift-kube-scheduler installer-7-control02.ocp4.vwd.clx 0/1 Completed 0 2d
openshift-kube-scheduler installer-7-control03.ocp4.vwd.clx 0/1 Completed 0 2d
openshift-kube-scheduler installer-7-retry-1-control01.ocp4.vwd.clx 0/1 Completed 0 2d
openshift-kube-scheduler openshift-kube-scheduler-control01.ocp4.vwd.clx 3/3 Running 0 2d
openshift-kube-scheduler openshift-kube-scheduler-control02.ocp4.vwd.clx 3/3 Running 0 2d
openshift-kube-scheduler openshift-kube-scheduler-control03.ocp4.vwd.clx 3/3 Running 0 2d
openshift-kube-scheduler openshift-kube-scheduler-guard-control01.ocp4.vwd.clx 1/1 Running 0 2d
openshift-kube-scheduler openshift-kube-scheduler-guard-control02.ocp4.vwd.clx 1/1 Running 0 2d
openshift-kube-scheduler openshift-kube-scheduler-guard-control03.ocp4.vwd.clx 1/1 Running 0 2d
openshift-kube-scheduler revision-pruner-6-control01.ocp4.vwd.clx 0/1 Completed 0 2d
openshift-kube-scheduler revision-pruner-6-control02.ocp4.vwd.clx 0/1 Completed 0 2d
openshift-kube-scheduler revision-pruner-7-control01.ocp4.vwd.clx 0/1 Completed 0 2d
openshift-kube-scheduler revision-pruner-7-control02.ocp4.vwd.clx 0/1 Completed 0 2d
openshift-kube-scheduler revision-pruner-7-control03.ocp4.vwd.clx 0/1 Completed 0 2d
openshift-kube-storage-version-migrator-operator kube-storage-version-migrator-operator-858f98bf69-gmhmk 1/1 Running 2 (2d ago) 2d
openshift-kube-storage-version-migrator migrator-8f5cb494f-cv2sw 1/1 Running 0 2d
openshift-machine-api cluster-autoscaler-operator-67d67f467c-ftjnd 2/2 Running 2 (2d ago) 2d
openshift-machine-api cluster-baremetal-operator-9f7c58876-7gfcf 2/2 Running 0 2d
openshift-machine-api machine-api-controllers-5d48848dc-f2lbn 7/7 Running 8 (2d ago) 2d
openshift-machine-api machine-api-operator-5869dbb6f9-jmd9d 2/2 Running 1 (2d ago) 2d
openshift-machine-api metal3-596fff4b5b-s45j9 7/7 Running 0 2d
openshift-machine-api metal3-image-cache-bjmnd 1/1 Running 0 2d
openshift-machine-api metal3-image-cache-g7dcc 1/1 Running 0 2d
openshift-machine-api metal3-image-cache-nxdlr 1/1 Running 0 2d
openshift-machine-api metal3-image-customization-95866c848-6dgvd 1/1 Running 0 2d
openshift-machine-config-operator machine-config-controller-77b5755d57-mqlk9 1/1 Running 1 (2d ago) 2d
openshift-machine-config-operator machine-config-daemon-7l7bd 2/2 Running 0 2d
openshift-machine-config-operator machine-config-daemon-c5n52 2/2 Running 0 2d
openshift-machine-config-operator machine-config-daemon-dhhtc 2/2 Running 0 2d
openshift-machine-config-operator machine-config-daemon-fl96h 2/2 Running 0 2d
openshift-machine-config-operator machine-config-daemon-jmmbg 2/2 Running 0 2d
openshift-machine-config-operator machine-config-daemon-n456s 2/2 Running 0 2d
openshift-machine-config-operator machine-config-operator-6b86784cb5-v7zf4 1/1 Running 1 (2d ago) 2d
openshift-machine-config-operator machine-config-server-l4sm6 1/1 Running 0 2d
openshift-machine-config-operator machine-config-server-rdngb 1/1 Running 0 2d
openshift-machine-config-operator machine-config-server-wn8z2 1/1 Running 0 2d
openshift-marketplace certified-operators-9tdzr 1/1 Running 0 75m
openshift-marketplace community-operators-57zzr 1/1 Running 0 28m
openshift-marketplace marketplace-operator-5bd7c86474-w47th 1/1 Running 3 (2d ago) 2d
openshift-marketplace redhat-marketplace-p92tb 1/1 Running 0 4h30m
openshift-marketplace redhat-operators-f98h8 1/1 Running 0 29h
openshift-monitoring alertmanager-main-0 6/6 Running 0 2d
openshift-monitoring alertmanager-main-1 6/6 Running 0 2d
openshift-monitoring cluster-monitoring-operator-77f85687f5-nj662 2/2 Running 0 2d
openshift-monitoring grafana-5487f6d9cf-jk5sv 3/3 Running 0 2d
openshift-monitoring kube-state-metrics-6d685b8687-wbfj6 3/3 Running 0 2d
openshift-monitoring node-exporter-7lcqv 2/2 Running 0 2d
openshift-monitoring node-exporter-9rcbv 2/2 Running 0 2d
openshift-monitoring node-exporter-cbhhd 2/2 Running 0 2d
openshift-monitoring node-exporter-hk5f4 2/2 Running 0 2d
openshift-monitoring node-exporter-rsw5t 2/2 Running 0 2d
openshift-monitoring node-exporter-wntwr 2/2 Running 0 2d
openshift-monitoring openshift-state-metrics-65f58d4c67-jpp6b 3/3 Running 0 2d
openshift-monitoring prometheus-adapter-b954595b-qc2nw 1/1 Running 0 24h
openshift-monitoring prometheus-adapter-b954595b-z6wrp 1/1 Running 0 24h
openshift-monitoring prometheus-k8s-0 6/6 Running 0 2d
openshift-monitoring prometheus-k8s-1 6/6 Running 0 2d
openshift-monitoring prometheus-operator-76f79c8d85-f2wqq 2/2 Running 0 2d
openshift-monitoring telemeter-client-7f76f65fd4-gndjp 3/3 Running 0 2d
openshift-monitoring thanos-querier-7b7cf74976-hm8qm 6/6 Running 0 2d
openshift-monitoring thanos-querier-7b7cf74976-zh66s 6/6 Running 0 2d
openshift-multus multus-66mmt 1/1 Running 0 2d
openshift-multus multus-8zpj9 1/1 Running 0 2d
openshift-multus multus-additional-cni-plugins-5xfgt 1/1 Running 0 2d
openshift-multus multus-additional-cni-plugins-8ntxc 1/1 Running 0 2d
openshift-multus multus-additional-cni-plugins-cf4pl 1/1 Running 0 2d
openshift-multus multus-additional-cni-plugins-kgzcv 1/1 Running 0 2d
openshift-multus multus-additional-cni-plugins-lzntc 1/1 Running 0 2d
openshift-multus multus-additional-cni-plugins-mkvqn 1/1 Running 0 2d
openshift-multus multus-admission-controller-2x94g 2/2 Running 0 2d
openshift-multus multus-admission-controller-54fzg 2/2 Running 0 2d
openshift-multus multus-admission-controller-rpq6d 2/2 Running 0 2d
openshift-multus multus-gbxp4 1/1 Running 0 2d
openshift-multus multus-h8mjv 1/1 Running 0 2d
openshift-multus multus-lbv7j 1/1 Running 0 2d
openshift-multus multus-wbqr8 1/1 Running 0 2d
openshift-multus network-metrics-daemon-dkv45 2/2 Running 0 2d
openshift-multus network-metrics-daemon-gnxjt 2/2 Running 0 2d
openshift-multus network-metrics-daemon-j5ng9 2/2 Running 0 2d
openshift-multus network-metrics-daemon-sc6cd 2/2 Running 0 2d
openshift-multus network-metrics-daemon-sddb9 2/2 Running 0 2d
openshift-multus network-metrics-daemon-vkhmw 2/2 Running 0 2d
openshift-network-diagnostics network-check-source-695cdb7747-nh98w 1/1 Running 0 2d
openshift-network-diagnostics network-check-target-24wqk 1/1 Running 0 2d
openshift-network-diagnostics network-check-target-jfpbl 1/1 Running 0 2d
openshift-network-diagnostics network-check-target-jsdtb 1/1 Running 0 2d
openshift-network-diagnostics network-check-target-rlpxk 1/1 Running 0 2d
openshift-network-diagnostics network-check-target-t6zqv 1/1 Running 0 2d
openshift-network-diagnostics network-check-target-w5nc5 1/1 Running 0 2d
openshift-network-operator network-operator-7d77dffff9-54tbt 1/1 Running 1 (2d ago) 2d
openshift-oauth-apiserver apiserver-5cc46c79bc-f2d6n 1/1 Running 0 2d
openshift-oauth-apiserver apiserver-5cc46c79bc-l5hjx 1/1 Running 0 2d
openshift-oauth-apiserver apiserver-5cc46c79bc-tjbw4 1/1 Running 0 2d
openshift-operator-lifecycle-manager catalog-operator-74c9986ff-xvnj8 1/1 Running 0 2d
openshift-operator-lifecycle-manager collect-profiles-27690600-8mwnv 0/1 Completed 0 40m
openshift-operator-lifecycle-manager collect-profiles-27690615-gd57g 0/1 Completed 0 25m
openshift-operator-lifecycle-manager collect-profiles-27690630-kkz28 0/1 Completed 0 10m
openshift-operator-lifecycle-manager olm-operator-67fcdb489c-m4cvc 1/1 Running 0 2d
openshift-operator-lifecycle-manager package-server-manager-765bb5f5-xrf8v 1/1 Running 2 (2d ago) 2d
openshift-operator-lifecycle-manager packageserver-fdd697dc6-c5b7v 1/1 Running 0 2d
openshift-operator-lifecycle-manager packageserver-fdd697dc6-qtqf2 1/1 Running 0 2d
openshift-sdn sdn-4j62m 2/2 Running 0 2d
openshift-sdn sdn-4q6jf 2/2 Running 0 2d
openshift-sdn sdn-7ct7v 2/2 Running 0 2d
openshift-sdn sdn-controller-29cvs 2/2 Running 0 2d
openshift-sdn sdn-controller-lm7g9 2/2 Running 0 2d
openshift-sdn sdn-controller-mrssb 2/2 Running 1 (2d ago) 2d
openshift-sdn sdn-fcv7m 2/2 Running 0 2d
openshift-sdn sdn-pq7pb 2/2 Running 0 2d
openshift-sdn sdn-rzz7l 2/2 Running 0 2d
openshift-service-ca-operator service-ca-operator-74997d4678-6dg7d 1/1 Running 2 (2d ago) 2d
openshift-service-ca service-ca-7567987bc8-cm9j7 1/1 Running 1 (2d ago) 2d
Installing the Node Feature Discovery (NFD) Operator
The OpenShift Node Feature Discovery (NFD) manages the detection of hardware features and their configuration in the OpenShift Container Platform. The NFD labels the host with node-specific attributes. Therefore, the NFD is a prerequisite for the NVIDIA GPU Operator. As a cluster administrator, you can install the NFD Operator using the Red Hat OperatorHub catalog in the OpenShift Container Platform web console.
Using the left menu bar, expand the Operators section, and select the OperatorHub.
Use the search bar to search for the Node Feature Discovery. Two items should be found as results.Select the operator that is tagged as the RedHat operator. This is the version supported by Red Hat.

Click Install.

The next menu allows you to determine how and where the operator will be installed. You would rarely have to change any of these options.
Click Install to continue with the defaults.
Wait while the NFD operator is being installed. Once you see the “Installed operator - ready for use” status, click View Operator . Notice that you are now in the openshift-nfd project that was created as part of the operator installation.


Click the Create Instance button to create a new NFD object.

The next menu provides options to configure how the NFD operator will scan your cluster. For the NFD operator, you would rarely have to change any of the default settings. Click Create to instantiate the NFD resource on your cluster.

You will be able to see the installation progress in the Infra Node ssh console. It can take 5 minutes for the NFD installation.

In the horizontal menu bar, select NodeFeatureDiscovery . You should be able to see one listed instance titled nfd-instance . Wait for the status to show that the deployment is finished.

Enabling a Cluster-wide Entitlement
The NVIDIA Network Operator deploys several PODs that manage and enable NVIDIA High Speed Networking for use in the OpenShift Container Platform. Some of these PODs require packages that are not available by default in the Universal Base Image (UBI) that the OpenShift Container Platform uses. To make packages available, you must enable cluster-wide entitled container builds in OpenShift. To do that, f ollow the instructions in Enabling a Cluster-wide Entitlement .
By running oc get mcp/worker command. You can see MachineConfigPool object monitor that the MCP is updated, not updating or degraded, so all the MachineConfig resources have been successfully applied to the nodes and you can proceed to validate the cluster. 

Installing the NVIDIA Network Operator
Please see the below steps for Network Operator deployment using Web UI.
Before starting, create a namespace for the Network Operator Resources by running [root@sl01lw01depl ocp4-helpernode]# oc create ns nvidia-operator-resources
Using the left menu bar, expand the Operators section, and select the OperatorHub.
Use the search bar to search for NVIDIA. Two items should be found.Select the NVIDIA Network Operator .

Click Install.

The next menu allows you to define how and where the operator will be installed. You would rarely have to change any of these options.
Click Install to continue with the default values.
Wait while the NVIDIA Network operator is being installed. Once you see the “Installed operator - ready for use” status, click View Operator .

Click the Create Instance button to create a new NicClusterPolicy object.

Click on YAML view, and change to the following:
NicClusterPolicy sample
            apiVersion: mellanox.com/v1alpha1
kind: NicClusterPolicy
metadata:
  name: nic-cluster-policy
spec:
  ofedDriver:
    image: mofed
    livenessProbe:
      initialDelaySeconds: 30
      periodSeconds: 30
    readinessProbe:
      initialDelaySeconds: 10
      periodSeconds: 30
    repository: nvcr.io/nvidia/mellanox
    startupProbe:
      initialDelaySeconds: 10
      periodSeconds: 20
    upgradePolicy:
      autoUpgrade: false
      drain:
        deleteEmptyDir: true
        enable: true
        force: true
        podSelector: ''
        timeoutSeconds: 300
      maxParallelUpgrades: 1
    version: 5.7-1.0.2.0
  sriovDevicePlugin:
    image: sriov-network-device-plugin
    repository: ghcr.io/k8snetworkplumbingwg
    version: a765300344368efbf43f71016e9641c58ec1241b
    config: |
      {
        "resourceList": [
            {
                "resourcePrefix": "nvidia.com",
                "resourceName": "host_dev",
                "selectors": {
                    "vendors": ["15b3"],
                    "isRdma": true
                }
            }
        ]
      }
Click Create.

Wait for the status to show State ready.

In the horizontal menu bar, select HostDeviceNetwork, and click on Create HostDeviceNetwork to create a new object .

Click on YAML view, and change to the following:
HostDeviceNetwork sample
            apiVersion: mellanox.com/v1alpha1
kind: HostDeviceNetwork
metadata:
  name: hostdev-net
spec:
  networkNamespace: "default"
  resourceName: "host_dev"
  ipam: |
    {
      "type": "whereabouts",
      "range": "192.168.3.225/28"
    }
Click Create.

Wait for the status to show State ready.

Running the Application
Now it is possible to deploy a sample POD.
K8s CLI VM console
[root@sl01lw01depl ocp4-helpernode]# vim podrdma.yaml
K8s CLI VM console
            apiVersion: v1
kind: Pod
metadata:
  name: rdma-test-pod-1
  annotations:
    k8s.v1.cni.cncf.io/networks: hostdev-net
spec:
  restartPolicy: OnFailure
  containers:
  - image: harbor.mellanox.com/nbu-solutions-labs/ubuntu-mlnx-inbox:20.04
    name: rdma-test-ctr
    securityContext:
      capabilities:
        add: [ "IPC_LOCK" ]
    resources:
      limits:
        nvidia.com/host_dev: '1'
      requests:
        nvidia.com/host_dev: '1'
    command:
    - sh
    - -c
    - sleep infinity
A sample of harbor.mellanox.com/nbu-solutions-labs/ubuntu-mlnx-inbox:20.04 docker file:
Docker Sample
            FROM ubuntu:20.04
# Ubuntu 20.04 docker container with inbox Mellanox drivers
WORKDIR /tmp/
ENV DEBIAN_FRONTEND=noninteractive
RUN apt-get clean -y && apt-get -y update && apt-get install -y apt-utils udev vim bash && apt-get -y upgrade
RUN apt-get install -y iproute2 rdma-core libibmad5 ibutils ibverbs-utils infiniband-diags perftest \
            mstflint strace iputils-ping
RUN ln -fs /usr/share/zoneinfo/America/New_York /etc/localtime
RUN dpkg-reconfigure --frontend noninteractive tzdata && apt-get clean all -y
CMD bash
Run the following command to create the POD:
K8s CLI VM console
            [root@sl01lw01depl ocp4-helpernode]# oc apply -f podrdma.yaml
pod/hostdev-test-pod created
To verify that the POD is running, run:
K8s CLI VM console
            [root@sl01lw01depl ocp4-helpernode]# oc get pods -o wide
NAME              READY   STATUS    RESTARTS   AGE     IP            NODE                    NOMINATED NODE   READINESS GATES
rdma-test-pod-1   1/1     Running   0          10s   10.129.3.80   worker02.ocp4.vwd.clx   <none>           <none>
Get a shell for the running container.
K8s CLI VM console
[root@sl01lw01depl ocp4-helpernode]# oc exec -it rdma-test-pod-1 -- bash
Check the available network interfaces in the POD:
K8s CLI VM console
            root@rdma-test-pod-1:/tmp# rdma link
link mlx5_0/1 state ACTIVE physical_state LINK_UP netdev net1

root@rdma-test-pod-1:/tmp# ip a s
1: lo: <LOOPBACK,UP,LOWER_UP> mtu 65536 qdisc noqueue state UNKNOWN group default qlen 1000
    link/loopback 00:00:00:00:00:00 brd 00:00:00:00:00:00
    inet 127.0.0.1/8 scope host lo
       valid_lft forever preferred_lft forever
    inet6 ::1/128 scope host
       valid_lft forever preferred_lft forever
3: eth0@if2890: <BROADCAST,MULTICAST,UP,LOWER_UP> mtu 1450 qdisc noqueue state UP group default
    link/ether 0a:58:0a:81:03:50 brd ff:ff:ff:ff:ff:ff link-netnsid 0
    inet 10.129.3.80/23 brd 10.129.3.255 scope global eth0
       valid_lft forever preferred_lft forever
    inet6 fe80::c05d:6ff:fe08:84ad/64 scope link
       valid_lft forever preferred_lft forever
161: net1: <BROADCAST,MULTICAST,UP,LOWER_UP> mtu 1500 qdisc mq state UP group default qlen 1000
    link/ether 00:50:56:a2:9b:7f brd ff:ff:ff:ff:ff:ff
    inet 192.168.3.225/28 brd 192.168.3.239 scope global net1
       valid_lft forever preferred_lft forever
    inet6 fe80::250:56ff:fea2:9b7f/64 scope link
       valid_lft forever preferred_lft forever
Verification
Check the RDMA
To check the RDMA, deploy the second POD. Open an additional console window, and run the following:
K8s CLI VM console
[root@sl01lw01depl ocp4-helpernode]# vim podrdma2.yaml
K8s CLI VM console
            apiVersion: v1
kind: Pod
metadata:
  name: rdma-test-pod-2
  annotations:
    k8s.v1.cni.cncf.io/networks: hostdev-net
spec:
  restartPolicy: OnFailure
  containers:
  - image: harbor.mellanox.com/nbu-solutions-labs/ubuntu-mlnx-inbox:20.04
    name: rdma-test-ctr
    securityContext:
      capabilities:
        add: [ "IPC_LOCK" ]
    resources:
      limits:
        nvidia.com/host_dev: '1'
      requests:
        nvidia.com/host_dev: '1'
    command:
    - sh
    - -c
    - sleep infinity
Run the following command to run the second POD:
K8s CLI VM console
            [root@sl01lw01depl ocp4-helpernode]# oc apply -f podrdma2.yaml
pod/hostdev-test-pod-2 created
Verify that two PODs are running on different Worker Nodes.
K8s CLI VM console
            [root@sl01lw01depl ocp4-helpernode]# oc get pods -o wide
NAME              READY   STATUS    RESTARTS   AGE     IP            NODE                    NOMINATED NODE   READINESS GATES
rdma-test-pod-1   1/1     Running   0          102s   10.129.3.80   worker02.ocp4.vwd.clx   <none>           <none>
rdma-test-pod-2   1/1     Running   0          83s    10.128.2.18   worker03.ocp4.vwd.clx   <none>           <none>
As you can see, the first rdma-test-pod-1 POD is running on the worker02 worker, and the second rdma-test-pod-2 POD is running on the worker03 worker.
Get a shell for the second running container.
K8s CLI VM console
[root@sl01lw01depl ocp4]# oc exec -it rdma-test-pod-2 -- bash
Check the available network interfaces in the POD.
K8s CLI VM console
            root@rdma-test-pod-1:/tmp# rdma link
link mlx5_0/1 state ACTIVE physical_state LINK_UP netdev net1

root@hostdev-test-pod-2:/tmp# ip a s
1: lo: <LOOPBACK,UP,LOWER_UP> mtu 65536 qdisc noqueue state UNKNOWN group default qlen 1000
    link/loopback 00:00:00:00:00:00 brd 00:00:00:00:00:00
    inet 127.0.0.1/8 scope host lo
       valid_lft forever preferred_lft forever
    inet6 ::1/128 scope host
       valid_lft forever preferred_lft forever
3: eth0@if30: <BROADCAST,MULTICAST,UP,LOWER_UP> mtu 1450 qdisc noqueue state UP group default
    link/ether 0a:58:0a:80:02:12 brd ff:ff:ff:ff:ff:ff link-netnsid 0
    inet 10.128.2.18/23 brd 10.128.3.255 scope global eth0
       valid_lft forever preferred_lft forever
    inet6 fe80::3415:caff:fed9:b936/64 scope link
       valid_lft forever preferred_lft forever
26: net1: <BROADCAST,MULTICAST,UP,LOWER_UP> mtu 1500 qdisc mq state UP group default qlen 1000
    link/ether 00:50:56:a2:2e:a2 brd ff:ff:ff:ff:ff:ff
    inet 192.168.3.226/28 brd 192.168.3.239 scope global net1
       valid_lft forever preferred_lft forever
    inet6 fe80::250:56ff:fea2:2ea2/64 scope link
       valid_lft forever preferred_lft forever
Now you can run the ib_write_bw (InfiniBand write bandwidth) tool as part of the Perftest Package by running the following:
Go back to the first running container shell window, a nd run:
K8s CLI VM console
            root@rdma-test-pod-1:/tmp# ib_write_bw  -F -d mlx5_0 --report_gbits

************************************
* Waiting for client to connect... *
************************************
Back to the additional running container shell window. And run.
K8s CLI VM console
root@rdma-test-pod-2:/tmp# ib_write_bw -F 192.168.3.225 -d mlx5_0 --report_gbits
Result:
K8s CLI VM console
            On Client side.
---------------------------------------------------------------------------------------
                    RDMA_Write BW Test
 Dual-port       : OFF          Device         : mlx5_0
 Number of qps   : 1            Transport type : IB
 Connection type : RC           Using SRQ      : OFF
 TX depth        : 128
 CQ Moderation   : 100
 Mtu             : 1024[B]
 Link type       : Ethernet
 GID index       : 2
 Max inline data : 0[B]
 rdma_cm QPs     : OFF
 Data ex. method : Ethernet
---------------------------------------------------------------------------------------
 local address: LID 0000 QPN 0x00c8 PSN 0xae9396 RKey 0x020b05 VAddr 0x007f1fd458a000
 GID: 00:00:00:00:00:00:00:00:00:00:255:255:192:168:03:226
 remote address: LID 0000 QPN 0x00c8 PSN 0x5fc1b8 RKey 0x020b05 VAddr 0x007f1c19487000
 GID: 00:00:00:00:00:00:00:00:00:00:255:255:192:168:03:225
---------------------------------------------------------------------------------------
 #bytes     #iterations    BW peak[Gb/sec]    BW average[Gb/sec]   MsgRate[Mpps]
 65536      5000             90.52              90.52              0.172651
---------------------------------------------------------------------------------------

On Server side.
************************************
* Waiting for client to connect... *
************************************
---------------------------------------------------------------------------------------
                    RDMA_Write BW Test
 Dual-port       : OFF          Device         : mlx5_0
 Number of qps   : 1            Transport type : IB
 Connection type : RC           Using SRQ      : OFF
 CQ Moderation   : 100
 Mtu             : 1024[B]
 Link type       : Ethernet
 GID index       : 2
 Max inline data : 0[B]
 rdma_cm QPs     : OFF
 Data ex. method : Ethernet
---------------------------------------------------------------------------------------
 local address: LID 0000 QPN 0x00c8 PSN 0x5fc1b8 RKey 0x020b05 VAddr 0x007f1c19487000
 GID: 00:00:00:00:00:00:00:00:00:00:255:255:192:168:03:225
 remote address: LID 0000 QPN 0x00c8 PSN 0xae9396 RKey 0x020b05 VAddr 0x007f1fd458a000
 GID: 00:00:00:00:00:00:00:00:00:00:255:255:192:168:03:226
---------------------------------------------------------------------------------------
 #bytes     #iterations    BW peak[Gb/sec]    BW average[Gb/sec]   MsgRate[Mpps]
 65536      5000             90.52              90.52              0.172651
---------------------------------------------------------------------------------------
The performance results listed in this document are indicative and should not be considered as formal performance targets for NVIDIA products.
To run DPDK application, please see the following document: RDG: DPDK Applications on SR-IOV Enabled Kubernetes Cluster with NVIDIA Network Operator.
Done!
Authors

|
Boris Kovalev Boris Kovalev has worked for the past several years as a Solutions Architect, focusing on NVIDIA Networking/Mellanox technology, and is responsible for complex machine learning, Big Data and advanced VMware-based cloud research and design. Boris previously spent more than 20 years as a senior consultant and solutions architect at multiple companies, most recently at VMware. He has written multiple reference designs covering VMware, machine learning, Kubernetes, and container solutions which are available at the Mellanox Documents website. |

|
Vitaliy Razinkov Over the past few years, Vitaliy Razinkov has been working as a Solutions Architect on the NVIDIA Networking team, responsible for complex Kubernetes/OpenShift and Microsoft's leading solutions, research and design. He previously spent more than 25 years in senior positions at several companies. Vitaliy has written several reference designs guides on Microsoft technologies, RoCE/RDMA accelerated machine learning in Kubernetes/OpenShift, and container solutions, all of which are available on the NVIDIA Networking Documentation website. |