Software Management
This chapter describes how to deploy UFM Cyber-AI on UFM Cyber-AI appliance.
NVIDIA® UFM® Cyber-AI is packaged in a tar file. The tar file consists of several docker images and an installation script. The script will load the docker images and create a UFM Cyber-AI service. UFM Cyber-AI should be installed on UFM Cyber-AI appliance.
To deploy the UFM Cyber-AI:
Copy the tar file to the UFM Cyber-AI appliance, for example, to the
/tmpfolder.Copy the license file to the same directory on the UFM Cyber-AI appliance.
Connect to the UFM Cyber-AI appliance via SSH.
Extract the tar file and install the service. Run:
            [root@r-ufm ~]# cd /tmp
[root@r-ufm ~]# tar xvf ufm-cyberai-sw-<version>.tar
[root@r-ufm ~]# cd ufm-cyberai-sw-<version>
[root@r-ufm ~]# ./install.sh
Installer options:
-n|--no-ufm: By default, UFM Enterprise is installed-q|--quiet: Upgrade Cyber-AI without a prompt-l|--license: License file locationExample:
./install -u –l <license_file_path>
If you did not provide the license when running the install script, copy the license file. Run:
[root@r-ufm ~]# cp /tmp/<cyberai-license-file>.lic /opt/ufm/cyberai/licenses
Start the UFM Cyber-AI service. Run:
[root@r-ufm ~]# systemctl start ufm-cyberai.service
Start the UFM Enterprise service. Run:
[root@r-ufm ~]# systemctl start ufm-enterprise.service
Wait 1 minute for the system to come up.
Ensure the service health by running the following:
            [root@r-ufm ~]# ufm-cai-sanity –u <username> -p <password>
Where the username and password are the default username and password for cyberai
Checking Service...
Done
Checking Images...
Done
Checking Containers...
Done
Checking ufm-cyberai REST server...
Done
Sanity tests completed successfully!
Set the NVIDIA UFM Enterprise connection parameters:
[root@ r-ufm ~]# ufm-cai-ufm-params update-i <ufm_ip> -p <ufm_port> -U <username> -P <password> -s <site_name> -t <protocol>
Options:
-h|--help Show
thismessage -i|--ip UFM server IP -p|--port UFM REST API connection port -U|--username UFM username -P|--password UFM password -s|--site UFM site name -t|--protocol UFM Rest API connection protocolThis step can be done also using the web UI. However, it is recommended to set the UFM Enterprise parameters as early as possible, as UFM Cyber-AI needs it to retrieve the fabric topology.
To access the UFM Cyber-AI logs, run the following on the UFM Cyber-AI appliance:
            [root@r-ufm ~]# ls -la /var/log/cyberai/
total 86160
drwxr-xr-x 2 root root     4096 Mar  6 03:28 .
drwxr-xr-x 3 root root     4096 Mar  5 18:46 ..
-rw-r--r-- 1 root root        0 Mar  5 19:51 access.log
-rw-r--r-- 1 root root 45563430 Mar 12 16:09 console.log
-rw-r--r-- 1 root root 42646820 Mar 12 16:09 cyberai.log
-rw-r--r-- 1 root root        0 Mar  5 19:53 rest.log
Access the Cyber-AI User Interface at https:<ip>:8443/cyberai.
For settings and configuration instructions, see Settings and Configuration.
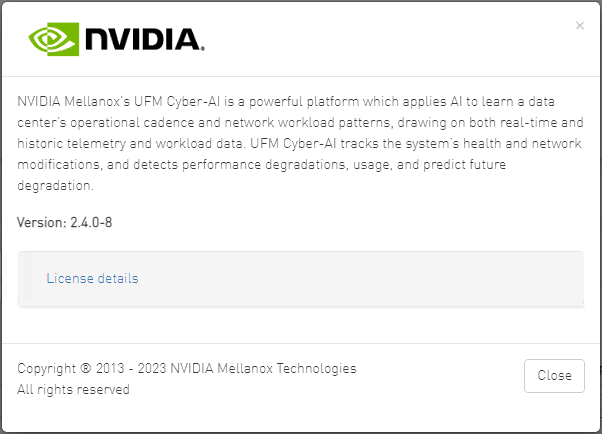
To view the license details:
After installing and activating the software, licenses can be viewed in the Web UI by clicking the about icon on the main page.
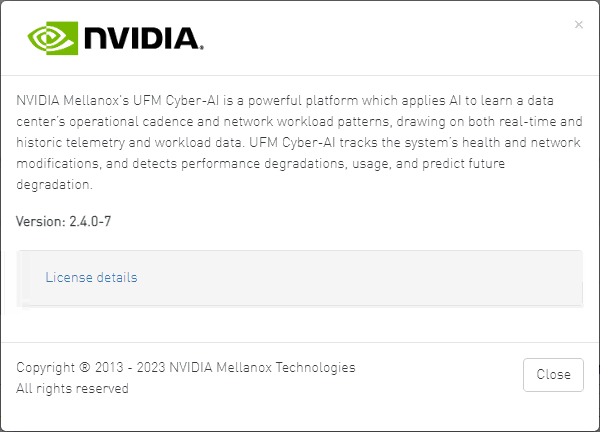
The main about screen displays the current UFM Cyber-AI version and build. To view more information, click "License details".
The first step of upgrading UFM Cyber-AI are similar to the first steps of a fresh installation. The installation process consists of replacing the containers with the new version and upgrading the data according to the new scheme.
Copy the tar file to the UFM Cyber-AI appliance, for example, to the
/tmpfolder.Connect to the UFM Cyber-AI appliance via SSH.
Stop the UFM Cyber-AI service. Run:
[root@r-ufm ~]# systemctl stop ufm-cyberai.service
Extract the tar file and install the service for upgrade. Run:
            root@r-ufm ~]# cd /tmp
[root@r-ufm ~]# tar xvf ufm-cyberai-sw-<version>.tar
[root@r-ufm ~]# cd ufm-cyberai-sw-<version>
[root@r-ufm ~]# ./install.sh
UFM Cyber-AI version <old-version> is installed on this machine
Would you like to upgrade to version <new-version>? [y|N]:
Enter ‘y’ to proceed with the upgrade.
Installer options:
-q|--quiet: Upgrade Cyber-Ai without prompt-n|--no-ufm: Will not install UFM-Enterprise-l|--license: The License file location
Start the ufm-cyberai service. Run:
[root@r-ufm ~]# systemctl start ufm-cyberai.service
Wait 1 minute for the system to come up.
Ensure the service health by running the following:
root
@r-ufm ~]# ufm-cai-sanity –u <username> -p <password> Where the username and password are thedefaultusername and passwordforcyberai Checking Service... Done Checking Images... Done Checking Containers... Done Checking ufm-cyberai REST server... Done Sanity tests completed successfully!
To integrate Cyber-AI with UFM Enterprise, it can be employed as a plugin. To achieve this, follow the below instructions.
Download the plugin's docker image to a local host:
[root
@r-ufm ~]# docker load -i ufm-plugin-cyberai_<version>.tar.gzLoad the docker image.
Once the Docker image has been loaded, refer to the UFM Enterprise user manual for instructions on managing the Cyber-AI plugin. It is important to note that when Cyber-AI is executed as a plugin, there will be no direct access to its APIs from remote machines. It will only be accessible locally and without the need for authentication.
Cyber-AI APIs can be accessed from the remote host via UFM Enterprise using the following URL. You should log in with UFM Enterprise authentication:
https://<host>/ufmRestV2/plugin/cyberai/cyber-ai/analytics/summary?from=-24h&to=-0h