Running UFM Server Software
Before running UFM®:
Perform initial configuration. Refer to Initial Configuration.
Ensure that all ports used by the UFM server for internal and external communication are open and available. For the list of ports, see Used Ports in the UFM User Manual.
You can run the UFM server software in the following modes:
Management
High Availability
Monitoring
Monitoring mode with failover to an external SM
WarningIn Management or High Availability mode, ensure that all Subnet Managers in the fabric are disabled before running UFM. Any remaining active Subnet Managers will prevent UFM from running.
After installing, run the UFM Server by invoking:
systemctl start ufm-enterprise.service
/etc/init.d/ufmd - Available for backward compatibility.
Log files are located under /opt/ufm/files/log (the links to log files are in /opt/ufm/log).
On the Master server, run the UFM Server by invoking:
ufm_ha_cluster start
You can specify additional command options for the ufmha service.
ufm_ha_cluster Command Options
|
Command |
Description |
|
start |
Starts UFM HA cluster. |
|
stop |
Stops UFM HA cluster. |
|
failover |
Initiates failover (change mastership from local server to remote server). |
|
takeover |
Initiates takeover (change mastership from remote server to local server). |
|
status |
Shows current HA cluster status. |
|
cleanup |
Cleans the HA configurations on this node. |
|
help |
Displays help text. |
Currently, running UFM in Monitoring mode is not fully supported as it was in the old Java-based UI. The unsupported functionalities in Monitoring mode are not reflected in the UFM web-based UI.
For Monitoring mode, connect UFM to the fabric using port ib0 only. The fabric must have a subnet manager (SM) running on it (on another UFM, HBSM, or switch SM).
Note that when running in Monitoring mode, the following parameters are automatically overwritten in the /opt/ufm/files/conf/opensm/opensm.conf file upon startup:
event_plugin_name osmufmpi
event_plugin_options --vendinfo -m 0
Any other configuration is not valid for Monitoring mode.
To run in Monitoring mode:
In the /opt/ufm/conf/gv.cfg configuration file:
Set monitoring_mode to yes
If required, change mon_mode_discovery_period (the default is 60 seconds)
Set reset_mode to no_reset
We recommend this setting when running multiple instances of UFM so that each port counter is not reset by different UFM instances. For more information, see Resetting Physical Port Counters in the UFM User Manual.
Ensure that the LMC value set in the opensm configuration file /opt/ufm/files/conf/opensm/opensm.conf is the same as the LMC value configured in the active SM.
Restart the UFM Server.
The Running mode is set to Monitoring, and the frequency of fabric discovery is updated according to the setting of mon_mode_discovery_period.Go to the About window to verify that the Running mode is Monitoring.
For information about running Monitoring mode with failover to an external SM, see Running UFM in Monitoring Mode with Failover to an External SM. For information about Monitoring mode parameters and changing running mode from Monitoring mode to Management mode, see the UFM User Manual.
UFM Web UI is supported on all the following web browsers: Internet Explorer, Firefox, Chrome and Opera.
For optimal UFM Web UI performance, make sure you are using the latest version available of Google Chrome.
For more information, see UFM User Manual.
Before accessing the UFM Web UI:
If required, you can change the configuration of the connection (port and protocol) between the UFM server and the APACHE server in the file gv.cfg:
ws_protocol = http or https
Setting the parameter ws_protocol to http allows unsecured access
Setting the parameter ws_protocol to https denies unsecured access.
ws_port = port number

To launch a UFM Web UI session, do the following:
Launch the Web UI by entering the following URL in your browser:
http://<UFM_server_IP>/ufm
https://<UFM_server_IP>/ufm
In the Login page, enter your User Name and your predefined user Password and click Login.
Once you have entered your user name and password, the main window shows the UFM Dashboard. For more information, see the Fabric Dashboard section in the UFM User Manual.
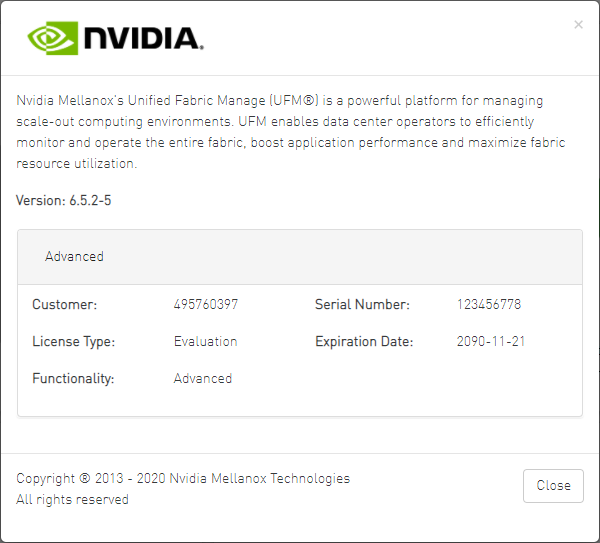
After installing and activating your software, you can view your licenses in the Web UI by clicking the About icon (

) in the main window.

To view the advanced license information, click the Advanced button. The advanced license details will be displayed below.

Product Functionality is updated only after startup. If you replace the UFM license, UFM continues to work in the previous mode until the UFM server is restarted.
To view license information from the CLI:

Run CLI Command "ufmlicense" to display information about all installed licenses on the UFM server under /opt/ufm/files/licenses. This includes invalid and expired license information.
There are two UFM HA licenses where each license includes 2 different MACs: one for the primary machine and one for the standby machine.
In a given time, for each license, only one MACs is detected to be "Valid" (exists on the local machine) where the other MAC is detected as "Invalid" (exist on the standby machine).
See below output example when running the CLI command ufmlicense in SA and HA Modes.
HA Mode Output Example:
|
[root@ip-10-224-16-49-dg11 ~]# docker exec -ti ufm bash root@ ip-10-224-16-49-dg11~# ufmlicense |--------------------------------------------------------------------------------------------------------------------------------| |NVIDIA Corp|xxxxxxx-xxxxxxx|UFM Enterprise|Subscription |e4:43:4b:18:3c:e0|2025-08-29 |128 |3 Years |Invalid | |--------------------------------------------------------------------------------------------------------------------------------| |NVIDIA Corp|xxxxxxx-xxxxxxx|UFM Enterprise|Subscription |e4:43:4b:18:49:a0|2025-08-29 |128 |3 Years |Valid | |--------------------------------------------------------------------------------------------------------------------------------| |NVIDIA Corp|xxxxxxx-xxxxxxx|UFM Enterprise|Subscription |e4:43:4b:18:3c:e0|2025-07-13 |128 |3 |Invalid | |--------------------------------------------------------------------------------------------------------------------------------| |BBK Electronics Corp Ltd|xxxxxxx-xxxxxxx|UFM Enterprise|Subscription |e4:43:4b:18:49:a0|2025-07-13 |128 |3 |Valid | |
SA Mode Output Example:
            root@ufm-production:~# ufmlicense
|--------------------------------------------------------------------------------------------------------------------------------|
|   Customer ID   |     SN     |   swName      |        Type         |   MAC Address   |   Exp. Date   |Limit| Functionality | Status |
|--------------------------------------------------------------------------------------------------------------------------------|
|495760397        |123456778   |UFM Enterprise |Evaluation           |NA               |2090-11-21     |1024 |Advanced       |Valid   |
|--------------------------------------------------------------------------------------------------------------------------------|
To remove a license:

Delete the license file from /opt/ufm/files/licenses.
See the UFM User Manual for information on the following procedures:
Configuring UFM failover to another port
HTTP/HTTPS port configuration
UFM SNMP agent configuration
User Management
