Upgrading UFM-SDN Appliance Software
The following figures describe various upgrade scenarios.
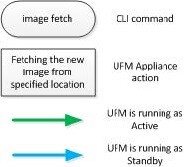
Legend

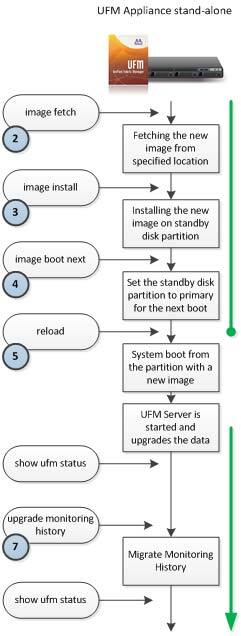
UFM-SDN Appliance Standalone Upgrade Flow

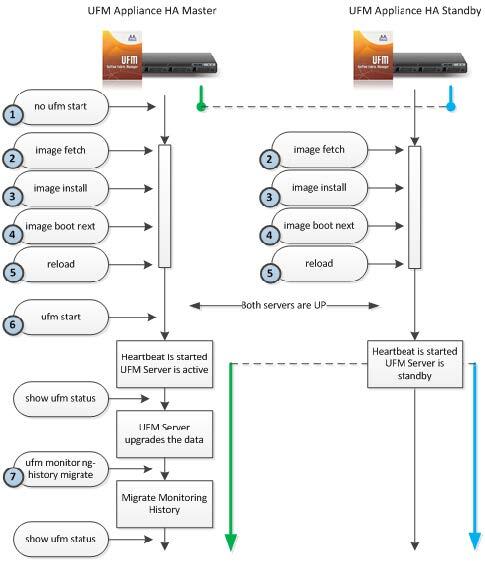
UFM-SDN Appliance High Availability Out-Of-Service Upgrade Flow

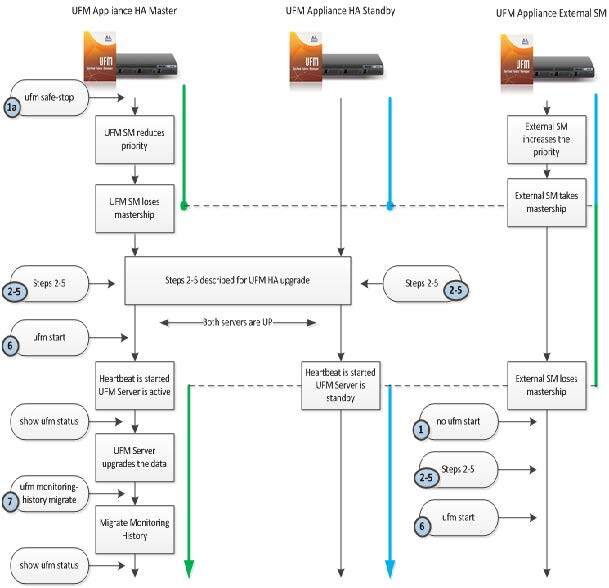
UFM-SDN Appliance High Availability External UFM-SM In-Service Upgrade Flow

To upgrade UFM-SDN Appliance software on your system:

Obtain the available image (.img file) and place it on either a USB storage device or an ftp/scp server and follow the steps below.
Stop UFM.
ufm-appliance [ mgmt-ha-active ] (config) # no ufm start
Alternatively, if external UFM-SM is available, run:
ufm-appliance [ mgmt-ha-active ] (config) # ufm safe-stop
Fetch the new software image.
            ufm-appliance [ mgmt-ha-active ] (config) # image fetch scp://<username>@192.168.10.125/var/www/html/<image_name>
Password ******
100.0%[############################################################]
Install the new image.
            ufm-appliance [ mgmt-ha-active ] (config) # image install image-ufm_appliance-x86_64-x86_64-20121205-152024.img
Step 1 of 4: Verify Image
100.0%
[################################################################]
Step 2 of 4: Uncompress Image
100.0%
[################################################################]
Step 3 of 4: Create Filesystems
100.0%
[################################################################]
Step 4 of 4: Extract Image
100.0%
[################################################################]
Set next boot location as the other slot.
ufm-appliance [ mgmt-ha-active ] (config) # image boot next
Save configuration. Run:
ufm-appliance [ mgmt-ha-active ] (config) # configuration write
Reload UFM-SDN Appliance.
ufm-appliance [ mgmt-ha-active ] (config) # reload
Start UFM.
ufm-appliance [ mgmt-ha-active ] (config) # ufm start
Run on both master and standby:
Fetch the new software image. Run:
ufm-appliance [ mgmt-ha-active ] (config) # image fetch <download URL>
Install the new image. Run:
ufm-appliance [ mgmt-ha-active ] (config) # image install <image name>
Set next boot location as the other slot. Run:
ufm-appliance [ mgmt-ha-active ] (config) # image boot next
Save the configuration changes. Run:
ufm-appliance [ mgmt-ha-active ] (config) # configuration write
Reload the standby UFM-SDN Appliance. Run:
ufm-appliance [ ha-standby ] (config) # reload
Once the standby is up and running, reload the master UFM-SDN Appliance. Run:
ufm-appliance [ mgmt-ha-active ] (config) # reload
As a result, a failover will occur from the master node to the standby node.