Events Policy
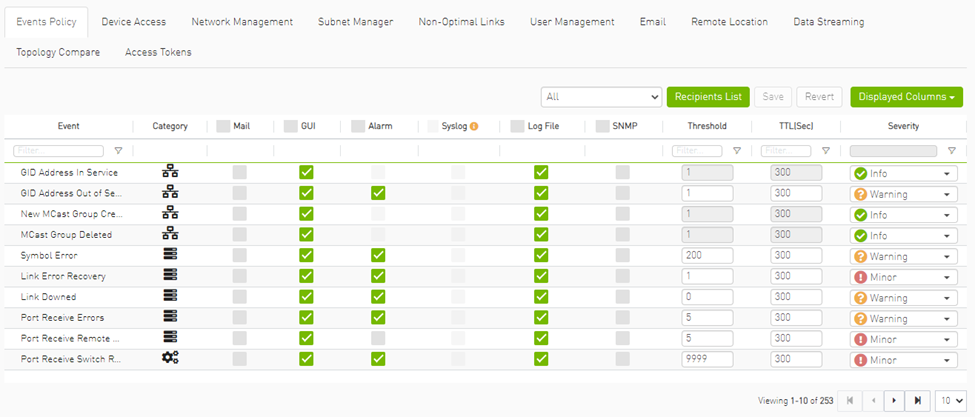
The Events Policy tab allows you to define how and when events are triggered for effective troubleshooting and fabric maintenance.

Events are reported by setting the following parameters:
|
Option |
Description/Instructions |
|
Event |
Event description. |
|
Category |
Event category, such as Communication Error and Hardware represented by icons. |
|
|
When selected, the corresponding events will be sent a list of recipients according to Configuring Email-on-Events. |
|
Web UI |
When selected, the corresponding events are displayed in the Events & Alarms window in the Web UI. |
|
Alarm |
Select the Alarm option to trigger an alarm for a specific event. When selected, the alarms will appear in the Events & Alarms window in the Web UI. |
|
Syslog |
When checked along with the Log file option, the selected events will be written to Syslog. |
|
Log File |
Select the Log File option if you would like the selected event to be reported in a log file. |
|
SNMP |
The UFM Server will send events to third-party clients by means of SNMP traps. Select the event SNMP check box option to enable the system to send an SNMP trap for the specific event. The SNMP trap will be sent to the port defined in Configuration file located under: /opt/ufm/conf/gv.cfg. For further information, refer to SNMP Settings. |
|
Threshold |
An event will be triggered when the traffic/error rate exceeds the defined threshold. For example: when PortXmit Discards is set to 5 and the counter value grows by 5 units or more between two sequential reads, an event is generated. |
|
TTL (Sec) |
TTL (Alarm Time to Live) sets the time during which the alarm on the event is visible on UFM Web UI. TTL is defined in seconds. CAUTION: Setting the TTL to 0 makes the alarm permanent, meaning that the alarm does not disappear from the Web UI until cleared manually. |
|
Action |
The action that will be executed in case the event which has triggered the action can be none or isolated (make the port unhealthy or isolated). This attribute can be set only for ports event policy. |
|
Severity |
Select the severity level of the event and its alarm from the drop-down list: Info, Warning, Minor, and Critical. |
Category column in the Events Policy table indicates to which category the event belongs. These categories are defined in the event configuration file and cannot be modified. Categories are: Hardware, Fabric Configuration, Communication Error, Fabric Notification, Maintenance, Logical Model, Fabric Topology, Gateway, Module Status, and UFM Server.
Event logs can still be checked even if the events.log file checkbox was not checked during Syslog configuration.
For a certain event to be sent to Syslog, both the Syslog and the Log File checkboxes must be checked. Otherwise, the selected events will not be sent to Syslog.
See Appendix - Supported Port Counters and Events for detailed information on port counters and events.
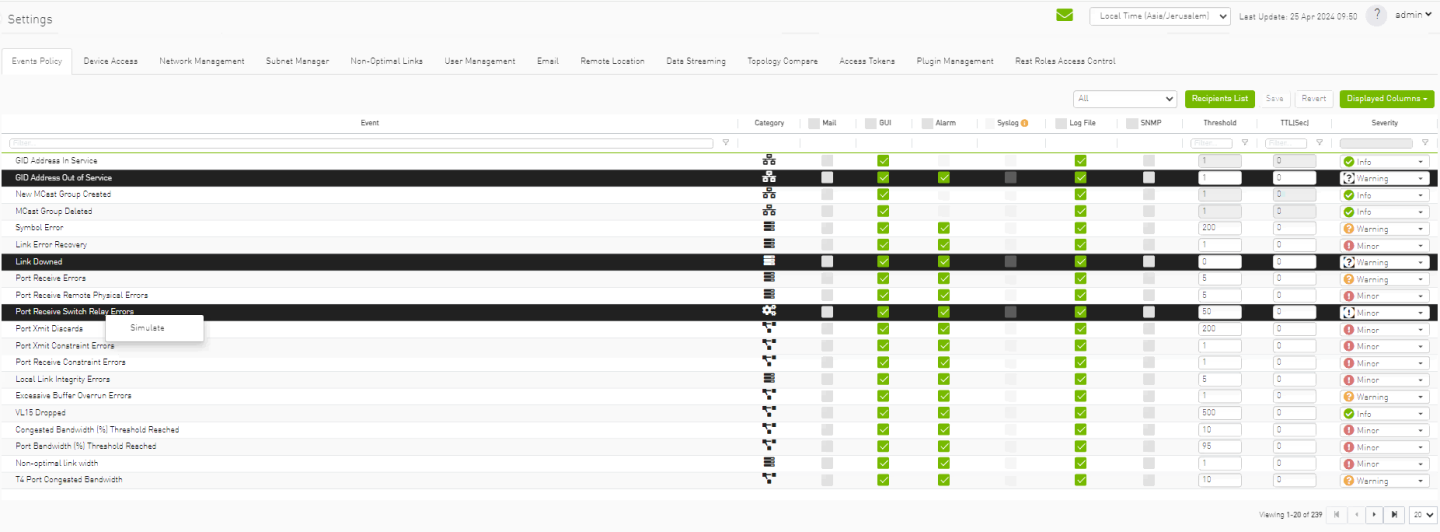
This feature enables you to simulate one or multiple event policies. To perform a simulation, choose one or multiple events from the events policy table, right-click, and then select the "Simulate" action from the context menu.

To view the simulated events policy, navigate to the Events & Alarms tab.

When UFM is running, the Web UI Policy Table shows the SNMP traps. You can then modify and save an SNMP Trap flag for each event. SNMP settings are enabled only after the installation of the UFM license.
UFM sends SNMP Trap using version SNMPV2 to the default port 162.

To set the SNMP properties:
Open the /opt/ufm/conf/gv.cfg configuration file.
Under the [Notifications] line (see the following example):
Set the (snmp_listeners) IP addresses and ports
Port is optional – the default port number is 162
Use a comma to separate multiple listeners
Format:
snmp_listeners = <IP Address 1>[:<port 1>][,<IP Address 2>[:<port 2>]…]
Example:
            [Notifications]
snmp_listeners = host1, host2:166
UFM enables you to configure each event to be sent by email to a list of pre-defined recipients. Every 5 minutes (configurable) UFM will collect all “Mail” selected events and send them to the list of pre-defined recipients. By default, the maximum number of events which can be sent in a single email is 100 (configurable, should be in the range of 1–1000)
The order of events in the email body can be set as desired. The available options are: order by severity or order by time (by default: order by severity)

To change email-on-events setting, do the following:
Edit the /opt/ufm/conf/gv.cfg file.
Go to section “[Events]” and set the relevant parameters:
sending_interval (default=5)—Time interval for keeping events (minimum 10 seconds, maximum 24 hours)
sending_interval_unit (default = minute)—Optional units: minute, second, hour
cyclic_buffer (default=false)—If the cyclic buffer is set to true, older events will be dropped, otherwise newer events will be dropped (if reaches max count)
max_events (default=100)—Maximum number of events to be sent in one mail (buffer size), should be in the range of 1–1000
group_by_severity (default=true)—Group events in mail by severity or by time

To receive the email-on-events, do the following:
Configure SMTP settings under Settings window → Email tab – see Email Tab.
Configure the Recipients List under Settings → Events Policy.
Click New.
In the Recipients List window, enter valid recipient email addresses, comma-separated, and click Submit.
The new recipients are then added to the Events Policy Recipients list.
These recipients automatically start receiving emails on the events for which the Mail checkbox is checked in the table under Events Policy.


