


Deploying Custom Models as NIM#
The NVIDIA TTS NIM microservice handles deployments of full pipelines that can be composed of one or more supported NVIDIA NeMo models (for example, an acoustic model and a vocoder, or an end-to-end synthesis model) and other pre-/post-processing components such as text normalization and grapheme-to-phoneme conversion. These pipelines must be exported to an efficient inference engine and optimized for the target platform. Therefore, the TTS NIM cannot directly use unsupported NVIDIA NeMo models because they represent only a single model.
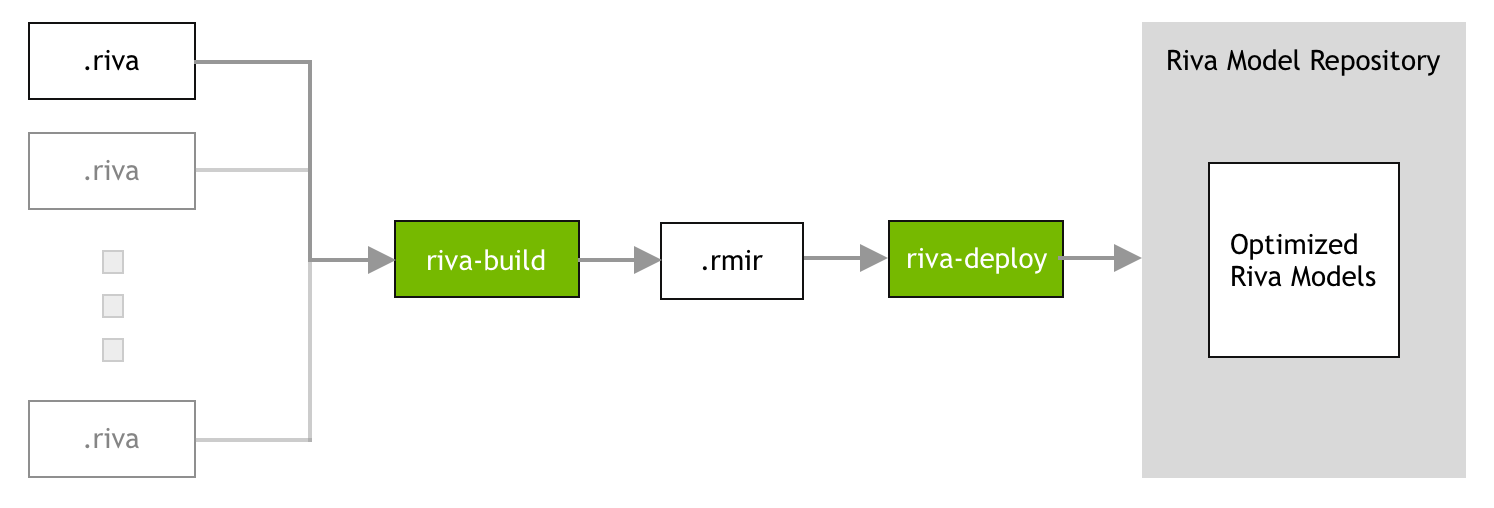
The process of gathering all the required artifacts (for example, models, files, configurations, and user settings) and generating the inference engines is referred to as the Riva model repository generation. The TTS NIM Docker images have all the necessary tools to generate the Riva model repository.
Phase 1: The development phase. To create a model in Riva, the model checkpoints must be converted to .riva format. You
can develop or fine-tune these model checkpoints in NeMo before exporting them to .riva format. For more information, refer to the Model Development with NeMo section.
Phase 2: The build phase. During the build phase, all the necessary artifacts (models, files, configurations, and user settings) required to deploy a Riva service are gathered into an intermediate file called RMIR (Riva Model Intermediate Representation). For more information, refer to the Riva Build section.
Phase 3: The deploy phase. During this phase, riva-deploy converts the RMIR file into an optimized Riva model repository for
the target platform. Run this phase on the physical cluster where the Riva server is deployed. For more information, refer to the
Riva Deploy section.
Model Development with NeMo#
Riva supports importing supported models trained in NVIDIA NeMo. For more information, refer to the NVIDIA/NeMo GitHub repository.
Prepare NeMo or Riva Model Artifacts#
The TTS NIM supports three artifact paths:
Inline
.nemoconversion inriva-build(recommended):riva-buildrunsnemo2rivainternally on the.nemocheckpoint that you pass throughsource_path, so no separate export step is required. This is the path used by the Magpie TTS model families and is shown in Riva Build.Standalone
.nemoto.rivaexport: Use this when the model build reference expects.rivainputs, such as a multi-component pipeline. Thenemo2rivatool already ships inside the TTS NIM container, so run it directly — no separate installation is required.Packaged deployable
.rivaartifact: Use the deployable artifact directly and skipnemo2riva.
The model config name, build options, and inline nemo2riva options are model-specific.
Standalone .nemo to .riva Export#
If the model build reference expects .riva inputs, convert each checkpoint to the .riva format from within the NIM container using the nemo2riva tool.
Note
nemo2riva is already bundled in the TTS NIM container. Run it from inside the container — this is the recommended approach. You do not need to install nemo2riva from PyPI.
nemo2riva --key tlt_encode --out /riva_build_deploy/<model_name>.riva /riva_build_deploy/<model_name>.nemo
where:
<model_name>.nemois the source checkpoint to convert (positional argument).--outis the path of the.rivafile to write.--keyencrypts the exported model with the given key.tlt_encodeis the key used for the pre-trained models published on NGC. Omit--keyto write an unencrypted.rivafile.
Run one export per .nemo checkpoint in the pipeline. For all options, run nemo2riva --help. For the full per-architecture reference, refer to the nemo2riva README.
Riva Build#
The riva-build tool is responsible for deployment preparation. Its output is an
intermediate format (called an RMIR) of an end-to-end pipeline for the supported
services within Riva.
Launch an interactive session inside the NIM image for the same TTS model family as the custom checkpoint.
export CONTAINER_ID=<tts-nim-container-id>
export ARTIFACT_DIR=/path/to/artifacts
export NIM_EXPORT_PATH=~/nim_export

mkdir -p "$NIM_EXPORT_PATH"
chmod 700 "$NIM_EXPORT_PATH"

docker run --gpus all -it --rm \
    -v "$ARTIFACT_DIR":/riva_build_deploy \
    -v "$NIM_EXPORT_PATH":/model_tar \
    --entrypoint="/bin/bash" \
    --name riva-tts-build-deploy \
    nvcr.io/nim/nvidia/$CONTAINER_ID:latest
where:
<tts-nim-container-id>is the TTS NIM container for the matching model family, such asmagpie-tts-multilingual.$ARTIFACT_DIRis the folder that contains the.nemoor.rivafile and any additional artifacts required to prepare the Riva model repository.$NIM_EXPORT_PATHis where the generatedcustom_model.tar.gzis written on the host.
If the container cannot write to the mounted paths, grant access to the container user instead of making the directory world-writable.
Run the
riva-buildcommand from within the container.Use the NIM/Hydra-style
riva-buildinterface and the model-specific TTS config for the image. To list every available parameter for the config, run the help command:riva-build --config-path=pkg://servicemaker.configs.tts --config-name=<model-config-name> -h
Build from a
.nemocheckpoint with inline conversion:riva-build --config-path=pkg://servicemaker.configs.tts --config-name=<model-config-name> \ output_path=/riva_build_deploy/custom_model.rmir:<encryption_key> \ 'source_path=[{path: /riva_build_deploy/model.nemo, nemo2riva: {<model-specific-conversion-options>}}]' \ <model-specific-build-options>
Build from a
.rivaartifact:riva-build --config-path=pkg://servicemaker.configs.tts --config-name=<model-config-name> \ output_path=/riva_build_deploy/custom_model.rmir:<encryption_key> \ 'source_path=[/riva_build_deploy/model.riva:<encryption_key>]' \ <model-specific-build-options>
For a multi-component pipeline, list each
.rivafile insource_pathin the order expected by that model family.where:
<model-config-name>is the TTS config name supported by the image, such as the model’sstreamingorofflineconfig.<model-specific-conversion-options>are the inlinenemo2rivaoptions required by that model family, such askey: tlt_encode.<model-specific-build-options>are service and model settings such as language, phone set, dictionary assets, voice metadata, speaker maps, and sample rate.<encryption_key>is optional.tlt_encodeis the key used for the models published on NGC. If the.rivafile or checkpoint is not encrypted, omit:<encryption_key>.
Example — Magpie TTS Multilingual. The following complete
riva-buildcommand converts a Magpie TTS Multilingual.nemocheckpoint inline withnemo2riva. Replace each placeholder from<tokenizer_far_file>through<abbreviations_file>with the corresponding filename from the extracted language-asset archive in$ARTIFACT_DIR.riva-build --config-path=pkg://servicemaker.configs.tts --config-name=streaming \ output_path=/riva_build_deploy/tts-magpie-multilingual.rmir:tlt_encode \ 'source_path=[{path: /riva_build_deploy/model.nemo, nemo2riva: {key: tlt_encode}}]' \ sample_rate=22050 \ phone_set=ipa \ voice_name=Magpie-Opensource \ language_code='en-US,es-US,fr-FR,de-DE,zh-CN,vi-VN,it-IT,hi-IN,ja-JP,ko-KR,ar-AR,pt-BR' \ wfst_tokenizer_model=/riva_build_deploy/<tokenizer_far_file> \ wfst_verbalizer_model=/riva_build_deploy/<verbalizer_far_file> \ mapping_file=/riva_build_deploy/<mapping_file> \ phone_dictionary_file=/riva_build_deploy/<phone_dictionary_file> \ sparrowhawk_proto_files=/riva_build_deploy/<sparrowhawk_proto_files> \ verbalizer_proto_files=/riva_build_deploy/<verbalizer_proto_files> \ tokenizer_proto_files=/riva_build_deploy/<tokenizer_proto_files> \ wfst_post_process_model=/riva_build_deploy/<post_process_far_file> \ postprocessor_proto_files=/riva_build_deploy/<postprocessor_proto_files> \ abbreviations_file=/riva_build_deploy/<abbreviations_file> \ preprocessor.g2p_ignore_ambiguous=False \ preprocessor.pad_with_space=false \ upper_case_chars=true \ magpie_tts.chunk_ms=90 \ magpie_tts.fade_ms=5 \ magpie_tts.history_future=1 \ magpie_tts.history_len=6 \ magpie_tts.future_len=1 \ magpie_tts.max_context_len=111 \ magpie_tts.attention_prior_window_length_left=1 \ magpie_tts.attention_prior_window_length_right=2
By default, if the RMIR output already exists, it will not be overwritten. To force overwrite with the NIM/Hydra-style command, add force=true to the same riva-build command. For the full parameter list, run the image-specific help command shown above.
Riva Deploy#
The riva-deploy tool converts an RMIR file into the Riva model repository for the target GPU.
Generate the Riva model repository from the Riva .rmir file with the following command:
riva-deploy -f /riva_build_deploy/custom_model.rmir:tlt_encode /data/models
The :tlt_encode suffix must match the encryption key used at build time. If the RMIR is not encrypted, omit :tlt_encode.
Use /data/models inside the container. Deploying elsewhere can require manual path fixes in generated Triton configurations for model-specific assets such as pronunciation dictionaries.
After the Riva model repository is generated, prepare the tar archive.
tar -C /data/models -czf /model_tar/custom_model.tar.gz .
Close the container.
exit
Launch the Custom NIM#
After the Riva model repository tar archive for your custom model is generated, manually start the NIM Docker container using the selector for the same model family.
export NIM_TAGS_SELECTOR=<selector-for-matching-model-family>

docker run -it --rm --name=$CONTAINER_ID \
  --runtime=nvidia \
  --gpus '"device=0"' \
  --shm-size=8GB \
  -e NGC_API_KEY \
  -e NIM_TAGS_SELECTOR \
  -e NIM_DISABLE_MODEL_DOWNLOAD=true \
  -e NIM_HTTP_API_PORT=9000 \
  -e NIM_GRPC_API_PORT=50051 \
  -p 9000:9000 \
  -p 50051:50051 \
  -v "$NIM_EXPORT_PATH":/opt/nim/export:ro \
  -e NIM_EXPORT_PATH=/opt/nim/export \
  nvcr.io/nim/nvidia/$CONTAINER_ID:latest
NIM_DISABLE_MODEL_DOWNLOAD=true tells the container to load the custom repository from NIM_EXPORT_PATH instead of downloading the default model artifacts from NGC.
Verify the Custom NIM#
curl -fsS http://localhost:9000/v1/health/ready
curl -fsS http://localhost:9000/v1/audio/list_voices | python3 -m json.tool
python3 python-clients/scripts/tts/talk.py \
  --server 0.0.0.0:50051 \
  --language-code <LANG_CODE> \
  --text "Hello from my custom TTS voice." \
  --voice <VOICE_NAME> \
  --output custom_tts_test.wav
file custom_tts_test.wav