Get Started with NIM#
Prerequisites#
Setup#
NVIDIA AI Enterprise License: NVIDIA NIM for VLMs is available for self-hosting under the NVIDIA AI Enterprise (NVAIE) License.
NVIDIA GPU(s): NVIDIA NIM for VLMs (NIM for VLMs) runs on any NVIDIA GPU with sufficient GPU memory, but some model/GPU combinations are optimized. Homogeneous multi-GPUs systems with tensor parallelism enabled are also supported. See the Support Matrix for more information.
CPU: x86_64 or aarch64 (depending on the model) architectures
OS: A Linux operating system (Ubuntu 22.04 or later recommended) that:
Has
glibc>= 2.35 (see output ofld -v)
Drivers and software:
NVIDIA Driver release 580 or later
Docker >= 23.0.1
Install the NVIDIA Driver.
Install CUDA by following the installation guide.
We recommend:
Using a network repository as part of a package manager installation and skipping the CUDA toolkit installation, as the libraries are available within the NIM container
Installing the open kernels for a specific version:
Major Version
EOL
Data Center & RTX/Quadro GPUs
GeForce GPUs
> 580
TBD
X
X
560
Aug. 2025
X
X
550
Feb. 2025
X
X
545
Oct. 2023
X
X
535
June 2026
X
525
Nov. 2023
X
470
Sept. 2024
X
Install Docker.
Install the NVIDIA Container Toolkit.
After installing the toolkit, follow the instructions in the Configure Docker section in the NVIDIA Container Toolkit documentation.
To ensure that your setup is correct, run the following command:
docker run --rm --runtime=nvidia --gpus all ubuntu nvidia-smi
This command should produce output similar to the following, allowing you to confirm the CUDA driver version and available GPUs.
+-----------------------------------------------------------------------------------------+
| NVIDIA-SMI 550.54.14              Driver Version: 550.54.14      CUDA Version: 12.4     |
|-----------------------------------------+------------------------+----------------------+
| GPU  Name                 Persistence-M | Bus-Id          Disp.A | Volatile Uncorr. ECC |
| Fan  Temp   Perf          Pwr:Usage/Cap |           Memory-Usage | GPU-Util  Compute M. |
|                                         |                        |               MIG M. |
|=========================================+========================+======================|
|   0  NVIDIA H100 80GB HBM3          On  |   00000000:1B:00.0 Off |                    0 |
| N/A   36C    P0            112W /  700W |   78489MiB /  81559MiB |      0%      Default |
|                                         |                        |             Disabled |
+-----------------------------------------+------------------------+----------------------+

+-----------------------------------------------------------------------------------------+
| Processes:                                                                              |
|  GPU   GI   CI        PID   Type   Process name                              GPU Memory |
|        ID   ID                                                               Usage      |
|=========================================================================================|
|  No running processes found                                                             |
+-----------------------------------------------------------------------------------------+
Installing WSL2 for Windows#
Certain downloadable NIMs can be used on an RTX Windows system with Windows System for Linux (WSL). To enable WSL2, perform the following steps.
Be sure your computer can run WSL2 as described in the Prerequisites section of the WSL2 documentation.
Enable WSL2 on your Windows computer by following the steps in Install WSL command. By default, these steps install the Ubuntu distribution of Linux. For alternative installations, see Change the default Linux distribution installed.
Launch NVIDIA NIM for VLMs#
You can download and run the NIM of your choice from either the API catalog or NGC.
From NGC#
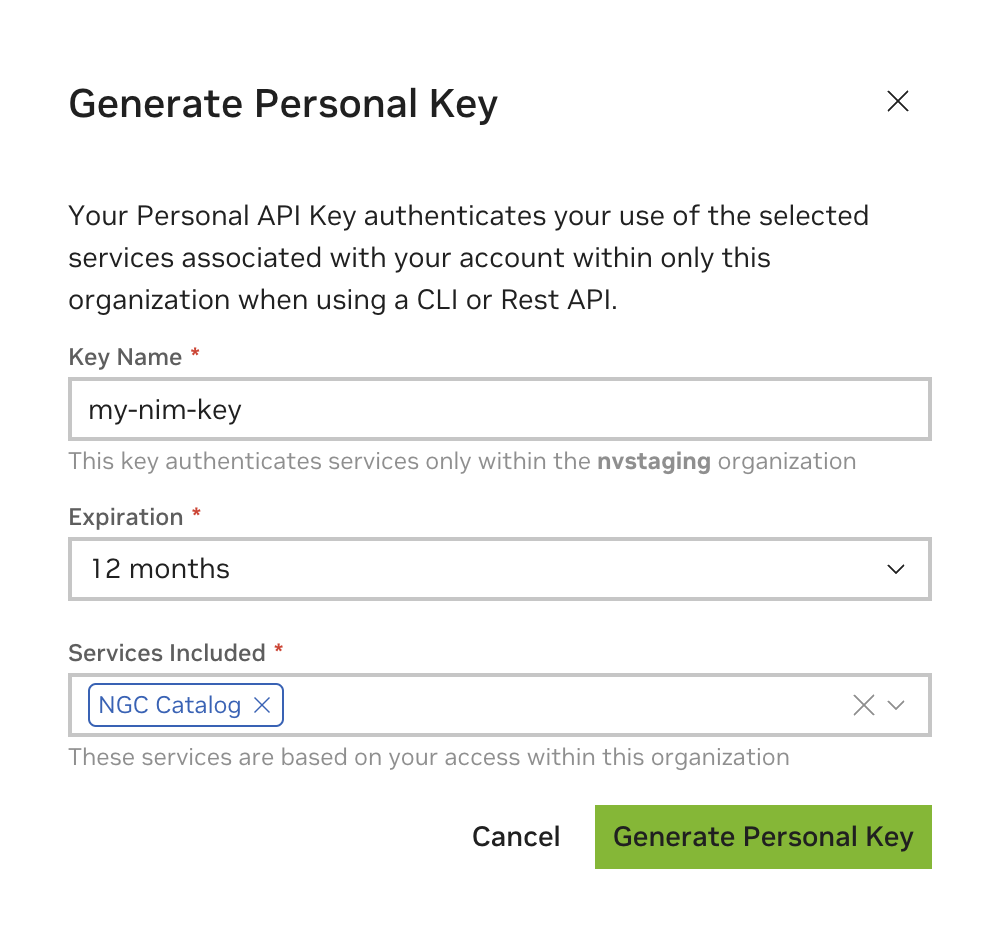
Generate an API key#
An NGC Personal API key is required to access NGC resources. Generate the key on the Setup API Keys page.
When creating a Personal API key, select (at least) NGC Catalog from the Services Included list. You can include more services to use this key for other purposes.
Export the API key#
Pass the value of the API key to the docker run command in the next section as the NGC_API_KEY environment variable to download the appropriate models and resources when starting the NIM.
If you are not familiar with how to create the NGC_API_KEY environment variable, the simplest way is to export it in your terminal:
export NGC_API_KEY=<value>
Run one of the following commands to make the key available at startup:
# If using bash
echo "export NGC_API_KEY=<value>" >> ~/.bashrc

# If using zsh
echo "export NGC_API_KEY=<value>" >> ~/.zshrc
Other more secure options include saving the value in a file, which you can retrieve with cat $NGC_API_KEY_FILE, or using a password manager.
Docker Login to NGC#
To pull the NIM container image from NGC, first authenticate with the NVIDIA Container Registry using the following command:
echo "$NGC_API_KEY" | docker login nvcr.io --username '$oauthtoken' --password-stdin
Use $oauthtoken as the username and NGC_API_KEY as the password. The $oauthtoken username is a special name indicating that you will authenticate with an API key, not a username and password.
List Available NIMs#
This documentation uses the NGC CLI tool in several examples. For information on downloading and configuring the tool, see the NGC CLI documentation.
Use the following command to list the available NIMs in CSV format.
ngc registry image list --format_type csv 'nvcr.io/nim/*'
This command should produce output in the following format:
Name,Repository,Latest Tag,Image Size,Updated Date,Permission,Signed Tag?,Access Type,Associated Products
<model-name1>,<repository1>,<latest-tag1>,<image size1>,<updated date1>,<permission1>,<signed tag?1>,<access type1>,<associated products1>
...
<model-nameN>,<repositoryN>,<latest-tagN>,<image sizeN>,<updated dateN>,<permissionN>,<signed tag?N>,<access typeN>,<associated productsN>

Use the **Repository** and **Latest Tag** values in the ``docker run`` command in the next section.
Note
The following sections describe how to launch and query a NIM for any model. For model-specific examples, refer to Querying the API.
Launch NIM#
The following command launches a Docker container for a specific model. To
launch a container for a different NIM, replace the values of Repository and
Latest_Tag with values from the previous image list command and change
the value of CONTAINER_NAME to something appropriate.
# Choose a container name for bookkeeping
export CONTAINER_NAME=<container-name>

# The container name from the previous ngc registry image list command
Repository=<repository>
Latest_Tag=<latest-tag>

# Choose a VLM NIM Image from NGC
export IMG_NAME="nvcr.io/${Repository}:${Latest_Tag}"

# Choose a path on your system to cache the downloaded models
export LOCAL_NIM_CACHE=~/.cache/nim
mkdir -p "$LOCAL_NIM_CACHE"

# Start the VLM NIM
docker run -it --rm --name=$CONTAINER_NAME \
  --runtime=nvidia \
  --gpus all \
  --shm-size=16GB \
  -e NGC_API_KEY=$NGC_API_KEY \
  -v "$LOCAL_NIM_CACHE:/opt/nim/.cache" \
  -u $(id -u) \
  -p 8000:8000 \
  $IMG_NAME
For more details on how to configure Docker, interactive execution, port forwarding, and more, see the Docker documentation.
Docker Run Parameters#
Flags |
Description |
|---|---|
|
|
|
Delete the container after it stops (see Docker docs) |
|
Give a name to the NIM container for bookkeeping. Use any preferred value. |
|
Ensure NVIDIA drivers are accessible in the container. |
|
Expose all NVIDIA GPUs inside the container. See the configuration page for mounting specific GPUs. |
|
Allocate host memory for multi-GPU communication. Not required for single GPU models or GPUs with NVLink enabled. |
|
Provide the container with the token necessary to download adequate models and resources from NGC. See Export the API key. |
|
Mount a cache directory from your
system ( |
|
Use the same user as your system user inside the NIM container to avoid permission mismatches when downloading models in your local cache directory. |
|
Forward the port where the NIM
server is published inside the
container to access from the host
system. The left-hand side of
the colon ( |
|
Name and version of the VLM NIM container from NGC. The VLM NIM server automatically starts if no argument is provided after this. |
Note
See the Configuring a NIM topic for information about additional configuration settings.
Note
If you have an issue with permission mismatches when downloading models in your local cache directory, add the -u $(id -u) option to the docker run call.
Note
NIM automatically selects the most suitable profile based on your system specifications. For details, see Automatic Profile Selection
Run Inference#
During startup, the NIM container downloads the required resources and serves the model behind an API endpoint. The following message indicates a successful startup.
INFO: Application startup complete.
INFO: Uvicorn running on http://0.0.0.0:8000 (Press CTRL+C to quit)
Once you see this message, you can validate the deployment of NIM by executing an inference request. In a new terminal, run the following command to show a list of models available for inference:
curl -X GET 'http://0.0.0.0:8000/v1/models'
Tip
Pipe the results of curl commands into a tool like jq or python -m json.tool to make the output of the API easier to read. For example: curl -s http://0.0.0.0:8000/v1/models | jq.
This command should produce output similar to the following:
{
  "object": "list",
  "data": [
    {
      "id": "<model-name>",
      "object": "model",
      "created": 1724796510,
      "owned_by": "system",
      "root": "<model-name>",
      "parent": null,
      "max_model_len": 131072,
      "permission": [
        {
          "id": "modelperm-c2e069f426cc43088eb408f388578289",
          "object": "model_permission",
          "created": 1724796510,
          "allow_create_engine": false,
          "allow_sampling": true,
          "allow_logprobs": true,
          "allow_search_indices": false,
          "allow_view": true,
          "allow_fine_tuning": false,
          "organization": "*",
          "group": null,
          "is_blocking": false
        }
      ]
    }
  ]
}
To check service readiness:
curl -X GET 'http://0.0.0.0:8000/v1/health/ready'
The server responds with HTTP 200 when it is ready to accept requests.
Querying the API#
Different models support different features and APIs. To launch a specific NIM and query its API, use the following:
Current Release#
Mistral-Small-4-119B-2603: Model card, API examples
Qwen3.5 models:
Refer to the following model cards and API examples for more information:
Nemotron-Parse-v1.2: Model card on Hugging Face, API examples
Ministral 3 14B Instruct 2512: Model card on build.nvidia.com, API examples
Kimi-K2.5: Model card on build.nvidia.com, API examples
Past Releases#
Mistral Large 3 675B Instruct 2512 (release 1.6.0): Model card on build.nvidia.com, API examples
Cosmos Reason2 (release 1.6.0): Cosmos Reason2 2B and Cosmos Reason2 8B model cards on Hugging Face, API examples
Nemotron Nano 12B v2 VL (release 1.6.0): Model card on build.nvidia.com, API examples
Nemotron Parse (release 1.5.0): Overview, API examples
Cosmos Reason1 7B (release 1.4.1): Model card on build.nvidia.com, API examples
Llama 4 Maverick 17B 128E Instruct (release 1.4.0): Model card on GitHub, API examples
Llama 4 Scout 17B 16E Instruct (release 1.3.2): Model card on GitHub, API examples
Mistral Small 3.2 24B Instruct 2506 (release 1.3.1): Model card on build.nvidia.com, API examples
Llama 3.1 Nemotron Nano VL 8B v1 (release 1.3.1): Model card on build.nvidia.com, API examples
nemoretriever-parse (release 1.2.0): Overview, API examples
Llama 3.2 Vision (release 1.1.1): Model card on GitHub, API examples
Stopping the Container#
If a Docker container is launched with the --name command line option, you can stop the running container using the following command.
# In the previous sections, the environment variable CONTAINER_NAME was
# defined using `export CONTAINER_NAME=<container-name>`
docker stop $CONTAINER_NAME
Use docker kill if stop is not responsive. Then, follow it with docker rm $CONTAINER_NAME if you do not intend to restart this container as-is (using docker start $CONTAINER_NAME). In which case you will need to re-use the docker run ... instructions from the top of this section to start a new container for your NIM.
If you did not start a container with --name, look at the output of docker ps to get a container ID for the image you used.
Serving Models from Local Assets#
NIM for VLMs provides utilities which enable downloading models to a local directory either as a model repository or to NIM cache. See the Utilities section for details.
Use the previous commands to launch a NIM container. From there, you can view and download models locally.
Use the list-model-profiles command to list the available profiles.
You can download any of the profiles to the NIM cache using the download-to-cache command. For example:
download-to-cache --profile 09e2f8e68f78ce94bf79d15b40a21333cea5d09dbe01ede63f6c957f4fcfab7b
You can also let the download-to-cache decide the most optimal profile given the hardware to download by providing no profiles to download, as shown in the following example.
download-to-cache