NVIDIA® Nsight™ Application Development Environment for Heterogeneous Platforms, Visual Studio Edition 5.3 User Guide
Send Feedback
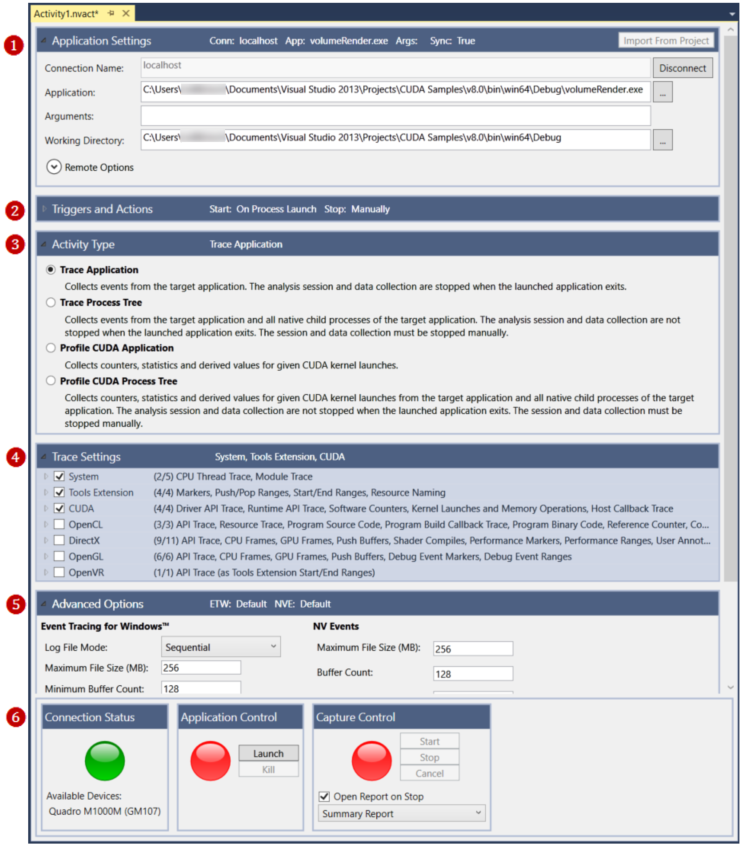
The NVIDIA Nsight Analysis Tools provide reports on various kinds of trace data of an application. You define the kind of data that you want to collect on the Analysis Activity document. The following explains the different sections of the Activity document.
 Application Settings
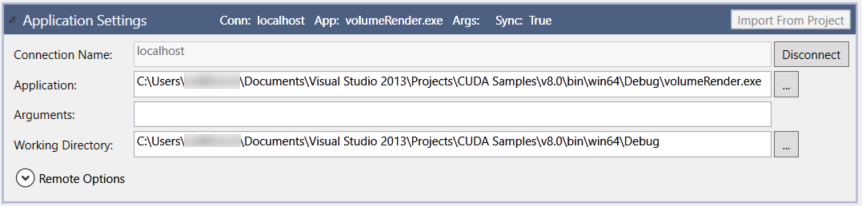
Use this section of the Activity document to specify the application that you want to analyze.
| Setting/Field | Description | ||||||
|---|---|---|---|---|---|---|---|
| Connection Name | The name of the machine on which the target application is to run. If you opened the Activity document while a project was open in Visual Studio, this field is automatically populated with the machine name you specified in the project's Nsight - User Settings window. | ||||||
| Application | The absolute path to the target application. | ||||||
| Arguments | Input arguments for the target application. | ||||||
| Working Directory | If no directory specified, the default is the directory where the target application resides. | ||||||
| Remote Options | The settings for Remote Options are available when the application to be analyzed is on a remote machine.
|
 Triggers and Actions
The Triggers and Actions section of the Activity document allows you to define how you want the capture session to start and end.
| Setting | Description |
|---|---|
| Start Collection |
Select which event you want to trigger the start of a data capture. |
| Stop Collection |
Select which event you want to trigger the end of a data capture. |
 Activity Type
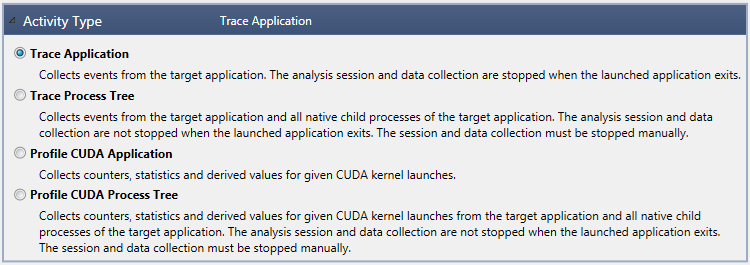
In the Activity Type section of the Activity document, specify the kind of analysis that you want to perform.
| Setting | Description |
|---|---|
| Trace Application |
Select Trace Application to collect trace data from a single target application. |
| Trace Process Tree |
Select Trace Process Tree to collect trace data from a target application and all native child processes of the target application. When performing a system trace, the Analysis Tool does not stop capturing data when you kill the launched application. You must stop the capture of data manually by clicking on the Stop button under Capture Control. One of the benefits of performing a Trace Process Tree is that it allows you to capture data from programs that used a launcher application. This means that the capture could contain pertinent information about child processes that continue after the target application terminates. That is why the Analysis tool does not automatically stop a system trace when a launched application terminates, and why you must manually stop the collection of data. |
| Profile CUDA Application |
Select Profile CUDA Application to collect counters, statistics, and derived metrics for each CUDA kernel launch. |
| Profile CUDA Process Tree |
Select Profile CUDA Process Tree to collect counters, statistics, and derived values for any given CUDA kernel launch, as well as all native child processes. The Control UI for Profile CUDA Process Tree equals the one from Trace Process Tree; that is, there is an additional checkbox that allows the user to kill the launcher on stop session. If this is disabled, the launched application will run without changes if the session is stopped. If it's enabled the launcher is killed on stop. (Note that this does not necessarily close all children as well.) During a running session, the user can switch modes (if no capture is active). This is only valid if staying within the same scope. In other words, you can switch from Profile Application to Trace Application (and back), and you can also switch from Profile Process Tree to Trace Process Tree (and back). However, you cannot switch from an Application scope to a Process Tree scope. With the Profile CUDA Process Tree option, the analysis session and data collection are not stopped when the launched application exits. The session and data collection must be stopped manually. |
For more information about CUDA counters and kernels, see Profile CUDA Settings.
 Trace and Profile Settings
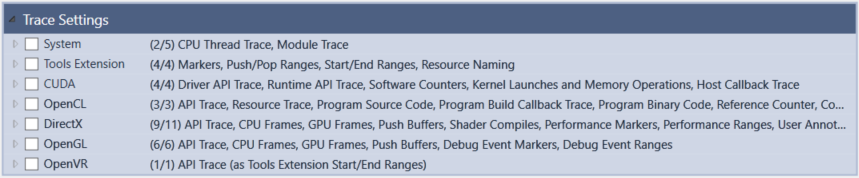
Depending on the type of activity you selected above, the Trace and Profile Settings section of the Activity document shows either Trace Settings or Profile Settings. Expand each group in order to mark the specific counters or signals on which you want to collect data.

|
Events in the System group use the Event Tracing for Windows (ETW) kernel provider. There are two requirements for capturing these events:
|
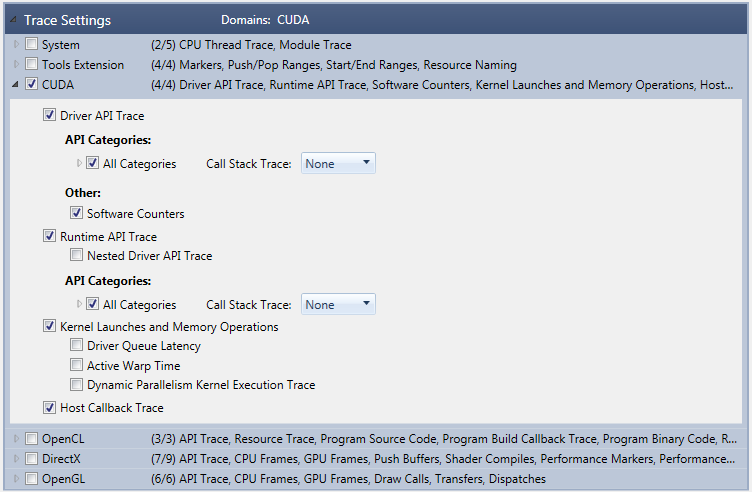
When you mark sub-items of a group, the checkboxes stay marked or unmarked even if you unmark the checkbox of the group.
For example, if you were to uncheck the CUDA checkbox in the following figure, the analysis tools will not collect any of the trace data in that subgroup. However, the sub-settings remain marked as you last set them.
For more details on the types of trace activities, see Analysis Trace Settings.
Note that if any problems are detected with the trace settings you've selected, a yellow warning icon will appear.
Hovering your mouse over the warning icon will display a tool tip to help you resolve the issue.
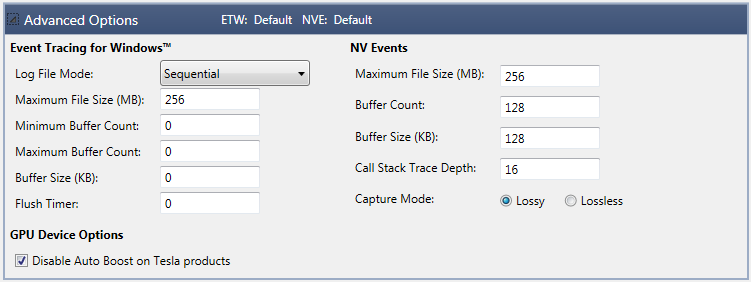
 Advanced Options
 The Advanced Options section contains settings users will typically not need to adjust, but are provided to allow more flexibility. The top section allows you to configure file and buffer sizes for two tracing frameworks: ETW and NVE.
| Setting | Description |
|---|---|
| Event Tracing for Windows (ETW) |
A tracing framework provided by Microsoft, ETW helps you examine system-level activity by capturing kernel and application-defined events. |
| NV Events (NVE) |
A tracing framework provided by NVIDIA, NVE helps you examine application activity by capturing events from the graphics driver. |
In the GPU Device Options section, you can choose to disable Auto Boost, which will cause kernels running on Tesla-based GPUs to execute at fixed speeds lower than Auto Boost levels, while ensuring that performance will be consistent across multiple runs.
The base clock speed for Tesla products ensures that any program will run within the published power limits, but many programs are not power-limited, allowing clock speed to be safely increased. Auto Boost is a feature of K40 and newer Tesla GPUs that dynamically adjusts clock speed to achieve higher performance when not power-limited. Auto Boost is enabled by default by the driver, but since dynamic clock speeds make profiling less accurate, NVIDIA Nsight provides this setting to disable Auto Boost. Usage of the CUDA_AUTO_BOOST environment variable overrides this setting. Geforce and Quadro GPUs are not affected.
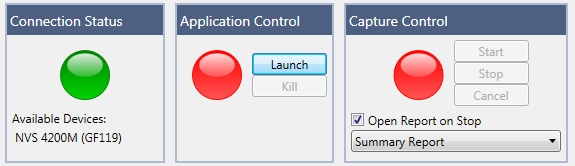
 Launch and Capture Control
Use this section of the Activity document to control starting and stopping the capture session.
| Setting | Description | ||||||||||
|---|---|---|---|---|---|---|---|---|---|---|---|
| Connection Status |
Green indicates that the Analysis Tool has an active connection to the Nsight Monitor. Yellow indicates that the activity is trying to connect. Red indicates that there is no active connection. You must have an active connection to start a capture session. If the indicator is red, make sure the Nsight Monitor is running on the system specified in the settings at the top of the Activity document under Connection and Application Settings. Click on the Connect button to initiate a connection. |
||||||||||
| Application Control |
Green indicates that the target application is running. Red indicates that the target application is not running. Click Launch to manually start the target application specified in the Connection and Application Settings section at the top of the Activity document. Click Kill to manually terminate the target application. If you are performing a System Trace, the Analysis Tool collects events from the target application and all native child processes of the target application. For that reason, the Analysis Tool does not stop capturing data when you kill the launched application. You must stop the capture manually by clicking on the Stop button under Capture Control. |
||||||||||
| Capture Control |
Green indicates that the Analysis Tool is currently capturing data from the application, and red indicates that capture is currently disabled. If you set Start Collection in the Triggers and Actions section to "On Process Launch," capture will automatically begin when you launch the application. If you choose "Manually," capture will not begin until you click Start in the Capture Control. If you find that enabling capture for the entire lifetime of your application creates excessively large reports that load slowly, use the manual capture control to limit capture to the parts of your application which you most want to analyze.
|

NVIDIA® Nsight™ Application Development Environment for Heterogeneous Platforms, Visual Studio Edition User Guide Rev. 5.3.170616 ©2009-2017. NVIDIA Corporation. All Rights Reserved.