DRIVE Platform Installation with NVIDIA SDK Manager
NVIDIA SDK Manager is an all-in-one tool that bundles DRIVE Software Development Kits (SDKs) and Platform Development Kits (PDKs), providing an end-to-end development environment setup solution for NVIDIA SDKs.
1.1. Installing the DRIVE Platform Through NVOnline
1.1.1. System Requirements
|
Category |
Requirement |
|---|---|
|
Host machine |
|
|
Architecture |
X86_64 |
|
Memory |
8GB |
|
Free disk space |
A minimum of 40GB and up to 120GB (during flash) free disk space on the system volume is needed for each full (host and target) deployed SDK version. |
|
GUI |
X11 must be enabled on the host. |
|
Graphics driver |
The most recent graphics driver for your GPU needs to be installed on the host system. To update your driver, use one of the following methods:
WARNING: Do not mix both the download and apt-get methods, as this is not supported. To see the most current graphics driver for the version of the CUDA toolkit you are installing, see CUDA Toolkit and Compatible Driver Versions. |
|
Target device |
The following supported development platform: |
|
QNX |
QNX Software Development Platform (SDP) 7.0, acquired directly from QNX Software Systems. To obtain a supported version of the QNX SDP, you need to acquire a license from: Configuring DRIVE QNX through NVIDIA SDK Manager requires QNX Software Development Platform 7.0. |
|
Additional hardware |
A2A USB cable to connect the Linux host to the target |
DRIVE QNX SDKs require QNX SDP (version: 7.0.0 — 700-SDP_3_build-aarch64-806). For more information, see QNX SDP Installation Instructions for DRIVE QNX.
2. Setting Up DRIVE QNX
To use NVIDIA SDK Manager to set up a DRIVE QNX development environment, you need to ensure that your system meets certain requirements, and configure QNX as outlined below.
2.1. QNX SDP Installation Instructions for DRIVE QNX
Use the following section to configure QNX SDP 7.0 to be compatible with DRIVE QNX.
There are two methods to install QNX SDP 7.0 from the QNX Software Center, as described in the following subsections.
-
Import Offline Package
-
Manually Select Every Package
To begin, you need to use the QNX Software Center application, which at the time of this writing, can be downloaded from http://www.qnx.com/download/group.html?programid=29178. From there, you need to download the Linux Host version of the QNX Software Center application. Note that you must be a registered QNX SDP 7.0 user with a myQNX account to download the QNX Software Center.
At the time of this writing, the QNX Software Center 1.3.1: Installation Note can be found at http://www.qnx.com/developers/articles/inst_6636_3.html.
For the most up-to-date version of the QNX Software Center Installation Note:
-
Go to the QNX website, www.qnx.com, and log in to your myQNX account.
-
Select the Developers tab at the top of the page, and click the QNX Software Center link.
-
Scroll down the page, and click on the Linux Host link for See Installation/Release notes.
Refer to the user guide at http://www.qnx.com/download/download/40545/qnx_qsc_user_guide_120418.pdf.
2.2. Prerequisites
-
myQNX user account issued from QNX
-
Activated QNX SDP license keys issued from QNX
2.3. Import Offline Package
Follow these instructions to install the QNX SDP that is compatible with DRIVE QNX.
The DRIVE QNX SDK includes a QNX patch set file generated by using the Export feature of the QNX Software Center. The following instructions describe how to Import this file to install the QNX SDP.
The QNX Software Center lets you export and import patch sets. A patch set is like a recipe for installing packages. It tells the QNX Software Center not only which packages to install, but also which version of each package to install. QNX patch sets are explained in the Advanced Topics section of the QNX Software Center User Guide.
-
In the QNX Software Center application, navigate to the Welcome to the QNX Software Center panel by clicking on the "home" icon that looks like a house.
-
On the Welcome to the QNX Software Center panel, click on Import Offline Package.
-
This opens the File Import Wizard.
-
In Select File: enter the full path to the QNX patch set file included in the DRIVE QNX SDK. The filename is:
drive-t186ref-qnx-5.1.0.0-sdp-patchset.qpkg
Note:This filename has not changed from release 5.1.0.0 to 5.1.3.0.
-
Click the Add new installation radio button.
-
Click the Finish button.
-
-
This will open the New Installation Wizard where you set installation properties.
-
Set the Installation Folder: and Name: fields to your desired location and name.
-
Set Update Policy: to the Ultraconservative option.
-
To install debug symbols, enable the Install debug symbols checkbox.
-
Deselect the Install experimental packages checkbox.
-
Ensure only the aarch64le checkbox is selected for Target Architectures.
-
Click Next>.
-
-
This will open the Install window where you check the items that you wish to install.
-
Ensure the checkbox is selected for the following:
DRIVE OS QNX 5.1.0.0 NVIDIA.DRIVE_OS_QNX_5_1_0_0
-
Click Next>.
-
-
Review Packages
-
Review package names and versions.
-
Click Next> again.
-
-
License Key Selection
-
Select the appropriate license key.
-
Click Finish.
-
An error window, titled "Installation package has errors," pops up due to a known issue already reported to QNX Software Systems. It reports an issue with HIGH severity and these details.
Package: "DRIVE OS QNX"
Severity: "HIGH"
Type: "PackageNotSigned"
Click OK to continue.
2.4. Manually Select Every Package
Alternatively, follow these instructions to manually select which packages to install in the QNX Software Center. The following steps instruct you how to install the same package revisions as you would get by importing the QNX patch set file included in the DRIVE QNX SDK.
I. Install Baseline
-
In the QNX Software Center application, navigate to the Welcome to the QNX Software Center panel by clicking on the "home" icon that looks like a house.
-
On the Welcome to the QNX Software Center panel, click on + Add Installation.
-
Available Packages
-
Select the following:
QNX Software Development Platform 7.0;STABLE (7.0.0 GA 201702151847)
-
Click Next>.
-
-
This will open the New Installation Wizard where you can set installation properties.
-
Set the Installation Folder: and Name: fields to your desired location and name.
-
Set Update Policy: to the Ultraconservative option.
-
To install debug symbols, enable the Install debug symbols checkbox.
-
Deselect the Install experimental packages checkbox.
-
Ensure only the aarch64le checkbox is selected for Target Architectures.
-
Click Next>.
-
-
Install
-
Ensure the checkbox is selected for the following:
QNX Software Development Platform 7.0;7.0.0SGA201702151847 com.qnx.sdp
-
Click Next>.
-
-
Review Packages
-
Review package names and versions.
-
Click Next> again.
-
-
License Key Selection
-
Select the appropriate license key.
-
Click Finish.
-
A pop-up window shows progress.
II. Install Updates
Install the following update packages using the below instructions:
-
On the Welcome to the QNX Software Center panel, Click on Manage Installation.
-
Install Available Packages
-
Select the Available tab.
-
In the pull-down at the upper-right corner, select the appropriate installation to update.
-
Deselect the Show Only Latest Version checkbox, which will allow you to see all available updates.
-
Under QNX Software Development Platform, select the update package(s) to install the following:
-
Encrypted Filesystems -> QNX SDP 7.0 Encrypted Filesystem Runtime Package
STABLE (7.0 BuildID 762 - April 18, 2018)
-
OS System Utilities -> QNX SDP 7.0 Utilities - System
STABLE (7.0 BuildID 629 - February 6, 2018)
-
OS Utilities -> QNX SDP 7.0 Utilities - Base
STABLE (7.0 BuildID 629 - February 6, 2018)
-
OS Utilities -> QNX SDP 7.0 Utilities - Debugging Tools
STABLE (7.0 BuildID 629 - February 6, 2018)
-
OS Utilities -> QNX SDP 7.0 Utilities - Neutrino utils
STABLE (7.0 BuildID 965 - August 31, 2018)
-
-
-
Updates
-
Select the Updates tab.
-
In the pull-down at the upper-right corner, select the appropriate installation to update.
-
Deselect the Show Only Latest Version checkbox, which allows you to see all available updates.
-
Under QNX Software Development Platform, select the update package(s) to install the following:
-
Tools -> QNX SDP Host Tools (Linux 64-bit)
STABLE (7.0 BuildID 797 - May 11, 2018)
-
Filesystems -> QNX SDP 7.0 Filesystems - Base
STABLE (7.0 BuildID 762 - May 8, 2018)
-
Filesystems -> QNX SDP 7.0 Filesystems - CAM layer
STABLE (7.0 BuildID 762 - April 18, 2018)
-
Filesystems -> QNX SDP 7.0 Filesystems - libgpt
STABLE (7.0 BuildID 762 - April 18, 2018)
-
Microkernel -> QNX SDP 7.0 Kernel and libc
STABLE (7.0 BuildID 861 - June 20, 2018)
-
Microkernel -> QNX SDP 7.0 Microkernel - kdumper
STABLE (7.0 BuildID 861 - June 20, 2018)
-
Microkernel -> QNX SDP 7.0 Microkernel - System Logger (slogger2)
STABLE (7.0 BuildID 629 - February 6, 2018)
-
Microkernel -> QNX SDP 7.0 Microkernel - Tools
STABLE (7.0 BuildID 629 - February 6, 2018)
-
Networking -> QNX SDP 7.0 Networking - Distributed filesystem support
STABLE (7.0 BuildID 798 - May 14, 2018)
-
Networking -> QNX SDP 7.0 Networking - io-pkt
STABLE (7.0 BuildID 798 - May 14, 2018)
-
OS Services -> QNX SDP 7.0 OS Services - Core
STABLE (7.0 BuildID 629 - February 6, 2018)
-
OS Services -> QNX SDP 7.0 OS Services - libsocket support
STABLE (7.0 BuildID 798 - May 14, 2018)
-
OS Services -> QNX SDP 7.0 OS services - OS services base
STABLE (7.0 BuildID 629 - February 6, 2018)
-
-
Click Install.
-
-
Install pop-up
-
Follow instructions to select options, and if necessary, click Next.
-
In the pop-up window, click Finish.
-
Another pop-up window shows progress and will indicate when the installation is complete.
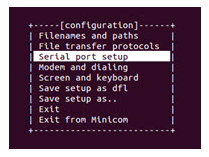
3. Set Up and Configure Minicom
If you do not configure minicom automatically through the SDK Manager installer, you can set it up manually by using the following steps.
-
From a terminal window on the Linux host, check if minicom is installed by executing the command:
minicom -s
-
If Minicom is NOT installed, install by executing the command:
sudo apt-get install minicom
-
Configure minicom on the Linux host by once again executing the command:
sudo minicom -s
A configuration dialog displays.
-
From the configuration dialog, select Serial Port Setup.
-
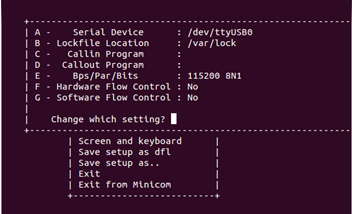
Define the configuration as follows:
-
Serial Device: /dev/ttyUSB2
-
Lockfile location: /var/lock
-
Bps/Par/Bits: 115200 8N1
-
Hardware Flow Control: No
-
Software Flow Control: No
-
/dev/ttyUSB2 maps to Xavier A
-
/dev/ttyUSB3 maps to AURIX
-
/dev/ttyUSB6 maps to Xavier B
-
-
Press Enter and click on Save setup as dfl, then select Exit.
Upon successful completion, a prompt window displays for the target system.
4. Download SDK Manager
-
Log in to partners.nvidia.com. If it is your first time logging in, you must accept the NVONLINE CONDITIONS OF USE agreement before proceeding.
-
To locate the SDK Manager package, use one of the two following methods:
-
Turn on active filters by enabling the Show Groups Only option, then click the hyperlink for NVIDIA SDK Manager for DRIVE.

-
In the search field, type "SDK Manager" and click Search. Locate and click the hyperlink for NVIDIA SDK Manager for DRIVE.
-
-
A new tab opens with the available files to download. This includes:
-
The SDK Manager user guide
-
The SDK Manager application, named sdkmanager-[version].[build#].deb
-
-
Download both files to your host machine.
-
From a terminal, install the Debian package:
sudo apt install ./sdkmanager-[version].[build#].deb
-
You can start SDK Manager using one of the following two methods:
-
Launch SDK Manager from the Ubuntu launcher.
-
Open a terminal and launch SDK Manager with the following command:
sdkmanager
-
-
From the NVIDIA SDK Manager launch screen, select the login tab for NVOnline | partners.nvidia.com.
-
Enter the same NVOnline account credentials that you used to access partners.nvidia.com, and click Login.

Notices
Notice
THE INFORMATION IN THIS GUIDE AND ALL OTHER INFORMATION CONTAINED IN NVIDIA DOCUMENTATION REFERENCED IN THIS GUIDE IS PROVIDED “AS IS.” NVIDIA MAKES NO WARRANTIES, EXPRESSED, IMPLIED, STATUTORY, OR OTHERWISE WITH RESPECT TO THE INFORMATION FOR THE PRODUCT, AND EXPRESSLY DISCLAIMS ALL IMPLIED WARRANTIES OF NONINFRINGEMENT, MERCHANTABILITY, AND FITNESS FOR A PARTICULAR PURPOSE. Notwithstanding any damages that customer might incur for any reason whatsoever, NVIDIA’s aggregate and cumulative liability towards customer for the product described in this guide shall be limited in accordance with the NVIDIA terms and conditions of sale for the product.
THE NVIDIA PRODUCT DESCRIBED IN THIS GUIDE IS NOT FAULT TOLERANT AND IS NOT DESIGNED, MANUFACTURED OR INTENDED FOR USE IN CONNECTION WITH THE DESIGN, CONSTRUCTION, MAINTENANCE, AND/OR OPERATION OF ANY SYSTEM WHERE THE USE OR A FAILURE OF SUCH SYSTEM COULD RESULT IN A SITUATION THAT THREATENS THE SAFETY OF HUMAN LIFE OR SEVERE PHYSICAL HARM OR PROPERTY DAMAGE (INCLUDING, FOR EXAMPLE, USE IN CONNECTION WITH ANY NUCLEAR, AVIONICS, LIFE SUPPORT OR OTHER LIFE CRITICAL APPLICATION). NVIDIA EXPRESSLY DISCLAIMS ANY EXPRESS OR IMPLIED WARRANTY OF FITNESS FOR SUCH HIGH RISK USES. NVIDIA SHALL NOT BE LIABLE TO CUSTOMER OR ANY THIRD PARTY, IN WHOLE OR IN PART, FOR ANY CLAIMS OR DAMAGES ARISING FROM SUCH HIGH RISK USES.
NVIDIA makes no representation or warranty that the product described in this guide will be suitable for any specified use without further testing or modification. Testing of all parameters of each product is not necessarily performed by NVIDIA. It is customer’s sole responsibility to ensure the product is suitable and fit for the application planned by customer and to do the necessary testing for the application in order to avoid a default of the application or the product. Weaknesses in customer’s product designs may affect the quality and reliability of the NVIDIA product and may result in additional or different conditions and/or requirements beyond those contained in this guide. NVIDIA does not accept any liability related to any default, damage, costs or problem which may be based on or attributable to: (i) the use of the NVIDIA product in any manner that is contrary to this guide, or (ii) customer product designs.
Other than the right for customer to use the information in this guide with the product, no other license, either expressed or implied, is hereby granted by NVIDIA under this guide. Reproduction of information in this guide is permissible only if reproduction is approved by NVIDIA in writing, is reproduced without alteration, and is accompanied by all associated conditions, limitations, and notices.
Trademarks
NVIDIA, the NVIDIA logo, and CUDA, cuDNN, Jetson, Kepler, Maxwell, Nsight Graphics, Nsight Systems, PerfWorks, Pascal, SDK Manager, Tegra, TensorRT, Tesla, and Volta are trademarks and/or registered trademarks of NVIDIA Corporation in the Unites States and other countries. Other company and product names may be trademarks of the respective companies with which they are associated.