Kubernetes Environment#
ACE Agent provides Kubernetes deployment using NVIDIA Unified Cloud Services (UCS) Tools. NVIDIA Unified Cloud Services Tools (UCS Tools) is a low-code framework for developing cloud-native, real-time, and multimodal AI applications. The NVIDIA ACE Agent releases includes the following UCS microservices:
Microservice Name |
Version |
Description |
|---|---|---|
|
4.0.0 |
Chat Engine Microservice |
|
4.0.0 |
NLP Server Microservice |
|
4.0.0 |
Plugin Server Microservice |
|
4.0.0 |
Chat Controller Microservice for Speech Support |
|
4.0.0 |
Sample Web Application |
You can easily create your own custom application Helm chart using ACE Agent microservices with UCS applications. The ACE Agent Quick Start package comes with a number of UCS applications for sample bots which can be found in the ./deploy/ucs_apps/ directory.
Prerequisites
Before you start using NVIDIA ACE Agent, it’s assumed that you meet the following prerequisites. The current version of ACE Agent is only supported on NVIDIA data centers.
You have access and are logged into NVIDIA GPU Cloud (NGC). You have installed the NGC CLI tool on the local system and you have logged into the NGC container registry. For more details about NGC, refer to the NGC documentation.
You have installed UCS tools along with prerequisite setups such as Helm, Kubernetes, GPU Operator, and so on. Refer to UCS tools developer system and deployment system prerequisite sections for detailed instructions. The latest UCS 2.5 tools require Ubuntu 22.04, alternatively you can build the Docker image for executing UCS commands using the Ubuntu 22.04 base image.
You have access to an NVIDIA Volta, NVIDIA Turing, NVIDIA Ampere, NVIDIA Ada Lovelace, or an NVIDIA Hopper Architecture-based GPU.
Setup
Install the Local Path Provisioner by running the following command if not already done:
curl https://raw.githubusercontent.com/rancher/local-path-provisioner/v0.0.23/deploy/local-path-storage.yaml | sed 's/^ name: local-path$/ name: mdx-local-path/g' | microk8s kubectl apply -f -
Note
If you miss deploying the local path provisioner Helm chart, you will see the following errors during deployment.
Warning  FailedMount  4m10s (x2 over 4m11s)  kubelet  MountVolume.SetUp failed for volume "workload-cm-volume" : failed to sync configmap cache: timed out waiting for the condition
Warning  FailedMount  4m10s (x2 over 4m11s)  kubelet  MountVolume.SetUp failed for volume "scripts-cm-volume" : failed to sync configmap cache: timed out waiting for the condition
Warning  FailedMount  4m10s (x2 over 4m11s)  kubelet  MountVolume.SetUp failed for volume "configs-volume" : failed to sync configmap cache: timed out waiting for the condition
Setup the mandatory Kubernetes secrets required for deployment.
export NGC_CLI_API_KEY=...

kubectl create secret docker-registry ngc-docker-reg-secret --docker-server=nvcr.io --docker-username='$oauthtoken' --docker-password="${NGC_CLI_API_KEY}"

kubectl create secret generic ngc-api-key-secret --from-literal=NGC_CLI_API_KEY="${NGC_CLI_API_KEY}"
Download NVIDIA ACE Agent Quick Start Scripts by cloning the GitHub ACE repository.
git clone git@github.com:NVIDIA/ACE.git
cd ACE
Go to the ACE Agent
microservicesdirectory.cd microservices/ace_agent/4.1
Deploying a Bot via UCS Application#
We will use the stock bot application specs as an example, which is present in the Quick Start package at ./deploy/ucs_apps/speech_bot.
The Stock bot uses the mixtral-8x7b-instruct-v0.1 model deployed via the NVIDIA API Catalog as the main model.
Get the API key from the mixtral-8x7b-instruct-v0.1 for trying out the bot and create the Kubernetes secret for passing
NVIDIA_API_KEYbefore deploying the bot Helm chart.cat <<EOF | tee custom-env.txt NVIDIA_API_KEY="nvapi-XXX" EOF kubectl create secret generic custom-env-secrets --from-file=ENV=custom-env.txt
Generate the Helm Chart using tools.
ucf_app_builder_cli app build deploy/ucs_apps/speech_bot/stock_bot/app.yaml deploy/ucs_apps/speech_bot/stock_bot/app-params.yaml
Deploy the Helm Chart.
helm install ace-agent deploy/ucs_apps/speech_bot/stock_bot/ucf-app-speech-bot-4.0.0/
Wait for all pods to be ready.
watch kubectl get pods
Try out the deployed bot using a web frontend application. Get the
nodeportforace-agent-webapp-deployment-serviceusingkubectl get svcand interact with the bot using the URLhttp://<workstation IP>:<NodePortWebApp>.Note
For accessing the mic on the browser, we need to either convert
httptohttpsendpoint by adding SSL validation or update yourchrome://flags/oredge://flags/to allowhttp://<Node_IP>:<Webapp_NodePort>as a secure endpoint.Stop the deployment and remove the persistent volumes.
helm uninstall ace-agent
kubectl delete pvc --all
Building a Custom Helm Chart using ACE Agent Microservices#
In this tutorial, we will showcase how you can create a Helm Chart using ACE Agent Microservices for use cases like text-based bot and speech-based bot and extend it for your custom applications. ACE Agent provides Kubernetes support using Unified Cloud Services (UCS). You can use the tutorials for building UCS applications in the UCS documentation as a reference.
We will use:
the UCS CLI interface, however, you should be able to execute the same steps via UCS Studio.
various customizations for the UCS application specs, and
various UCS microservices in this tutorial.
Building a Chatbot UCS Application#
In this tutorial, we will use the stock sample bot present at ./samples/stock_bot as a reference bot for building the chatbot UCS application. We already have a UCS application for the stock chat bot at ./deploy/ucs_apps/chat_bot/stock_bot/ and you can use the same as reference during this tutorial.
Create the boilerplate UCS application specs.
ucf_app_builder_cli app create test-app
Build the UCS application with the Chat Engine microservice only. Update
test-app/app.yamlas follows:We only need the Chat Engine Microservice, however, we might optionally include the Web App Microservice for the UI to interact with the text-based bot. The dependencies we need are:
dependencies:
- ucf.svc.ace-agent.chat-engine:4.0.0
- ucf.svc.ace-agent.web-app:4.0.0
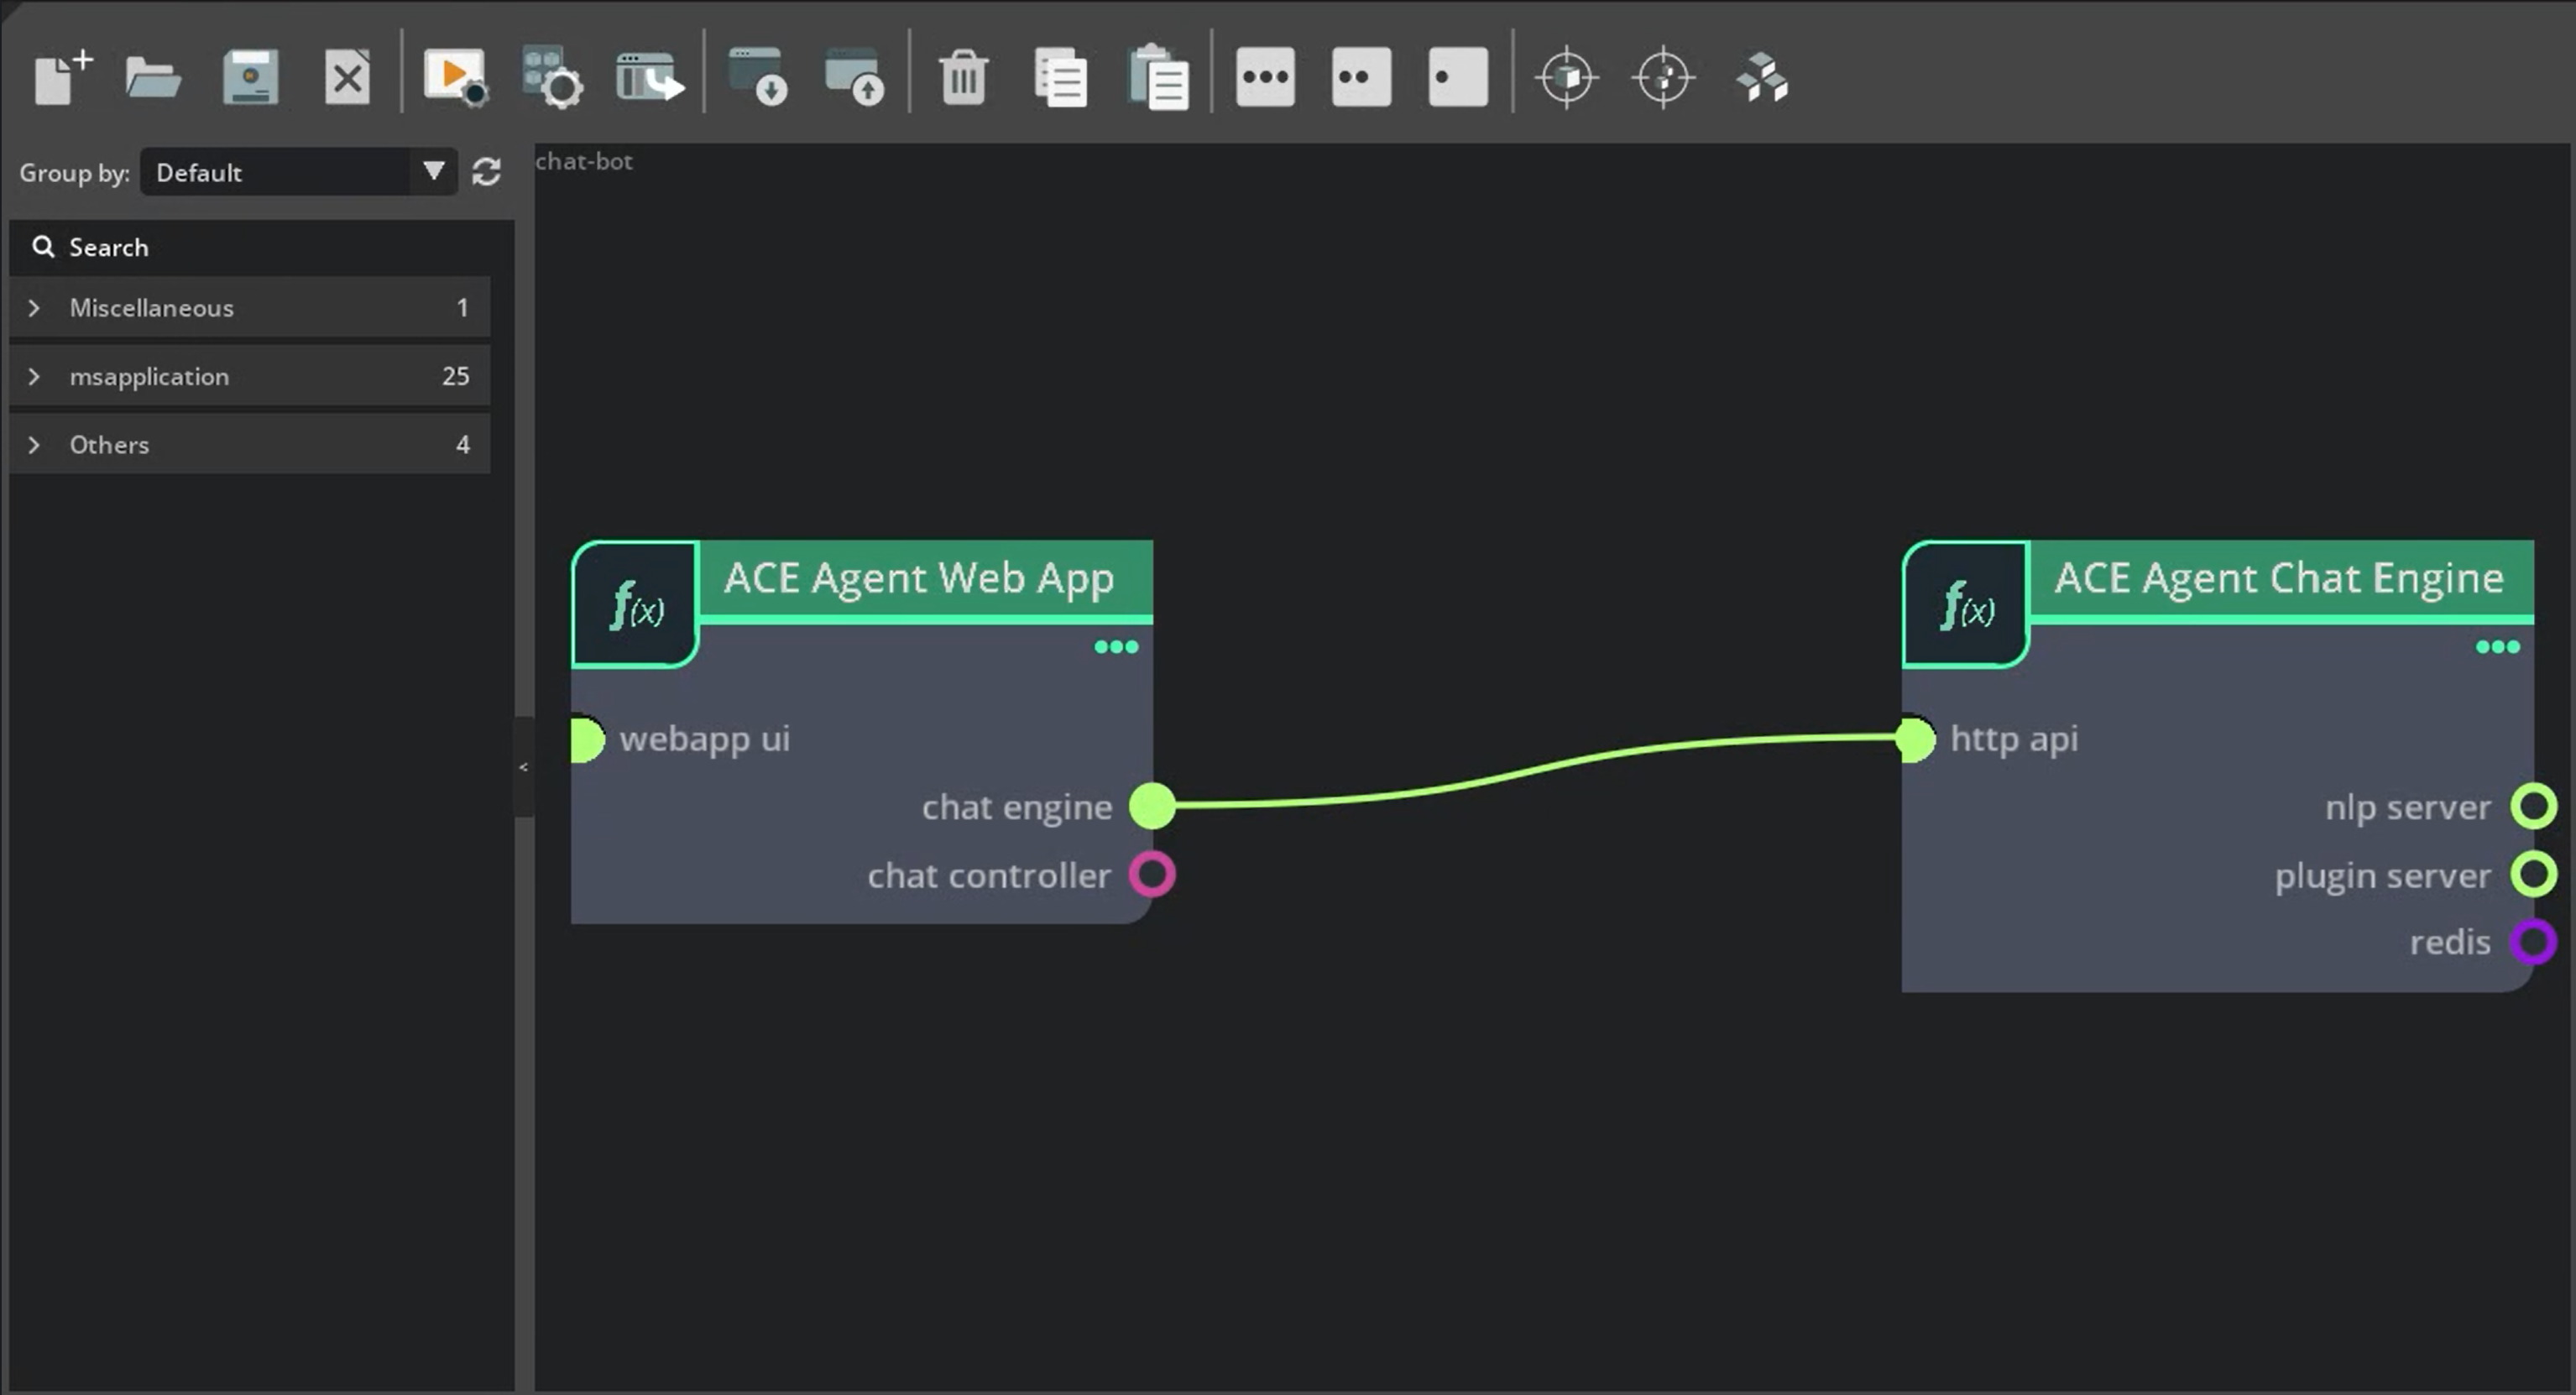
Update the components section with the Chat Engine and Web App Microservices.
components:
- name: chat-engine
type: ucf.svc.ace-agent.chat-engine
parameters:
    imagePullSecrets:
    - name: ngc-docker-reg-secret
- name: webapp
type: ucf.svc.ace-agent.web-app
parameters:
    imagePullSecrets:
    - name: ngc-docker-reg-secret
Update the connections between the Chat Engine and the Web App Microservices.
connections:
  webapp/chat-engine: chat-engine/http-api
The Stock bot uses the
mixtral-8x7b-instruct-v0.1model deployed via the NVIDIA API Catalog as the main model. Get the API key from the mixtral-8x7b-instruct-v0.1 for trying out the bot and create the Kubernetes secret for passingNVIDIA_API_KEYbefore deploying the bot Helm chart.cat <<EOF | tee custom-env.txt NVIDIA_API_KEY="nvapi-XXX" EOF kubectl create secret generic custom-env-secrets --from-file=ENV=custom-env.txt
Retrieve the NGC CLI API key for downloading NGC resources. We have created
ngc-api-key-secretin thePrerequisitessection. Remove thevaultsection and update thesecretssection withngc-api-key-secretandcustom-env-secrets.secrets: k8sSecret/ngc-api-key-secret/NGC_CLI_API_KEY: k8sSecret: secretName: ngc-api-key-secret key: NGC_CLI_API_KEY k8sSecret/custom-env-secrets: k8sSecret: secretName: custom-env-secrets key: ENV
Configure
ngc-api-key-secretandcustom-env-secretsin thechat-enginesection.- name: chat-engine type: ucf.svc.ace-agent.chat-engine parameters: imagePullSecrets: - name: ngc-docker-reg-secret secrets: ngc-api-key-secret: k8sSecret/ngc-api-key-secret/NGC_CLI_API_KEY custom-env-secrets: k8sSecret/custom-env-secrets
Mount the bot to the Chat Engine Microservice. We can do the same by providing the local directory under the
chat-enginecomponent in the application specs.- name: chat-engine type: ucf.svc.ace-agent.chat-engine parameters: imagePullSecrets: - name: ngc-docker-reg-secret secrets: ngc-api-key-secret: k8sSecret/ngc-api-key-secret/NGC_CLI_API_KEY openai-key-secret: k8sSecret/openai-key-secret/OPENAI_API_KEY files: config_dir: ../samples/stock_bot/
Generate the Helm Chart using UCS tools.
ucf_app_builder_cli app build test-app/app.yaml
Deploy the generated Helm Chart and wait for all pods to be ready. Interact with the bot using the Web app at
http://<NodeIP>:<NodePort>/. You can getNodePortusingkubectl get svc.helm install test test-app/test-app-0.0.1/
As we haven’t deployed the Plugin server microservices, queries related to live stock price will not work. Add an ACE Agent Plugin server in the UCS application. Update
test-app/app.yaml.Update the
dependenciessection with the Plugin Microservices.dependencies: - ucf.svc.ace-agent.chat-engine:4.0.0 - ucf.svc.ace-agent.web-app:4.0.0 - ucf.svc.ace-agent.plugin-server:4.0.0
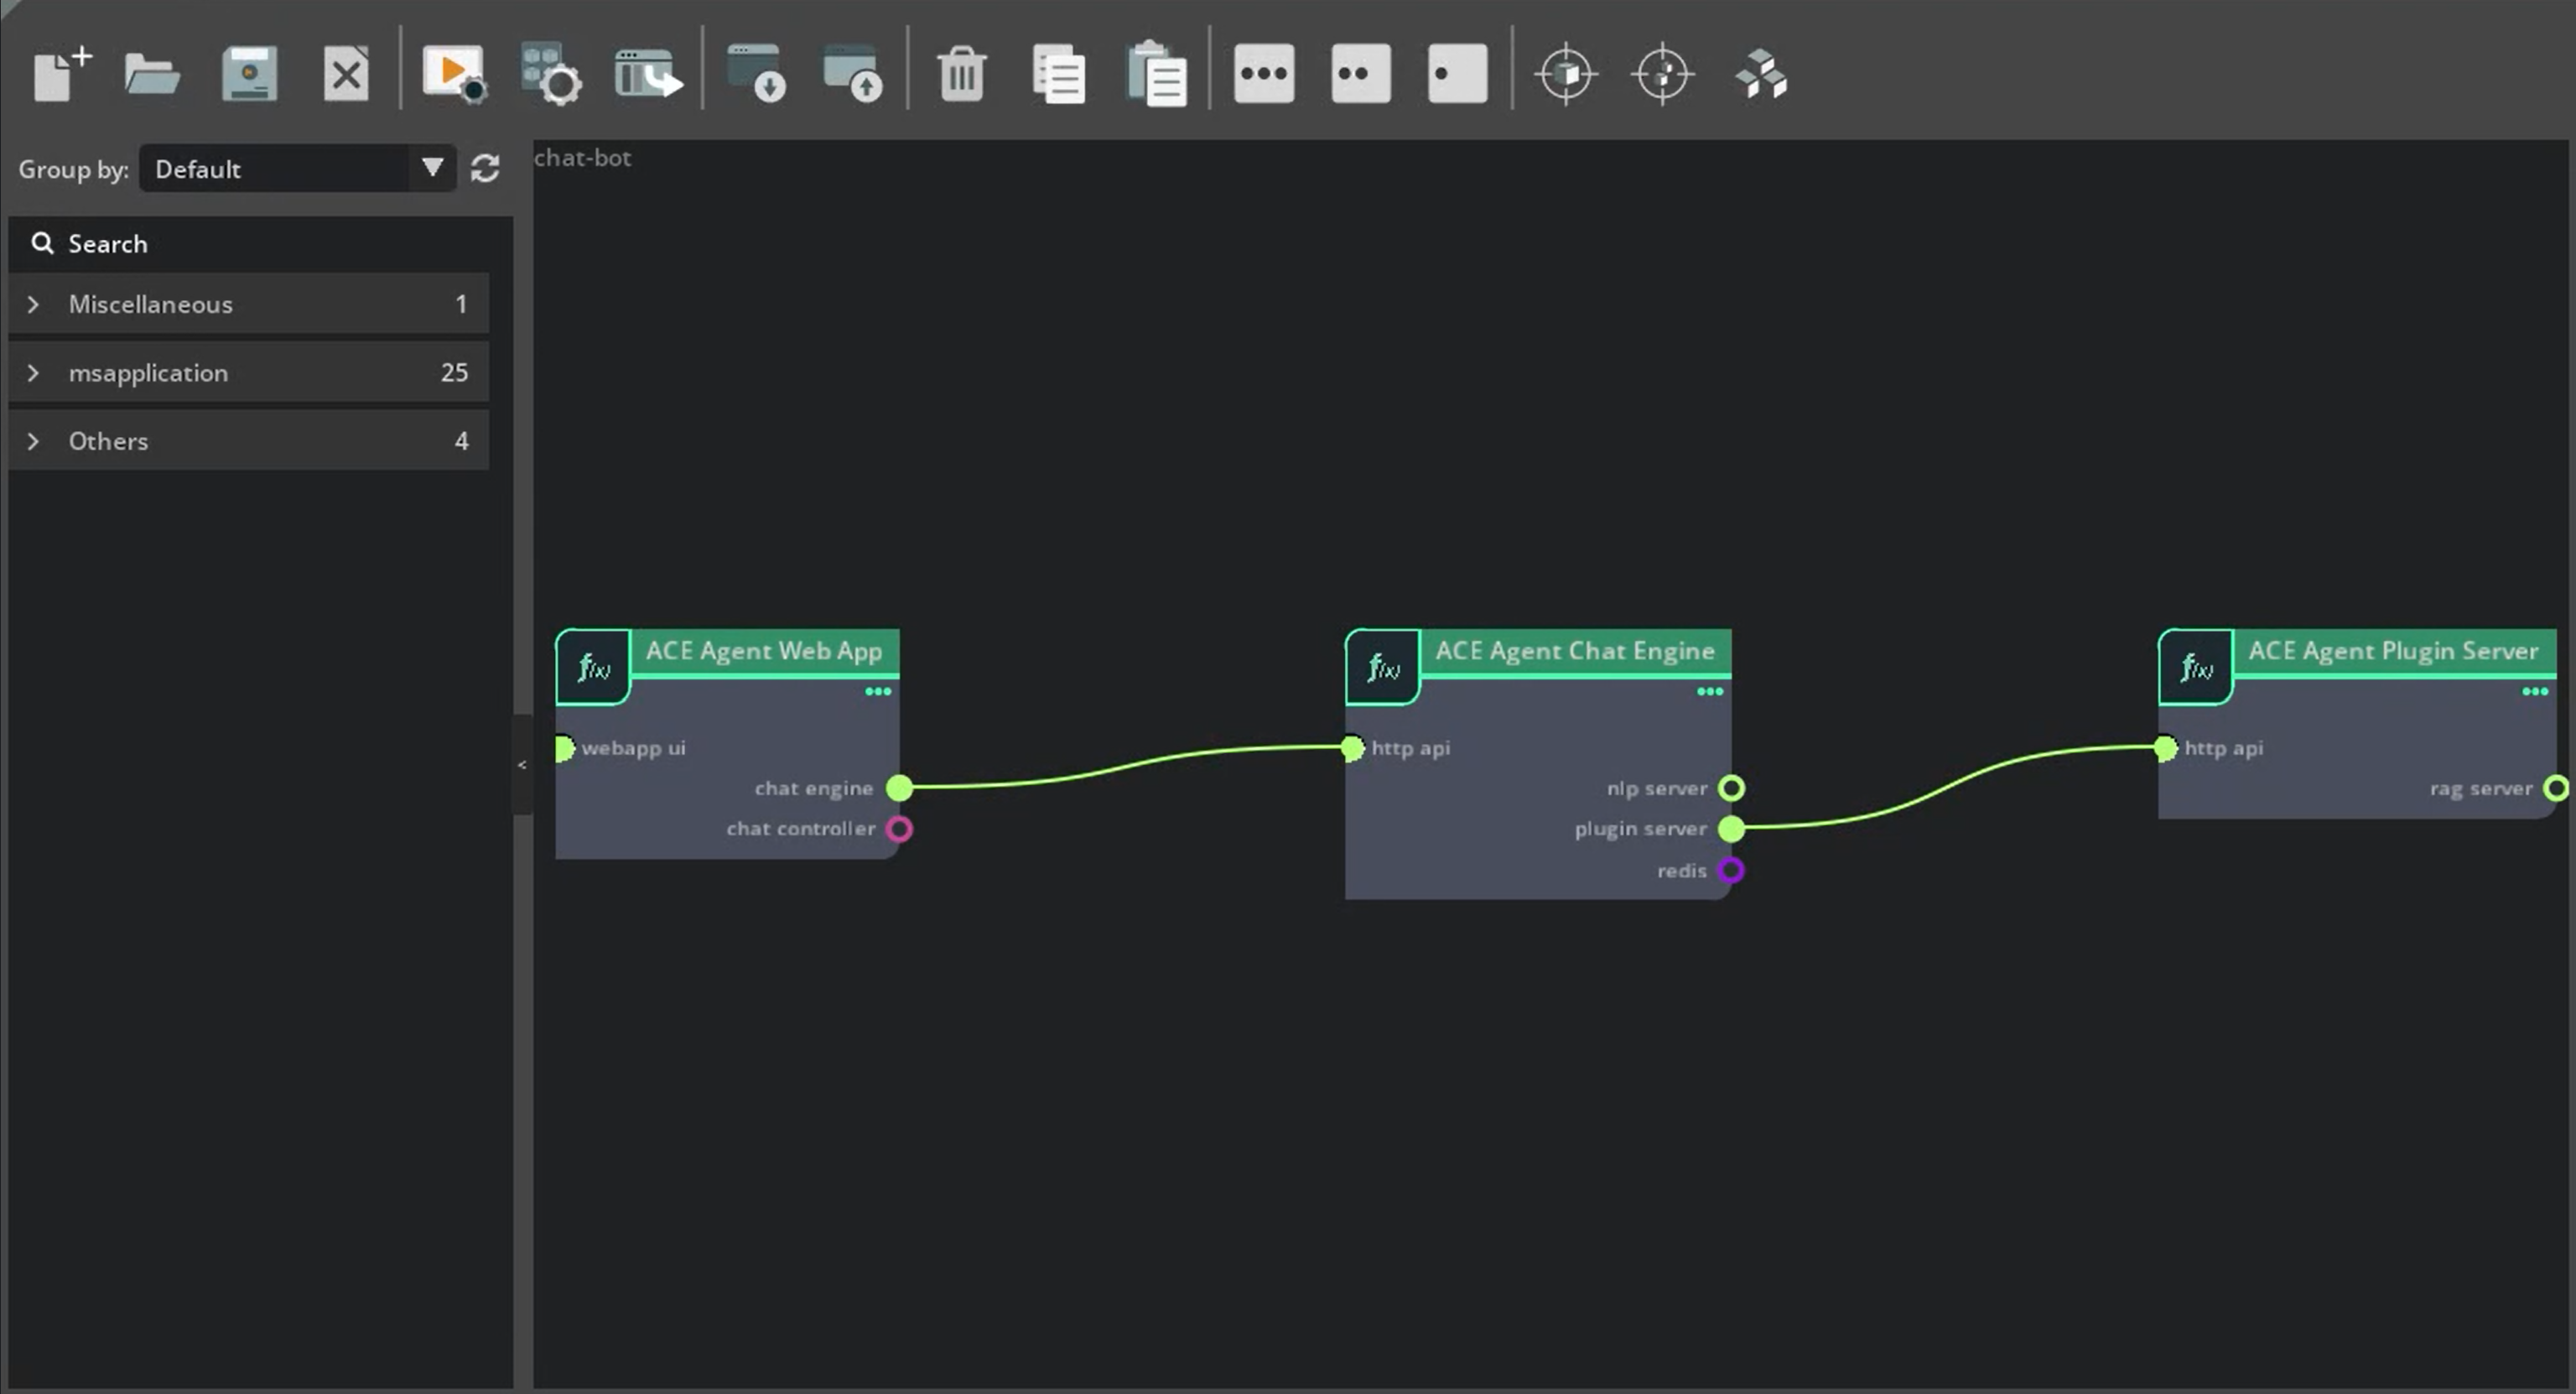
Add the
plugin-serverin components.- name: plugin-server type: ucf.svc.ace-agent.plugin-server parameters: imagePullSecrets: - name: ngc-docker-reg-secret secrets: ngc-api-key-secret: k8sSecret/ngc-api-key-secret/NGC_CLI_API_KEY
Mount the plugin configurations by providing the local directory under the
plugin-servercomponent.- name: plugin-server type: ucf.svc.ace-agent.plugin-server parameters: imagePullSecrets: - name: ngc-docker-reg-secret secrets: ngc-api-key-secret: k8sSecret/ngc-api-key-secret/NGC_CLI_API_KEY files: config_dir: ../samples/stock_bot/
Add a connection between the Chat Engine and the Plugin microservices.
connections: webapp/chat-engine: chat-engine/http-api chat-engine/plugin-server: plugin-server/http-api
Specify parameters for the Plugin microservices. You can either update the
parameterssection in theplugin-servercomponent, or create a new filetest-app/params.yamland update.plugin-server: pluginConfigPath: "plugin_config.yaml" # relative path of the plugin_config.yaml
Generate the updated Helm Chart and deploy the application. You should be able to interact with the updated bot using the Web app at
http://<NodeIP>:<NodePort>/.ucf_app_builder_cli app build test-app/app.yaml test-app/params.yaml # Uninstall existing deployment helm uninstall test kubectl delete pvc --all # Deploy updated helm chart helm install test test-app/test-app-0.0.1/
Try all queries supported by the stock sample bot.
The stock sample bot doesn’t use any NLP models, but if you are adding NLP models in your custom bots, we need to add an NLP server microservice.
Add the NLP server microservice in the
dependenciescomponent.dependencies: - ucf.svc.ace-agent.chat-engine:4.0.0 - ucf.svc.ace-agent.web-app:4.0.0 - ucf.svc.ace-agent.plugin-server:4.0.0 - ucf.svc.ace-agent.nlp-server:4.0.0

Update the components.
- name: nlp-server type: ucf.svc.ace-agent.nlp-server parameters: imagePullSecrets: - name: ngc-docker-reg-secret secrets: ngc-api-key-secret: k8sSecret/ngc-api-key-secret/NGC_CLI_API_KEY
Update the
connections. The Chat Engine utilizes the NLP server.connections: webapp/chat-engine: chat-engine/http-api chat-engine/plugin-server: plugin-server/http-api chat-engine/nlp-server: nlp-server/api-server
We can mount the model configurations by providing the local directory under the
nlp-servercomponent.- name: nlp-server type: ucf.svc.ace-agent.nlp-server parameters: imagePullSecrets: - name: ngc-docker-reg-secret secrets: ngc-api-key-secret: k8sSecret/ngc-api-key-secret/NGC_CLI_API_KEY files: config_dir: ../samples/stock_bot/
Update the NLP Server Microservice parameters and GPU device to use in
test-app/params.yaml.nlp-server: ucfVisibleGpus: [0] modelConfigPath: "model_config.yaml"
Generate the updated Helm Chart and deploy the application. You should be able to interact with the updated bot using the Web app at
http://<NodeIP>:<NodePort>/.# Build updated helm chart ucf_app_builder_cli app build test-app/app.yaml test-app/params.yaml # Uninstall previous deployment helm uninstall test kubectl delete pvc --all # Install updated helm chart helm install test test-app/test-app-0.0.1/
Building Speech Bot UCS Application#
In the previous section, we have created a text based UCS application for stock sample bot and will update the UCS application to support speech to speech conversations. We already have a UCS application for the stock speech bot at ./deploy/ucs_apps/speech_bot/stock_bot/ and you can use the same as reference during this tutorial.
Add Speech support using the Chat Controller Microservice.
Add the Chat Controller Microservice in the
dependenciessection.
dependencies: - ucf.svc.ace-agent.chat-engine:4.0.0 - ucf.svc.ace-agent.web-app:4.0.0 - ucf.svc.ace-agent.plugin-server:4.0.0 - ucf.svc.ace-agent.nlp-server:4.0.0 - ucf.svc.ace-agent.chat-controller:4.0.0
Add the
chat-controllerto thecomponentssection.
- name: chat-controller
  type: ucf.svc.ace-agent.chat-controller
  parameters:
    imagePullSecrets:
    - name: ngc-docker-reg-secret
  secrets:
    ngc-api-key-secret: k8sSecret/ngc-api-key-secret/NGC_CLI_API_KEY
Add the Riva Speech Skills microservice for deploying speech models in the
dependenciessection.
dependencies:
- ucf.svc.ace-agent.chat-engine:4.0.0
- ucf.svc.ace-agent.web-app:4.0.0
- ucf.svc.ace-agent.plugin-server:4.0.0
- ucf.svc.riva.speech-skills:2.15.1
- ucf.svc.ace-agent.nlp-server:4.0.0
- ucf.svc.ace-agent.chat-controller:4.0.0
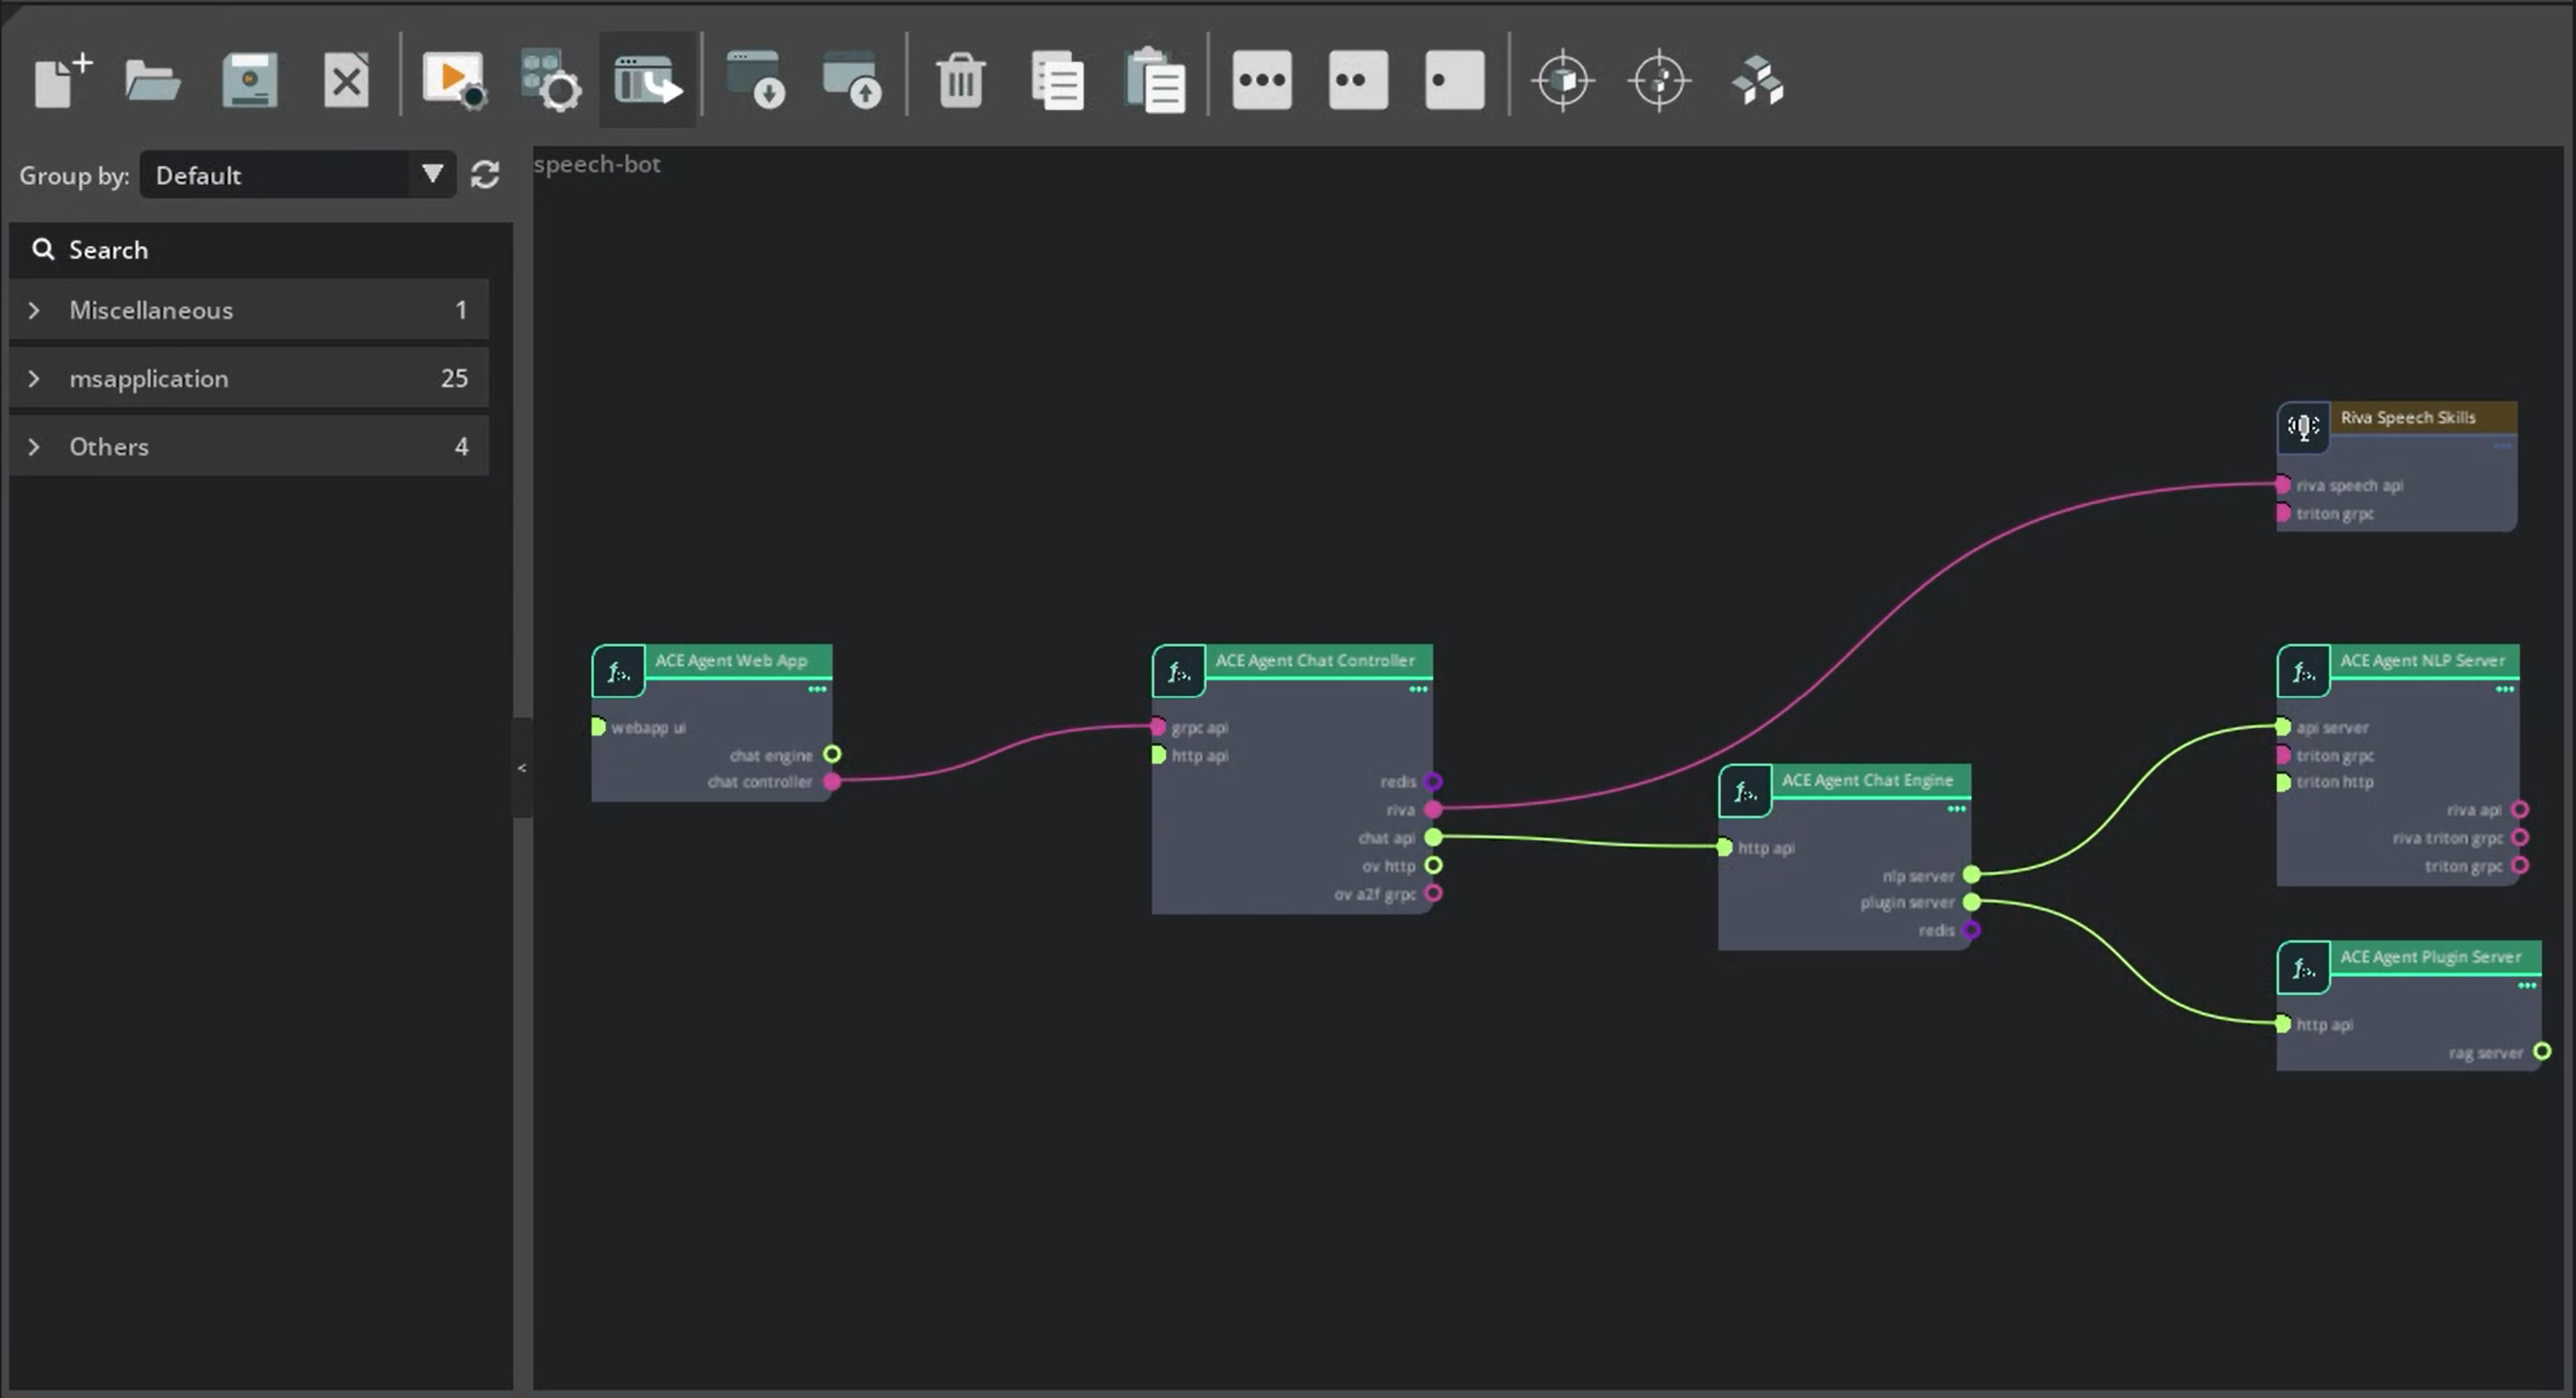
Add the
riva-speechto thecomponentssection.- name: riva-speech type: ucf.svc.riva.speech-skills parameters: imagePullSecrets: - name: ngc-docker-reg-secret secrets: ngc-api-key-secret: k8sSecret/ngc-api-key-secret/NGC_CLI_API_KEY
Add the Chat Controller connections to the Riva server and Chat Engine. Update the
webappconnection with Chat Controller.connections: chat-engine/plugin-server: plugin-server/http-api chat-engine/nlp-server: nlp-server/api-server nlp-server/riva-triton-grpc: riva-speech/triton-grpc nlp-server/riva-api: riva-speech/riva-speech-api chat-controller/riva: riva-speech/riva-speech-api chat-controller/chat-engine: chat-api/http-api webapp/chat-controller: chat-controller/grpc-api
Update the Riva server parameters with the ASR and TTS models in
test-app/params.yaml.riva-speech: riva: visibleGpus: "0" modelRepoGenerator: ngcModelConfigs: triton0: models: #> description: List of NGC models for deployment - nvidia/ucs-ms/rmir_asr_parakeet_1-1b_en_us_str_vad:2.15.0 - nvidia/riva/rmir_tts_radtts_hifigan_en_us_ipa:2.15.0
Generate the updated Helm Chart and deploy the application. Wait for all pods to be ready, it might take around 40-50 minutes. You should be able to interact with the updated bot using the Speech Web App at
http://<NodeIP>:<NodePort>/.# Rebuild the helm chart ucf_app_builder_cli app build test-app/app.yaml test-app/params.yaml # Uninstall previous deployment helm uninstall test kubectl delete pvc --all # Install updated helm chart helm install test test-app/test-app-0.0.1/
Note
For accessing the mic on the browser, we need to have the HTTPS endpoint. You can add SSL validation and convert the endpoint to HTTPS, or update your
chrome://flags/, oredge://flags/to allowhttp://<Node_IP>:<Webapp_NodePort>as a secure endpoint.
For production deployment, use NGC resources for providing bot configurations to various ACE Agent Microservices. This will allow you to keep track of versions and don’t have to depend on the host file systems. We will update the
chat-engineMicroservice, however, you can update the NLP, Plugin, and Chat Controller Microservices similarly.Remove files from the
chat-enginecomponent intest-app/app.yaml.- name: chat-engine type: ucf.svc.ace-agent.chat-engine parameters: imagePullSecrets: - name: ngc-docker-reg-secret secrets: ngc-api-key-secret: k8sSecret/ngc-api-key-secret/NGC_CLI_API_KEY openai-key-secret: k8sSecret/openai-key-secret/OPENAI_API_KEY
Add the
chat-engineparameters intest-app/params.yaml. If files are provided via a component intest-app/app.yaml, theconfigNgcPathparameter will not be used. If you have multiple bots in NGC and want to deploy a single bot, usebotConfigNameto point to the requiredbot_config.yaml.chat-engine: configNgcPath: <NGC_RESOURCE_PATH> botConfigName: bot_config.yaml
Rebuild the Helm Chart and redeploy.
Building LangChain Bot UCS Application#
In this tutorial, we will showcase how you can create the UCS application for the sample LangChain based bot present at ./samples/ddg_langchain_bot. This tutorial can be used for creating UCS applications for the other sample bots such as ./samples/rag_bot or your own custom bot.
The DuckDuckGo LangChain sample bot uses OpenAI models and we will need an OPENAI_API_KEY. We already have a UCS application for the DuckDuckGo LangChain bot at ./deploy/ucs_apps/speech_bot/ddg_langchain_bot/ and you can use the same as reference during this tutorial.
Create the boilerplate UCS application specs.
ucf_app_builder_cli app create langchain-app
Update
langchain-app/app.yamlas follows:LangChain Agent will be deployed as part of the Plugin server microservice. We will need a Chat Controller and Riva Speech Skills for speech support. We might optionally include the Web App microservice for the UI to interact with the bot using text or speech. The dependencies we need are:
dependencies:
- ucf.svc.riva.speech-skills:2.15.1
- ucf.svc.ace-agent.plugin-server:4.0.0
- ucf.svc.ace-agent.chat-controller:4.0.0
- ucf.svc.ace-agent.web-app:4.0.0
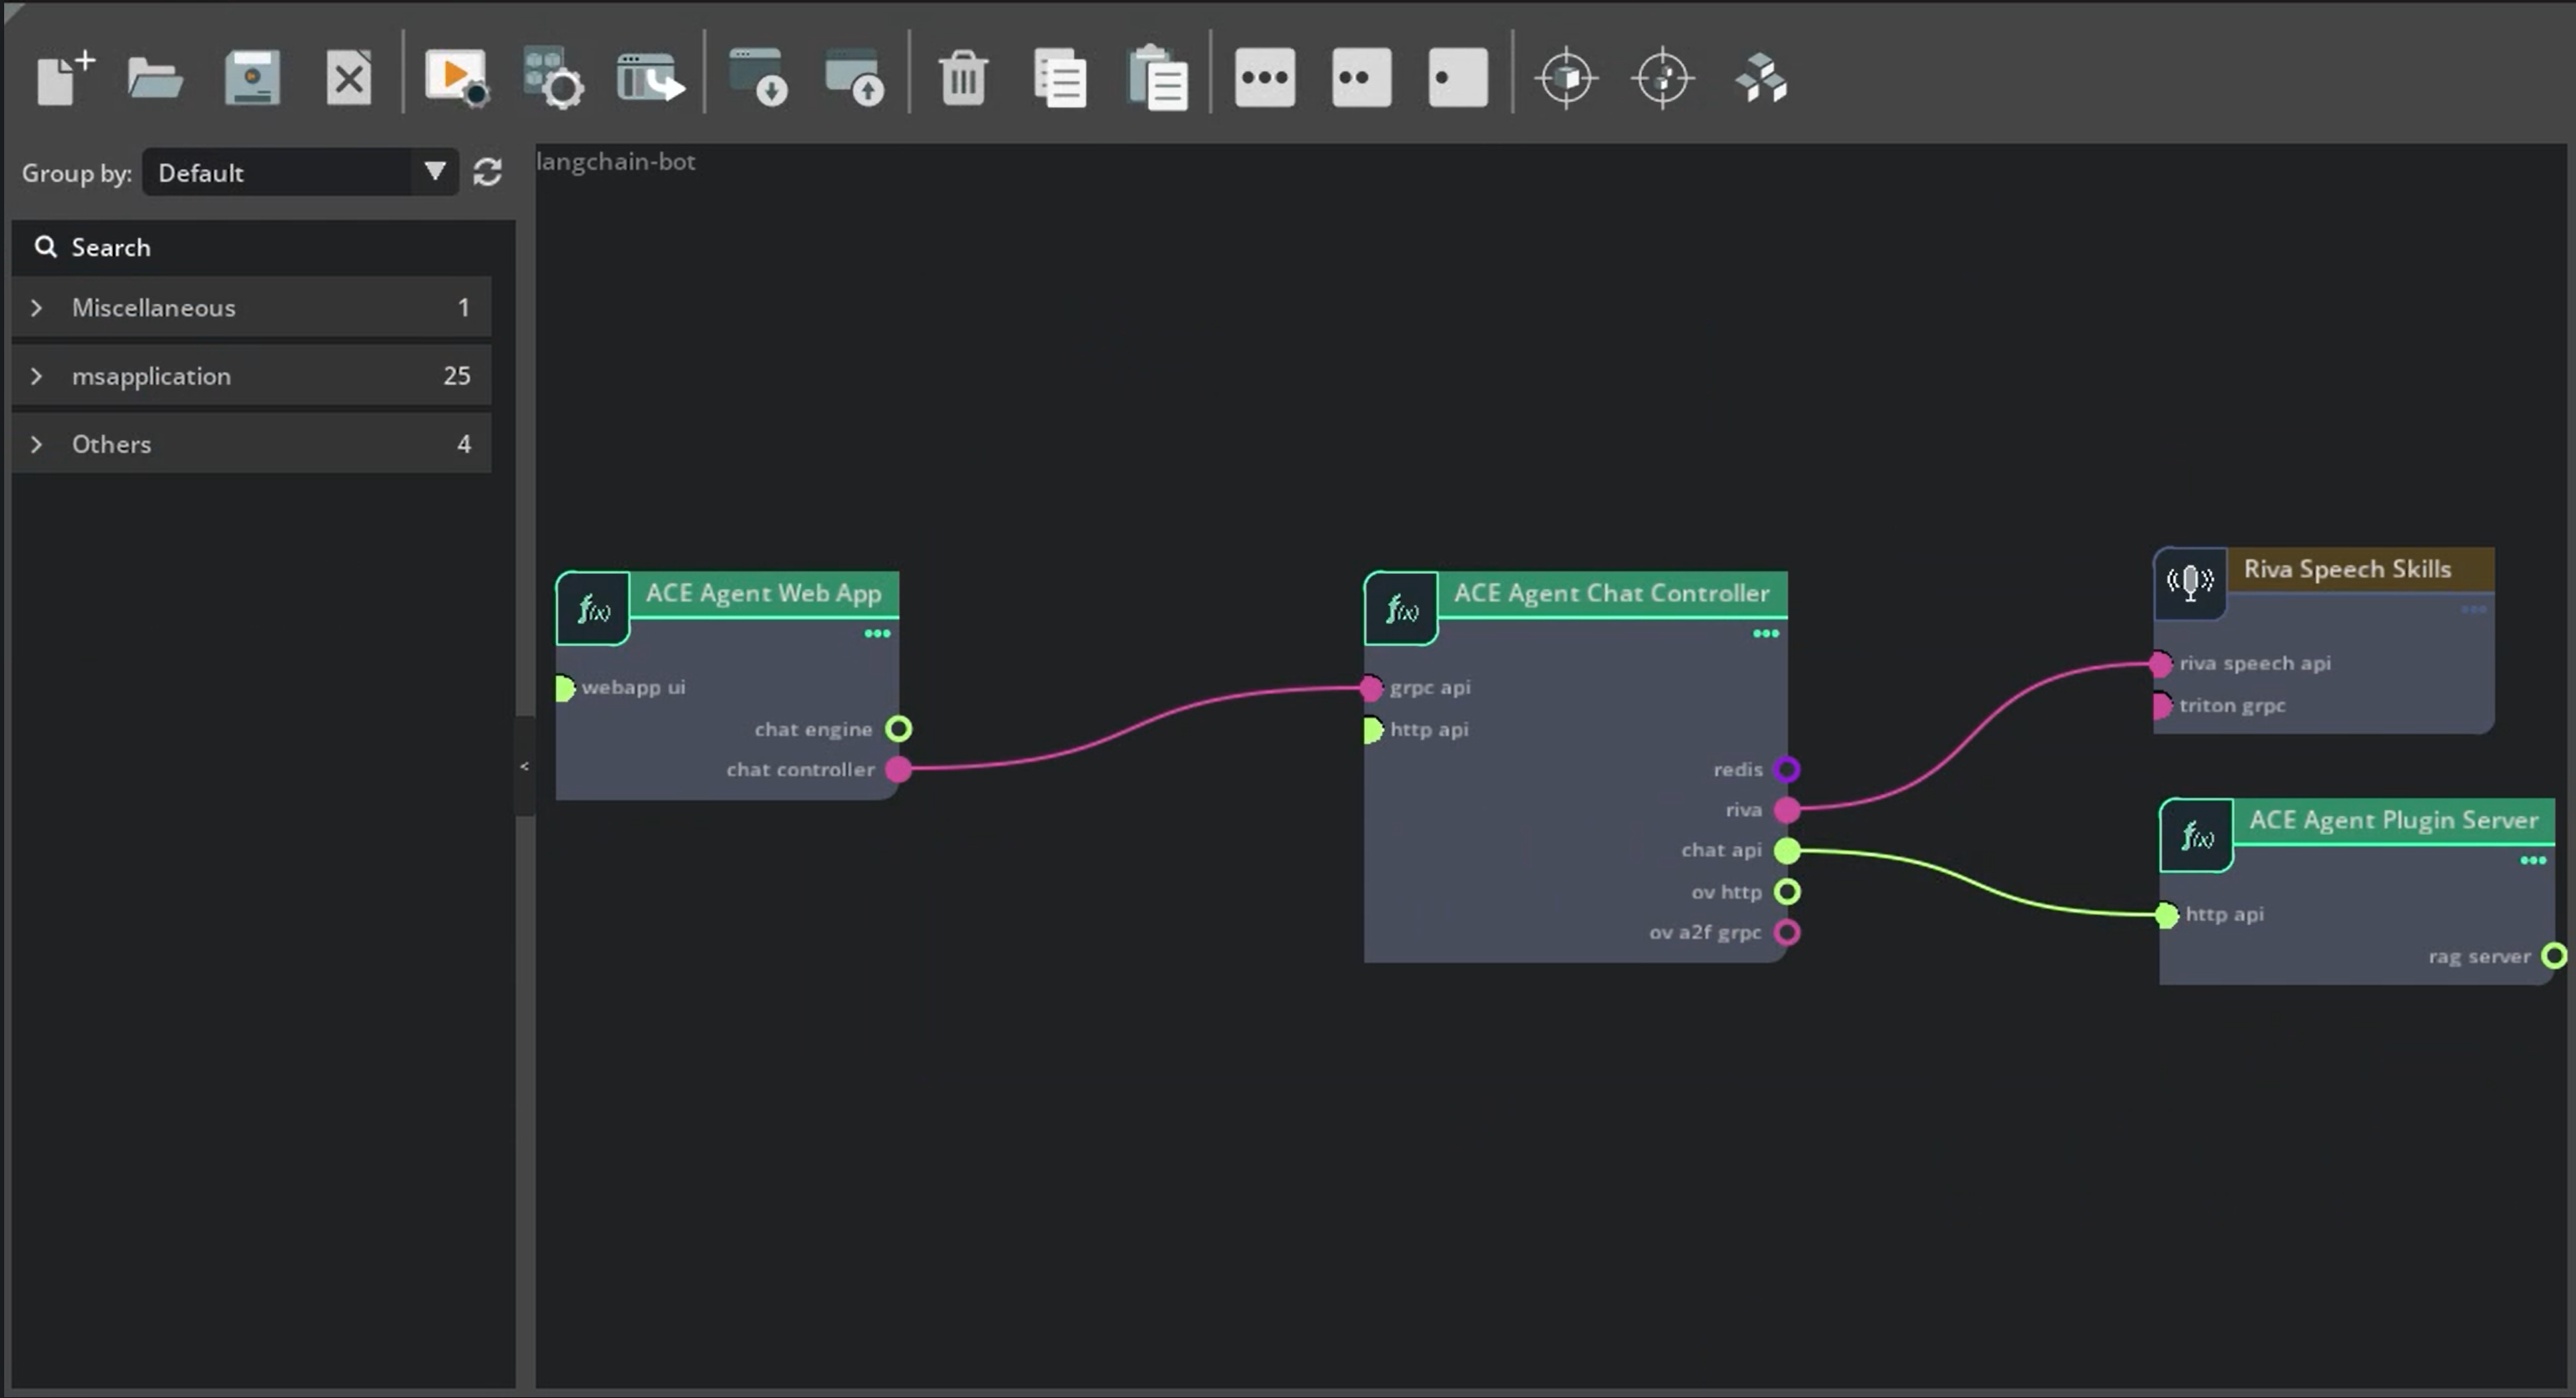
Update the
componentssection for the microservices in thedependenciessection.- name: riva-speech type: ucf.svc.riva.speech-skills parameters: imagePullSecrets: - name: ngc-docker-reg-secret - name: plugin-server type: ucf.svc.ace-agent.plugin-server parameters: imagePullSecrets: - name: ngc-docker-reg-secret - name: chat-controller type: ucf.svc.ace-agent.chat-controller parameters: imagePullSecrets: - name: ngc-docker-reg-secret - name: webapp type: ucf.svc.ace-agent.web-app parameters: imagePullSecrets: - name: ngc-docker-reg-secret
Update the
connectionsbetween the microservices.connections: chat-controller/riva: riva-speech/riva-speech-api chat-controller/chat-api: plugin-server/http-api webapp/chat-controller: chat-controller/grpc-api
Configure the OpenAI API key. To create Kubernetes secret, run:
export OPENAI_API_KEY=...
kubectl create secret generic openai-key-secret --from-literal=OPENAI_API_KEY=${OPENAI_API_KEY}
Set the NGC CLI API key for downloading NGC resources. We have created
ngc-api-key-secretin thePrerequisitessection. Remove thevaultsection and update the secrets withngc-api-key-secretandopenai-key-secret.secrets: k8sSecret/ngc-api-key-secret/NGC_CLI_API_KEY: k8sSecret: secretName: ngc-api-key-secret key: NGC_CLI_API_KEY k8sSecret/openai-key-secret/OPENAI_API_KEY: k8sSecret: secretName: openai-key-secret key: OPENAI_API_KEY
Configure
ngc-api-key-secretandopenai-key-secretin theplugin-server,chat-controller, andriva-skillssection as needed.- name: riva-speech type: ucf.svc.riva.speech-skills parameters: imagePullSecrets: - name: ngc-docker-reg-secret secrets: ngc-api-key-secret: k8sSecret/ngc-api-key-secret/NGC_CLI_API_KEY - name: plugin-server type: ucf.svc.ace-agent.plugin-server parameters: imagePullSecrets: - name: ngc-docker-reg-secret secrets: ngc-api-key-secret: k8sSecret/ngc-api-key-secret/NGC_CLI_API_KEY openai-key-secret: k8sSecret/openai-key-secret/OPENAI_API_KEY - name: chat-controller type: ucf.svc.ace-agent.chat-controller parameters: imagePullSecrets: - name: ngc-docker-reg-secret secrets: ngc-api-key-secret: k8sSecret/ngc-api-key-secret/NGC_CLI_API_KEY
Mount the bot to the Plugin server and Chat Controller microservices. We can do the same by providing the local directory under the
plugin-serverandchat-controllercomponents in the application specs.- name: plugin-server type: ucf.svc.ace-agent.plugin-server parameters: imagePullSecrets: - name: ngc-docker-reg-secret secrets: ngc-api-key-secret: k8sSecret/ngc-api-key-secret/NGC_CLI_API_KEY openai-key-secret: k8sSecret/openai-key-secret/OPENAI_API_KEY files: config_dir: ../samples/ddg_langchain_bot - name: chat-controller type: ucf.svc.ace-agent.chat-controller parameters: imagePullSecrets: - name: ngc-docker-reg-secret secrets: ngc-api-key-secret: k8sSecret/ngc-api-key-secret/NGC_CLI_API_KEY files: config_dir: ../samples/ddg_langchain_bot
Specify the parameters for the microservices. You can either update the
parameterssection in the component itself, or createlangchain-app/app-params.yaml. Updatelangchain-app/app-params.yamlas follows:Update the Riva Speech parameters with the ASR and TTS models in
langchain-app/params.yaml.riva-speech: riva: visibleGpus: "0" modelRepoGenerator: ngcModelConfigs: triton0: models: #> description: List of NGC models for deployment - nvidia/ucs-ms/rmir_asr_parakeet_1-1b_en_us_str_vad:2.15.0 - nvidia/riva/rmir_tts_radtts_hifigan_en_us_ipa:2.15.0
Update the Chat Controller parameters in
langchain-app/params.yaml. We will be using thespeech_litepipeline. The Plugin server will expose the APIs with the LangChain endpoint prefix.chat-controller: pipeline: speech_lite speechConfigPath: "speech_config.yaml" chatEndpointPrefix: "langchain"
Update the Plugin server parameters.
plugin-server:
  pluginConfigPath: "plugin_config.yaml"
The LangChain plugin requires additional packages to be installed in the Plugin server container.
Build a custom Dockerfile by copying the requirements from
ddg_langchain_bot/plugins/requirements_dev.txtintodeploy/docker/dockerfiles/plugin_server.Dockerfile.############################## # Install custom dependencies ############################## RUN pip3 install \ langchain==0.1.1 \ langchain-community==0.0.13 \ langchain-core==0.1.12 \ duckduckgo-search==5.3.1b1
Note
If you see a crash in the Plugin server or an issue with fetching a response from DuckDuckGo, try using a more recent
duckduckgo-searchversion.Build the container and push to the NGC Docker registry.
# Set required environment variables for docker-compose.yaml
source deploy/docker/docker_init.sh

# Build custom plugin server docker image
docker compose -f deploy/docker/docker-compose.yml build plugin-server

# Retag docker image and push to NGC docker registry
docker tag docker.io/library/plugin-server:4.0.0 <CUSTOM_DOCKER_IMAGE_PATH>:<VERSION>

docker push <CUSTOM_DOCKER_IMAGE_PATH>:<VERSION>
If you want to use a different Docker registry, update
imagePullSecretsinlangchain-app/app.yaml.Override the Plugin server image using
langchain-app/params.yaml.plugin-server: pluginConfigPath: "plugin_config.yaml" applicationSpecs: deployment: containers: container: image: repository: <CUSTOM_DOCKER_IMAGE_PATH> tag: <VERSION>
Generate the updated Helm Chart and deploy the application. You should be able to interact with the updated bot using the Speech Web App at
http://<NodeIP>:<NodePort>/.# Build helm chart using UCS tools ucf_app_builder_cli app build langchain-app/app.yaml langchain-app/params.yaml # Uninstall previous deployment helm uninstall test kubectl delete pvc --all # Deploy generated helm chart helm install test langchain-app/langchain-app-0.0.1/
Note
For accessing the mic on the browser, we need to have the HTTPS endpoint. You can add SSL validation and convert the endpoint to HTTPS, or update your chrome://flags/, or edge://flags/ to allow http://<Node_IP>:<Webapp_NodePort> as a secure endpoint.
Building Event Interface-Based Bot UCS Application#
In this tutorial, we will showcase how you can create the UCS application for event interface based bot and will use the Colang 2.0 sample bot present at ./samples/colang_2_sample_bot/ as an example.
The Colang 2.0 sample bot uses OpenAI models and we will need an OPENAI_API_KEY. We already have a UCS application for the Colang 2.0 sample bot at ./deploy/ucs_apps/speech_bot/colang2_sample_bot/ and you can use the same as reference during this tutorial.
Create the boilerplate UCS application specs.
ucf_app_builder_cli app create event-app
Update
event-app/app.yamlas follows:Chat Engine will deploy the event interface bot and Redis microservice used for passing events. We will need a Chat Controller and Riva Speech Skills for Speech Support. The dependencies we need are:
dependencies:
- ucf.svc.riva.speech-skills:2.15.1
- ucf.svc.ace-agent.chat-engine:4.0.0
- ucf.svc.ace-agent.chat-controller:4.0.0
- ucf.svc.core.redis-timeseries:0.0.17
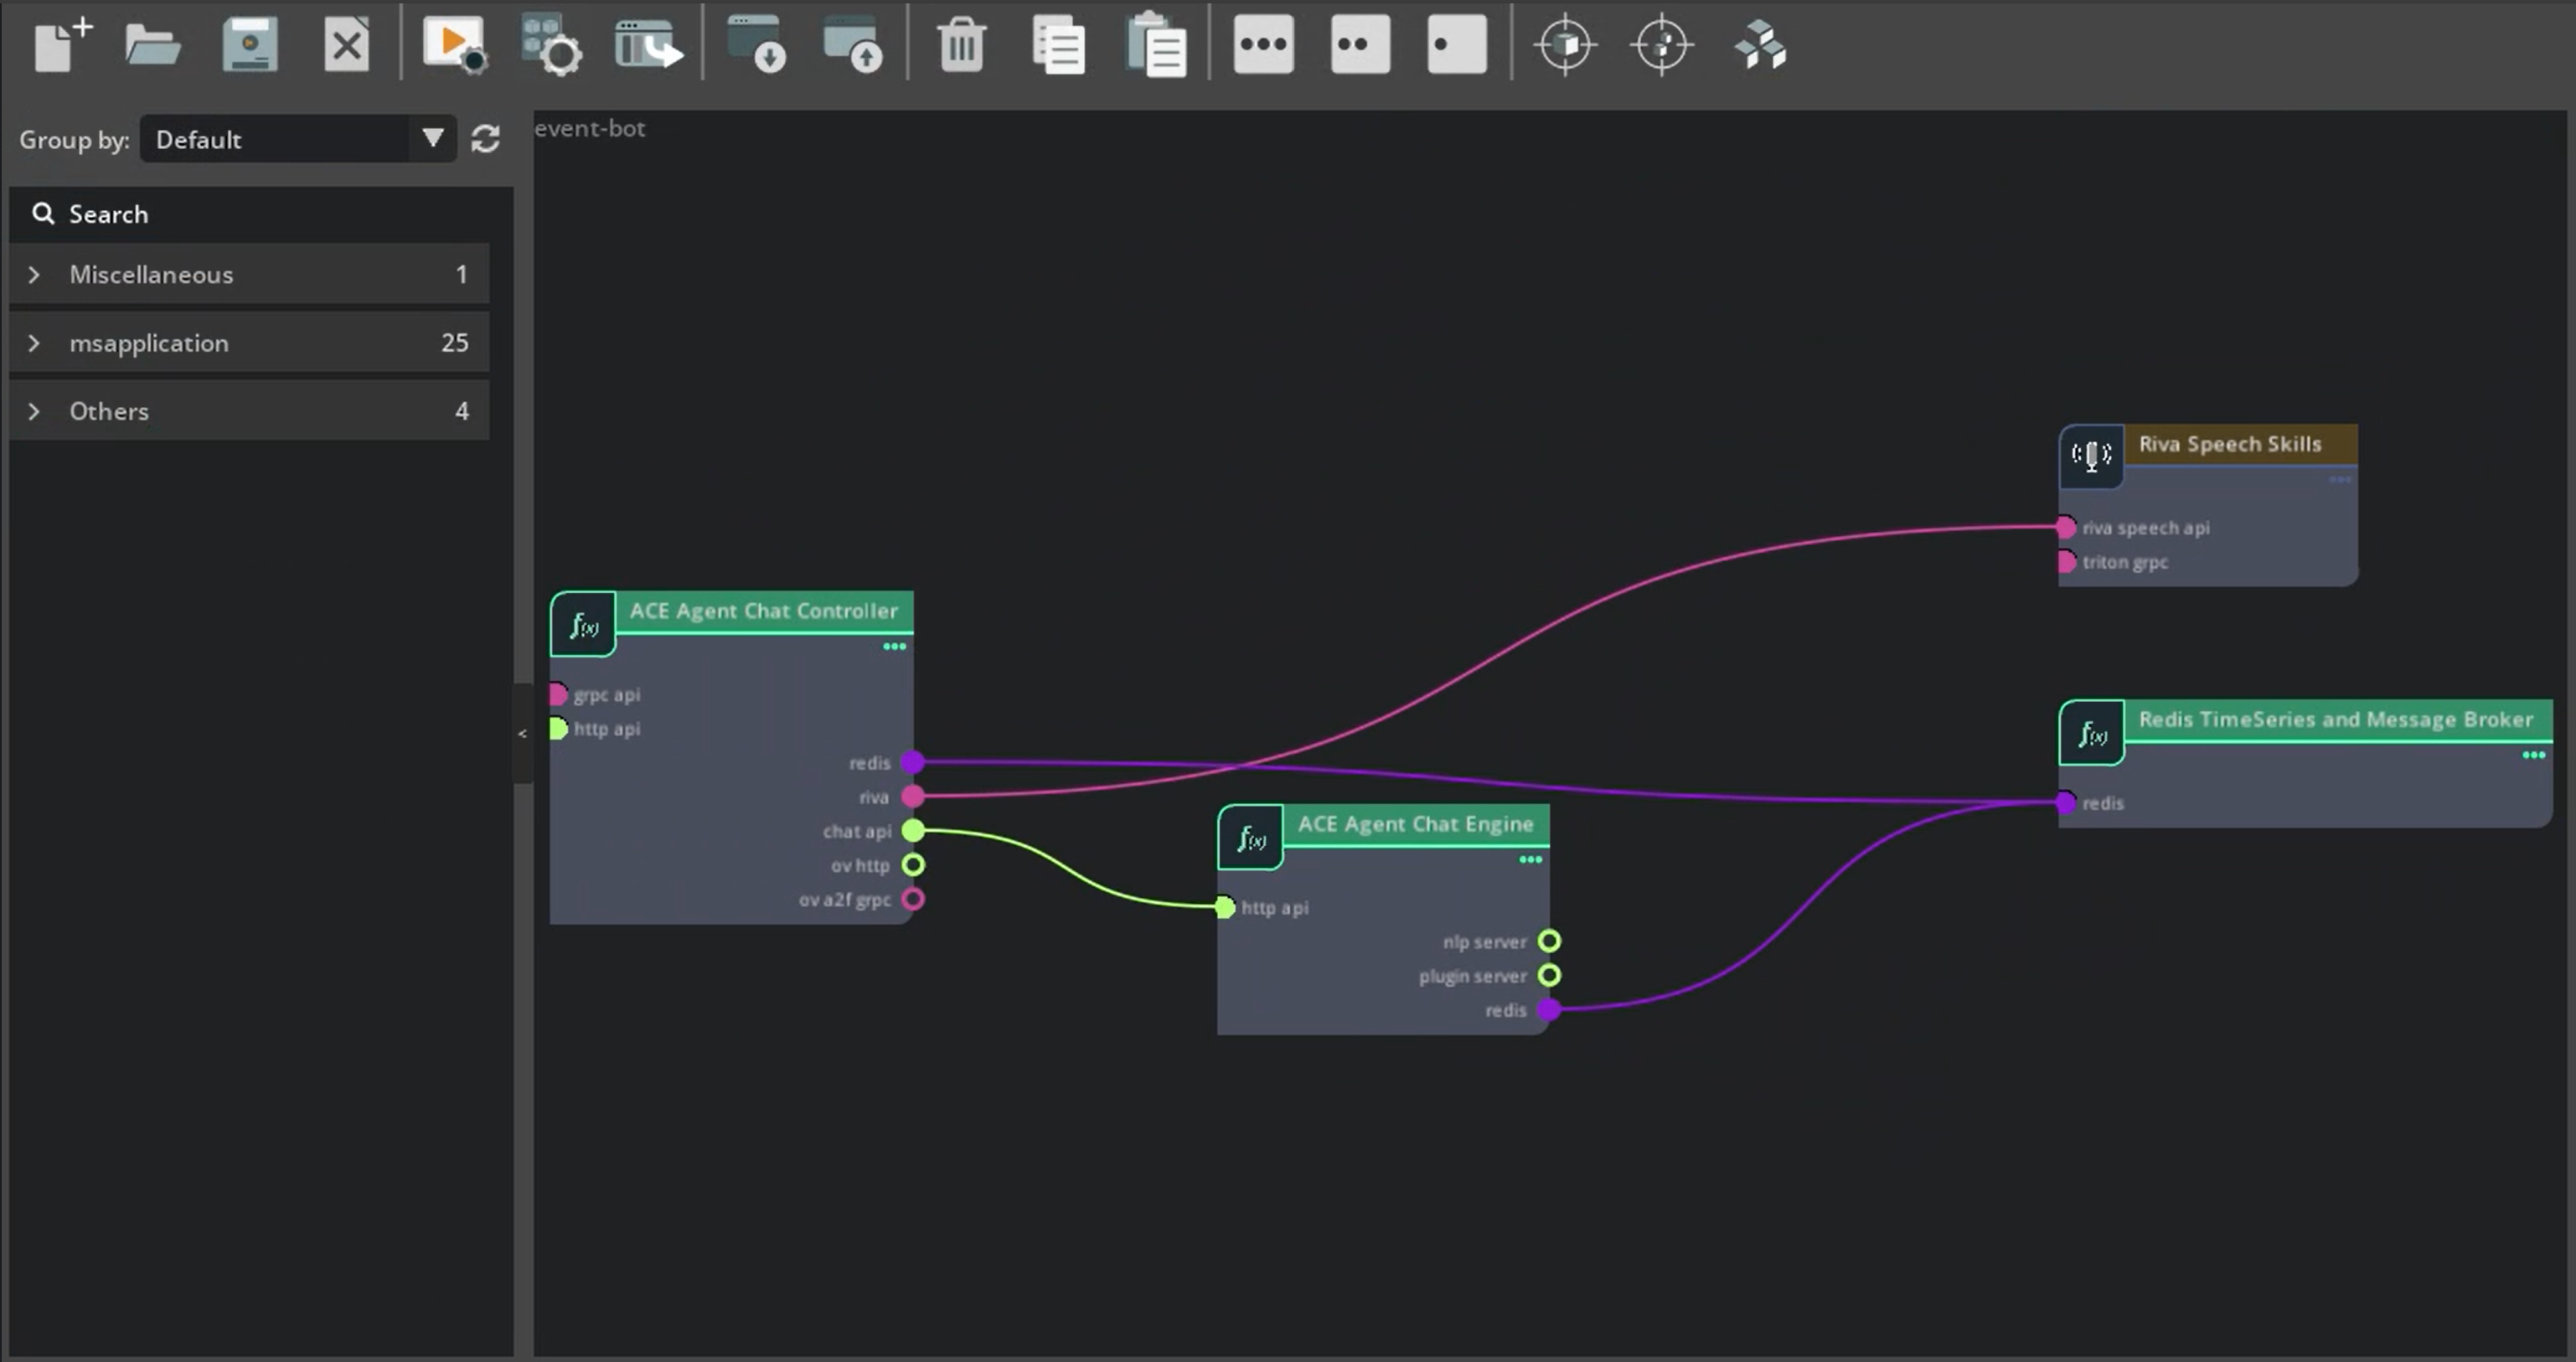
Update the
componentssection for the microservices in thedependenciessection.- name: riva-speech type: ucf.svc.riva.speech-skills parameters: imagePullSecrets: - name: ngc-docker-reg-secret - name: chat-engine type: ucf.svc.ace-agent.chat-engine parameters: imagePullSecrets: - name: ngc-docker-reg-secret - name: chat-controller type: ucf.svc.ace-agent.chat-controller parameters: imagePullSecrets: - name: ngc-docker-reg-secret - name: redis-timeseries type: ucf.svc.core.redis-timeseries parameters: imagePullSecrets: - name: ngc-docker-reg-secret
Update the
connectionsbetween the microservices.connections: chat-engine/redis: redis-timeseries/redis chat-controller/redis: redis-timeseries/redis chat-controller/riva: riva-speech/riva-speech-api chat-controller/chat-api: chat-engine/http-api
Configure the OpenAI API key. To create Kubernetes secret, run:
export OPENAI_API_KEY=...
kubectl create secret generic openai-key-secret --from-literal=OPENAI_API_KEY=${OPENAI_API_KEY}
Set the NGC CLI API key for downloading NGC resources. We have created
ngc-api-key-secretin thePrerequisitessection. Remove thevaultsection and update the secrets withngc-api-key-secretandopenai-key-secret.secrets: k8sSecret/ngc-api-key-secret/NGC_CLI_API_KEY: k8sSecret: secretName: ngc-api-key-secret key: NGC_CLI_API_KEY k8sSecret/openai-key-secret/OPENAI_API_KEY: k8sSecret: secretName: openai-key-secret key: OPENAI_API_KEY
Configure
ngc-api-key-secretandopenai-key-secretin thechat-engine,chat-controller, andriva-skillssection as needed.- name: riva-speech type: ucf.svc.riva.speech-skills parameters: imagePullSecrets: - name: ngc-docker-reg-secret secrets: ngc-api-key-secret: k8sSecret/ngc-api-key-secret/NGC_CLI_API_KEY - name: chat-engine type: ucf.svc.ace-agent.chat-engine parameters: imagePullSecrets: - name: ngc-docker-reg-secret secrets: ngc-api-key-secret: k8sSecret/ngc-api-key-secret/NGC_CLI_API_KEY openai-key-secret: k8sSecret/openai-key-secret/OPENAI_API_KEY - name: chat-controller type: ucf.svc.ace-agent.chat-controller parameters: imagePullSecrets: - name: ngc-docker-reg-secret secrets: ngc-api-key-secret: k8sSecret/ngc-api-key-secret/NGC_CLI_API_KEY
Mount the bot to the Chat Engine and Chat Controller microservices. We can do the same by providing the local directory under the
chat-engineandchat-controllercomponents in the application specs.- name: chat-engine type: ucf.svc.ace-agent.chat-engine parameters: imagePullSecrets: - name: ngc-docker-reg-secret secrets: ngc-api-key-secret: k8sSecret/ngc-api-key-secret/NGC_CLI_API_KEY openai-key-secret: k8sSecret/openai-key-secret/OPENAI_API_KEY files: config_dir: ../samples/colang_2_sample_bot - name: chat-controller type: ucf.svc.ace-agent.chat-controller parameters: imagePullSecrets: - name: ngc-docker-reg-secret secrets: ngc-api-key-secret: k8sSecret/ngc-api-key-secret/NGC_CLI_API_KEY files: config_dir: ../samples/colang_2_sample_bot
Specify the parameters for the microservices. You can either update the
parameterssection in the component itself, or createevent-app/app-params.yaml. Updateevent-app/app-params.yamlas follows:Update the Riva Speech parameters with the ASR and TTS models in
event-app/params.yaml.riva-speech: riva: visibleGpus: "0" modelRepoGenerator: ngcModelConfigs: triton0: models: #> description: List of NGC models for deployment - nvidia/ucs-ms/rmir_asr_parakeet_1-1b_en_us_str_vad:2.15.0 - nvidia/riva/rmir_tts_radtts_hifigan_en_us_ipa:2.15.0
Update the Chat Controller parameters in
event-app/app-params.yaml. We will be using thespeech_umimpipeline.chat-controller: pipeline: speech_umim speechConfigPath: "speech_config.yaml"
Update the
chat-engineto use the event interface.chat-engine: botConfigName: colang_2_sample_bot_config.yml interface: event
Generate the updated Helm Chart and deploy the application.
ucf_app_builder_cli app build event-app/app.yaml event-app/app-params.yaml
helm uninstall test
kubectl delete pvc --all
helm install test event-app/event-app-0.0.1/
Interact with the updated bot using the gRPC Server Sample Client.