Image Mirroring#
All required self-hosted NVCF artifacts (see Artifact Manifest) must be available to be pulled by pods in your Kubernetes cluster for a successful installation using the helmfile (nvcf-self-managed-stack) automation. This page provides examples on how to pull artifacts from NGC and push them to your desired registry.
Note
Mirroring images is not the same as configuring image pull secrets. This page covers how to copy NVCF artifacts into your registry. If your registry is private, Kubernetes also needs credentials to pull those images at runtime. For instructions on configuring image pull secrets for the NVCF control plane pods, see Step 4. Configure image pull secrets (conditional) in the installation guide.
Recommended for ECR Users: Automated ECR Mirroring#
If you are deploying to Amazon EKS with ECR, the nvcf-base Terraform module provides automated image mirroring as the recommended approach. This eliminates manual mirroring steps entirely.
To enable automated mirroring, set the following in your terraform.tfvars:
# Enable automated ECR mirroring
create_sm_ecr_repos = true
When create_sm_ecr_repos = true, Terraform will:
Create all required ECR repositories under
{cluster_name}/prefixMirror all NVCF control plane images and Helm charts from NGC
Mirror LLS artifacts (streaming-proxy, gdn-streaming Helm chart)
Use the correct architecture for your cluster (linux/amd64)
What’s included:
Infrastructure components (NATS, Cassandra, OpenBao)
Control plane components (API, SIS, gRPC proxy, invocation service, etc.)
GPU workload components (NVCA operator, worker utilities)
LLS components (always included)
Reference architecture components (gateway routes, admin-issuer-proxy)
What’s NOT included by default:
Simulation caching components (gxcache, ddcs, usd-content-cache) — uncomment in the copy script if needed
Custom streaming application images (e.g., usd-composer) — mirror manually
Important
Automated mirroring requires:
AWS credentials configured with ECR push permissions. Verify with
aws sts get-caller-identity. See Configure AWS Credentials for configuration options.NGC_API_KEY environment variable set with an API key from the
nvcf-onpremorganization before runningterraform apply.skopeo installed on your machine. Skopeo is used to copy container images directly between registries without requiring a local Docker daemon. See the skopeo installation guide for installation instructions.
For detailed Terraform configuration, see EKS Cluster Terraform (Optional).
If you cannot use the Terraform automation (e.g., non-ECR registry, air-gapped environment), continue with the manual mirroring instructions below.
Prerequisites#
You must have access to the NGC nvcf-onprem organization to begin.
Navigate to https://org.ngc.nvidia.com/setup/api-keys and ensure you have selected the
nvcf-onpremorganization in the upper right.Create a Personal API key with the required scopes to pull entities.
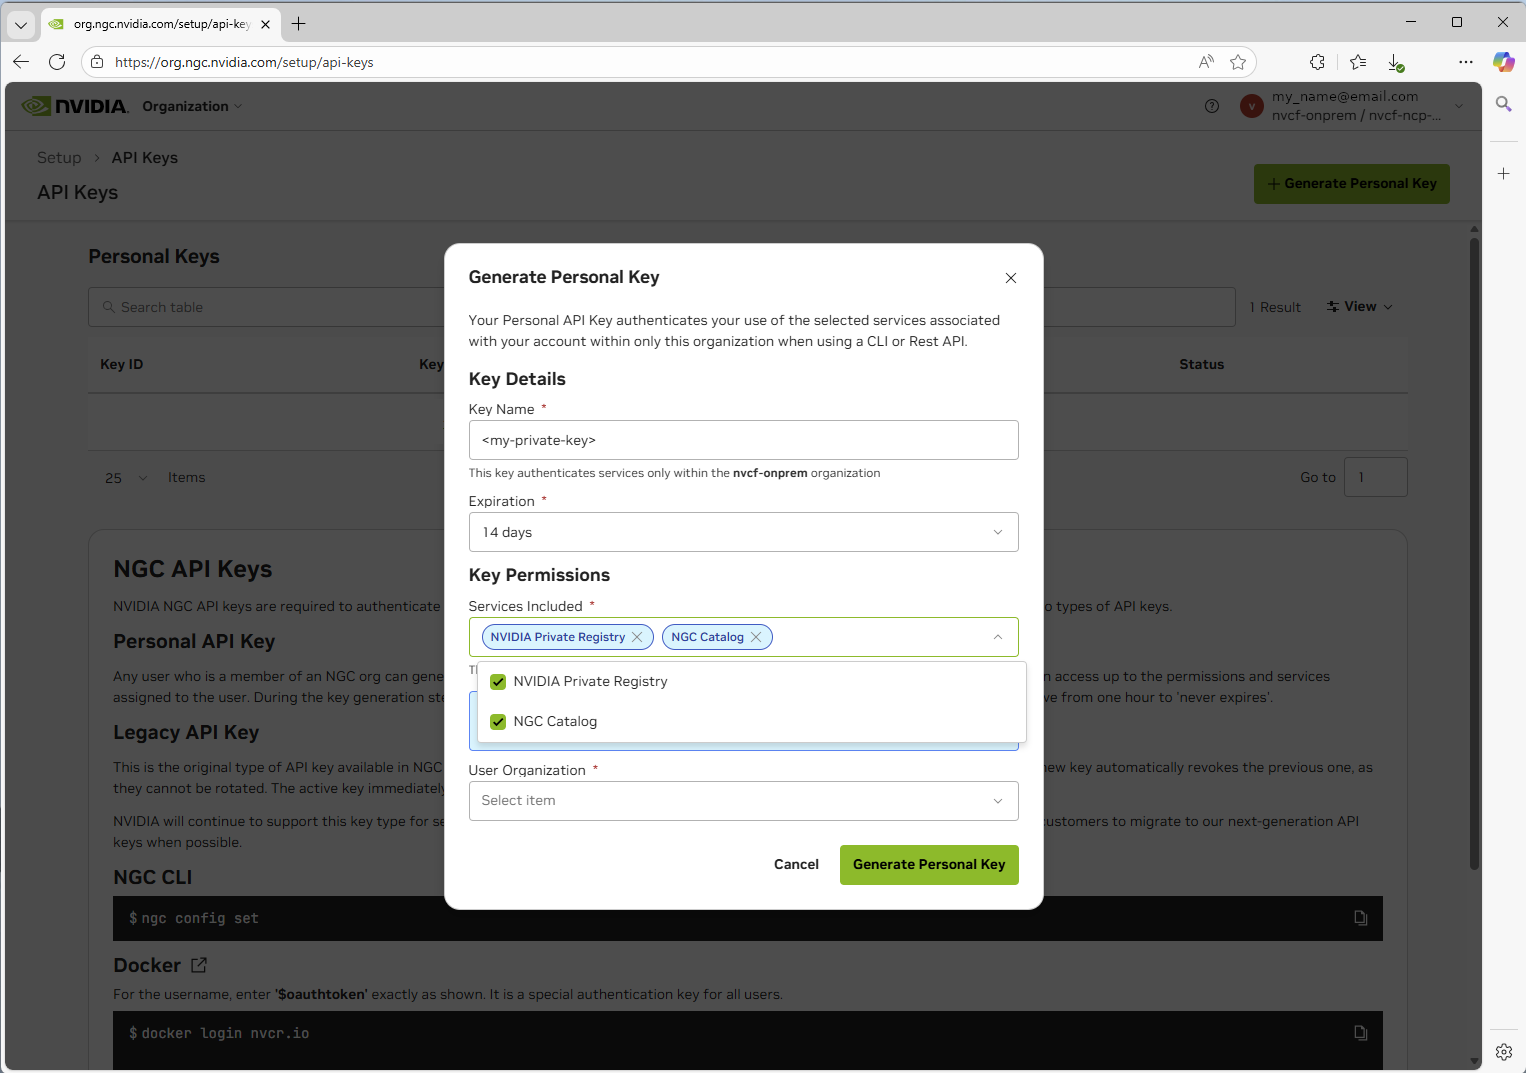
The User Organization in the drop-down will be whichever NCA Organization your account is registered against. It will not be nvcf-onprem.#
Set the NGC API key as an environment variable for use in any subsequent commands:
export NGC_API_KEY="nvapi-xxxxxxxxxxxxx" # Replace with your NGC API key
LLS-Specific Artifacts#
If you plan to deploy Low Latency Streaming (LLS), you must mirror the following additional artifacts beyond the core NVCF control plane:
Container Images:
streaming-proxy- Streaming Proxy container for streaming
Helm Charts:
gdn-streaming- GDN Streaming Proxy Helm chart
Optional (for streaming workloads):
Streaming application images (e.g.,
usd-composer)
Note
These artifacts (aside from the streaming application sample) are automatically included when using Terraform automated mirroring (create_sm_ecr_repos = true). LLS artifacts are always mirrored regardless of whether lls_enabled is set.
See LLS Installation for LLS deployment instructions.
Pulling Artifacts from NGC#
Warning
Important: The examples below show how to pull individual artifacts. You must pull each image, chart, and resource listed in the Artifact Manifest individually. These examples demonstrate the process for one artifact of each type - you will need to repeat these steps for every artifact required for your deployment.
Complete the following for each artifact:
Pull each container image from NGC
Pull each Helm chart from NGC
Pull each resource (like
nvcf-base,nvcf-self-managed-stack) from NGCPush each artifact to your target registry (ECR, Harbor, etc.)
See the Artifact Manifest for the complete list of all required artifacts.
Pulling Images#
Warning
Platform Architecture Mismatch
When pulling images, Docker pulls the architecture matching your local machine by default. If you’re running on an Apple Silicon Mac (arm64) but deploying to an amd64 cluster (most EKS/GKE clusters), you must specify the target platform:
# Pull for amd64 clusters (most common)
docker pull --platform linux/amd64 <image>

# Pull for arm64 clusters
docker pull --platform linux/arm64 <image>
Failing to specify the correct platform will result in exec format error when pods attempt to start. See Troubleshooting for more details.
Login using the Personal API key you have generated in the previous step:
docker login nvcr.io -u '$oauthtoken' -p <NGC_API_KEY>
Pull the image (specify platform matching your target cluster):
# For amd64 clusters (most EKS, GKE, AKS clusters)
docker pull --platform linux/amd64 nvcr.io/0833294136851237/nvcf-ncp-staging/nvcf-openbao:2.5.1-nv-1.1.0

# For arm64 clusters (Graviton-based EKS, etc.)
docker pull --platform linux/arm64 nvcr.io/0833294136851237/nvcf-ncp-staging/nvcf-openbao:2.5.1-nv-1.1.0
Pulling Helm Charts#
OCI-compliant Helm Charts
# Set your API key
export NGC_API_KEY=<api key generated from the Personal API key steps above>

# Login to the registry
echo "${NGC_API_KEY}" | helm registry login nvcr.io/0833294136851237/nvcf-ncp-staging \
  --username '$oauthtoken' --password-stdin

# Pull the chart
helm pull oci://nvcr.io/0833294136851237/nvcf-ncp-staging/helm-nvca-operator --version 1.4.7
Repository-based Helm Charts (Non-OCI)
Some charts like the GPU Operator are available from traditional Helm repositories rather than OCI registries. These can be pulled directly from the public NVIDIA NGC Catalog.
# Add the NVIDIA Helm repository
helm repo add nvidia https://helm.ngc.nvidia.com/nvidia --force-update

# Update repositories
helm repo update

# Pull the chart (downloads as .tgz file)
helm pull nvidia/gpu-operator --version 25.3.1
Note
The GPU Operator and related components (gpu-operator-validator, k8s-device-plugin) are available from the public NVIDIA NGC Catalog. You can either:
Pull directly from the public repository at runtime (simplest approach)
Mirror to your private registry for air-gapped environments (see below)
Converting Non-OCI Charts for ECR
To push repository-based Helm charts to Amazon ECR (which requires OCI format), you must convert them:
# Pull the chart from the traditional repository
helm pull nvidia/gpu-operator --version 25.3.1

# Login to ECR
aws ecr get-login-password --region us-east-1 | \
  helm registry login --username AWS --password-stdin <aws-account-id>.dkr.ecr.us-east-1.amazonaws.com

# Create ECR repository for the chart (include your repository prefix)
aws ecr create-repository --repository-name nvcf-self-hosted/gpu-operator --region us-east-1

# Push the .tgz file as an OCI artifact (include repository prefix)
helm push gpu-operator-25.3.1.tgz oci://<aws-account-id>.dkr.ecr.us-east-1.amazonaws.com/nvcf-self-hosted
Tip
ECR will properly track both container images and Helm charts under the same repository name and version, so you can use consistent naming for both. The repository prefix (e.g., nvcf-self-hosted) must match your global.image.repository environment configuration.
Pulling Resources from NGC#
Using NGC CLI
First, ensure you have the NGC CLI installed and configured using the Personal API key you created.
# Download a specific version
ngc registry resource download-version \
  "0833294136851237/nvcf-ncp-staging/nvcf-self-managed-stack:0.5.0"

# List all versions
ngc registry resource list \
  "0833294136851237/nvcf-ncp-staging/nvcf-self-managed-stack:*"

# Download latest version (omit version)
ngc registry resource download-version \
  "0833294136851237/nvcf-ncp-staging/nvcf-self-managed-stack"
Downloading nvcf-base#
The nvcf-base repository contains Terraform configurations and core application deployments for self-hosted NVCF infrastructure.
Important
Check for the latest version before downloading. The version shown below is an example only.
# List available versions to find the latest
ngc registry resource list "0833294136851237/nvcf-ncp-staging/nvcf-base:*"
Download and extract:
# Set the version (replace with latest from the list command above)
export VERSION="0.1.4"

# Download and extract
ngc registry resource download-version "0833294136851237/nvcf-ncp-staging/nvcf-base:${VERSION}" && \
   mkdir -p nvcf-base && \
   tar -xzf nvcf-base_v${VERSION}/nvcf-base-${VERSION}.tar.gz -C nvcf-base && \
   rm -rf nvcf-base_v${VERSION} && \
   echo "SUCCESS: nvcf-base extracted to $(pwd)/nvcf-base"
Note
If you don’t have access to this repository, contact your NVIDIA representative.
Downloading nvcf-self-managed-stack#
The nvcf-self-managed-stack repository contains Helmfile configurations for deploying the NVCF control plane components.
Warning
Check for the latest version before downloading. The version shown below is an example only.
# List available versions to find the latest
ngc registry resource list "0833294136851237/nvcf-ncp-staging/nvcf-self-managed-stack:*"
Download and extract:
# Set the version (replace with latest from the list command above)
export VERSION="0.5.0"

# Download and extract
ngc registry resource download-version "0833294136851237/nvcf-ncp-staging/nvcf-self-managed-stack:${VERSION}" && \
   mkdir -p nvcf-self-managed-stack && \
   tar -xzf nvcf-self-managed-stack_v${VERSION}/nvcf-self-managed-stack-${VERSION}.tar.gz -C nvcf-self-managed-stack && \
   rm -rf nvcf-self-managed-stack_v${VERSION} && \
   echo "SUCCESS: nvcf-self-managed-stack extracted to $(pwd)/nvcf-self-managed-stack"
Note
If you don’t have access to this repository, contact your NVIDIA representative.
Downloading nvcf-cli#
The nvcf-cli is a command-line interface for managing NVIDIA Cloud Functions in self-hosted deployments.
Warning
Check for the latest version before downloading. The version shown below is an example only.
# List available versions to find the latest
ngc registry resource list "0833294136851237/nvcf-ncp-staging/nvcf-cli:*"
Download and extract:
# Set the version (replace with latest from the list command above)
export VERSION="0.0.22"

# Set your platform (linux-amd64, linux-arm64, darwin-amd64, darwin-arm64, windows-amd64)
export PLATFORM="linux-amd64"

# Download the resource
ngc registry resource download-version "0833294136851237/nvcf-ncp-staging/nvcf-cli:${VERSION}"

# Extract the platform-specific package
tar -xzf nvcf-cli_v${VERSION}/${PLATFORM}/nvcf-cli-${PLATFORM}-${VERSION}.tar.gz

# Move to a working directory
mv nvcf-cli-${PLATFORM}-${VERSION} nvcf-cli
chmod +x nvcf-cli/nvcf-cli

# Verify installation
./nvcf-cli/nvcf-cli --help

# Clean up downloaded resource
rm -rf nvcf-cli_v${VERSION}
The extracted directory contains:
nvcf-cli- The CLI binary.nvcf-cli.yaml.template- Configuration templateexamples/- Sample configuration files for different environmentsUSAGE-GUIDE.md- Detailed usage documentation
See Self-hosted CLI for detailed configuration instructions
Note
If you don’t have access to this repository, contact your NVIDIA representative.
Pushing to Your Registry#
Important
Ensure all artifacts listed in the Artifact Manifest are mirrored to your registry before beginning the installation process.
Example: Pushing to Amazon ECR#
This example assumes you’re configured and authenticated using the AWS CLI.
Note
Identify Your AWS Account ID
The examples below use <aws-account-id> as a placeholder. To get your AWS account ID, run:
aws sts get-caller-identity --query Account --output text
Important
ECR Repository Naming Convention
The Helm templates expect images at: {{ registry }}/{{ repository }}/image-name:tag
For example, with environment configuration:
global:
  image:
    registry: <aws-account-id>.dkr.ecr.us-east-1.amazonaws.com
    repository: nvcf-self-hosted
The resulting image path would be: <aws-account-id>.dkr.ecr.us-east-1.amazonaws.com/nvcf-self-hosted/nvcf-openbao:2.5.1-nv-1.1.0
In ECR, you must create repositories with the full path including the prefix, e.g., nvcf-self-hosted/bitnami-cassandra, nvcf-self-hosted/nvcf-openbao, etc.
Initial Setup
# Set your repository prefix (must match global.image.repository in your environment config)
REPO_PREFIX="nvcf-self-hosted"

# Login to AWS ECR
aws ecr get-login-password --region us-east-1 | \
  docker login --username AWS --password-stdin <aws-account-id>.dkr.ecr.us-east-1.amazonaws.com
Push an Image to ECR
# Create ECR repository with the full path (including prefix)
aws ecr create-repository --repository-name ${REPO_PREFIX}/nvcf-openbao --region us-east-1

# Tag the image for ECR (include repository prefix in path)
docker tag nvcr.io/0833294136851237/nvcf-ncp-staging/nvcf-openbao:2.5.1-nv-1.1.0 \
  <aws-account-id>.dkr.ecr.us-east-1.amazonaws.com/${REPO_PREFIX}/nvcf-openbao:2.5.1-nv-1.1.0

# Push to ECR
docker push <aws-account-id>.dkr.ecr.us-east-1.amazonaws.com/${REPO_PREFIX}/nvcf-openbao:2.5.1-nv-1.1.0
Push a Helm Chart to ECR
# 1. Login to NGC with Helm
export NGC_API_KEY="your-api-key"
echo "${NGC_API_KEY}" | helm registry login nvcr.io/0833294136851237/nvcf-ncp-staging \
  --username '$oauthtoken' --password-stdin

# 2. Pull the Helm chart from NGC
helm pull oci://nvcr.io/0833294136851237/nvcf-ncp-staging/helm-nvca-operator --version 1.4.7
# This creates: helm-nvca-operator-1.4.7.tgz

# 3. Login to AWS ECR with Helm
aws ecr get-login-password --region us-east-1 | \
  helm registry login --username AWS --password-stdin <aws-account-id>.dkr.ecr.us-east-1.amazonaws.com

# 4. Create ECR repository with prefix (must match your environment config)
aws ecr create-repository --repository-name ${REPO_PREFIX}/helm-nvca-operator --region us-east-1

# 5. Push to ECR as OCI artifact (include repository prefix)
helm push helm-nvca-operator-1.4.7.tgz oci://<aws-account-id>.dkr.ecr.us-east-1.amazonaws.com/${REPO_PREFIX}
Note
Replace <aws-account-id> with your AWS account ID (run aws sts get-caller-identity --query Account --output text). The REPO_PREFIX value must match your global.image.repository setting in your environment config. Adjust the region as needed.
Example: Pushing to Volcano Engine Container Registry#
This example shows how to push images and Helm charts to Volcano Engine Container Registry (CR) using the web console, Docker commands and Helm commands.
Important
Volcano Engine CR Repository Naming Convention
The Helm templates expect images at: {{ registry }}/{{ repository }}/image-name:tag
For example, with environment configuration:
global:
  image:
    registry: cr-example-cn-beijing.cr.volces.com
    repository: nvcf-self-hosted
The resulting image path would be: cr-example-cn-beijing.cr.volces.com/nvcf-self-hosted/nvcf-openbao:2.5.1-nv-1.1.0
Docker Authentication
# Set your Volcano Engine CR endpoint
CR_ENDPOINT="cr-example-cn-beijing.cr.volces.com"
CR_USERNAME="your-username"
CR_PASSWORD="your-password"

# Login to Volcano Engine CR
echo "${CR_PASSWORD}" | docker login "${CR_ENDPOINT}" \
  --username "${CR_USERNAME}" --password-stdin
Note
Replace cr-example-cn-beijing.cr.volces.com with your Volcano Engine CR endpoint, your-username with your username, and your-password with your password.
Navigate to your Volcano Engine Container Registry instance web console to get the username and password. If you haven’t set the password, you can set it by clicking “Set Repository Instance Password”.
Push an Image to Volcano Engine CR
# Set your registry endpoint and namespace
CR_ENDPOINT="cr-example-cn-beijing.cr.volces.com"
NAMESPACE="nvcf-self-hosted"

# Tag the image for Volcano Engine CR
docker tag nvcr.io/0833294136851237/nvcf-ncp-staging/nvcf-openbao:2.5.1-nv-1.1.0 \
  ${CR_ENDPOINT}/${NAMESPACE}/nvcf-openbao:2.5.1-nv-1.1.0

# Push to Volcano Engine CR
docker push ${CR_ENDPOINT}/${NAMESPACE}/nvcf-openbao:2.5.1-nv-1.1.0
Push a Helm Chart to Volcano Engine CR
# Set your registry endpoint and namespace
CR_ENDPOINT="cr-example-cn-beijing.cr.volces.com"
NAMESPACE="nvcf-self-hosted"
CR_USERNAME="your-username"
CR_PASSWORD="your-password"

# 1. Login to NGC with Helm
export NGC_API_KEY="your-api-key"
echo "${NGC_API_KEY}" | helm registry login nvcr.io/0833294136851237/nvcf-ncp-staging \
  --username '$oauthtoken' --password-stdin

# 2. Pull the Helm chart from NGC
helm pull oci://nvcr.io/0833294136851237/nvcf-ncp-staging/nvca-operator --version 1.2.9
# This creates: nvca-operator-1.2.9.tgz

# 3. Login to Volcano Engine CR with Helm
helm registry login ${CR_ENDPOINT} \
  --username "${CR_USERNAME}" \
  --password "${CR_PASSWORD}"

# 4. Push to Volcano Engine CR as OCI artifact
helm push nvca-operator-1.2.9.tgz oci://${CR_ENDPOINT}/${NAMESPACE}
Troubleshooting#
exec format error#
Symptom: Pods fail to start with Init:CrashLoopBackOff or CrashLoopBackOff status. Checking the logs shows:
exec /bin/sh: exec format error
or
exec /usr/local/bin/docker-entrypoint.sh: exec format error
Cause: This error occurs when container images were pulled/pushed with an architecture that doesn’t match your cluster’s node architecture. This commonly happens when:
Mirroring from an Apple Silicon Mac (arm64) to an amd64 EKS/GKE cluster
Mirroring from an Intel/AMD machine (amd64) to an arm64 cluster (e.g., AWS Graviton)
Solution:
Delete the incorrectly mirrored images from your registry (e.g., ECR):
# Delete all repositories with your prefix
aws ecr describe-repositories --region us-west-2 \
  --query "repositories[?starts_with(repositoryName, 'nvcf-self-hosted')].repositoryName" \
  --output text | tr '\t' '\n' | while read repo; do
  aws ecr delete-repository --repository-name "$repo" --region us-west-2 --force
done
Clean local Docker cache to ensure fresh pulls:
# Remove all NGC and ECR images from local cache
docker images --format "{{.Repository}}:{{.Tag}}" | \
  grep -E "(nvcr.io|\.ecr\.)" | \
  xargs -r docker rmi -f

# Prune dangling images
docker image prune -f
Re-mirror images with the correct platform:
When pulling images, explicitly specify the target platform:
# For amd64 clusters (most common)
docker pull --platform linux/amd64 <image>

# For arm64 clusters
docker pull --platform linux/arm64 <image>
Then re-tag and push to your registry.
Force Kubernetes to re-pull images by either:
Setting
imagePullPolicy: Alwaystemporarily in your Helm valuesDeleting and redeploying the affected StatefulSets/Deployments
# Delete StatefulSets to force recreation
kubectl -n cassandra-system delete statefulset cassandra
kubectl -n nats-system delete statefulset nats

# Redeploy using helmfile
HELMFILE_ENV=<environment-name> helmfile sync