GPU Operator with MIG
Multi-Instance GPU (MIG) allows GPUs based on the NVIDIA Ampere architecture (such as NVIDIA A100) to be securely partitioned into separate GPU Instances for CUDA applications. Refer to the MIG User Guide for more details on MIG.
This documents provides an overview of how to use the GPU Operator with nodes that support MIG.
Getting Started
Prerequisites
The GPU Operator starting with v1.7 supports the use of pre-installed drivers and the NVIDIA
Container Toolkit (nvidia-docker2). Note that, the MIG Manager currently does not support
the use of pre-installed drivers (with one of the reasons being that kubelet opens a handle
to the NVIDIA driver when available. See this issue,
which may be addressed in future releases of Kubernetes).
As a result, the --set driver.enabled=false option in the Helm chart for use with pre-installed
drivers is not supported when using the MIG Manager on NVIDIA Ampere GPUs. The MIG Manager only
works when the Operator deploys the NVIDIA driver as a container.
Future releases of the MIG Manager will support the use of pre-installed drivers.
Initial Setup
In this example workflow, we start with a MIG strategy of single. The mixed strategy can also be
specified and used in a similar manner.
Note
In a CSP IaaS environment such as Google Cloud, ensure that the mig-manager variable
WITH_REBOOT is set to “true”.
Refer to the note
in the MIG User Guide for more information on the constraints with enabling MIG mode.
We can use the following option to install the GPU Operator:
$ helm install gpu-operator \
    deployments/gpu-operator \
    --set mig.strategy=single
At this point, all the pods, including the nvidia-mig-manager will be deployed on nodes that have MIG capable GPUs:
NAMESPACE                NAME                                                          READY   STATUS      RESTARTS   AGE
default                  gpu-operator-d6ccd4d8d-9cgzr                                  1/1     Running     2          6m58s
default                  gpu-operator-node-feature-discovery-master-867c4f7bfb-4nlq7   1/1     Running     0          6m58s
default                  gpu-operator-node-feature-discovery-worker-6rvr2              1/1     Running     1          6m58s
gpu-operator-resources   gpu-feature-discovery-sclxr                                   1/1     Running     0          6m39s
gpu-operator-resources   nvidia-container-toolkit-daemonset-tnh82                      1/1     Running     0          6m39s
gpu-operator-resources   nvidia-cuda-validator-qt6wq                                   0/1     Completed   0          3m11s
gpu-operator-resources   nvidia-dcgm-exporter-dh46q                                    1/1     Running     0          6m39s
gpu-operator-resources   nvidia-device-plugin-daemonset-t6qkz                          1/1     Running     0          6m39s
gpu-operator-resources   nvidia-device-plugin-validator-sd5f7                          0/1     Completed   0          105s
gpu-operator-resources   nvidia-driver-daemonset-f7ktr                                 1/1     Running     0          6m40s
gpu-operator-resources   nvidia-mig-manager-gzg8n                                      1/1     Running     0          79s
gpu-operator-resources   nvidia-operator-validator-vsccj                               1/1     Running     0          6m39s
kube-system              calico-kube-controllers-b656ddcfc-722nd                       1/1     Running     0          39m
kube-system              calico-node-vt5pz                                             1/1     Running     0          39m
kube-system              coredns-558bd4d5db-cmgzk                                      1/1     Running     0          39m
kube-system              coredns-558bd4d5db-hx98h                                      1/1     Running     0          39m
kube-system              etcd-a100-mig-k8s                                             1/1     Running     0          39m
kube-system              kube-apiserver-a100-mig-k8s                                   1/1     Running     0          39m
kube-system              kube-controller-manager-a100-mig-k8s                          1/1     Running     1          39m
kube-system              kube-proxy-7597j                                              1/1     Running     0          39m
kube-system              kube-scheduler-a100-mig-k8s                                   1/1     Running     1          39m
You can also check the labels applied to the node:
$ kubectl get node -o json | jq '.items[].metadata.labels'
"nvidia.com/cuda.driver.major": "460",
"nvidia.com/cuda.driver.minor": "73",
"nvidia.com/cuda.driver.rev": "01",
"nvidia.com/cuda.runtime.major": "11",
"nvidia.com/cuda.runtime.minor": "2",
"nvidia.com/gfd.timestamp": "1621375725",
"nvidia.com/gpu.compute.major": "8",
"nvidia.com/gpu.compute.minor": "0",
"nvidia.com/gpu.count": "1",
"nvidia.com/gpu.deploy.container-toolkit": "true",
"nvidia.com/gpu.deploy.dcgm-exporter": "true",
"nvidia.com/gpu.deploy.device-plugin": "true",
"nvidia.com/gpu.deploy.driver": "true",
"nvidia.com/gpu.deploy.gpu-feature-discovery": "true",
"nvidia.com/gpu.deploy.mig-manager": "true",
"nvidia.com/gpu.deploy.operator-validator": "true",
"nvidia.com/gpu.family": "ampere",
"nvidia.com/gpu.machine": "Google-Compute-Engine",
"nvidia.com/gpu.memory": "40536",
"nvidia.com/gpu.present": "true",
"nvidia.com/gpu.product": "A100-SXM4-40GB",
"nvidia.com/mig.strategy": "single"
Warning
The MIG Manager currently requires that all user workloads on the GPUs being configured be stopped. In some cases, the node may need to be rebooted (esp. in CSP IaaS), so the node may need to be cordoned before changing the MIG mode or the MIG geometry on the GPUs.
This requirement may be relaxed in future releases.
Configuring MIG Profiles
Now, let’s configure the GPU into a supported by setting the mig.config label on the
GPU node.
Note
The mig-manager uses a ConfigMap called mig-parted-config in the gpu-operator-resources
namespace in the daemonset to include supported MIG profiles. Refer to the ConfigMap to use when
changing the label below or modify the ConfigMap appropriately for your use-case.
In this example, we use the 1g.5gb profile:
$ kubectl label nodes $NODE nvidia.com/mig.config=all-1g.5gb
The MIG manager will proceed to apply a mig.config.state label to the GPU and then terminate all
the GPU pods in preparation to enable MIG mode and configure the GPU into the desired MIG geometry:
"nvidia.com/mig.config": "all-1g.5gb",
"nvidia.com/mig.config.state": "pending"
kube-system              kube-scheduler-a100-mig-k8s                                   1/1     Running     1          45m
gpu-operator-resources   nvidia-dcgm-exporter-dh46q                                    1/1     Terminating   0          13m
gpu-operator-resources   gpu-feature-discovery-sclxr                                   1/1     Terminating   0          13m
gpu-operator-resources   nvidia-device-plugin-daemonset-t6qkz                          1/1     Terminating   0          13m
Note
As described above, if the WITH_REBOOT option is set then the MIG manager will proceed to reboot the node:
"nvidia.com/mig.config": "all-1g.5gb",
"nvidia.com/mig.config.state": "rebooting"
Once the MIG manager has completed applying the configuration changes (including a node reboot if required), the node labels should appear as shown below:
"nvidia.com/cuda.driver.major": "460",
"nvidia.com/cuda.driver.minor": "73",
"nvidia.com/cuda.driver.rev": "01",
"nvidia.com/cuda.runtime.major": "11",
"nvidia.com/cuda.runtime.minor": "2",
"nvidia.com/gfd.timestamp": "1621442537",
"nvidia.com/gpu.compute.major": "8",
"nvidia.com/gpu.compute.minor": "0",
"nvidia.com/gpu.count": "7",
"nvidia.com/gpu.deploy.container-toolkit": "true",
"nvidia.com/gpu.deploy.dcgm-exporter": "true",
"nvidia.com/gpu.deploy.device-plugin": "true",
"nvidia.com/gpu.deploy.driver": "true",
"nvidia.com/gpu.deploy.gpu-feature-discovery": "true",
"nvidia.com/gpu.deploy.mig-manager": "true",
"nvidia.com/gpu.deploy.operator-validator": "true",
"nvidia.com/gpu.engines.copy": "1",
"nvidia.com/gpu.engines.decoder": "0",
"nvidia.com/gpu.engines.encoder": "0",
"nvidia.com/gpu.engines.jpeg": "0",
"nvidia.com/gpu.engines.ofa": "0",
"nvidia.com/gpu.family": "ampere",
"nvidia.com/gpu.machine": "Google-Compute-Engine",
"nvidia.com/gpu.memory": "4864",
"nvidia.com/gpu.multiprocessors": "14",
"nvidia.com/gpu.present": "true",
"nvidia.com/gpu.product": "A100-SXM4-40GB-MIG-1g.5gb",
"nvidia.com/gpu.slices.ci": "1",
"nvidia.com/gpu.slices.gi": "1",
"nvidia.com/mig.config": "all-1g.5gb",
"nvidia.com/mig.config.state": "success",
"nvidia.com/mig.strategy": "single"
The labels gpu.count and gpu.slices indicate that the devices are configured. We can also run nvidia-smi
in the driver container to verify that the GPU has been configured:
$ sudo docker exec 629b93e200d9eea35be35a1b30991d007e48497d52a38e18a472945e44e52a8e nvidia-smi -L
GPU 0: A100-SXM4-40GB (UUID: GPU-5c89852c-d268-c3f3-1b07-005d5ae1dc3f)
  MIG 1g.5gb Device 0: (UUID: MIG-GPU-5c89852c-d268-c3f3-1b07-005d5ae1dc3f/7/0)
  MIG 1g.5gb Device 1: (UUID: MIG-GPU-5c89852c-d268-c3f3-1b07-005d5ae1dc3f/8/0)
  MIG 1g.5gb Device 2: (UUID: MIG-GPU-5c89852c-d268-c3f3-1b07-005d5ae1dc3f/9/0)
  MIG 1g.5gb Device 3: (UUID: MIG-GPU-5c89852c-d268-c3f3-1b07-005d5ae1dc3f/11/0)
  MIG 1g.5gb Device 4: (UUID: MIG-GPU-5c89852c-d268-c3f3-1b07-005d5ae1dc3f/12/0)
  MIG 1g.5gb Device 5: (UUID: MIG-GPU-5c89852c-d268-c3f3-1b07-005d5ae1dc3f/13/0)
  MIG 1g.5gb Device 6: (UUID: MIG-GPU-5c89852c-d268-c3f3-1b07-005d5ae1dc3f/14/0)
Finally, verify that the GPU Operator pods are in running state:
NAMESPACE                NAME                                                          READY   STATUS      RESTARTS   AGE
default                  gpu-operator-d6ccd4d8d-hhhq4                                  1/1     Running     4          38m
default                  gpu-operator-node-feature-discovery-master-867c4f7bfb-jt95x   1/1     Running     1          38m
default                  gpu-operator-node-feature-discovery-worker-rjpfb              1/1     Running     3          38m
gpu-operator-resources   gpu-feature-discovery-drzft                                   1/1     Running     0          97s
gpu-operator-resources   nvidia-container-toolkit-daemonset-885b5                      1/1     Running     1          38m
gpu-operator-resources   nvidia-cuda-validator-kh4tv                                   0/1     Completed   0          94s
gpu-operator-resources   nvidia-dcgm-exporter-6d5kd                                    1/1     Running     0          97s
gpu-operator-resources   nvidia-device-plugin-daemonset-kspv5                          1/1     Running     0          97s
gpu-operator-resources   nvidia-device-plugin-validator-mpgv9                          0/1     Completed   0          83s
gpu-operator-resources   nvidia-driver-daemonset-mgmdb                                 1/1     Running     3          38m
gpu-operator-resources   nvidia-mig-manager-svv7b                                      1/1     Running     1          35m
gpu-operator-resources   nvidia-operator-validator-w44q8                               1/1     Running     0          97s
kube-system              calico-kube-controllers-b656ddcfc-722nd                       1/1     Running     6          19h
kube-system              calico-node-vt5pz                                             1/1     Running     6          19h
kube-system              coredns-558bd4d5db-cmgzk                                      1/1     Running     5          19h
kube-system              coredns-558bd4d5db-hx98h                                      1/1     Running     5          19h
kube-system              etcd-a100-mig-k8s                                             1/1     Running     5          19h
kube-system              kube-apiserver-a100-mig-k8s                                   1/1     Running     5          19h
kube-system              kube-controller-manager-a100-mig-k8s                          1/1     Running     13         19h
kube-system              kube-proxy-7597j                                              1/1     Running     5          19h
kube-system              kube-scheduler-a100-mig-k8s                                   1/1     Running     11         19h
Reconfiguring MIG Profiles
The MIG manager supports dynamic reconfiguration of the MIG geometry. In this example, let’s reconfigure the
GPU into a 3g.20gb profile:
$ kubectl label nodes $NODE nvidia.com/mig.config=all-3g.20gb --overwrite
We can see from the logs of the MIG manager that it has reconfigured the GPU into the new MIG geometry:
Applying the selected MIG config to the node
time="2021-05-19T16:42:14Z" level=debug msg="Parsing config file..."
time="2021-05-19T16:42:14Z" level=debug msg="Selecting specific MIG config..."
time="2021-05-19T16:42:14Z" level=debug msg="Running apply-start hook"
time="2021-05-19T16:42:14Z" level=debug msg="Checking current MIG mode..."
time="2021-05-19T16:42:14Z" level=debug msg="Walking MigConfig for (devices=all)"
time="2021-05-19T16:42:14Z" level=debug msg="  GPU 0: 0x20B010DE"
time="2021-05-19T16:42:14Z" level=debug msg="    Asserting MIG mode: Enabled"
time="2021-05-19T16:42:14Z" level=debug msg="    MIG capable: true\n"
time="2021-05-19T16:42:14Z" level=debug msg="    Current MIG mode: Enabled"
time="2021-05-19T16:42:14Z" level=debug msg="Checking current MIG device configuration..."
time="2021-05-19T16:42:14Z" level=debug msg="Walking MigConfig for (devices=all)"
time="2021-05-19T16:42:14Z" level=debug msg="  GPU 0: 0x20B010DE"
time="2021-05-19T16:42:14Z" level=debug msg="    Asserting MIG config: map[1g.5gb:7]"
time="2021-05-19T16:42:14Z" level=debug msg="Running pre-apply-config hook"
time="2021-05-19T16:42:14Z" level=debug msg="Applying MIG device configuration..."
time="2021-05-19T16:42:14Z" level=debug msg="Walking MigConfig for (devices=all)"
time="2021-05-19T16:42:14Z" level=debug msg="  GPU 0: 0x20B010DE"
time="2021-05-19T16:42:14Z" level=debug msg="    MIG capable: true\n"
time="2021-05-19T16:42:14Z" level=debug msg="    Updating MIG config: map[1g.5gb:7]"
time="2021-05-19T16:42:14Z" level=debug msg="Running apply-exit hook"
MIG configuration applied successfully
Restarting all GPU clients previouly shutdown by reenabling their component-specific nodeSelector labels
node/pramarao-a100-mig-k8s labeled
Changing the 'nvidia.com/mig.config.state' node label to 'success'
And the node labels have been updated appropriately:
"nvidia.com/gpu.product": "A100-SXM4-40GB-MIG-3g.20gb",
"nvidia.com/gpu.slices.ci": "3",
"nvidia.com/gpu.slices.gi": "3",
"nvidia.com/mig.config": "all-3g.20gb",
We can now proceed to run some sample workloads.
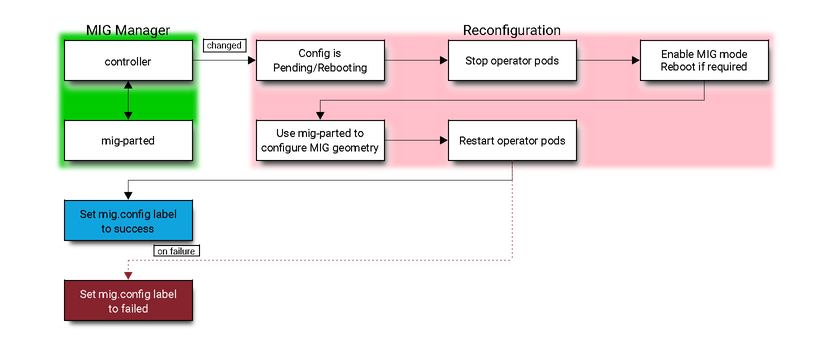
Architecture
The MIG manager is designed as a controller within Kubernetes. It watches for changes to the
nvidia.com/mig.config label on the node and then applies the user requested MIG configuration
When the label changes, the MIG Manager first stops all GPU pods (including the device plugin, gfd
and dcgm-exporter), applies the MIG reconfiguration and restarts the GPU pods. The MIG reconfiguration
may also involve a node reboot if required for enabling MIG mode.
The available MIG profiles are specified in a ConfigMap to the MIG manager daemonset. The user may
choose one of these profiles to apply to the mig.config label to trigger a reconfiguration of the
MIG geometry.
The MIG manager relies on the mig-parted tool to apply the configuration changes to the GPU, including enabling MIG mode (with a node reboot as required by some scenarios).