


Quick Start Guide#
This guide helps you get started with the TensorRT SDK. It demonstrates how to construct an application to run inference on a TensorRT engine.
Introduction#
What Is TensorRT?#
NVIDIA TensorRT is an SDK that takes a trained deep learning model and turns it into a fast, GPU-specific program for running inference — the act of computing predictions on new inputs after training is complete. It has two parts that you will see referenced throughout this guide:
A builder that compiles your model into a serialized, hardware-specific binary called an engine (sometimes also called a plan file). The builder picks the fastest available GPU kernel (a low-level GPU function) for each layer in your network.
A runtime that loads the engine into your application and executes it on the GPU.
You typically start from a trained model exported to ONNX — a framework-neutral interchange format that PyTorch, TensorFlow, and most other training frameworks can produce. TensorRT reads the ONNX file, builds the engine, and then your application uses the runtime to serve predictions.
The result: your trained model runs at higher throughput and lower latency than the original framework, on the same NVIDIA GPU.
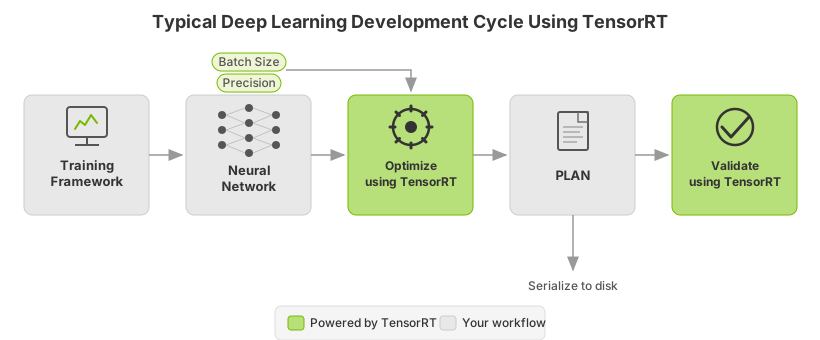
This section covers the basic installation, conversion, and runtime options available in TensorRT and when they are best applied.
What You’ll Build#
By the end of this guide, you will have:
TensorRT installed on your machine, with the
trtexeccommand-line tool available for building and benchmarking engines (Installing TensorRT).A ResNet-50 image classifier converted from ONNX to a TensorRT engine and deployed end to end, so you’ve seen every step of the build → optimize → run loop (Example Deployment Using ONNX).
A semantic-segmentation model running through both the C++ and Python TensorRT runtime APIs, so you know how to embed TensorRT into your own application in either language (Using the TensorRT Runtime API).
After completing these tutorials, you’ll be able to deploy your own trained model and pick the right TensorRT workflow for it.
Here is a quick summary of each chapter:
Installing TensorRT: Provides multiple ways to install TensorRT.
The TensorRT Ecosystem: Describes a flowchart showing the different types of conversion and deployment workflows and discusses their pros and cons.
Example Deployment Using ONNX: Examines the basic steps to convert and deploy your model, introduces concepts used in the rest of the guide, and walks you through the decisions you must make to optimize inference execution.
ONNX Conversion and Deployment: Walks through exporting a PyTorch model to ONNX and directs you to the ONNX deployment workflow for conversion and inference.
Using the TensorRT Runtime API: Provides a tutorial on semantic segmentation of images using the TensorRT C++ and Python API.
To deploy your model quickly using a higher-level application, refer to the NVIDIA Triton Inference Server Quick Start.
Installing TensorRT#
There are several installation methods for TensorRT. This section covers the most common options using:
A container
A Debian file
A standalone
pipwheel file
For other ways to install TensorRT, refer to the Alternative Installation Methods.
For advanced users who are already familiar with TensorRT and want to get their application running quickly, who are using an NVIDIA CUDA container, or who want to set up automation, follow the network repo installation instructions in Using The NVIDIA CUDA Network Repo For Debian Installation.
Container Installation#
This section introduces the customized virtual machine images (VMI) that NVIDIA publishes and maintains regularly. NVIDIA NGC-certified public cloud platform users can access specific setup instructions by browsing the NGC website and identifying an available NGC container and tag to run on their VMI.
On each of the major cloud providers, NVIDIA publishes customized GPU-optimized VMIs with regular updates to OS and drivers. These VMIs are optimized for performance on the latest generations of NVIDIA GPUs. Using these VMIs to deploy NGC-hosted containers, models, and resources on cloud-hosted virtual machine instances with B200, B300, H100, A100, L40S, or T4 GPUs ensures optimum performance for deep learning, machine learning, and HPC workloads.
To deploy a TensorRT container on a public cloud, follow the steps associated with your NGC-certified public cloud platform.
Debian Installation#
Refer to the Debian Installation instructions.
Python Package Index Installation#
Refer to the Python Package Index Installation instructions.
The TensorRT Ecosystem#
TensorRT is a large and flexible project. It can handle a variety of conversion and deployment workflows. The best workflow for you depends on your specific use case and problem setting.
TensorRT provides several deployment options, but all workflows involve converting your model to an optimized representation, which TensorRT refers to as an engine. Building a TensorRT workflow for your model involves picking the right deployment option and the right combination of parameters for engine creation.
Basic TensorRT Workflow#
Follow these steps to convert and deploy your model:
Export the model.
Select a precision.
Convert the model.
Deploy the model.
It is easiest to understand these steps in the context of a complete, end-to-end workflow: In Example Deployment Using ONNX, we will cover a simple framework-agnostic deployment workflow to convert and deploy a trained ResNet-50 model to TensorRT using ONNX conversion and TensorRT’s standalone runtime.
Conversion and Deployment Options#
The TensorRT ecosystem breaks down into two parts:
You can follow various paths to convert your models to optimized TensorRT engines.
The various runtimes users can target with TensorRT when deploying their optimized TensorRT engines.
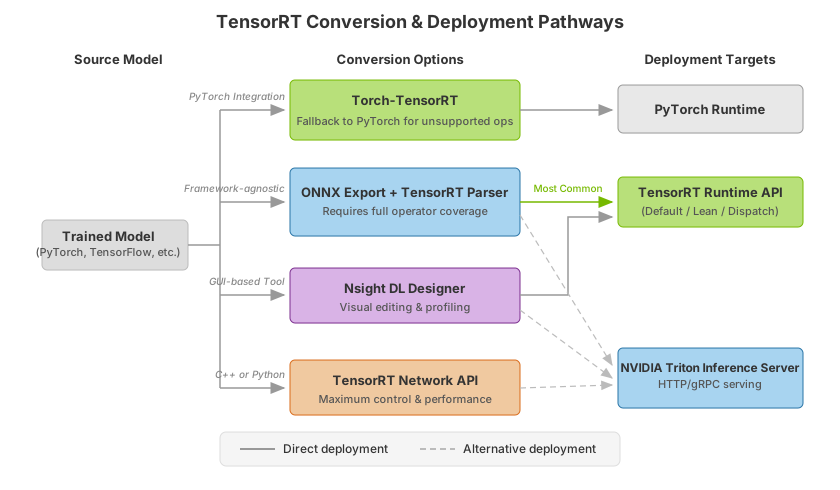
Conversion#
There are four main options for converting a model with TensorRT:
Using Torch-TensorRT
Automatic ONNX conversion from
.onnxfilesUsing the GUI-based tool Nsight Deep Learning Designer
Manually constructing a network using the TensorRT API (either in C++ or Python)
The PyTorch integration (Torch-TensorRT) provides model conversion and a high-level runtime API for converting PyTorch models. It can fall back to PyTorch implementations where TensorRT does not support a particular operator. For more information about supported operators, refer to ONNX Operator Support.
A more performant option for automatic model conversion and deployment is to convert using ONNX. ONNX is a framework-agnostic option that works with models in TensorFlow, PyTorch, and more. TensorRT supports automatic conversion from ONNX files using the TensorRT API or trtexec, which we will use in this section. ONNX conversion requires full operator coverage; that is, all operations in your model must be supported by TensorRT (or you must provide custom plugins for unsupported operations). ONNX conversion results in a singular TensorRT engine that allows less overhead than Torch-TensorRT.
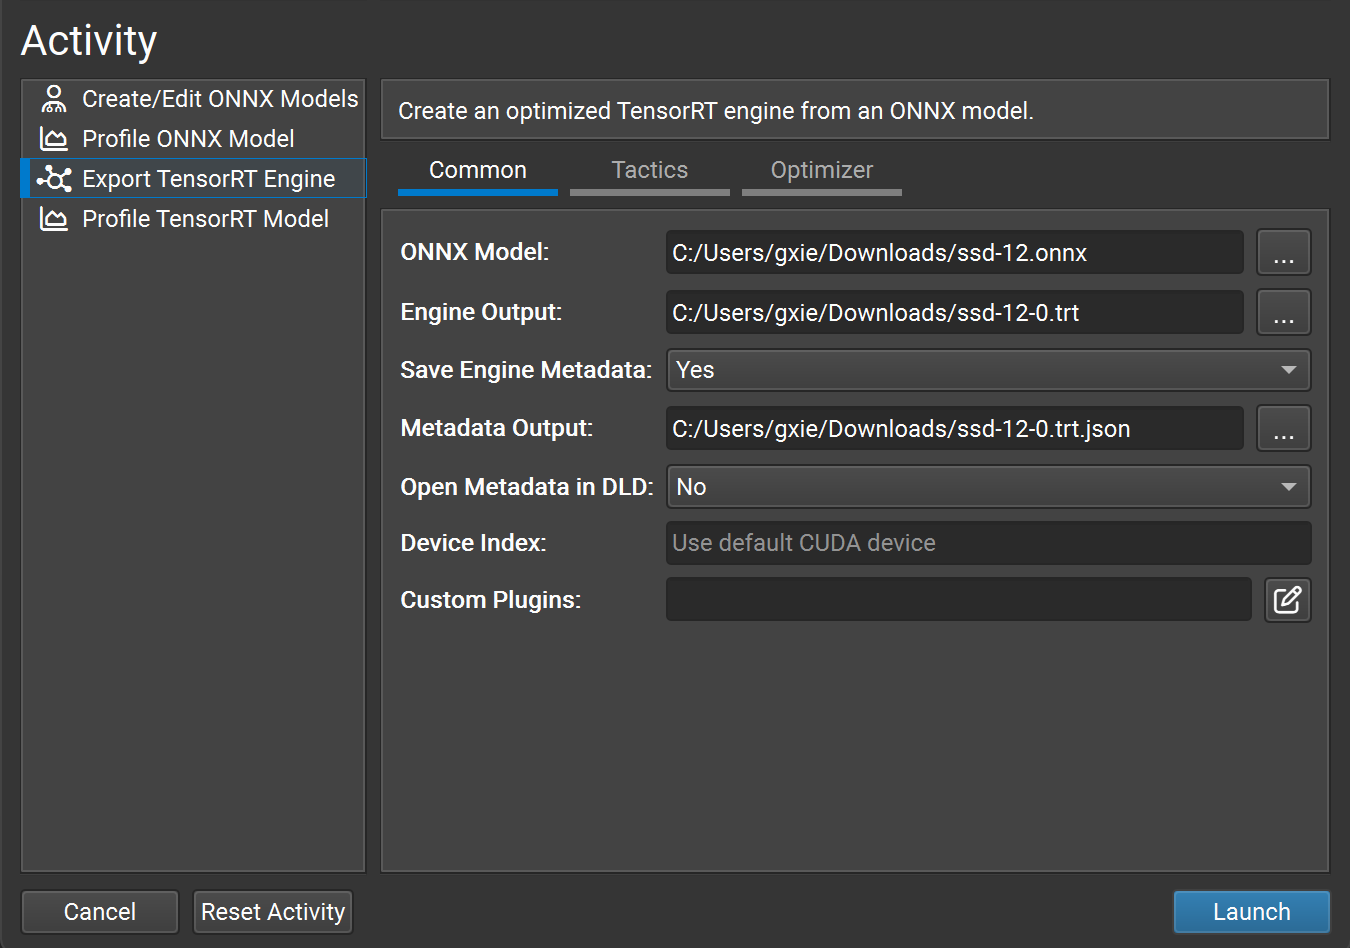
In addition to trtexec, Nsight Deep Learning Designer can convert ONNX files into TensorRT engines. The GUI-based tool provides model visualization and editing, inference performance profiling, and easy conversions to TensorRT engines for ONNX models. Nsight Deep Learning Designer automatically downloads TensorRT bits (including CUDA) on demand without requiring a separate installation of TensorRT.
You can manually construct TensorRT engines using the TensorRT network definition API for the most performance and customizability possible. This involves building an identical network to your target model in TensorRT operation by operation, using only TensorRT operations. After a TensorRT network is created, you will export just the weights of your model from the framework and load them into your TensorRT network. For this approach, more information about constructing the model using TensorRT’s network definition API can be found here:
Deployment#
There are three options for deploying a model with TensorRT:
Deploying within PyTorch
Using the standalone TensorRT runtime API
Using NVIDIA Triton Inference Server
Your choice for deployment will determine the steps required to convert the model.
When using Torch-TensorRT, the most common deployment option is simply to deploy within PyTorch. Torch-TensorRT conversion results in a PyTorch graph with TensorRT operations inserted into it. You can run Torch-TensorRT models like any other PyTorch model using Python.
The TensorRT runtime API allows for the lowest overhead and finest-grained control. However, operators that TensorRT does not natively support must be implemented as plugins (a library of prewritten plugins is available on GitHub: TensorRT plugin). The most common path for deploying with the runtime API is using ONNX export from a framework, which we cover in the following section.
Last, NVIDIA Triton Inference Server is open-source inference-serving software that enables teams to deploy trained AI models from any framework (TensorFlow, TensorRT, PyTorch, ONNX Runtime, or a custom framework), from local storage or Google Cloud Platform or AWS S3 on any GPU- or CPU-based infrastructure (cloud, data center, or edge). It is a flexible project with several unique features, such as concurrent model execution of heterogeneous models and multiple copies of the same model (multiple model copies can reduce latency further), load balancing, and model analysis. It is a good option if you must serve your models over HTTP - such as in a cloud inferencing solution. You can find the NVIDIA Triton Inference Server home page and the documentation.
Selecting the Correct Workflow#
Two of the most important factors in selecting how to convert and deploy your model are:
Your choice of framework
Your preferred TensorRT runtime to target
For more information on the runtime options available, refer to the Jupyter notebook included with this guide on Understanding TensorRT Runtimes.
Example Deployment Using ONNX#
ONNX is a framework-agnostic model format that can be exported from most major frameworks, including TensorFlow and PyTorch. TensorRT provides a library for directly converting ONNX into a TensorRT engine through the ONNX-TRT parser.
This section will go through the steps to convert a pre-trained ResNet-50 model from the ONNX model zoo into a TensorRT engine. Visually, this is the process we will follow:
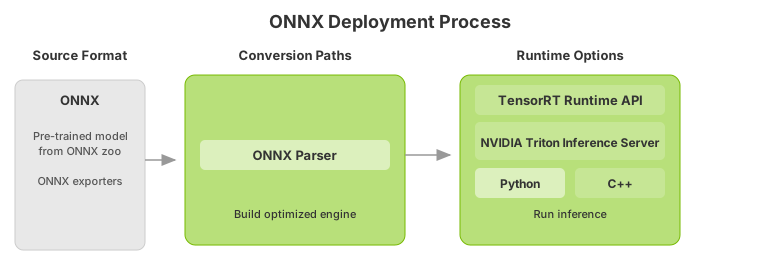
After you understand the basic steps of the TensorRT workflow, you can dive into the more in-depth Jupyter notebooks (refer to the following topics) for using TensorRT using Torch-TensorRT or ONNX. Using the PyTorch framework, you can follow along in the introductory Jupyter Notebook Running this Guide, which covers these workflow steps in more detail.
Export the Model#
The main automatic path for TensorRT conversion requires different model formats to convert a model successfully: The ONNX path requires that models be saved in ONNX.
This example uses ONNX, so it requires an ONNX model. The example uses ResNet-50, a basic backbone vision model that can be used for various purposes, to perform classification using a pre-trained ResNet-50 ONNX model from the ONNX model zoo on Hugging Face.
Download the pre-trained ResNet-50 model and place it in the expected path.
mkdir -p resnet50
wget -O resnet50/model.onnx https://huggingface.co/onnxmodelzoo/resnet50-v1-12/resolve/main/resnet50-v1-12.onnx
This downloads a pre-trained ResNet-50 .onnx file to the path resnet50/model.onnx.
In Exporting To ONNX From PyTorch, you can learn how to export ONNX models that work with this same deployment workflow.
Select a Precision#
Inference typically requires less numeric precision than training. With some care, lower precision can give you faster computation and lower memory consumption without sacrificing any meaningful accuracy. TensorRT supports FP32, FP16, FP8, BF16, and INT8 precisions, along with limited support for INT4 weights.
FP32 is most frameworks’ default training precision, so we will start by using it for inference here.
import numpy as np
PRECISION = np.float32
We set the precision that our TensorRT engine should use at runtime, which we will do in the next section.
Convert the Model#
The ONNX conversion path is one of the most universal and performant paths for automatic TensorRT conversion. It works for TensorFlow, PyTorch, and many other frameworks.
Several tools help you convert models from ONNX to a TensorRT engine. One common approach is to use trtexec, a command-line tool included with TensorRT that can, among other things, convert ONNX models to TensorRT engines and profile them.
We can run this conversion as follows:
trtexec --onnx=resnet50/model.onnx --saveEngine=resnet_engine_intro.engine --stronglyTyped
This will convert our resnet50/model.onnx to a TensorRT engine named resnet_engine_intro.engine using strong typing.
Note
To tell
trtexecwhere to find our ONNX model, use the following option:--onnx=resnet50/model.onnx
To tell
trtexecwhere to save our optimized TensorRT engine, use the following option:--saveEngine=resnet_engine_intro.engine
For developers who prefer the ease of a GUI-based tool, Nsight Deep Learning Designer enables you to easily convert an ONNX model into a TensorRT engine file. Most of the command-line parameters for trtexec are also available on the GUI of Nsight Deep Learning Designer.
Deploy the Model#
After successfully creating our TensorRT engine, we must decide how to run it with TensorRT.
There are two types of TensorRT runtimes: a standalone runtime with C++ and Python bindings and a native integration into PyTorch. This section will use a simplified wrapper (ONNXClassifierWrapper) that calls the standalone runtime. We will generate a batch of randomized “dummy” data and use our ONNXClassifierWrapper to run inference on that batch. For more information on TensorRT runtimes, refer to the Understanding TensorRT Runtimes Jupyter Notebook.
Set up the
ONNXClassifierWrapper(using the precision we determined in Select a Precision).from onnx_helper import ONNXClassifierWrapper trt_model = ONNXClassifierWrapper("resnet_engine_intro.engine", target_dtype = PRECISION)
Generate a dummy batch.
input_shape = (1, 3, 224, 224)
dummy_input_batch = np.zeros(input_shape , dtype = PRECISION)
Feed a batch of data into our engine and get our predictions.
predictions = trt_model.predict(dummy_input_batch)
Note that the wrapper loads and initializes the engine when running the first batch, so this batch generally has higher latency. For more information about batching, refer to the Batching section.
For more information about TensorRT APIs, refer to the NVIDIA TensorRT API Documentation. For more information on the ONNXClassifierWrapper, refer to its implementation on GitHub: onnx_helper.py.
ONNX Conversion and Deployment#
The ONNX interchange format provides a way to export models from many frameworks, including PyTorch, TensorFlow, and TensorFlow 2, for use with the TensorRT runtime. Importing models using ONNX requires the operators in your model to be supported by ONNX and for you to supply plugin implementations of any operators TensorRT does not support. (A library of plugins for TensorRT can be found on GitHub: plugin).
Exporting to ONNX from PyTorch#
ONNX models can be generated from PyTorch models using PyTorch torch.onnx.export. This subsection walks through the export steps. Once you have an ONNX file, follow the steps in Example Deployment Using ONNX to convert and deploy it with TensorRT.
For additional detail, refer to the Using PyTorch with TensorRT through ONNX notebook.
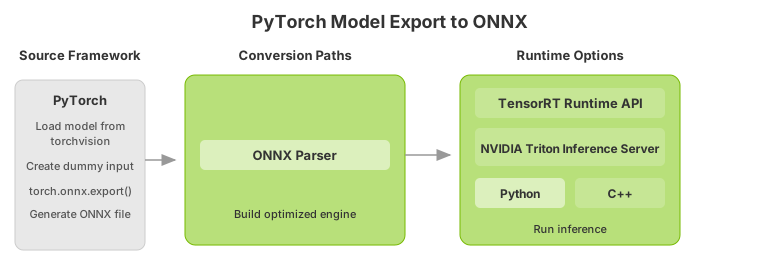
Import a ResNet-50 model from
torchvision. This will load a copy of ResNet-50 with pre-trained weights.import torchvision.models as models resnet50 = models.resnet50(weights=models.ResNet50_Weights.DEFAULT).eval()
Save the ONNX file from PyTorch.
Note
We need a batch of data to save our ONNX file from PyTorch. We will use a dummy batch.
import torch

BATCH_SIZE = 32
dummy_input=torch.randn(BATCH_SIZE, 3, 224, 224)
Save the ONNX file.
import torch.onnx
torch.onnx.export(resnet50, dummy_input, "resnet50_pytorch.onnx", verbose=False)
Converting and Deploying the ONNX Model#
After exporting the ONNX file, you can convert it to a TensorRT engine and deploy it using the same workflow described in Example Deployment Using ONNX. That section covers precision selection, engine conversion with trtexec, and deployment using the TensorRT runtime.
For a deeper look at the TensorRT C++ and Python runtime APIs, refer to Using the TensorRT Runtime API.
Using the TensorRT Runtime API#
One of the most performant and customizable options for model conversion and deployment is the TensorRT API, which has C++ and Python bindings.
TensorRT includes a standalone runtime with C++ and Python bindings. It is generally more performant and customizable than Torch-TRT integration and runs in PyTorch. The C++ API has lower overhead, but the Python API works well with Python data loaders and libraries like NumPy and SciPy and is easier to use for prototyping, debugging, and testing.
The following tutorial illustrates the semantic segmentation of images using the TensorRT C++ and Python API. For this task, a fully convolutional model with a ResNet-101 backbone is used. The model accepts images of arbitrary sizes and produces per-pixel predictions.
The tutorial consists of the following steps:
Set-up: Launch the test container and generate the TensorRT engine from a PyTorch model exported to ONNX and converted using
trtexec.C++ runtime API: Run inference using engine and TensorRT’s C++ API.
Python runtime API: Run inference using the engine and TensorRT’s Python API.
Setting Up the Test Container and Building the TensorRT Engine#
Download the source code for this quick start tutorial from the TensorRT Open Source Software repository.
git clone https://github.com/NVIDIA/TensorRT.git
cd TensorRT/quickstart
Convert a pre-trained FCN-ResNet-101 model to ONNX.
Here, we use the export script included with the tutorial to generate an ONNX model and save it to
fcn-resnet101.onnx. For details on ONNX conversion, refer to ONNX Conversion and Deployment. The script also generates a test image of size 1282x1026 and saves it toinput.ppm.
Launch the NVIDIA PyTorch container to run the export script.
docker run --rm -it --gpus all -p 8888:8888 -v `pwd`:/workspace -w /workspace/SemanticSegmentation nvcr.io/nvidia/pytorch:26.02-py3 bash
Run the export script to convert the pre-trained model to ONNX.
python3 export.py
Note
FCN-ResNet-101 has one input of dimension
[batch, 3, height, width]and one output of dimension[batch, 21, height, weight]containing unnormalized probabilities corresponding to predictions for 21 class labels. When exporting the model to ONNX, we append an argmax layer at the output to produce per-pixel class labels of the highest probability.Build a TensorRT engine from ONNX using the trtexec tool.
trtexeccan generate a TensorRT engine from an ONNX model that can then be deployed using the TensorRT runtime API. It leverages the TensorRT ONNX parser to load the ONNX model into a TensorRT network graph and the TensorRT Builder API to generate an optimized engine.Building an engine can be time-consuming and is usually performed offline.
trtexec --onnx=fcn-resnet101.onnx --saveEngine=fcn-resnet101.engine --optShapes=input:1x3x1026x1282
Successful execution should generate an engine file and something similar to
Successfulin the command output.trtexeccan build TensorRT engines using the configuration options described in the Commonly Used Command-line Flags.

Running an Engine in C++#
Compile and run the C++ segmentation tutorial within the test container.
cd quickstart
make
./bin/segmentation_tutorial
The following steps show how to use the Deserializing A Plan for inference.
Warning
Engine files are executable artifacts that contain compiled CUDA tactics. Deserialize only engines you built yourself or received over a trusted channel — never deserialize an engine file from an untrusted source.
Deserialize the TensorRT engine from a file. The file contents are read into a buffer and deserialized in memory.
std::vector<char> engineData(fsize);
engineFile.read(engineData.data(), fsize);

std::unique_ptr<nvinfer1::IRuntime> mRuntime{nvinfer1::createInferRuntime(sample::gLogger.getTRTLogger())};

std::unique_ptr<nvinfer1::ICudaEngine> mEngine(runtime->deserializeCudaEngine(engineData.data(), fsize));
A TensorRT execution context encapsulates execution state such as persistent device memory for holding intermediate activation tensors during inference.
Since the segmentation model was built with dynamic shapes enabled, the shape of the input must be specified for inference execution. The network output shape can be queried to determine the corresponding dimensions of the output buffer.
char const* input_name = "input";
assert(mEngine->getTensorDataType(input_name) == nvinfer1::DataType::kFLOAT);
auto input_dims = nvinfer1::Dims4{1, /* channels */ 3, height, width};
context->setInputShape(input_name, input_dims);
auto input_size = util::getMemorySize(input_dims, sizeof(float));
char const* output_name = "output";
assert(mEngine->getTensorDataType(output_name) == nvinfer1::DataType::kINT64);
auto output_dims = context->getTensorShape(output_name);
auto output_size = util::getMemorySize(output_dims, sizeof(int64_t));
In preparation for inference, CUDA device memory is allocated for all inputs and outputs, image data is processed and copied into input memory, and a list of engine bindings is generated.
For semantic segmentation, input image data is processed by fitting into a range of
[0, 1]and normalized using mean[0.485, 0.456, 0.406]and std deviation[0.229, 0.224, 0.225]. Refer to the input-preprocessing requirements for thetorchvisionmodels GitHub: models. This operation is abstracted by the utility classRGBImageReader.void* input_mem{nullptr}; cudaMalloc(&input_mem, input_size); void* output_mem{nullptr}; cudaMalloc(&output_mem, output_size); const std::vector<float> mean{0.485f, 0.456f, 0.406f}; const std::vector<float> stddev{0.229f, 0.224f, 0.225f}; auto input_image{util::RGBImageReader(input_filename, input_dims, mean, stddev)}; input_image.read(); cudaStream_t stream; auto input_buffer = input_image.process(); cudaMemcpyAsync(input_mem, input_buffer.get(), input_size, cudaMemcpyHostToDevice, stream);
Inference execution is kicked off using the context’s
enqueueV3method. After the execution, we copy the results to a host buffer and release all device memory allocations.context->setTensorAddress(input_name, input_mem); context->setTensorAddress(output_name, output_mem); bool status = context->enqueueV3(stream); auto output_buffer = std::unique_ptr<int64_t>{new int64_t[output_size]}; cudaMemcpyAsync(output_buffer.get(), output_mem, output_size, cudaMemcpyDeviceToHost, stream); cudaStreamSynchronize(stream); cudaFree(input_mem); cudaFree(output_mem);
A pseudo-color plot of per-pixel class predictions is written to
output.ppmto visualize the results. The utility classArgmaxImageWriterabstracts this.const int num_classes{21}; const std::vector<int> palette{ (0x1 << 25) - 1, (0x1 << 15) - 1, (0x1 << 21) - 1}; auto output_image{util::ArgmaxImageWriter(output_filename, output_dims, palette, num_classes)}; int64_t* output_ptr = output_buffer.get(); std::vector<int32_t> output_buffer_casted(output_size); for (size_t i = 0; i < output_size; ++i) { output_buffer_casted[i] = static_cast<int32_t>(output_ptr[i]); } output_image.process(output_buffer_casted.get()); output_image.write();
For the test image, the expected output is as follows:

Putting steps 1–5 together, here is the complete tutorial-runtime.cpp program. It compiles against the util.h and logger.h helpers that ship in the same quickstart/SemanticSegmentation directory you cloned earlier, and runs end to end against the engine you built with trtexec.
#include <cassert>
#include <fstream>
#include <iostream>
#include <memory>
#include <string>
#include <vector>

#include <cuda_runtime.h>

#include "NvInfer.h"
#include "logger.h"
#include "util.h"

using namespace nvinfer1;

int main(int argc, char** argv)
{
    if (argc != 5)
    {
        std::cerr << "Usage: " << argv[0]
                  << " <engine_file> <input.ppm> <output.ppm> <height>x<width>\n";
        return 1;
    }
    std::string const engine_filename{argv[1]};
    std::string const input_filename{argv[2]};
    std::string const output_filename{argv[3]};
    std::string const shape{argv[4]};
    auto const x_pos = shape.find('x');
    int const height = std::stoi(shape.substr(0, x_pos));
    int const width = std::stoi(shape.substr(x_pos + 1));

    // Deserialize the engine from disk.
    std::ifstream engineFile(engine_filename, std::ios::binary | std::ios::ate);
    auto const fsize = engineFile.tellg();
    engineFile.seekg(0, std::ios::beg);
    std::vector<char> engineData(fsize);
    engineFile.read(engineData.data(), fsize);

    std::unique_ptr<IRuntime> runtime{
        createInferRuntime(sample::gLogger.getTRTLogger())};
    std::unique_ptr<ICudaEngine> engine{
        runtime->deserializeCudaEngine(engineData.data(), fsize)};
    std::unique_ptr<IExecutionContext> context{engine->createExecutionContext()};

    // Set the input shape and query the resulting output shape.
    char const* const input_name = "input";
    assert(engine->getTensorDataType(input_name) == DataType::kFLOAT);
    auto const input_dims = Dims4{1, 3, height, width};
    context->setInputShape(input_name, input_dims);
    auto const input_size = util::getMemorySize(input_dims, sizeof(float));
    char const* const output_name = "output";
    assert(engine->getTensorDataType(output_name) == DataType::kINT64);
    auto const output_dims = context->getTensorShape(output_name);
    auto const output_size = util::getMemorySize(output_dims, sizeof(int64_t));

    // Allocate device memory and load the preprocessed input image.
    void* input_mem{nullptr};
    cudaMalloc(&input_mem, input_size);
    void* output_mem{nullptr};
    cudaMalloc(&output_mem, output_size);
    std::vector<float> const mean{0.485f, 0.456f, 0.406f};
    std::vector<float> const stddev{0.229f, 0.224f, 0.225f};
    util::RGBImageReader input_image{input_filename, input_dims, mean, stddev};
    input_image.read();
    cudaStream_t stream;
    cudaStreamCreate(&stream);
    auto input_buffer = input_image.process();
    cudaMemcpyAsync(input_mem, input_buffer.get(), input_size,
                    cudaMemcpyHostToDevice, stream);

    // Run inference and copy the result back to the host.
    context->setTensorAddress(input_name, input_mem);
    context->setTensorAddress(output_name, output_mem);
    if (!context->enqueueV3(stream))
    {
        std::cerr << "enqueueV3 failed\n";
        return 1;
    }
    std::unique_ptr<int64_t[]> output_buffer{new int64_t[output_size]};
    cudaMemcpyAsync(output_buffer.get(), output_mem, output_size,
                    cudaMemcpyDeviceToHost, stream);
    cudaStreamSynchronize(stream);
    cudaFree(input_mem);
    cudaFree(output_mem);

    // Convert per-pixel argmax labels to a color-coded PPM.
    int const num_classes{21};
    std::vector<int> const palette{
        (0x1 << 25) - 1, (0x1 << 15) - 1, (0x1 << 21) - 1};
    util::ArgmaxImageWriter output_image{
        output_filename, output_dims, palette, num_classes};
    std::vector<int32_t> output_buffer_casted(output_size);
    for (size_t i = 0; i < output_size; ++i)
    {
        output_buffer_casted[i] = static_cast<int32_t>(output_buffer[i]);
    }
    output_image.process(output_buffer_casted.data());
    output_image.write();

    cudaStreamDestroy(stream);
    return 0;
}
Build with the supplied Makefile and run end to end:
cd quickstart/SemanticSegmentation
make
./bin/tutorial_runtime fcn-resnet101.engine input.ppm output.ppm 1026x1282
Running an Engine in Python#
The TensorRT Python runtime APIs map directly to the C++ API used in Running an Engine in C++. Here is the same end-to-end deserialize → set shapes → run inference → write output flow as a single copy-paste-ready Python script.
Install the required Python packages inside the test container.
pip install cuda-python numpy pillow
Save the following script as
tutorial-runtime.pynext to yourfcn-resnet101.engineandinput.ppmfiles.import sys import numpy as np from PIL import Image import tensorrt as trt from cuda.bindings import runtime as cudart def check(err): # cuda-python returns (cudaError_t, *values); raise on any non-success status. if err != cudart.cudaError_t.cudaSuccess: raise RuntimeError(f"CUDA error: {err}") def load_engine(runtime, engine_path): with open(engine_path, "rb") as f: return runtime.deserialize_cuda_engine(f.read()) def preprocess(image_path, height, width): mean = np.array([0.485, 0.456, 0.406], dtype=np.float32) stddev = np.array([0.229, 0.224, 0.225], dtype=np.float32) img = Image.open(image_path).convert("RGB").resize((width, height)) arr = np.asarray(img, dtype=np.float32) / 255.0 arr = (arr - mean) / stddev # HWC -> CHW -> NCHW with a leading batch of 1 return np.ascontiguousarray(arr.transpose(2, 0, 1)[None]) def write_ppm_argmax(labels, output_path, num_classes=21): palette = np.array( [(0x1 << 25) - 1, (0x1 << 15) - 1, (0x1 << 21) - 1], dtype=np.int64 ) colors = ((labels[..., None] * palette) % 255).astype(np.uint8) Image.fromarray(colors).save(output_path) def main(engine_path, input_path, output_path, height, width): logger = trt.Logger(trt.Logger.WARNING) runtime = trt.Runtime(logger) engine = load_engine(runtime, engine_path) context = engine.create_execution_context() input_name, output_name = "input", "output" context.set_input_shape(input_name, (1, 3, height, width)) host_input = preprocess(input_path, height, width) output_shape = tuple(context.get_tensor_shape(output_name)) host_output = np.empty(output_shape, dtype=np.int64) err, d_input = cudart.cudaMalloc(host_input.nbytes); check(err) err, d_output = cudart.cudaMalloc(host_output.nbytes); check(err) err, stream = cudart.cudaStreamCreate(); check(err) check(cudart.cudaMemcpyAsync( d_input, host_input.ctypes.data, host_input.nbytes, cudart.cudaMemcpyKind.cudaMemcpyHostToDevice, stream, )) context.set_tensor_address(input_name, int(d_input)) context.set_tensor_address(output_name, int(d_output)) context.execute_async_v3(stream) check(cudart.cudaMemcpyAsync( host_output.ctypes.data, d_output, host_output.nbytes, cudart.cudaMemcpyKind.cudaMemcpyDeviceToHost, stream, )) check(cudart.cudaStreamSynchronize(stream)) write_ppm_argmax(host_output[0], output_path) cudart.cudaFree(d_input) cudart.cudaFree(d_output) cudart.cudaStreamDestroy(stream) if __name__ == "__main__": shape = sys.argv[4].split("x") main( engine_path=sys.argv[1], input_path=sys.argv[2], output_path=sys.argv[3], height=int(shape[0]), width=int(shape[1]), )
Run the script end to end against the engine you built with
trtexecand the preprocessed input image.python3 tutorial-runtime.py fcn-resnet101.engine input.ppm output.png 1026x1282
For an interactive walkthrough of the same flow, the tutorial-runtime.ipynb notebook in the OSS repo covers every step in cells you can edit and re-run. Launch it with:
jupyter notebook --port=8888 --no-browser --ip=0.0.0.0 --allow-root
What’s Next#
Now that you have completed the Quick Start Guide, explore these resources to deepen your TensorRT knowledge:
See also
- How TensorRT Works
Understand the builder, runtime, and optimization pipeline in detail.
- Best Practices
Benchmarking, profiling, and optimization techniques for production inference.
- Working with Dynamic Shapes
Configure optimization profiles for variable-size inputs.
- TensorRT Sample Support Guide
Browse additional C++ and Python samples with step-by-step instructions.
- C++ API Tutorial
Full C++ API walkthrough for building and running engines.
- Python API Tutorial
Full Python API walkthrough for building and running engines.