3. Cluster User Guide#
This guide is intended to provide cluster users with information they need to run jobs and develop workflows on NVIDIA DGX™ Cloud.
Information for cluster owners and admin can be found in the NVIDIA DGX Cloud Slurm Cluster Admin Guide
The NVIDIA DGX Cloud Slurm Onboarding Quick Start Guide gives cluster owners, cluster admins and cluster users information they need to get started with the DGX Cloud Cluster.
3.1. NVIDIA DGX Cloud Overview#
NVIDIA DGX Cloud is an AI platform for enterprise developers, optimized for the demands of generative AI.

DGX Cloud delivers an integrated, full-stack solution co-engineered with leading cloud partners, integrating their best of breed architectures with the newest NVIDIA AI technologies across accelerated computing, networking fabric, and software, and providing direct access to NVIDIA AI experts.
DGX Cloud includes NVIDIA AI Enterprise, offering accelerated data science libraries, optimized frameworks and pre-trained models enabling developers to quickly and easily deliver production-ready AI.
3.2. Overview of Your Cluster#
The DGX Cloud cluster includes the following components provisioned and configured for use:
Head (management) node(s)
Login nodes
CPU worker nodes
GPU worker nodes
Shared NFS storage
Shared high-performance Lustre storage

The exact configuration and capacity of each of the components available is customized for specific requirements as specified during the onboarding process.
The Slurm workload management tool is provided as the primary interface of the cluster for users familiar with HPC schedulers who want direct access to underlying systems.
The Slurm implementation is deployed and configured by NVIDIA Base Command Manager, and leverages Pyxis and Enroot as the container plugin and runtime.
The cluster configuration via Base Command Manager (BCM) and the Slurm configuration can be further modified and customized by the customer for specific use cases.
For more information on BCM, refer to the BCM documentation.
For more information on Slurm, refer to the Slurm Quick Start Guide.
3.3. Accessing Your DGX Cloud Cluster#
Note
The following sections assume that your cluster admin has worked with you to create a cluster user. If you do not have an admin user and SSH key pair for logging in to the cluster yet, please contact your cluster admin to get onboarded.
3.3.1. DGX Cloud Access Methods#
As a user, two connection options are available for accessing a DGX Cloud environment. The cluster only exposes port 22 access, so all port access beyond port 22 is accomplished via SSH port forwarding.
Login Nodes: Two login nodes are accessible via public internet from network addresses defined by your cluster administrator, using a public SSH key that has been registered with the user account provisioned for you in the DGX Cloud deployment.
User Portal: A web interface called User Portal is accessible via a SSH tunnel to port 8081 to either login node. Instructions to access the User Portal can be found in the User Portal section of this guide.
Note
The addresses to access the login nodes should be provided to you by your cluster admin.
3.3.2. Accessing Login Nodes#
Note
Non-root users are not permitted to SSH to the head node - they will only be able to SSH to the cluster’s Slurm login nodes.
To access a Slurm login node, you need to have a user account created along with a matching public SSH key pair on your system tied to that user. Your cluster admin or owner will need to have created this user account for you and attached your SSH key pair.
Instructions for creating an SSH key pair can be found in the Creating an SSH Key Pair to Send to Your Admin For User Creation section below. For more information, see the NVIDIA DGX Cloud Cluster Admin Guide.
3.3.2.1. Logging In with an SSH Key#
Cluster users will have SSH access to the login nodes. Cluster users can also access the User Portal from the login nodes.
To access a login node, follow these steps:
Obtain the login node addresses from your cluster admin.
Login with the user account(s) created by the cluster admin:
ssh -i /path/to/ssh_cert <cluster-user>@ip-addr-of-login-node
3.3.2.2. Updating Passwords#
You will access the login nodes using your SSH key. However, to access the web interfaces for the User Portal you will use a password.
You should have been given a default account password by your cluster admin. To change your password after you have logged in with an SSH key, use the passwd command:
passwd
Make note of your new password. If you do not remember your password, please consult with the cluster admin to reset it.
3.3.2.3. Creating an SSH Key Pair to Send to Your Admin For User Creation#
For a cluster admin or owner to create your user account, you will need to create an SSH key pair and send the public key to the admin. Follow the steps below to do so.
Open a Linux terminal, then run the following command, making sure to change the
<cluster-user>andyour_email@example.comto your specific information:ssh-keygen -t ed25519 -b 4096 -f ~/.ssh/<cluster-user>-ed25519-dgxc -C "your_email@example.com"
Run the following command to output the content of the public key. Copy the output from running this command, and send it to your cluster admin or owner:
cat ~/.ssh/<cluster-user>-ed25519-dgxc.pub
3.4. Overview of Working in Your DGX Cloud Cluster#
3.4.1. Home Directories#
Your home directory is your default file path upon logging into a DGX Cloud Slurm cluster. This is of the form /home/demo-user.
In a DGX Cloud Slurm cluster, all user home directories reside on a network filesystem (NFS). This makes it possible for all nodes in the cluster to access the same data concurrently when you run a job.
The network filesystem means you can:
Write a script once and run it on multiple nodes simultaneously.
Clone from a repository once and make the repository available on the entire cluster
Use a shared directory to log a job’s output from multiple producers
Run your code on whatever systems are available - data availability is not dependent on any one system.
All User data is isolated via filesystem permissions, which means that user-a can only read and write data to /home/user-a, and not to /home/user-b. However, users can impact each other if the home filesystem is overtaxed.
3.4.1.1. Best Practices with Home Directories#
When working with Home Directories, there are some best practices to keep in mind:
Home directory storage is a great fit for small amounts of data, particularly code, scripts, and configuration files.
Home directory storage can also be an acceptable fit for log files, but alternative storage should be considered for log files that will grow to be large and/or are frequently written to.
Home directory storage has a quota configured for your home directory - the default per-user quota is 10 GB if your administrator has not specified a different quota in collaboration with your NVIDIA TAM.
For datasets and more intensive storage IO use cases, a parallel filesystem is provided. Key information is discussed in the following section.
3.4.1.2. Home Directory Quota Management#
You may exhaust your quota - when that happens, a message like the following will appear in a log file or your terminal:
disk quota exceeded
To write any additional data to your home directory, you must remove data or move data to Lustre (which is discussed in further detail in the following section).
To investigate your home directory utilization, the du command combined with the sort command can be used to identify large files in your home directory by sorting from smallest to largest.
1$ du -sh /home/demo-user/* | sort -h
24.0K        /home/demo-user/a-script.sh
34.0K        /home/demo-user/an-sbatch-file
48.0K        /home/demo-user/log.out
5226M        /home/demo-user/an-executable
67G          /home/demo-user/a-big-file
In the case shown above, a-big-file could cause quota problems with the default quota of 10 GB.
To remove the file if it is no longer needed, use the rm command.
rm a-big-file
To move it instead, use the mv command. The second argument is the target path, in this case, the demo-user Lustre scratch directory.
mv a-big-file /lustre/fs0/scratch/demo-user/
3.4.3. User Portal#
The DGX Cloud User Portal is a GUI which shows you a dashboard of your workloads in the cluster. In the portal you can view infromation about job queues, job history and cluster node status.
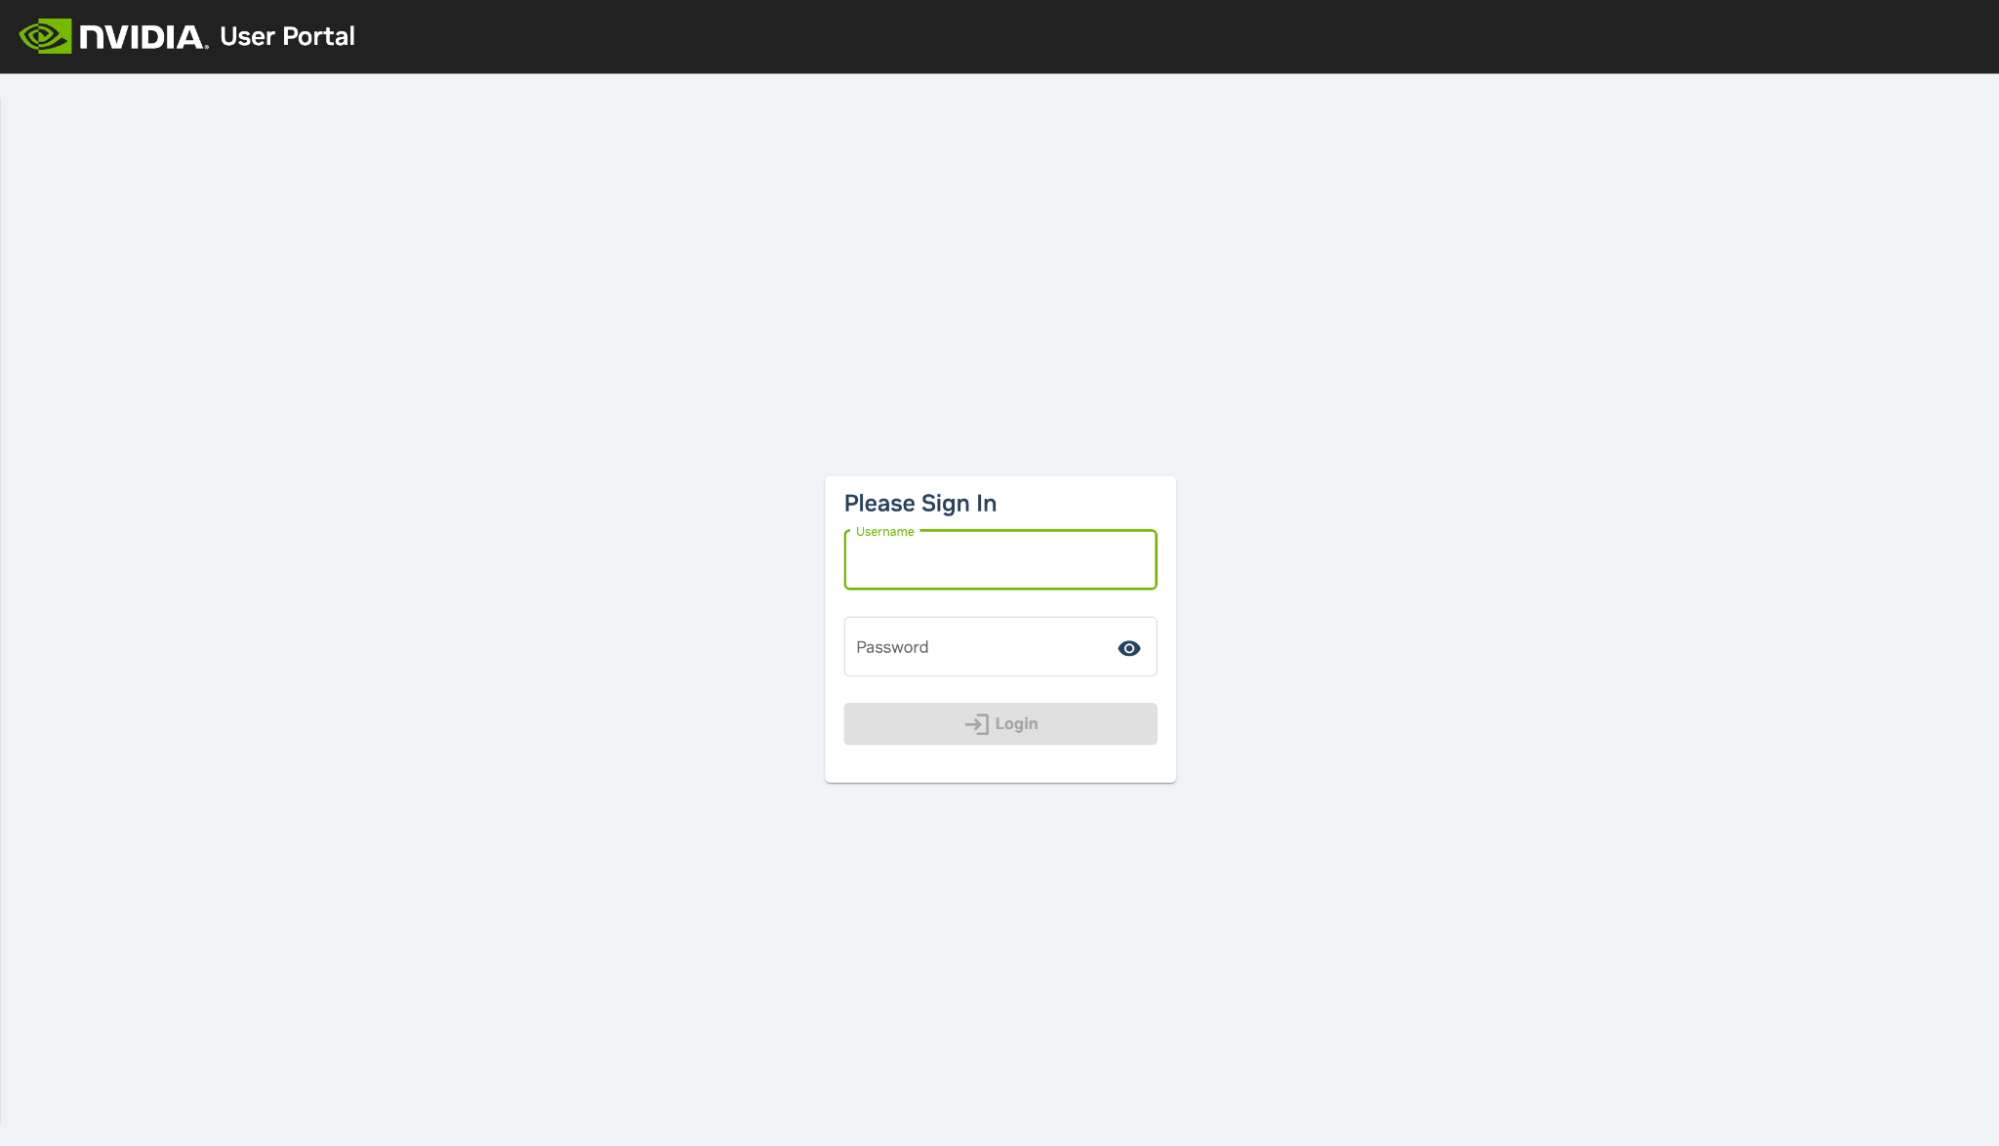
3.4.3.1. Logging In to the User Portal#
You can log into the User Portal using these steps.
Use this command to create an SSH tunnel back to your local desktop host:
ssh <cluster-user>@ip-addr-of-login-node -L 8081:master:8081
Navigate to
https://localhost:8081/userportal/from your web browser.In the browser, add your cluster username and password to sign into the User Portal.
Note
This is the same user that you used to connect via SSH from the Accessing Login Nodes section.
Note
The first time a browser is used to log in to the cluster portal, a warning about the site certificate being untrusted appears in a default cluster configuration. This can safely be accepted.
3.4.3.2. Navigating the User Portal#
Once you have logged in to the User Portal, you will see an Overview page and a left-hand sidebar.
The sidebar can be used to move between views of your workloads and information about cluster nodes.
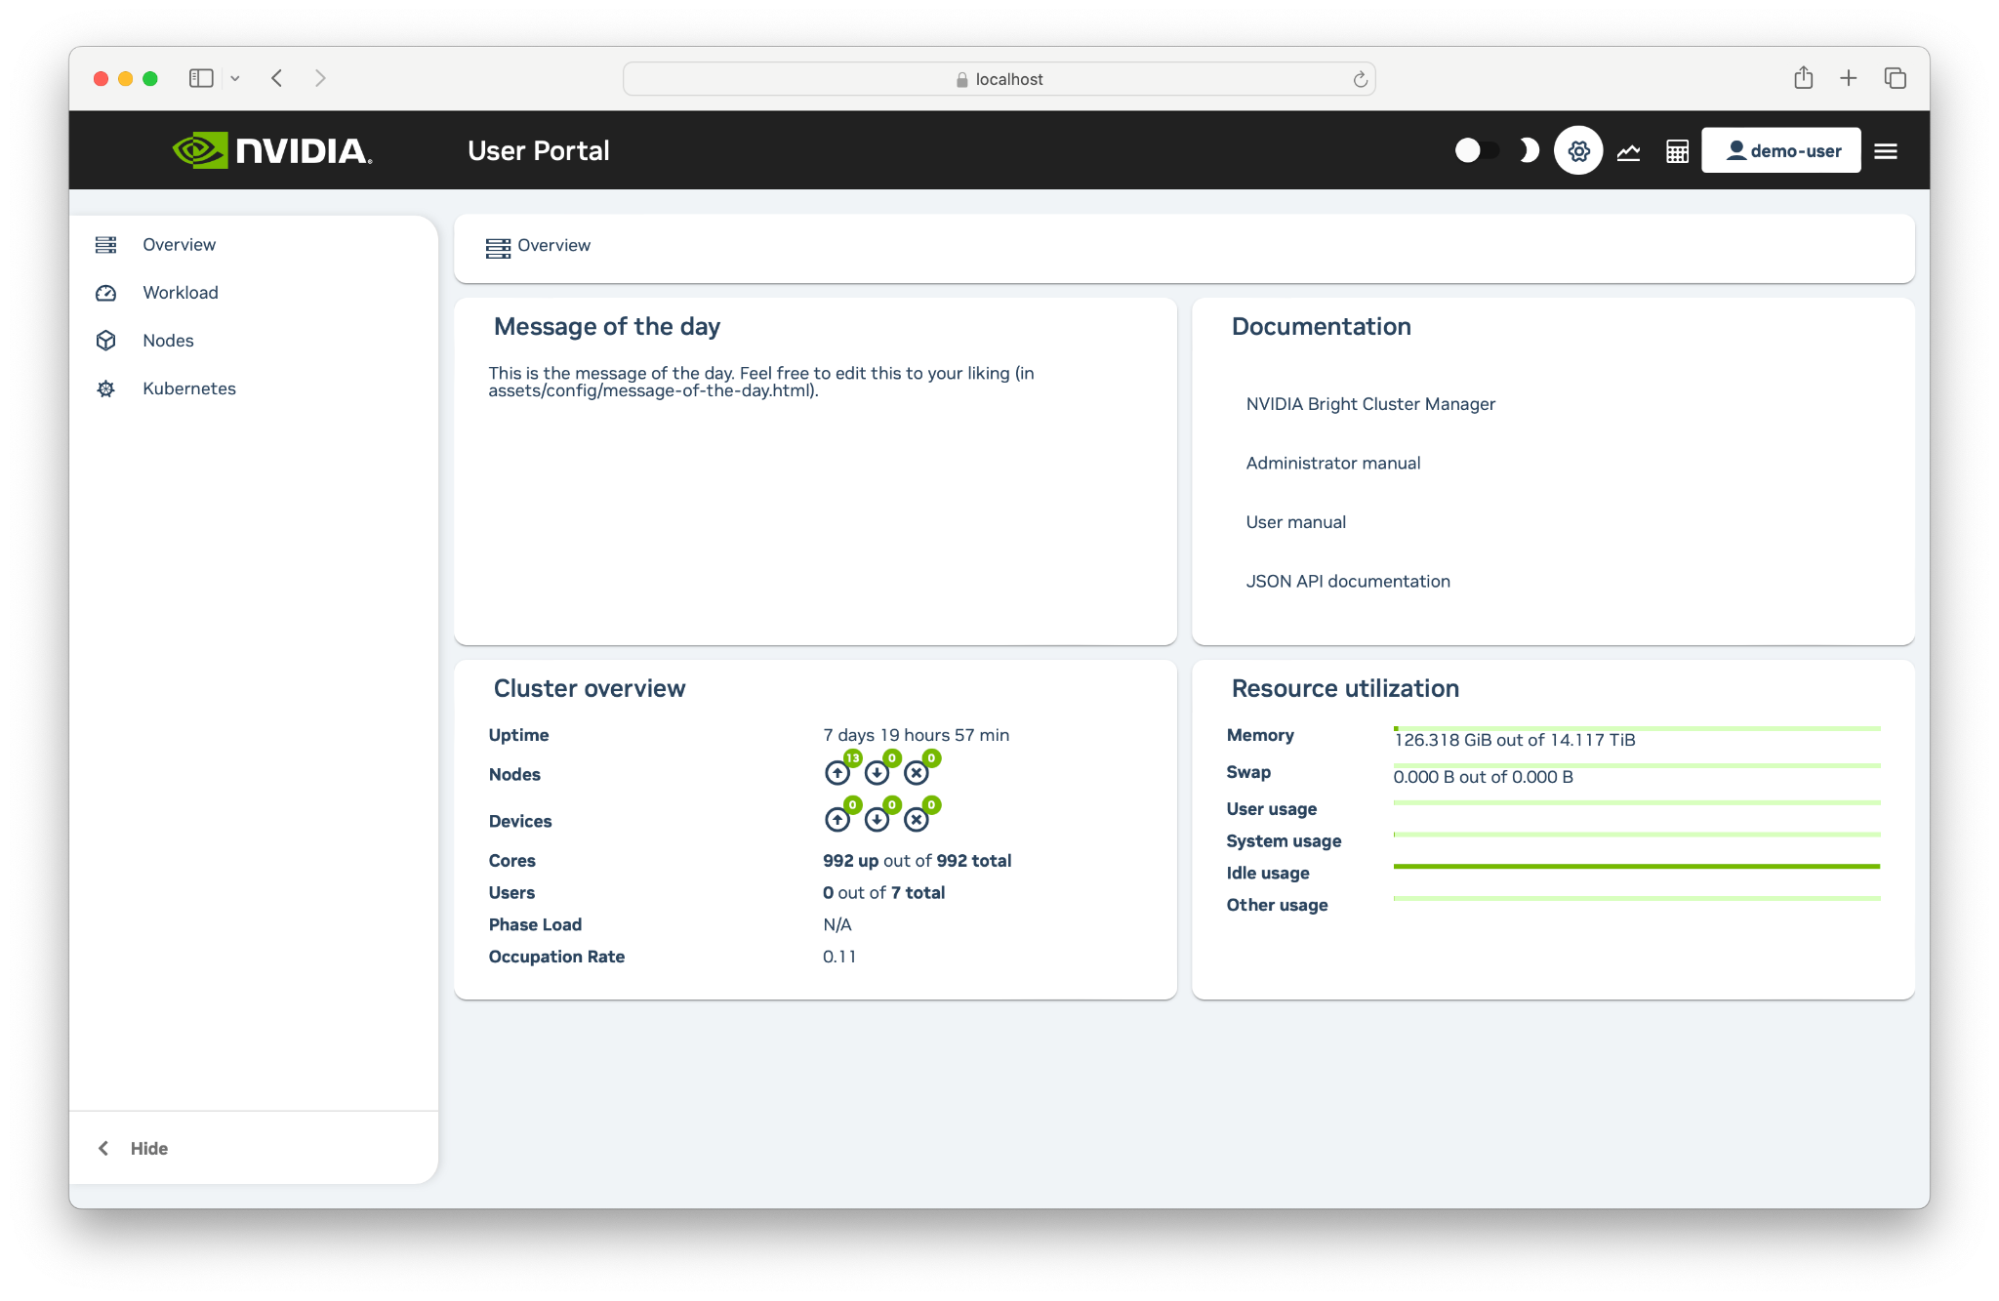
The Overview tab shows:
Message Of The Day: Administrators may provide important messages for users here.
Links to online cluster documentation.
Contact information for technical support.
An overview of the current cluster state.
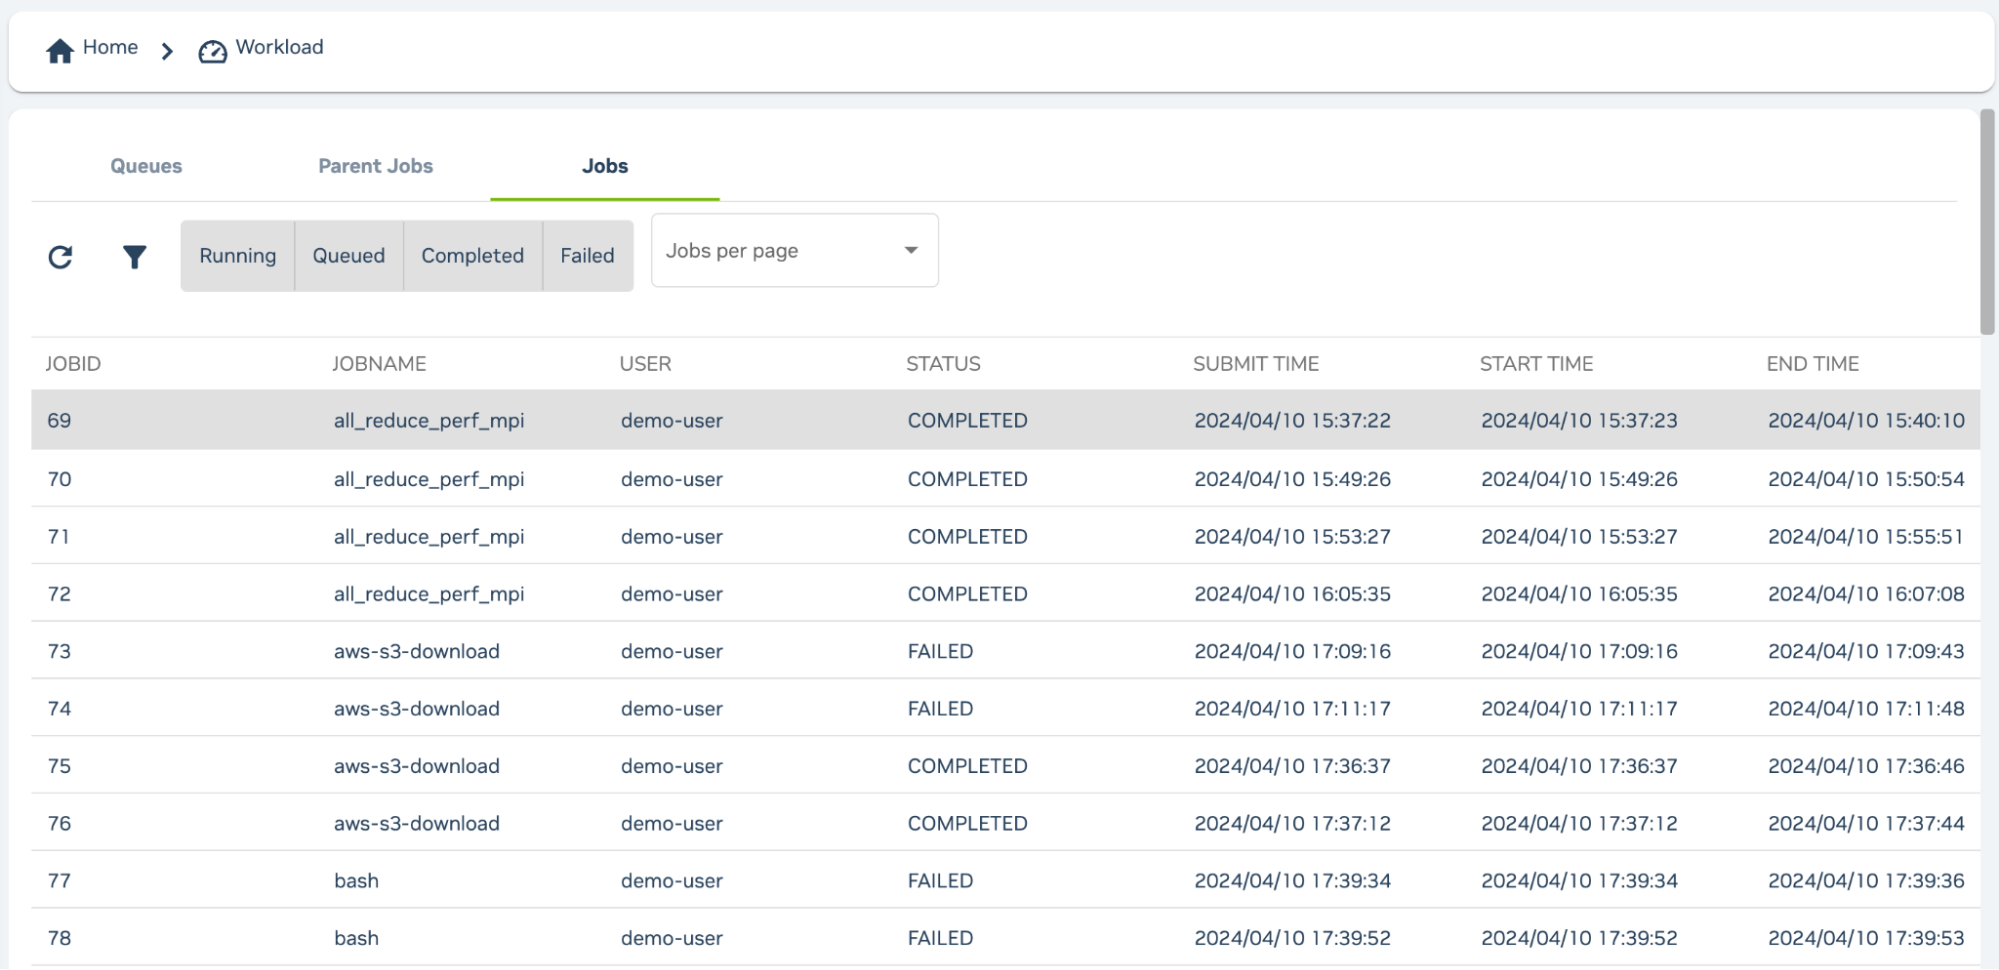
You can select Workload from the left-hand sidebar to see a view of queues, parent jobs, and jobs.
Jobs are listed with completion status, submission time, start time, and job end time.
By default, you will only information about your own jobs but the cluster adminstrator can adjust this to allow you to view information about other user’s jobs.
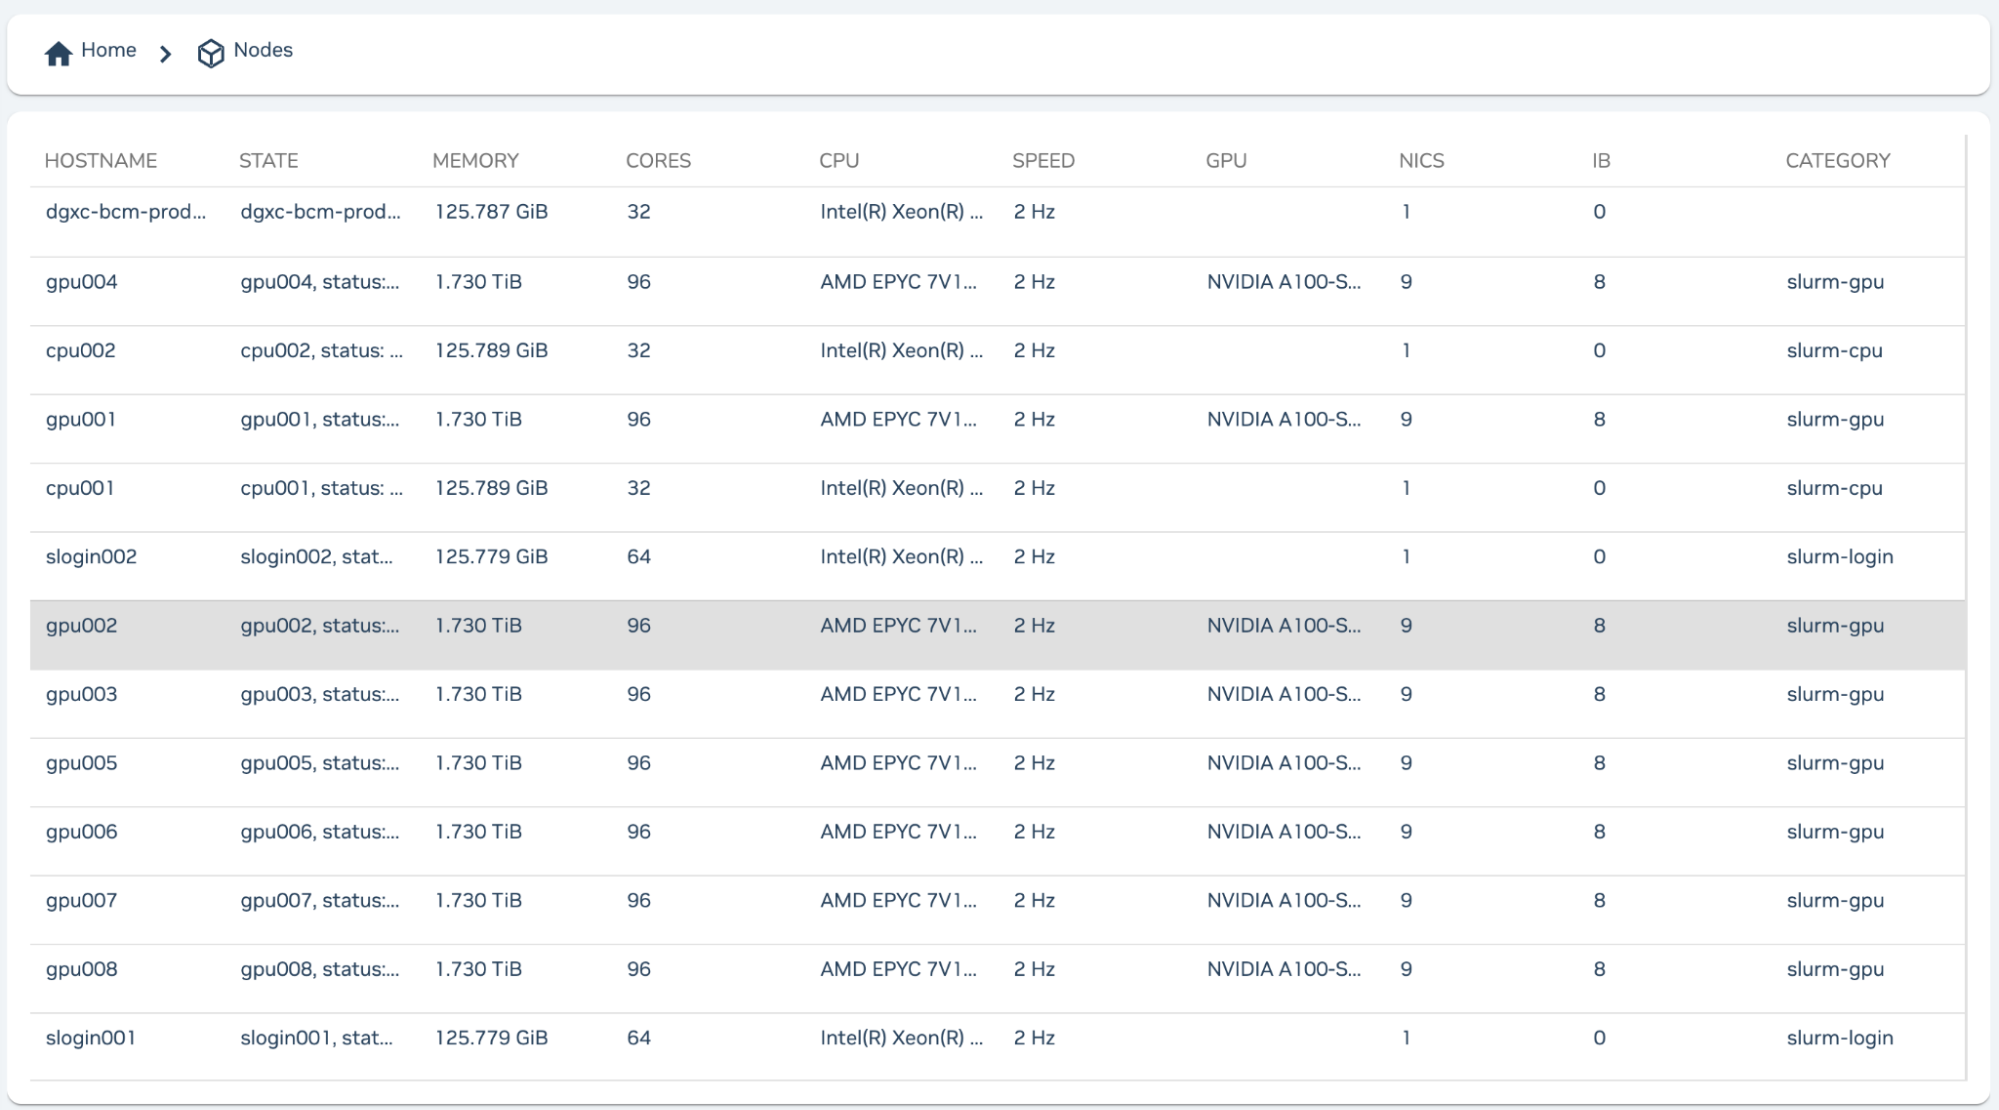
The Nodes view provides information about the nodes in the cluster including the head and login nodes. Each entry is listed with a hostname, status, RAM, cores, CPU model, CPU clock rate, GPU model, NIC, InfiniBand interfaces, and the category of the node, indicating if it is a CPU or GPU node.
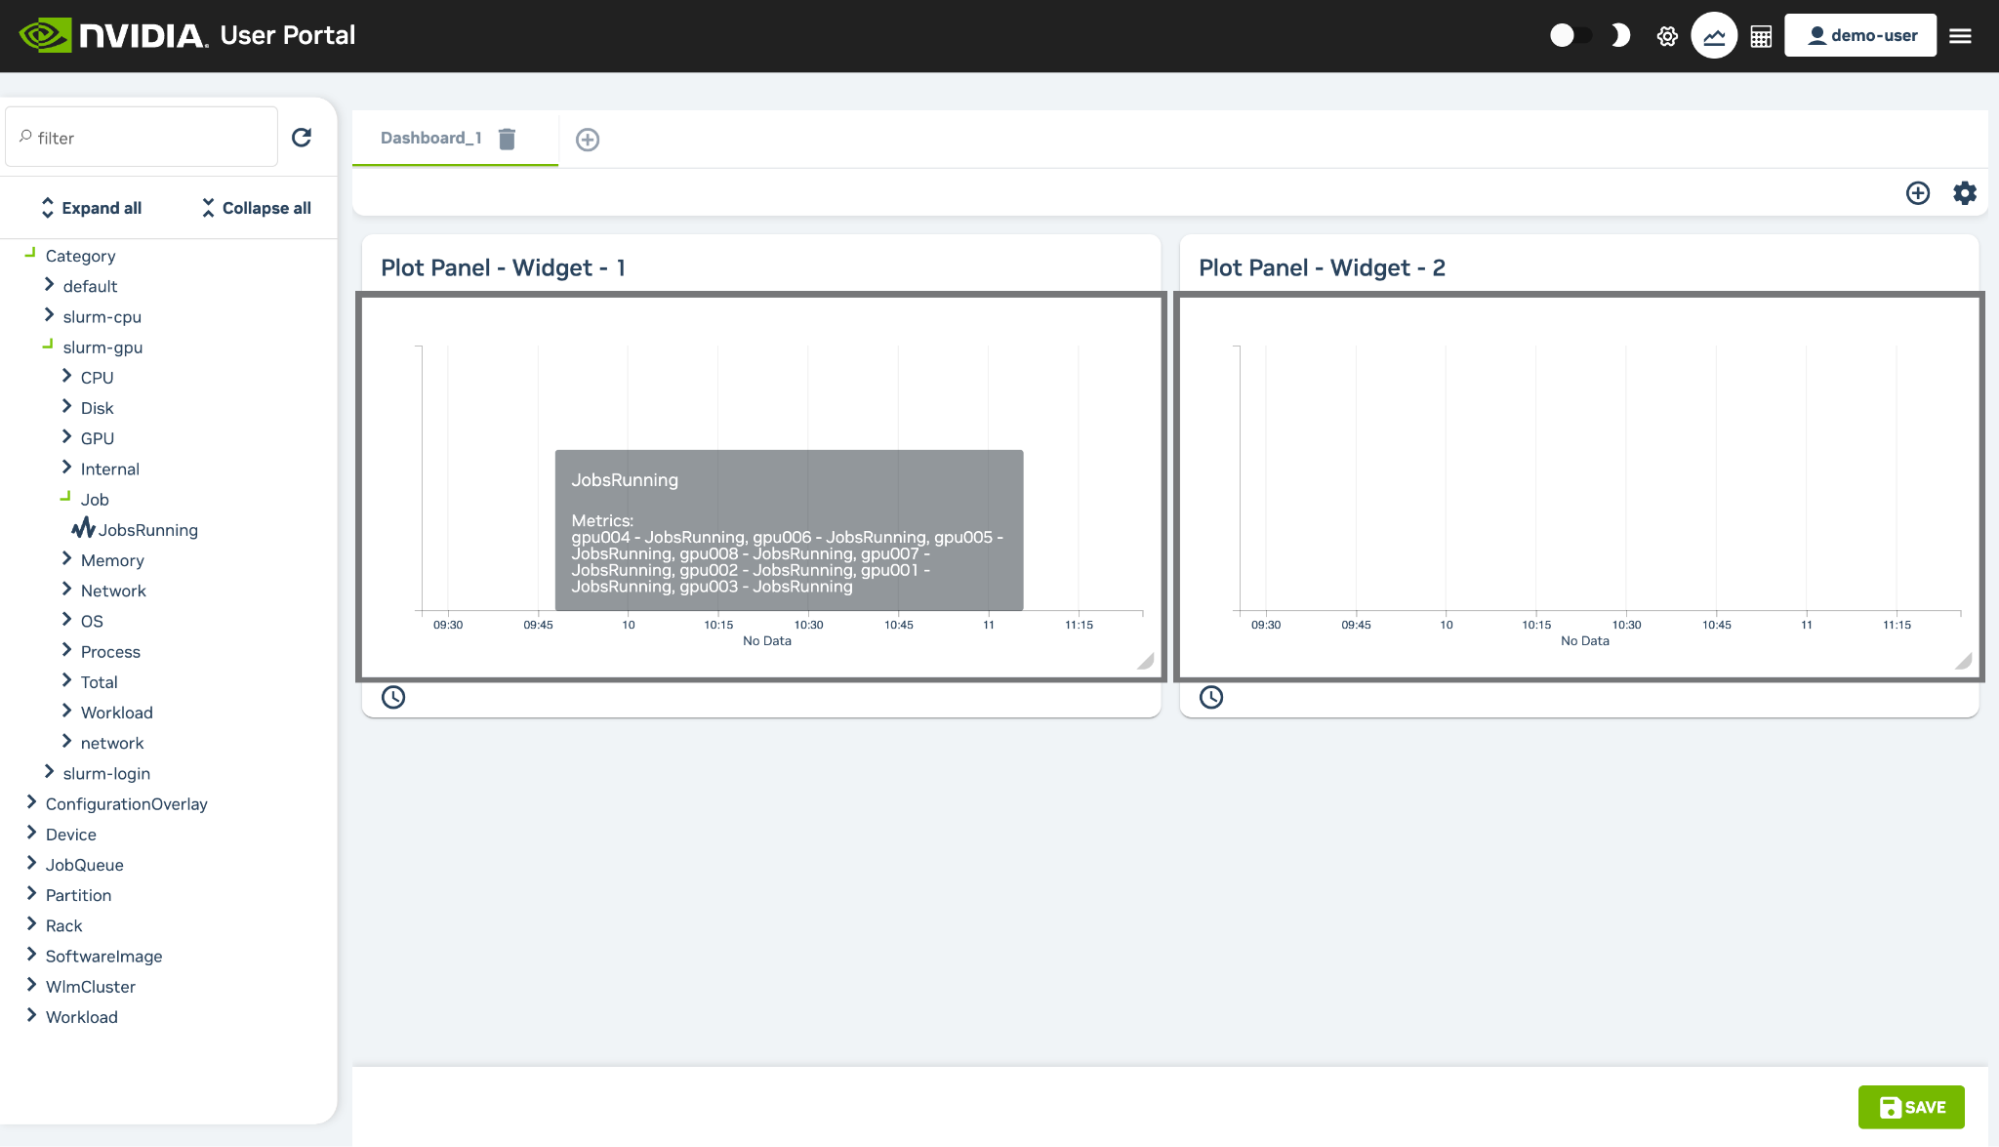
3.4.3.3. Monitoring#
At the top right of the User Portal users can access a Monitoring page that initially displays two empty plot panels within the dashboard section of the page. The panels can have measurables drag-and-dropped into them from the measurables navigation tree on the left hand side of the page. The tree can be partly or fully expanded.
A filter can be used to select from visible measurables. For example, after expanding the tree, it is possible to find a measurable for the cluster occupation rate by using the key word “occupation” in the filter. The measurable can then be dragged from the options that remain visible.
Extra plot panel widgets can be added to the page by clicking on the “Add new widget” option (the + button) in the panels section of the dashboard page. A new dashboard tab can be added to the page by clicking on the “Add new dashboard” option (the + button) in the dashboard tabs section of the page.
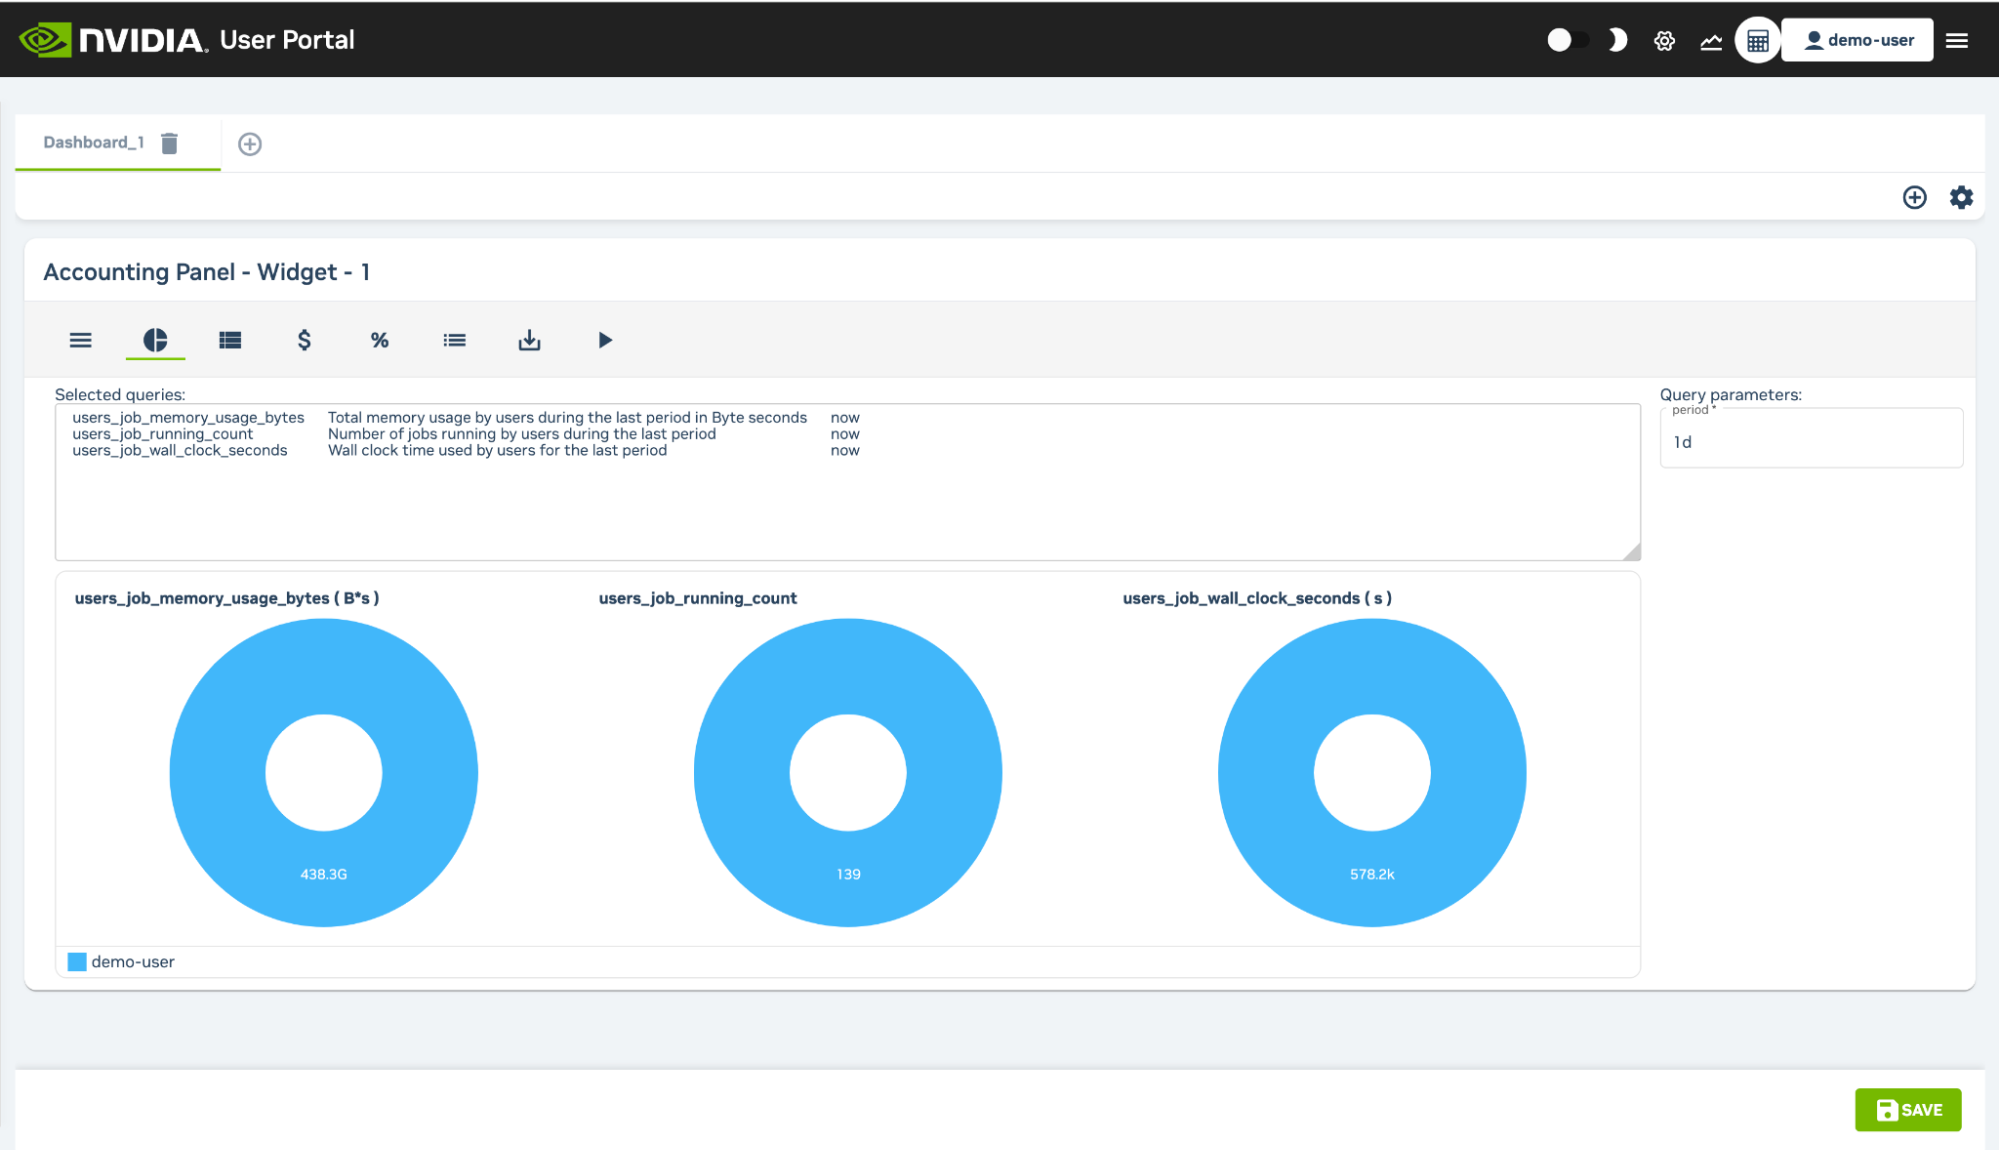
3.4.3.4. Accounting and Reporting#
At the top right of the User Portal users can access an Accounting and Reporting page that can be used to show resource use by using PromQL queries. A wizard allows resource reports to be created per user and per account which can then be grouped and organized into individual tabs. Reports can be saved and exported as a download in CSV or Microsoft Excel format.
3.5. Setting Up to Run Jobs#
3.5.1. Loading Slurm Modules#
Your cluster admin should have configured your user account to automatically load the Slurm module upon login. However, if you need to load the Slurm module manually, run the following command to do so, before proceeding and running any Slurm commands.
module load slurm
To configure your user account to load the Slurm module automatically, run the following command, then log out, then log back into the login node.
module initadd slurm
3.5.2. Basic Slurm Commands#
This section covers some common commands that can be used to interact with Slurm on your DGX Cloud cluster.
3.5.2.1. sinfo#
To see all nodes in the cluster and their current state, SSH to the Slurm login node for your cluster and run the sinfo command:
1sinfo
2
3PARTITION  AVAIL  TIMELIMIT  NODES  STATE  NODELIST
4cpuq       up     infinite    2     idle   cpu[001-002]
5defq*      up     infinite   64     idle   gpu[001-064]
In this example there are 64 nodes available, all in an idle state.
When a node is in use its state will change from idle to alloc.
1sinfo
2
3PARTITION  AVAIL  TIMELIMIT  NODES  STATE  NODELIST
4cpuq       up     infinite    2     idle   cpu[001-002]
5defq*      up     infinite   1      alloc  gpu001
6defq*      up     infinite   63     idle   gpu[002-064]
Other possible node states include drain, indicating a node is currently down, mix indicating a node is partially in-use, and maint when a node is down for maintenance.
Note
Depending on the details of the configuration of your cluster, your specific partitions may vary. CPU nodes may be in the same defq partition as the GPU nodes, for example, or additional partitions may exist and/or have been created.
3.5.2.2. srun#
The simplest way of running a job on Slurm is to use srun and specify the number of nodes and parameters to run the job on. The following command runs a job on two nodes and prints out the hostname of each node:
1srun --nnodes=2 --nproc-per-node=1 hostname
2
3gpu001
4gpu002
srun is a blocking command which prevents users from running other commands in the current terminal session until the job completes or is canceled.
3.5.2.3. sbatch#
To run non-blocking jobs that are queued and run in the background, sbatch scripts are used. An sbatch script is a bash script which allows additional functions and code to be wrapped around the job submission. All sbatch scripts must have at least one srun command in the file that launches the job. Here is an example of an sbatch script:
1#!/bin/bash
2#SBATCH --exclusive
3#SBATCH --gpus-per-node=8
4#SBATCH --nodes=2
5#SBATCH --ntasks-per-node=4
6
7srun python3 trainer.py
To run the scripy use sbatch <filename>, where <filename> is the name of the bash file above. This job will run python3 trainer.py on each node with 2 nodes allocated and 8 GPUs per node running the job.
3.5.2.4. squeue#
To view all jobs currently running and in the queue in a cluster, run squeue. The following example shows a job with id 1234 running on 64 nodes for 30 minutes on nodes gpu001-gpu064. The other two jobs, 1235 and 1236 are currently in the queue waiting for resources to be available. Once job 1234 completes and frees up resources, both of the pending jobs should get allocated:
1squeue
2
3JOBID  PARTITION      NAME       USER  ST  TIME   NODES  NODELIST(REASON)
41235   defq       llm-train   demo-use PD   0:00   2     (Dependency)
51236   defq       llm-ft      demo-use PD   0:00   2     (Dependency)
61234   defq       trainer     demo-use  R  30:00   64    gpu[001-064]
3.5.2.5. scancel#
To cancel a running job, run scancel followed by the job ID. This will send a signal to the job to terminate and it will have a period of time to gracefully exit.
To cancel a job with ID 1234, you would run:
scancel 1234
To verify that it was canceled, check the queue. The state of CG indicates a job is completing:
1squeue
2
3JOBID  PARTITION      NAME       USER  ST  TIME   NODES  NODELIST(REASON)
41235   defq       llm-train   demo-use PD   0:00   2     (Dependency)
51236   defq       llm-ft      demo-use PD   0:00   2     (Dependency)
61234   defq       trainer     demo-use CG  30:00   64    gpu[001-064]
3.5.2.6. scontrol show#
The scontrol show command allows you to view greater detail on different parts of the Slurm cluster. Some of the more common areas to show more information on are specific nodes or job details.
To view information on a specific node such as the current state, available resources, uptime, and more, run scontrol show node <node name>:
 1scontrol show node gpu001
 2
 3NodeName=gpu001 Arch=x86_64 CoresPerSocket=62
 4CPUAlloc=0 CPUEfctv=248 CPUTot=248 CPULoad=2.55
 5AvailableFeatures=location=us-chicago-1
 6ActiveFeatures=location=us-chicago-1
 7Gres=gpu:8(S:0-1)
 8NodeAddr=gpu001 NodeHostName=gpu001 Version=23.02.5
 9OS=Linux 5.15.0-1032-oracle #38~20.04.1-Ubuntu SMP Thu Mar 23 20:47:49 UTC 2023
10RealMemory=1878738 AllocMem=0 FreeMem=1945682 Sockets=2 Boards=1
11State=IDLE ThreadsPerCore=2 TmpDisk=0 Weight=1 Owner=N/A MCS_label=N/A
12Partitions=batch
13BootTime=2024-02-21T12:31:03 SlurmdStartTime=2024-03-08T09:28:09
14LastBusyTime=2024-03-08T13:37:46 ResumeAfterTime=None
15CfgTRES=cpu=248,mem=1878738M,billing=60,gres/gpu=8
16AllocTRES=
17CapWatts=n/a
18CurrentWatts=0 AveWatts=0
19ExtSensorsJoules=n/s ExtSensorsWatts=0 ExtSensorsTemp=n/s
Additionally, view details of a specific job including current state and reason for that state, submission time, log files, and requests with scontrol show job <job ID>:
 1scontrol show job 1234
 2
 3JobId=1234 JobName=trainer
 4UserId=jdoe(1004) GroupId=jdoe(30) MCS_label=N/A
 5Priority=50 Nice=0 Account=general QOS=normal
 6JobState=RUNNING Reason=None Dependency=(null)
 7Requeue=1 Restarts=0 BatchFlag=1 Reboot=0 ExitCode=0:0
 8RunTime=00:24:15 TimeLimit=04:00:00 TimeMin=N/A
 9SubmitTime=2024-03-08T13:17:23 EligibleTime=2024-03-08T13:17:23
10AccrueTime=2024-03-08T13:17:23
11StartTime=2024-03-08T13:20:39 EndTime=2024-03-08T17:20:39 Deadline=N/A
12SuspendTime=None SecsPreSuspend=0 LastSchedEval=2024-03-08T13:20:39 Scheduler=Main
13Partition=defq AllocNode:Sid=login-01
14ReqNodeList=(null) ExcNodeList=(null)
15NodeList=gpu[001-064]
16BatchHost=gpu[001-064]
17NumNodes=64 NumCPUs=64 NumTasks=4 CPUs/Task=16 ReqB:S:C:T=0:0:*:*
18ReqTRES=cpu=64,mem=1000G,node=1,billing=25,gres/gpu=8
19AllocTRES=cpu=64,mem=1000G,node=1,billing=25,gres/gpu=8
20Socks/Node=* NtasksPerN:B:S:C=4:0:*:* CoreSpec=*
21MinCPUsNode=64 MinMemoryNode=1000G MinTmpDiskNode=0
22Features=(null) DelayBoot=00:00:00
23OverSubscribe=OK Contiguous=0 Licenses=(null) Network=(null)
24Command=trainer.sh
25WorkDir=/lustre/fs0/scratch/demo-user
26StdErr=/lustre/fs0/scratch/demo-user/slurm-%N-%J.out
27StdIn=/dev/null
28StdOut=/lustre/fs0/scratch/demo-user/slurm-%N-%J.out
29Power=
30TresPerNode=gres:gpu:4
31MailUser=
3.5.3. Setting Up NGC Integration#
3.5.3.1. Accessing Your NGC Org#
As a part of the DGX Cloud subscription, your organization has received access to NVIDIA NGC, with Private Registry and NVIDIA AI Enterprise subscriptions enabled.
Your cluster owner will be able to invite you to NGC. Once you have received the invitation, follow the instructions in the email to set up your account.
3.5.3.2. Setting Up Your NGC API Key#
To generate your NGC API key, follow these steps:
Go to ngc.nvidia.com and login.
Click on your user profile in the top right of the screen and click the “Setup” button.
Click “Generate Personal Key” and generate the key in the new form that opens. Save the displayed key in a safe place as this will only be shown once and is needed for future steps.
3.5.3.3. Setting Up Your Enroot Config File#
Once you have generated your NGC API key, you must put the key in a config file. This will be used to authenticate with Enroot when you run a job.
Save your NGC API key to a config file with the following steps:
Run the following commands on the login node:
1mkdir -p ~/.config/enroot
2touch ~/.config/enroot/.credentials
Open
~/.config/enroot/.credentialsand enter the following in the file, replacing<API KEY>with your NGC key.machine nvcr.io login $oauthtoken password <API KEY>
Save the file.
3.5.3.4. Installing NGC CLI#
NGC CLI simplifies interacting with your DGX Cloud Private Registry by providing commands to upload and download various artifacts (such as trained models).
To access the latest version of NGC CLI, navigate to the CLI Install page. The following documentation is based on version 3.41.4.
From a login node, download the NGC CLI tool via
wget.wget --content-disposition https://api.ngc.nvidia.com/v2/resources/nvidia/ngc-apps/ngc_cli/versions/3.41.4/files/ngccli_linux.zip -O ngccli_linux.zip && unzip ngccli_linux.zip
Check the binary’s md5 hash to ensure it has not been corrupted.
find ngc-cli/ -type f -exec md5sum {} + | LC_ALL=C sort | md5sum -c ngc-cli.md5
You can also check the binary’s SHA256 hash as well.
sha256sum ngccli_linux.zipThe following value should be returned for version
3.41.4.2c86681048ab8e2980bdd6aa6c17f086eff988276ad90a28f1307b69fdb50252
When the tool is confirmed to be ready for use, make NGC CLI executable and add it to your user’s
PATH.chmod u+x ngc-cli/ngc; echo "export PATH=\"\$PATH:$(pwd)/ngc-cli\"" >> ~/.bash_profile && source ~/.bash_profile
Configure NGC CLI.
ngc config set
Enter the requested information at each step. The most important field is the requested API key, which is the same as the value used for Enroot configuration.
Enter API key [no-apikey]. Choices: [<VALID_APIKEY>, 'no-apikey']: <API KEY>
Once you have completed these steps, you can use the NGC CLI from the login nodes or in Slurm jobs to upload and download artifacts from your private registry.
3.5.3.5. Running a Hello World Job#
Once your NGC key has been added to the Enroot config file, a simple job can be run with an NGC container. The following command will launch a single-node job against a PyTorch container and print the PyTorch version inside the container:
srun --container-image nvcr.io/nvidia/pytorch:24.09-py3 -N1 bash -c "python3 -c 'import torch; print(torch.__version__)'"
3.5.4. Downloading Containers Onto the Cluster#
Within your DGX Cloud cluster you can save container images onto the Lustre shared storage directory, to avoid repeated downloads of the same image. This can be particularly useful when working with large multi-node jobs or repetitive job runs.
The DGX Cloud cluster uses Enroot as the container runtime, which can save container images as squash files.
3.5.4.1. Creating a Squash File From an NGC Container#
A squash file is the compressed representation of an NGC container that Enroot uses.
The following steps create a squash file from an NGC Container:
In your Lustre directory, create a directory for squash files if one does not exist already, and enter that directory.
1mkdir /lustre/fs0/scratch/demo-user/sqsh-files
2cd /lustre/fs0/scratch/demo-user/sqsh-files
At the terminal, run the following command:
srun -N 1 --pty --partition cpuq --exclusive --job-name "enroot-import:interactive" bash
You should now be running on a CPU node, within the newly created
sqsh-filesdirectory. This will be indicated by the shell prompt:demo-user@cpu001:/lustre/fs0/scratch/demo-user/sqsh-files$
Use
enrootto import the target container - in this case, we are importing a NeMo Framework container from NGC.enroot import 'docker://$oauthtoken@nvcr.io#nvidia/nemo:24.01.framework'
The output from a CPU node with 32 cores follows - the output may differ slightly from deployment to deployment.
 1[INFO] Querying registry for permission grant
 2[INFO] Authenticating with user: $oauthtoken
 3[INFO] Using credentials from file: /home/demo-user/.config/enroot/.credentials
 4[INFO] Authentication succeeded
 5[INFO] Fetching image manifest list
 6[INFO] Fetching image manifest
 7[INFO] Downloading 74 missing layers... 100% 74:0=0s 9ee9f649846387c87376a6ed73d7938fb7ebc0de62ae5e6b5285643682dc12c2
 8[INFO] Extracting image layers... 100% 78:0=0s a486411936734b0d1d201c8a0ed8e9d449a64d5033fdc33411ec95bc26460efb
 9[INFO] Converting whiteouts... 100% 78:0=0s a486411936734b0d1d201c8a0ed8e9d449a64d5033fdc33411ec95bc26460efb
10[INFO] Creating squashfs filesystem... Parallel mksquashfs: Using 32 processors Creating 4.0 filesystem on /lustre/fs0/scratch/demo-user/sqsh-files-cpu/nvidia+nemo+24.01.framework.sqsh, block size 131072.
11[=============================================================================================================================================================================================\] 594940/594940 100% Exportable Squashfs 4.0 filesystem, gzip compressed, data block size 131072
12uncompressed data, uncompressed metadata, uncompressed fragments,         uncompressed xattrs, uncompressed ids   duplicates are not removed Filesystem size 34918700.97 Kbytes (34100.29 Mbytes)
1399.98% of uncompressed filesystem size (34924117.67 Kbytes) Inode table size 13604323 bytes (13285.47 Kbytes)     100.00% of uncompressed inode table size (13604323 bytes) Directory table size 12122240 bytes (11838.12 Kbytes)
14100.00% of uncompressed directory table size (12122240 bytes) No duplicate files removed Number of inodes 387307 Number of files 345979 Number of fragments 21833 Number of symbolic links 1737 Number of device nodes 0 Number of fifo nodes 0 Number of socket nodes 0 Number of directories 39591
15Number of ids (unique uids + gids) 1 Number of uids 1     root (0) Number of gids 1       root (0)
End the interactive job.
exit
Subsequent srun commands can now use this squash file instead of pulling a container from NGC. This example modifys an interactive job to use the squash file that was just downloaded:
srun -N 1 --pty --gpus 8 --container-image /lustre/fs0/scratch/demo-user/sqsh-files/nvidia+nemo+24.01.framework.sqsh --exclusive --job-name "use-squash-file:interactive" bash
3.6. Running Example Jobs#
3.6.1. Example Single-Node Batch Job#
This section gives more detail on running a single node batch job using Slurm on DGX Cloud. The example job runs on multiple GPUs wtihin a single node.
3.6.1.1. Basic srun Command#
A Slurm srun command that uses Pyxis and Enroot to leverage NGC containers has the following structure:
srun --nodes 1 --job-name example-srun-job --exclusive --gpus-per-node 8 --mpi=pmix --container-mounts /lustre/fs0 --container-mount-home --container-mounts /cm/shared --container-image nvcr.io/nvidia/pytorch:24.09-py3 --partition defq <command>
Where the parameters are:
nodes - The number of nodes to launch to support this job.
job-name - An arbitrary string defining the job’s name.
exclusive - Requests exclusive access to the node that Slurm provides for this job. No other jobs will run on the provided node for the duration of this job.
gpus-per-node - Requests a quantity of GPUs from each provided node.
mpi - Specifies the MPI version to be used for this job. The pmix value is commonly the correct value - to learn more about the options available, visit the SchedMD documentation.
container-mounts - Specifies a path to map from the host into the job on each node that is part of that job. Multiple instances of this flag may be specified - one per desired path. In the example above, the path will be mirrored into the job as it exists on the host - to specify a different mapping, the argument would change to the format
/host-path:/new-job-path. In the example above, a Lustre filesystem path and a shared NFS path are specified - to learn more about the purpose of the Lustre path, please see the DGX Cloud Lustre filesystem overview. The shared NFS path will be explained later in this section.container-mount-home - Mounts the user’s home directory into the resulting containerized environment at its
/home/usernamepath on each node that is part of that job. Otherwise, the home directory is not mounted automatically in a job leveraging Enroot as configured in DGX Cloud.container-image - Specifies the NGC container that will be used through Enroot as the job’s host environment once the job begins. The argument will be of the format
nvcr.io#nvidia/container:versionfor public NGC containers andnvcr.io#org/container:versionornvcr.io#org/team/container:versionif using a Private Registry container.partition - Specifies the queue to select a node from. By default, the
defqqueue will be used.
3.6.1.2. Environment Variables#
All environment variables required to achieve target performance for a given cluster across multiple nodes are encoded across several files in the /etc/enroot/environ.d/ directory on each host.
For more detail, review Environment Variables. To specify additional environment variables, consider creating a file named env-vars.sh and define any additional variables necessary within it.
You can then use source from within a script to specify those new environment variables within a job.
source env-vars.sh
3.6.1.3. Running an srun Command#
The example below runs a GPU-based job.
Create a script at
$HOME/hostname.shusing the text editor of your choice, with the following content:#!/bin/bash srun --nodes 1 --job-name example-srun-job --exclusive --gpus-per-node 8 --mpi=pmix --container-image nvcr.io/nvidia/pytorch:24.09-py3 --partition defq hostname
Make the script executable by running the following command:
chmod +x hostname.sh
You can now run the script:
./hostname.sh
The command output (sdout and sderr) will output to the terminal from which the above script was submitted. Use of srun is blocking unless run in the background with &.
An expected output example will show the hostname of the system that the job ran on (which Slurm takes care of determining for you), such as the following:
1pyxis: importing docker image: nvcr.io#nvidia/pytorch:24.02-py3
2pyxis: imported docker image: nvcr.io#nvidia/pytorch:24.02-py3
3gpu001
3.6.1.4. Running an sbatch Command#
Alternatively, sbatch can be used to submit jobs:
1#!/bin/bash
2#SBATCH --partition defq --nodes 1
3#SBATCH --exclusive
4#SBATCH --job-name=example-sbatch-job
5#SBATCH --gpus-per-node=8
6
7srun --mpi=pmix --container-image nvcr.io/nvidia/pytorch:24.09-py3 hostname
Arguments can be specified at the top of an sbatch script, or within individual commands as desired. srun commands can be specified within sbatch scripts, as shown.
To submit the script above, save the text to a file named hostname.sbatch and run sbatch hostname.sbatch. This will be non-blocking, meaning that additional jobs can be queued immediately if desired.
3.6.1.5. Viewing sbatch Log Files#
A log file corresponding to the job number will automatically be created in the directory from which sbatch was run of the format slurm-x.out. This file name and path are configurable - consult the SchedMD documentation for these options and more.
To check the job’s status while in the queue or while running, the squeue command can be used as shown in the Cluster Overview documentation:
1squeue
2
3JOBID  PARTITION  NAME       USER  ST  TIME   NODES  NODELIST(REASON)
442     batch      example-s  jdoe  R   0:01   1     gpu001
3.6.1.6. SSH Access to Compute Nodes#
While executing, the user who owns the active job on a node can SSH to that node if necessary or desired.
ssh gpu001
3.6.1.7. Access the Container Running on a Node#
There are cases where it is advantageous to create an interactive terminal with access to a job that has been launched via sbatch, or a secondary terminal as part of an interactive job. To accomplish this, you will need to access the container running as part of the job through Enroot.
To access the container running as part of a job on a node, first determine which node is running the job.
1$ squeue
2JOBID PARTITION     NAME     USER ST       TIME  NODES NODELIST(REASON)
3  517      defq example- demo-use  R       2:44      1 gpu002
SSH to the listed node.
ssh gpu002Use the
enroot list --fancycommand to generate a list of the containers that are running on the node.1$ enroot list --fancy 2NAME PID COMM STATE STARTED TIME MNTNS USERNS COMMAND 3pyxis_517.0 2351732 bash S May02 3-15:37:17 4026540834 4026540785 /usr/bin/bash -c <command>
Copy the
PIDvalue for the target container and use as an argument to theenroot execcommand. Run thebashcommand inside the container.enroot exec 2351732 bash
The end result will be an interactive session running inside the target container.
1$ enroot exec 2351732 bash
2bash: module: command not found
3demo-user@gpu002:/workspace$
3.7. Example Single-Node Interactive Bash Job#
An interactive job can be launched with the following srun command. The key argument to remember is the --pty flag, which allows the job to run interactively in a terminal.
1srun -N 1 --pty \
2--container-image nvcr.io/nvidia/pytorch:24.09-py3 \
3--container-mounts "/lustre/fs0" \
4--gpus 8 \
5--exclusive \
6--job-name "my-job:interactive" \
7bash
The shell should now indicate connection to a node with 8 GPUs, which can be confirmed by running nvidia-smi.
 1demo-user@gpu003:/workspace$ nvidia-smi
 2
 3+-----------------------------------------------------------------------------------------+
 4| NVIDIA-SMI 550.54.15              Driver Version: 550.54.15      CUDA Version: 12.4     |
 5|-----------------------------------------+------------------------+----------------------+
 6| GPU  Name                 Persistence-M | Bus-Id          Disp.A | Volatile Uncorr. ECC |
 7| Fan  Temp   Perf          Pwr:Usage/Cap |           Memory-Usage | GPU-Util  Compute M. |
 8|                                         |                        |               MIG M. |
 9|=========================================+========================+======================|
10|   0  NVIDIA A100-SXM4-80GB          On  |   00000001:00:00.0 Off |                    0 |
11| N/A   35C    P0             63W /  400W |       0MiB /  81920MiB |      0%      Default |
12|                                         |                        |             Disabled |
13+-----------------------------------------+------------------------+----------------------+
14|   1  NVIDIA A100-SXM4-80GB          On  |   00000002:00:00.0 Off |                    0 |
15| N/A   35C    P0             65W /  400W |       0MiB /  81920MiB |      0%      Default |
16|                                         |                        |             Disabled |
17+-----------------------------------------+------------------------+----------------------+
18|   2  NVIDIA A100-SXM4-80GB          On  |   00000003:00:00.0 Off |                    0 |
19| N/A   35C    P0             64W /  400W |       0MiB /  81920MiB |      0%      Default |
20|                                         |                        |             Disabled |
21+-----------------------------------------+------------------------+----------------------+
22|   3  NVIDIA A100-SXM4-80GB          On  |   00000004:00:00.0 Off |                    0 |
23| N/A   35C    P0             65W /  400W |       0MiB /  81920MiB |      0%      Default |
24|                                         |                        |             Disabled |
25+-----------------------------------------+------------------------+----------------------+
26|   4  NVIDIA A100-SXM4-80GB          On  |   0000000B:00:00.0 Off |                    0 |
27| N/A   35C    P0             62W /  400W |       0MiB /  81920MiB |      0%      Default |
28|                                         |                        |             Disabled |
29+-----------------------------------------+------------------------+----------------------+
30|   5  NVIDIA A100-SXM4-80GB          On  |   0000000C:00:00.0 Off |                    0 |
31| N/A   34C    P0             64W /  400W |       0MiB /  81920MiB |      0%      Default |
32|                                         |                        |             Disabled |
33+-----------------------------------------+------------------------+----------------------+
34|   6  NVIDIA A100-SXM4-80GB          On  |   0000000D:00:00.0 Off |                    0 |
35| N/A   34C    P0             63W /  400W |       0MiB /  81920MiB |      0%      Default |
36|                                         |                        |             Disabled |
37+-----------------------------------------+------------------------+----------------------+
38|   7  NVIDIA A100-SXM4-80GB          On  |   0000000E:00:00.0 Off |                    0 |
39| N/A   34C    P0             62W /  400W |       0MiB /  81920MiB |      0%      Default |
40|                                         |                        |             Disabled |
41+-----------------------------------------+------------------------+----------------------+
42
43+-----------------------------------------------------------------------------------------+
44| Processes:                                                                              |
45|  GPU   GI   CI        PID   Type   Process name                              GPU Memory |
46|        ID   ID                                                               Usage      |
47|=========================================================================================|
48|  No running processes found                                                             |
49+-----------------------------------------------------------------------------------------+
3.7.1. Example Single-Node JupyterLab Job#
NGC containers support launching the Jupyter service for the interactive use of Jupyter notebooks. This section provides an example sbatch script that installs the RAPIDS Jupyterlab Dashboard and launches Jupyter in a Slurm job. We will then walk through how to connect to the resulting Jupyter service via your local web browser.
3.7.1.1. SSH to a Login Node#
Establish a new SSH session with one of the cluster’s login nodes. This is not the only way to successfully execute this outcome, but it will make all steps possible from a single shell.
ssh -i /path/to/ssh_cert <cluster-user>@ip-addr-of-login-node -L 8888:localhost:8888
3.7.2. Example Jupyter sbatch Script#
1#!/bin/bash
2#SBATCH --partition defq --nodes 1
3#SBATCH --exclusive
4#SBATCH --job-name=example-jupyter-sbatch-job
5#SBATCH --gpus-per-node=8
6
7srun --mpi=pmix --container-mounts /lustre/fs0/scratch/demo-user --container-image nvcr.io/nvidia/pytorch:24.02-py3 \
8  bash -c "set -x; pip install --extra-index-url https://pypi.anaconda.org/rapidsai-wheels-nightly/simple --pre jupyterlab_nvdashboard;
9  jupyter lab --NotebookApp.token='' --notebook-dir=/ --no-browser --ip=0.0.0.0 --NotebookApp.allow_origin='*'; sleep 1d"
Save the text above in a file named jupyterlab.sbatch, and run the following command.
sbatch jupyterlab.sbatch
3.7.2.1. Connecting to the Jupyter Service#
Verify that the job has started and is running on a node via
squeue. Take note of the node it is running on.1$ squeue 2JOBID PARTITION NAME USER ST TIME NODES NODELIST(REASON) 3 517 defq example- demo-use R 2:44 1 gpu002
Watch the job’s output logs for output similar to the following, indicating that the server is accessible.
1[I 2024-05-02 15:37:10.540 ServerApp] Jupyter Server 2.14.0 is running at:
2[I 2024-05-02 15:37:10.540 ServerApp] http://gpu002:8888/lab
3[I 2024-05-02 15:37:10.540 ServerApp]     http://127.0.0.1:8888/lab
From the same SSH session, SSH to the running GPU node (in this example,
gpu002) and pass port8888to the login node, completing the connection to your local workstation.ssh gpu002 -L 8888:localhost:8888
Navigate to
http://localhost:8888from your web browser. You should see a Jupyter interface with the RAPIDS Jupyterlab Dashboard integrated.
3.7.3. Example Single-Node VS Code Job#
For developer workflows, having the ability to run Microsoft Visual Studio Code on a node inside the DGX Cloud cluster can eliminate code synchronization while iteratively experimenting with software changes. As an example, we will walk through the use of an interactive job to install the vscode CLI and leverage its Remote Tunnel capability to connect to your local workstation.
Run the following job to get started. Note that a CPU node could have been selected instead of a GPU node, if it is preferred to make code changes on a node that is uninvolved in running an application test.
1srun -N 1 --pty \
2--container-image nvcr.io/nvidia/pytorch:24.02-py3 \
3--container-mounts "/lustre/fs0" \
4--container-mount-home \
5--gpus 8 \
6--exclusive \
7--job-name "vscode-job:interactive" \
8bash
Download and extract the
codetool to your user’s home directory.cd ~; curl -Lk 'https://code.visualstudio.com/sha/download?build=stable&os=cli-alpine-x64' --output vscode_cli.tar.gz && tar -xf vscode_cli.tar.gz; rm vscode_cli.tar.gz;
Create a tunnel with the
code tunnelcommand../code tunnel --accept-server-license-terms --name dgxc-remote-tunnel
Select your preferred login method and follow the authentication prompts.
*
* Visual Studio Code Server
*
* By using the software, you agree to
* the Visual Studio Code Server License Terms (https://aka.ms/vscode-server-license) and
* the Microsoft Privacy Statement (https://privacy.microsoft.com/en-US/privacystatement).
*
? How would you like to log in to Visual Studio Code? ›
❯ Microsoft Account
  GitHub Account
Once authentication is successful, you will see a URL that allows you to open a web browser and use the remote tunnel.
Open this link in your browser https://vscode.dev/tunnel/dgxc-remote-tunnel/workspace
3.7.4. Example Multi-Node Batch Jobs#
Multi-node jobs bear many similarities to single-node jobs - to modify a Slurm command to run a multi-node job, simply request multiple nodes. An example sbatch script that requests multiple nodes follows:
1#!/bin/bash
2#SBATCH --partition defq --nodes 2
3#SBATCH --exclusive
4#SBATCH --job-name=example-mn-sbatch-job
5#SBATCH --gpus-per-node=8
6
7srun --mpi=pmix --container-image nvcr.io/nvidia/pytorch:24.09-py3 hostname
The only change made between this sbatch script and the previously discussed single node version is the `-nodes argument input incrementing from 1 to 2.
Save the text above in a file named multinode-hostname.sbatch, and run the following command.
sbatch multinode-hostname.sbatch
Expected output will now change as follows, and can be found in the resulting .out file (in this case, shown using the cat command).
1cat slurm-225.out
2
3pyxis: imported docker image: nvcr.io#nvidia/pytorch:24.02-py3
4pyxis: imported docker image: nvcr.io#nvidia/pytorch:24.02-py3
5gpu001
6gpu002
3.7.4.1. Key Environment Variables#
There are a several environment variables documented in Environment Variables that are essential for multi-node functionality. They fall into several categories. Those are: ensuring devices are presented to software correctly (CUDA_DEVICE_ORDER, MELLANOX_VISIBLE_DEVICES), ensuring MPI and PMIX are configured correctly (environment variables that begin with, OMPI_MCA or PMIX), ensuring NCCL is configured correctly (environment variables that begin with NCCL), and ensuring UCX is configured correctly (environment variables that begin with UCX).
In addition to the environment variables noted, there many environment variables that Slurm automatically creates and sets depending on the arguments provided via srun or sbatch. A full list of the options available via srun and associated environment variables can be found in the official documentation.
A table is provided here for the relevant SLURM_GPU environment variables and what they mean, along mechanisms to ensure the environment variable will be visible during jobs.
Environment Variable |
Explanation |
Associated Flag |
Associated Sbatch Environment Variable |
|---|---|---|---|
SLURM_GPUS |
The total number of GPUs required for the job. |
--gpus |
SBATCH_GPUS |
SLURM_GPUS_ON_NODE |
The number of GPUs available to the step on this node. |
--exclusive |
SBATCH_EXCLUSIVE |
SLURM_GPUS_PER_NODE |
The number of GPUs required for the job on each node included in the job’s resource allocation. |
--gpus-per-node |
SBATCH_GPUS_PER_NODE |
SLURM_GPUS_PER_TASK |
The number of GPUs required for the job on each task to be spawned in the job’s resource allocation. |
--gpus-per-task |
SBATCH_GPUS_PER_TASK |
SLURM_GPU_BIND |
The way tasks are bound to specific GPUs in a job. |
--gpu-bind |
SBATCH_GPU_BIND |
SLURM_GPU_FREQ |
The requested frequency values for GPUs allocated to the job. |
--gpu-freq |
SBATCH_GPU_FREQ |
3.7.4.2. Example PyTorch Job#
To run a more complex example using the PyTorch NGC container, we will first clone the PyTorch examples repository to our home directory. If we were generating log files or downloading data inside this repository, it would make sense to clone this repository to our Lustre scratch directory instead.
git clone https://github.com/pytorch/examples
We will use PyTorch’s torchrun tool to launch the multinode.py example.
Create a file named torchrun.sh and add the following text to it. We have specified environment variables as arguments to torchrun, which Slurm creates for us based on how we launch our Slurm job.
 1#!/bin/bash
 2
 3torchrun \
 4--nnodes $SLURM_JOB_NUM_NODES \
 5--nproc_per_node $SLURM_GPUS_ON_NODE \
 6--master-addr $MASTER_ADDR \
 7--master-port $MASTER_PORT \
 8--node-rank $RANK \
 9--log-dir="${PWD}/logs" \
10/home/demo-user/examples/distributed/ddp-tutorial-series/multinode.py 100 25
Make the torchrun.sh file executable.
chmod +x torchrun.sh
We will create an sbatch script to run torchrun.sh. Create a file named multinode-torchrun.sbatch and add the following text to it.
 1#!/bin/bash
 2
 3#SBATCH --job-name=multinode-example
 4#SBATCH --partition defq
 5#SBATCH --exclusive
 6#SBATCH --nodes=2
 7#SBATCH --ntasks-per-node=1
 8#SBATCH --gpus-per-node=1
 9#SBATCH --gpus-per-task=1
10
11source env-vars.sh
12
13srun --container-image nvcr.io/nvidia/pytorch:24.02-py3 --mpi=pmix --container-mounts /lustre/fs0 --container-mount-home /home/demo-user/torchrun.sh
This sbatch script will use a single GPU on each of the two requested nodes. It is important to specify --ntasks-per-node=1, as torchrun will subsequently launch any additional necessary processes itself. Run multinode-torchrun.sbatch with the following command.
sbatch multinode-torchrun.sbatch
An output similar to the following can be found in the resulting .out file (in this case, shown using the cat command).
 1cat slurm-226.out
 2
 3pyxis: imported docker image: nvcr.io#nvidia/pytorch:24.02-py3
 4pyxis: imported docker image: nvcr.io#nvidia/pytorch:24.02-py3
 5[2024-06-13 14:24:39,312] torch.distributed.launcher.api: [INFO] Starting elastic_operator with launch configs:
 6[2024-06-13 14:24:39,312] torch.distributed.launcher.api: [INFO]   entrypoint       : /home/demo-user/examples/distributed/ddp-tutorial-series/multinode.py
 7[2024-06-13 14:24:39,312] torch.distributed.launcher.api: [INFO]   min_nodes        : 2
 8[2024-06-13 14:24:39,312] torch.distributed.launcher.api: [INFO]   max_nodes        : 2
 9[2024-06-13 14:24:39,312] torch.distributed.launcher.api: [INFO]   nproc_per_node   : 1
10[2024-06-13 14:24:39,312] torch.distributed.launcher.api: [INFO]   run_id           : none
11[2024-06-13 14:24:39,312] torch.distributed.launcher.api: [INFO]   rdzv_backend     : static
12[2024-06-13 14:24:39,312] torch.distributed.launcher.api: [INFO]   rdzv_endpoint    : gpu001:49228
13[2024-06-13 14:24:39,312] torch.distributed.launcher.api: [INFO]   rdzv_configs     : {'rank': 1, 'timeout': 900}
14[2024-06-13 14:24:39,312] torch.distributed.launcher.api: [INFO]   max_restarts     : 0
15[2024-06-13 14:24:39,312] torch.distributed.launcher.api: [INFO]   monitor_interval : 5
16[2024-06-13 14:24:39,312] torch.distributed.launcher.api: [INFO]   log_dir          : None
17[2024-06-13 14:24:39,312] torch.distributed.launcher.api: [INFO]   metrics_cfg      : {}
18[2024-06-13 14:24:39,312] torch.distributed.launcher.api: [INFO]
19...
20[GPU0] Epoch 99 | Batchsize: 32 | Steps: 32
21gpu002:862118:862201 [0] NCCL INFO [Service thread] Connection closed by localRank 0
22gpu001:875891:875974 [0] NCCL INFO [Service thread] Connection closed by localRank 0
23gpu001:875891:875891 [0] NCCL INFO comm 0x55555cee37a0 rank 0 nranks 2 cudaDev 0 busId 100000 - Abort COMPLETE
24gpu002:862118:862118 [0] NCCL INFO comm 0x55555cee3e20 rank 1 nranks 2 cudaDev 0 busId 100000 - Abort COMPLETE
25[2024-06-13 14:24:51,350] torch.distributed.elastic.agent.server.api: [INFO] [default] worker group successfully finished. Waiting 300 seconds for other agents to finish.
26[2024-06-13 14:24:51,350] torch.distributed.elastic.agent.server.api: [INFO] Local worker group finished (WorkerState.SUCCEEDED). Waiting 300 seconds for other agents to finish
27[2024-06-13 14:24:51,351] torch.distributed.elastic.agent.server.api: [INFO] [default] worker group successfully finished. Waiting 300 seconds for other agents to finish.
28[2024-06-13 14:24:51,352] torch.distributed.elastic.agent.server.api: [INFO] Local worker group finished (WorkerState.SUCCEEDED). Waiting 300 seconds for other agents to finish
29[2024-06-13 14:24:51,353] torch.distributed.elastic.agent.server.api: [INFO] Done waiting for other agents. Elapsed: 0.0012083053588867188 seconds
30[2024-06-13 14:24:51,352] torch.distributed.elastic.agent.server.api: [INFO] Done waiting for other agents. Elapsed: 0.002357959747314453 seconds
3.8. Moving Data Into Your DGX Cloud Cluster#
There are several factors to consider with regard to data movement in DGX Cloud:
Is the data available on your local workstation that can access the DGX Cloud cluster?
Is the data available on a shared filesystem or repository within your corporate network?
Is the data available on the public internet outside of an object store?
Is the data available on the public internet in a CSP object store?
What protocols, ports, or client software are necessary to transfer the data?
How much data will be transferred?
Is the person transferring the data the same person who will be using the data?
3.8.1. Moving Data from Your Local Workstation to DGX Cloud#
To move data from your local workstation to DGX Cloud, consider the scale of your data.
If you are working with a set of data that is publicly available code (Github, Gitlab), it is preferred to clone that code using git from either a DGX Cloud login node or a job.
git clone https://git*b.com/my-repo
If the code is only available from your local workstation or a fileshare accessible from your workstation, a copy is warranted. You can write to either your home directory (of the form /home/<cluster user>) or a Lustre directory you have access to (an example is /lustre/fs0/scratch/<cluster user>).
Remember the guidance noted for home directories and Lustre - choose the appropriate location for your data transfer. A small amount of code and configuration files is a great fit for your home directory. However, larger sets of code that include data (or download it internally to the repository structure) will make the most sense on Lustre.
These strategies work well for local workstations and internal compute resources configured to access your DGX Cloud environment.
Note
Depending on the scale of local data you are working with, uploading that data to an object store may make sense instead of using tools like scp, sftp, or rsync.
3.8.1.1. scp#
scp is a common default data transfer method for files, archives, and small directories. The following example will copy the local archive.tgz archive to the user’s home directory.
scp archive.tgz <cluster user>@ip-addr-of-login-node:/home/<cluster user>
The following command will copy archive.tgz to the user’s Lustre scratch directory instead.
scp archive.tgz <cluster user>@ip-addr-of-login-node:/lustre/fs0/scratch/<cluster user>
To copy a directory instead of a file or archive, use the -r flag.
scp -r data/ <cluster user>@ip-addr-of-login-node:/lustre/fs0/scratch/<cluster user>
Note that scp expects the remote directory to exist. If the remote directory does not exist, the following behavior will be observed.
1scp archive.tgz <cluster user>@ip-addr-of-login-node:/lustre/fs0/scratch/<cluster user>/fake-dir/
2scp: dest open "/lustre/fs0/scratch/<cluster user>/fake-dir/": Failure
3scp: failed to upload archive.tgz to /lustre/fs0/scratch/<cluster user>/fake-dir/
To resolve this problem, SSH to the login node and create the expected directory.
1ssh <cluster user>@ip-addr-of-login-node
2mkdir /lustre/fs0/scratch/<cluster user>/fake-dir/
3.8.1.2. sftp#
sftp is another option to transfer files from your workstation to DGX Cloud. To get started, have sftp connect to a login node.
sftp <cluster user>@ip-addr-of-login-node
You will see the prompt change, indicating authentication succeeded and you are using sftp.
sftp>
sftp offers commands to move data from your local system to the remote system and from the remote system to your local system.
Some operations apply to both local and remote directories and files. For those operations, an l is pre-pended to the command version that operates on your local workstation.
For example, to list the local workstation directory’s contents, run lls. To list the directory contents in your DGX Cloud directory, run ls.
A full inventory of operations can be found with the ? command.
1sftp> ?
2Available commands:
3...
To change your remote directory, use the cd command. Then, check your remote directory with the pwd command and your local directory with lpwd. Files will be copied to or from the directory you change to in both local and remote contexts.
1sftp> cd /lustre/fs0/scratch/demo-user
2sftp> pwd
3Remote working directory: /lustre/fs0/scratch/demo-user
4sftp> lpwd
5Local working directory: /Users/demo-user
To upload a file to DGX Cloud, use the put command.
sftp> put archive.tgz
To upload a directory and its contents to DGX Cloud, add the -R flag.
sftp> put -R my-directory
To easily download data from DGX Cloud to your local workstation, use the get command (with the -R flag for directory download).
sftp> get -R my-log-file-directory
To exit your sftp session, use the bye command.
sftp> bye
3.8.1.3. rsync#
rsync is also a commonly used tool for data transfer, primarily when multiple files and/or directories need to move and when data is being synchronized periodically between local and remote directories.
For example, use rsync to copy a local workstation file to a user’s DGX Cloud home directory.
rsync archive.tgz <cluster user>@ip-addr-of-login-node:/home/<cluster user>
rsync usage is similar to scp, but there are some important differences.
To copy a directory from your local workstation to DGX Cloud, ensure the local directory argument has a trailing / if you intend to maintain the local directory structure.
rsync local-directory/ <cluster user>@ip-addr-of-login-node:/home/<cluster user>
Without the trailing /, the contents of the local directory will be placed in the DGX Cloud target directory.
There are a large number of flags to consider when using rsync. Check the official documentation to explore all possible flags and optimize for your use case.
3.8.2. Moving Data from Your Cloud-based Storage to DGX Cloud#
When data that you need to move into DGX Cloud is in a cloud-based object store, the general strategy below can be relied on for various tools.
Write a sbatch script to download the appropriate tool, configure authentication, and place the data in your target directory (likely Lustre scratch).
Run the sbatch script.
Verify that the results in your target DGX Cloud directory are correct.
Repeat for additional data.
An example process for how to do this on CPU nodes in the cluster can be found in the section below.
3.8.2.1. Running Jobs Using Containers on CPU Nodes#
This section shows an example of running a batch job on a CPU node using NGC containers. For many use cases, this is optional, but it can be helpful if you have a container with general-purpose tools built into it that can be leveraged on CPU nodes.
3.8.2.1.1. Identifying Nodes#
You can use the sinfo command to see which nodes are in the cluster:
1sinfo
2
3PARTITION AVAIL  TIMELIMIT  NODES  STATE NODELIST
4cpuq         up   infinite      2   idle cpu[001-002]
5defq*        up   infinite     64   idle gpu[001-064]
In this example, the CPU nodes are available in a discrete cpuq partition. We’ll continue to reference this partition in the following sections. In the next step, we will specify the job samples to run on the CPU nodes.
Note
Depending on the details of the configuration of your cluster, your specific partitions may vary. CPU nodes may be in the same defq partition as the GPU nodes, for example, additional partitions may exist or have been created.
3.8.2.1.2. Running the Job#
The key addition necessary to use an NGC container on a CPU-only node is the NVIDIA_VISIBLE_DEVICES=void environment variable. The following sbatch script specifies this environment variable.
1#!/bin/bash
2#SBATCH --partition cpuq --nodes 1
3#SBATCH --exclusive
4#SBATCH --job-name=example-cpu-sbatch-job
5
6export NVIDIA_VISIBLE_DEVICES=void
7
8srun --mpi=pmix --container-image nvcr.io/nvidia/pytorch:24.09-py3 hostname
Save the script above in a file named cpu-hostname.sbatch, and run it with sbatch as shown.
sbatch cpu-hostname.sbatch
3.8.2.1.3. Viewing sbatch Logs#
Use the tail -f command to follow the output of the resulting Slurm log file in your home directory.
1tail -f slurm-20.out
2
3pyxis: importing docker image: nvcr.io/nvidia/pytorch:24.09-py3
4pyxis: imported docker image: nvcr.io/nvidia/pytorch:24.09-py3
5cpu002
3.8.2.2. Loading Data Via Batch Jobs on CPU Nodes#
This section shows an example of how to run batch job on a CPU nodes to download data from cloud object stores, then store the data on the Lustre filesystem.
3.8.2.2.1. Identifying Nodes#
You can use the sinfo command to see which nodes are in the cluster:
1sinfo
2
3PARTITION AVAIL  TIMELIMIT  NODES  STATE NODELIST
4cpuq         up   infinite      2   idle cpu[001-002]
5defq*        up   infinite     64   idle gpu[001-064]
In this example, the CPU nodes are available in a discrete cpuq partition. We’ll continue to reference this partition in following sections. In the next step, we will specify the job samples to run on the CPU nodes.
Note
Depending on the details of the configuration of your cluster, your specific partitions may vary. CPU nodes may be in the same defq partition as the GPU nodes, for example, or additional partitions may exist and/or have been created.
3.8.2.2.2. S3#
Loading Data From S3 via an AWS CLI sbatch Job
In this section, we write a batch job to load data from S3. The job carries out three main tasks:
Downloads the AWS CLI tool.
Unpacks the downloaded CLI tool into your home directory.
Uses the tool to download a dataset to Lustre via AWS S3.
1#!/bin/bash
2#SBATCH --partition cpuq --nodes 1
3#SBATCH --exclusive
4#SBATCH --job-name=aws-s3-download
5srun bash -c 'curl "https://awscli.amazonaws.com/awscli-exe-linux-x86_64.zip"
6  -o "awscliv2.zip"; unzip awscliv2.zip; mkdir /lustre/fs0/scratch/demo-user/s3-dl;
7/home/demo-user/aws/dist/aws s3 sync --no-sign-request --region=us-east-1 s3://noaa-swpc-pds /lustre/fs0/scratch/demo-user/s3-dl/'
To run the script:
Save the script above to your home directory as
aws-s3-download.sbatch.Update <demo-user> to your username.
Submit the job to the queue with this command:
sbatch aws-s3-download.sbatch
An open dataset is used in this example, so no AWS credentials are required.
The output from sinfo will show activity in the cpuq partition on one of the CPU nodes.
1sinfo
2
3PARTITION AVAIL  TIMELIMIT  NODES  STATE NODELIST
4cpuq         up   infinite      1  alloc cpu001
5cpuq         up   infinite      1   idle cpu002
6defq*        up   infinite     64   idle gpu[001-064]
Accessing S3 Data with Authentication
You can use environment variables to access an S3 bucket that requires security authorization.
A modified sbatch script that uses AWS environment variables follows - it is rewritten to assume AWS CLI has been downloaded and unpacked.
 1#!/bin/bash
 2#SBATCH --partition cpuq --nodes 1
 3#SBATCH --exclusive
 4#SBATCH --job-name=aws-secure-s3-download
 5
 6export AWS_ACCESS_KEY_ID=your-access-key
 7export AWS_SECRET_ACCESS_KEY=your-secret-access-key
 8export AWS_DEFAULT_REGION=target-region
 9
10srun bash -c 'mkdir /lustre/fs0/scratch/demo-user/secure-s3-dl; /home/user/aws/dist/aws s3 sync s3://your-secure-bucket /lustre/fs0/scratch/demo-user/secure-s3-dl/'
Different authentication mechanisms may be required, depending on the location of data or company policies.
Accessing S3 Data with the s5cmd Tool
An alternative tool to consider for data downloads using S3 is the s5cmd tool. It provides significant performance gains relative to the standard aws tool, which can lead to significant time savings for large data movement operations on the order of tens of gigabytes or more.
The following sbatch script mirrors the previous examples, but downloads and uses the s5cmd tool instead.
1#!/bin/bash
2#SBATCH --partition cpuq --nodes 1
3#SBATCH --exclusive
4#SBATCH --job-name=s5cmd-s3-download
5srun bash -c 'wget https://github.com/peak/s5cmd/releases/download/v2.2.2/s5cmd_2.2.2_Linux-64bit.tar.gz; tar -xf s5cmd_2.2.2_Linux-64bit.tar.gz; mkdir /lustre/fs0/scratch/demo-user/s5cmd-dl;
6/home/demo-user/s5cmd --no-sign-request cp s3://noaa-swpc-pds/* /lustre/fs0/scratch/demo-user/s5cmd-dl/'
3.8.2.2.3. Azure#
Loading Data From Azure Storage via an AzCopy sbatch Job
In this section, we write a batch job to load data from Azure Storage using AzCopy. The job carries out three main tasks:
Downloads the
AzCopytool.Unpacks the downloaded CLI tool into your home directory.
Uses the tool to download a dataset to Lustre via Azure Storage.
1#!/bin/bash
2#SBATCH --partition cpuq --nodes 1
3#SBATCH --exclusive
4#SBATCH --job-name=azcopy-download
5
6srun bash -c 'wget -O azcopy_v10.tar.gz https://aka.ms/downloadazcopy-v10-linux && tar -xf azcopy_v10.tar.gz --strip-components=1; mkdir /lustre/fs0/scratch/demo-user/azcopy; ./azcopy copy "https://azureopendatastorage.blob.core.windows.net/mnist/train-images-idx3-ubyte.gz" "/lustre/fs0/scratch/demo-user/azcopy"'
To run the script:
Save the script above to your home directory as
azcopy-download.sbatch.Update <demo-user> to your username.
Submit the job to the queue with this command:
sbatch azcopy-download.sbatch
An open dataset is used in this example, so no Azure credentials are required.
The output from sinfo will show activity in the cpuq partition on one of the CPU nodes.
1sinfo
2
3PARTITION AVAIL  TIMELIMIT  NODES  STATE NODELIST
4cpuq         up   infinite      1  alloc cpu001
5cpuq         up   infinite      1   idle cpu002
6defq*        up   infinite     64   idle gpu[001-064]
3.8.2.2.4. CPU Job sbatch Logs#
As with other examples in this section, use the tail -f command to follow the output of the resulting Slurm log file in your home directory.
 1tail -f /home/demo-user/slurm-22.out
 2
 3download: s3://noaa-swpc-pds/json/goes/primary/differential-protons-7-day.json to s3-dl/json/goes/primary/differential-protons-7-day.json
 4download: s3://noaa-swpc-pds/text/3-day-geomag-forecast.txt to s3-dl/text/3-day-geomag-forecast.txt
 5download: s3://noaa-swpc-pds/text/aurora-nowcast-hemi-power.txt to s3-dl/text/aurora-nowcast-hemi-power.txt
 6download: s3://noaa-swpc-pds/text/45-day-ap-forecast.txt to s3-dl/text/45-day-ap-forecast.txt
 7download: s3://noaa-swpc-pds/json/solar-cycle/sunspots.json to s3-dl/json/solar-cycle/sunspots.json
 8download: s3://noaa-swpc-pds/json/goes/primary/xrays-7-day.json to s3-dl/json/goes/primary/xrays-7-day.json
 9download: s3://noaa-swpc-pds/text/3-day-forecast.txt to s3-dl/text/3-day-forecast.txt
10download: s3://noaa-swpc-pds/text/27-day-outlook.txt to s3-dl/text/27-day-outlook.txt
11download: s3://noaa-swpc-pds/products/alerts.json to s3-dl/products/alerts.json
12download: s3://noaa-swpc-pds/text/relativistic-electron-fluence-tabular.txt to s3-dl/text/relativistic-electron-fluence-tabular.txt
3.8.2.2.5. Verifying Data#
The downloaded data will be present in the Lustre filesystem, ready for local manipulation or ingest into a GPU-based job if already preprocessed.
1ls /lustre/fs0/scratch/demo-user/s3-dl/
2
3index.html  json  products  text
3.9. Managing Jobs#
3.9.1. Job Status and Monitoring#
To see the status of which jobs on the cluster, use the squeue command:
1squeue -a -l
2
32Tue Nov 17 19:08:18 2020
43JOBID PARTITION NAME USER STATE TIME TIME_LIMIT NODES NODELIST(REASON)
549      batch    bash user01 RUNNING 5:43 UNLIMITED 1 dgx1
6510     batch    Bash user02 RUNNING 6:33 UNLIMITED 2 dgx[2-3]
This shows the JOBID as well as the state of all jobs in the queue.
You can use the -u flag to view jobs for a particular username:
squeue -l -u USERNAME
To view more detailed information about a particular job, use the scontrol command:
scontrol show job
3.9.2. Adjusting Job Priority#
You can change the job priority for a queued job using the following command:
scontrol update JOBID Priority=<Priority-Integer>
Where <Priority-Integer> is replaced by an integer between 1 and 2^32 - 1. The higher the integer, the higher the priority the job is given.
3.9.3. Pausing and Resuming a Running Job#
It is possible to pause a running job using the scontrol suspend command:
scontrol suspend JOBID
The job will be stopped at its current step, so it can be resumed at a later time.
To resume a paused job, use the scontrol resume command:
scontrol resume JOBID
3.9.4. Holding and Releasing a Queued Job#
It is possible to prevent a queued job from running using the scontrol hold command:
scontrol hold JOBID
The Job will remain in the queue in a held state, so will not run until it is released:
scontrol release JOBID
3.9.5. Resubmitting a Job#
You can use the requeue flag with scontrol to add a batch job in the CONFIGURING, RUNNING, STOPPED or SUSPENDED state to the pending queue:
scontrol requeue JOBID
3.9.6. Cancelling a Job#
To cancel a running job, first make sure you know the JOBID, which can be found using the squeue command as previously shown. You can then cancel with scancel:
scancel JOBID
Multiple jobs can be canceled in one command by separating job id’s by commas:
scancel JOBID1, JOBID2