1. Data Download Examples#
1.1. Download Data From S3 in a Training Workload#
In this example, we will create a new Workload to download data from a private S3 bucket. We will use a Training workload due to the noninteractive nature of this example. We will configure the workload with private information to access the S3 bucket and execute the commands necessary to install and run the s5cmd tool to download the data from that bucket to a PVC.
1.1.1. Prerequisites and Requirements#
The following are required before running the data download Training workload:
You must have the user role L1 researcher, ML Engineer, or System Administrator to run through all sections of this tutorial.
Your user must be able to access a project and department.
You must have access to a compute resource in your scope that you can use—it can be CPU-only, which is ideal to avoid using GPU resources when it is unnecessary.
You must have a private S3 bucket with data in it.
You must have the necessary permissions to download that data from S3 via access key ID and secret access key.
1.1.2. Creating the Credentials#
To securely insert the necessary keys into the workload, we will create a Credential for the access key ID and the secret access key, allowing access to our S3 bucket.
To create a new Credential, go to the Credentials page. Click + NEW CREDENTIALS and then Access key to open the access key creation form.
On the form, set the desired scope. The scope should be as narrow as possible—in this case, set the scope to match the targeted project for your workload.
Give the access key a descriptive name, such as
aws-access-keys, and add a description if desired.In the Secret pane, select New secret. Set the Access key field to your AWS access key ID, and the Access secret field to your AWS secret access key.
Click CREATE CREDENTIALS to save the new Credential.
1.1.3. Creating the Data Source#
We will create a PVC Data Source to allow the resulting dataset to be shared with future workloads.
To create a new PVC, go to the Data Sources page. Click New Data Source and then PVC to open the PVC creation form.
On the new form, set the desired scope.
Important
PVC Data Sources created at the cluster or department level do not replicate data across projects or namespaces. Each project or namespace will be provisioned as a separate PVC replica with different underlying PVs; therefore, the data in each PVC is not replicated.
Give the PVC a memorable name like
s3-datasetand add a description if desired.For the data options, select a new PVC storage class that suits your needs according to the PVC recommended storage classes. In this example,
dgxc-enterprise-fileis sufficient. To allow all nodes to read and write from/to the PVC, select Read-write by many nodes for the access mode. Enter a capacity that will fit your target dataset—we will specify10 TBfor this example. Select Filesystem as the volume mode. Lastly, set the Container path to/dataset, where the PVC will be mounted inside containers.Once the form is complete, click the CREATE DATA SOURCE button at the bottom of the page.
Note
The first time a job is launched using a new PVC, it will take longer to start as the storage gets provisioned only once the first claim to the PVC is made.
1.1.4. Creating the Training Workload#
Go to the Workloads overview page and click the + New Workload button in the top left. A drop-down menu will appear. From the drop-down menu, select Training. You will be taken to the New training creation page.
Select the desired project to run your job in.
Leave the Template pane of the form set to Start from scratch.
Enter a descriptive name for your workload, such as
s3-download. Click Continue. After a few seconds, the Environment pane of the creation process will appear.To create a new environment for the workload, click the + New Environment button in the top right of the Environment pane. The Environment creation form will open.
In the Environment creation form, enter a name for the environment, such as
s3-download-env, and optionally add a description.Under Image URL, put
nvcr.io/nvidia/pytorch:24.08-py3. If desired, the image pull policy can be changed. The default value of “if not already present” is recommended for most cases, but if you are pushing new containers to the NGC org with the same tag, “always pull the image from the registry” should be used to check for updates to the image.Under the Workload architecture & type pane, select Standard and Training if they are not selected already. These options are likely already selected and grayed out.
Do not modify any other settings, including the Runtime settings section—we will fill that in for the specific workload, keeping this environment multipurpose for future workloads.
Click Create Environment in the bottom right of the page. You should see a pop-up saying that your environment has been created. The page will refresh, and you will be taken back to the top of the Environment pane of the New training creation page. The environment you just created should now be selected.
Open the Runtime settings section for this training workload. We will execute a sequence of several commands within this workload. Set the Command field to
bash -c, and the Arguments field to"wget https://github.com/peak/s5cmd/releases/download/v2.2.2/s5cmd_2.2.2_Linux-64bit.tar.gz; tar -xf s5cmd_2.2.2_Linux-64bit.tar.gz; ./s5cmd cp s3://your-s3-bucket-name-here/* /dataset"To embed the Credentials into the workload, click the + ENVIRONMENT VARIABLE button twice.
For the first entry’s Name field, enter
AWS_ACCESS_KEY_ID, set the Source toCredentials, set the Credentials name field toaws-access-keys, and set the Secret Key field toAccessKeyId.For the second entry’s Name field, enter
AWS_SECRET_ACCESS_KEY, set the Source toCredentials, set the Credentials name field toaws-access-keys, and set the Secret Key field toSecretKey.Go to the Compute resource pane and select your desired compute resource—ideally a CPU-only resource to avoid consuming GPU resources.
In the Data Sources section, select your
s3-datasetPVC.Go to the bottom of the page and click CREATE TRAINING. This will add your workload to the queue and it will automatically get scheduled once cluster resources are available.
After creating the training workload, you will be taken to the workload overview page, where you can view the status of your workload. Your training workload is running once the status reads “Running”. This may take a while if the container you chose has not previously been pulled to the cluster.
Once the status is “Completed”, you can review the outcome by clicking the workload and selecting the SHOW DETAILS button on the right side of the blue banner. Select the LOGS tab in the workload’s detail pane—it should indicate that data is being copied to your new PVC from your S3 bucket.
1.1.5. Cleaning up the Environment#
After the job finishes, it can be deleted to free up resources for other jobs. Note that certain jobs do not self-terminate and should be monitored to ensure resources are not idle for completed jobs.
1.2. Using Your Data From Google Cloud Storage#
There are two ways to use your data residing in Google or other clouds:
Copy the data into the DGX Cloud Create environment, from Google Cloud Storage (GCS) or other cloud, onto the shared store NFS filesystems.
Access the data directly from services within the cloud provider. We recommend running this job as a pure Kubernetes job at this time.
Here are examples of the following scenarios:
1.2.1. Example: Using GCS to copy data to PVC within NVIDIA Run:ai#
In GCP, create a custom GCP role with the required permissions.
The following is a minimal set of permissions, which may be created by cloning the Storage Object Viewer role and adding the
storage.buckets.getpermission.storage.buckets.get storage.buckets.getIamPolicy storage.buckets.listEffectiveTags storage.buckets.listTagBindings storage.managedFolders.create storage.managedFolders.get storage.managedFolders.list storage.objects.list
Create a GCP service account (SA).
Assign the custom role to the service account on the target bucket(s).
Create a service account key for the SA created and download the .json key file. Protect the key file as it contains your private key.
Create a Kubernetes secret with the SA key in your NVIDIA Run:ai project (namespace) using the following command.
Note
You must have your kubeconfig set to the NVIDIA Run:ai researcher configuration provided by DGX Cloud Create.
kubectl create secret generic google-gcs-creds --from-file=key=projectID-deadbeef.json -n runai-<NVIDIA Run:ai projectName>
Within NVIDIA Run:ai, create a data source as a PVC using the following sequence:
Specify the scope, name, and an optional description for the PVC.
In the Data Mount section, select New PVC. Choose a storage class, access mode, and always Filesystem. Then, set a default mount path within any containers.
Note
The Block Volume mode is unsupported. Selecting it may lead to errors when launching a workload that uses the resulting PVC.
Use the
kubectl get pvccommand to determine the actual name of the PVC created by the NVIDIA Run:ai console. The actual name will be similar toname-for-pvc-<cluster-identifier>-<digits>. Use this for the next step.Create a Kubernetes manifest YAML utilizing the Google Cloud command line to copy the data from GCS into the PVC. The example below uses the secret you created and the PVC as mounted volumes to the container. The ProjectID and Bucket name are passed to a
gcloud rsyncvia environment variables.1apiVersion: v1 2kind: Pod 3metadata: 4 name: gcp-gcs-copy-2-pv-podd 5 namespace: runai-<NVIDIA Run:ai projectName> 6spec: 7 volumes: 8 - name: pv-storage 9 persistentVolumeClaim: 10 claimName: name-for-pvc 11 - name: gcp-sa-credential 12 secret: 13 secretName: google-gcs-creds 14 restartPolicy: OnFailure 15 schedulerName: runai-scheduler 16 containers: 17 - name: gcp-cli-container 18 image: google/cloud-sdk 19 imagePullPolicy: IfNotPresent 20 env: 21 - name: PROJECTNAME 22 value: projectID 23 - name: BUCKET 24 value: bucket-name 25 volumeMounts: 26 - mountPath: "/data/shared" 27 name: pv-storage 28 - name: gcp-sa-credential 29 mountPath: /etc/gcp_cred 30 readOnly: true 31 command: 32 - "sh" 33 - "-c" 34 - "gcloud auth activate-service-account --key-file=/etc/gcp_cred/key && gcloud storage rsync -r gs://${BUCKET} /data/shared --project=${PROJECTNAME}"
Submit the Kubernetes manifest for execution in the DGX Cloud Create environment using the following command:
kubectl apply -f manifest.yaml -n runai-<NVIDIA Run:ai ProjectName>.Monitor the job for completion using
kubectl get pod gcp-gcs-copy-2-pv-podd
You can now use the PVC in your NVIDIA Run:ai jobs.
1.2.2. Example: Using data directly within Google Cloud Services#
NVIDIA Run:ai training jobs can directly access data in Google Cloud storage. This section gives an example of how to do this in a Python job, and the small configuration steps needed to make it happen.
The following Python code demonstrates how to read all text files from a bucket into a list of strings. While this approach may not be practical for AI training workloads, it will help illustrate the necessary configurations.
 1from google.cloud import storage
 2import argparse
 3import os
 4
 5def get_bucket_name():
 6    parser = argparse.ArgumentParser(description="Read text files from a    Google Cloud Storage bucket.")
 7    parser.add_argument("bucket_name", help="The name of the bucket to read from.", nargs='?')
 8    args = parser.parse_args()
 9
10    if args.bucket_name:
11        return args.bucket_name
12    elif "BUCKET" in os.environ:
13        return os.environ["BUCKET"]
14    else:
15        print("Error: Bucket name not provided. Please provide it as a command line argument or set the   BUCKET environment variable.")
16        return None
17
18def read_bucket_files(bucket_name):
19    storage_client = storage.Client()
20    bucket = storage_client.bucket(bucket_name)
21
22    file_contents = []
23    blobs = bucket.list_blobs()
24        for blob in blobs:
25            if blob.name.endswith(".txt"):
26                # Download the file content
27                content = blob.download_as_string().decode("utf-8")
28                file_contents.append(content)
29
30    return file_contents
31
32if __name__ == "__main__":
33    bucket_name = get_bucket_name()
34    if bucket_name:
35        file_contents = read_bucket_files(bucket_name)
36    else:
37        exit(1)
38
39    for content in file_contents:
40        print(content)
To execute the above code in a containerized training job on Kubernetes, you will need to do the following:
Include the Google Cloud Storage Python libraries into the container.
Inject a secret into the container, allowing proper authorization to the GCS API.
To install the google-cloud-storage Python library, use pip to install it into the container image. For example, use the following Dockerfile:
FROM python:3.12

RUN pip install google-cloud-storage
RUN mkdir /app
COPY read.py /app/

ENTRYPOINT ["python"]
CMD ["/app/read.py"]
To inject the secret into the container, use a Kubernetes secret mounted as a file with the environment variable GOOGLE_APPLICATION_CREDENTIALS pointed at the file. The example below uses the same secret as the one created above.
 1apiVersion: v1
 2kind: Pod
 3metadata:
 4  name: gcs-reader
 5spec:
 6  containers:
 7    - name: gcs-reader
 8      image: nvcr.io/<orgID>/gcs-read:latest
 9      imagePullPolicy: IfNotPresent
10      command: ["python", "/app/read.py"]
11      env:
12        - name: BUCKET
13          value: bucket-name
14        - name: GOOGLE_APPLICATION_CREDENTIALS
15          value: /etc/gcp_cred/key
16      volumeMounts:
17        - name: gcs-creds
18          mountPath: /etc/gcp_cred
19          readOnly: true
20  imagePullSecrets:
21  - name: nvcr.io-creds
22  volumes:
23    - name: gcs-creds
24      secret:
25        secretName: google-gcs-creds
26  restartPolicy: OnFailure
Note
Currently, there isn’t a method to mount Kubernetes secrets as files in NVIDIA Run:ai jobs. NVIDIA Run:ai supports only environment variables. Since the Google libraries require a token file (which should be a secret), you will need workarounds to use them with NVIDIA Run:ai jobs. The recommended workarounds are:
only use Kubernetes native jobs for data manipulation, or
copy the GCP service account key into shared storage and point the
GOOGLE_APPLICATION_CREDENTIALSenvironmental variable at that shared storage location.
1.2.3. Example: Reading data from Google BigQuery#
You can use data from Google BigQuery directly in your training jobs on NVIDIA Run:ai. This example shows the Python script and the small configuration code needed.
In GCP, the BigQuery Data Viewer role contains the necessary permissions and may be assigned at the table, dataset or project levels. Following the principle of least privilege, NVIDIA recommends assigning the role at the Table level, unless you need to read multiple tables from the dataset or project. The following is a Python code example for a BigQuery reader.
 1import argparse
 2import os
 3from google.cloud import bigquery
 4
 5def read_bigquery_table(project, dataset, table):
 6    client = bigquery.Client()
 7    table_ref = client.dataset(dataset).table(table)
 8    table = client.get_table(table_ref)
 9
10    rows = client.list_rows(table)
11    return rows
12
13if __name__ == "__main__":
14    parser = argparse.ArgumentParser(description='Read a BigQuery table.')
15    parser.add_argument('--project', help='The project ID.')
16    parser.add_argument('--dataset', help='The dataset ID.')
17    parser.add_argument('--table', help='The table ID.')
18
19    args = parser.parse_args()
20
21    project = args.project or os.environ.get('PROJECTNAME')
22    dataset = args.dataset or os.environ.get('DATASET')
23    table = args.table or os.environ.get('TABLENAME')
24
25    if not project or not dataset or not table:
26        print("Error: Missing project, dataset, or table name.")
27        exit(1)
28
29    rows = read_bigquery_table(project, dataset, table)
30
31    for row in rows:
32        print(row)
Include the above code in a container using the following Dockerfile:
FROM python:3.12

RUN pip install google-cloud-bigquery
RUN mkdir /app
COPY read-bq.py /app/

ENTRYPOINT ["python"]
CMD ["/app/read-bq.py"]
Finally, you can start a job/pod with the following Kubernetes manifest:
 1apiVersion: v1
 2kind: Pod
 3metadata:
 4  name: read-bq
 5spec:
 6  containers:
 7    - name: read-bq
 8      image: nvcr.io/<orgID>/read-from-bq:latest
 9      imagePullPolicy: Always
10      command: ["python", "/app/read-bq.py"]
11      env:
12        - name: PROJECTNAME
13          value: project
14        - name: DATASET
15          value: austin_training
16        - name: TABLENAME
17          value: example
18        - name: GOOGLE_APPLICATION_CREDENTIALS
19          value: /etc/gcp_cred/key
20      volumeMounts:
21        - name: gcs-creds
22          mountPath: /etc/gcp_cred
23          readOnly: true
24  imagePullSecrets:
25  - name: nvcr.io-creds
26  volumes:
27    - name: gcs-creds
28      secret:
29        secretName: google-gcs-creds
30  restartPolicy: OnFailure
1.2.4. Alternative to using Service Account Keys#
Service account keys are powerful credentials, and can present a security risk if they are not managed correctly. Workload Identity Federation eliminates the maintenance and security burden associated with service account keys. With Workload Identity Federation, you can use Identity and Access Management (IAM) to grant external identities IAM roles, and direct access on Google Cloud resources. You can also grant access through service account impersonation.
As part of environment onboarding, NVIDIA will provide you with the OIDC issuer URL for the environment. Navigate to your organization’s Google Cloud Console, then go to IAM & Admin > Workload Identity Federation. Click the CREATE POOL button to proceed.

In the subsequent workflow wizard, provide a name for the pool and an optional description and select OpenID Connect (OIDC) as the provider.
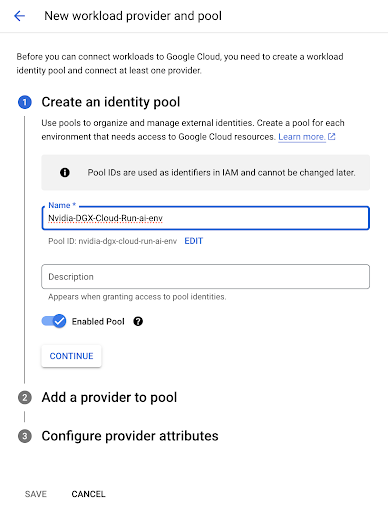
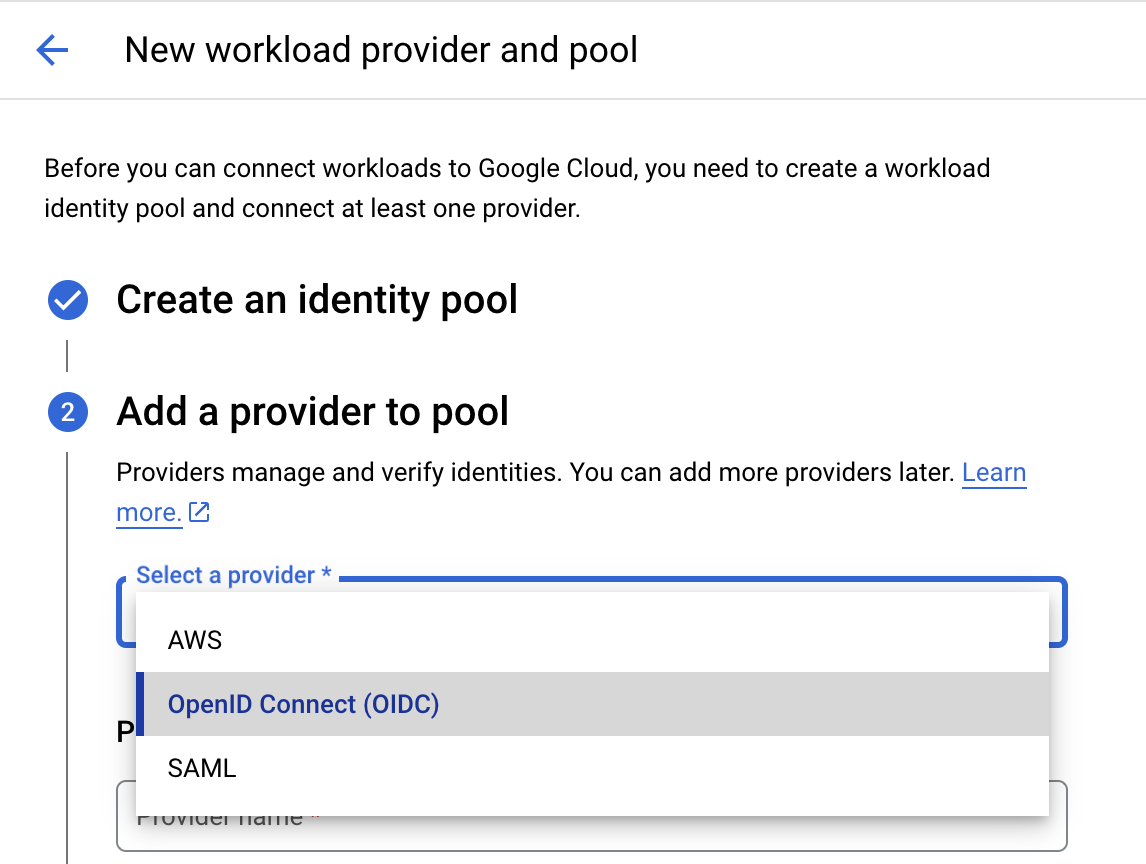
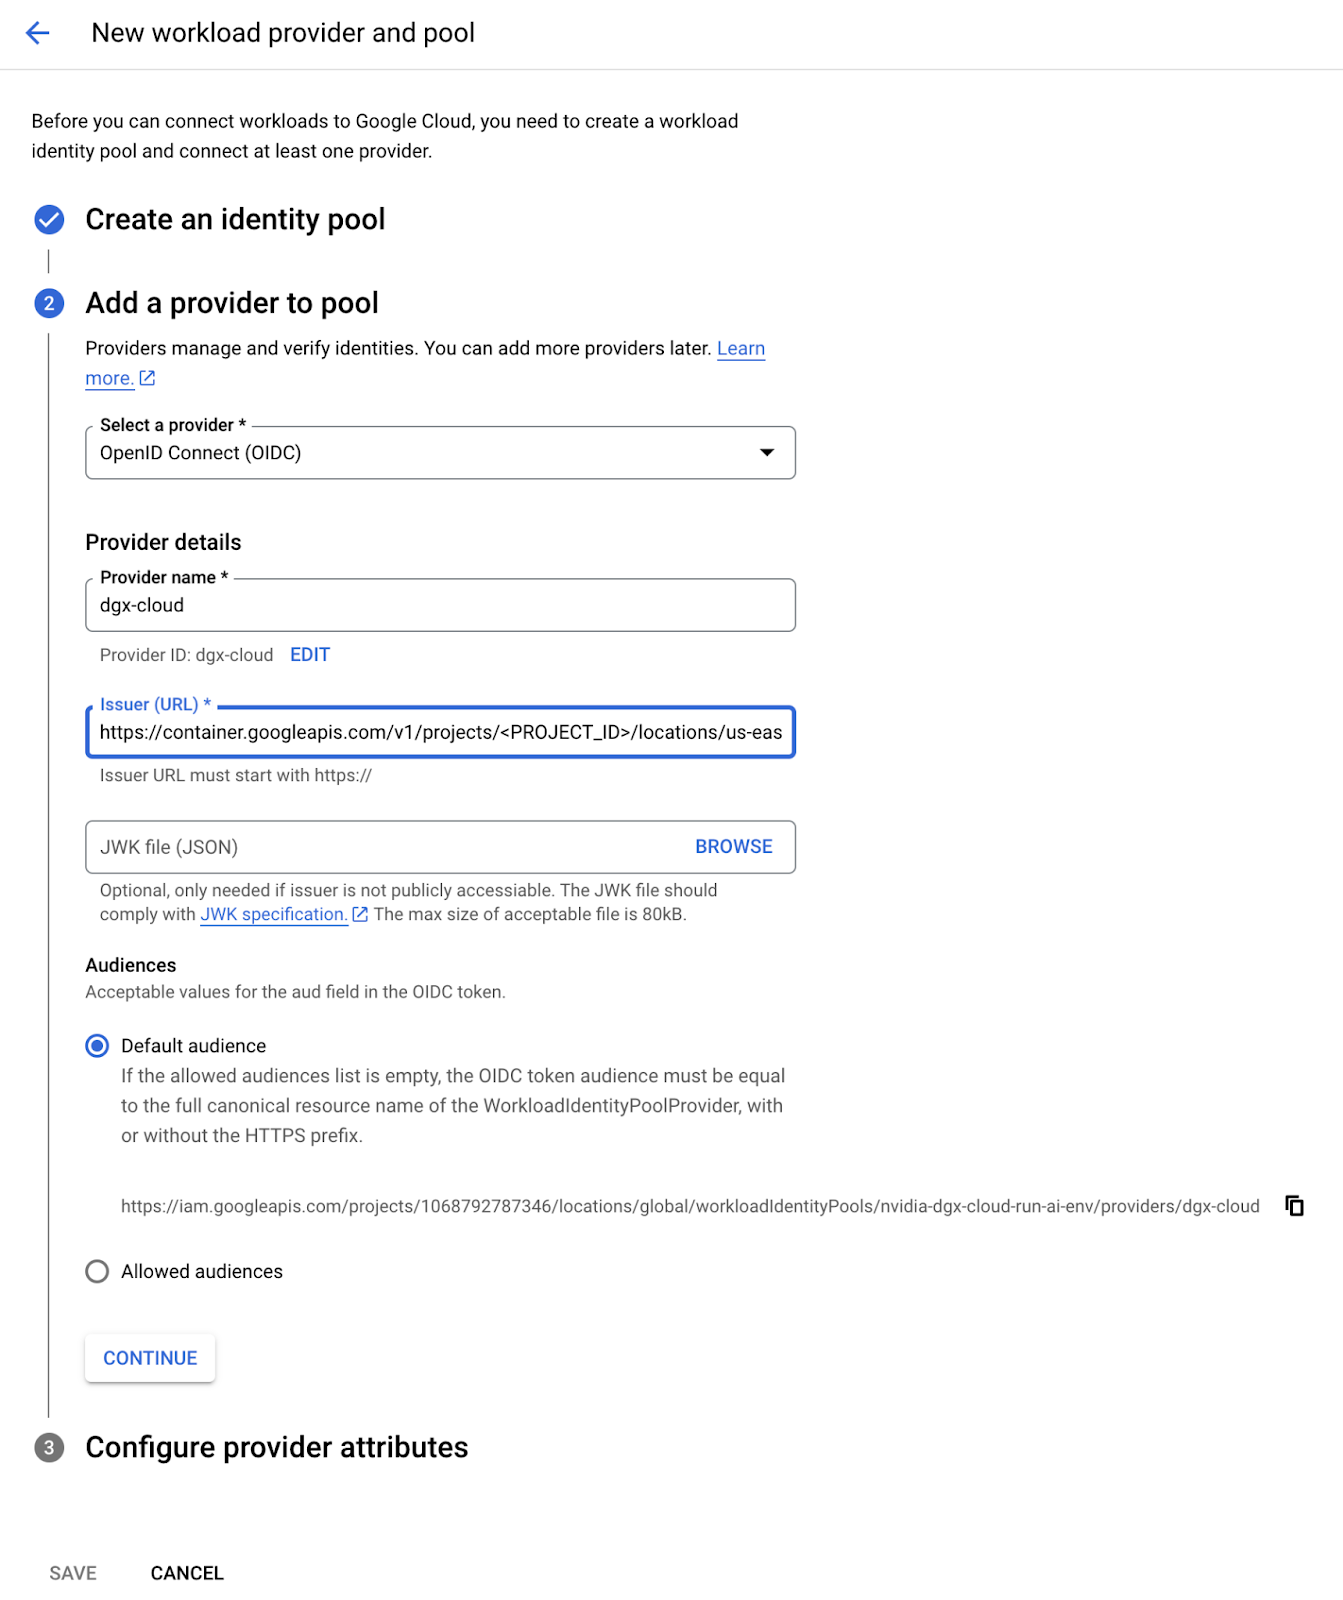
After selecting the provider type, enter “dgx-cloud” as the provider name and paste the Issuer URL provided with your environment into the Issuer (URL) field. Under Audiences, select Default audience.
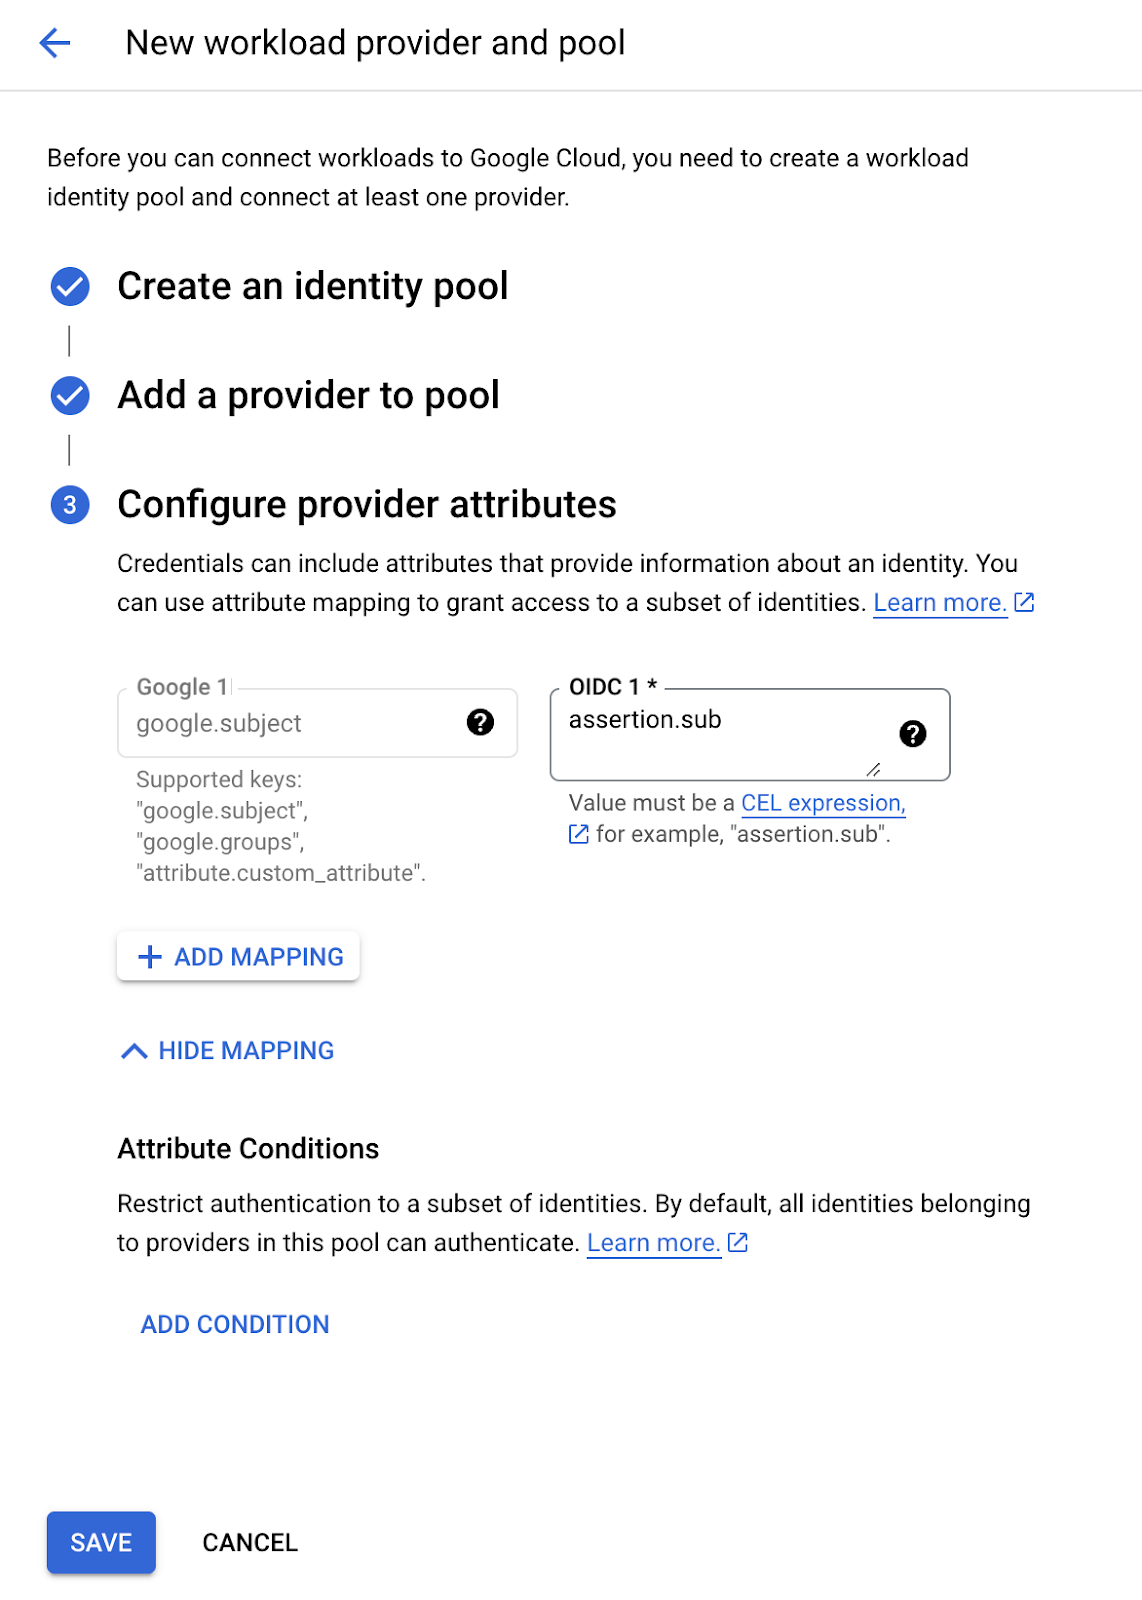
Lastly, add a mapping google.subject to assertion.sub in the Configure provider attributes step.
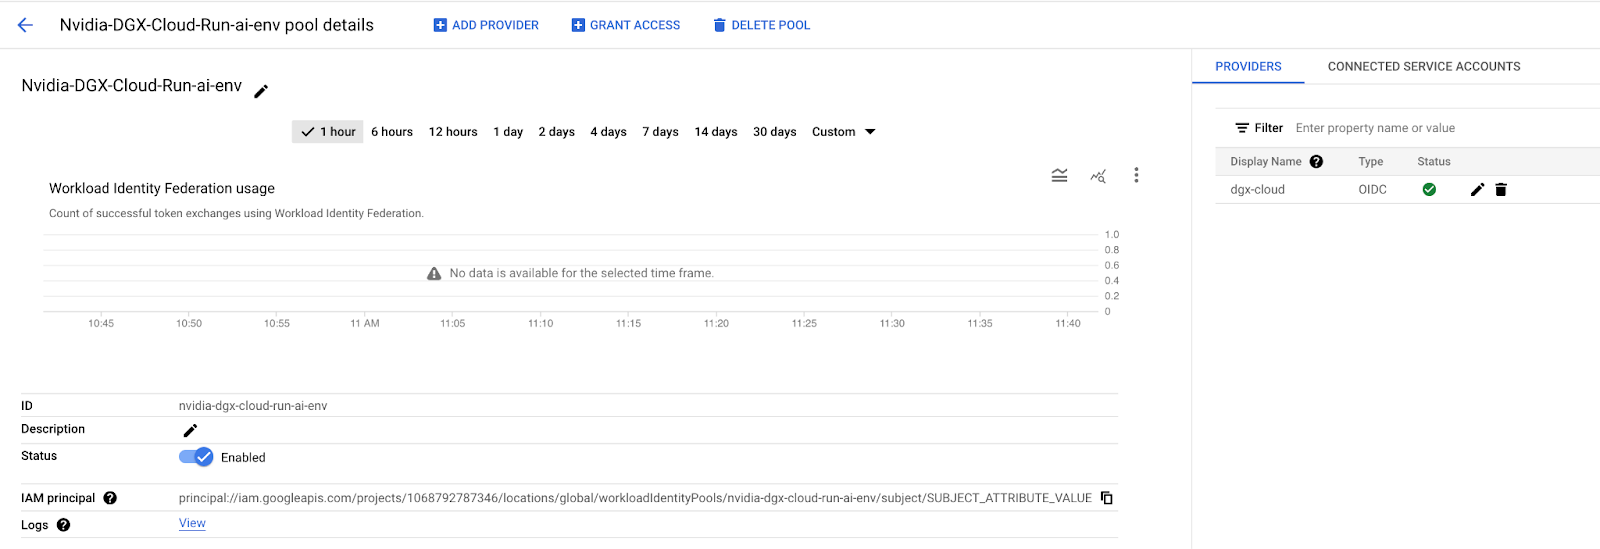
Once complete, the Workload Identity Pool will confirm that it can communicate with the “dgx-cloud” Kubernetes cluster. You should see a green checkmark in the upper left corner near the provider you created, as shown below.
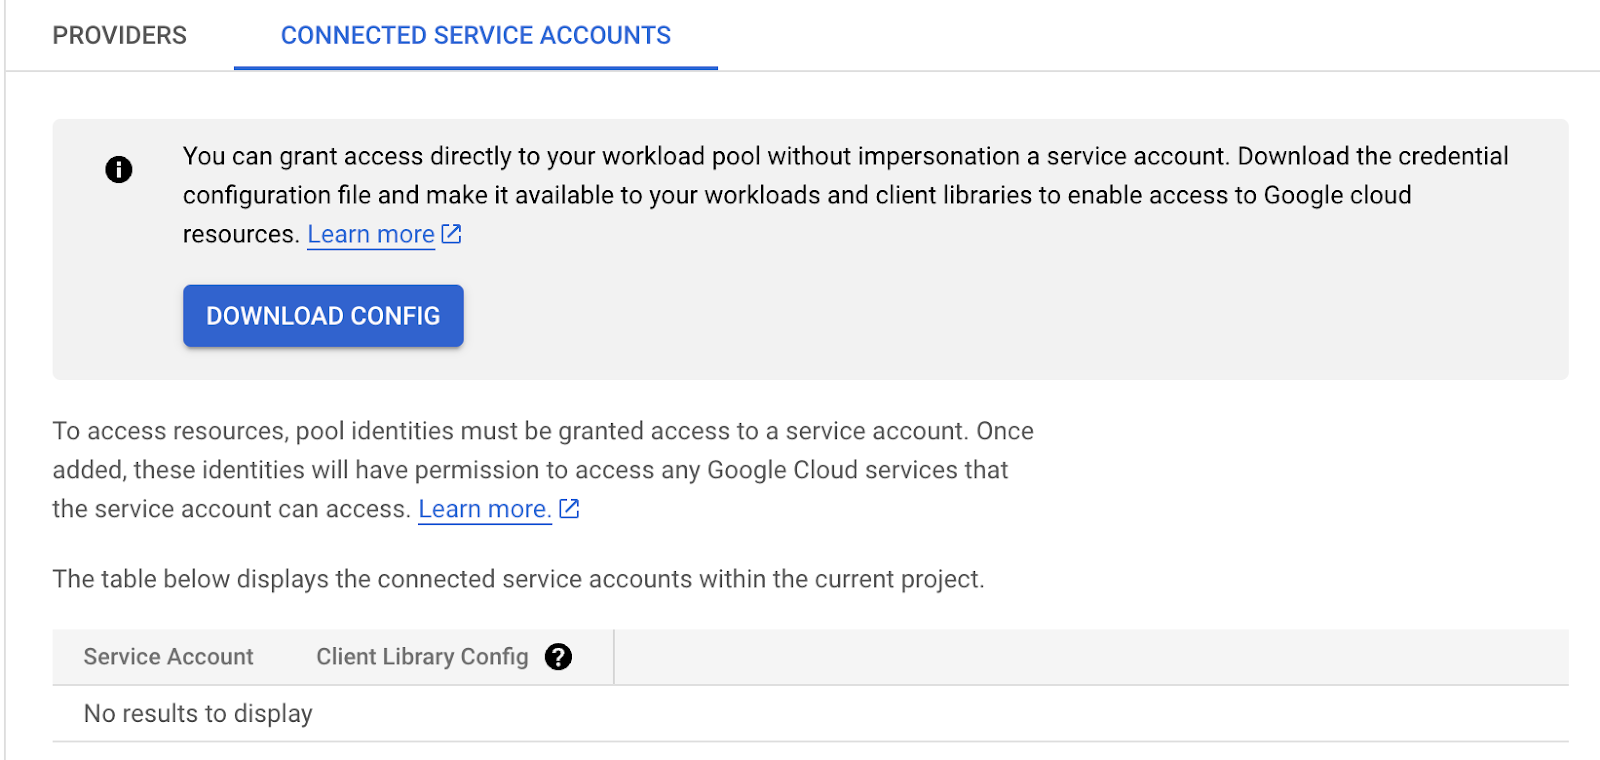
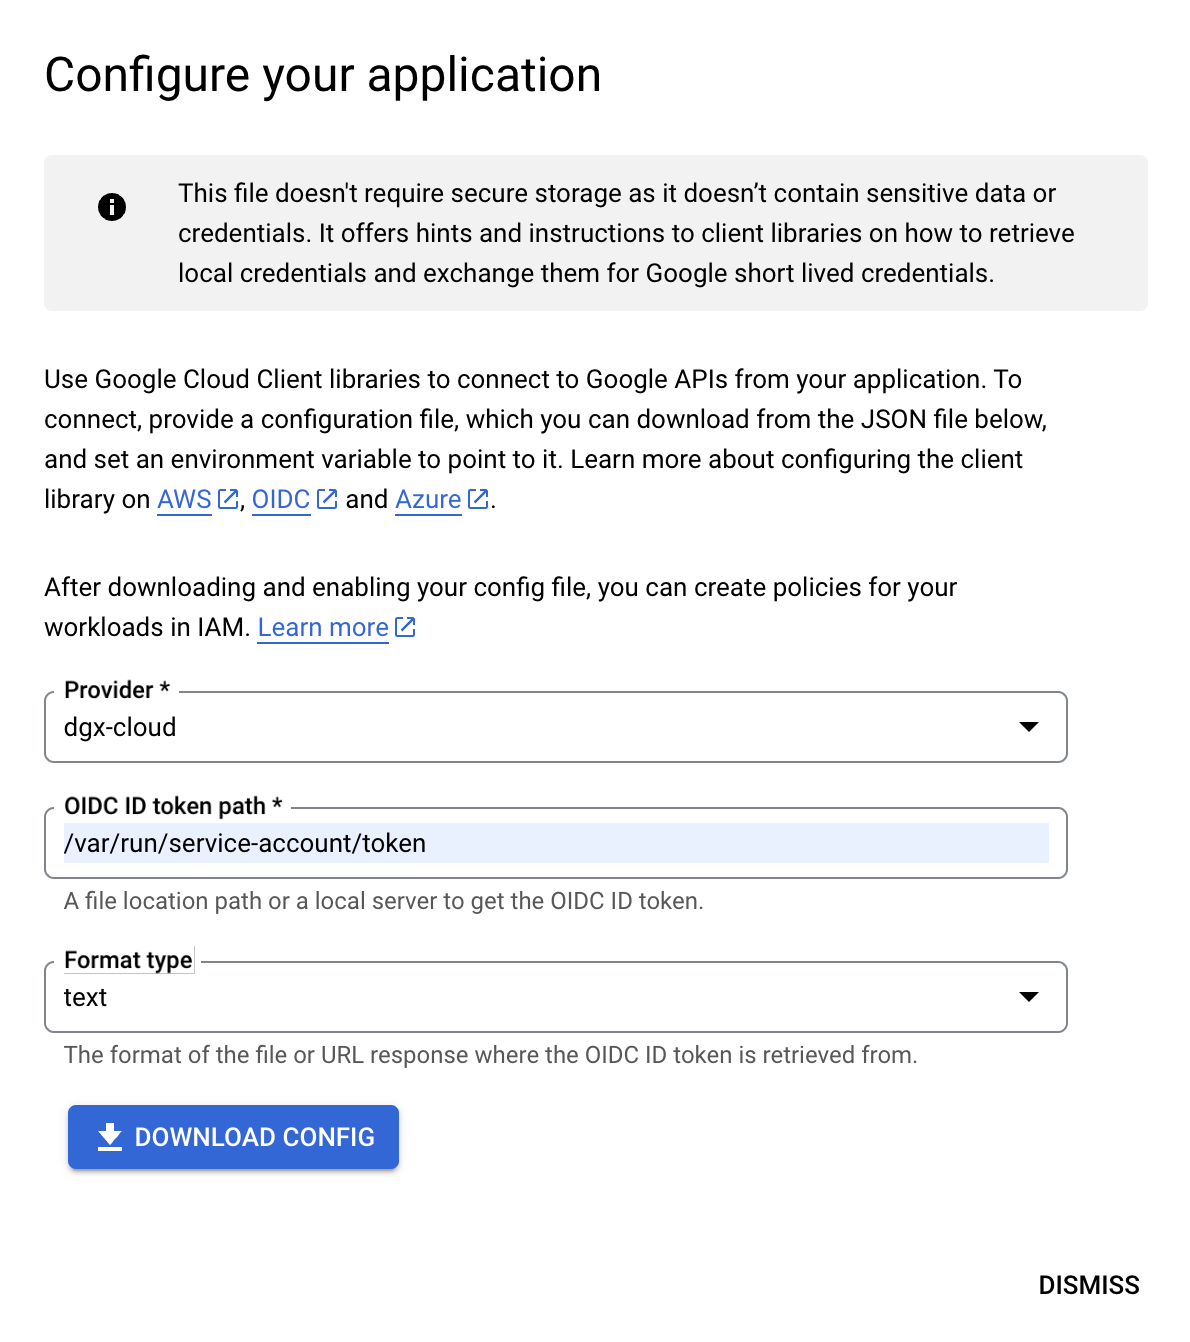
Then, click CONNECTED SERVICE ACCOUNTS in the upper right corner and then select the DOWNLOAD CONFIG button. When the Configure your application dialog comes up, select the provider you created and then paste the path
/var/run/service-account/token into the OIDC ID token path field, leaving the format as “text” and then click DOWNLOAD CONFIG to download the required configuration file.
After saving the configuration file, click DISMISS. On the main Identity Federation Pool page, locate and copy the value in the IAM Principal field. It will look similar to:
principal://iam.googleapis.com/projects/1091797687346/locations/global/workloadIdentityPools/nvidia-dgx-cloud-run-ai-env/subject/SUBJECT_ATTRIBUTE_VALUE
where SUBJECT_ATTRIBUTE_VALUE represents the Kubernetes identifier.
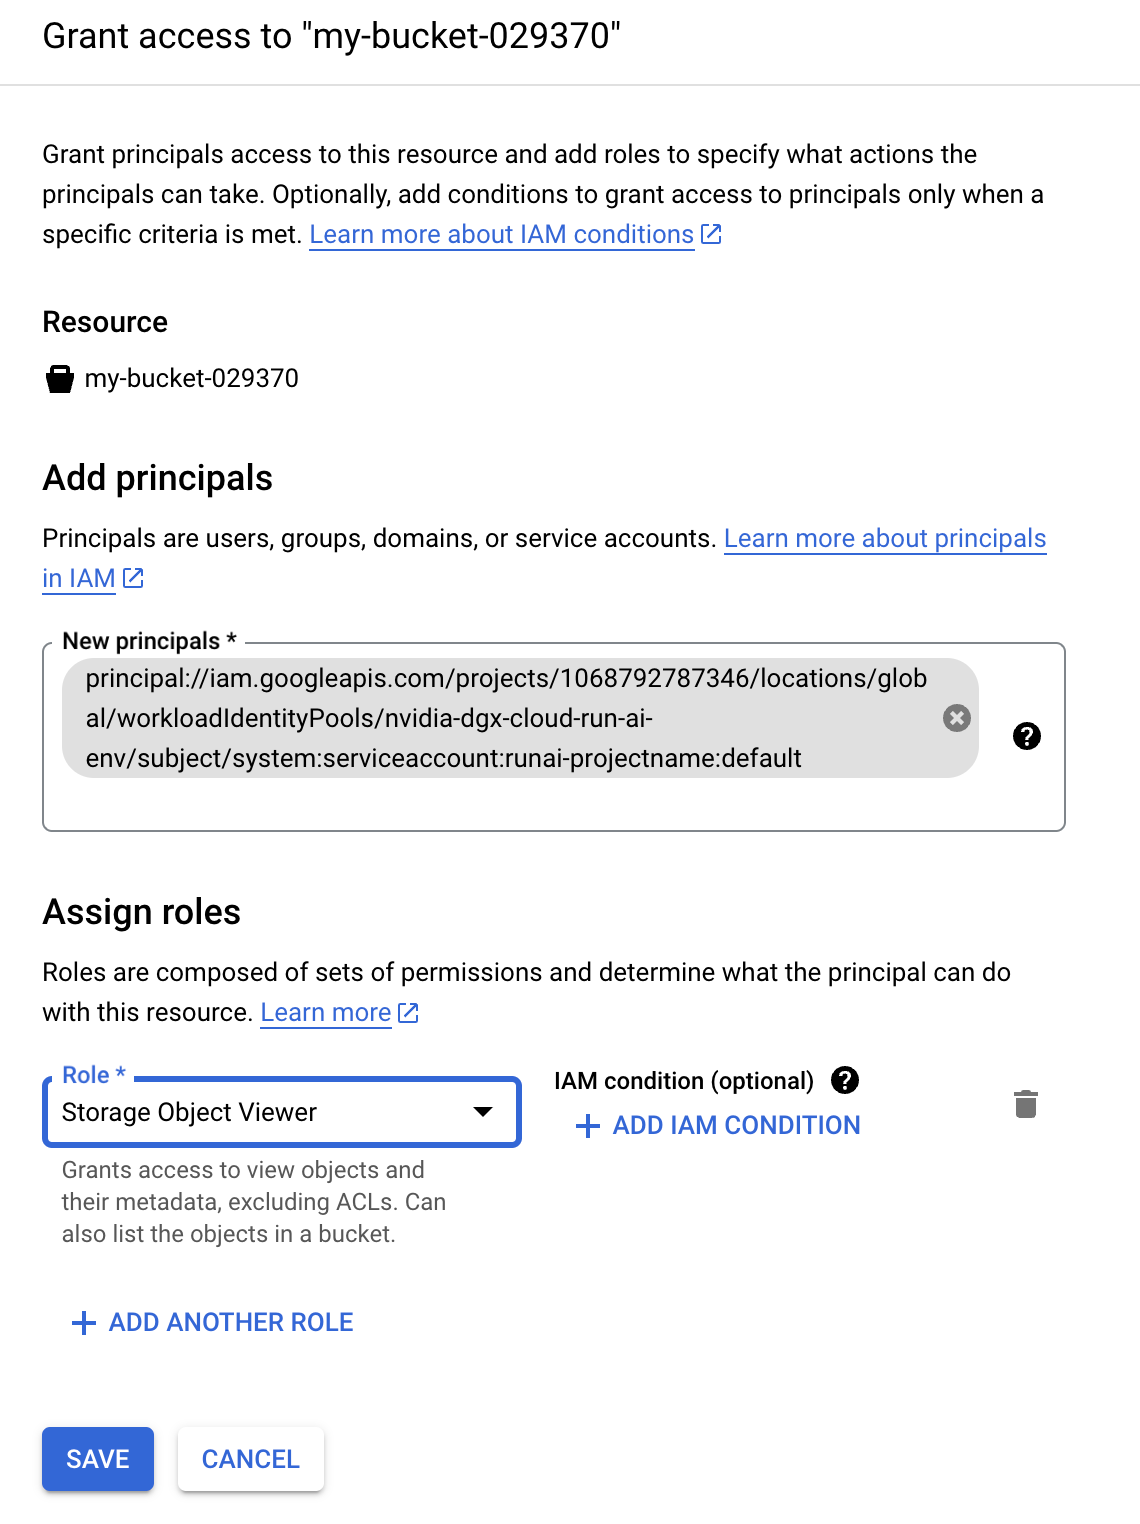
For example, if the service account is default in the NVIDIA Run:ai project runai-projectname and we substitute system:serviceaccount:runai-projectname:default as the SUBJECT_ATTRIBUTE_VALUE, the overall IAM Principal will be:
principal://iam.googleapis.com/projects/1068792787346/locations/global/workloadIdentityPools/nvidia-dgx-cloud-run-ai-env/subject/system:serviceaccount:runai-projectname:default``
This is the IAM Principal to use (within GCP IAM) to grant access to workloads in that NVIDIA Run:ai project as shown below:
gcloud projects add-iam-policy-binding projects/PROJECT_ID \
  --role=roles/container.clusterViewer \
  --member=principal://iam.googleapis.com/projects/1068792787346/locations/global/workloadIdentityPools/nvidia-dgx-cloud-run-ai-env/subject/system:serviceaccount:runai-projectname:default \
  --condition=None
Or with the Cloud Console UI:
Once IAM permissions have been provided, a ConfigMap should be constructed on the “dgx-cloud” Kubernetes cluster, with the configuration file you downloaded using the following command.
kubectl create configmap google-wi --from-file clientLibraryConifg-dgx-cloud.json --namespace runai-projectname
Once the ConfigMap has been created, each workload should be augmented with three items, a volume projecting the SA token, a volume mapping the ConfigMap, and an environment variable pointing to the ConfigMap projection. The following example manifest shows a simple container with the three requirements.
Note
The audience property in the serviceAccountToken below may be copied from the clientLibraryConifg file audience field (be sure to add the https:).
 1apiVersion: v1
 2kind: Pod
 3metadata:
 4  name: oidc-example
 5spec:
 6  containers:
 7  - name: example
 8    image: google/cloud-sdk
 9    command: ["/bin/sh", "-c", "gcloud auth login --cred-file $GOOGLE_APPLICATION_CREDENTIALS && sleep infinity"]
10    volumeMounts:
11    - name: token
12        mountPath: "/var/run/service-account"
13        readOnly: true
14    - name: workload-identity-credential-configuration
15        mountPath: "/etc/workload-identity"
16        readOnly: true
17    env:
18    - name: GOOGLE_APPLICATION_CREDENTIALS
19      value: "/etc/workload-identity/clientLibraryConifg-dgx-cloud.json"
20  volumes:
21  - name: token
22    projected:
23      sources:
24      - serviceAccountToken:
25        audience: https://iam.googleapis.com/projects/<Your PROJECT_ID>/locations/global/workloadIdentityPools/<Your WORKLOAD_POOL>/providers/<Your WORKLOAD_PROVIDER>
26        expirationSeconds: 3600
27        path: token
28  - name: workload-identity-credential-configuration
29    configMap:
30      name: cloud-ce-config
To confirm the configurations, run kubectl exec -it oidc-example -n runai-projectname -- bash to access the container and gcloud config list to confirm the configuration.
The GCP resources configured in IAM should be accessible using either gcloud or gsutil commands.
1.3. Using Your Data From Amazon S3#
There are two ways to use your data residing in AWS or other clouds:
Copy the data into the DGX Cloud Create environment, from Amazon S3 or other cloud storage, onto the shared store NFS filesystems.
Access the data directly from services within the cloud provider. We recommend running this job as a pure Kubernetes job at this time.
Here are examples of the following scenarios:
1.3.1. Example: Using S3 to copy data to PVC within NVIDIA Run:ai#
In AWS, create a custom AWS IAM role with the required permissions.
The following is a minimal set of permissions, which may be created by granting S3 read access.
s3:GetObject
s3:ListBucket
s3:GetBucketPolicy
s3:PutObject
Create an AWS IAM user or role.
Assign the custom role to the IAM user or role to allow access to the target S3 bucket(s).
Create an access key for the IAM user and download the .csv key file. Protect the key file as it contains your private credentials.
Create a Kubernetes secret with the IAM access keys in your NVIDIA Run:ai project (namespace) using the following command.
Note
You must have your kubeconfig set to the NVIDIA Run:ai researcher configuration provided by DGX Cloud Create.
kubectl create secret generic aws-s3-creds --from-literal=aws_access_key_id=<ACCESS_KEY_ID> --from-literal=aws_secret_access_key=<SECRET_ACCESS_KEY> -n runai-<NVIDIA Run:ai projectName>
Within NVIDIA Run:ai, create a data source as a PVC using the following sequence:
Specify the scope, name, and an optional description for the PVC.
In the Data Mount section, select New PVC. Choose a storage class, access mode, and always Filesystem. Then, set a default mount path within any containers.
Note
The Block Volume mode is unsupported. Selecting it may lead to errors when launching a workload that uses the resulting PVC.
Use the
kubectl get pvccommand to determine the actual name of the PVC created by the NVIDIA Run:ai console. The actual name will be similar toname-for-pvc-<cluster-identifier>-<digits>. Use this for the next step.Create a Kubernetes manifest YAML utilizing the AWS CLI to copy the data from S3 into the PVC. The example below uses the secret you created and the PVC as mounted volumes to the container. The bucket name is passed to an
aws s3 synccommand via environment variables.1apiVersion: v1 2kind: Pod 3metadata: 4 name: aws-s3-copy-2-pv-pod 5 namespace: runai-<NVIDIA Run:ai projectName> 6spec: 7 volumes: 8 - name: pv-storage 9 persistentVolumeClaim: 10 claimName: name-for-pvc 11 - name: aws-credential 12 secret: 13 secretName: aws-s3-creds 14 restartPolicy: OnFailure 15 schedulerName: runai-scheduler 16 containers: 17 - name: aws-cli-container 18 image: amazon/aws-cli 19 imagePullPolicy: IfNotPresent 20 env: 21 - name: BUCKET 22 value: <bucket-name> 23 volumeMounts: 24 - mountPath: "/data/shared" 25 name: pv-storage 26 - name: aws-credential 27 mountPath: /root/.aws/ 28 readOnly: true 29 command: ["sh","-c"] 30 args: 31 - aws s3 sync s3://${BUCKET} /data/shared/;
Submit the Kubernetes manifest for execution in the DGX Cloud Create environment using the following command:
kubectl apply -f manifest.yaml -n runai-<NVIDIA Run:ai ProjectName>.Monitor the job for completion using
kubectl get pod aws-s3-copy-2-pv-pod.
You can now use the PVC in your NVIDIA Run:ai jobs.
1.3.2. Example: Using data directly within AWS Services#
NVIDIA Run:ai training jobs can directly access data in Amazon S3. This section gives an example of how to do this in a Python job, and the small configuration steps needed to make it happen.
The following Python code demonstrates how to read all text files from a bucket into a list of strings. While this approach may not be practical for AI training workloads, it will help illustrate the necessary configurations.
 1import boto3
 2import argparse
 3import os
 4
 5def get_bucket_name():
 6    parser = argparse.ArgumentParser(description="Read text files from an AWS S3 bucket.")
 7    parser.add_argument("bucket_name", help="The name of the bucket to read from.", nargs='?')
 8    args = parser.parse_args()
 9
10    if args.bucket_name:
11        return args.bucket_name
12    elif "BUCKET" in os.environ:
13        return os.environ["BUCKET"]
14    else:
15        print("Error: Bucket name not provided. Please provide it as a command line argument or set the BUCKET environment variable.")
16        return None
17
18def read_bucket_files(bucket_name):
19    s3_client = boto3.client('s3')
20    file_contents = []
21    response = s3_client.list_objects_v2(Bucket=bucket_name)
22    for obj in response.get('Contents', []):
23        if obj['Key'].endswith(".txt"):
24            file_obj = s3_client.get_object(Bucket=bucket_name, Key=obj['Key'])
25            content = file_obj['Body'].read().decode('utf-8')
26            file_contents.append(content)
27    return file_contents
28
29if __name__ == "__main__":
30    bucket_name = get_bucket_name()
31    if bucket_name:
32        file_contents = read_bucket_files(bucket_name)
33    else:
34        exit(1)
35
36    for content in file_contents:
37        print(content)
To execute the above code in a containerized training job on Kubernetes, you will need to do the following:
Include the AWS SDK for Python (Boto3) into the container.
Inject a secret into the container, allowing proper authorization to the S3 API.
To install the boto3 Python library, use pip to install it into the container image. For example, use the following Dockerfile:
FROM python:3.12

RUN pip install boto3
RUN mkdir /app
COPY read.py /app/

ENTRYPOINT ["python"]
CMD ["/app/read.py"]
To inject the secret into the container, use a Kubernetes secret mounted as a file with the environment variables AWS_ACCESS_KEY_ID and AWS_SECRET_ACCESS_KEY. The example below uses the same secret as the one created above.
 1apiVersion: v1
 2kind: Pod
 3metadata:
 4  name: s3-reader
 5spec:
 6  containers:
 7    - name: s3-reader
 8      image: nvcr.io/<orgID>/s3-read:latest
 9      imagePullPolicy: IfNotPresent
10      command: ["python", "/app/read.py"]
11      env:
12        - name: BUCKET
13          value: <bucket-name>
14        - name: AWS_ACCESS_KEY_ID
15          valueFrom:
16            secretKeyRef:
17              name: aws-s3-creds
18              key: aws_access_key_id
19        - name: AWS_SECRET_ACCESS_KEY
20          valueFrom:
21            secretKeyRef:
22              name: aws-s3-creds
23              key: aws_secret_access_key
24      volumeMounts:
25        - name: aws-credentials
26          mountPath: /root/.aws/
27          readOnly: true
28  imagePullSecrets:
29  - name: nvcr.io-creds
30  volumes:
31    - name: aws-credentials
32      secret:
33        secretName: aws-s3-creds
34  restartPolicy: OnFailure
Note
Currently, there isn’t a method to mount Kubernetes secrets as files in NVIDIA Run:ai jobs. NVIDIA Run:ai supports only environment variables. Since the AWS SDK for Python requires access keys (which should be stored as secrets), you will need workarounds to use them with NVIDIA Run:ai jobs. The recommended workarounds are:
only use Kubernetes native jobs for data manipulation, or
copy the AWS credentials into shared storage and point the
AWS_ACCESS_KEY_IDandAWS_SECRET_ACCESS_KEYenvironmental variables at that shared storage location.