6. MLOps Integration Examples#
In this section, we give examples for deploying Integrations on your Run:ai on DGX Cloud cluster. These examples require administrator access as specified in the Advanced Kubernetes Usage for Admins section when deployed but can be used by non-admin users as noted for a given Integration.
Additional Integrations beyond the scope of those documented here are possible as long as they can be deployed within the capabilities provided by the dgxc-customer-app-admin-access role.
6.1. Argo Workflows Integration#
Argo Workflows is a workflow engine that enables container-native job orchestration. It is implemented as a Kubernetes Custom Resource Definition (CRD) and can be deployed as an Integration into a Run:ai on DGX Cloud cluster.
6.1.1. Prerequisites and Requirements#
Any administrator or user that will deploy or use Argo Workflows has followed the
kubectlandrunaitool installation process documented in Accessing the NVIDIA Run:ai CLIA NVIDIA Run:ai project namespace identified for use (either new or existing)
This should be the namespace where workflows are intended to run
6.1.2. Installing Argo Workflows CLI#
To install the argo command-line interface (CLI) tool for your version (if not already installed), navigate to the target release in the Argo Workflow releases page and follow the instructions for your workstation’s operating system.
Run the command argo version to confirm your installation and version. Sample output below.
1argo: v3.5.11
2BuildDate: 2024-09-20T14:48:48Z
3GitCommit: 25bbb71cced32b671f9ad35f0ffd1f0ddb8226ee
4GitTreeState: clean
5GitTag: v3.5.11
6GoVersion: go1.21.13
7Compiler: gc
8Platform: darwin/amd64
6.1.3. Configure Target Namespace#
For both administrators and users, configure an environment variable containing your target namespace for all namespace-specific commands. It will be referenced in all subsequent use of your namespace as an input to a command.
NAMESPACE=your-namespace-here
6.1.4. Installing Argo Workflows (Admin Only)#
The documented installation process is a namespace installation, which results in workflows being runnable only within the namespace where Argo is installed.
Begin by downloading the
namespace-install.yamlfor the target Argo Workflows release to your workstation in order to configure it for installation on Run:ai on DGX Cloud. NVIDIA recommends versionv3.5.11.wget https://github.com/argoproj/argo-workflows/releases/download/v3.5.11/namespace-install.yamlOpen the
namespace-install.yamlfile in a text editor. Delete or comment out the following line within theargo-roleYAML segment to align with the capabilities provided by Run:ai on DGX Cloud.persistentvolumeclaims/finalizers
At the bottom of the
argo-roleYAML segment, add the following resource request for kubeflow resources. This example requests all supported kubeflow resources, but can be restricted to a subset if preferred.1- apiGroups: 2 - kubeflow.org 3 resources: 4 - pytorchjobs 5 - mpijobs 6 - tfjobs 7 - xgboostjobs 8 verbs: 9 - get 10 - list 11 - create 12 - delete 13 - patch 14 - update
To install Argo Workflows into your target namespace, run the following with the locally modified
namespace-install.yamlfile.kubectl apply -n $NAMESPACE -f ./namespace-install.yaml
6.1.5. Basic Argo Workflows Usage#
To run some basic examples, we can leverage the Argo Workflows GitHub project. These examples can be run as either an administrator or a user with a Researcher role and access to the target project namespace.
To get started, clone the repository to your local workstation as shown.
git clone https://github.com/argoproj/argo-workflows.git
All workflow examples must be modified to use the service account created as part of the Argo Workflows deployment.
6.1.5.1. Hello World#
Copy the
hello-world.yamlexample to a file namedhello-world-runai.yaml.cp ./argo-workflows/examples/hello-world.yaml ./hello-world-runai.yaml
Open the file path
./hello-world-runai.yamland make the following changes.Add the
serviceAccountNamekey and value to thespecdictionary. The value will beargounless the Argo Workflows deployment is augmented with a custom service account.Add the
schedulerNamekey with an associated value ofrunai-scheduler. If unspecified, the workflow will run using the default Kubernetes scheduler.The file’s contents after modification are provided below.
 1apiVersion: argoproj.io/v1alpha1
 2kind: Workflow
 3metadata:
 4  generateName: hello-world-
 5  labels:
 6    workflows.argoproj.io/archive-strategy: "false"
 7  annotations:
 8    workflows.argoproj.io/description: |
 9      This is a simple hello world example.
10spec:
11  entrypoint: hello-world
12  serviceAccountName: argo
13  schedulerName: runai-scheduler
14  templates:
15  - name: hello-world
16    container:
17      image: busybox
18      command: [echo]
19      args: ["hello world"]
Submit the Hello World example with
argo submitas shown, with aPendingstatus result indicating a successful submission.1argo submit hello-world-runai.yaml -n $NAMESPACE 2Name: hello-world-9dqgn 3Namespace: your-namespace-here 4ServiceAccount: argo 5Status: Pending 6Created: Thu Oct 17 14:43:10 -0500 (now) 7Progress:
To list all submitted workflows to the target namespace, use the
argo listcommand.1argo list -n $NAMESPACE 2NAME STATUS AGE DURATION PRIORITY MESSAGE 3hello-world-9dqgn Running 8s 8s 0
You can use the
argo watchcommand to follow the workflow’s status until it terminates. A successful result is shown below.1argo watch hello-world-9dqgn -n $NAMESPACE 2Name: hello-world-9dqgn 3Namespace: your-namespace-here 4ServiceAccount: argo 5Status: Succeeded 6Conditions: 7PodRunning False 8Completed True 9Created: Thu Oct 17 14:43:10 -0500 (20 hours ago) 10Started: Thu Oct 17 14:43:10 -0500 (20 hours ago) 11Finished: Thu Oct 17 14:43:41 -0500 (20 hours ago) 12Duration: 31 seconds 13Progress: 1/1 14ResourcesDuration: 0s*(1 cpu),7s*(100Mi memory) 15 16STEP TEMPLATE PODNAME DURATION MESSAGE 17✔ hello-world-9dqgn hello-world hello-world-9dqgn 20s
6.1.5.2. Hello GPU#
To create a custom workflow that uses an NGC container and requests a GPU resource, create a file named
hello-gpu-runai.yamland open it in your preferred text editor. Add the following content.1apiVersion: argoproj.io/v1alpha1 2kind: Workflow 3metadata: 4 generateName: hello-gpu- 5 labels: 6 workflows.argoproj.io/archive-strategy: "false" 7 annotations: 8 workflows.argoproj.io/description: | 9 This is a hello world example using NGC containers and requesting GPU resources. 10spec: 11 schedulerName: runai-scheduler 12 entrypoint: hello-gpu 13 serviceAccountName: argo 14 templates: 15 - name: hello-gpu 16 container: 17 image: nvcr.io/nvidia/pytorch:24.09-py3 18 command: [nvidia-smi] 19 resources: 20 limits: 21 nvidia.com/gpu: 1
Submit the Hello GPU example with
argo submitas shown, with aPendingstatus result indicating a successful submission.1argo submit hello-gpu-runai.yaml -n $NAMESPACE 2Name: hello-gpu-d4lr6 3Namespace: your-namespace-here 4ServiceAccount: argo 5Status: Pending 6Created: Fri Oct 18 12:33:47 -0500 (now) 7Progress:
Use the
argo watchcommand to follow the workflow’s status to termination. A successful result is shown below, removing intermediate states for brevity. This example may take several minutes to complete due to the NGC container pull.1argo watch hello-gpu-d4lr6 -n $NAMESPACE 2Name: hello-gpu-d4lr6 3Namespace: your-namespace-here 4ServiceAccount: argo 5Status: Succeeded 6Conditions: 7PodRunning False 8Completed True 9Created: Fri Oct 18 12:33:47 -0500 (2 minutes ago) 10Started: Fri Oct 18 12:33:47 -0500 (2 minutes ago) 11Finished: Fri Oct 18 12:36:37 -0500 (now) 12Duration: 2 minutes 50 seconds 13Progress: 1/1 14ResourcesDuration: 14s*(1 cpu),40s*(10Gi ephemeral-storage),2m25s*(100Mi memory),2s*(1 nvidia.com/gpu) 15 16STEP TEMPLATE PODNAME DURATION MESSAGE 17✔ hello-gpu-d4lr6 hello-gpu hello-gpu-d4lr6 2m
To view the resulting
nvidia-smioutput, theargo logcommand should be used, as shown below.1argo logs hello-gpu-d4lr6 -n $NAMESPACE 2hello-gpu-d4lr6: Fri Oct 18 17:36:27 2024 3hello-gpu-d4lr6: +-----------------------------------------------------------------------------------------+ 4hello-gpu-d4lr6: | NVIDIA-SMI 550.90.07 Driver Version: 550.90.07 CUDA Version: 12.4 | 5hello-gpu-d4lr6: |-----------------------------------------+------------------------+----------------------+ 6hello-gpu-d4lr6: | GPU Name Persistence-M | Bus-Id Disp.A | Volatile Uncorr. ECC | 7hello-gpu-d4lr6: | Fan Temp Perf Pwr:Usage/Cap | Memory-Usage | GPU-Util Compute M. | 8hello-gpu-d4lr6: | | | MIG M. | 9hello-gpu-d4lr6: |=========================================+========================+======================| 10hello-gpu-d4lr6: | 0 NVIDIA H100 80GB HBM3 Off | 00000000:05:00.0 Off | 0 | 11hello-gpu-d4lr6: | N/A 32C P0 69W / 700W | 4MiB / 81559MiB | 0% Default | 12hello-gpu-d4lr6: | | | Disabled | 13hello-gpu-d4lr6: +-----------------------------------------+------------------------+----------------------+ 14hello-gpu-d4lr6: 15hello-gpu-d4lr6: +-----------------------------------------------------------------------------------------+ 16hello-gpu-d4lr6: | Processes: | 17hello-gpu-d4lr6: | GPU GI CI PID Type Process name GPU Memory | 18hello-gpu-d4lr6: | ID ID Usage | 19hello-gpu-d4lr6: |=========================================================================================| 20hello-gpu-d4lr6: | No running processes found | 21hello-gpu-d4lr6: +-----------------------------------------------------------------------------------------+ 22hello-gpu-d4lr6: time="2024-10-18T17:36:28.268Z" level=info msg="sub-process exited" argo=true error="<nil>"
6.1.6. Access Argo Workflows Web Interface#
Argo Workflows also provides an integrated web interface made available by the argo-server service.
Verify that the argo-server service is running with the kubectl describe service command, and make a note of the
TargetPortvalue.1kubectl describe service argo-server -n $NAMESPACE 2Name: argo-server 3Namespace: your-namespace-here 4... 5Port: web 2746/TCP 6TargetPort: 2746/TCP 7...
To access argo-server from your workstation, use the kubectl port-forward command, updating the
2746value before the colon to a different local port if desired. Note that this will impact all subsequent commands in this section that target port2746. This example uses&to run the command persistently in the background.1kubectl port-forward service/argo-server 2746:2746 -n $NAMESPACE & 2[1] 23192 3Forwarding from 127.0.0.1:2746 -> 2746 4Forwarding from [::1]:2746 -> 2746
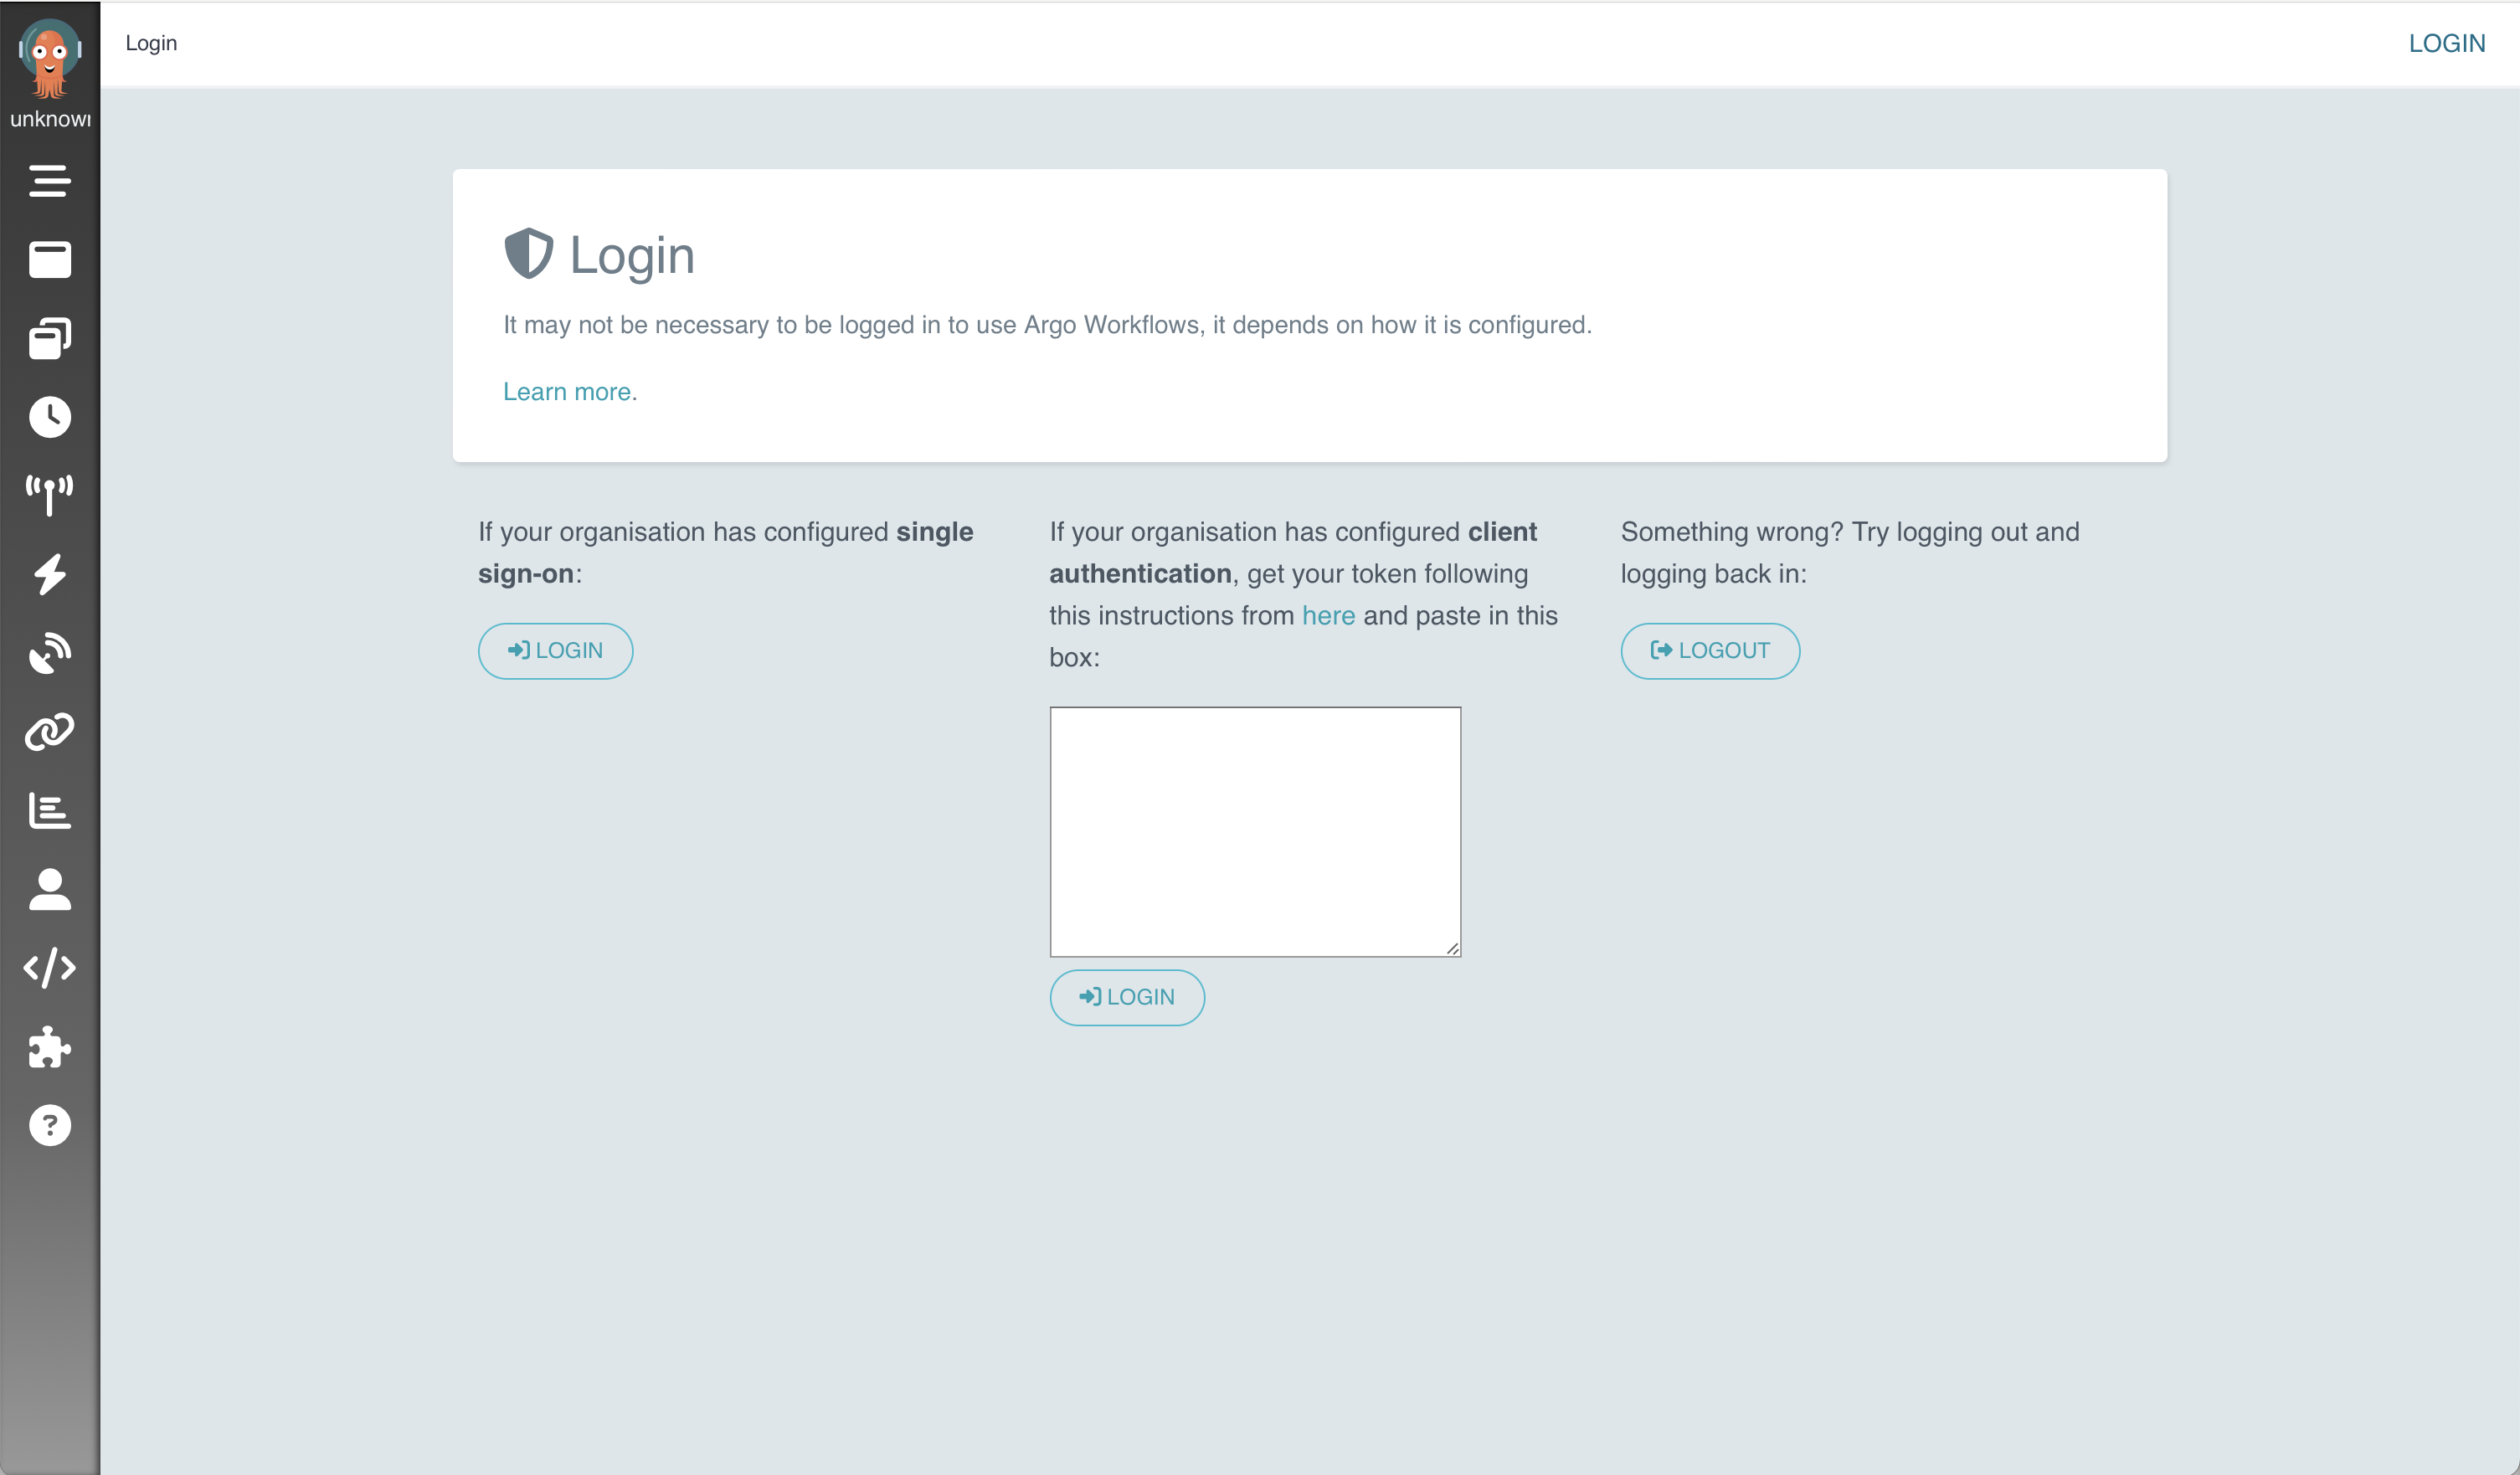
The Argo Workflows web interface will now be available at https://localhost:2746. However, it is necessary to authenticate with a bearer token to proceed beyond the login screen.
Begin the authentication process by creating a secret using kubectl apply. Submit the entire set of text below as a single command.
1kubectl apply -n $NAMESPACE -f - <<EOF
2apiVersion: v1
3kind: Secret
4metadata:
5  name: gui-account-token
6  annotations:
7    kubernetes.io/service-account.name: argo-server
8type: kubernetes.io/service-account-token
9EOF
Create a local environment variable containing a bearer token in the correct format required by argo-server.
ARGO_TOKEN="Bearer $(kubectl get secret gui-account-token -n $NAMESPACE -o=jsonpath='{.data.token}' | base64 --decode)"
Test your authentication with argo-server via the following curl command, which leverages the generated bearer token.
curl -k "https://localhost:2746/api/v1/workflows/$NAMESPACE" -H "Authorization: $ARGO_TOKEN"
If the authentication succeeds, the resulting output will be very long and look structurally like the following example.
{"metadata":{"resourceVersion":"153974789"},"items":[...]}
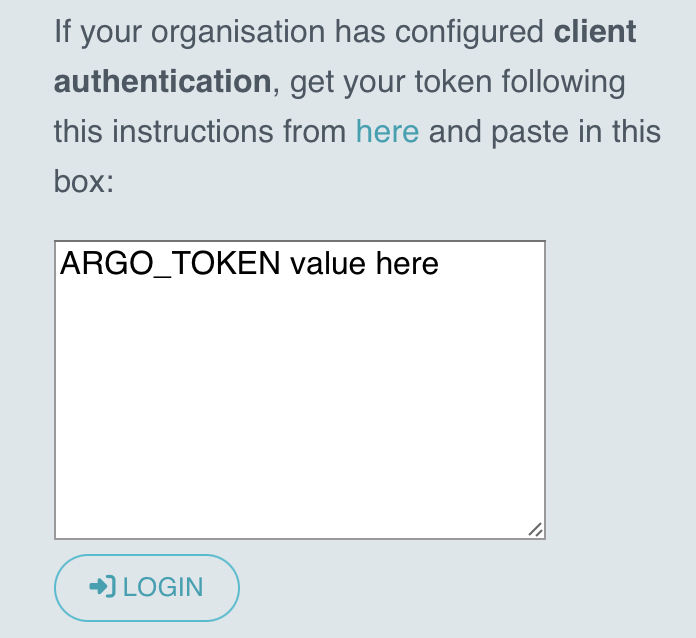
Take the output from the
ARGO_TOKENenvironment variable and insert it in the client authentication box in the center of the Argo Workflows web interface, available at https://localhost:2746 when using the kubectl port-forward command as specified earlier in the example. Click the LOGIN button to submit the token.echo $ARGO_TOKEN
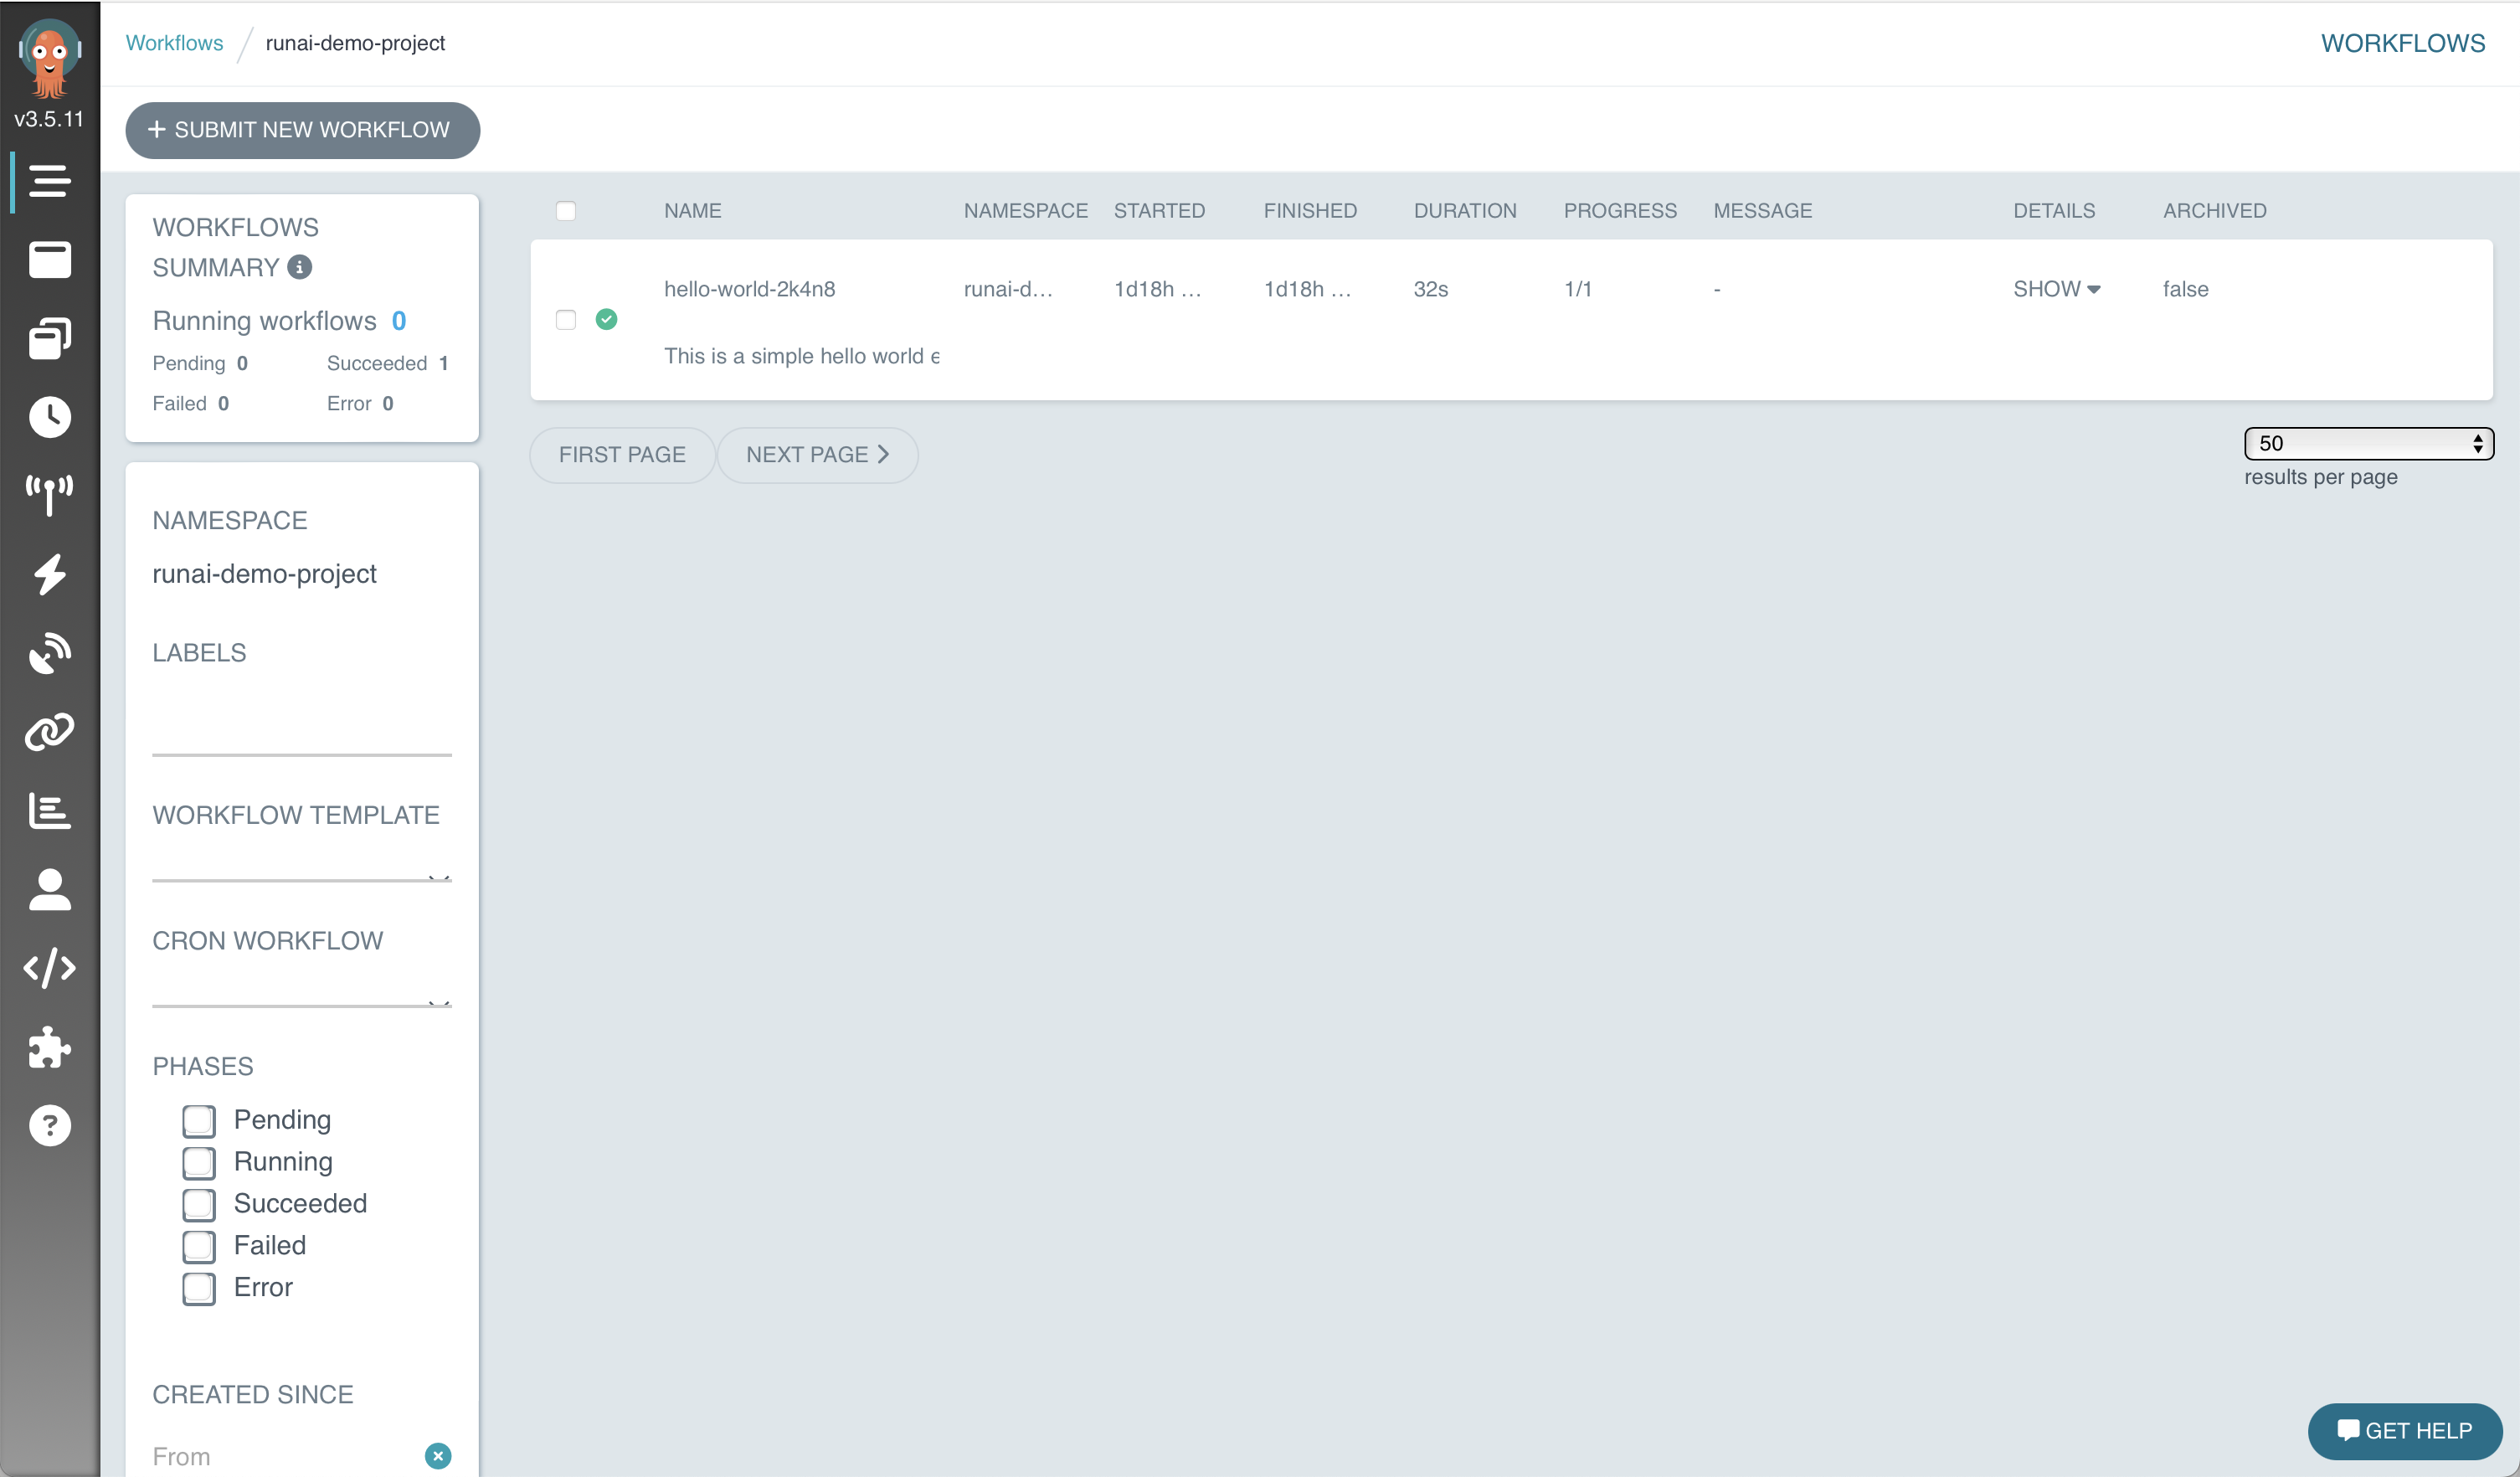
If the authentication is successful, you should see the screen below and can now interact with Argo Workflows via the web interface provided by the argo-server service.
6.1.7. Clean Up#
To remove the test workflows, execute argo delete for each workflow you would like to remove. The following commands remove the two workflow examples previously described.
1argo delete hello-world-9dqgn -n $NAMESPACE
2argo delete hello-gpu-d4lr6 -n $NAMESPACE
To stop the web interface port forwarding, use ps to discover the process number of the port forwarding process.
1ps | grep port-forward
230590 ttys000    0:00.01 grep port-forward
323192 ttys002    1:20.68 kubectl -n $NAMESPACE port-forward service/argo-server 2746:2746
That port is 23192 in the example above, so use kill to halt the process.
kill 23192
6.2. Ray Cluster Integration#
Ray is an open-source unified framework for scaling AI and Python applications like machine learning. It provides the compute layer for parallel processing so that you don’t need to be a distributed systems expert. Ray can be used as an Integration with NVIDIA Run:ai using the KubeRay operator.
For more information, refer to Ray on Kubernetes.
6.2.1. Prerequisites and Requirements#
The administrator has been granted the role documented in Advanced Kubernetes Usage for Admins.
Any users who will use KubeRay have an AI practitioner role assigned and have access to the target NVIDIA Run:ai project.
Any administrator or user who will deploy or use KubeRay has followed the
kubectlandrunaitool installation process documented in Accessing the NVIDIA Run:ai CLI.A NVIDIA Run:ai project namespace identified for use (either new or existing).
This should be the namespace where workflows are intended to run.
6.2.2. Deploy a KubeRay Operator#
Install the Helm CLI from the Helm install page.
Deploy the KubeRay operator with the Helm chart repository.
helm repo add kuberay https://ray-project.github.io/kuberay-helm/
helm repo update

# Install both CRDs and KubeRay operator v1.2.2.
helm install kuberay-operator kuberay/kuberay-operator --version 1.2.2

# Confirm that the operator is running your desired namespace
kubectl get pods
# NAME                                READY   STATUS    RESTARTS   AGE
# kuberay-operator-7fbdbf8c89-pt8bk   1/1     Running   0          27s
6.2.3. Deploy a KubeRay Cluster#
To integrate the KubeRay operator with NVIDIA Run:ai, you need to modify the cluster configuration to use the NVIDIA Run:ai scheduler. Follow these steps.
Get the sample cluster config which includes a GPU resource.
wget https://raw.githubusercontent.com/ray-project/ray/master/doc/source/cluster/kubernetes/configs/ray-cluster.gpu.yamlTo run this config with NVIDIA Run:ai, this needs to be run in a namespace associated with a NVIDIA Run:ai project. We must also modify the config and set the scheduler name to NVIDIA Run:ai. Add
schedulerName: runai-schedulerto theheadGroupSpec.template.specand theworkerGroupSpecs.template.spec.Your final YAML file should look like the following:
apiVersion: ray.io/v1alpha1
kind: RayCluster
metadata:
labels:
   controller-tools.k8s.io: "1.0"
   # A unique identifier for the head node and workers of this cluster.
name: raycluster
spec:
# The version of Ray you are using. Make sure all Ray containers are running this version of Ray.
rayVersion: '2.2.0'
######################headGroupSpec#################################
# head group template and specs, (perhaps 'group' is not needed in the name)
headGroupSpec:
   # logical group name, for this called headgroup, also can be functional
   # pod type head or worker
   # rayNodeType: head # Not needed since it is under the headgroup
   # the following params are used to complete the ray start: ray start --head --block ...
   rayStartParams:
      dashboard-host: '0.0.0.0'
   #pod template
   template:
      spec:
         schedulerName: runai-scheduler
         containers:
         # The Ray head pod
         - name: ray-head
            image: rayproject/ray-ml:2.2.0-gpu
            lifecycle:
               preStop:
               exec:
                  command: ["/bin/sh","-c","ray stop"]
            resources:
               limits:
               cpu: "4"
               memory: "24G"
               requests:
               cpu: "4"
               memory: "12G"
workerGroupSpecs:
# the pod replicas in this group typed worker
- replicas: 1
   minReplicas: 1
   maxReplicas: 300
   # logical group name, for this called small-group, also can be functional
   groupName: small-group
   rayStartParams:
      num-gpus: "1"
   #pod template
   template:
      metadata:
      labels:
         key: value
      # annotations for pod
      annotations:
         key: value
      spec:
         schedulerName: runai-scheduler
         containers:
         - name: machine-learning # must consist of lower case alphanumeric characters or '-', and must start and end with an alphanumeric character (e.g. 'my-name',  or '123-abc'
            image: rayproject/ray-ml:2.2.0-gpu
            lifecycle:
               preStop:
               exec:
                  command: ["/bin/sh","-c","ray stop"]
            resources:
               limits:
               cpu: "8"
               memory: "24G"
               nvidia.com/gpu: 1
               requests:
               cpu: "4"
               memory: "12G"
               nvidia.com/gpu: 1
This config is now ready to be deployed onto your NVIDIA Run:ai cluster. Run the following to create your Ray cluster.
kubectl apply -f ray-cluster.gpu.yaml

# Confirm your Ray cluster is starting
kubectl get pods
Once your Ray cluster pods have started, you can start port-forwarding to see the dashboard of your Ray cluster.
kubectl port-forward services/raycluster-head-svc 8265:8265
6.2.4. Submit a Ray Job#
Now you will be able to launch applications on your Ray cluster.
6.2.4.1. Execute a Ray job in the head pod#
The most straightforward way to experiment with your Ray Cluster is to use kubernetes to exec directly into the head pod.
Identify your Ray Cluster’s head pod and use kubectl exec to execute a command in your head pod.
export HEAD_POD=$(kubectl get pods --selector=ray.io/node-type=head -o custom-columns=POD:metadata.name --no-headers)
echo $HEAD_POD
# raycluster-kuberay-head-vkj4n

# Print the cluster resources.
kubectl exec -it $HEAD_POD -- python -c "import ray; ray.init(); print(ray.cluster_resources())"

# 2023-04-07 10:57:46,472 INFO worker.py:1243 -- Using address 127.0.0.1:6379 set in the environment variable RAY_ADDRESS
# 2023-04-07 10:57:46,472 INFO worker.py:1364 -- Connecting to existing Ray cluster at address: 10.244.0.6:6379...
# 2023-04-07 10:57:46,482 INFO worker.py:1550 -- Connected to Ray cluster. View the dashboard at http://10.244.0.6:8265
# {'object_store_memory': 802572287.0, 'memory': 3000000000.0, 'node:10.244.0.6': 1.0, 'CPU': 2.0, 'node:10.244.0.7': 1.0}
6.2.4.2. Submit a Ray job to the Ray Cluster via ray job submission SDK#
Using the previously created port forwarding, we are able to submit a ray job to the Ray Dashboard that is listening at port 8265. You can submit jobs using the Ray Job CLI.
ray job submit --address http://localhost:8265 -- python -c "import ray; ray.init(); print(ray.cluster_resources())"
6.2.5. Cleanup#
Delete your Ray cluster and KubeRay with the following commands:
kubectl delete raycluster raycluster

# Please make sure the ray cluster has already been removed before delete the operator.
helm uninstall kuberay-operator