3. Distributed Training Workload Examples#
In this section, we give instructions for running several Training Workloads on your Run:ai on DGX Cloud cluster. The examples are not exhaustive, but can be adapted for your own workloads.
3.1. Distributed PyTorch Training Job#
In this example, we demonstrate how to run a multi-node training job using the PyTorch training operator from Kubeflow.
3.1.1. Requirements#
For running a Distributed PyTorch training job, a custom Docker container needs to be built. This is necessary to get relevant code into a container that can be run and shared for all future jobs.
To build a custom Docker container, the Docker runtime needs to be installed on a local machine with the same CPU architecture as the Run:ai on DGX Cloud hosts (that is, if the Run:ai on DGX Cloud hosts have AMD64-based CPUs, the container needs to be built on an AMD64 machine. If the Run:ai on DGX Cloud hosts are arm-based, the container needs to be built on an ARM CPU). To install Docker locally, follow the Docker Engine Install guide.
Additionally, you need to authenticate with your NGC private registry using your NGC key created during the Credentials section above. To authenticate with NGC, run the following commands (note, the username must be exactly “$oauthtoken”):
1$ docker login nvcr.io
2Username: $oauthtoken
3Password: <NGC Key here>
3.1.2. Creating a Custom Docker Container#
On your local machine where Docker is installed, create and navigate to a directory to save the Dockerfile, such as
pytorch-distributed:$ mkdir -p pytorch-distributed $ cd pytorch-distributed
In the new directory, open a new file named
run.shand copy the following contents to the file:#!/bin/bash torchrun multinode.py --batch_size 32 100 25 cp snapshot.pt /checkpoints
This is a very simple script that uses
torchrunto launch a distributed training job and copies the generated checkpoint to the/checkpointsdirectory inside the container so it can be used again later.Save and close the file. Next, open another new file named
Dockerfileand copy the following contents to the file:FROM nvcr.io/nvidia/pytorch:24.07-py3 WORKDIR /runai-distributed RUN git clone https://github.com/pytorch/examples WORKDIR /runai-distributed/examples/distributed/ddp-tutorial-series COPY run.sh .
This Dockerfile uses the 24.07 PyTorch container hosted on NGC as a base, clones the official PyTorch examples repository inside the container, and copies the
run.shfile created previously into the container. Save and close the file.Once both files have been saved locally, build a container with the following command, replacing <ORG ID> with the ID of your private registry on NGC:
docker build -t nvcr.io/<ORG ID>/pytorch-ddp-example:24.07-py3 .
This will build the custom container locally.
Once the build has finished, push the image to the NGC private registry with:
docker push nvcr.io/<ORG ID>/pytorch-ddp-example:24.07-py3
The custom container will be available in your private NGC registry and can be used immediately for jobs.
3.1.3. Creating a Data Source#
To make it easier to reuse code and checkpoints in future jobs, a data source is created, specifically a PVC. The PVC can be mounted in jobs and will persist after the job completes so any data created can be reused.
To create a new PVC, go to the Data Sources page. Click New Data Source then PVC to open the PVC creation form.
On the new form, set the desired scope.
Important
PVC Data Sources created at the cluster or department level do not replicate data across projects or namespaces. Each project or namespace will be provisioned as a separate PVC replica with different underlying PVs; therefore, the data in each PVC is not replicated.
Give the PVC a memorable name like
distributed-pytorch-checkpointand add a description if desired.For the data options, select a new PVC storage class that suits your needs according to the PVC recommendations here. In this example,
dgxc-enterprise-fileis sufficient. To allow all nodes to read and write from/to the PVC, select Read-write by many nodes for the access mode. Enter10 TBfor the size to ensure we have plenty of capacity for future jobs. Select Filesystem as the volume mode. Lastly, set the Container path to/checkpointswhich is where the PVC will be mounted inside containers. This completed section should look as shown below.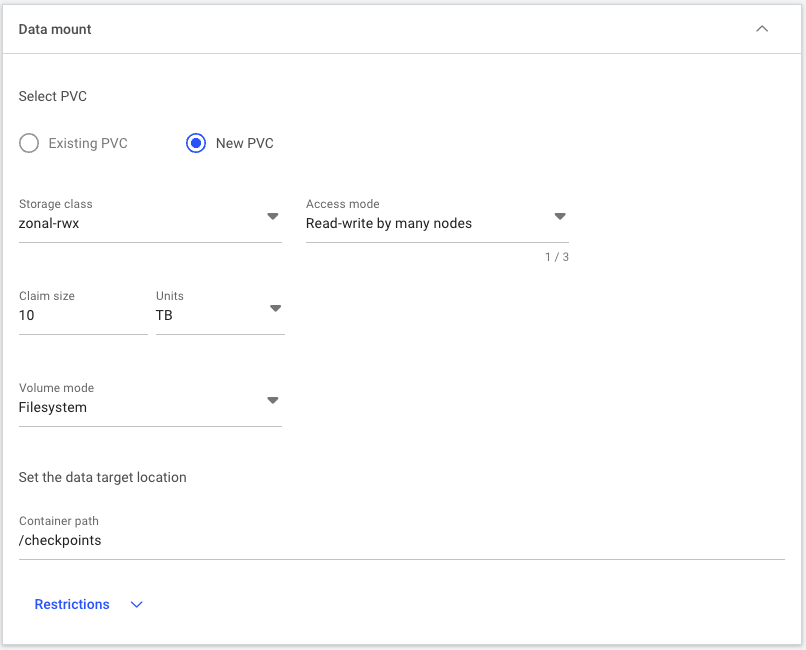
Once the form is complete, create the data source using the button at the bottom of the page.
Note
The first time a job is launched using a new PVC, it will take longer to start as the storage gets provisioned only once the first claim to the PVC is made.
3.1.4. Creating the Workload via the UI#
To create the training job, navigate to the Workloads page and click New Workload > Training.
On the project creation form page, select the desired project to run the job in.
Select Distributed for the workload architecture to run a multi-node job. This adds a drop-down menu which lists the available frameworks for running distributed jobs. Since we are running a PyTorch job, select the PyTorch framework.
The distributed training configuration has an option for either Workers & master or Workers only.
Note
In this documentation, we will use the term ‘primary’ instead of ‘master’ to align with modern terminology. Please note that the UI and commands may still refer to it as ‘master’.
A primary node is typically required when running multi-node jobs that need to coordinate with one another, such as a job that does an all_reduce operation. The primary node can either be identical to the workers and run the training process or be a lightweight pod that only does coordination. If a job doesn’t need coordination between processes, the Workers only option can be used. For our example, we want the pods to coordinate with each other. Select the Workers & master option.
Ensure the Start from scratch option is selected for the template.
Give the job a name like “distributed-training-pytorch” and click Continue.
In the new environment form that opens, select New environment. In the new form, provide a name for the environment such as “distributed-pytorch-env” and optionally add a description.
In the Image URL, provide the name of the image tag that was specified during the container build in the Creating a Custom Docker Container section above, such as
nvcr.io/<ORG ID>/pytorch-ddp-example:24.07-py3. This will use the container that was pushed to your private NGC org for the job.If desired, the image pull policy can be changed. The default value of “if not already present” is recommended for most cases, but if you are pushing new containers to the NGC org with the same tag, “always pull the image from the registry” should be used to check if there are updates to the image.
Most of the remaining settings on the form can be kept as default with the exception of the runtime settings. The runtime settings indicate the directory to open pods to and what command to launch inside the containers if something other than the default container values are desired.
In our example, we want to launch the
multinode.pyscript withtorchrunwhich runs a multi-process application where each process has its own unique rank. The PyTorch Training Operator coordinates with torchrun to automatically set theRANK,LOCAL_RANK, andWORLD_SIZE, among other environment variables, based on the total number of GPUs allocated for a job. In the Commands and Arguments field, enterbash run.shfor the command. This will run the script with the distributed training job on all allocated GPUs with a batch size of 32 for 100 total epochs and save a checkpoint every 25 epochs. The final checkpoint will be saved to the/checkpointsdirectory.For the directory field, put
/runai-distributed/examples/distributed/ddp-tutorial-series. This is the location of the scripts that were saved inside of the container we built and is the path we want the pod to open to inside the container when it starts.After selecting the Create Environment button, you will be returned to the job creation page with the new environment selected. In the compute resource pane, select the desired number of workers. Note that since we are using a primary and worker configuration where we want the primary to participate in the training, we will specify one fewer worker node than the total number of nodes expected for the job. In other words, if we want to run an 8 node job where the primary will be coordinating processes as well as training, we will specify 7 workers and 1 primary (which is the next form). In our example we will train with 2 total nodes. As a result, select 1 worker in the form.
For the compute resource, we want to train on a full DGX node with all available GPU resources. Select the compute resource in your project with a GPU capacity of 8.
In the Data Sources pane, select the name of the PVC that was created in the previous section. The name of the PVC in this example is “distributed-pytorch-checkpoints”. Click Continue to navigate to the primary configuration page.
As mentioned previously, the primary pod can have a different configuration from the worker pods for distributed PyTorch jobs. For our example, we want to use the same setup for workers and the primary so ensure the Allow different setup for the master radio button is deselected.
Once finished, click Create Training to queue the training job.
3.1.5. Monitoring the Job#
After the job is submitted, the status can be viewed in the Workloads page. Find the job name in the list, such as “distributed-training-pytorch” per the previous example. Clicking on the job will show a form with additional information about the job, including event history, metrics, and logs.
The event history tab shows the current status of the job, such as Creating, Initializing, Pending, Running, and so on. Additionally, it shows a log with timestamps of all of the states over time including any output messages when applicable. This is useful to see when a job is running or if it failed for any reason.
The metrics tab contains several graphs showing pod resource usage, including GPU, CPU, and memory utilization. This helps determine how much a job is stressing the hardware resources or potentially seeing if the application is under-utilizing resources. At the top of the tab, there is a dropdown to select metrics for a specific pod or for an aggregate of all pods for finer granularity.
Lastly, the logs tab shows the live STDOUT for each of the pods, including the aggregate output. In our example application, there will be output showing the training progress, including the epoch, batch size, and steps on a per-GPU basis. The logs are a good place to view training progress or possibly see if there are any errors in the process.
3.1.6. Getting the Checkpoint#
The end of the run.sh script we created copies the latest generated checkpoint to the PVC attached to the job. Any job that uses this same PVC will now be able to load the checkpoint at /checkpoints/snapshot.pt inside a job. Similarly, any data can be saved to the PVC in a job at the specified filesystem path. This is helpful while generating checkpoints in long-running training jobs to continue progress in future jobs or change hyperparameters between jobs.
3.1.7. Cleaning up the Environment#
After the job finishes, it can be deleted to free up resources for other jobs. Note that certain jobs do not self-terminate, and jobs should be monitored to ensure resources are not sitting idle for completed jobs.
3.2. Using Zero Quota Projects for Lower Priority Workloads#
In this example, we walk through the process of creating a zero quota project for lower priority workloads, ensuring that they will always be preemptible.
This example is intended for cluster administrators managing the usage of the cluster, and demonstrates that certain workloads and projects can be prioritized over others for mixed usage of the cluster. In this manner, lower priority workloads can be preempted when higher priority workloads need to be run, and resumed once higher priority workloads are completed.
Once the project and quota configuration is completed by the cluster administrator, users can then run workloads in their assigned projects that fit the lower or higher priority use cases, and their workloads will be scheduled and preempted as configured.
3.2.1. Requirements#
Access to the
defaultdepartment or a department that has enough quota to use the entire cluster’s resources. For more information on configuring departments and projects, see Departments.Ability to create projects and configure quotas. For more information on required user roles, see Cluster Users and Managing Users.
No workloads are currently running in the cluster (if other workloads are running, they may interfere with the scheduler behavior).
Note
The NVIDIA Run:ai scheduler provides more configuration capabilities, such as over-quota priority, that can influence the behavior of workloads on the cluster (such as if other workloads are also running). Read here for more information about the NVIDIA Run:ai Scheduler.
3.2.2. Creating the Maximum Quota Project via the UI#
In this section, we will create a project with enough quota to use the entire cluster’s compute resources.
Note
This is a setup step that only needs to be executed once. The maximum quota project will persist unless removed.
Navigate to the Projects page and click the + NEW PROJECT button.
In the Scope field, ensure the
defaultdepartment is selected (or an alternative department with the ability to use all of the cluster’s available resources).Enter a name like
full-quota-projectin the Project name field.Under Quota management, set the GPU devices field to use all GPUs available to the department, and set the CPUs (Cores) and CPU memory fields to
Unlimited.Change no other fields, and click the CREATE PROJECT button.
3.2.3. Creating the Zero Quota Project via the UI#
In this section, we will create a project with zero quota. Workloads running in this project will still be able to use compute resources, but will always be over quota and subject to preemption.
Note
This is a setup step that only needs to be executed once. The zero quota project will persist unless removed.
Navigate to the Projects page and click the + NEW PROJECT button.
In the Scope field, ensure the same department is selected as the one used in the previous section.
Enter a name like
zero-quota-projectin the Project name field.Under Quota management, set the GPU devices, CPUs (Cores), and CPU memory fields to
0.Change no other fields, and click the CREATE PROJECT button.
3.2.4. Creating the Lower Priority Interactive Workload via the UI#
In this section, we will create and start a workspace in the zero-quota project.
Note
The same scheduling behaviors exist when using a training workload in a zero quota project. Some of the exact steps and environments used will differ.
Navigate to the Workloads page and click the + NEW WORKLOAD button. Select the Workspace option.
Select the
zero-quota-projectoption under the Projects section.Select Start from scratch under the Template section.
Enter a name like
zero-quota-workspaceunder the Workspace name section and click the CONTINUE button.Select the
jupyter-laboption under the Environment section.Select the
h100-1goption under the Compute resource section.Open the General section and toggle the
Allow the workspace to exceed the project's quotaswitch to on (it will appear blue when on). Otherwise, the workspace will not start.Note
You can set a policy for workspaces to enable this option by default. To do so, set the
spec.preemptible.rules.required: trueparameter in an interactive workspace policy, following the instructions for NVIDIA Run:ai Policies .Click the CREATE WORKSPACE button.
The UI will automatically return to the Workloads page - observe the
zero-quota-workspaceworkload enter aRunningstate.
3.2.5. Creating the Higher Priority Training Workload via the UI#
In this section, we will create and start a training workload in the full quota project. This training workload will preempt the workload initiated in the zero quota project.
Navigate to the Workloads page and click the + NEW WORKLOAD button. Select the Training option.
Select the
full-quota-projectoption under the Projects section.Select the
Distributedoption under the Workload architecture section.Select the
PyTorchoption when the Set the framework for distributed trainings dropdown menu appears in the Workload architectures section.Select the
Workers onlyoption when the Set the distributed training configuration options appear in the Workload architectures section.Select Start from scratch under the Template section.
Enter a name like
full-quota-trainingunder the Training name section and click the CONTINUE button.Click the + NEW ENVIRONMENT button under the Environment section.
In the next screen, enter a name like
simple-pytorch-environmentunder the Environment name & description section.Set the Image URL field to
nvcr.io/nvidia/pytorch:24.07-py3under the Image section.Click the CREATE ENVIRONMENT button.
Upon being returned to the previous screen, ensure that the
simple-pytorch-environmentthat we just created is selected in the Environment section.click the Runtime settings section.
Click the + COMMAND & ARGUMENTS button.
Enter
sleep 5munder the Command field.In the Set the number of workers for your training field, choose a number that uses all available GPU nodes in the cluster. For example, in a 32 GPU cluster, that number will be
4(8 GPUs per node, 8*4=32).Select the
h100-8goption under the Compute resource section.Click the CREATE TRAINING button.
The UI will automatically return to the Workloads page - observe the
zero-quota-workspaceworkload entering aPendingstate first, followed by thefull-quota-trainingworkload entering aRunningstate.If the
full-quota-trainingworkload is completed or is stopped, thezero-quota-workspaceworkload will resume if there are free resources available in the cluster.
3.2.6. Cleaning up the Environment#
All test workloads and projects used in this example can be safely deleted.