Installing the DGX Software#
This section requires that you have already installed Red Hat Enterprise Linux or derived operating system on the DGX™ system. You can skip this section if you already installed the DGX software stack during a kickstart install.
Important
Before performing the installation, refer to the Release Notes for the latest information and additional instructions depending on the specific release.
Configuring a System Proxy#
If your network requires you to use a proxy:
Edit the file
/etc/dnf/dnf.confand make sure the following lines are present in the[main]section, using the parameters that apply to your network:proxy=http://<Proxy-Server-IP-Address>:<Proxy-Port> proxy_username=<Proxy-User-Name> proxy_password=<Proxy-Password>
Enabling the DGX Software Repository#
Attention
By running these commands you are confirming that you have read and agree to be bound by the NVIDIA Software License Agreement found on the NVIDIA Enterprise Software page. You are also confirming that you understand that any pre-release software and materials available that you elect to install in a DGX might not be fully functional, might contain errors or design flaws, and might have reduced or different security, privacy, availability, and reliability standards relative to commercial versions of NVIDIA software and materials, and that you use pre-release versions at your own risk.
Install the NVIDIA DGX Package for Red Hat Enterprise Linux.
sudo dnf install -y https://repo.download.nvidia.com/baseos/el/el-files/9/nvidia-repo-setup-25.02-1.el9.x86_64.rpm
Installing Required Components#
On Red Hat Enterprise Linux, run the following commands to enable additional repositories required by the DGX software.
sudo subscription-manager repos --enable=rhel-9-for-x86_64-appstream-rpms
sudo subscription-manager repos --enable=rhel-9-for-x86_64-baseos-rpms
sudo subscription-manager repos --enable=codeready-builder-for-rhel-9-x86_64-rpms
Upgrade to the latest software.
sudo dnf update -y --nobest
sudo rebootInstall kernel-devel and kernel-headers packages:
sudo dnf install -y kernel-devel-$(uname -r) kernel-headers-$(uname -r)
Install DGX tools and configuration files.
For the DGX A100, install DGX A100 Configurations.
sudo dnf group install -y 'DGX A100 Configurations'
For the DGX A800, install DGX A800 Configurations.
sudo dnf group install -y 'DGX A800 Configurations'
For the DGX H100, install DGX H100 Configurations.
sudo dnf group install -y 'DGX H100 Configurations'
For the DGX H200, install DGX H200 Configurations.
sudo dnf group install -y 'DGX H200 Configurations'
For the DGX B200, install DGX B200 Configurations.
sudo dnf group install -y 'DGX B200 Configurations'
For the DGX B300, install DGX B300 Configurations.
sudo dnf group install -y 'DGX B300 Configurations'
For the DGX Station A100, install DGX Station A100 Configurations.
sudo dnf group install -y 'DGX Station A100 Configurations'
The configuration changes take effect only after rebooting the system. To reduce the number of reboots, you can defer rebooting until this user guide instructs you to reboot when you are installing DOCA and the GPU driver.
Configuring Data Drives#
The data drives in the DGX systems can be configured as RAID 0 or RAID 5. RAID 0 provides the maximum storage capacity and performance, but does not provide any redundancy.
RAID 0 is often used for data caching. You can use cachefilesd to provide a cache for NFS shares.
Important
You can change the RAID level later but this will destroy the data on those drives.
The RAID configuration can be configured during the operating system installation. If you have already configured the RAID array during the installation, you can skip the first step and go to step 2.
Configure the
/raidpartition.All DGX systems support RAID 0 or RAID 5 arrays.
The following commands create a RAID array, mount it to
/raidand create an appropriate entry in/etc/fstab.To create a RAID 0 array:
sudo /usr/bin/configure_raid_array.py -c -f
To create a RAID 5 array:
sudo /usr/bin/configure_raid_array.py -c -f -5
Note
The RAID array must be configured before installing
nvidia-conf-cachefilesd, which places the proper SELinux label on the/raiddirectory. If you ever need to recreate the RAID array — which will wipe out any labeling on/raid— afternvidia-conf-cachefilesdhas already been installed, be sure to restore the label manually before restartingcachefilesd.sudo restorecon /raid sudo systemctl restart cachefilesd
(Optional) Install tools for managing the self-encrypting drives (SED) for the data drives on DGX A100, DGX A800, or DGX H100/H200/B200/B300 systems.
Refer to Managing Self-Encrypting Drives for more information.
(Optional) If you want to use your RAID array for caching, install
nvidia-conf-cachefilesd. This will update thecachefilesdconfiguration to use the/raidpartition.sudo dnf install -y nvidia-conf-cachefilesd
Enabling Relaxed Ordering for NVMe Drives#
The Samsung NVMe drives used in the NVIDIA DGX systems support relaxed ordering for I/O operations. Relaxed ordering enables the PCIe bus to complete transactions out of order. NVIDIA recommends enabling this setting when you use GPUDirect Storage to improve performance.
To enable relaxed ordering for I/O operations, run the nvidia-relaxed-ordering-nvme.sh utility as follows:
sudo /bin/nvidia-relaxed-ordering-nvme.sh enable
Note
To see the full usage information for the nvidia-relaxed-ordering-nvme.sh command, run sudo /bin/nvidia-relaxed-ordering-nvme.sh without any arguments.
Configuring NVMe Interrupt Coalescing#
The nvidia-nvme-options package, which is installed on all DGX systems, automatically configures
NVMe interrupt coalescing on all Samsung and Kioxia drives at each boot. To disable this setting
or manually configure the setting, issue the following commands:
To disable the setting:
sudo systemctl stop nvidia-nvme-interrupt-coalescing.service
sudo systemctl disable nvidia-nvme-interrupt-coalescing.service
To configure the setting manually:
sudo /usr/bin/nvidia-nvme-interrupt-coalescing.sh enable
sudo /usr/bin/nvidia-nvme-interrupt-coalescing.sh disable
Installing the GPU Driver#
Note
If you will be installing DOCA, do the steps in the Installing NVIDIA DOCA-OFED section now. DOCA needs to be installed prior to installing the GPU driver; otherwise, nvidia-peermem module will not load.
You have the option to choose between different GPU driver branches for your DGX system. The latest driver release includes new features but might not provide the same support duration as an older release. Refer to the release notes at the NVIDIA Driver Documentation for more details and the minimum required driver release for the GPU architecture.
Display a list of available drivers.
dnf module list nvidia-driverExample Output
NVIDIA CUDA for EL9
Name                   Stream                 Profiles                         Summary
nvidia-driver          latest                 default [d], fm, ks              Nvidia driver for latest branch
nvidia-driver          latest-dkms            default [d], fm, ks              Nvidia driver for latest-dkms branch
nvidia-driver          open-dkms [d]          default [d], fm, ks              Nvidia driver for open-dkms branch
nvidia-driver          515                    default [d], fm, ks, src         Nvidia driver for 515 branch
nvidia-driver          515-dkms               default [d], fm, ks              Nvidia driver for 515-dkms branch
nvidia-driver          515-open               default [d], fm, ks, src         Nvidia driver for 515-open branch
nvidia-driver          520                    default [d], fm, ks, src         Nvidia driver for 520 branch
nvidia-driver          520-dkms               default [d], fm, ks              Nvidia driver for 520-dkms branch
nvidia-driver          520-open               default [d], fm, ks, src         Nvidia driver for 520-open branch
nvidia-driver          525                    default [d], fm, ks, src         Nvidia driver for 525 branch
nvidia-driver          525-dkms               default [d], fm, ks              Nvidia driver for 525-dkms branch
nvidia-driver          525-open               default [d], fm, ks, src         Nvidia driver for 525-open branch
nvidia-driver          530                    default [d], fm, ks, src         Nvidia driver for 530 branch
nvidia-driver          530-dkms               default [d], fm, ks              Nvidia driver for 530-dkms branch
nvidia-driver          530-open               default [d], fm, ks, src         Nvidia driver for 530-open branch
nvidia-driver          535                    default [d], fm, ks, src         Nvidia driver for 535 branch
nvidia-driver          535-dkms               default [d], fm, ks              Nvidia driver for 535-dkms branch
nvidia-driver          535-open               default [d], fm, ks, src         Nvidia driver for 535-open branch
nvidia-driver          545                    default [d], fm, ks, src         Nvidia driver for 545 branch
nvidia-driver          545-dkms               default [d], fm, ks              Nvidia driver for 545-dkms branch
nvidia-driver          545-open               default [d], fm, ks, src         Nvidia driver for 545-open branch
nvidia-driver          550                    default [d], fm, ks, src         Nvidia driver for 550 branch
nvidia-driver          550-dkms               default [d], fm, ks              Nvidia driver for 550-dkms branch
nvidia-driver          550-open               default [d], fm, ks, src         Nvidia driver for 550-open branch
nvidia-driver          555                    default [d], fm, ks, src         Nvidia driver for 555 branch
nvidia-driver          555-dkms               default [d], fm, ks              Nvidia driver for 555-dkms branch
nvidia-driver          555-open               default [d], fm, ks, src         Nvidia driver for 555-open branch
nvidia-driver          560                    default [d], fm, ks, src         Nvidia driver for 560 branch
nvidia-driver          560-dkms               default [d], fm, ks              Nvidia driver for 560-dkms branch
nvidia-driver          560-open               default [d], fm, ks, src         Nvidia driver for 560-open branch
nvidia-driver          565                    default [d], fm, ks, src         Nvidia driver for 565 branch
nvidia-driver          565-dkms               default [d], fm, ks              Nvidia driver for 565-dkms branch
nvidia-driver          565-open               default [d], fm, ks, src         Nvidia driver for 565-open branch
nvidia-driver          570                    default [d], fm, ks              Nvidia driver for 570 branch
nvidia-driver          570-dkms               default [d], fm, ks              Nvidia driver for 570-dkms branch
nvidia-driver          570-open               default [d], fm, ks              Nvidia driver for 570-open branch
nvidia-driver          575                    default [d], fm, ks              Nvidia driver for 575 branch
nvidia-driver          575-dkms               default [d], fm, ks              Nvidia driver for 575-dkms branch
nvidia-driver          575-open               default [d], fm, ks              Nvidia driver for 575-open branch
nvidia-driver          580                    default [d], fm, ks              Nvidia driver for 580 branch
nvidia-driver          580-dkms               default [d], fm, ks              Nvidia driver for 580-dkms branch
nvidia-driver          580-open               default [d], fm, ks              Nvidia driver for 580-open branch
nvidia-driver          590                    default [d], fm, ks              Nvidia driver for 590 branch
nvidia-driver          590-dkms               default [d], fm, ks              Nvidia driver for 590-dkms branch
nvidia-driver          590-open               default [d], fm, ks              Nvidia driver for 590-open branch
Before installing the NVIDIA CUDA driver and configuring the system,
Ensure that the driver release you intend to install is supported by the GPU in the system.
If you will be installing GDS on a system other than NVIDIA DGX Station A100 (refer to Installing NVIDIA GPUDirect Storage below), you must install the NVIDIA Open GPU Kernel module driver using the instructions in step 3.a.i below.
Note
To prevent any future
dnf updatecommands from triggering an unintended major version upgrade (for example, 580 to 590) at a later date, ensure that your desired driver stream version is pinned by one of the following two methods:When installing the GPU driver with the
dnf module installcommand in the install steps below, ensure that the stream version [580, for instance] is specified.If the GPU driver has already been installed without specifying the stream version, before running any future
dnf update command, run:sudo dnf module reset nvidia driver
sudo dnf module enable nvidia-driver:<preferred-stream-version>
For more information, refer to the Red Hat Enterprise Linux section of the NVIDIA Driver Installation Guide for the appropriate GPU driver version.
If installing on Rocky Linux, run the following command:
sudo dnf config-manager --set-enabled crb
Install the NVIDIA CUDA driver.
If you will be installing version 580 or later of the GPU driver, use the GPU driver, version 580 and later, installation step. Otherwise, use the GPU driver previous revisions installation step, below.
GPU driver, version 570 and later, installation (revision 580 is used in the examples below):
For NVSwitch systems, such as DGX B200, DGX B300, DGX H200, DGX H100, DGX A100, and DGX A800, the recommended nvidia-driver installation method is to install the open kernel module. On NVSwitch systems with the fifth-generation NVLinks, such as DGX B200 and DGX B300, the open nvidia-driver should be installed. For B200, the minimum GPU driver version that should be installed is 570 Open. For B300, the minimum GPU driver version that should be installed is 580 Open. Install the 570 or later version of the open GPU driver with the following commands (replace 580 in the examples below with the version of the GPU driver that you are going to install).
Install the most recent version of the GPU driver or the newest branch of the GPU driver by doing one of the two following options:
To install the most recent version of the 580 driver:
sudo dnf module install --nobest -y nvidia-driver:580-open/fm
To install the most recent version of the newest branch of the GPU driver:
sudo dnf module install --nobest -y nvidia-driver:open-dkms/fm
Install
nvlsmon NVSwitch systems with the fifth-generation NVLinks, such as DGX B200 and DGX B300.sudo dnf install -y nvlsm
Install nv-persistence-mode and nvidia-fm-enable:
sudo dnf install -y nv-persistence-mode nvidia-fm-enable
For NVSwitch systems, such as DGX H200, DGX H100, DGX A100, and DGX A800, an alternate installation method is to install the 580 or later version of the GPU driver using the fm profile as follows:
sudo dnf module install --nobest -y nvidia-driver:580/fm
Install nv-persistence-mode and nvidia-fm-enable:
sudo dnf install -y nv-persistence-mode nvidia-fm-enable
For non-NVSwitch systems, such as DGX Station A100, install the driver using the default profile. In the example below replace 580 with the version of the GPU driver that you are going to install:
sudo dnf module install --nobest -y nvidia-driver:580/default
sudo dnf install -y nv-persistence-mode libnvidia-nscq-580
GPU driver previous revisions installation (revision 560 and earlier):
Note
Replace the release version (560) used here in the example commands with the release you want to install.
Note
If the
Streamcolumn in thednf module list nvidia-driveroutput list does not display the compiled driver version you want (for example,560) but only the DKMS version (560-dkms), replace the pertinentsudo dnf module install --nobest -y nvidia-driver:560...command below with the following command, regardless of the system:sudo dnf module install --nobest -y nvidia-driver:560-dkms/fm
For NVSwitch systems, such as DGX A100, DGX H100, DGX H200, and DGX A800, install the driver using the
fmandsrcprofiles:sudo dnf module install --nobest -y nvidia-driver:560/{fm,src}
sudo dnf install -y nv-persistence-mode nvidia-fm-enable
For non-NVSwitch systems, such as DGX Station A100, install the driver using the
defaultandsrcprofiles:sudo dnf module install --nobest -y nvidia-driver:560/{default,src}
sudo dnf install -y nv-persistence-mode libnvidia-nscq-560
(DGX Station A100 only) Install additional packages required for DGX Station A100.
These packages must be installed after installation of the
nvidia-drivermodule.sudo dnf install -y nvidia-conf-xconfig nv-docker-gpus
The configuration changes take effect only after rebooting the system. To reduce the number of reboots, you can defer rebooting until after you install the NVIDIA Container Runtime group.
Install and configure the NVIDIA Container Toolkit with Docker CE or Podman.
Choose one of the following options:
Reboot the server or manually start the NVIDIA Fabric Manager:
sudo systemctl start nvidia-fabricmanager.service
Verify the installation of the nvidia-driver by running:
nvidia-smi
The
nvidia-smicommand should return without errors, with output showing the Driver Version, CUDA Version, all available GPUs, and so on.
Installing and Running Docker CE#
To run an NVIDIA container with Docker CE:
Install the NVIDIA container device plugin along with Docker CE.
Install the NVIDIA Container Runtime group:
sudo dnf group install -y --allowerasing 'NVIDIA Container Runtime'
Reboot the system to load the drivers and to update system configurations.
Reboot the system.
sudo rebootAfter the system reboots, verify that the drivers are loaded and are handling the NVIDIA devices.
nvidia-smi
The output shows all available GPUs.
Example Output
+-----------------------------------------------------------------------------------------+
| NVIDIA-SMI 580.126.16             Driver Version: 580.126.16     CUDA Version: 13.0     |
+-----------------------------------------+------------------------+----------------------+
| GPU  Name                 Persistence-M | Bus-Id          Disp.A | Volatile Uncorr. ECC |
| Fan  Temp   Perf          Pwr:Usage/Cap |           Memory-Usage | GPU-Util  Compute M. |
|                                         |                        |               MIG M. |
|=========================================+========================+======================|
|   0  NVIDIA H100 80GB HBM3          On  |   00000000:1B:00.0 Off |                    0 |
| N/A   21C    P0             70W /  700W |       0MiB /  81559MiB |      0%      Default |
|                                         |                        |             Disabled |
+-----------------------------------------+------------------------+----------------------+
|   1  NVIDIA H100 80GB HBM3          On  |   00000000:43:00.0 Off |                    0 |
| N/A   23C    P0             70W /  700W |       0MiB /  81559MiB |      0%      Default |
|                                         |                        |             Disabled |
+-----------------------------------------+------------------------+----------------------+
|
+-----------------------------------------+------------------------+----------------------+
|   7  NVIDIA H100 80GB HBM3          On  |   00000000:DF:00.0 Off |                    0 |
| N/A   23C    P0             69W /  700W |       0MiB /  81559MiB |      0%      Default |
|                                         |                        |             Disabled |
+-----------------------------------------+------------------------+----------------------+

+-----------------------------------------------------------------------------------------+
| Processes:                                                                              |
|  GPU   GI   CI              PID   Type   Process name                        GPU Memory |
|        ID   ID                                                               Usage      |
|=========================================================================================|
|  No running processes found                                                             |
+-----------------------------------------------------------------------------------------+
Run the following command to verify the installation:
sudo docker run --gpus=all --rm nvcr.io/nvidia/cuda:12.2.0-base-ubi8 nvidia-smi
The output shows all available GPUs.
For information about
nvcr.io, refer to the NGC Private Registry User Guide.
Installing and Running Podman#
To run an NVIDIA container with Podman:
Install Podman.
sudo dnf install -y podman
Install the
nvidia-container-toolkit-basepackage.sudo dnf clean expire-cache && sudo dnf install -y nvidia-container-toolkit-base
Check the NVIDIA Container Toolkit version.
nvidia-ctk --versionGenerate the Container Device Interface (CDI) specification file.
sudo nvidia-ctk cdi generate --output=/etc/cdi/nvidia.yaml
The sample command uses
sudoto ensure that the file at/etc/cdi/nvidia.yamlis created. You can omit the--outputargument to print the generated specification toSTDOUT.Verify that the GPU drivers are loaded and are handling the NVIDIA devices.
nvidia-smi -LRun the following command to verify the installation.
sudo podman run --rm --device nvidia.com/gpu=all ubuntu nvidia-smi -L
Verify your installation by running a sample container with Podman.
podman run --security-opt=label=disable --rm --device nvidia.com/gpu=all ubuntu nvidia-smi
Installing Optional Components#
The DGX is fully functional after installing the components as described in Installing Required Components. If you intend to launch NGC containers (which incorporate the CUDA toolkit, NCCL, cuDNN, and TensorRT) on the DGX system, which is the expected use case, then you can skip this section.
If you intend to use your DGX as a development system for running deep learning applications on bare metal, then install the optional components as described in this section.
Install CUDA Toolkit 13.0 packages (refer to Install the NVIDIA CUDA driver in Installing the GPU Driver)
sudo dnf install -y cuda-toolkit-13-0 cuda-compat-13-0 nvidia-cuda-compat-setup
Note
The output of nvidia-smi shows the version of CUDA that is native-compatible with the installed driver (for example, “NVIDIA-SMI 580.126.16 Driver Version: 580.126.16 CUDA Version: 13.0” in the prior steps). We recommend installing the CUDA toolkit and compatible packages that match the CUDA Version shown. For instance, if nvidia-smi output lists “Driver Version” as “580.126.16”, the “CUDA Version” is currently “13.0”. Therefore, specify “13-0” for installing the cuda-toolkit and cuda-compat packages in the install command above. (Refer to Release Notes for more information.)
To install the NVIDIA Collectives Communication Library (NCCL) Runtime, refer to the NCCL:Getting Started documentation
sudo dnf group install -y 'NVIDIA Collectives Communication Library Runtime'
To install the CUDA Deep Neural Networks (cuDNN) Library Runtime, refer to the NVIDIA cuDNN page.
sudo dnf group install -y 'CUDA Deep Neural Networks Library Runtime'
To install NVIDIA TensorRT, refer to the NVIDIA TensorRT page.
Installing NVIDIA GPUDirect Storage#
Prerequisites#
For systems other than NVIDIA DGX Station A100, to use any GDS version that is 12.2.2-1 or greater that is provided by
nvidia-fs-dkms, you must install an NVIDIA Open GPU Kernel module driver. Refer to Installing the GPU Driver for more information about installing the driver.For NVIDIA DGX Station A100 running the generic Linux Kernel, the GPUs in these systems are not supported with the NVIDIA Open GPU Kernel modules. The GDS versions 12.2.2-1 and higher only support the Open GPU Kernel modules.
For these systems, you must lock the nvidia-fs package to version 2.17.3 or lower and the nvidia-gds package to version 12.2.1-1 or lower.
sudo dnf install python3-dnf-plugin-versionlock
sudo dnf versionlock add nvidia-fs-0:2.17.3-1 nvidia-fs-dkms-0:2.17.3-1 nvidia-gds-0:12.2.1-1
Example Output
Adding versionlock on: nvidia-fs-0:2.17.3-1.*
Adding versionlock on: nvidia-gds-0:12.2.1-1.*
Procedure#
To install NVIDIA GPUDirect Storage (GDS), perform the following steps.
Install the kernel headers and development packages for your kernel.
sudo dnf install -y kernel-headers-$(uname -r) kernel-devel-$(uname -r)
Install the GDS package.
sudo dnf install -y nvidia-gds
Refer to Verifying a Successful GDS Installation in the NVIDIA GPUDirect Storage Installation and Troubleshooting Guide.
Installing the Optional NVIDIA Desktop Theme#
The DGX Software Repository also provides optional theme packages and desktop wallpapers to give the user-interface an NVIDIA look-and-feel for the DGX Station desktop. These packages would have been installed as part of the DGX Station Configurations group.
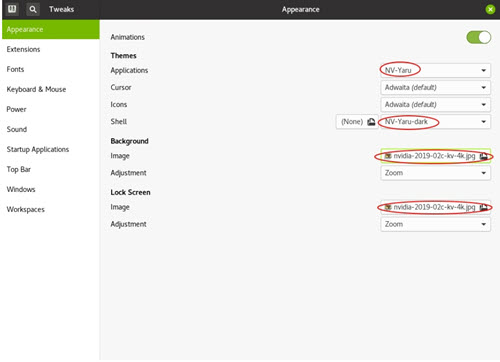
To apply the theme and background images, first open gnome-tweaks.
Under Applications, select one of the NV-Yaru themes. This comes in default, light, and dark variations.
Under Shell, select the NV-Yaru-dark theme.
If this field is grayed out, you might need to reboot the system or restart GDM in order to enable the user-themes extension.
To restart GDM, issue the following.
sudo systemctl restart gdm
Select one of the NVIDIA wallpapers for the background image and lock screen.