Managing and Upgrading Software#
DGX OS 6 is an optimized version of the Ubuntu 22.04 Linux distribution with
access to a large collection of additional software that is available from the
Ubuntu and NVIDIA repositories. You can install the additional software using
the apt command or through a graphical tool.
Note
The graphical tool is only available for DGX Station and DGX Station A100.
For more information about additional software available from Ubuntu, refer also to Install additional applications
Before you install additional software or upgrade installed software, refer also to the Release Notes for the latest release information.
Upgrading the System#
Before installing any additional software, you should upgrade the system to the latest versions. This ensures that you have access to new software releases that have been added to the repositories since your last upgrade. Refer to Upgrading the OS for more information and instructions including instructions for enabling Ubuntu’s Extended Security Maintenance updates.
Important
You will only see the latest software branches after upgrading DGX OS.
Note
When you switch between software branches, such as the GPU driver or CUDA toolkit, you have to install the package(s) for the new branch. Depending on the software, it will then remove the existing branch or support concurrent branches installed on a system.
Changing Your GPU Branch#
NVIDIA drivers are released as precompiled and signed kernel modules by Canonical and are available directly from the Ubuntu repository. Signed drivers are required to verify the integrity of driver packages and identity of the vendor.
However, the verification process requires that Canonical build and release the drivers with Ubuntu kernel updates after their release cycle is complete, and this process might sometimes delay new driver branch releases and updates. For more information about the NVIDIA driver release, refer to the release notes at NVIDIA Driver Documentation.
Important
The Ubuntu repositories provide the following versions of the signed and precompiled NVIDIA drivers:
The general NVIDIA display drivers
The NVIDIA Data Center GPU drivers
On your DGX system, only install the packages that include the NVIDIA Data Center GPU drivers.
The metapackages for the NVIDIA Data Center GPU driver have the -server or -server-open suffix.
Checking the Currently Installed Driver Branch#
Before you install a new NVIDIA driver branch, to check the currently installed driver branch, run the following command:
apt list --installed nvidia-driver*server
Determining the New Available Driver Branches#
These steps help you determine which new driver branches are available.
To see the new available NVIDIA driver branches:
Update the local database with the latest information from the Ubuntu repository.
sudo apt update
Show all available driver branches.
apt list nvidia-driver-*-server
Optional: Show the available NVIDIA Open GPU Kernel module branches.
apt list nvidia-driver-*-server-open
Caution
The NVIDIA Open GPU Kernel module drivers are not supported on NVIDIA DGX-1, DGX-2, and DGX Station systems.
Upgrading Your GPU Branch#
To manually upgrade your driver to the latest branch:
Install the latest kernel.
sudo apt install -y linux-nvidia
Upgrade the NVIDIA GPU driver.
Note
From the
apt-get installexamples below, choose the command set appropriate for your environment. Replace the 535 release of the GPU driver with the release family you want to install, for example, the 550 release. For the DGX H200 systems, the installed GPU driver release must be 550 or greater.To upgrade the NVIDIA GPU driver,
Note
In the following commands, the trailing
-character innvidia${GPU_BRANCH}*-specifies that the currently installed GPU driver will be removed in the same transaction. Because this operation removes packages from the system, it is important to perform a dry run first to ensure that the correct packages will be removed.On non-Fabric Manager systems, such as the NVIDIA DGX-1, DGX Station, DGX Station A100, and DGX Station A800 systems, run the following commands:
GPU_BRANCH=$(dpkg -l | grep nvidia-driver | tr -s " " | cut -d' ' -f3 | cut -d'.' -f1)

# Specify --dry-run to check the packages to install.
sudo apt-get install -y linux-modules-nvidia-535-server-nvidia nvidia-driver-535-server libnvidia-nscq-535 nvidia-modprobe "*nvidia*${GPU_BRANCH}*-" --dry-run

# Install the packages.
sudo apt-get install -y linux-modules-nvidia-535-server-nvidia nvidia-driver-535-server libnvidia-nscq-535 nvidia-modprobe "*nvidia*${GPU_BRANCH}*-"
On Fabric Manager systems, such as the NVIDIA DGX-2, DGX A100, DGX H100/H200, DGX A800, and DGX H800 systems, run the same commands, but append the
nvidia-fabricmanager-535package:GPU_BRANCH=$(dpkg -l | grep nvidia-driver | tr -s " " | cut -d' ' -f3 | cut -d'.' -f1) # Specify --dry-run to check the packages to install. sudo apt-get install -y linux-modules-nvidia-535-server-nvidia nvidia-driver-535-server libnvidia-nscq-535 nvidia-modprobe nvidia-fabricmanager-535 "*nvidia*${GPU_BRANCH}*-" --dry-run # Install the packages. sudo apt-get install -y linux-modules-nvidia-535-server-nvidia nvidia-driver-535-server libnvidia-nscq-535 nvidia-modprobe nvidia-fabricmanager-535 "*nvidia*${GPU_BRANCH}*-"
To install the NVIDIA open GPU kernel module drivers of a different release family from the current GPU driver, such as from the 470 release to the 535 release, specify the packages with the
-server-openstring, for example,linux-modules-nvidia-535-server-open-nvidiaandnvidia-driver-535-server-open:Note
In the following commands, the trailing
-character innvidia${GPU_BRANCH}*-specifies that the currently installed GPU driver will be removed in the same transaction. Because this operation removes packages from the system, it is important to perform a dry run first to ensure that the correct packages will be removed.On non-Fabric Manager systems, such as the NVIDIA DGX Station A100 and DGX Station A800 systems, run the following commands:
GPU_BRANCH=$(dpkg -l | grep nvidia-driver | tr -s " " | cut -d' ' -f3 | cut -d'.' -f1)

# Specify --dry-run to check the packages to install.
sudo apt-get install -y linux-modules-nvidia-535-server-open-nvidia nvidia-driver-535-server-open libnvidia-nscq-535 nvidia-modprobe "*nvidia*${GPU_BRANCH}*-" --dry-run

# Install the packages.
sudo apt-get install -y linux-modules-nvidia-535-server-open-nvidia nvidia-driver-535-server-open libnvidia-nscq-535 nvidia-modprobe "*nvidia*${GPU_BRANCH}*-"
On Fabric Manager systems, such as the NVIDIA DGX A100, DGX H100/H200, DGX A800, and DGX H800 systems, run the same commands, but append the
nvidia-fabricmanager-535package:GPU_BRANCH=$(dpkg -l | grep nvidia-driver | tr -s " " | cut -d' ' -f3 | cut -d'.' -f1) # Specify --dry-run to check the packages to install. sudo apt-get install -y linux-modules-nvidia-535-server-open-nvidia nvidia-driver-535-server-open libnvidia-nscq-535 nvidia-modprobe nvidia-fabricmanager-535 "*nvidia*${GPU_BRANCH}*-" --dry-run # Install the packages. sudo apt-get install -y linux-modules-nvidia-535-server-open-nvidia nvidia-driver-535-server-open libnvidia-nscq-535 nvidia-modprobe nvidia-fabricmanager-535 "*nvidia*${GPU_BRANCH}*-"
To install the NVIDIA open GPU kernel module drivers of the same release family as the current GPU driver, such as the 535 release,
On non-Fabric Manager systems, such as the NVIDIA DGX Station A100 and DGX Station A800 systems, first remove the current driver and then install the package:
# Remove the current driver.
sudo apt-get purge "*nvidia*535*"

# Install the packages.
sudo apt-get install -y linux-modules-nvidia-535-server-open-nvidia nvidia-driver-535-server-open libnvidia-nscq-535 nvidia-modprobe
On Fabric Manager systems, such as the NVIDIA DGX A100, DGX H100/H200, DGX A800, and DGX H800 systems, run the same commands, but append the
nvidia-fabricmanager-535package:#Remove the current driver. sudo apt-get purge "*nvidia*535*" #Install the packages. sudo apt-get install -y linux-modules-nvidia-535-server-open-nvidia nvidia-driver-535-server-open libnvidia-nscq-535 nvidia-modprobe nvidia-fabricmanager-535
Reboot the system to ensure the new drivers get loaded:
sudo reboot
Installing or Upgrading to a Newer CUDA Toolkit Release#
Only DGX Station and DGX Station A100 have a CUDA Toolkit release installed by default. DGX servers are intended to be shared resources that use containers and do not have CUDA Toolkit installed by default. However, you have the option to install a qualified CUDA Toolkit release.
Although the DGX OS supports all CUDA Toolkit releases that interoperate with the installed driver, DGX OS releases might include a default CUDA Toolkit release that might not be the most recently released version. Unless you must use a new CUDA Toolkit version that contains the new features, we recommend that you remain on the default version that is included in the DGX OS release. Refer to the DGX OS Software Release Notes for the default CUDA Toolkit release.
Important
Before you install or upgrade to any CUDA Toolkit release, ensure the release is compatible with the driver that is installed on the system. Refer to CUDA Compatibility for more information and a compatibility matrix.
CUDA Compatibility Matrix and Forward Compatibility#
Each CUDA toolkit requires a minimum GPU driver version. This compatibility matrix is documented in CUDA Compatibility
Newer CUDA Toolkits may be used with older GPU drivers if the appropriate forward compatibility package is installed. Refer to: Installing the CUDA Forward Compatibility Package
Example:
CUDA toolkit 12.0 requires GPU driver version 525.60.13, however GPU driver 515.43.04 is installed. In order to use CUDA toolkit 12.0 with the older GPU driver, you must install the cuda-compat-12-0 package:
sudo apt install cuda-compat-12-0
Set either LD_LIBRARY_PATH manually:
LD_LIBRARY_PATH=/usr/local/cuda/compat:$LD_LIBRARY_PATH
or automatically via the /etc/ld.so.conf file or by adding a file under /etc/ld.so.conf.d/.
Checking the Currently Installed CUDA Toolkit Release#
Here is some information about the prerequisite to determine the CUDA Toolkit release that you currently have installed.
Before you install a new CUDA Toolkit release, to check the currently installed release, run the following command:
apt list --installed cuda-toolkit-*
The following example output shows that CUDA Toolkit 11.0 is installed:
apt list --installed cuda-toolkit-*
Listing... Done
cuda-toolkit-11-0/unknown,unknown,now 11.0.3-1 amd64 [installed]
N: There is 1 additional version. Please use the '-a' switch to see it
Installing or Upgrading the CUDA Toolkit#
These steps help you determine which new CUDA Toolkit releases are available.
To see the new available CUDA Toolkit releases:
Update the local database with the latest information from the Ubuntu repository.
sudo apt update
Show all available CUDA Toolkit releases.
apt list cuda-toolkit-*
The following output shows that 11.7, 11.8, 12.0 are the possible CUDA Toolkit versions that can be installed:
Listing... Done
cuda-toolkit-11-7/unknown 11.7.1-1 amd64
cuda-toolkit-11-8/unknown 11.8.0-1 amd64
cuda-toolkit-12-0/unknown 12.0.0-1 amd64
To install or upgrade the CUDA Toolkit, run the following:
sudo apt install cuda-toolkit-<version>
Installing the Mellanox OFED Drivers#
DGX OS 6 uses the OFED drivers supplied with the Ubuntu 22.04 distribution. Alternatively, you can install the Mellanox OFED (MLNX_OFED) drivers. The Mellanox OFED drivers are tested and packaged by NVIDIA.
Using the Mellanox OFED Packages#
If you are upgrading from OS 5 to OS 6, refer to Upgrading in the DGX OS 5 User Guide before changing drivers.
Download the driver from the Linux Drivers page.
Scroll down to the MLNX_OFED Download Center matrix, and click the Download tab.
Choose the package that is relevant to your host operating system.
Click the supported ISO or tgz package.
To obtain the download link, accept the End User License Agreement (EULA).
To check the integrity of your ISO image, run the following command and compare the result to the value provided on the download page:
md5sum MLNX_OFED_LINUX-<ver>-<OS label>.iso
For more information, refer to Downloading the Driver.
To remove the Ubuntu OFED components, run the following command:
sudo /usr/sbin/nvidia-manage-ofed.py -r ofed
Proceed with the installation steps by following the instructions in Installing MLNX_OFED.
Using the Ubuntu OFED Packages#
Remove the Mellanox OFED components:
sudo /usr/sbin/nvidia-manage-ofed.py -r mofed
Ensure the APT is not configured with the Mellanox repository.
Remove the
/etc/apt/sources.list.d/mlnx.listfile.Update APT so it no longer has information about the packages from the Mellanox repository:
sudo apt update
Add the Ubuntu OFED components:
sudo /usr/sbin/nvidia-manage-ofed.py -i ofed
Inbox OFED vs Mellanox OFED Use Cases#
The following table describes common MOFED utilities / use cases, and how to accomplish them with inbox OFED tools.
One key difference between MOFED and inbox OFED is that the /dev/mst* devices aren’t used by inbox OFED. Devices are addressed by their PCIe Bus:Device:Function instead.
Use Case |
Mellanox OFED Method |
Inbox OFED Method |
|---|---|---|
Correlate IB devices to network devices |
ibdev2netdev |
rdma link show |
Provide information about bond / mtu |
net-interfaces |
View the contents of:
|
Reload OFED drivers |
openidb |
modprobe |
Manipulation with device configuration |
mlxconfig |
mstconfig |
FW image burn |
flint |
mstflint |
Collect debug traces |
fwtrace |
mstfwtrace |
Reset operation on device |
mlxfwreset |
mstfwreset |
Configuration Register Access tool |
mcra |
mstmcra |
Manipulation with host privileges |
mlxprivhost |
mstprivhost |
Dump device internal configuration registers |
mlxdump |
mstregdump |
Read device Vital Product Data |
mlxvpd |
mstvpd |
Upgrading Firmware for Mellanox ConnectX Cards#
DGX OS 6 uses the open source mstflint program to upgrade firmware on Mellanox cards.
Checking the Device Type#
Mstflint uses the PCI-E Bus/Device/Function (BDF) identifier to specify devices. To locate all Mellanox Ethernet and Infiniband devices in the system,
execute the command:
lspci | grep Mellanox | grep -e Infiniband -e Ethernet
The first column of the output is the BDF, for example:
29:00.0 Infiniband controller: Mellanox Technologies MT2910 Family [ConnectX-7]
29:00.1 Ethernet controller: Mellanox Technologies MT2910 Family [ConnectX-7]
To locate the correct firmware for your device you will need the OPN and PSID of the device.
To find the OPN, use the
mstvpdcommand:# mstvpd 29:00.0 | grep PN PN: MCX755206AS-NEAT-N
To find the PSID, use the mstflint command:
# mstflint -d 29:00.0 q | grep PSID
PSID:                     MT_0000000892
Download the New Firmware#
Navigate to https://network.nvidia.com/support/firmware/firmware-downloads/
Select the product line, e.g.: ConnectX-6 Infiniband.
Select the firmware version.
Select the OPN and PSID that matches your device.
Select “Download” to download the firmware.
Use the “unzip” command to unpack the compressed file to access the .bin file.
Program the Firmware#
Use the mstflint command to program the device:
# mstflint -d 29:00.0 -i fw-ConnectX7-rel-28_36_1010-MCX75310AAS-HEA-N_Ax-UEFI-14.29.14-FlexBoot-3.6.901.signed.bin burn
After installing the new firmware, reboot the system.
Installing the DOCA-OFED Package#
DGX systems include high-performance network cards to connect to other systems over InfiniBand or Ethernet. The DOCA-OFED package provides the same functionality as MLNX_OFED, including kernel drivers, user space libraries, and management tools for NVIDIA networking products. For more information about DOCA-OFED as part of the DOCA-Host package, refer to the What IS DOCA-OFED section in MLNX_OFED to DOCA-OFED Transition Guide.
The DGX OS 6 software stack does not include the DOCA-OFED package. To install DOCA-OFED, follow these steps:
Download the latest DOCA-Host package from the NVIDIA website or public repo.
Uninstall the existing MLNX_OFED package from your system.
Install the DOCA-OFED package on your host server using a standard Linux package manager.
Reboot your system and verify that the DOCA-OFED components function correctly.
For more information, refer to DOCA-HOST Installation and Upgrade.
Installing GPUDirect Storage Support#
NVIDIA Magnum IO GPUDirect Storage (GDS) enables a direct data path for direct memory access (DMA) transfers between GPU memory and storage. This software avoids a bounce buffer through the CPU.
Note
This section only applies if you intend to use GPUDirect Storage in bare metal.
Prerequisites#
Determine if GDS is supported with your Linux kernel and whether you need to install OFED drivers.
Optimized NVIDIA Kernel
Generic kernel
Ubuntu OFED
All kernel modules (nvidia-fs, NVMe, NVMf, NFS) related to GDS are part of the Optimized NVIDIA kernel.
Unsupported
Mellanox OFED
All kernel modules related to GDS are part of the Optimized NVIDIA kernel.
Install MOFED. Refer to Installing Mellanox OFED Drivers and then perform the steps in the following section.
GDS kernel modules are not present in the Ubuntu generic kernel. These kernel modules are patched via MOFED installation.
Install MOFED. Refer to Installing Mellanox OFED Drivers and then perform the steps in the following section.
For additional help, refer to MLNX_OFED Requirements and Installation in the NVIDIA GPUDirect Storage Installation and Troubleshooting Guide.
For systems other than NVIDIA DGX-1, DGX-2, and DGX Station, to use the latest GDS version, 12.2.2-1, that is provided by nvidia-fs-dkms-2.17.5-1, you must install an NVIDIA Open GPU Kernel module driver. Refer to Changing Your GPU Branch for more information about installing the driver.
For NVIDIA DGX-1, DGX-2, and DGX Station running the generic Linux Kernel, the GPUs in these systems are not supported with the NVIDIA Open GPU Kernel modules. The GDS versions 12.2.2-1 and higher only support the Open GPU Kernel modules.
For these systems, you must pin the nvidia-fs package to version 2.17.3 or lower and the nvidia-gds package to version 12.2.1-1 or lower.
Create an
/etc/apt/preferences.d/nvidia-fsfile with contents like the following.Package: nvidia-fs Pin-Priority: 900 Pin: version 2.17.3-1 Package: nvidia-fs-dkms Pin-Priority: 900 Pin: version 2.17.3-1 Package: nvidia-gds Pin-Priority: 900 Pin: version 12.2.1-1 Package: nvidia-gds-12-2 Pin-Priority: 900 Pin: version 12.2.1-1
Verify that the nvidia-fs package preference is correct.
sudo apt-cache policy nvidia-fs
Example Output
nvidia-fs:
  Installed: (none)
  Candidate: 2.17.3-1
  Version table:
     2.17.5-1 580
        580 https://developer.download.nvidia.com/compute/cuda/repos/ubuntu2204/x86_64  Packages
     2.17.3-1 900
        580 https://developer.download.nvidia.com/compute/cuda/repos/ubuntu2204/x86_64  Packages
     ...
Verify that the nvidia-gds package preference is correct.
sudo apt-cache policy nvidia-gds
Example Output
nvidia-gds:
  Installed: (none)
  Candidate: 12.2.1-1
  Version table:
     12.2.2-1 580
        580 https://developer.download.nvidia.com/compute/cuda/repos/ubuntu2204/x86_64  Packages
     12.2.1-1 900
        580 https://developer.download.nvidia.com/compute/cuda/repos/ubuntu2204/x86_64  Packages
     ...
For NVIDIA DGX-1, DGX-2, and DGX Station, disable IOMMU to avoid a DMAR penalty.
Edit the GRUB configuration file.
sudo vi /etc/default/grub
Add
intel_iommu=offto theGRUB_CMDLINE_LINUX_DEFAULTvariable.If the variable already includes other options, enter a space to separate the options. Refer to the following example.
...
GRUB_CMDLINE_LINUX_DEFAULT="console=tty0 intel_iommu=off"
...
Generate the GRUB bootloader.
sudo update-grub
sudo reboot
After the system reboots, verify the change took effect.
cat /proc/cmdlineExample Output
BOOT_IMAGE=/boot/vmlinuz-... console=tty0 intel_iommu=off
Installing GDS Components for the Optimized NVIDIA Kernel#
This procedure applies to both the Ubuntu OFED and Mellanox OFED with the Optimized NVIDIA kernel.
The nvidia-fs kernel module nvidia-fs.ko is available as a precompiled Linux kernel module and
in the linux-modules-nvidia-fs-5.15.0-xxx-nvidia deb package.
To use GDS with the Optimized NVIDIA kernel, install the CUDA libcufile packages:
sudo apt install libcufile-<ver> libcufile-dev-<ver> gds-tools-<ver>
Use the CUDA Toolkit version number in place of <ver>, such as
12-2.
Installing GDS Components for the Generic Kernel#
The GDS user-space components, libcufile and tools, are required and are installed by performing this procedure.
To use GDS with the Ubuntu generic kernel, perform the following steps:
Set the
NVIDIA_DRV_VERSIONenvironment variable to the driver version.NVIDIA_DRV_VERSION=$(cat /proc/driver/nvidia/version | grep Module | awk '{print $8}' | cut -d '.' -f 1)
Install the nvidia-gds package.
For NVIDIA DGX-1, DGX-2, and DGX Station that must use version
12.2.1-1:sudo apt install nvidia-gds-12-2=12.2.1-1 nvidia-dkms-${NVIDIA_DRV_VERSION}-server
For other NVIDIA DGX Systems:
sudo apt install nvidia-gds-<version> nvidia-dkms-${NVIDIA_DRV_VERSION}-server
Use the CUDA Toolkit version number in place of <version>, such as
12-2.
Enabling Relaxed Ordering for NVMe Drives#
The Samsung NVMe drives used in NVIDIA DGX systems support relaxed ordering for I/O operations. Relaxed ordering enables the PCIe bus to complete transactions out of order. NVIDIA recommends enabling this setting when using GPUDirect Storage to improve performance.
Run the
nvidia-relaxed-ordering-nvme.shutility:sudo /bin/nvidia-relaxed-ordering-nvme.sh enable
Next Steps#
Refer to Verifying a Successful GDS Installation in the NVIDIA GPUDirect Storage Installation and Troubleshooting Guide.
Selecting a different Linux kernel#
DGX OS 6 uses a kernel optimized for NVIDIA systems.
Install the generic Ubuntu kernel by running sudo apt install linux-generic.
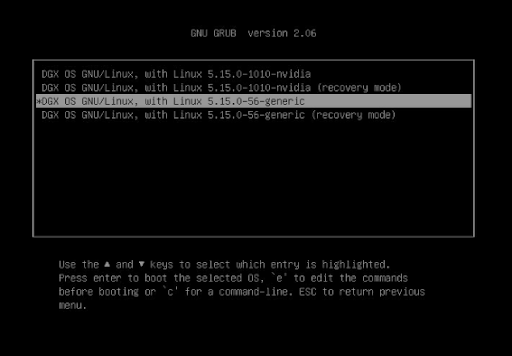
Boot the system to the generic kernel one time#
To boot from the generic kernel first select “Advance options for DGX OS GNU/Linux” in the grub menu:

Select the generic kernel:
Boot the system to the generic kernel by default#
As shipped, GRUB_DEFAULT is set to 0.
This setting indicates to boot the first menu entry on the first menu.
The first menu entry is always set to the newest kernel.
To set a different default kernel, you must specify both the menu entry and the submenu item.
View the
/boot/grub/grub.cfgfile.Locate the Advanced options for DGX OS GNU/Linux submenu line. Copy the ID that follows the
$menuentry_id_optionstring. In the following example, the ID begins withgnulinux-advanced.submenu 'Advanced options for DGX OS GNU/Linux' $menuentry_id_option 'gnulinux-advanced-342551e3-c0b6-46da-90c1-d938ff352025'
Further down in the file, locate the menu entry line for the kernel that you want to boot. In the following example, the menu entry is DGX OS GNU/Linux, with Linux 5.15.0-84-generic.
Copy the ID that follows the
$menuentry_id_optionstring. In the following example, the ID begins withgnulinux-5.15.0-84-generic.menuentry 'DGX OS GNU/Linux, with Linux 5.15.0-84-generic' --class dgx --class gnu-linux --class gnu --class os --unrestricted $menuentry_id_option 'gnulinux-5.15.0-84-generic-advanced-342551e3-c0b6-46da-90c1-d938ff352025'
Edit the
/etc/default/grubfile and set theGRUB_DEFAULTvalue to the ID of the submenu, the greater than character (>), and the ID of the kernel, like the following example.Example
GRUB_DEFAULT='gnulinux-advanced-342551e3-c0b6-46da-90c1-d938ff352025>gnulinux-5.15.0-84-generic-advanced-342551e3-c0b6-46da-90c1-d938ff352025'
Update the grub configuration.
sudo update-grub2Example Output
Sourcing file `/etc/default/grub'
Sourcing file `/etc/default/grub.d/hugepage.cfg'
...
Adding boot menu entry for UEFI Firmware Settings ...
done
The system uses the newly selected default kernel on the next boot.