Upgrading the OS#
This section provides information about upgrading an existing DGX OS installation.
If you want to reimage the system with DGX OS to a default state, refer to Reimaging the System for more information.
Important
Before you upgrade a system or any installed software, always consult the Release Notes for the latest information about available upgrades. You can find out more about the release cadence and release methods for DGX OS in Release Guidance
This release incorporates the following updates:
Ubuntu ConnectX drivers and OFED stack
Customers are advised to consider these updates and any effect they may have on their application. For example, some MOFED-dependent applications may be affected.
Best practices support upgrading select systems and verifying that your applications are working as expected before deploying on additional systems.
Here is some information that describes the difference between the different types of upgrades:
When you perform a release upgrade, you currently have the DGX OS 5 installed, and you want to move to DGX OS 6.
You can upgrade to DGX OS 6 only from the latest DGX OS 5.x release. Refer to Performing a Release Upgrade from DGX OS 5 for the upgrade instructions. The instructions also provide information about completing an over-the-internet upgrade.
When you perform package upgrades, you want to install upgrades that have been made available in the repositories since the initial DGX OS 6 release. The repositories are periodically updated with packages that include bug fixes and security updates. The NVIDIA repository also includes packages with new features that are available with the latest DGX OS minor version release. Refer to Performing Package Upgrades for instructions.
Note
If you want to change the branch of a driver or CUDA Toolkit, refer to Managing and Upgrading Software for instructions.
Upgrades are cumulative, which means that your systems will install all available upgrades, including upgrades available from Ubuntu, such as the kernel. Performing upgrades will install the latest versions available at the time when the upgrade is performed. These may be newer than the current DGX OS release.
Important
The instructions in this chapter upgrade all software for which updates are available from your configured software sources, including applications that you installed yourself. If you want to prevent an application from being upgraded, you can instruct the Ubuntu package manager to keep the current version.
For more information, refer to the Ubuntu Community Help Wiki: Introduction to Holding Packages. It is typically not advised to hold packages as it can disrupt package dependencies.
Important
When you upgrade DGX OS, the system remains on the installed GPU driver branch unless the installed GPU driver branch is end of support. When a GPU driver branch reaches end of support, you will automatically transition to the next supported branch. Refer to Changing Your GPU Branch for instructions on manually switching GPU driver branches.
DGX OS 6 Release Upgrade Advisory#
Here is some additional information when you intend to perform a release upgrade from DGX OS 5:
NGC Containers
With DGX OS 6, customers should update their NGC containers to container release 20.10.17 or later if they are using multi-node training. For all other use cases, refer to the NCG Framework Containers Support Matrix. Refer to the NVIDIA Deep Learning Frameworks documentation for information about the latest container releases and how to access the releases.
Ubuntu ConnectX drivers and OFED stack
For a release upgrade from DGX OS 5, the Mellanox OFED (MOFED) drivers are replaced with the OFED drivers from DGX OS 6.
Customers are advised to consider these updates and any effect they may have on their application. For example, some MOFED-dependent applications may be affected.
After you perform the release upgrade, you can replace the OFED drivers with MOFED. Refer to Installing the Mellanox OFED Drivers for more information.
Best practices support upgrading select systems and verifying that your applications are working as expected before deploying on additional systems.
Getting Release Information for DGX Systems#
Here is some information about how you can determine the release information for your DGX systems.
The /etc/dgx-release file provides release information, such as the
product name and serial number. This file also tracks the history of the
DGX OS software updates by providing the following information:
The version number and installation date of the last version to be installed from an ISO image
DGX_SWBUILD_VERSION.The version number and update date of each over-the-network update applied since the software was last installed from an ISO image (
DGX_OTA_VERSION).
For DGX OS 6, the DGX_OTA_VERSION file indicates the latest ISO
version that was released, and upgrades to the system include the
changes that were made in the network repository up to the indicated
date. You can use this information to determine whether your DGX system is
running the current version of the DGX OS software.
To get release information for the DGX system, view the content of the
/etc/dgx-release file. For example:
more /etc/dgx-release

DGX_NAME="DGX Station A100"
DGX_PRETTY_NAME="NVIDIA DGX Station A100"
DGX_SWBUILD_DATE="2022-10-11-17-49-32"
DGX_SWBUILD_VERSION="5.4.1"
DGX_COMMIT_ID="38d36e8"
DGX_PLATFORM="DGX Station A100"
DGX_SERIAL_NUMBER="1632920000024"

DGX_OTA_VERSION="5.5.0"
DGX_OTA_DATE="Mon 10 Apr 2023 10:11:07 PM PDT"

DGX_OTA_VERSION="6.0.10"
DGX_OTA_DATE="Thu Apr 13 04:55:25 PM PDT 2023"
Preparing to Upgrade the Software#
This section provides information about the tasks you need to complete before you can upgrade your DGX OS software.
Connect to the DGX System Console#
Connect to the console of the DGX system using a direct connection or a remote connection through the BMC. See Connecting to the DGX System
Note
SSH can be used to perform the upgrade. However, if the Ethernet port is configured for DHCP, the IP address might change after the DGX server is rebooted during the upgrade, which results in the loss of connection. A loss of connection might also occur if you are connecting through a VPN. If this happens, connect by using a direct connection or through the BMC to continue the upgrade process. Warning: Connect directly to the DGX server console if the DGX is connected to a 172.17.xx.xx subnet.
DGX OS software installs Docker CE, which uses the 172.17.xx.xx subnet by default for Docker containers. If the DGX server is on the same subnet, you will not be able to establish a network connection to the DGX server.
See Configuring Docker IP Addresses To ensure that your DGX system can access the network interfaces for Docker containers, Docker should be configured to use a subnet distinct from other network resources used by the DGX system. for instructions on how to change the default Docker network settings after performing the upgrade.
If you are using a GUI to connect to the console, see Performing Package Upgrades Using the GUI. You can use the graphical Software Updater application to manage package upgrades on the DGX Station.
Verifying the DGX System Connection to the Repositories#
Before you attempt to complete the update, you can verify that the network connection for your DGX system can access the public repositories and that the connection is not blocked by a firewall or proxy.
On the DGX system, enter the following:
wget -O f1-changelogs http://changelogs.ubuntu.com/meta-release-lts
wget -O f2-archive http://archive.ubuntu.com/ubuntu/dists/jammy/Release
wget -O f3-security http://security.ubuntu.com/ubuntu/dists/jammy/Release
wget -O f4-nvidia-baseos http://repo.download.nvidia.com/baseos/ubuntu/jammy/x86_64/dists/jammy/Release
wget -O f5-nvidia-cuda https://developer.download.nvidia.com/compute/cuda/repos/ubuntu2204/x86_64/Release
The wget commands should be successful, and there should be five
files in the directory with non-zero content.
Performing a Release Upgrade from DGX OS 5#
Here you find information on performing a release upgrade from DGX OS 5 to DGX OS 6.
Important
If installed software packages do not have upgrade
candidates, and you try to upgrade, an error message will be
displayed. You need to use the --force option, and upgrade
process. Refer to the Release Notes
for a list of packages that are no longer available in DGX OS 6.
Upgrade DGX OS 5 to the Latest Version#
See “Upgrading” in the DGX OS 5 User Guide
Before you can perform the release upgrade of your system, you need to upgrade the current DGX OS 5 to the latest version. These steps upgrade your system to the latest DGX OS 5 release:
If you have DGX OS 5.2 or earlier installed, please see the “upgrading” section of the DGX OS 5 User Guide and the following release notes for instructions and details:
Download information from all configured sources about the latest versions of the packages.
sudo apt update
Install all available upgrades for your current DGX OS release.
sudo apt -y full-upgrade
Note
Depending on which packages were updated when running
sudo apt -y full-upgrade, you might be prompted to reboot the
system before performing nvidia-release-upgrade
Performing the Release Upgrade#
Follow these steps to upgrade your system from DGX OS 5 to DGX OS 6:
Install the
nvidia-release-upgradepackage for upgrading to the latest DGX OS 5 release.sudo apt install -y nvidia-release-upgrade
Note
The next step might install a newer GPU driver. To select a specific driver branch, edit the file
/etc/update-manager/release-upgrades.d/nvidia.cfgand change the DriverBranch setting.Start the DGX OS release upgrade process.
sudo nvidia-release-upgradeIf you are using a proxy server, add the
-Eoption to keep your proxy environment variables. For example:sudo -E nvidia-release-upgrade
Note
Some package upgrades require that you reboot the system before completing the upgrade. Ensure that you reboot the system when prompted.
Resolve conflicts.
Refer to Resolving Release Upgrade Conflicts for details and instructions.
Wait for the upgrade process to complete and press y at the prompt that appears when the system upgrade is completed.
System upgrade is complete. Restart required To finish the upgrade, a
restart is required. If you select 'y' the system will be restarted.
Continue [yN]
The system must be restarted to complete the update process and ensure that any changes are captured by restarted services and runtimes.
Note
If no reboot prompt appeared or if you did not restart the system when prompted, then reboot to complete the update process.
sudo reboot
After the system is restarted, the upgrade process takes several minutes to perform some final installation steps.
Resolving Release Upgrade Conflicts#
During the upgrade, the system might encounter conflicts or require other manual intervention.
When you are prompted to resolve conflicts in configuration files, evaluate the changes before selecting one of the following options:
Accepting the maintainer’s version.
Keeping the local version.
Manually resolving the difference.
Conflicts in some configuration files might be the result of customizations to the Ubuntu Desktop OS made for DGX OS software. For guidance about how to resolve these conflicts, see the chapter in the Release Notes for the release family to which you are upgrading.
/etc/apt/sources.list.d/dgx.list. You should install the package maintainer’s version./etc/ssh/sshd_config. You can keep the local version that is currently installed.
Conflicts in the following configuration files are the result of customizations to the Ubuntu Desktop OS made for DGX OS 6.
/etc/gdm3/custom.conf.distrib. You can keep your currently installed version./etc/gdm3/custom.conf. You can keep your currently installed version.
If you are logged in to the DGX system remotely through secure shell (SSH), you are prompted about whether you want to continue running under SSH.
Continue running under SSH?
This session appears to be running under ssh. It is not recommended to perform a upgrade over ssh currently because in case of failure it is harder to recover.
If you continue, an additional ssh daemon will be started at port '1022'.
Do you want to continue?
Continue [yN]
Enter y to continue.
An additional sshd daemon is started and the following message is displayed:
Starting additional ``sshd`` To make recovery in case of failure easier, an
additional sshd will be started on port '1022'. If anything goes wrong
with the running ssh you can still connect to the additional one. If you
run a firewall, you may need to temporarily open this port. As this is
potentially dangerous it's not done automatically. You can open the port
with e.g.: 'iptables -I INPUT -p tcp --dport 1022 -j ACCEPT' To continue
please press [ENTER]
Press Enter.
If you are warned that third-party sources are disabled:
Third party sources disabled
Some third party entries in your sources.list were disabled. You can re-enable them after the upgrade with the 'software-properties' tool or your package manager.
To continue please press **ENTER**
Canonical and DGX repositories are preserved for the upgrade, but any other repositories, for example, Google Chrome or VSCode, will be disabled. After the upgrade, you must manually re-enable any third-party sources that you want to keep.
Press Enter.
You are asked to confirm that you want to start the upgrade.
Do you want to start the upgrade?
Installing the upgrade can take several hours. Once the download has finished, the process cannot be canceled.
Continue [yN] Details [d]
Press Enter.
(DGX Station only) In response to the warning that lock screen is disabled, press Enter to continue. Do not press Ctrl+C to respond to this warning, because pressing Ctrl+C terminates the upgrade process.
If you are prompted to confirm that you want to remove obsolete packages, select one of the options:
Remove obsolete packages?
371 packages are going to be removed. Removing the packages can take several hours.
Continue [yN]   Details [d]

- Determine whether to remove obsolete packages and continue with the
  upgrade.

  - Review the list of packages that will be removed.

     To identify obsolete DGX OS Desktop packages, see the lists of obsolete
     packages in the `DGX OS Desktop Release
     Notes <https://docs.nvidia.com/dgx/dgx-os-desktop-release-notes/index.html>`__
     for all releases after your current release.

  - If the list contains only packages that you want to remove, enter
     **y** to continue with the upgrade.
Enter y to accept the recommended changes, n (default) for no, or d for more details.
Verifying the Upgrade#
Here is are steps to verify your upgrade.
Confirm the Linux kernel version.
For example, when you upgrade to DGX OS 6.0, the Linux kernel version is at least
5.15.0-1023-nvidia.For the minimum Linux kernel version of the release to which you are upgrading, refer to the release notes for that release.
Confirm the NVIDIA Graphics Drivers for Linux version.
nvidia-smi
For example, for an upgrade to DGX OS 6.0, the NVIDIA Graphics Drivers for Linux version is at least 525.105.17:
Thu Apr 27 17:00:38 2023
+-----------------------------------------------------------------------------+
| NVIDIA-SMI 525.105.17   Driver Version: 525.105.17   CUDA Version: 12.0     |
|-------------------------------+----------------------+----------------------+
Recovering from an Interrupted or Failed Update#
If the script is interrupted during the update, because of a loss of power or loss of network connection, depending on the issue, you need to restore power or restore the network connection.
If the system encounters a kernel panic after you restore power and reboot the DGX system, you cannot perform the over-the-network update. You need to reinstall DGX OS 6 with the latest image instead. See Reimaging the System.
This section provides information about how to install the DGX OS for instructions and complete the network update.
If you can successfully return to the Linux command line, complete the following steps.
Reconfigure the packages.
dpkg -a --configure
Fix the broken package installs.
apt -f install -y
Determine where the
release-upgraderwas extracted./tmp/ubuntu-release-upgrader-<random-string>
Start a bash shell, go to the upgrader, and configure.
sudo bashcd /tmp/ubuntu-release-upgrader-<random-string>
RELEASE_UPGRADER_ALLOW_THIRD_PARTY=1 ./jammy --frontend=DistUpgradeViewText
Do not reboot at this time.
Issue the following command and reboot.
bash /usr/bin/nvidia-post-release-upgradereboot
Performing a Release Upgrade with Base Command Manager#
Caution
With Base Command Manager, when you upgrade DGX OS from version 6.0 or 6.1 to a later release by
running apt upgrade, apt update, or apt install in a chroot environment and
encounter errors, follow the steps in this procedure to complete the upgrade.
Remove the packages that produced the errors during the upgrade.
apt purge -y kdump-tools nvsm
Update the metadata.
sudo apt update -y
Perform either of the following two tasks.
Install the new Linux kernel. For example,
sudo apt install -y linux-image-5.15.0-1040-nvidia
Replace the Linux kernel version used as an example in this step (
linux-image-5.15.0-1040-nvidia) with your Linux kernel version.Perform the full upgrade, if needed.
sudo apt upgrade -y
Reinstall the required packages.
For the DGX H100/H200 system,
sudo apt install -y dgx-h100-system-configurations kdump-tools linux-crashdump nvidia-crashdump nvsm
For the DGX A100 system,
sudo apt install -y dgx-a100-system-configurations kdump-tools linux-crashdump nvidia-crashdump nvsm
Performing Package Upgrades#
NVIDIA and Canonical provide updates to the OS in the form of updated software packages between releases with security mitigations and bug fixes. You should evaluate the available updates in regular intervals and update the system that is based on the threat level.
Enabling Extended Security Maintenance Upgrades#
This section provides information about Ubuntu’s Extended Security Updates (ESM).
As a DGX OS customer, you are entitled to Extended Security Updates from the Ubuntu Universe repository.
You may see the following Ubuntu Pro message from ubuntu-advantage-tools
during an apt upgrade if security updates are available for packages from
the Ubuntu Universe repository:
Get more security updates through Ubuntu Pro with 'esm-apps' enabled.
Learn more about Ubuntu Pro at https://ubuntu.com/pro.
In addition, DGX users will also get the following NVIDIA message:
Your DGX contract entitles you to Extended Security Maintenance updates
for additional packages in the Ubuntu repository. Please
contact NVIDIA Support to get your key to enable this capability.”
After contacting NVIDIA Enterprise Support to obtain an Ubuntu Pro token, you can use the token with the following command to enable Extended Security Maintenance updates:
sudo pro attach XXXXX
Ubuntu Pro subscription can be checked with the sudo pro status command:
sudo pro status
Renewing Extended Security Maintenance#
The Ubuntu Pro Client does not automatically update the Ubuntu Pro subscription for token expiration. If your Ubuntu Pro token expires, refresh the token on the DGX system to renew the Extended Security Maintenance subscription.
To refresh the Ubuntu Pro token:
sudo pro refresh
To check the new expiration date or the status of ESM:
sudo pro status
Performing Package Upgrades Using the CLI#
You should evaluate the available updates in regular intervals and update the system based on the threat level:
Refer to the Ubuntu Wiki Upgrades for more information about upgrades available for Ubuntu.
For a list of the known Common Vulnerabilities and Exposures (CVEs), including those that can be resolved by updating the DGX OS software, refer to the Ubuntu Security Notices
If updates are available, you can obtain upgraded packages by completing the following steps:
Update the internal database with the list of available packages and their versions.
sudo apt update
Review the packages that will be upgraded.
sudo apt full-upgrade -s
To prevent an application from being upgraded, you can instruct the Ubuntu package manager to “hold packages”. Refer to Holding Packages for more information.
Note
Holding packages should only be used in extreme rare cases as it can disrupt package dependencies.
Upgrade to the latest version.
sudo apt full-upgrade
When prompted to resolve an issue, answer any questions that appear. Most questions require a Yes or No response.
When prompted to select which the GRUB configuration to use, select the current one on the system.
When prompted to select the GRUB install devices, keep the default selection.
The other questions will depend on what other packages were installed before the update, and how those packages interact with the update.
If a message appears that indicates that the
nvidia-docker.servicefailed to start, you can disregard it and continue with the next step. The service will start at that time.
If upgrading from a release earlier than 6.3.2, you must manually upgrade the
datacenter-gpu-managerpackage from version 3.x to version 4.x.For more information, refer to the instructions in the Installation section of the DCGM documentation.
When the upgrade is complete, reboot the system.
sudo reboot
Note
Upgrades to the NVIDIA Graphics Drivers for Linux requires a restart to
complete the kernel upgrade. If you upgrade the NVIDIA Graphics Drivers
for Linux without restarting the DGX system, when you run the
nvidia-smi command, an error message is displayed.
nvidia-smi
Failed to initialize NVML: Driver/library version mismatch
Managing Software Upgrades on DGX Station#
This section provides information about managing upgrades between DGX OS releases by using a GUI tool on DGX Station.
Performing Package Upgrades Using the GUI#
You can use the graphical Software Updater application to manage package upgrades on the DGX Station.
Ensure that you are logged in to your Ubuntu desktop on the DGX Station as an administrator user.
Press the Super key.
This key is usually found on to the Alt key. Refer to What is the Super key? for more information.
If you are using a Windows keyboard, the Super key usually has a Windows logo on it, and it is sometimes called the Windows key or system key.
If you are using an Apple keyboard, this key is known as the Apple key.
In the search bar, type
Software UpdaterOpen the Software Updater, review the available updates, and click [Install Now].
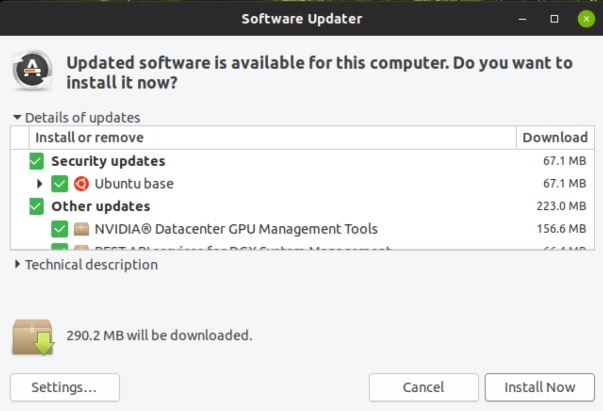
Screen capture showing the software updater window.
If no updates are available, the Software Updater informs you that your software is up to date.
If an update requires the removal of obsolete packages, you will be warned that not all updates can be installed.
To continue with the update, complete the following steps:
Click [Partial Upgrade].
Review the list of packages that will be removed. To identify obsolete DGX Station packages, see the lists of obsolete packages in the DGX OS Desktop Release Notes for all releases after your current release.
If the list contains only packages that you want to remove, click [Start Upgrade].
When prompted to authenticate, type your password into the [Password] field and click [Authenticate].
When the update is complete, restart DGX Station.
Restart the system even if you are not prompted to restart it to
complete the updates. Any update to the NVIDIA Graphics Drivers for
Linux requires a restart. If you update the NVIDIA Graphics Drivers for
Linux without restarting the DGX Station, running the nvidia-smi
command displays an error message.
nvidia-smi
Failed to initialize NVML: Driver/library version mismatch
Checking for Updates to DGX Station Software#
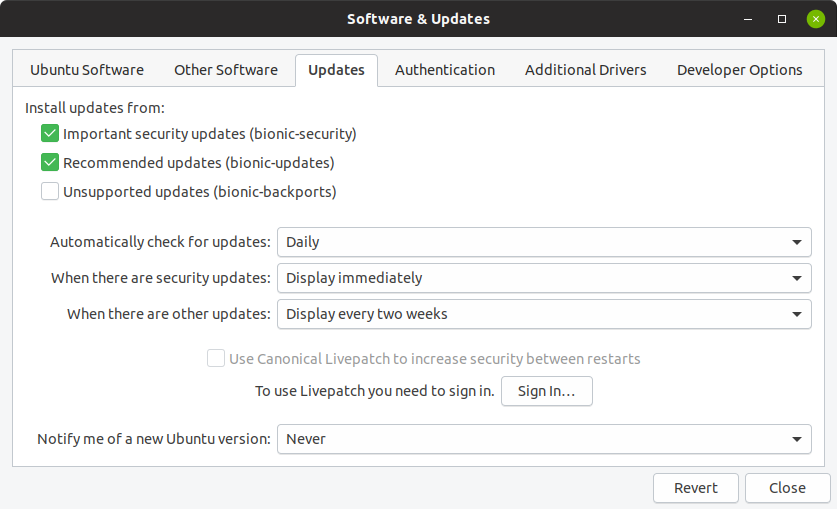
In Software & Updates, you can change your settings to automatically check for package updates and to configure updates from the Ubuntu software repositories. You can also configure your DGX Station to notify you of important security updates more frequently than other updates.
In the following example, the DGX Station is configured to check for updates daily, to display important security updates immediately, and to display other updates every two weeks.
Screen capture showing the options in the Updates tab of Ubuntu Software & Updates window to check for updates daily, to display important security updates immediately, and to display other updates every two weeks.