Installing Red Hat Enterprise Linux 8#
Red Hat provides several methods for installing Red Hat Enterprise Linux as described in Performing a Standard RHEL 8 Installation.
The installation instructions in this topic are for the latest release of the DGX Software for Red Hat Enterprise Linux 8. The DGX Software does not include Extended Update Support (EUS), which is an optional subscription for Red Hat Enterprise Linux. For more information about EUS, refer to Red Hat Enterprise Linux (RHEL) Extended Update Support (EUS) Overview.
For convenience, this topic describes how to install Red Hat Enterprise Linux or Rocky Linux using the Quick Install method, and shows when to reclaim disk space in the process. It describes a minimal installation. If you have a preferred method for installing Red Hat Enterprise Linux, then you can skip this section but be sure to reclaim disk space occupied by the existing Ubuntu installation.
The interactive method described here installs Red Hat Enterprise Linux on DGX using a connected monitor and keyboard and USB stick with the ISO image, or remotely through the remote console of the BMC.
Obtaining Red Hat Enterprise Linux 8#
Obtain the Red Hat Enterprise Linux 8 ISO image and store on your local disk or create a boot USB drive formatted for UEFI. See Downloading Red Hat Enterprise Linux for instructions.
For Rocky Linux 8, visit Downloading Rocky Linux.
Important
Refer to the release notes for any critical information regarding supported releases or dependencies.
Booting Red Hat Enterprise Linux 8 ISO Locally#
Plug the USB flash drive containing the Red Hat Enterprise Linux 8 ISO image into the DGX.
Connect a monitor and keyboard directly to the DGX.
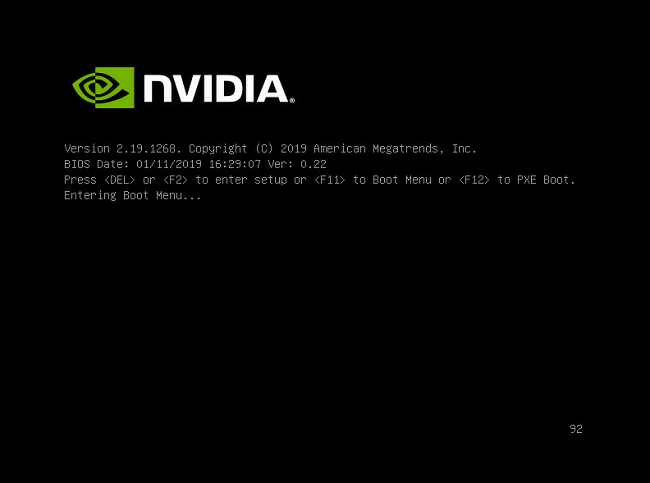
Boot the system and press F11 when the NVIDIA logo appears to get to the boot menu.
Select the USB volume name that corresponds to the inserted USB flash drive, and boot the system from it.
Follow the instructions at Installing Red Hat Enterprise Linux.
Booting the Red Hat Enterprise Linux 8 ISO Remotely#
Skip this chapter if you are using a monitor and keyboard for installing locally. It is also not possible to boot an ISO remotely if you are doing the install on a DGX Station.
Booting the ISO Image on the DGX-1 Remotely#
Skip this chapter if you are using a monitor and keyboard for installing locally.
For instructions applicable to the NVIDIA DGX-2, DGX A100/A800, or DGX H100, see Booting the ISO Image on the DGX-2, DGX A100/A800, or DGX H100 Remotely
Connect to the BMC and change user privileges.
Open a Java-enabled web browser within your LAN and go to
http://<BMC-ip-address>/, then log in.Use Firefox or Internet Explorer (Google Chrome is not officially supported by the BMC.)
From the top menu, click Configuration and then select Users.
Click the card with the user name that you created for the BMC
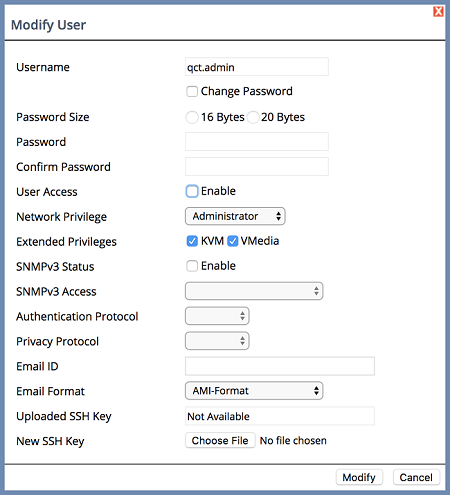
In the*Modify User* dialog, select the VMedia checkbox to add it to the extended privileges for the user, then click Modify.
Set up the ISO image as virtual media and reboot the system.
From the top menu, click Remote Control then Launch KVM.

Click Java Console to open the remote JViewer window. Make sure pop-up blockers are disabled for this site.
From the JViewer top menu bar, click Media and then select Virtual Media Wizard

From the CD/DVD Media: I section of the Virtual Media dialog, click Browse and then locate the Red Hat Enterprise Linux ISO file on your system and click Open. You can ignore the device redirection warning at the bottom of the Virtual Media wizard as it does not affect the ability to re-image the system.
Click Connect CD/DVD, then click OK at the Information dialog. The Virtual Media window shows that the ISO image is connected.
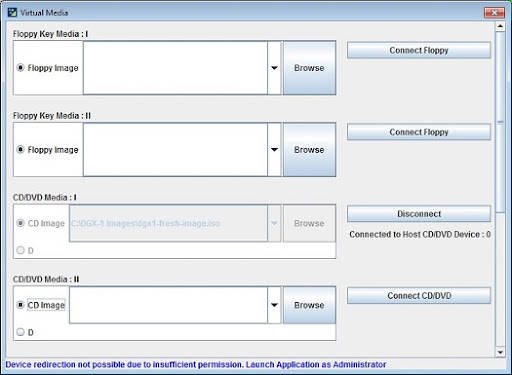
Close the window. The CD ROM icon in the menu bar turns green to indicate that the ISO image is attached.

From the top menu, click Power and then select Reset Server.
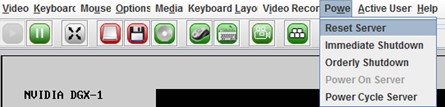
Click Yes and then OK at the Power Control dialogs, then wait for the system to power down and then come back online..
Boot the CD ROM image
The default boot order does not typically boot the CDROM image. This can be changed in the BIOS or as a one-time option in the boot menu. To bring up the boot menu, press F11 at the beginning of the boot process. Pressing F11 will display Show Boot Options at the top of the virtual display before entering the boot menu. Use the ‘soft’ keyboard (Menu → Keyboard Layout → SoftKeyboard → {Language}) to bring up a virtual keyboard if pressing the physical key has no effect. .
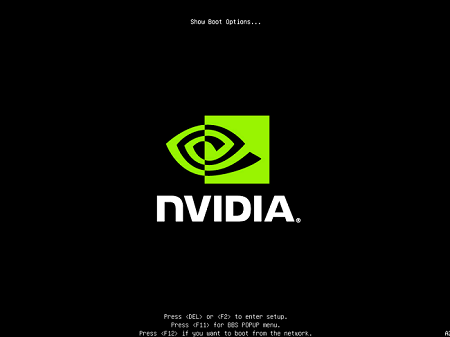
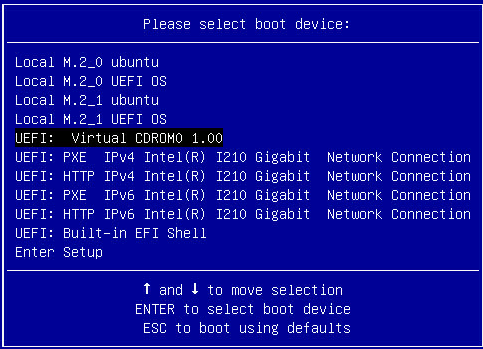
In the boot menu, select UEFI: AMI Virtual CDROM 1.00 as the boot device and then press ENTER.
Follow the instructions at Installing Red Hat Enterprise Linux
Booting the ISO Image on the DGX-2, DGX A100/A800, or DGX H100 Remotely#
Skip this chapter if you are using a monitor and keyboard for installing locally.
Connect to the BMC and ensure the required user privileges are set.
Open a browser within your LAN and go to
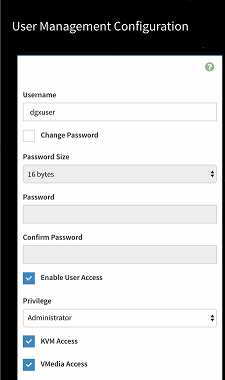
https://<BMC-ip-address>/, then log in.From the left-side menu, click Settings and then select User Management.
Click the card with the user name that you created for the BMC.
In the User Management Configuration dialog, make sure the VMedia Access checkbox is selected, then click Save.
Set up the ISO image as virtual media.
From the left-side menu, click Remote Control.
Select Launch KVM.
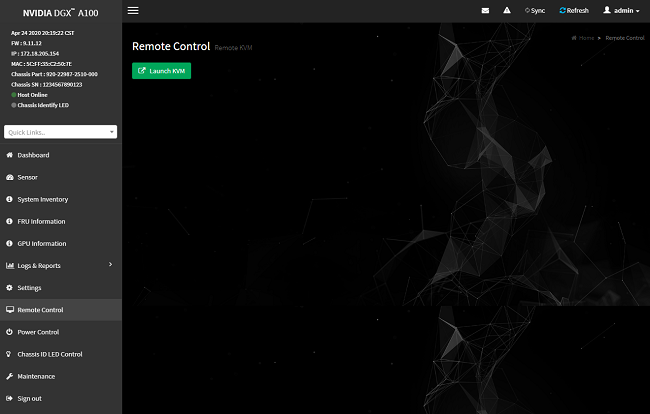
From the top menu bar in the KVM window, click Browse File and select the ISO image, then click Start Media.
The CD image should now be connected.

From the top menu bar in the KVM window, click Power and then select Reset Server.
Boot from the virtual media.
Typically, the default boot order does not boot the CDROM image. You can change this in the BIOS or as a one-time option in the boot menu.
To bring up the boot menu, press F11 at the beginning of the boot process.
Pressing F11 will display Entering Boot Menu in the virtual display before entering the boot menu.
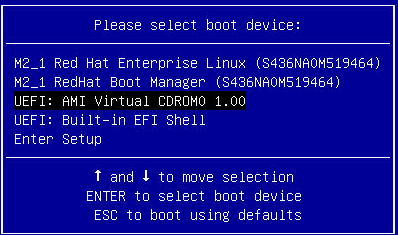
In the boot menu, select UEFI: AMI Virtual CDROM0 1.00 as the boot device and then press ENTER.
If you are booting from the DGX-2, the boot device is labeled UEFI: Virtual CDROM0 1.00.
Follow the instructions at Installing Red Hat Enterprise Linux
Installing Red Hat Enterprise Linux#
This section assumes you have booted the Red Hat Enterprise Linux ISO image. For DGX Station, this can only be performed locally; for all other platforms, this can be performed locally or remotely.
If you wish to automate the installation with a kickstart file, see the section Installing with Kickstart
After booting the ISO image, the GRUB menu for the installer appears.
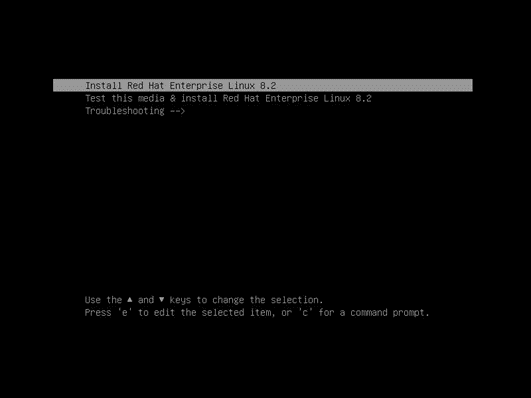
Select
Install Red Hat Enterprise Linuxand press ‘e’ to edit the selected option.Add the “nomodeset” parameter as shown below.
“nomodeset” prevents the in-box Nouveau driver from loading as it may not properly support the GPUs used in the DGX systems, resulting in display issues.
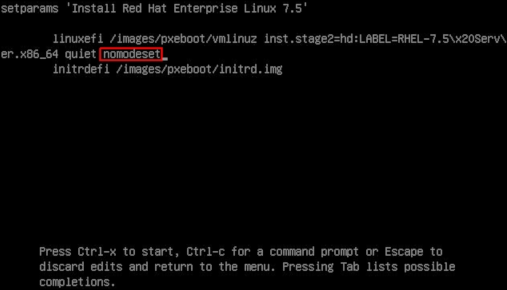
Press Ctrl-x to save your changes and start the installation.
Refer to Performing a Standard RHEL 8 Installation for guidance on using the RHEL 8 installer.
Configure the language, region, date, time, keyboard, and other configuration options you may need from the Installation Summary screen.
Set the Software Selection to the correct value.
For DGX Station, DGX Station A100/A800, DGX Station A100, and DGX Station A800: Set to Server with GUI.
For DGX Servers (DGX 1-1, DGX-2, DGX A100/A800, DGX H100): Set to Minimal Install.
Note
Setting the correct Software Selection is critical for proper operation.
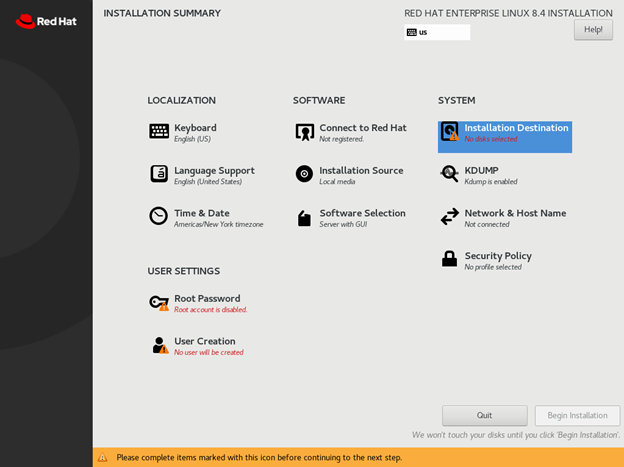
Partition your disks based on the platform and whether or not you would like to use encryption:
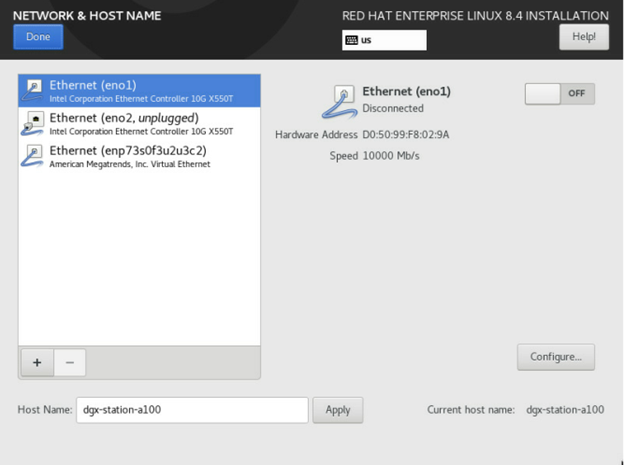
Configure Ethernet.
From the Network & Host Name section, select and enable the Ethernet device. This defaults to DHCP and can be changed for static IP configurations under Configure.
From the INSTALLATION SUMMARY screen, set your password (at User Settings > Root Password) and create a new user (at User Settings > User Creation), then click Begin installation to start the installation.
When the system reboots, be sure and eject any still-mounted installation discs.
Complete the initial Red Hat Enterprise Linux setup.
If you installed using the Server with GUI base environment, the Initial Setup starts automatically where you can accept the license agreement and register the system. See the Red Hat instructions for details.
If you are using CentOS you will need to accept the license agreement.
If you installed with any other base environment, log on to the system as root user and then register the system.
subscription-manager register --auto-attach --username=user_name --password=passwordTo prevent accidental upgrade of the Linux kernel, such as from RHEL 8.9 to 8.10, when precompiled GPU modules and drivers for that kernel are not available, you should pin the desired RHEL release by setting the
--set=<release>option of thereleasecommand.For example, to stay on the RHEL 8.9 release:
subscription-manager release --set=8.9
You should check the NVIDIA DGX Software for Red Hat Enterprise Linux 8 Release Notes for GPU driver and Linux kernel support before changing the
–set=<release>setting and performingsudo dnf update –-nobest.
See How to register and subscribe a system to the Red Hat Customer Portal using Red Hat Subscription-Manager for further information.
Installing with Kickstart#
Install using Kickstart#
Kickstart provides a method of automating the installation process by providing a file which contains the answers to the questions that would be asked during installation. NVIDIA provides kickstart templates for all supported platforms in the following locations:
https://repo.download.nvidia.com/baseos/el/el-files/8/el8-ks/dgx1-ks.cfg
https://repo.download.nvidia.com/baseos/el/el-files/8/el8-ks/dgx2-ks.cfg
https://repo.download.nvidia.com/baseos/el/el-files/8/el8-ks/dgx-a100-ks.cfg
https://repo.download.nvidia.com/baseos/el/el-files/8/el8-ks/dgxstation-ks.cfg
https://repo.download.nvidia.com/baseos/el/el-files/8/el8-ks/dgxstation-a100-ks.cfg
In these files are tags that you must replace with your site specific information: language, keyboard, timezone, hostname, etc. Each tag is of the form <CHANGE_YOUR_xxxx>. These tags must be replaced with your specific information.
Once you have a kickstart file customized for your installation, place that file in a location that can be accessed by NFS, FTP, HTTP, or HTTPS. After booting from the installation medium, when the grub menu appears, press ‘e’ to edit the grub entry as you normally would to add the “ nomodeset ” option. In addition to “ nomodeset ”, add an option in the format “ inst.ks=<URL> ”. For example: inst.ks=https://192.168.1.2/kickstart/dgx-a100-cfg.ks
Lastly, after using these kickstart files – remember to reboot the system one final time to apply all settings.
For more information on using kickstart files with Red Hat 8, refer to the 27.2. How Do You Perform a Kickstart Installation? section in Red Hat documentation.
Disk Partitioning for DGX-1, DGX Station, DGX Station A100, and DGX Station A800#
Note
The screenshots in the following section are taken from a DGX-1. The screens for the DGX Station, DGX Station A100, and DGX Station A800 installations can present slightly different information for such things as disk size, disk space available, interface names, etc.
At the Installation Destination screen, select the first drive (sda) to install on.
Under Storage Configuration, click the Custom radio button and then click Done.
This brings up the Manual Partitioning window.
Expand the drop-down menu for the device you’ve selected and delete all existing partitions until there are none remaining.
Click the + button on the bottom left to create a new partition.
Create the
/boot/efipartition with a size of 512 MiB.Select Standard Partition for the Device Type.
Under Devices, ensure only the drive you chose in step 1 is selected. Click Update Settings to confirm your changes.
Click the + button on the bottom left again to create another new partition.
Create the / partition, this time leaving the Desired Capacity field empty. This lets the installer know to use the remaining capacity of the disks.
For the / partition, again select Standard Partition for the Device Type.
Under Devices, ensure that only the drive you chose in step 1 is selected. For the File System, select XFS. Click Update Settings to confirm your changes.
Click Done.
This causes a yellow warning bar to appear on the bottom because no swap partition has been created.
Click Done again and then click Accept Changes to write all of our customizations to disk.
Return to step 5 in the Installing Red Hat Enterprise Linux section.
Disk Partitioning with Encryption for DGX-1, DGX Station, DGX Station A100, and DGX Station A800#
Note
The screenshots in the following section are taken from a DGX-1. The screens for the DGX Station, DGX Station A100, and DGX Station A800 installations can present slightly different information for such things as disk size, disk space available, interface names, etc.
At the Installation Destination screen, select the first drive (
sda) to install on. Under Storage Configuration, click the Custom radio button and then click Done.This brings up the Manual Partitioning window.
Expand the drop-down menu for the device you’ve selected and delete all existing partitions until there are none remaining.
Click the + button on the bottom left to create a new partition.
Create the
/boot/efipartition with a size of 512 MiB.Select Standard Partition for the Device Type.
Under Devices, ensure only the drive you chose in step 1 is selected.
Click Update Settings to confirm your changes.
Click the + button on the bottom left again to create another new partition.
Create the /boot partition with a size of 2 GiB.
For the /boot partition, again select Standard Partition for the Device Type.
Under Devices, ensure that only the drive you chose in step 1 is selected. For the File System, select XFS.
Click Update Settings to confirm your changes.
Click the + button on the bottom left again to create another new partition.
Create the / partition, this time leaving the Desired Capacity field empty. This lets the installer know to use the remaining capacity of the disks.
For the / partition, again select Standard Partition for the Device Type.
Be sure to check the Encrypt checkbox, and choose luks2 for the LUKS Version.
For the File System, select XFS. Again confirm that this partition uses both of the devices you selected in step 2.
Click Update Settings to confirm your changes.
A prompt will now appear, asking for a LUKS password.
Be sure to choose a strong and secure password.
After entering your password twice, click Save Passphrase.
Click Done.
This causes a yellow warning bar to appear on the bottom because no swap partition has been created.
Click Done again and then click Accept Changes to write all of our customizations to disk.
Return to step 5 in the Installing Red Hat Enterprise Linux section.
Disk Partitioning for DGX-2, DGX A100/A800, and DGX H100#
Note
The screenshots in the following section are taken from a DGX A100/A800. The screens for the DGX-2 installation can present slightly different information for such things as disk size, disk space available, interface names, etc.
At the Installation Destination screen, select both M.2 disks (that is, the 894,25GB drives for DGX-2, or the 1.8 TB drives for DGX A100/A800).
Under Storage Configuration, click the Custom radio button and then click Done.
This brings up the Manual Partitioning window.
Expand the drop-down menu for the device you’ve selected and delete all existing partitions until there are none remaining.
Click the + button on the bottom left to create a new partition.
Create the
/boot/efipartition with a size of 512 MiB.Change the Device Type to RAID, change the RAID Level to RAID1, then click Update Settings and confirm that this partition covers both of the devices you selected in step 2.
Click the + button on the bottom left again to create another new partition.
Create the / partition, this time leaving the Desired Capacity field empty. This lets the installer know to use the remaining capacity of the disks.
For the / partition, again select RAID for the Device Type, RAID1, and the RAID Level.
For the File System, select XFS.
Click Update Settings to confirm this partition uses both of the devices you selected in step 2.
Click Done.
This causes a yellow warning bar to appear on the bottom because no swap partition has been created.
Click Done again and then click Accept Changes to write all of our customizations to disk.
Return to the instructions in the Installing Red Hat Enterprise Linux section.
This should be at the step to configure Ethernet.
Disk Partitioning with Encryption for DGX-2, DGX A100/A800, and DGX H100#
Note
The screenshots in the following section are taken from a DGX A100/A800.The screens for the DGX-2 installation can present slightly different information for such things as disk size, disk space available, interface names, etc.
At the Installation Destination screen, select both M.2 disks (that is, the 894,25GB drives for DGX-2, or the 1.8 TB drives for DGX A100/A800).
Under Storage Configuration, click the Custom radio button and then click Done.
This brings up the Manual Partitioning window.
Expand the drop-down menu for the device you’ve selected and delete all existing partitions until there are none remaining.
Click the + button on the bottom left to create a new partition.
Create the
/boot/efipartition with a size of 512 MiB.Change the Device Type to RAID, change the RAID Level to RAID1, and confirm that this partition covers both of the devices you selected in step 2 by clicking Modify in the Device(s) section and making sure both disks are still selected.
Note that the partition information on the left may not reflect both devices yet.
Click Update Settings to confirm your changes, and verify that the
/boot/efipartition shown lists the partition name and not the individual device.Click the + button on the bottom left again to create another new partition.
Create the /boot partition with a size of 2 GiB.
For the /boot partition, again select RAID for the Device Type, RAID1, and the RAID Level.
For the File System, select XFS.
Again confirm that this partition uses both of the devices you selected in step 2 by clicking Modify in the Device(s) section and making sure both disks are still selected.
Click Update Settings to confirm your changes.
Click the + button on the bottom left again to create another new partition.
Create the / partition, this time leaving the Desired Capacity field empty. This lets the installer know to use the remaining capacity of the disks.
For the / partition, again select RAID for the Device Type, RAID1 and the RAID Level.
Be sure to check the Encrypt checkbox, and choose luks2 for the LUKS Version.
For the File System, select XFS. Again confirm that this partition uses both of the devices you selected in step 2.
Click Update Settings to confirm your changes, and Done to begin exiting the partition menu.
A prompt will now appear asking for a LUKS password.
Be sure to choose a strong and secure password.
After entering your password twice, click Save Passphrase.
Click Done.
This causes a yellow warning bar to appear on the bottom because no swap partition has been created.
Click Done again and then click Accept Changes to write all of our customizations to disk.
Return to step 5 in the Installing Red Hat Enterprise Linux section.