1. Host System Requirements
It is recommended for the host system to have Ubuntu 18.04 (64-bit) installed, with at least 200GB of disk space, and a network connection. For requirements to run Docker Engine, see the Docker website:
1.1. Software Version
Use the following values in place of their respective variables in this guide.
Variable Value ${SW_VERSION} 5.2.6.0
1.2. Images Available in This Release
Note:
Starting from the 5.2.6.0 release, Docker tar balls will be deprecated and will no longer be posted on NVONLINE.
The following images will be available on NGC in this release:
| File Name | Intent |
|---|---|
| drive-agx-xavier-linux-aarch64-sdk-build-x86:5.2.6.0 | Build and Flash DRIVE OS Linux SDK |
| drive-agx-xavier-linux-aarch64-sdk-flash-x86:5.2.6.0 | Flash DRIVE OS Linux SDK |
| drive-agx-xavier-linux-aarch64-sdk-oss-source-x86:5.2.6.0 | Open Source Debian packages used in DRIVE Docker containers |
1.3. Workspace
NVIDIA runfiles, packages, and compute bits may need to be downloaded and staged on your host system so that they can be mounted into Docker to compile or run various samples and examples. Designate a directory to use as this workspace and export WORKSPACE as a variable in your environment, assigning it the fully qualified path name to the designated directory.
2. Download and Install Docker
-
On the host system, download the type of Docker software needed for your organization (Enterprise, Desktop, or other) from https://www.docker.com/.
If you downloaded Docker as a Debian package (.deb), install Docker using dpkg with a command similar to the following, where <docker.deb> is replaced by the actual filename of the download:
dpkg -i <docker.deb>
-
Alternatively, download an installation script from https://get.docker.com/ and install Docker on your host system with a command similar to the following:
wget -qO- https://get.docker.com/ | ${SHELL}
Note:
The minimum required version of Docker Engine to run DRIVE OS Linux Docker containers is 19.03.
2.1. Install DRIVE OS with SDK Manager
-
The ${WORKSPACE} directory used in the examples in this document is for the installed NVIDIA DRIVE OS samples directory. This directory is to be mounted into the Docker container.
3. NVIDIA GPU Cloud Access
In order to access NGC (http://ngc.nvidia.com), you will need an NVIDIA Developer Account (http://developer.nvidia.com) and membership in the NVIDIA DRIVE® Developer Program for DRIVE AGX. Please register for an account and apply for membership in the Developer Program before proceeding.
Note:
It may take up to a few days for access to the Developer Program to be approved.
3.1. Sign into NVIDIA GPU Cloud
|
Note: |
Please make sure you’ve received the NGC activation email and successfully activated the NGC drive organization before proceeding. |
-
On the host system, sign into NGC (https://ngc.nvidia.com) using your NVIDIA Developer credentials.
-
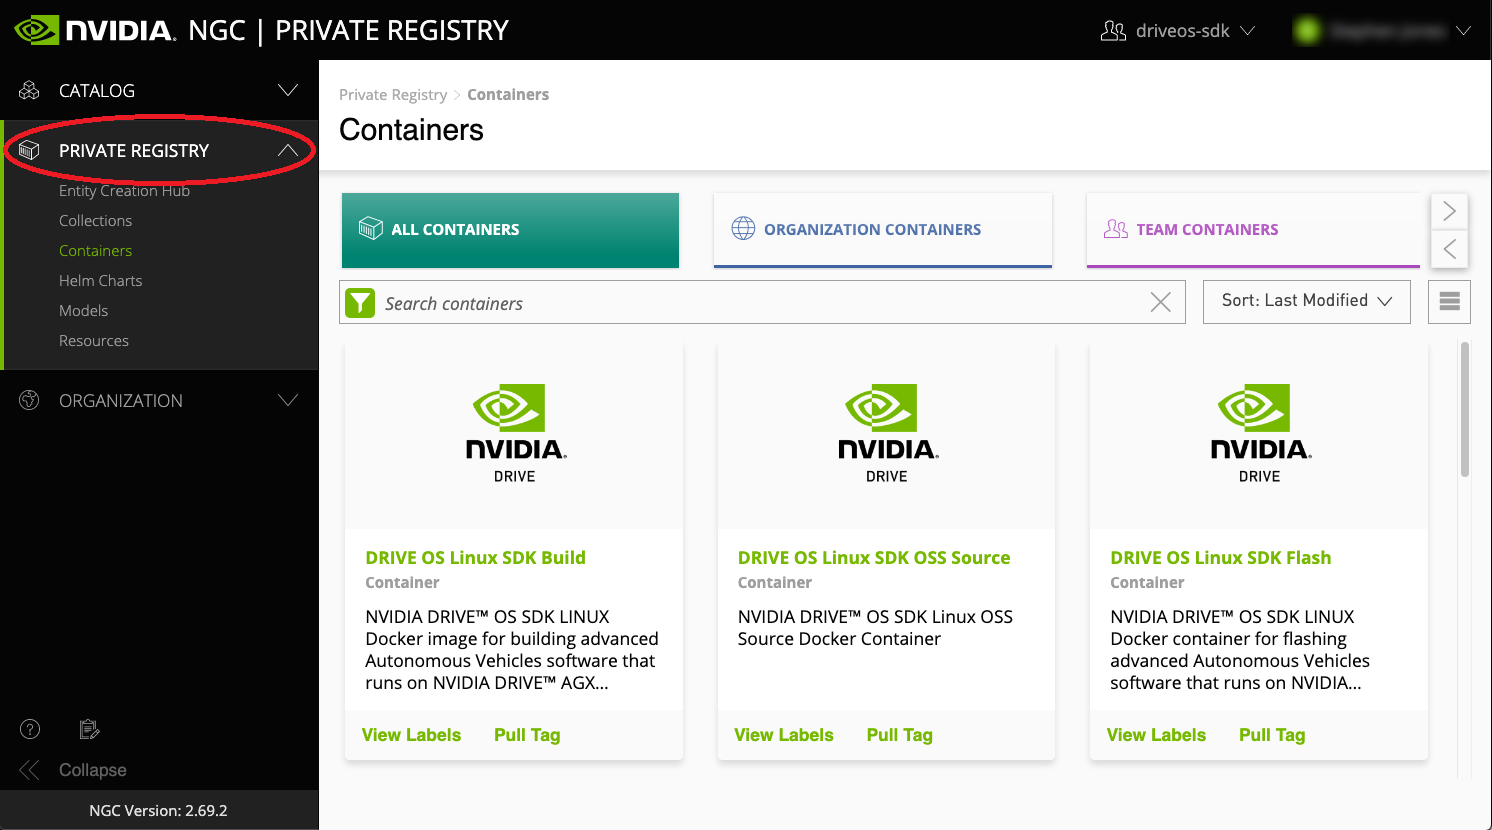
Once you have signed in, select the drive organization. DRIVE Platform Docker Containers are located under PRIVATE REGISTRY.
-
Once signed in, select Setup under the User menu in the top-right of the page to Generate an API Key in order to pull Docker images.
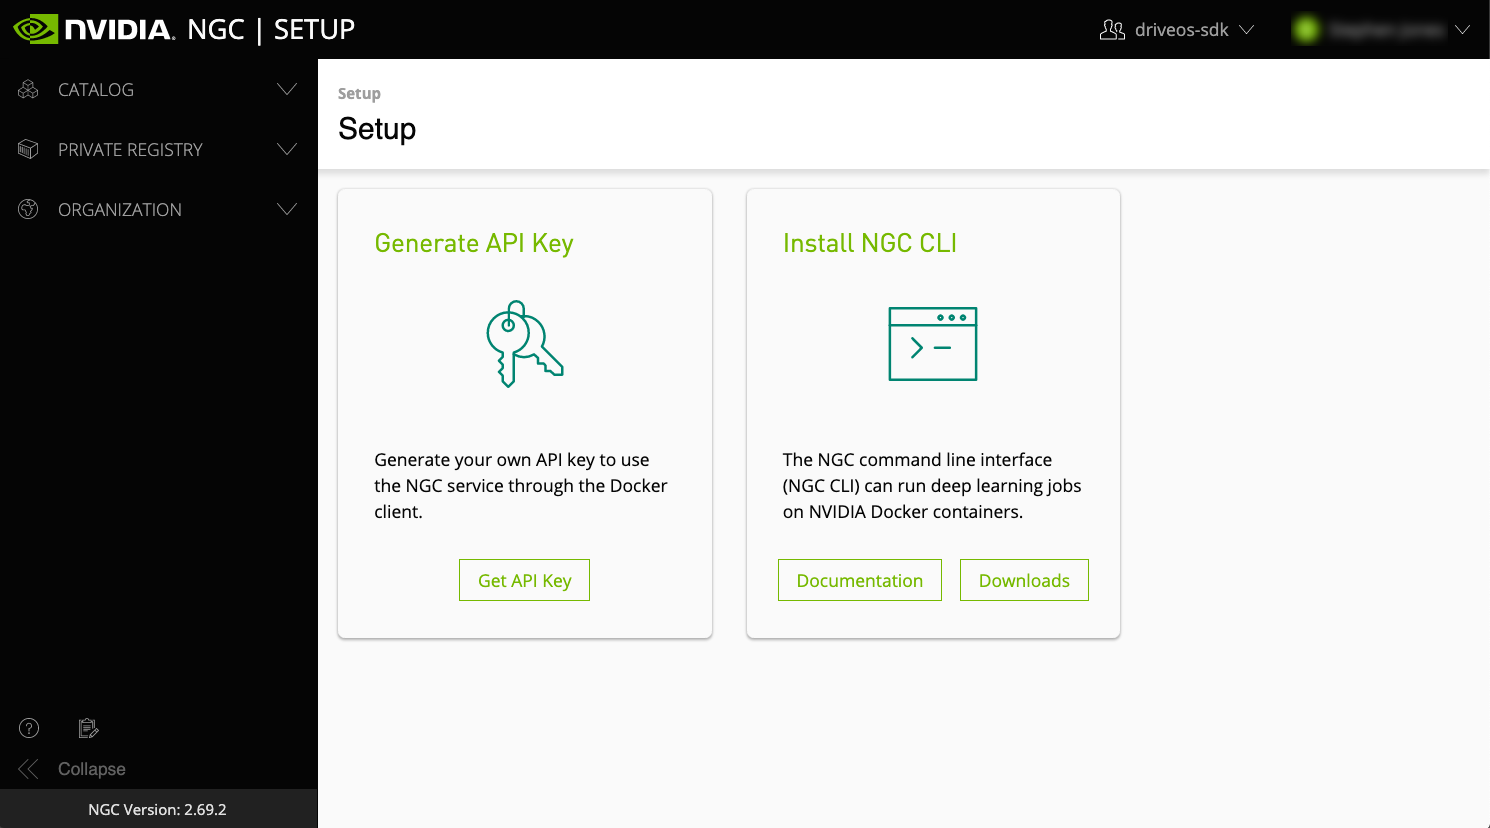
For more information, see:
https://docs.nvidia.com/ngc/ngc-overview/index.html#generating-api-key
Note:
Using NVIDIA GPU Cloud is beyond the scope of this document. Please refer to the NVIDIA GPU Cloud documentation for more information.
-
From the command line on your host system, log on to the NVIDIA GPU Cloud with your username and API key with the following command. Replace ${YOUR_USERNAME} and ${YOUR_API_KEY} with username and API key respectively.
sudo docker login -u="${YOUR_USERNAME}" -p "${YOUR_API_KEY}" nvcr.ioNote:
${YOUR_USERNAME} is commonly $oauthtoken. Please note the $ is part of the username.
See Docker Login documentation for more information on login methods.
After you log in, you have access to NVIDIA DRIVE Docker images, depending on your specific permissions in the registry.
4. Pull Docker Images from NGC
-
Log into the NVIDIA GPU Cloud (NGC) using instructions in the previous section.
This example pulls and uses the following DRIVE build/flash image:
nvcr.io/drive/driveos-sdk/drive-agx-xavier-linux-aarch64-sdk-build-x86:${SW_VERSION} -
On the host system, pull the image using the following command:
sudo docker pull nvcr.io/drive/driveos-sdk/drive-agx-xavier-linux-aarch64-sdk-build-x86:${SW_VERSION} -
After successfully pulling the Docker image, start the Docker container with the following command on the host system:
sudo docker run -it --privileged --net=host -v /dev/bus/usb:/dev/bus/usb -v ${WORKSPACE}:/home/nvidia/
nvcr.io/drive/driveos-sdk/drive-agx-xavier-linux-aarch64-sdk-build-x86:${SW_VERSION}
5. Build with DRIVE OS Linux SDK
Use the procedures in this section to build with DRIVE OS Linux SDK in the DRIVE Docker build container.
5.1. Start the Docker Container
-
Log on to the NVIDIA GPU Cloud (NGC). If you need to download a Docker image, use the procedures in the NVIDIA GPU Cloud Access section of this document.
-
Start the Docker container with the following command on the host system:
sudo docker run -it --privileged --net=host -v ${WORKSPACE}:/home/nvidia/
nvcr.io/drive/driveos-sdk/drive-agx-xavier-linux-aarch64-sdk-build-x86:${SW_VERSION}
where ${SW_VERSION} is the version of the NVIDIA DRIVE OS. ${WORKSPACE} is the path containing the code to be built inside the Docker container.
Note:
Enter all subsequent commands at the Docker container command prompt.
5.2. Example: Compile CUDA
-
Check that the CUDA samples are in /home/nvidia/.
-
Determine the target architecture and compile the samples with the corresponding command from the table below. In the commands in the table below SMS=72 is for compilation for Xavier. For Turing dGPU, use SMS=75.
Architecture Make Command x86 AARCH64 For samples that require targetfs libraries, use:
make -C /home/nvidia/samples/ TARGET_ARCH=aarch64 SMS=72 TARGET_FS=/drive/drive-t186ref-linux/targetfs/
5.3. Example: Compile TensorRT/cuDNN
-
Check that the TensorRT samples are in /usr/src/tensorrt/samples/.
-
Compile the samples with the corresponding command from the following table:
Architecture Make Command x86 AARCH64
6. Flash DRIVE OS Linux
Use the procedures in this section to flash NVIDIA DRIVE™ OS Linux to the target system from the Docker container.
6.1. Flash Using the Docker Container
-
Log on to the NVIDIA GPU Cloud (NGC). If you need to download a Docker image, use the procedures in the NVIDIA GPU Cloud Access section of this document.
-
Connect NVIDIA DRIVE™ AGX to the host system.
Note:
Ensure that NVIDIA DRIVE AGX is connected to the host system, and that no other processes, such as TCUMuxer or Minicom are holding a lock on /dev/ttyUSB* before starting the Docker container.
-
Start the Docker container and flash DRIVE OS Linux onto the NVIDIA DRIVE AGX using the following command. Replace ${SW_VERSION} with the version of NVIDIA DRIVE OS.
sudo docker run -it --privileged --net=host -v /dev/bus/usb:/dev/bus/usb -v /drive_flashing:/drive_flashing
nvcr.io/drive/driveos-sdk/drive-agx-xavier-linux-aarch64-sdk-flash-x86:${SW_VERSION}
Upon execution of the Docker run command, a command prompt will open. Execute the following command to start flashing the target.
./flash.sh
|
Note: |
Please note when installing DRIVE OS, the HDMI display will not be activated when flashing is completed. (See Enable Display below.) The user must connect to the DRIVE AGX platform console via a terminal emulator to determine when flashing has been completed, and to complete the platform setup. Instructions for connecting a terminal emulator to the platform are in the DRIVE OS 5.2 Linux Developer Guide sections Using tcu_muxer and Terminal Emulation. |
|
Note: |
Beginning with this DRIVE OS Linux 5.2.6 release username, password, and security profile/setup will remain persistent on later flashes once they are set the first time after flashing the 5.2.6 release. The user will not be prompted for this information again when flashing this or later releases. However, the user may need to clear the persistent when downgrading to an earlier release. See the DRIVE OS 5.2 Linux Developer Guide sections on Persistence across Bootburn Flashing for information on removing the persistent data, and User Management for information on adding/deleting/changing users or changing the security profile and settings. |
|
Note: |
Pop-up Windows on the Linux Host During Target Flashing When flashing the DRIVE AGX platform, different windows may pop up on the host. This can be seen on all DRIVE Software and DRIVE OS with DriveWorks releases. These pop-up windows are harmless and do not affect flashing of the unit. However, they can be managed as follows:
|
6.2. Finalize DRIVE AGX System Setup (Linux)
-
Connect Console to the Target.
To complete the setup of the DRIVE AGX platform, the user MUST connect a console to the system to answer system configuration prompts [not prompted if already set on 5.2.6 Linux first flashing]. Instructions for connecting a terminal emulator to the platform are in the DRIVE OS 5.2 Linux Developer Guide sections Using tcu_muxer and Terminal Emulation. The customer is recommended to use the “putty” terminal emulation program for better display of the setup prompts.
-
Select SSH Profile and Other Setup Options.
DRIVE OS Linux provides two profiles for security setup (including SSH): an NVIDIA enhanced security profile that uses ECDSA-based algorithms for SSH security, or stock Ubuntu 18.04 configuration. The customer must select the profile on the first setup screen. Both profiles will enable SSH server in the target by default.
The user can follow the other prompts after SSH profile selection to install additional users; see DRIVE OS Linux oem-config for more information [not prompted if already set on 5.2.6 Linux first flashing]. After these prompts are completed, the platform will boot to the prompt to enter the username.
-
Enable Display.
To maximize the compute capacity of the DRIVE AGX Platform, DRIVE OS release does not include a Linux Desktop by default. To enable use of the display or to install a desktop, do one of the following:
-
To enable display without a desktop, start the X server as below. See Manually Starting X Server for more information.
$ sudo -b X -ac -noreset -nolisten tcp
OR
-
To install the Ubuntu desktop, use the following instructions. See Installing GUI on the Target for more information.
$ sudo apt-get update
$ sudo apt-get install gdm3 ubuntu-unity-desktop
-
7. Open Source License Compliance
Use the procedures in this chapter to obtain the Debian source package of open source utilities and libraries used by various Docker images. These source packages provide a way to view the source code and compile the desired piece of software.
7.1. Obtain Source for Utilities and Libraries
-
Log on to the NVIDIA GPU Cloud (NGC). If you need to download a Docker image, use the procedures in the NVIDIA GPU Cloud Access section of this document.
-
nvcr.io/drive/driveos-sdk/drive-agx-xavier-linux-aarch64-sdk-oss-source-x86:${SW_VERSION} includes the code of open source packages used in the following Docker images:
nvcr.io/drive/driveos-sdk/drive-agx-xavier-linux-aarch64-sdk-build-x86:${SW_VERSION}nvcr.io/drive/driveos-sdk/drive-agx-xavier-linux-aarch64-sdk-flash-x86:${SW_VERSION}Start the Docker container with the following command on the host system:
sudo docker run -it --privileged --net=host -v ${WORKSPACE}:/home/nvidia/ nvcr.io/drive/driveos-sdk/drive-agx-xavier-linux-aarch64-sdk-oss-source-x86:${SW_VERSION}where ${SW_VERSION} is the version of the NVIDIA DRIVE OS. The source packages are in the /drive directory.
Notices
Notice
THE INFORMATION IN THIS GUIDE AND ALL OTHER INFORMATION CONTAINED IN NVIDIA DOCUMENTATION REFERENCED IN THIS GUIDE IS PROVIDED “AS IS.” NVIDIA MAKES NO WARRANTIES, EXPRESSED, IMPLIED, STATUTORY, OR OTHERWISE WITH RESPECT TO THE INFORMATION FOR THE PRODUCT, AND EXPRESSLY DISCLAIMS ALL IMPLIED WARRANTIES OF NONINFRINGEMENT, MERCHANTABILITY, AND FITNESS FOR A PARTICULAR PURPOSE. Notwithstanding any damages that customer might incur for any reason whatsoever, NVIDIA’s aggregate and cumulative liability towards customer for the product described in this guide shall be limited in accordance with the NVIDIA terms and conditions of sale for the product.
THE NVIDIA PRODUCT DESCRIBED IN THIS GUIDE IS NOT FAULT TOLERANT AND IS NOT DESIGNED, MANUFACTURED OR INTENDED FOR USE IN CONNECTION WITH THE DESIGN, CONSTRUCTION, MAINTENANCE, AND/OR OPERATION OF ANY SYSTEM WHERE THE USE OR A FAILURE OF SUCH SYSTEM COULD RESULT IN A SITUATION THAT THREATENS THE SAFETY OF HUMAN LIFE OR SEVERE PHYSICAL HARM OR PROPERTY DAMAGE (INCLUDING, FOR EXAMPLE, USE IN CONNECTION WITH ANY NUCLEAR, AVIONICS, LIFE SUPPORT OR OTHER LIFE CRITICAL APPLICATION). NVIDIA EXPRESSLY DISCLAIMS ANY EXPRESS OR IMPLIED WARRANTY OF FITNESS FOR SUCH HIGH RISK USES. NVIDIA SHALL NOT BE LIABLE TO CUSTOMER OR ANY THIRD PARTY, IN WHOLE OR IN PART, FOR ANY CLAIMS OR DAMAGES ARISING FROM SUCH HIGH RISK USES.
NVIDIA makes no representation or warranty that the product described in this guide will be suitable for any specified use without further testing or modification. Testing of all parameters of each product is not necessarily performed by NVIDIA. It is customer’s sole responsibility to ensure the product is suitable and fit for the application planned by customer and to do the necessary testing for the application in order to avoid a default of the application or the product. Weaknesses in customer’s product designs may affect the quality and reliability of the NVIDIA product and may result in additional or different conditions and/or requirements beyond those contained in this guide. NVIDIA does not accept any liability related to any default, damage, costs or problem which may be based on or attributable to: (i) the use of the NVIDIA product in any manner that is contrary to this guide, or (ii) customer product designs.
Other than the right for customer to use the information in this guide with the product, no other license, either expressed or implied, is hereby granted by NVIDIA under this guide. Reproduction of information in this guide is permissible only if reproduction is approved by NVIDIA in writing, is reproduced without alteration, and is accompanied by all associated conditions, limitations, and notices.
Trademarks
NVIDIA, the NVIDIA logo, and cuBLAS, CUDA, CUDA-GDB, CUDA-MEMCHECK, cuDNN, cuFFT, cuSPARSE, DIGITS, DGX, DGX-1, DGX Station, NVIDIA DRIVE, NVIDIA DRIVE AGX, NVIDIA DRIVE Software, NVIDIA DRIVE OS, NVIDIA Developer Zone (aka "DevZone"), GRID, Jetson, NVIDIA Jetson Nano, NVIDIA Jetson AGX Xavier, NVIDIA Jetson TX2, NVIDIA Jetson TX2i, NVIDIA Jetson TX1, NVIDIA Jetson TK1, Kepler, NGX, NVIDIA GPU Cloud, Maxwell, Multimedia API, NCCL, NVIDIA Nsight Compute, NVIDIA Nsight Eclipse Edition, NVIDIA Nsight Graphics, NVIDIA Nsight Systems, NVLink, nvprof, Pascal, NVIDIA SDK Manager, Tegra, TensorRT, Tesla, Visual Profiler, VisionWorks and Volta are trademarks and/or registered trademarks of NVIDIA Corporation in the United States and other countries. Other company and product names may be trademarks of the respective companies with which they are associated.