

System Configuration#
Pre-requisites for installing Run:ai and NIM LLM#
A Kubernetes Cluster with a supported version installed with NVIDIA GPU Operator and NVIDIA Network Operator installed, which should already be in place if the NVIDIA Software Enterprise RA is followed.
Active Subscription to NVAIE and Access to the NGC Enterprise Catalog. Please generate and download your nvcr.io access token in NGC. For more information on how to get the access token, refer to the following guide.
Install Helm in the Kubernetes Cluster and download the helm CLI. This should have been installed if the Software Enterprise RA is followed.
Access to Kubernetes Clusters config file and
kubectlCLI installed, this file is in the Enterprise RA cluster BCMe head node under/<user>/.kube/configA Storage Class with present to create Persistent Volume Claims by Kubernetes, this can be an NFS or Block-based storage class, the storage class name is
default.Get the Run.ai SaaS Login, the run.ai portal, where the control pane requires a login to be created by NVIDIA. Please work with Account/SA teams to get an org carved out for this.
Access to the BCM node through which the Kubernetes Cluster was installed
Pre-reqs for RunAI#
Please install the Run:ai Cluster and Control plane components on the Enterprise RA cluster. The reference implementation steps have been provided at the end of this document in Appendix A.
At the end of the Run:ai installation you should have:
The Enterprise RA cluster added to the Run:ai Control Plane
A Project created in Run:ai that has all the Nodes and 64 GPUs allocated to the cluster and a different namespace is used for Run:ai Project
The node pool in Run:ai has the placement strategy set to
Spreadinstead ofBin-Packfor GPUs and CPUsUsers are created in Run:ai
Please refer to Appendix A for reference implementation in a SaaS mode/Classic mode.
Deploy and Configure NIM LLM on Run:ai#
Create Data Source for NIM#
The NIM inference service will need storage to load the NIM Cache on to, for that we need to create a Persistent Volume drive in the project Run:ai is going to use.
Create a Persistent Volume for the Data Store that Run:ai Inference workload will use, replace <namespace-project> with the project name created in step above.
Also, replace storage class with the StorageClass Name with the name in the cluster, change the server to the NFS server’s IP address, and the Path to the share/mount the NFS server is configured with.
kubectl apply -f nfs-pv.yaml -n <namespace-project>

apiVersion: v1
kind: PersistentVolume
metadata:
  name: nfs-pv
spec:
  capacity:
    storage: 100Gi
  accessModes:
    - ReadWriteMany
  persistentVolumeReclaimPolicy: Retain
  storageClassName: nfs-storage
  nfs:
    server: 10.185.118.25
    path: /mnt/cm-nfs
Create a PVC that can be used, replace <namespace-project> with the namespace in k8s Run:ai is using:
kubectl apply -f nfs-pvc.yaml -n <namespace-project>

apiVersion: v1
kind: PersistentVolumeClaim
metadata:
  name: nfs-pvc-nim
spec:
  accessModes:
    - ReadWriteMany
  resources:
    requests:
      storage: 100Gi
  storageClassName: nfs-storage
Create a Data Source in Run:ai to use the PVC created above.
Go to Workload Manager → Assets → Data Sources, click on New Data Source → PVC.
Select the scope to your project, click apply.
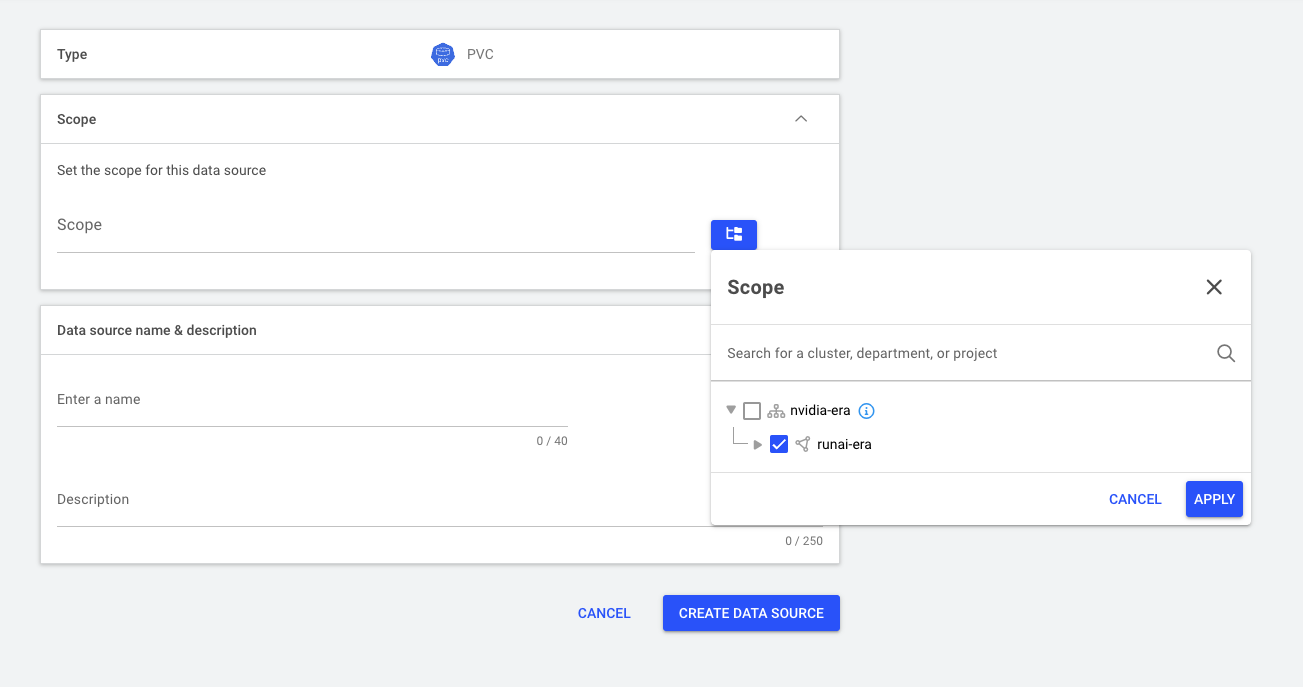
Figure 6 Create a Data Source - Assign Scope#
Enter a name, select Existing PVC in the Data Mount field. Select the PVC name you created in the step above. Make sure to enter /opt/nim/.cache as the Container Path; this is where the NIM service will download the NIM cache.
Click Create Data Source.
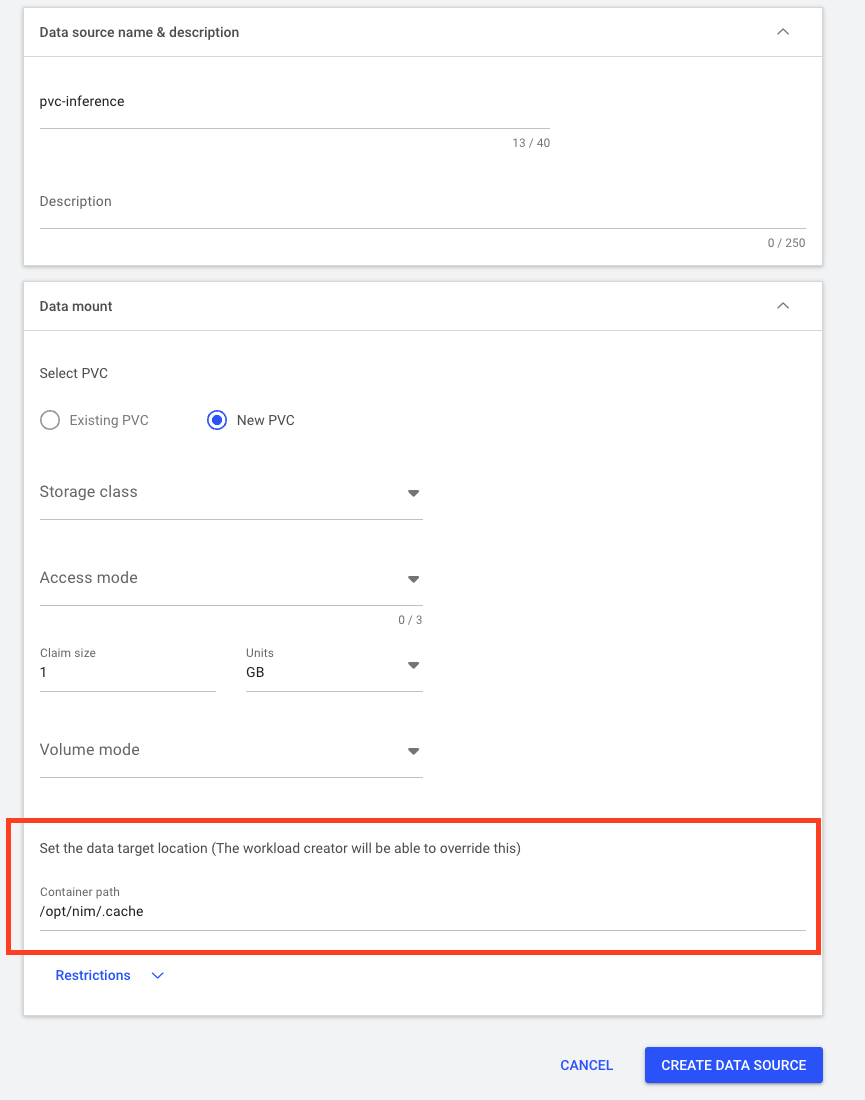
Figure 7 Create DataSource - Details#
Create a Secret#
A secret is needed for the workload to access NGC and download the correct NIMs.
Create a NGC-API Secret
Login to the Run:ai UI, Go to Workloads → Assets → Credentials.
Click on New Credential → Generic Secret.
Select the Scope to the Project in use, enter a Name for the Credential.
Under Secret, click New Secret and add NGC_API_KEY in the key and your NGC API token in the Value field.
Click Create Credentials.
Add Docker Registry Secret
Docker Registry secret is needed by run.ai to access nvcr.io.
Login to Run.ai, Go to Workloads → Assets → Credentials.
Click on New Credential → Docker Registry.
Click Create Credentials.
Select the Scope of the Project in use, and enter a Name for the Credential.
Under Secret, click New Secret and add $oauthtoken in the key and your NGC API token key in the Value field.
Deploy a Specific NIM LLM#
Go to Run:ai, click on Workload Manager → Workloads → Click on New Workload.
Select inference, select the Project you will be using, Select Inference Type as Nvidia NIM, give the Inference workload a name, and Click Continue.
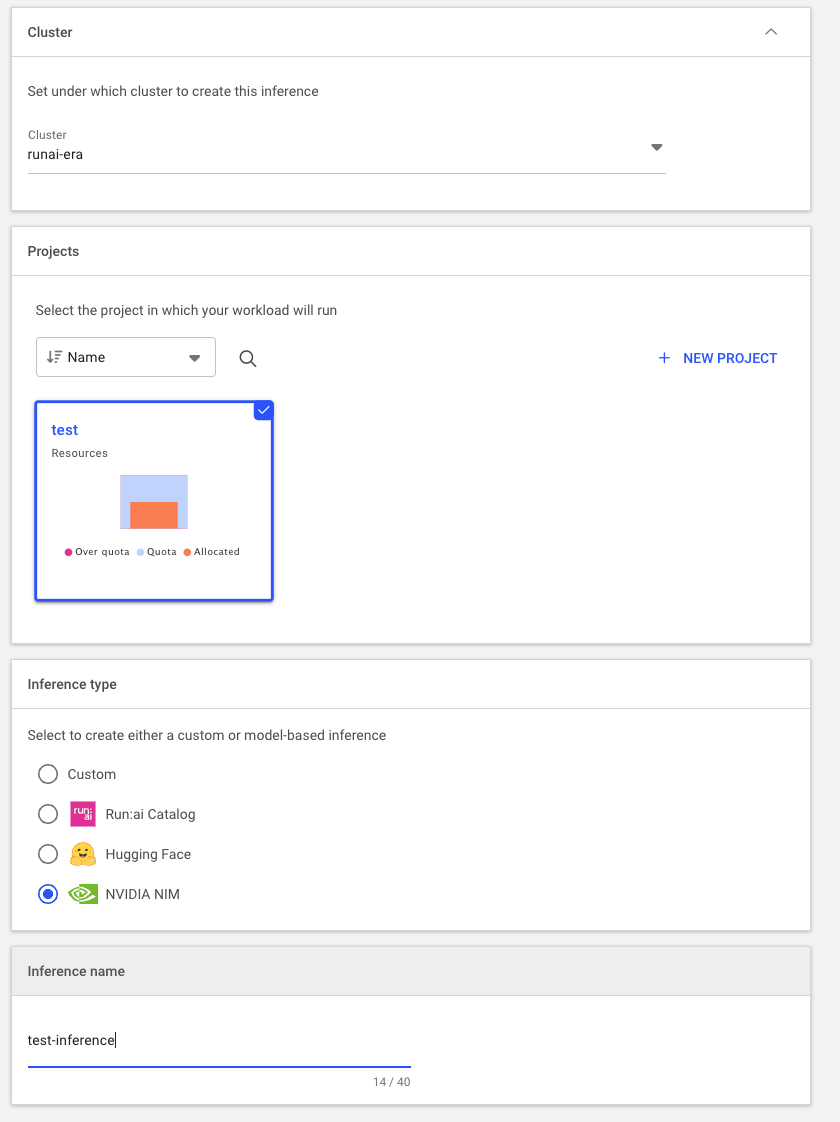
Figure 8 Deploy NIM - Provide Name#
Select Meta/Llama-3.1-8b-instruct from the dropdown list for Model names.
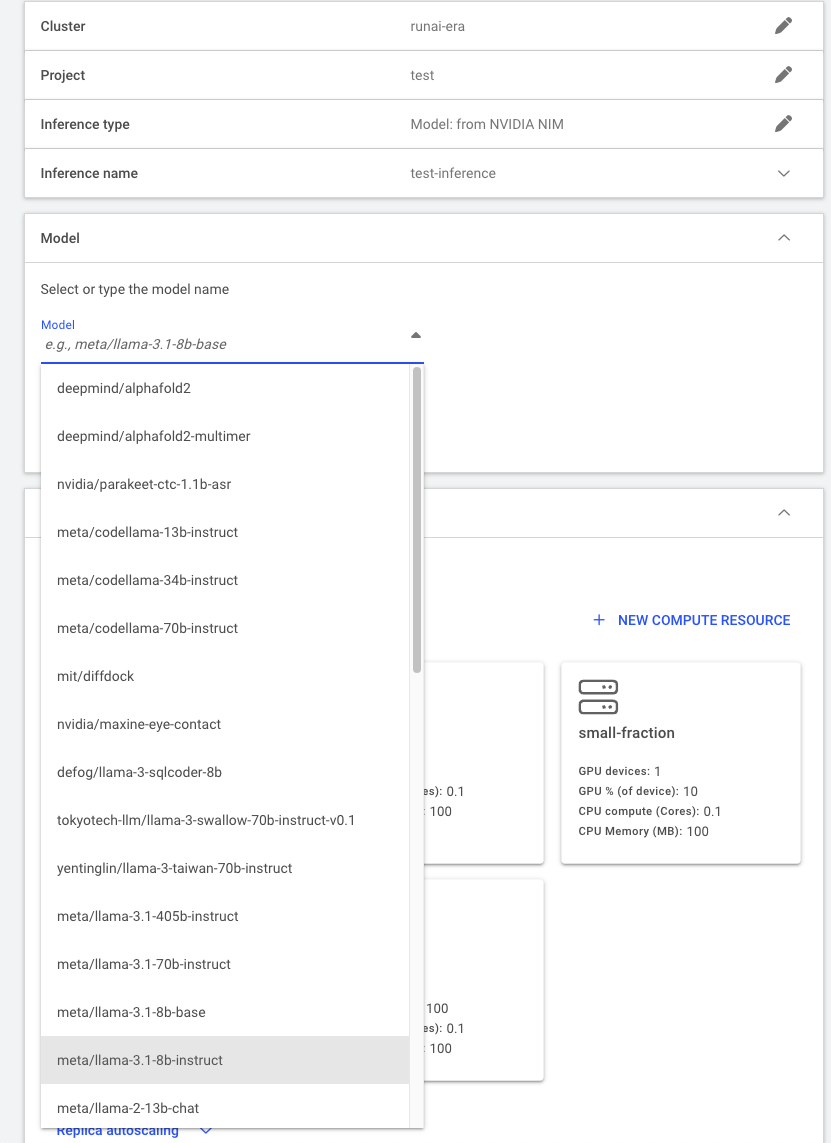
Figure 9 Create NIM - Select Model#
Make sure the Provide a token radio button is selected and enter your NGC API Key in the field.
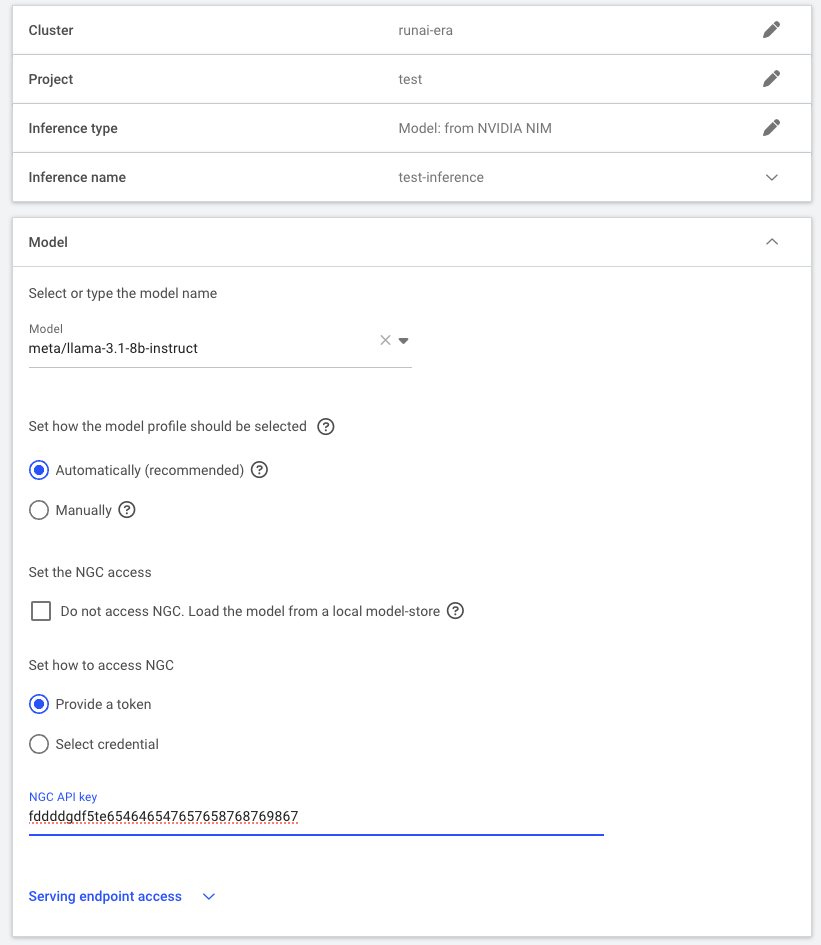
Figure 10 Create NIM - Provide NGC Key#
Select one-gpu tile; this varies by the workload you select.
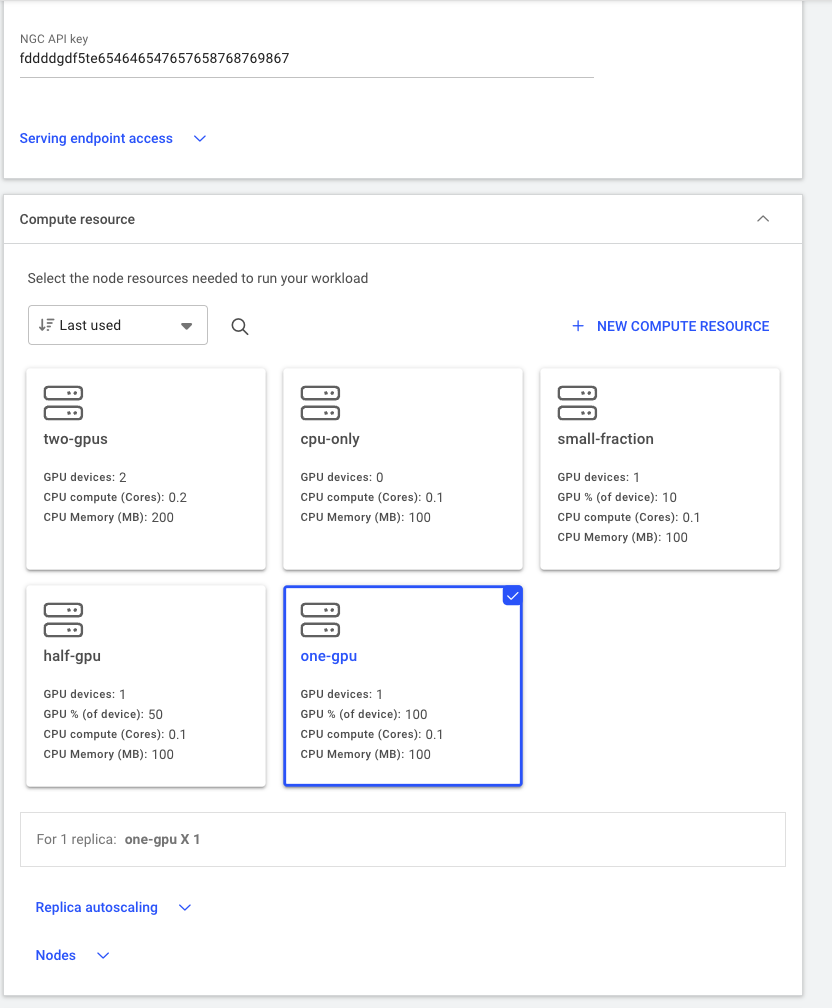
Figure 11 Create NIM - Provide Resources#
Click on Model store to expand it, and select the Data Source we created in the steps above.
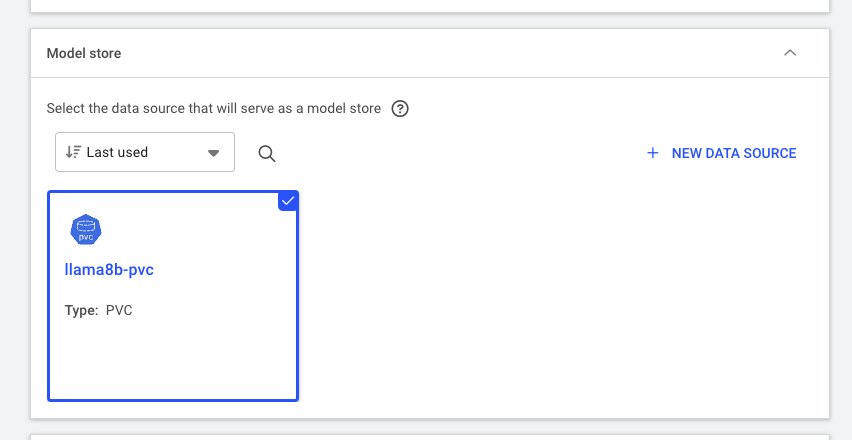
Figure 12 Create NIM - Provide PVC#
Expand the General section and select days 30 box, click Create Inference.
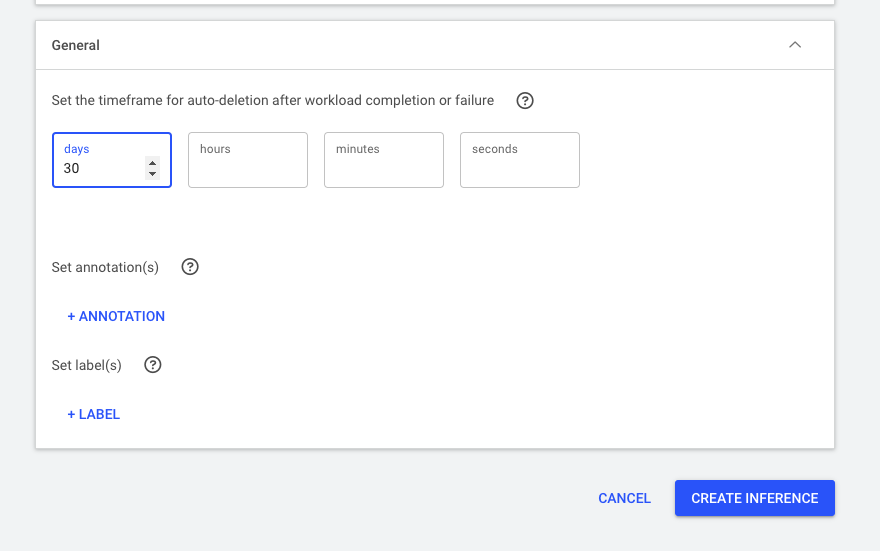
Figure 13 Create NIM#
You should see the inference service running in a few minutes.
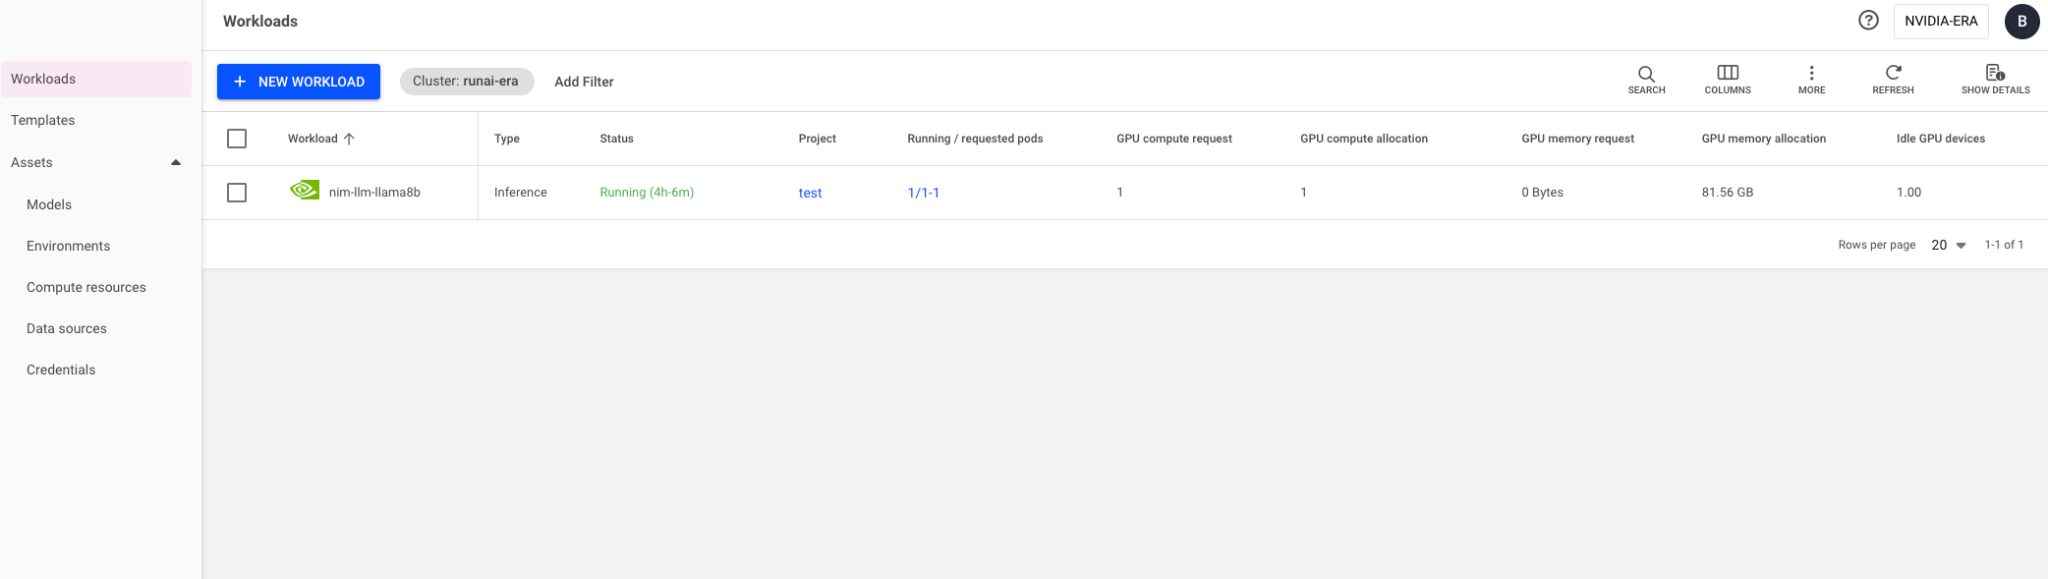
Figure 14 Create NIM - Running status#
Alternate YAML method#
You can create an Inference request via YAML as well. Submit the below sample YAML, replace the NGC_API with your API key to Kubectl.
apiVersion: run.ai/v2alpha1
kind: InferenceWorkload
metadata:
  name: llama-8b-single-gpu
  namespace: runai-test
spec:
  environment:
    items:
      NGC_API_KEY:
        value: nvapi- # Update this to your API key, no quotes
      NIM_CACHE_PATH:
        value: /opt/nim/.cache
  gpu:
    value: "0.5"
  image:
    value: nvcr.io/nim/meta/llama-3.1-8b-instruct
  minScale:
    value: 1
  maxScale:
    value: 2
  metric:
    value: concurrency #
  target:
    value: 1000  #
  ports:
    items:
      port1:
        value:
          container: 8000
          protocol: http
          serviceType: ServingPort
  pvcs:
    items:
      pvc:
        value:
          claimName: nfs-pvc-nim
          existingPvc: true
          path: /opt/nim/.cache
          readOnly: false
Query the Inference Server#
Find the Inference Server Endpoint:
Under
Workloads, selectColumnson the top right. Add the columnConnections.See the connections of the
inference-server-1workload:
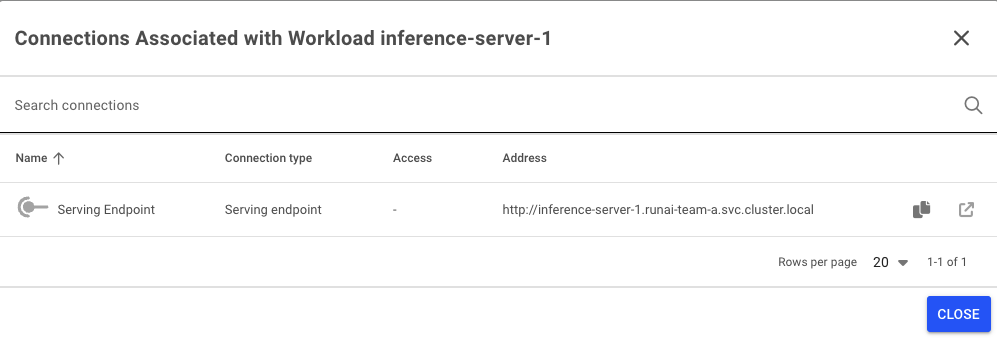
Figure 15 NIM Serving Endpoint#
Run:ai creates an External Name for the inference service, we can expose the service on an LB IP using the metal-LB already deployed on the cluster. Get the Deployment name of the inference service in Kubernetes by:
kubectl get deployment -n <runai-namespace-project>
Then, run the following, change the name to the name that’s on your cluster:
kubectl expose deployment <deployment-name> --port=8000 --target-port=8000 --name=nim-lb-service-h100 --type=LoadBalancer -n <runai-namespace-project>
Check the Load Balancing IP of the Inference Service by:
kubectl get svc -n <runai-namespace-project>
Validate everything is running by running curl or pointing a browser to:
http://<LB-IP-Infernece-service>:8000/v1/models
You should see an output like below:
{
  "object": "list",
  "data": [
    {
      "id": "meta/llama3-8b-instruct",
      "object": "model",
      "created": 1741026705,
      "owned_by": "system",
      "root": "meta/llama3-8b-instruct",
      "parent": null,
      "permission": [
        {
          "id": "modelperm-777c1ee100c846b1ad8e0b4d530f4f1e",
          "object": "model_permission",
          "created": 1741026705,
          "allow_create_engine": false,
          "allow_sampling": true,
          "allow_logprobs": true,
          "allow_search_indices": false,
          "allow_view": true,
          "allow_fine_tuning": false,
          "organization": "*",
          "group": null,
          "is_blocking": false
        }
      ]
    }
  ]
}