Virtual GPU Software User Guide
Virtual GPU Software User Guide
Documentation for administrators that explains how to install and configure NVIDIA Virtual GPU manager, configure virtual GPU software in pass-through mode, and install drivers on guest operating systems.
NVIDIA vGPU software is a graphics virtualization platform that provides virtual machines (VMs) access to NVIDIA GPU technology.
1.1. How NVIDIA vGPU Software Is Used
NVIDIA vGPU software can be used in several ways.
1.1.1. NVIDIA vGPU
NVIDIA Virtual GPU (vGPU) enables multiple virtual machines (VMs) to have simultaneous, direct access to a single physical GPU, using the same NVIDIA graphics drivers that are deployed on non-virtualized operating systems. By doing this, NVIDIA vGPU provides VMs with unparalleled graphics performance, compute performance, and application compatibility, together with the cost-effectiveness and scalability brought about by sharing a GPU among multiple workloads.
For more information, see Installing and Configuring NVIDIA Virtual GPU Manager.
1.1.2. GPU Pass-Through
In GPU pass-through mode, an entire physical GPU is directly assigned to one VM, bypassing the NVIDIA Virtual GPU Manager. In this mode of operation, the GPU is accessed exclusively by the NVIDIA driver running in the VM to which it is assigned. The GPU is not shared among VMs.
For more information, see Using GPU Pass-Through.
1.1.3. Bare-Metal Deployment
In a bare-metal deployment, you can use NVIDIA vGPU software graphics drivers with vWS and vApps licenses to deliver remote virtual desktops and applications. If you intend to use Tesla boards without a hypervisor for this purpose, use NVIDIA vGPU software graphics drivers, not other NVIDIA drivers.
To use NVIDIA vGPU software drivers for a bare-metal deployment, complete these tasks:
-
Install the driver on the physical host.
For instructions, see Installing the NVIDIA vGPU Software Graphics Driver.
-
License any NVIDIA vGPU software that you are using.
For instructions, see Virtual GPU Client Licensing User Guide.
-
Configure the platform for remote access.
To use graphics features with Tesla GPUs, you must use a supported remoting solution, for example, RemoteFX, Citrix Virtual Apps and Desktops, VNC, or similar technology.
-
Use the display settings feature of the host OS to configure the Tesla GPU as the primary display.
NVIDIA Tesla generally operates as a secondary device on bare-metal platforms.
-
If the system has multiple display adapters, disable display devices connected through adapters that are not from NVIDIA.
You can use the display settings feature of the host OS or the remoting solution for this purpose. On NVIDIA GPUs, including Tesla GPUs, a default display device is enabled.
Users can launch applications that require NVIDIA GPU technology for enhanced user experience only after displays that are driven by NVIDIA adapters are enabled.
1.2. Primary Display Adapter Requirements for NVIDIA vGPU Software Deployments
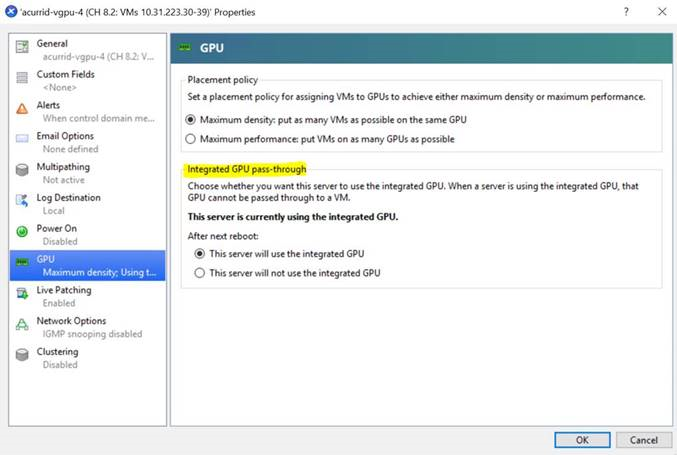
The GPU that is set as the primary display adapter cannot be used for NVIDIA vGPU deployments or GPU pass through deployments. The primary display is the boot display of the hypervisor host, which displays SBIOS console messages and then boot of the OS or hypervisor.
Any GPU that is being used for NVIDIA vGPU deployments or GPU pass through deployments must be set as a secondary display adapter.
Citrix Hypervisor provides a specific setting to allow the primary display adapter to be used for GPU pass through deployments.
Only the following GPUs are supported as the primary display adapter:
- Tesla M6
- Quadro RTX 6000
- Quadro RTX 8000
All other GPUs that support NVIDIA vGPU software cannot function as the primary display adapter because they are 3D controllers, not VGA devices.
If the hypervisor host does not have an extra graphics adapter, consider installing a low-end display adapter to be used as the primary display adapter. If necessary, ensure that the primary display adapter is set correctly in the BIOS options of the hypervisor host.
1.3. NVIDIA vGPU Software Features
NVIDIA vGPU software includes vWS, vCS, vPC, and vApps.
1.3.1. GPU Instance Support on NVIDIA vGPU Software
NVIDIA vGPU software supports GPU instances on GPUs that support the Multi-Instance GPU (MIG) feature in NVIDIA vGPU and GPU pass through deployments. MIG enables a physical GPU to be securely partitioned into multiple separate GPU instances, providing multiple users with separate GPU resources to accelerate their applications.
In addition to providing all the benefits of MIG, NVIDIA vGPU software adds virtual machine security and management for workloads. Single Root I/O Virtualization (SR-IOV) virtual functions enable full IOMMU protection for the virtual machines that are configured with vGPUs.
Figure 1 shows a GPU that is split into three GPU instances of different sizes, with each instance mapped to one vGPU. Although each GPU instance is managed by the hypervisor host and is mapped to one vGPU, each virtual machine can further subdivide the compute resources into smaller compute instances and run multiple containers on top of them in parallel, even within each vGPU.
Figure 1. GPU Instances Configured with NVIDIA vGPU
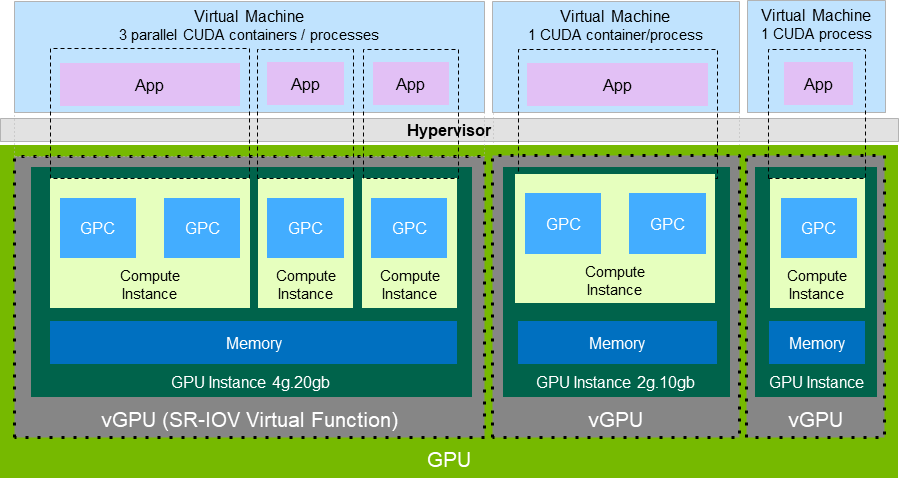
NVIDIA vGPU software supports a single-slice MIG-backed vGPU with DEC, JPG, and OFA support. Only one MIG-backed vGPU with DEC, JPG, and OFA support can reside on a GPU. The instance can be placed identically to a single-slice instance without DEC, JPG, and OFA support.
Not all hypervisors support GPU instances in NVIDIA vGPU deployments. To determine if your chosen hypervisor supports GPU instances in NVIDIA vGPU deployments, consult the release notes for your hypervisor at NVIDIA Virtual GPU Software Documentation.
NVIDIA vGPU software supports GPU instances only with NVIDIA Virtual Compute Server and Linux guest operating systems.
To support GPU instances with NVIDIA vGPU, a GPU must be configured with MIG mode enabled and GPU instances must be created and configured on the physical GPU. For more information, see Configuring a GPU for MIG-Backed vGPUs. For general information about the MIG feature, see: NVIDIA Multi-Instance GPU User Guide.
1.3.2. API Support on NVIDIA vGPU
NVIDIA vGPU includes support for the following APIs:
- Open Computing Language (OpenCL™ software) 3.0
- OpenGL® 4.6
- Vulkan® 1.3
- DirectX 11
- DirectX 12 (Windows 10)
- Direct2D
- DirectX Video Acceleration (DXVA)
- NVIDIA® CUDA® 11.6
- NVIDIA vGPU software SDK (remote graphics acceleration)
- NVIDIA RTX (on GPUs based on the NVIDIA Volta graphic architecture and later architectures)
These APIs are backwards compatible. Older versions of the API are also supported.
1.3.3. NVIDIA CUDA Toolkit and OpenCL Support on NVIDIA vGPU Software
NVIDIA CUDA Toolkit and OpenCL are supported with NVIDIA vGPU only on a subset of vGPU types and supported GPUs.
For more information about NVIDIA CUDA Toolkit, see CUDA Toolkit 11.6 Documentation.
If you are using NVIDIA vGPU software with CUDA on Linux, avoid conflicting installation methods by installing CUDA from a distribution-independent runfile package. Do not install CUDA from a distribution-specific RPM or Deb package.
To ensure that the NVIDIA vGPU software graphics driver is not overwritten when CUDA is installed, deselect the CUDA driver when selecting the CUDA components to install.
For more information, see NVIDIA CUDA Installation Guide for Linux.
OpenCL and CUDA Application Support
OpenCL and CUDA applications are supported on the following NVIDIA vGPU types:
- The 8Q vGPU type on Tesla M6, Tesla M10, and Tesla M60 GPUs
- All Q-series vGPU types on the following GPUs:
- NVIDIA A2
- NVIDIA A10
- NVIDIA A16
- NVIDIA A40
- NVIDIA RTX A5000
- NVIDIA RTX A5500
- NVIDIA RTX A6000
- Tesla P4
- Tesla P6
- Tesla P40
- Tesla P100 SXM2 16 GB
- Tesla P100 PCIe 16 GB
- Tesla P100 PCIe 12 GB
- Tesla V100 SXM2
- Tesla V100 SXM2 32GB
- Tesla V100 PCIe
- Tesla V100 PCIe 32GB
- Tesla V100S PCIe 32GB
- Tesla V100 FHHL
- Tesla T4
- Quadro RTX 6000
- Quadro RTX 6000 passive
- Quadro RTX 8000
- Quadro RTX 8000 passive
- All C-series vGPU types
NVIDIA CUDA Toolkit Development Tool Support
NVIDIA vGPU supports the following NVIDIA CUDA Toolkit development tools on some GPUs:
- Debuggers:
- CUDA-GDB
- Compute Sanitizer
- Profilers:
- The Activity, Callback, and Profiling APIs of the CUDA Profiling Tools Interface (CUPTI)
Other CUPTI APIs, such as the Event and Metric APIs, are not supported.
- NVIDIA Nsight™ Compute
- NVIDIA Nsight Systems
- NVIDIA Nsight plugin
- NVIDIA Nsight Visual Studio plugin
Other CUDA profilers, such as nvprof and NVIDIA Visual Profiler, are not supported.
- The Activity, Callback, and Profiling APIs of the CUDA Profiling Tools Interface (CUPTI)
These tools are supported only in Linux guest VMs.
NVIDIA CUDA Toolkit profilers are supported and can be enabled on a VM for which unified memory is enabled.
By default, NVIDIA CUDA Toolkit development tools are disabled on NVIDIA vGPU. If used, you must enable NVIDIA CUDA Toolkit development tools individually for each VM that requires them by setting vGPU plugin parameters. For instructions, see Enabling NVIDIA CUDA Toolkit Development Tools for NVIDIA vGPU.
The following table lists the GPUs on which NVIDIA vGPU supports these debuggers and profilers.
| GPU | vGPU Mode | Debuggers | Profilers |
|---|---|---|---|
| NVIDIA A2 | Time-sliced | ✓ | ✓ |
| NVIDIA A10 | Time-sliced | ✓ | ✓ |
| NVIDIA A16 | Time-sliced | ✓ | ✓ |
| NVIDIA A30 | Time-sliced | ✓ | ✓ |
| MIG-backed | ✓ | ✓ | |
| NVIDIA A30X | Time-sliced | ✓ | ✓ |
| MIG-backed | ✓ | ✓ | |
| NVIDIA A40 | Time-sliced | ✓ | ✓ |
| NVIDIA A100 HGX 40GB | Time-sliced | ✓ | ✓ |
| MIG-backed | ✓ | ✓ | |
| NVIDIA A100 PCIe 40GB | Time-sliced | ✓ | ✓ |
| MIG-backed | ✓ | ✓ | |
| NVIDIA A100 HGX 80GB | Time-sliced | ✓ | ✓ |
| MIG-backed | ✓ | ✓ | |
| NVIDIA A100 PCIe 80GB | Time-sliced | ✓ | ✓ |
| MIG-backed | ✓ | ✓ | |
| NVIDIA A100X | Time-sliced | ✓ | ✓ |
| MIG-backed | ✓ | ✓ | |
| NVIDIA RTX A5000 | Time-sliced | ✓ | ✓ |
| NVIDIA RTX A5500 | Time-sliced | ✓ | ✓ |
| NVIDIA RTX A6000 | Time-sliced | ✓ | ✓ |
| Tesla T4 | Time-sliced | ✓ | ✓ |
| Quadro RTX 6000 | Time-sliced | ✓ | ✓ |
| Quadro RTX 6000 passive | Time-sliced | ✓ | ✓ |
| Quadro RTX 8000 | Time-sliced | ✓ | ✓ |
| Quadro RTX 8000 passive | Time-sliced | ✓ | ✓ |
| Tesla V100 SXM2 | Time-sliced | ✓ | ✓ |
| Tesla V100 SXM2 32GB | Time-sliced | ✓ | ✓ |
| Tesla V100 PCIe | Time-sliced | ✓ | ✓ |
| Tesla V100 PCIe 32GB | Time-sliced | ✓ | ✓ |
| Tesla V100S PCIe 32GB | Time-sliced | ✓ | ✓ |
| Tesla V100 FHHL | Time-sliced | ✓ | ✓ |
✓ Feature is supported
- Feature is not supported
Supported NVIDIA CUDA Toolkit Features
NVIDIA vGPU supports the following NVIDIA CUDA Toolkit features if the vGPU type, physical GPU, and the hypervisor software version support the feature:
- Error-correcting code (ECC) memory
- Peer-to-peer CUDA transfers over NVLink
Note:
To determine the NVLink topology between physical GPUs in a host or vGPUs assigned to a VM, run the following command from the host or VM:
$ nvidia-smi topo -m
- NVIDIA GPUDirect® Remote Direct Memory Access (RDMA) technology
- GPUDirect Storage technology
- Unified Memory
Note:
Unified memory is disabled by default. If used, you must enable unified memory individually for each vGPU that requires it by setting a vGPU plugin parameter. For instructions, see Enabling Unified Memory for a vGPU.
- NVIDIA Nsight Systems GPU context switch trace
Dynamic page retirement is supported for all vGPU types on physical GPUs that support ECC memory, even if ECC memory is disabled on the physical GPU.
NVIDIA CUDA Toolkit Features Not Supported by NVIDIA vGPU
NVIDIA vGPU does not support the NVIDIA Nsight Graphics feature of NVIDIA CUDA Toolkit.
The NVIDIA Nsight Graphics feature is supported in GPU pass-through mode and in bare-metal deployments.
1.3.4. Additional vWS Features
In addition to the features of vPC and vApps, vWS provides the following features:
- Workstation-specific graphics features and accelerations
- Certified drivers for professional applications
- GPU pass through for workstation or professional 3D graphics
In pass-through mode, vWS supports multiple virtual display heads at resolutions up to 8K and flexible virtual display resolutions based on the number of available pixels. For details, see Display Resolutions for Physical GPUs.
- 10-bit color for Windows users. (HDR/10-bit color is not currently supported on Linux, NvFBC capture is supported but deprecated.)
1.3.5. NVIDIA GPU Cloud (NGC) Containers Support on NVIDIA vGPU Software
NVIDIA vGPU software supports NGC containers in NVIDIA vGPU and GPU pass-through deployments on all supported hypervisors.
In NVIDIA vGPU deployments, the following vGPU types are supported only on GPUs based on NVIDIA GPU architectures after the Maxwell architecture:
- All Q-series vGPU types
- All C-series vGPU types
In GPU pass-through deployments, all GPUs based on NVIDIA GPU architectures after the NVIDIA Maxwell™ architecture that support NVIDIA vGPU software are supported.
The Ubuntu guest operating system is supported.
For more information about setting up NVIDIA vGPU software for use with NGC containers, see Using NGC with NVIDIA Virtual GPU Software Setup Guide.
1.3.6. NVIDIA GPU Operator Support
NVIDIA GPU Operator simplifies the deployment of NVIDIA vGPU software on software container platforms that are managed by the Kubernetes container orchestration engine. It automates the installation and update of NVIDIA vGPU software graphics drivers for container platforms running in guest VMs that are configured with NVIDIA vGPU.
NVIDIA GPU Operator uses a driver catalog published with the NVIDIA vGPU software graphics drivers to determine automatically the NVIDIA vGPU software graphics driver version that is compatible with a platform's Virtual GPU Manager.
Any drivers to be installed by NVIDIA GPU Operator must be downloaded from the NVIDIA Licensing Portal to a local computer. Automated access to the NVIDIA Licensing Portal by NVIDIA GPU Operator is not supported.
NVIDIA GPU Operator supports automated configuration of NVIDIA vGPU software and provides telemetry support through DCGM Exporter running in a guest VM.
NVIDIA GPU Operator is supported only on specific combinations of hypervisor software release, container platform, vGPU type, and guest OS release. To determine if your configuration supports NVIDIA GPU Operator with NVIDIA vGPU deployments, consult the release notes for your chosen hypervisor at NVIDIA Virtual GPU Software Documentation.
For more information, see NVIDIA GPU Operator Overview on the NVIDIA documentation portal.
1.4. How this Guide Is Organized
Virtual GPU Software User Guide is organized as follows:
- This chapter introduces the capabilities and features of NVIDIA vGPU software.
- Installing and Configuring NVIDIA Virtual GPU Manager provides a step-by-step guide to installing and configuring vGPU on supported hypervisors.
- Using GPU Pass-Through explains how to configure a GPU for pass-through on supported hypervisors.
- Installing the NVIDIA vGPU Software Graphics Driver explains how to install NVIDIA vGPU software graphics driver on Windows and Linux operating systems.
- Licensing an NVIDIA vGPU explains how to license NVIDIA vGPU licensed products on Windows and Linux operating systems.
- Modifying a VM's NVIDIA vGPU Configuration explains how to remove a VM’s vGPU configuration and modify GPU assignments for vGPU-enabled VMs.
- Monitoring GPU Performance covers performance monitoring of physical GPUs and virtual GPUs from the hypervisor and from within individual guest VMs.
- Changing Scheduling Behavior for Time-Sliced vGPUs describes the scheduling behavior of NVIDIA vGPUs and how to change it.
- Troubleshooting provides guidance on troubleshooting.
- Virtual GPU Types Reference provides details of each vGPU available from each supported GPU and provides examples of mixed virtual display configurations for B-series and Q-series vGPUs.
- Configuring x11vnc for Checking the GPU in a Linux Server explains how to use x11vnc to confirm that the NVIDIA GPU in a Linux server to which no display devices are directly connected is working as expected.
- Disabling NVIDIA Notification Icon for Citrix Published Application User Sessions explains how to ensure that the NVIDIA Notification Icon application does not prevent the Citrix Published Application user session from being logged off even after the user has quit all ot
- Citrix Hypervisor Basics explains how to perform basic operations on Citrix Hypervisor to install and configure NVIDIA vGPU software and optimize Citrix Hypervisor operation with vGPU.
- Citrix Hypervisor vGPU Management covers vGPU management on Citrix Hypervisor.
- Citrix Hypervisor Performance Tuning covers vGPU performance optimization on Citrix Hypervisor.
The process for installing and configuring NVIDIA Virtual GPU Manager depends on the hypervisor that you are using. After you complete this process, you can install the display drivers for your guest OS and license any NVIDIA vGPU software licensed products that you are using.
2.1. About NVIDIA Virtual GPUs
2.1.1. NVIDIA vGPU Architecture
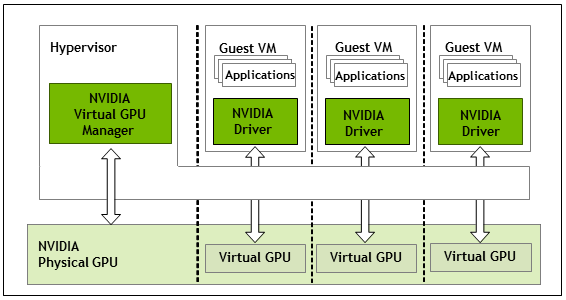
The high-level architecture of NVIDIA vGPU is illustrated in Figure 2. Under the control of the NVIDIA Virtual GPU Manager running under the hypervisor, NVIDIA physical GPUs are capable of supporting multiple virtual GPU devices (vGPUs) that can be assigned directly to guest VMs.
Guest VMs use NVIDIA vGPUs in the same manner as a physical GPU that has been passed through by the hypervisor: an NVIDIA driver loaded in the guest VM provides direct access to the GPU for performance-critical fast paths, and a paravirtualized interface to the NVIDIA Virtual GPU Manager is used for non-performant management operations.
Figure 2. NVIDIA vGPU System Architecture
Each NVIDIA vGPU is analogous to a conventional GPU, having a fixed amount of GPU framebuffer, and one or more virtual display outputs or "heads". The vGPU’s framebuffer is allocated out of the physical GPU’s framebuffer at the time the vGPU is created, and the vGPU retains exclusive use of that framebuffer until it is destroyed.
Depending on the physical GPU, different types of vGPU can be created on the vGPU:
- On all GPUs that support NVIDIA vGPU software, time-sliced vGPUs can be created.
- Additionally, on GPUs that support the Multi-Instance GPU (MIG) feature, MIG-backed vGPUs can be created. The MIG feature is introduced on GPUs that are based on the NVIDIA Ampere GPU architecture.
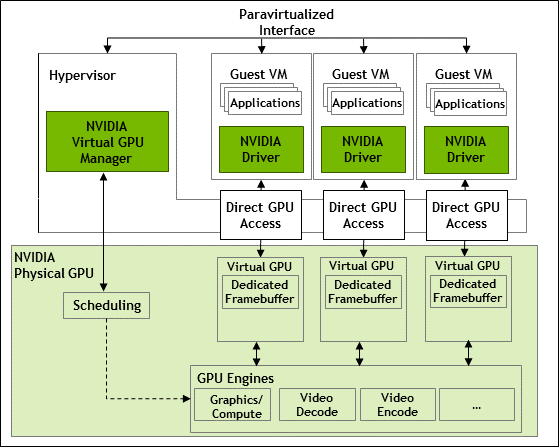
2.1.1.1. Time-Sliced NVIDIA vGPU Internal Architecture
A time-sliced vGPU is a vGPU that resides on a physical GPU that is not partitioned into multiple GPU instances. All time-sliced vGPUs resident on a GPU share access to the GPU’s engines including the graphics (3D), video decode, and video encode engines.
In a time-sliced vGPU, processes that run on the vGPU are scheduled to run in series. Each vGPU waits while other processes run on other vGPUs. While processes are running on a vGPU, the vGPU has exclusive use of the GPU's engines. You can change the default scheduling behavior as explained in Changing Scheduling Behavior for Time-Sliced vGPUs.
Figure 3. Time-Sliced NVIDIA vGPU Internal Architecture
2.1.1.2. MIG-Backed NVIDIA vGPU Internal Architecture
A MIG-backed vGPU is a vGPU that resides on a GPU instance in a MIG-capable physical GPU. Each MIG-backed vGPU resident on a GPU has exclusive access to the GPU instance’s engines, including the compute and video decode engines.
In a MIG-backed vGPU, processes that run on the vGPU run in parallel with processes running on other vGPUs on the GPU. Process run on all vGPUs resident on a physical GPU simultaneously.
Figure 4. MIG-Backed NVIDIA vGPU Internal Architecture

2.1.2. About Virtual GPU Types
The number of physical GPUs that a board has depends on the board. Each physical GPU can support several different types of virtual GPU (vGPU). vGPU types have a fixed amount of frame buffer, number of supported display heads, and maximum resolutions1. They are grouped into different series according to the different classes of workload for which they are optimized. Each series is identified by the last letter of the vGPU type name.
| Series | Optimal Workload |
|---|---|
| Q-series | Virtual workstations for creative and technical professionals who require the performance and features of Quadro technology |
| C-series | Compute-intensive server workloads, such as artificial intelligence (AI), deep learning, or high-performance computing (HPC)2, 3 |
| B-series | Virtual desktops for business professionals and knowledge workers |
| A-series | App streaming or session-based solutions for virtual applications users6 |
The number after the board type in the vGPU type name denotes the amount of frame buffer that is allocated to a vGPU of that type. For example, a vGPU of type A16-4C is allocated 4096 Mbytes of frame buffer on an NVIDIA A16 board.
Due to their differing resource requirements, the maximum number of vGPUs that can be created simultaneously on a physical GPU varies according to the vGPU type. For example, an NVDIA A16 board can support up to 4 A16-4C vGPUs on each of its two physical GPUs, for a total of 16 vGPUs, but only 2 A16-8C vGPUs, for a total of 8 vGPUs. When enabled, the frame-rate limiter (FRL) limits the maximum frame rate in frames per second (FPS) for a vGPU as follows:
- For B-series vGPUs, the maximum frame rate is 45 FPS.
- For Q-series, C-series, and A-series vGPUs, the maximum frame rate is 60 FPS.
By default, the FRL is enabled for all GPUs. The FRL is disabled when the vGPU scheduling behavior is changed from the default best-effort scheduler on GPUs that support alternative vGPU schedulers. For details, see Changing Scheduling Behavior for Time-Sliced vGPUs. On vGPUs that use the best-effort scheduler, the FRL can be disabled as explained in the release notes for your chosen hypervisor at NVIDIA Virtual GPU Software Documentation.
NVIDIA vGPU is a licensed product on all supported GPU boards. A software license is required to enable all vGPU features within the guest VM. The type of license required depends on the vGPU type.
- Q-series vGPU types require a vWS license.
- C-series vGPU types require an NVIDIA Virtual Compute Server (vCS) license but can also be used with a vWS license.
- B-series vGPU types require a vPC license but can also be used with a vWS license.
- A-series vGPU types require a vApps license.
For details of the virtual GPU types available from each supported GPU, see Virtual GPU Types for Supported GPUs.
2.1.3. Virtual Display Resolutions for Q-series and B-series vGPUs
Instead of a fixed maximum resolution per display, Q-series and B-series vGPUs support a maximum combined resolution based on the number of available pixels, which is determined by their frame buffer size. You can choose between using a small number of high resolution displays or a larger number of lower resolution displays with these vGPUs.
The number of virtual displays that you can use depends on a combination of the following factors:
- Virtual GPU series
- GPU architecture
- vGPU frame buffer size
- Display resolution
You cannot use more than the maximum number of displays that a vGPU supports even if the combined resolution of the displays is less than the number of available pixels from the vGPU. For example, because -0Q and -0B vGPUs support a maximum of only two displays, you cannot use four 1280×1024 displays with these vGPUs even though the combined resolution of the displays (6220800) is less than the number of available pixels from these vGPUs (8192000).
Various factors affect the consumption of the GPU frame buffer, which can impact the user experience. These factors include and are not limited to the number of displays, display resolution, workload and applications deployed, remoting solution, and guest OS. The ability of a vGPU to drive a certain combination of displays does not guarantee that enough frame buffer remains free for all applications to run. If applications run out of frame buffer, consider changing your setup in one of the following ways:
- Switching to a vGPU type with more frame buffer
- Using fewer displays
- Using lower resolution displays
The maximum number of displays per vGPU listed in Virtual GPU Types for Supported GPUs is based on a configuration in which all displays have the same resolution. For examples of configurations with a mixture of display resolutions, see Mixed Display Configurations for B-Series and Q-Series vGPUs.
2.1.4. Valid Virtual GPU Configurations on a Single GPU
Valid vGPU configurations on a single GPU depend on whether the vGPUs are time sliced or, on GPUs that support MIG, are MIG-backed.
2.1.4.1. Valid Time-Sliced Virtual GPU Configurations on a Single GPU
This release of NVIDIA vGPU supports time-sliced vGPUs with the same amount of frame buffer from different virtual GPU series on the same physical GPU. For example, A-series, B-series, C-series, and Q-series vGPUs with the same amount of frame buffer can reside on the same physical GPU simultaneously.
However, the requirement that all vGPUs have the same amount of frame buffer doesn’t extend across physical GPUs on the same card. Different physical GPUs on the same card may host virtual GPUs with different amounts of frame buffer at the same time, provided that the vGPU types on any one physical GPU all have the same amount of frame buffer. For example, an NVIDIA A16 card has four physical GPUs, and can support several types of virtual GPU.
- A configuration with a mixture of A16-4C vGPUs and A16-4Q vGPUs on GPU0 is valid.
- A configuration with A16-16C vGPUs on GPU 0 and GPU 1, A16-8C vGPUs on GPU 2, and A16-4C vGPUs on GPU3 is valid.
- A configuration with a mixture of A16-8C vGPUs and A16-4C vGPUs on GPU0 is invalid.
Not all hypervisors support time-sliced vGPUs with the same amount of frame buffer from different virtual GPU series on the same physical GPU. To determine if your chosen hypervisor supports this feature, consult the release notes for your hypervisor at NVIDIA Virtual GPU Software Documentation.
2.1.4.2. Valid MIG-Backed Virtual GPU Configurations on a Single GPU
This release of NVIDIA vGPU supports both homogeneous and mixed MIG-backed virtual GPUs based on the underlying GPU instance configuration.
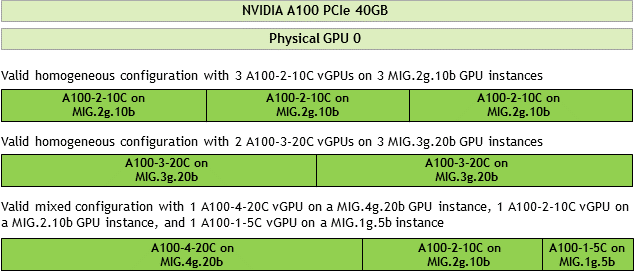
For example, an NVIDIA A100 PCIe 40GB card has one physical GPU, and can support several types of virtual GPU. Figure 5 shows the following examples of valid homogeneous and mixed MIG-backed virtual GPU configurations on NVIDIA A100 PCIe 40GB.
- A valid homogeneous configuration with 3 A100-2-10C vGPUs on 3 MIG.2g.10b GPU instances
- A valid homogeneous configuration with 2 A100-3-20C vGPUs on 3 MIG.3g.20b GPU instances
- A valid mixed configuration with 1 A100-4-20C vGPU on a MIG.4g.20b GPU instance, 1 A100-2-10C vGPU on a MIG.2.10b GPU instance, and 1 A100-1-5C vGPU on a MIG.1g.5b instance
Figure 5. Example MIG-Backed vGPU Configurations on NVIDIA A100 PCIe 40GB
2.1.5. Guest VM Support
NVIDIA vGPU supports Windows and Linux guest VM operating systems. The supported vGPU types depend on the guest VM OS.
For details of the supported releases of Windows and Linux, and for further information on supported configurations, see the driver release notes for your hypervisor at NVIDIA Virtual GPU Software Documentation.
2.1.5.1. Windows Guest VM Support
Windows guest VMs are supported only on Q-series, B-series, and A-series NVIDIA vGPU types. They are not supported on C-series NVIDIA vGPU types.
2.1.5.2. Linux Guest VM support
64-bit Linux guest VMs are supported only on Q-series, C-series, and B-series NVIDIA vGPU types. They are not supported on A-series NVIDIA vGPU types.
2.2. Prerequisites for Using NVIDIA vGPU
Before proceeding, ensure that these prerequisites are met:
- You have a server platform that is capable of hosting your chosen hypervisor and NVIDIA GPUs that support NVIDIA vGPU software.
- One or more NVIDIA GPUs that support NVIDIA vGPU software is installed in your server platform.
-
If you are using GPUs based on the NVIDIA Ampere architecture, the following BIOS settings are enabled on your server platform:
- VT-D/IOMMU
- SR-IOV
- You have downloaded the NVIDIA vGPU software package for your chosen hypervisor, which consists of the following software:
- NVIDIA Virtual GPU Manager for your hypervisor
- NVIDIA vGPU software graphics drivers for supported guest operating systems
- The following software is installed according to the instructions in the software vendor's documentation:
- Your chosen hypervisor, for example, Citrix Hypervisor, Red Hat Enterprise Linux KVM, Red Hat Virtualization (RHV), or VMware vSphere Hypervisor (ESXi)
- The software for managing your chosen hypervisor, for example, Citrix XenCenter management GUI, or VMware vCenter Server
- The virtual desktop software that you will use with virtual machines (VMs) running NVIDIA Virtual GPU, for example, Citrix Virtual Apps and Desktops, or VMware Horizon
Note:If you are using VMware vSphere Hypervisor (ESXi), ensure that the ESXi host on which you will configure a VM with NVIDIA vGPU is not a member of a fully automated VMware Distributed Resource Scheduler (DRS) cluster. For more information, see Installing and Configuring the NVIDIA Virtual GPU Manager for VMware vSphere.
- A VM to be enabled with vGPU is created.
Note:
All hypervisors covered in this guide support multiple vGPUs in a VM.
- Your chosen guest OS is installed in the VM.
For information about supported hardware and software, and any known issues for this release of NVIDIA vGPU software, refer to the Release Notes for your chosen hypervisor:
- Virtual GPU Software for Citrix Hypervisor Release Notes
- Virtual GPU Software for Red Hat Enterprise Linux with KVM Release Notes
- Virtual GPU Software for Ubuntu Release Notes
- Virtual GPU Software for VMware vSphere Release Notes
2.3. Switching the Mode of a GPU that Supports Multiple Display Modes
Some GPUs support displayless and display-enabled modes but must be used in NVIDIA vGPU software deployments in displayless mode.
The GPUs listed in the following table support multiple display modes. As shown in the table, some GPUs are supplied from the factory in displayless mode, but other GPUs are supplied in a display-enabled mode.
| GPU | Mode as Supplied from the Factory |
|---|---|
| NVIDIA A40 | Displayless |
| NVIDIA RTX A5000 | Display enabled |
| NVIDIA RTX A5500 | Display enabled |
| NVIDIA RTX A6000 | Display enabled |
A GPU that is supplied from the factory in displayless mode, such as the NVIDIA A40 GPU, might be in a display-enabled mode if its mode has previously been changed.
To change the mode of a GPU that supports multiple display modes, use the displaymodeselector tool, which you can request from the NVIDIA Display Mode Selector Tool page on the NVIDIA Developer website.
Only the following GPUs support the displaymodeselector tool:
- NVIDIA A40
- NVIDIA RTX A5000
- NVIDIA RTX A5500
- NVIDIA RTX A6000
Other GPUs that support NVIDIA vGPU software do not support the displaymodeselector tool and, unless otherwise stated, do not require display mode switching.
2.4. Switching the Mode of a Tesla M60 or M6 GPU
Tesla M60 and M6 GPUs support compute mode and graphics mode. NVIDIA vGPU requires GPUs that support both modes to operate in graphics mode.
Recent Tesla M60 GPUs and M6 GPUs are supplied in graphics mode. However, your GPU might be in compute mode if it is an older Tesla M60 GPU or M6 GPU or if its mode has previously been changed.
To configure the mode of Tesla M60 and M6 GPUs, use the gpumodeswitch tool provided with NVIDIA vGPU software releases. If you are unsure which mode your GPU is in, use the gpumodeswitch tool to find out the mode.
Only Tesla M60 and M6 GPUs support the gpumodeswitch tool. Other GPUs that support NVIDIA vGPU do not support the gpumodeswitch tool and, except as stated in Switching the Mode of a GPU that Supports Multiple Display Modes, do not require mode switching.
Even in compute mode, Tesla M60 and M6 GPUs do not support NVIDIA Virtual Compute Server vGPU types. Furthermore, vCS is not supported on any GPU on Citrix Hypervisor.
For more information, refer to gpumodeswitch User Guide.
2.5. Installing and Configuring the NVIDIA Virtual GPU Manager for Citrix Hypervisor
The following topics step you through the process of setting up a single Citrix Hypervisor VM to use NVIDIA vGPU. After the process is complete, you can install the graphics driver for your guest OS and license any NVIDIA vGPU software licensed products that you are using.
These setup steps assume familiarity with the Citrix Hypervisor skills covered in Citrix Hypervisor Basics.
2.5.1. Installing and Updating the NVIDIA Virtual GPU Manager for Citrix Hypervisor
The NVIDIA Virtual GPU Manager runs in the Citrix Hypervisor dom0 domain. The NVIDIA Virtual GPU Manager for Citrix Hypervisor is supplied as an RPM file and as a Supplemental Pack.
NVIDIA Virtual GPU Manager and guest VM drivers must be compatible. If you update vGPU Manager to a release that is incompatible with the guest VM drivers, guest VMs will boot with vGPU disabled until their guest vGPU driver is updated to a compatible version. Consult Virtual GPU Software for Citrix Hypervisor Release Notes for further details.
2.5.1.1. Installing the RPM package for Citrix Hypervisor
The RPM file must be copied to the Citrix Hypervisor dom0 domain prior to installation (see Copying files to dom0).
- Use the rpm command to install the package:
            [root@xenserver ~]# rpm -iv NVIDIA-vGPU-NVIDIA-vGPU-CitrixHypervisor-8.2-510.108.03.x86_64.rpm
Preparing packages for installation...
NVIDIA-vGPU-NVIDIA-vGPU-CitrixHypervisor-8.2-510.108.03
[root@xenserver ~]#
- Reboot the Citrix Hypervisor platform:
            [root@xenserver ~]# shutdown –r now

Broadcast message from root (pts/1) (Fri Dec 23 14:24:11 2022):

The system is going down for reboot NOW!
[root@xenserver ~]#
2.5.1.2. Updating the RPM Package for Citrix Hypervisor
If an existing NVIDIA Virtual GPU Manager is already installed on the system and you want to upgrade, follow these steps:
- Shut down any VMs that are using NVIDIA vGPU.
- Install the new package using the –U option to the rpm command, to upgrade from the previously installed package:
            [root@xenserver ~]# rpm -Uv NVIDIA-vGPU-NVIDIA-vGPU-CitrixHypervisor-8.2-510.108.03.x86_64.rpm
Preparing packages for installation...
NVIDIA-vGPU-NVIDIA-vGPU-CitrixHypervisor-8.2-510.108.03
[root@xenserver ~]#
Note:You can query the version of the current NVIDIA Virtual GPU Manager package using the rpm –q command:
            [root@xenserver ~]# rpm –q NVIDIA-vGPU-NVIDIA-vGPU-CitrixHypervisor-8.2-510.108.03
[root@xenserver ~]#
If an existing NVIDIA GRID package is already installed and you don’t select the upgrade (-U) option when installing a newer GRID package, the rpm command will return many conflict errors.
Preparing packages for installation...
        file /usr/bin/nvidia-smi from install of NVIDIA-vGPU-NVIDIA-vGPU-CitrixHypervisor-8.2-510.108.03.x86_64 conflicts with file from package NVIDIA-vGPU-xenserver-8.2-510.85.02.x86_64
        file /usr/lib/libnvidia-ml.so from install of NVIDIA-vGPU-NVIDIA-vGPU-CitrixHypervisor-8.2-510.108.03.x86_64 conflicts with file from package NVIDIA-vGPU-xenserver-8.2-510.85.02.x86_64
        ...
- Reboot the Citrix Hypervisor platform:
            [root@xenserver ~]# shutdown –r now
Broadcast message from root (pts/1) (Fri Dec 23 14:24:11 2022):

The system is going down for reboot NOW!
[root@xenserver ~]#
2.5.1.3. Installing or Updating the Supplemental Pack for Citrix Hypervisor
XenCenter can be used to install or update Supplemental Packs on Citrix Hypervisor hosts. The NVIDIA Virtual GPU Manager supplemental pack is provided as an ISO.
- Select Install Update from the Tools menu.
- Click Next after going through the instructions on the Before You Start section.
- Click Select update or supplemental pack from disk on the Select Update section and open NVIDIA’s Citrix Hypervisor Supplemental Pack ISO.
Figure 6. NVIDIA vGPU Manager supplemental pack selected in XenCenter

- Click Next on the Select Update section.
- In the Select Servers section select all the Citrix Hypervisor hosts on which the Supplemental Pack should be installed on and click Next.
- Click Next on the Upload section once the Supplemental Pack has been uploaded to all the Citrix Hypervisor hosts.
- Click Next on the Prechecks section.
- Click Install Update on the Update Mode section.
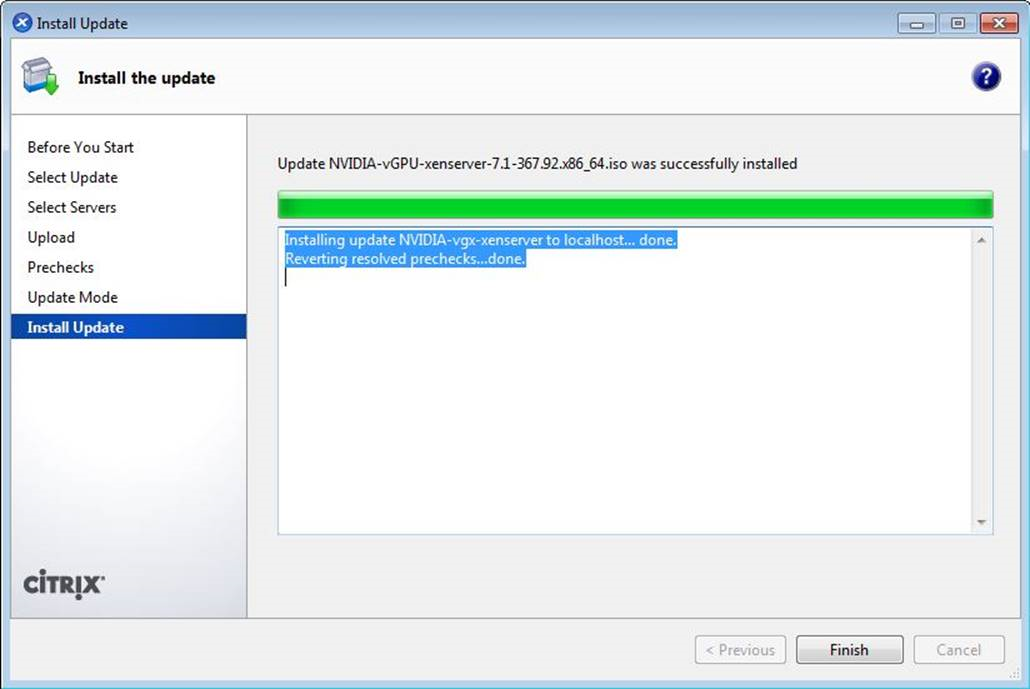
- Click Finish on the Install Update section.
Figure 7. Successful installation of NVIDIA vGPU Manager supplemental pack
2.5.1.4. Verifying the Installation of the NVIDIA vGPU Software for Citrix Hypervisor Package
After the Citrix Hypervisor platform has rebooted, verify the installation of the NVIDIA vGPU software package for Citrix Hypervisor.
- Verify that the NVIDIA vGPU software package is installed and loaded correctly by checking for the NVIDIA kernel driver in the list of kernel loaded modules.
            [root@xenserver ~]# lsmod | grep nvidia
nvidia               9522927  0
i2c_core               20294  2 nvidia,i2c_i801
[root@xenserver ~]#
- Verify that the NVIDIA kernel driver can successfully communicate with the NVIDIA physical GPUs in your system by running the nvidia-smi command. The nvidia-smi command is described in more detail in NVIDIA System Management Interface nvidia-smi.
Running the nvidia-smi command should produce a listing of the GPUs in your platform.
            [root@xenserver ~]# nvidia-smi
Fri Dec 23 18:46:50 2022
+------------------------------------------------------+
| NVIDIA-SMI 510.108.03   Driver Version: 510.108.03   |
|-------------------------------+----------------------+----------------------+
| GPU  Name        Persistence-M| Bus-Id        Disp.A | Volatile Uncorr. ECC |
| Fan  Temp  Perf  Pwr:Usage/Cap|         Memory-Usage | GPU-Util  Compute M. |
|===============================+======================+======================|
|   0  Tesla M60           On   | 00000000:05:00.0 Off |                  Off |
| N/A   25C    P8    24W / 150W |     13MiB /  8191MiB |      0%      Default |
+-------------------------------+----------------------+----------------------+
|   1  Tesla M60           On   | 00000000:06:00.0 Off |                  Off |
| N/A   24C    P8    24W / 150W |     13MiB /  8191MiB |      0%      Default |
+-------------------------------+----------------------+----------------------+
|   2  Tesla M60           On   | 00000000:86:00.0 Off |                  Off |
| N/A   25C    P8    25W / 150W |     13MiB /  8191MiB |      0%      Default |
+-------------------------------+----------------------+----------------------+
|   3  Tesla M60           On   | 00000000:87:00.0 Off |                  Off |
| N/A   28C    P8    24W / 150W |     13MiB /  8191MiB |      0%      Default |
+-------------------------------+----------------------+----------------------+

+-----------------------------------------------------------------------------+
| Processes:                                                       GPU Memory |
|  GPU       PID   Type   Process name                             Usage      |
|=============================================================================|
|  No running processes found                                                 |
+-----------------------------------------------------------------------------+

[root@xenserver ~]#
If nvidia-smi fails to run or doesn’t produce the expected output for all the NVIDIA GPUs in your system, see Troubleshooting for troubleshooting steps.
2.5.2. Configuring a Citrix Hypervisor VM with Virtual GPU
To support applications and workloads that are compute or graphics intensive, you can add multiple vGPUs to a single VM.
For details about which Citrix Hypervisor versions and NVIDIA vGPUs support the assignment of multiple vGPUs to a VM, see Virtual GPU Software for Citrix Hypervisor Release Notes.
Citrix Hypervisor supports configuration and management of virtual GPUs using XenCenter, or the xe command line tool that is run in a Citrix Hypervisor dom0 shell. Basic configuration using XenCenter is described in the following sections. Command line management using xe is described in Citrix Hypervisor vGPU Management.
If you are using Citrix Hypervisor 8.1 or later and need to assign plugin configuration parameters, create vGPUs using the xe command as explained in Creating a vGPU Using xe.
- Ensure the VM is powered off.
- Right-click the VM in XenCenter, select Properties to open the VM’s properties, and select the GPU property. The available GPU types are listed in the GPU type drop-down list:
Figure 8. Using Citrix XenCenter to configure a VM with a vGPU

After you have configured a Citrix Hypervisor VM with a vGPU, start the VM, either from XenCenter or by using xe vm-start in a dom0 shell. You can view the VM’s console in XenCenter.
After the VM has booted, install the NVIDIA vGPU software graphics driver as explained in Installing the NVIDIA vGPU Software Graphics Driver.
2.5.3. Setting vGPU Plugin Parameters on Citrix Hypervisor
Plugin parameters for a vGPU control the behavior of the vGPU, such as the frame rate limiter (FRL) configuration in frames per second or whether console virtual network computing (VNC) for the vGPU is enabled. The VM to which the vGPU is assigned is started with these parameters. If parameters are set for multiple vGPUs assigned to the same VM, the VM is started with the parameters assigned to each vGPU.
For each vGPU for which you want to set plugin parameters, perform this task in a command shell in the Citrix Hypervisor dom0 domain.
- Get the UUIDs of all VMs on the hypervisor host and use the output from the command to identify the VM to which the vGPU is assigned.
            [root@xenserver ~] xe vm-list
...
uuid ( RO)           : 7f6c855d-5635-2d57-9fbc-b1200172162f
     name-label ( RW): RHEL8.3
    power-state ( RO): running
...
- Get the UUIDs of all vGPUs on the hypervisor host and from the UUID of the VM to which the vGPU is assigned, determine the UUID of the vGPU.
            [root@xenserver ~] xe vgpu-list
...
uuid ( RO)              : d15083f8-5c59-7474-d0cb-fbc3f7284f1b
           vm-uuid ( RO): 7f6c855d-5635-2d57-9fbc-b1200172162f
            device ( RO): 0
    gpu-group-uuid ( RO): 3a2fbc36-827d-a078-0b2f-9e869ae6fd93
...
- Use the xe command to set each vGPU plugin parameter that you want to set.
[root@xenserver ~] xe vgpu-param-set uuid=vgpu-uuid extra_args='parameter=value'
- vgpu-uuid
- The UUID of the vGPU, which you obtained in the previous step.
- parameter
- The name of the vGPU plugin parameter that you want to set.
- value
- The value to which you want to set the vGPU plugin parameter.
This example sets the enable_uvm vGPU plugin parameter to 1 for the vGPU that has the UUID
d15083f8-5c59-7474-d0cb-fbc3f7284f1b. This parameter setting enables unified memory for the vGPU.[root@xenserver ~] xe vgpu-param-set uuid=d15083f8-5c59-7474-d0cb-fbc3f7284f1b extra_args='enable_uvm=1'
2.6. Installing the Virtual GPU Manager Package for Linux KVM
NVIDIA vGPU software for Linux Kernel-based Virtual Machine (KVM) (Linux KVM) is intended only for use with supported versions of Linux KVM hypervisors. For details about which Linux KVM hypervisor versions are supported, see Virtual GPU Software for Generic Linux with KVM Release Notes.
If you are using Red Hat Enterprise Linux KVM, follow the instructions in Installing and Configuring the NVIDIA Virtual GPU Manager for Red Hat Enterprise Linux KVM or RHV.
Before installing the Virtual GPU Manager package for Linux KVM, ensure that the following prerequisites are met:
-
The following packages are installed on the Linux KVM server:
- The
x86_64build of the GNU Compiler Collection (GCC) - Linux kernel headers
- The
-
The package file is copied to a directory in the file system of the Linux KVM server.
If the Nouveau driver for NVIDIA graphics cards is present, disable it before installing the package.
- Change to the directory on the Linux KVM server that contains the package file.
# cd package-file-directory
- package-file-directory
- The path to the directory that contains the package file.
- Make the package file executable.
# chmod +x package-file-name
- package-file-name
- The name of the file that contains the Virtual GPU Manager package for Linux KVM, for example NVIDIA-Linux-x86_64-390.42-vgpu-kvm.run.
- Run the package file as the root user.
# sudo sh./package-file-name
- Accept the license agreement to continue with the installation.
- When installation has completed, select OK to exit the installer.
- Reboot the Linux KVM server.
# systemctl reboot
2.7. Installing and Configuring the NVIDIA Virtual GPU Manager for Red Hat Enterprise Linux KVM or RHV
The following topics step you through the process of setting up a single Red Hat Enterprise Linux Kernel-based Virtual Machine (KVM) or Red Hat Virtualization (RHV) VM to use NVIDIA vGPU.
Red Hat Enterprise Linux KVM and RHV use the same Virtual GPU Manager package, but are configured with NVIDIA vGPU in different ways.
Output from the VM console is not available for VMs that are running vGPU. Make sure that you have installed an alternate means of accessing the VM (such as a VNC server) before you configure vGPU.
For RHV, follow this sequence of instructions:
- Installing the NVIDIA Virtual GPU Manager for Red Hat Enterprise Linux KVM or RHV
- MIG-backed vGPUs only: Configuring a GPU for MIG-Backed vGPUs
- Adding a vGPU to a Red Hat Virtualization (RHV) VM
For Red Hat Enterprise Linux KVM, follow this sequence of instructions:
- Installing the NVIDIA Virtual GPU Manager for Red Hat Enterprise Linux KVM or RHV
- MIG-backed vGPUs only: Configuring a GPU for MIG-Backed vGPUs
- Getting the BDF and Domain of a GPU on a Linux with KVM Hypervisor
- Creating an NVIDIA vGPU on a Linux with KVM Hypervisor
- Adding One or More vGPUs to a Linux with KVM Hypervisor VM
- Setting vGPU Plugin Parameters on a Linux with KVM Hypervisor
After the process is complete, you can install the graphics driver for your guest OS and license any NVIDIA vGPU software licensed products that you are using.
If you are using a generic Linux KVM hypervisor, follow the instructions in Installing the Virtual GPU Manager Package for Linux KVM.
2.7.1. Installing the NVIDIA Virtual GPU Manager for Red Hat Enterprise Linux KVM or RHV
The NVIDIA Virtual GPU Manager for Red Hat Enterprise Linux KVM and Red Hat Virtualization (RHV) is provided as a .rpm file.
NVIDIA Virtual GPU Manager and guest VM drivers must be compatible. If you update vGPU Manager to a release that is incompatible with the guest VM drivers, guest VMs will boot with vGPU disabled until their guest vGPU driver is updated to a compatible version. Consult Virtual GPU Software for Red Hat Enterprise Linux with KVM Release Notes for further details.
2.7.1.1. Installing the Virtual GPU Manager Package for Red Hat Enterprise Linux KVM or RHV
Before installing the RPM package for Red Hat Enterprise Linux KVM or RHV, ensure that the sshd service on the Red Hat Enterprise Linux KVM or RHV server is configured to permit root login. If the Nouveau driver for NVIDIA graphics cards is present, disable it before installing the package. For instructions, see How to disable the Nouveau driver and install the Nvidia driver in RHEL 7 (Red Hat subscription required).
Some versions of Red Hat Enterprise Linux KVM have z-stream updates that break Kernel Application Binary Interface (kABI) compatibility with the previous kernel or the GA kernel. For these versions of Red Hat Enterprise Linux KVM, the following Virtual GPU Manager RPM packages are supplied:
- A package for the GA Linux KVM kernel
- A package for the updated z-stream kernel
To differentiate these packages, the name of each RPM package includes the kernel version. Ensure that you install the RPM package that is compatible with your Linux KVM kernel version.
- Securely copy the RPM file from the system where you downloaded the file to the Red Hat Enterprise Linux KVM or RHV server.
- From a Windows system, use a secure copy client such as WinSCP.
- From a Linux system, use the scp command.
- Use secure shell (SSH) to log in as root to the Red Hat Enterprise Linux KVM or RHV server.
# ssh root@kvm-server
- kvm-server
- The host name or IP address of the Red Hat Enterprise Linux KVM or RHV server.
- Change to the directory on the Red Hat Enterprise Linux KVM or RHV server to which you copied the RPM file.
# cd rpm-file-directory
- rpm-file-directory
- The path to the directory to which you copied the RPM file.
- Use the rpm command to install the package.
            # rpm -iv NVIDIA-vGPU-rhel-8.4-510.108.03.x86_64.rpm
Preparing packages for installation...
NVIDIA-vGPU-rhel-8.4-510.108.03
#
- Reboot the Red Hat Enterprise Linux KVM or RHV server.
# systemctl reboot
2.7.1.2. Verifying the Installation of the NVIDIA vGPU Software for Red Hat Enterprise Linux KVM or RHV
After the Red Hat Enterprise Linux KVM or RHV server has rebooted, verify the installation of the NVIDIA vGPU software package for Red Hat Enterprise Linux KVM or RHV.
- Verify that the NVIDIA vGPU software package is installed and loaded correctly by checking for the VFIO drivers in the list of kernel loaded modules.
            # lsmod | grep vfio
nvidia_vgpu_vfio       27099  0
nvidia              12316924  1 nvidia_vgpu_vfio
vfio_mdev              12841  0
mdev                   20414  2 vfio_mdev,nvidia_vgpu_vfio
vfio_iommu_type1       22342  0
vfio                   32331  3 vfio_mdev,nvidia_vgpu_vfio,vfio_iommu_type1
#
- Verify that the libvirtd service is active and running.
# service libvirtd status
- Verify that the NVIDIA kernel driver can successfully communicate with the NVIDIA physical GPUs in your system by running the nvidia-smi command. The nvidia-smi command is described in more detail in NVIDIA System Management Interface nvidia-smi.
Running the nvidia-smi command should produce a listing of the GPUs in your platform.
            # nvidia-smi
Fri Dec 23 18:46:50 2022
+------------------------------------------------------+
| NVIDIA-SMI 510.108.03   Driver Version: 510.108.03   |
|-------------------------------+----------------------+----------------------+
| GPU  Name        Persistence-M| Bus-Id        Disp.A | Volatile Uncorr. ECC |
| Fan  Temp  Perf  Pwr:Usage/Cap|         Memory-Usage | GPU-Util  Compute M. |
|===============================+======================+======================|
|   0  Tesla M60           On   | 0000:85:00.0     Off |                  Off |
| N/A   23C    P8    23W / 150W |     13MiB /  8191MiB |      0%      Default |
+-------------------------------+----------------------+----------------------+
|   1  Tesla M60           On   | 0000:86:00.0     Off |                  Off |
| N/A   29C    P8    23W / 150W |     13MiB /  8191MiB |      0%      Default |
+-------------------------------+----------------------+----------------------+
|   2  Tesla P40           On   | 0000:87:00.0     Off |                  Off |
| N/A   21C    P8    18W / 250W |     53MiB / 24575MiB |      0%      Default |
+-------------------------------+----------------------+----------------------+
+-----------------------------------------------------------------------------+
| Processes:                                                       GPU Memory |
|  GPU       PID  Type  Process name                               Usage      |
|=============================================================================|
|  No running processes found                                                 |
+-----------------------------------------------------------------------------+
#
If nvidia-smi fails to run or doesn’t produce the expected output for all the NVIDIA GPUs in your system, see Troubleshooting for troubleshooting steps.
2.7.2. Adding a vGPU to a Red Hat Virtualization (RHV) VM
Ensure that the VM to which you want to add the vGPU is shut down.
- Determine the mediated device type (
mdev_type) identifiers of the vGPU types available on the RHV host.# vdsm-client Host hostdevListByCaps ... "mdev": { "nvidia-155": { "name": "GRID M10-2B", "available_instances": "4" }, "nvidia-36": { "name": "GRID M10-0Q", "available_instances": "16" }, ...
mdev_typeidentifiers of the following vGPU types:- For the
GRID M10-2BvGPU type, themdev_typeidentifier isnvidia-155. - For the
GRID M10-0QvGPU type, themdev_typeidentifier isnvidia-36.
- For the
- Note the
mdev_typeidentifier of the vGPU type that you want to add. - Log in to the RHV Administration Portal.
- From the Main Navigation Menu, choose Compute > Virtual Machines > virtual-machine-name.
- virtual-machine-name
- The name of the virtual machine to which you want to add the vGPU.
- Click Edit.
- In the Edit Virtual Machine window that opens, click Show Advanced Options and in the list of options, select Custom Properties.
- From the drop-down list, select mdev_type.
- In the text field, type the
mdev_typeidentifier of the vGPU type that you want to add and click OK.
After adding a vGPU to an RHV VM, start the VM.
After the VM has booted, install the NVIDIA vGPU software graphics driver as explained in Installing the NVIDIA vGPU Software Graphics Driver.
2.8. Installing and Configuring the NVIDIA Virtual GPU Manager for Ubuntu
Follow this sequence of instructions to set up a single Ubuntu VM to use NVIDIA vGPU.
- Installing the NVIDIA Virtual GPU Manager for Ubuntu
- MIG-backed vGPUs only: Configuring a GPU for MIG-Backed vGPUs
- Getting the BDF and Domain of a GPU on a Linux with KVM Hypervisor
- Creating an NVIDIA vGPU on a Linux with KVM Hypervisor
- Adding One or More vGPUs to a Linux with KVM Hypervisor VM
- Setting vGPU Plugin Parameters on a Linux with KVM Hypervisor
Output from the VM console is not available for VMs that are running vGPU. Make sure that you have installed an alternate means of accessing the VM (such as a VNC server) before you configure vGPU.
After the process is complete, you can install the graphics driver for your guest OS and license any NVIDIA vGPU software licensed products that you are using.
2.8.1. Installing the NVIDIA Virtual GPU Manager for Ubuntu
The NVIDIA Virtual GPU Manager for Ubuntu is provided as a Debian package (.deb) file.
NVIDIA Virtual GPU Manager and guest VM drivers must be compatible. If you update vGPU Manager to a release that is incompatible with the guest VM drivers, guest VMs will boot with vGPU disabled until their guest vGPU driver is updated to a compatible version. Consult Virtual GPU Software for Ubuntu Release Notes for further details.
2.8.1.1. Installing the Virtual GPU Manager Package for Ubuntu
Before installing the Debian package for Ubuntu, ensure that the sshd service on the Ubuntu server is configured to permit root login. If the Nouveau driver for NVIDIA graphics cards is present, disable it before installing the package.
- Securely copy the Debian package file from the system where you downloaded the file to the Ubuntu server.
- From a Windows system, use a secure copy client such as WinSCP.
- From a Linux system, use the scp command.
- Use secure shell (SSH) to log in as root to the Ubuntu server.
# ssh root@ubuntu-server
- ubuntu-server
- The host name or IP address of the Ubuntu server.
- Change to the directory on the Ubuntu server to which you copied the Debian package file.
# cd deb-file-directory
- deb-file-directory
- The path to the directory to which you copied the Debian package file.
- Use the apt command to install the package.
# apt install ./nvidia-vgpu-ubuntu-510_510.108.03_amd64.deb
- Reboot the Ubuntu server.
# systemctl reboot
2.8.1.2. Verifying the Installation of the NVIDIA vGPU Software for Ubuntu
After the Ubuntu server has rebooted, verify the installation of the NVIDIA vGPU software package for Red Hat Enterprise Linux KVM or RHV.
- Verify that the NVIDIA vGPU software package is installed and loaded correctly by checking for the VFIO drivers in the list of kernel loaded modules.
            # lsmod | grep vfio
nvidia_vgpu_vfio       27099  0
nvidia              12316924  1 nvidia_vgpu_vfio
vfio_mdev              12841  0
mdev                   20414  2 vfio_mdev,nvidia_vgpu_vfio
vfio_iommu_type1       22342  0
vfio                   32331  3 vfio_mdev,nvidia_vgpu_vfio,vfio_iommu_type1
#
- Verify that the libvirtd service is active and running.
# service libvirtd status
- Verify that the NVIDIA kernel driver can successfully communicate with the NVIDIA physical GPUs in your system by running the nvidia-smi command. The nvidia-smi command is described in more detail in NVIDIA System Management Interface nvidia-smi.
Running the nvidia-smi command should produce a listing of the GPUs in your platform.
            # nvidia-smi
Fri Dec 23 18:46:50 2022
+------------------------------------------------------+
| NVIDIA-SMI 510.108.03   Driver Version: 510.108.03   |
|-------------------------------+----------------------+----------------------+
| GPU  Name        Persistence-M| Bus-Id        Disp.A | Volatile Uncorr. ECC |
| Fan  Temp  Perf  Pwr:Usage/Cap|         Memory-Usage | GPU-Util  Compute M. |
|===============================+======================+======================|
|   0  Tesla M60           On   | 0000:85:00.0     Off |                  Off |
| N/A   23C    P8    23W / 150W |     13MiB /  8191MiB |      0%      Default |
+-------------------------------+----------------------+----------------------+
|   1  Tesla M60           On   | 0000:86:00.0     Off |                  Off |
| N/A   29C    P8    23W / 150W |     13MiB /  8191MiB |      0%      Default |
+-------------------------------+----------------------+----------------------+
|   2  Tesla P40           On   | 0000:87:00.0     Off |                  Off |
| N/A   21C    P8    18W / 250W |     53MiB / 24575MiB |      0%      Default |
+-------------------------------+----------------------+----------------------+
+-----------------------------------------------------------------------------+
| Processes:                                                       GPU Memory |
|  GPU       PID  Type  Process name                               Usage      |
|=============================================================================|
|  No running processes found                                                 |
+-----------------------------------------------------------------------------+
#
If nvidia-smi fails to run or doesn’t produce the expected output for all the NVIDIA GPUs in your system, see Troubleshooting for troubleshooting steps.
2.9. Installing and Configuring the NVIDIA Virtual GPU Manager for VMware vSphere
You can use the NVIDIA Virtual GPU Manager for VMware vSphere to set up a VMware vSphere VM to use NVIDIA vGPU or VMware vSGA. The vGPU Manager vSphere Installation Bundles (VIBs) for VMware vSphere 6.5 and later provide vSGA and vGPU functionality in a single VIB. For VMware vSphere 6.0, vSGA and vGPU functionality are provided in separate vGPU Manager VIBs.
Some servers, for example, the Dell R740, do not configure SR-IOV capability if the SR-IOV SBIOS setting is disabled on the server. If you are using the Tesla T4 GPU with VMware vSphere on such a server, you must ensure that the SR-IOV SBIOS setting is enabled on the server.
However, with any server hardware, do not enable SR-IOV in VMware vCenter Server for the Tesla T4 GPU. If SR-IOV is enabled in VMware vCenter Server for T4, VMware vCenter Server lists the status of the GPU as needing a reboot. You can ignore this status message.
NVIDIA vGPU Instructions
As of VMware vSphere 7.0 Update 1, the Xorg service is no longer required for graphics devices in NVIDIA vGPU mode. For more information, see Installing and Updating the NVIDIA Virtual GPU Manager for vSphere.
For NVIDIA vGPU, follow this sequence of instructions:
- Installing and Updating the NVIDIA Virtual GPU Manager for vSphere
- Configuring VMware vMotion with vGPU for VMware vSphere
- Changing the Default Graphics Type in VMware vSphere 6.5 and Later
- MIG-backed vGPUs only: Configuring a GPU for MIG-Backed vGPUs
- Configuring a vSphere VM with NVIDIA vGPU
- Optional: Setting vGPU Plugin Parameters on VMware vSphere
After configuring a vSphere VM to use NVIDIA vGPU, you can install the NVIDIA vGPU software graphics driver for your guest OS and license any NVIDIA vGPU software licensed products that you are using.
VMware vSGA Instructions
For VMware vSGA, follow this sequence of instructions:
- Installing and Updating the NVIDIA Virtual GPU Manager for vSphere
- Configuring a vSphere VM with VMware vSGA
Installation of the NVIDIA vGPU software graphics driver for the guest OS is not required for vSGA.
Requirements for Configuring NVIDIA vGPU in a DRS Cluster
You can configure a VM with NVIDIA vGPU on an ESXi host in a VMware Distributed Resource Scheduler (DRS) cluster. However, you must ensure that the automation level of the cluster supports VMs configured with NVIDIA vGPU:
- For any supported VMware vSphere release, set the automation level to Manual.
- For VMware vSphere 6.7 Update 1 or later, set the automation level to Partially Automated or Manual.
For more information about these settings, see Edit Cluster Settings in the VMware documentation.
2.9.1. Installing and Updating the NVIDIA Virtual GPU Manager for vSphere
The NVIDIA Virtual GPU Manager runs on the ESXi host. How the NVIDIA Virtual GPU Manager package is distributed depends on the release of VMware vSphere.
-
For all supported VMware vSphere releases, the NVIDIA Virtual GPU Manager package is distributed as a software component in a ZIP archive, which you can install in one of the following ways:
- By copying the software component to the ESXi host and then installing it as explained in Installing the NVIDIA Virtual GPU Manager Package for vSphere
- By importing the software component manually as explained in Import Patches Manually in the VMware vSphere documentation
- For supported releases before VMware vSphere 7.0, the NVIDIA Virtual GPU Manager package is also distributed as a vSphere Installation Bundle (VIB) file, which you must copy to the ESXi host and then install as explained in Installing the NVIDIA Virtual GPU Manager Package for vSphere.
NVIDIA Virtual GPU Manager and guest VM drivers must be compatible. If you update vGPU Manager to a release that is incompatible with the guest VM drivers, guest VMs will boot with vGPU disabled until their guest vGPU driver is updated to a compatible version. Consult Virtual GPU Software for VMware vSphere Release Notes for further details.
2.9.1.1. Installing the NVIDIA Virtual GPU Manager Package for vSphere
To install the vGPU Manager package you need to access the ESXi host via the ESXi Shell or SSH. Refer to VMware’s documentation on how to enable ESXi Shell or SSH for an ESXi host.
Before you begin, ensure that the following prerequisites are met:
- The ZIP archive that contains NVIDIA vGPU software has been downloaded from the NVIDIA Licensing Portal.
- The NVIDIA Virtual GPU Manager package has been extracted from the downloaded ZIP archive.
- Copy the NVIDIA Virtual GPU Manager package file to the ESXi host.
- Put the ESXi host into maintenance mode.
$ esxcli system maintenanceMode set –-enable true
- Use the esxcli command to install the vGPU Manager package. For more information about the esxcli command, see esxcli software Commands in the VMware vSphere documentation.
-
For a software component, run the following command:
[root@esxi:~] esxcli software vib install -d /vmfs/volumes/datastore/software-component.zip
- datastore
- The name of the VMFS datastore to which you copied the software component.
- software-component
- The name of the file that contains the NVIDIA Virtual GPU Manager package in the form of a software component. Ensure that you specify the file that was extracted from the downloaded ZIP archive. For example, for VMware vSphere 7.0, software-component is NVD.NVIDIA_bootbank_NVIDIA-VMware_510.108.03-1OEM.700.0.0.8169922-offline_bundle-build-number.
-
For a VIB file, run the following command:
            [root@esxi:~] esxcli software vib install -v directory/NVIDIA-vGPU-VMware_ESXi_7.0_Host_Driver_510.108.03-1OEM.700.0.0.8169922.vib
Installation Result
   Message: Operation finished successfully.
   Reboot Required: false
   VIBs Installed: NVIDIA-vGPU-VMware_ESXi_7.0_Host_Driver_510.108.03-1OEM.700.0.0.8169922
   VIBs Removed:
   VIBs Skipped:
- directory
- The absolute path to the directory to which you copied the VIB file. You must specify the absolute path even if the VIB file is in the current working directory.
-
- Exit maintenance mode.
$ esxcli system maintenanceMode set –-enable false
- Reboot the ESXi host.
$ reboot
2.9.1.2. Updating the NVIDIA Virtual GPU Manager Package for vSphere
Update the vGPU Manager VIB package if you want to install a new version of NVIDIA Virtual GPU Manager on a system where an existing version is already installed.
Do not perform this task on a system where an existing version isn't already installed. If you perform this task on a system where an existing version isn't already installed, the Xorg service (when required) fails to start after the NVIDIA vGPU software driver is installed. Instead, install the vGPU Manager VIB package as explained in Installing the NVIDIA Virtual GPU Manager Package for vSphere.
To update the vGPU Manager VIB you need to access the ESXi host via the ESXi Shell or SSH. Refer to VMware’s documentation on how to enable ESXi Shell or SSH for an ESXi host.
Before proceeding with the vGPU Manager update, make sure that all VMs are powered off and the ESXi host is placed in maintenance mode. Refer to VMware’s documentation on how to place an ESXi host in maintenance mode
- Use the esxcli command to update the vGPU Manager package:
            [root@esxi:~] esxcli software vib update -v directory/NVIDIA-vGPU-VMware_ESXi_7.0_Host_Driver_510.108.03-1OEM.700.0.0.8169922.vib

Installation Result
   Message: Operation finished successfully.
   Reboot Required: false
   VIBs Installed: NVIDIA-vGPU-VMware_ESXi_7.0_Host_Driver_510.108.03-1OEM.700.0.0.8169922
   VIBs Removed: NVIDIA-vGPU-VMware_ESXi_7.0_Host_Driver_510.85.02-1OEM.700.0.0.8169922
   VIBs Skipped:
directory is the path to the directory that contains the VIB file.
- Reboot the ESXi host and remove it from maintenance mode.
2.9.1.3. Verifying the Installation of the NVIDIA vGPU Software Package for vSphere
After the ESXi host has rebooted, verify the installation of the NVIDIA vGPU software package for vSphere.
- Verify that the NVIDIA vGPU software package installed and loaded correctly by checking for the NVIDIA kernel driver in the list of kernel loaded modules.
            [root@esxi:~] vmkload_mod -l | grep nvidia
nvidia                   5    8420
- If the NVIDIA driver is not listed in the output, check dmesg for any load-time errors reported by the driver.
- Verify that the NVIDIA kernel driver can successfully communicate with the NVIDIA physical GPUs in your system by running the nvidia-smi command. The nvidia-smi command is described in more detail in NVIDIA System Management Interface nvidia-smi.
Running the nvidia-smi command should produce a listing of the GPUs in your platform.
            [root@esxi:~] nvidia-smi
Fri Dec 23 17:56:22 2022
+------------------------------------------------------+
| NVIDIA-SMI 510.108.03   Driver Version: 510.108.03   |
|-------------------------------+----------------------+----------------------+
| GPU  Name        Persistence-M| Bus-Id        Disp.A | Volatile Uncorr. ECC |
| Fan  Temp  Perf  Pwr:Usage/Cap|         Memory-Usage | GPU-Util  Compute M. |
|===============================+======================+======================|
|   0  Tesla M60           On   | 00000000:05:00.0 Off |                  Off |
| N/A   25C    P8    24W / 150W |     13MiB /  8191MiB |      0%      Default |
+-------------------------------+----------------------+----------------------+
|   1  Tesla M60           On   | 00000000:06:00.0 Off |                  Off |
| N/A   24C    P8    24W / 150W |     13MiB /  8191MiB |      0%      Default |
+-------------------------------+----------------------+----------------------+
|   2  Tesla M60           On   | 00000000:86:00.0 Off |                  Off |
| N/A   25C    P8    25W / 150W |     13MiB /  8191MiB |      0%      Default |
+-------------------------------+----------------------+----------------------+
|   3  Tesla M60           On   | 00000000:87:00.0 Off |                  Off |
| N/A   28C    P8    24W / 150W |     13MiB /  8191MiB |      0%      Default |
+-------------------------------+----------------------+----------------------+

+-----------------------------------------------------------------------------+
| Processes:                                                       GPU Memory |
|  GPU       PID   Type   Process name                             Usage      |
|=============================================================================|
|  No running processes found                                                 |
+-----------------------------------------------------------------------------+
If nvidia-smi fails to report the expected output for all the NVIDIA GPUs in your system, see Troubleshooting for troubleshooting steps.
2.9.2. Configuring VMware vMotion with vGPU for VMware vSphere
NVIDIA vGPU software supports vGPU migration, which includes VMware vMotion and suspend-resume, for VMs that are configured with vGPU. To enable VMware vMotion with vGPU, an advanced vCenter Server setting must be enabled. However, suspend-resume for VMs that are configured with vGPU is enabled by default.
For details about which VMware vSphere versions, NVIDIA GPUs, and guest OS releases support vGPU migration, see Virtual GPU Software for VMware vSphere Release Notes.
Before configuring VMware vMotion with vGPU for an ESXi host, ensure that the current NVIDIA Virtual GPU Manager for VMware vSphere package is installed on the host.
- Log in to vCenter Server by using the vSphere Web Client.
- In the Hosts and Clusters view, select the vCenter Server instance.
Note:
Ensure that you select the vCenter Server instance, not the vCenter Server VM.
- Click the Configure tab.
- In the Settings section, select Advanced Settings and click Edit.
- In the Edit Advanced vCenter Server Settings window that opens, type vGPU in the search field.
- When the vgpu.hotmigrate.enabled setting appears, set the Enabled option and click OK.

2.9.3. Changing the Default Graphics Type in VMware vSphere 6.5 and Later
The vGPU Manager VIBs for VMware vSphere 6.5 and later provide vSGA and vGPU functionality in a single VIB. After this VIB is installed, the default graphics type is Shared, which provides vSGA functionality. To enable vGPU support for VMs in VMware vSphere 6.5, you must change the default graphics type to Shared Direct. If you do not change the default graphics type, VMs to which a vGPU is assigned fail to start and the following error message is displayed:
The amount of graphics resource available in the parent resource pool is insufficient for the operation.
If you are using a supported version of VMware vSphere earlier than 6.5, or are configuring a VM to use vSGA, omit this task.
Change the default graphics type before configuring vGPU. Output from the VM console in the VMware vSphere Web Client is not available for VMs that are running vGPU.
Before changing the default graphics type, ensure that the ESXi host is running and that all VMs on the host are powered off.
- Log in to vCenter Server by using the vSphere Web Client.
- In the navigation tree, select your ESXi host and click the Configure tab.
- From the menu, choose Graphics and then click the Host Graphics tab.
- On the Host Graphics tab, click Edit.
Figure 9. Shared default graphics type

- In the Edit Host Graphics Settings dialog box that opens, select Shared Direct and click OK.
Figure 10. Host graphics settings for vGPU
 Note:
Note:In this dialog box, you can also change the allocation scheme for vGPU-enabled VMs. For more information, see Modifying GPU Allocation Policy on VMware vSphere.
After you click OK, the default graphics type changes to Shared Direct.
- Click the Graphics Devices tab to verify the configured type of each physical GPU on which you want to configure vGPU. The configured type of each physical GPU must be Shared Direct. For any physical GPU for which the configured type is Shared, change the configured type as follows:
- On the Graphics Devices tab, select the physical GPU and click the Edit icon.
Figure 11. Shared graphics type

- In the Edit Graphics Device Settings dialog box that opens, select Shared Direct and click OK.
Figure 12. Graphics device settings for a physical GPU

- On the Graphics Devices tab, select the physical GPU and click the Edit icon.
- Restart the ESXi host or stop and restart the Xorg service if necessary and nv-hostengine on the ESXi host.
To stop and restart the Xorg service and nv-hostengine, perform these steps:
- VMware vSphere releases before 7.0 Update 1 only: Stop the Xorg service.
As of VMware vSphere 7.0 Update 1, the Xorg service is no longer required for graphics devices in NVIDIA vGPU mode.
- Stop nv-hostengine.
[root@esxi:~] nv-hostengine -t
- Wait for 1 second to allow nv-hostengine to stop.
- Start nv-hostengine.
[root@esxi:~] nv-hostengine -d
- VMware vSphere releases before 7.0 Update 1 only: Start the Xorg service.
As of VMware vSphere 7.0 Update 1, the Xorg service is no longer required for graphics devices in NVIDIA vGPU mode.
[root@esxi:~] /etc/init.d/xorg start
- VMware vSphere releases before 7.0 Update 1 only: Stop the Xorg service.
- In the Graphics Devices tab of the VMware vCenter Web UI, confirm that the active type and the configured type of each physical GPU are Shared Direct.
Figure 13. Shared direct graphics type

After changing the default graphics type, configure vGPU as explained in Configuring a vSphere VM with NVIDIA vGPU.
See also the following topics in the VMware vSphere documentation:
2.9.4. Configuring a vSphere VM with NVIDIA vGPU
To support applications and workloads that are compute or graphics intensive, you can add multiple vGPUs to a single VM.
For details about which VMware vSphere versions and NVIDIA vGPUs support the assignment of multiple vGPUs to a VM, see Virtual GPU Software for VMware vSphere Release Notes.
If you upgraded to VMware vSphere 6.7 Update 3 from an earlier version and are using VMs that were created with that version, change the VM compatibility to vSphere 6.7 Update 2 and later. For details, see Virtual Machine Compatibility in the VMware documentation.
If you are adding multiple vGPUs to a single VM, perform this task for each vGPU that you want to add to the VM.
Output from the VM console in the VMware vSphere Web Client is not available for VMs that are running vGPU. Make sure that you have installed an alternate means of accessing the VM (such as VMware Horizon or a VNC server) before you configure vGPU.
VM console in vSphere Web Client will become active again once the vGPU parameters are removed from the VM’s configuration.
If you are configuring a VM to use VMware vSGA, omit this task.
- Open the vCenter Web UI.
- In the vCenter Web UI, right-click the VM and choose Edit Settings.
- Click the Virtual Hardware tab.
- In the New device list, select Shared PCI Device and click Add. The PCI device field should be auto-populated with NVIDIA GRID vGPU.
Figure 14. VM settings for vGPU

- From the GPU Profile drop-down menu, choose the type of vGPU you want to configure and click OK.
Note:
VMware vSphere does not support vCS. Therefore, C-series vGPU types are not available for selection from the GPU Profile drop-down menu.
- Ensure that VMs running vGPU have all their memory reserved:
- Select Edit virtual machine settings from the vCenter Web UI.
- Expand the Memory section and click Reserve all guest memory (All locked).
After you have configured a vSphere VM with a vGPU, start the VM. VM console in vSphere Web Client is not supported in this vGPU release. Therefore, use VMware Horizon or VNC to access the VM’s desktop.
After the VM has booted, install the NVIDIA vGPU software graphics driver as explained in Installing the NVIDIA vGPU Software Graphics Driver.
2.9.5. Setting vGPU Plugin Parameters on VMware vSphere
Plugin parameters for a vGPU control the behavior of the vGPU, such as the frame rate limiter (FRL) configuration in frames per second or whether console virtual network computing (VNC) for the vGPU is enabled. The VM to which the vGPU is assigned is started with these parameters. If parameters are set for multiple vGPUs assigned to the same VM, the VM is started with the parameters assigned to each vGPU.
Ensure that the VM to which the vGPU is assigned is powered off.
For each vGPU for which you want to set plugin parameters, perform this task in the vSphere Client. vGPU plugin parameters are PCI pass through configuration parameters in advanced VM attributes.
- In the vSphere Client, browse to the VM to which the vGPU is assigned.
- Context-click the VM and choose Edit Settings.
- In the Edit Settings window, click the VM Options tab.
- From the Advanced drop-down list, select Edit Configuration.
- In the Configuration Parameters dialog box, click Add Row.
- In the Name field, type the parameter name pciPassthruvgpu-id.cfg.parameter, in the Value field type the parameter value, and click OK.
- vgpu-id
-
A positive integer that identifies the vGPU assigned to a VM. For the first vGPU assigned to a VM, vgpu-id is 0. For example, if two vGPUs are assigned to a VM and you are setting a plugin parameter for both vGPUs, set the following parameters:
- pciPassthru0.cfg.parameter
- pciPassthru1.cfg.parameter
- parameter
- The name of the vGPU plugin parameter that you want to set. For example, the name of the vGPU plugin parameter for enabling unified memory is enable_uvm.
To enable unified memory for two vGPUs that are assigned to a VM, set pciPassthru0.cfg.enable_uvm and pciPassthru1.cfg.enable_uvm to 1.
2.9.6. Configuring a vSphere VM with VMware vSGA
Virtual Shared Graphics Acceleration (vSGA) is a feature of VMware vSphere that enables multiple virtual machines to share the physical GPUs on ESXi hosts.
If you are configuring a VM to use NVIDIA vGPU, omit this task.
Before configuring a vSphere VM with vSGA, ensure that these prerequisites are met:
- VMware tools are installed on the VM.
- The VM is powered off.
- The NVIDIA Virtual GPU Manager package for vSphere is installed.
- Open the vCenter Web UI.
- In the vCenter Web UI, right-click the VM and choose Edit Settings.
- Click the Virtual Hardware tab.
- In the device list, expand the Video card node and set the following options:
- Select the Enable 3D support option.
- Set the 3D Renderer to Hardware.
For more information, see Configure 3D Graphics and Video Cards in the VMware Horizon documentation.
- Start the VM.
- After the VM has booted, verify that the VM has been configured correctly with vSGA.
- Under the Display Adapter section of Device Manager, confirm that VMware SVGA 3D is listed.
- Verify that the virtual machine is using the GPU card.
# gpuvm
The output from the command is similar to the following example for a VM named
samplevm1:Xserver unix:0, GPU maximum memory 4173824KB pid 21859, VM samplevm1, reserved 131072KB of GPU memory. GPU memory left 4042752KB.
The memory reserved for the VM and the GPU maximum memory depend on the GPU installed in the host and the 3D memory allocated to the virtual machine.
Installation of the NVIDIA vGPU software graphics driver for the guest OS is not required for vSGA.
2.10. Configuring the vGPU Manager for a Linux with KVM Hypervisor
NVIDIA vGPU software supports the following Linux with KVM hypervisors: Red Hat Enterprise Linux with KVM and Ubuntu.
2.10.1. Getting the BDF and Domain of a GPU on a Linux with KVM Hypervisor
Sometimes when configuring a physical GPU for use with NVIDIA vGPU software, you must find out which directory in the sysfs file system represents the GPU. This directory is identified by the domain, bus, slot, and function of the GPU.
For more information about the directory in the sysfs file system that represents a physical GPU, see NVIDIA vGPU Information in the sysfs File System.
- Obtain the PCI device bus/device/function (BDF) of the physical GPU.
# lspci | grep NVIDIA
The NVIDIA GPUs listed in this example have the PCI device BDFs
06:00.0and07:00.0.# lspci | grep NVIDIA 06:00.0 VGA compatible controller: NVIDIA Corporation GM204GL [Tesla M10] (rev a1) 07:00.0 VGA compatible controller: NVIDIA Corporation GM204GL [Tesla M10] (rev a1)
- Obtain the full identifier of the GPU from its PCI device BDF.
# virsh nodedev-list --cap pci| grep transformed-bdf
- transformed-bdf
-
The PCI device BDF of the GPU with the colon and the period replaced with underscores, for example,
06_00_0.
This example obtains the full identifier of the GPU with the PCI device BDF
06:00.0.# virsh nodedev-list --cap pci| grep 06_00_0 pci_0000_06_00_0
- Obtain the domain, bus, slot, and function of the GPU from the full identifier of the GPU.
virsh nodedev-dumpxml full-identifier| egrep 'domain|bus|slot|function'
- full-identifier
-
The full identifier of the GPU that you obtained in the previous step, for example,
pci_0000_06_00_0.
This example obtains the domain, bus, slot, and function of the GPU with the PCI device BDF
06:00.0.# virsh nodedev-dumpxml pci_0000_06_00_0| egrep 'domain|bus|slot|function' <domain>0x0000</domain> <bus>0x06</bus> <slot>0x00</slot> <function>0x0</function> <address domain='0x0000' bus='0x06' slot='0x00' function='0x0'/>
2.10.2. Creating an NVIDIA vGPU on a Linux with KVM Hypervisor
For each vGPU that you want to create, perform this task in a Linux command shell on the a Linux with KVM hypervisor host.
Before you begin, ensure that you have the domain, bus, slot, and function of the GPU on which you are creating the vGPU. For instructions, see Getting the BDF and Domain of a GPU on a Linux with KVM Hypervisor.
How to create an NVIDIA vGPU on a Linux with KVM hypervisor depends on whether the NVIDIA vGPU supports single root I/O virtualization (SR-IOV). For details, refer to:
- Creating a Legacy NVIDIA vGPU on a Linux with KVM Hypervisor
- Creating an NVIDIA vGPU that Supports SR-IOV on a Linux with KVM Hypervisor
2.10.2.1. Creating a Legacy NVIDIA vGPU on a Linux with KVM Hypervisor
A legacy NVIDIA vGPU does not support SR-IOV.
- Change to the mdev_supported_types directory for the physical GPU.
# cd /sys/class/mdev_bus/domain\:bus\:slot.function/mdev_supported_types/
- domain
- bus
- slot
- function
-
The domain, bus, slot, and function of the GPU, without the
0xprefix.
This example changes to the mdev_supported_types directory for the GPU with the domain
0000and PCI device BDF06:00.0.# cd /sys/bus/pci/devices/0000\:06\:00.0/mdev_supported_types/
- Find out which subdirectory of mdev_supported_types contains registration information for the vGPU type that you want to create.
# grep -l "vgpu-type" nvidia-*/name
- vgpu-type
-
The vGPU type, for example,
M10-2Q.
This example shows that the registration information for the M10-2Q vGPU type is contained in the nvidia-41 subdirectory of mdev_supported_types.
            # grep -l "M10-2Q" nvidia-*/name
nvidia-41/name
- Confirm that you can create an instance of the vGPU type on the physical GPU.
# cat subdirectory/available_instances
- subdirectory
-
The subdirectory that you found in the previous step, for example,
nvidia-41.
The number of available instances must be at least 1. If the number is 0, either an instance of another vGPU type already exists on the physical GPU, or the maximum number of allowed instances has already been created.
This example shows that four more instances of the M10-2Q vGPU type can be created on the physical GPU.
            # cat nvidia-41/available_instances
4
- Generate a correctly formatted universally unique identifier (UUID) for the vGPU.
            # uuidgen
aa618089-8b16-4d01-a136-25a0f3c73123
- Write the UUID that you obtained in the previous step to the create file in the registration information directory for the vGPU type that you want to create.
# echo "uuid"> subdirectory/create
- uuid
- The UUID that you generated in the previous step, which will become the UUID of the vGPU that you want to create.
- subdirectory
-
The registration information directory for the vGPU type that you want to create, for example,
nvidia-41.
This example creates an instance of the M10-2Q vGPU type with the UUID
aa618089-8b16-4d01-a136-25a0f3c73123.# echo "aa618089-8b16-4d01-a136-25a0f3c73123" > nvidia-41/create
An
mdevdevice file for the vGPU is added to the parent physical device directory of the vGPU. The vGPU is identified by its UUID.The /sys/bus/mdev/devices/ directory contains a symbolic link to the
mdevdevice file. - Make the
mdevdevice file that you created to represent the vGPU persistent.# mdevctl define --auto --uuid uuid
- uuid
- The UUID that you specified in the previous step for the vGPU that you are creating.
Note:Not all Linux with KVM hypervisor releases include the mdevctl command. If your release does not include the mdevctl command, you can use standard features of the operating system to automate the re-creation of this device file when the host is booted. For example, you can write a custom script that is executed when the host is rebooted.
- Confirm that the vGPU was created.
- Confirm that the /sys/bus/mdev/devices/ directory contains the
mdevdevice file for the vGPU.# ls -l /sys/bus/mdev/devices/ total 0 lrwxrwxrwx. 1 root root 0 Nov 24 13:33 aa618089-8b16-4d01-a136-25a0f3c73123 -> ../../../devices/pci0000:00/0000:00:03.0/0000:03:00.0/0000:04:09.0/0000:06:00.0/aa618089-8b16-4d01-a136-25a0f3c73123
- If your release includes the mdevctl command, list the active mediated devices on the hypervisor host.
            # mdevctl list
aa618089-8b16-4d01-a136-25a0f3c73123 0000:06:00.0 nvidia-41
- Confirm that the /sys/bus/mdev/devices/ directory contains the
2.10.2.2. Creating an NVIDIA vGPU that Supports SR-IOV on a Linux with KVM Hypervisor
An NVIDIA vGPU that supports SR-IOV resides on a physical GPU that supports SR-IOV, such as a GPU based on the NVIDIA Ampere architecture.
- Enable the virtual functions for the physical GPU in the sysfs file system.
Note:
- Before performing this step, ensure that the GPU is not being used by any other processes, such as CUDA applications, monitoring applications, or the nvidia-smi command.
- The virtual functions for the physical GPU in the sysfs file system are disabled after the hypervisor host is rebooted or if the driver is reloaded or upgraded.
Use only the custom script sriov-manage provided by NVIDIA vGPU software for this purpose. Do not try to enable the virtual function for the GPU by any other means.
# /usr/lib/nvidia/sriov-manage -e domain:bus:slot.function
- domain
- bus
- slot
- function
-
The domain, bus, slot, and function of the GPU, without the
0xprefix.
Note:Only one
mdevdevice file can be created on a virtual function.This example enables the virtual functions for the GPU with the domain
00, bus41, slot0000, and function0.# /usr/lib/nvidia/sriov-manage -e 00:41:0000.0
- Obtain the domain, bus, slot, and function of the available virtual functions on the GPU.
# ls -l /sys/bus/pci/devices/domain\:bus\:slot.function/ | grep virtfn
- domain
- bus
- slot
- function
-
The domain, bus, slot, and function of the GPU, without the
0xprefix.
This example shows the output of this command for a physical GPU with slot
00, bus41, domain0000, and function0.# ls -l /sys/bus/pci/devices/0000:41:00.0/ | grep virtfn lrwxrwxrwx. 1 root root 0 Jul 16 04:42 virtfn0 -> ../0000:41:00.4 lrwxrwxrwx. 1 root root 0 Jul 16 04:42 virtfn1 -> ../0000:41:00.5 lrwxrwxrwx. 1 root root 0 Jul 16 04:42 virtfn10 -> ../0000:41:01.6 lrwxrwxrwx. 1 root root 0 Jul 16 04:42 virtfn11 -> ../0000:41:01.7 lrwxrwxrwx. 1 root root 0 Jul 16 04:42 virtfn12 -> ../0000:41:02.0 lrwxrwxrwx. 1 root root 0 Jul 16 04:42 virtfn13 -> ../0000:41:02.1 lrwxrwxrwx. 1 root root 0 Jul 16 04:42 virtfn14 -> ../0000:41:02.2 lrwxrwxrwx. 1 root root 0 Jul 16 04:42 virtfn15 -> ../0000:41:02.3 lrwxrwxrwx. 1 root root 0 Jul 16 04:42 virtfn16 -> ../0000:41:02.4 lrwxrwxrwx. 1 root root 0 Jul 16 04:42 virtfn17 -> ../0000:41:02.5 lrwxrwxrwx. 1 root root 0 Jul 16 04:42 virtfn18 -> ../0000:41:02.6 lrwxrwxrwx. 1 root root 0 Jul 16 04:42 virtfn19 -> ../0000:41:02.7 lrwxrwxrwx. 1 root root 0 Jul 16 04:42 virtfn2 -> ../0000:41:00.6 lrwxrwxrwx. 1 root root 0 Jul 16 04:42 virtfn20 -> ../0000:41:03.0 lrwxrwxrwx. 1 root root 0 Jul 16 04:42 virtfn21 -> ../0000:41:03.1 lrwxrwxrwx. 1 root root 0 Jul 16 04:42 virtfn22 -> ../0000:41:03.2 lrwxrwxrwx. 1 root root 0 Jul 16 04:42 virtfn23 -> ../0000:41:03.3 lrwxrwxrwx. 1 root root 0 Jul 16 04:42 virtfn24 -> ../0000:41:03.4 lrwxrwxrwx. 1 root root 0 Jul 16 04:42 virtfn25 -> ../0000:41:03.5 lrwxrwxrwx. 1 root root 0 Jul 16 04:42 virtfn26 -> ../0000:41:03.6 lrwxrwxrwx. 1 root root 0 Jul 16 04:42 virtfn27 -> ../0000:41:03.7 lrwxrwxrwx. 1 root root 0 Jul 16 04:42 virtfn28 -> ../0000:41:04.0 lrwxrwxrwx. 1 root root 0 Jul 16 04:42 virtfn29 -> ../0000:41:04.1 lrwxrwxrwx. 1 root root 0 Jul 16 04:42 virtfn3 -> ../0000:41:00.7 lrwxrwxrwx. 1 root root 0 Jul 16 04:42 virtfn30 -> ../0000:41:04.2 lrwxrwxrwx. 1 root root 0 Jul 16 04:42 virtfn31 -> ../0000:41:04.3 lrwxrwxrwx. 1 root root 0 Jul 16 04:42 virtfn4 -> ../0000:41:01.0 lrwxrwxrwx. 1 root root 0 Jul 16 04:42 virtfn5 -> ../0000:41:01.1 lrwxrwxrwx. 1 root root 0 Jul 16 04:42 virtfn6 -> ../0000:41:01.2 lrwxrwxrwx. 1 root root 0 Jul 16 04:42 virtfn7 -> ../0000:41:01.3 lrwxrwxrwx. 1 root root 0 Jul 16 04:42 virtfn8 -> ../0000:41:01.4 lrwxrwxrwx. 1 root root 0 Jul 16 04:42 virtfn9 -> ../0000:41:01.5
- Choose the available virtual function on which you want to create the vGPU and note its domain, bus, slot, and function.
- Change to the mdev_supported_types directory for the virtual function on which you want to create the vGPU.
# cd /sys/class/mdev_bus/domain\:bus\:vf-slot.v-function/mdev_supported_types/
- domain
- bus
-
The domain and bus of the GPU, without the
0xprefix. - vf-slot
- v-function
- The slot and function of the virtual function.
This example changes to the mdev_supported_types directory for the first virtual function (
virtfn0) for the GPU with the domain0000and bus41. The first virtual function (virtfn0) has slot00and function4.# cd /sys/class/mdev_bus/0000\:41\:00.4/mdev_supported_types
- Find out which subdirectory of mdev_supported_types contains registration information for the vGPU type that you want to create.
# grep -l "vgpu-type" nvidia-*/name
- vgpu-type
-
The vGPU type, for example,
A40-2Q.
This example shows that the registration information for the A40-2Q vGPU type is contained in the nvidia-558 subdirectory of mdev_supported_types.
            # grep -l "A40-2Q" nvidia-*/name
nvidia-558/name
- Confirm that you can create an instance of the vGPU type on the virtual function.
# cat subdirectory/available_instances
- subdirectory
-
The subdirectory that you found in the previous step, for example,
nvidia-558.
The number of available instances must be 1. If the number is 0, a vGPU has already been created on the virtual function. Only one instance of any vGPU type can be created on a virtual function.
This example shows that an instance of the A40-2Q vGPU type can be created on the virtual function.
            # cat nvidia-558/available_instances
1
- Generate a correctly formatted universally unique identifier (UUID) for the vGPU.
            # uuidgen
aa618089-8b16-4d01-a136-25a0f3c73123
- Write the UUID that you obtained in the previous step to the create file in the registration information directory for the vGPU type that you want to create.
# echo "uuid"> subdirectory/create
- uuid
- The UUID that you generated in the previous step, which will become the UUID of the vGPU that you want to create.
- subdirectory
-
The registration information directory for the vGPU type that you want to create, for example,
nvidia-558.
This example creates an instance of the A40-2Q vGPU type with the UUID
aa618089-8b16-4d01-a136-25a0f3c73123.# echo "aa618089-8b16-4d01-a136-25a0f3c73123" > nvidia-558/create
An
mdevdevice file for the vGPU is added to the parent virtual function directory of the vGPU. The vGPU is identified by its UUID. - Time-sliced vGPUs only: Make the
mdevdevice file that you created to represent the vGPU persistent.# mdevctl define --auto --uuid uuid
- uuid
- The UUID that you specified in the previous step for the vGPU that you are creating.
Note:- If you are using a GPU that supports SR-IOV, the
mdevdevice file persists after a host reboot only if you perform Step 1 before rebooting any VM that is configured with a vGPU on the GPU. - You cannot use the mdevctl command to make the
mdevdevice file for a MIG-backed vGPU persistent. Themdevdevice file for a MIG-backed vGPU is not retained after the host is rebooted because MIG instances are no longer available. - Not all Linux with KVM hypervisor releases include the mdevctl command. If your release does not include the mdevctl command, you can use standard features of the operating system to automate the re-creation of this device file when the host is booted. For example, you can write a custom script that is executed when the host is rebooted.
- Confirm that the vGPU was created.
- Confirm that the /sys/bus/mdev/devices/ directory contains a symbolic link to the
mdevdevice file.# ls -l /sys/bus/mdev/devices/ total 0 lrwxrwxrwx. 1 root root 0 Jul 16 05:57 aa618089-8b16-4d01-a136-25a0f3c73123 -> ../../../devices/pci0000:40/0000:40:01.1/0000:41:00.4/aa618089-8b16-4d01-a136-25a0f3c73123
- If your release includes the mdevctl command, list the active mediated devices on the hypervisor host.
            # mdevctl list
aa618089-8b16-4d01-a136-25a0f3c73123 0000:06:00.0 nvidia-558
- Confirm that the /sys/bus/mdev/devices/ directory contains a symbolic link to the
2.10.3. Adding One or More vGPUs to a Linux with KVM Hypervisor VM
To support applications and workloads that are compute or graphics intensive, you can add multiple vGPUs to a single VM.
For details about which hypervisor versions and NVIDIA vGPUs support the assignment of multiple vGPUs to a VM, see Virtual GPU Software for Red Hat Enterprise Linux with KVM Release Notes and Virtual GPU Software for Ubuntu Release Notes.
Ensure that the following prerequisites are met:
- The VM to which you want to add the vGPUs is shut down.
- The vGPUs that you want to add have been created as explained in Creating an NVIDIA vGPU on a Linux with KVM Hypervisor.
You can add vGPUs to a Linux with KVM hypervisor VM by using any of the following tools:
- The virsh command
- The QEMU command line
After adding vGPUs to a Linux with KVM hypervisor VM, start the VM.
# virsh start vm-name
- vm-name
- The name of the VM that you added the vGPUs to.
After the VM has booted, install the NVIDIA vGPU software graphics driver as explained in Installing the NVIDIA vGPU Software Graphics Driver.
2.10.3.1. Adding One or More vGPUs to a Linux with KVM Hypervisor VM by Using virsh
- In virsh, open for editing the XML file of the VM that you want to add the vGPU to.
# virsh edit vm-name
- vm-name
- The name of the VM to that you want to add the vGPUs to.
- For each vGPU that you want to add to the VM, add a device entry in the form of an
addresselement inside thesourceelement to add the vGPU to the guest VM.<device> ... <hostdev mode='subsystem' type='mdev' model='vfio-pci'> <source> <address uuid='uuid'/> </source> </hostdev> </device>
- uuid
- The UUID that was assigned to the vGPU when the vGPU was created.
This example adds a device entry for the vGPU with the UUID
a618089-8b16-4d01-a136-25a0f3c73123.<device> ... <hostdev mode='subsystem' type='mdev' model='vfio-pci'> <source> <address uuid='a618089-8b16-4d01-a136-25a0f3c73123'/> </source> </hostdev> </device>
This example adds device entries for two vGPUs with the following UUIDs:
-
c73f1fa6-489e-4834-9476-d70dabd98c40 -
3b356d38-854e-48be-b376-00c72c7d119c
            <device>
...
  <hostdev mode='subsystem' type='mdev' model='vfio-pci'>
    <source>
      <address uuid='c73f1fa6-489e-4834-9476-d70dabd98c40'/>
    </source>
  </hostdev>
  <hostdev mode='subsystem' type='mdev' model='vfio-pci'>
    <source>
      <address uuid='3b356d38-854e-48be-b376-00c72c7d119c'/>
    </source>
  </hostdev>
</device>
- Optional: Add a
videoelement that contains amodelelement in which thetypeattribute is set tonone.<video> <model type='none'/> </video>
Adding this
videoelement prevents the default video device thatlibvirtadds from being loaded into the VM. If you don't add thisvideoelement, you must configure the Xorg server or your remoting solution to load only the vGPU devices you added and not the default video device.
2.10.3.2. Adding One or More vGPUs to a Linux with KVM Hypervisor VM by Using the QEMU Command Line
Add the following options to the QEMU command line:
-
For each vGPU that you want to add to the VM, add one -device option in the following format:
-device vfio-pci,sysfsdev=/sys/bus/mdev/devices/vgpu-uuid
- vgpu-uuid
- The UUID that was assigned to the vGPU when the vGPU was created.
-
Add a -uuid option to specify the VM as follows:
-uuid vm-uuid
- vm-uuid
- The UUID that was assigned to the VM when the VM was created.
This example adds the vGPU with the UUID aa618089-8b16-4d01-a136-25a0f3c73123 to the VM with the UUID ebb10a6e-7ac9-49aa-af92-f56bb8c65893.
            -device vfio-pci,sysfsdev=/sys/bus/mdev/devices/aa618089-8b16-4d01-a136-25a0f3c73123 \
-uuid ebb10a6e-7ac9-49aa-af92-f56bb8c65893
This example adds device entries for two vGPUs with the following UUIDs:
-
676428a0-2445-499f-9bfd-65cd4a9bd18f -
6c5954b8-5bc1-4769-b820-8099fe50aaba
The entries are added to the VM with the UUID ec5e8ee0-657c-4db6-8775-da70e332c67e.
            -device vfio-pci,sysfsdev=/sys/bus/mdev/devices/676428a0-2445-499f-9bfd-65cd4a9bd18f \
-device vfio-pci,sysfsdev=/sys/bus/mdev/devices/6c5954b8-5bc1-4769-b820-8099fe50aaba \
-uuid ec5e8ee0-657c-4db6-8775-da70e332c67e
2.10.4. Setting vGPU Plugin Parameters on a Linux with KVM Hypervisor
Plugin parameters for a vGPU control the behavior of the vGPU, such as the frame rate limiter (FRL) configuration in frames per second or whether console virtual network computing (VNC) for the vGPU is enabled. The VM to which the vGPU is assigned is started with these parameters. If parameters are set for multiple vGPUs assigned to the same VM, the VM is started with the parameters assigned to each vGPU.
For each vGPU for which you want to set plugin parameters, perform this task in a Linux command shell on the Linux with KVM hypervisor host.
- Change to the nvidia subdirectory of the
mdevdevice directory that represents the vGPU.# cd /sys/bus/mdev/devices/uuid/nvidia
- uuid
-
The UUID of the vGPU, for example,
aa618089-8b16-4d01-a136-25a0f3c73123.
- Write the plugin parameters that you want to set to the vgpu_params file in the directory that you changed to in the previous step.
# echo "plugin-config-params" > vgpu_params
- plugin-config-params
- A comma-separated list of parameter-value pairs, where each pair is of the form parameter-name=value.
This example disables frame rate limiting and console VNC for a vGPU.
# echo "frame_rate_limiter=0, disable_vnc=1" > vgpu_params
This example enables unified memory for a vGPU.
# echo "enable_uvm=1" > vgpu_params
This example enables NVIDIA CUDA Toolkit debuggers for a vGPU.
# echo "enable_debugging=1" > vgpu_params
This example enables NVIDIA CUDA Toolkit profilers for a vGPU.
# echo "enable_profiling=1" > vgpu_params
To clear any vGPU plugin parameters that were set previously, write a space to the vgpu_params file for the vGPU.
# echo " " > vgpu_params
2.10.5. Deleting a vGPU on a Linux with KVM Hypervisor
For each vGPU that you want to delete, perform this task in a Linux command shell on the Linux with KVM hypervisor host.
Before you begin, ensure that the following prerequisites are met:
- You have the domain, bus, slot, and function of the GPU where the vGPU that you want to delete resides. For instructions, see Getting the BDF and Domain of a GPU on a Linux with KVM Hypervisor.
- The VM to which the vGPU is assigned is shut down.
- Change to the mdev_supported_types directory for the physical GPU.
# cd /sys/class/mdev_bus/domain\:bus\:slot.function/mdev_supported_types/
- domain
- bus
- slot
- function
-
The domain, bus, slot, and function of the GPU, without the
0xprefix.
This example changes to the mdev_supported_types directory for the GPU with the PCI device BDF
06:00.0.# cd /sys/bus/pci/devices/0000\:06\:00.0/mdev_supported_types/
- Change to the subdirectory of mdev_supported_types that contains registration information for the vGPU.
# cd `find . -type d -name uuid`
- uuid
-
The UUID of the vGPU, for example,
aa618089-8b16-4d01-a136-25a0f3c73123.
- Write the value
1to the remove file in the registration information directory for the vGPU that you want to delete.# echo "1" > remove
Note:On the Red Hat Virtualization (RHV) kernel, if you try to remove a vGPU device while its VM is running, the vGPU device might not be removed even if the remove file has been written to successfully. To confirm that the vGPU device is removed, confirm that the UUID of the vGPU is not found in the sysfs file system.
2.10.6. Preparing a GPU Configured for Pass-Through for Use with vGPU
The mode in which a physical GPU is being used determines the Linux kernel module to which the GPU is bound. If you want to switch the mode in which a GPU is being used, you must unbind the GPU from its current kernel module and bind it to the kernel module for the new mode. After binding the GPU to the correct kernel module, you can then configure it for vGPU.
A physical GPU that is passed through to a VM is bound to the vfio-pci kernel module. A physical GPU that is bound to the vfio-pci kernel module can be used only for pass-through. To enable the GPU to be used for vGPU, the GPU must be unbound from vfio-pci kernel module and bound to the nvidia kernel module.
Before you begin, ensure that you have the domain, bus, slot, and function of the GPU that you are preparing for use with vGPU. For instructions, see Getting the BDF and Domain of a GPU on a Linux with KVM Hypervisor.
- Determine the kernel module to which the GPU is bound by running the lspci command with the -k option on the NVIDIA GPUs on your host.
# lspci -d 10de: -k
The
Kernel driver in use:field indicates the kernel module to which the GPU is bound.The following example shows that the NVIDIA Tesla M60 GPU with BDF
06:00.0is bound to thevfio-pcikernel module and is being used for GPU pass through.06:00.0 VGA compatible controller: NVIDIA Corporation GM204GL [Tesla M60] (rev a1) Subsystem: NVIDIA Corporation Device 115e Kernel driver in use: vfio-pci
- Unbind the GPU from
vfio-pcikernel module.- Change to the sysfs directory that represents the
vfio-pcikernel module.# cd /sys/bus/pci/drivers/vfio-pci
- Write the domain, bus, slot, and function of the GPU to the unbind file in this directory.
# echo domain:bus:slot.function > unbind
- domain
- bus
- slot
- function
-
The domain, bus, slot, and function of the GPU, without a
0xprefix.
This example writes the domain, bus, slot, and function of the GPU with the domain
0000and PCI device BDF06:00.0.# echo 0000:06:00.0 > unbind
- Change to the sysfs directory that represents the
- Bind the GPU to the
nvidiakernel module.- Change to the sysfs directory that contains the PCI device information for the physical GPU.
# cd /sys/bus/pci/devices/domain\:bus\:slot.function
- domain
- bus
- slot
- function
-
The domain, bus, slot, and function of the GPU, without a
0xprefix.
This example changes to the sysfs directory that contains the PCI device information for the GPU with the domain
0000and PCI device BDF06:00.0.# cd /sys/bus/pci/devices/0000\:06\:00.0
- Write the kernel module name
nvidiato the driver_override file in this directory.# echo nvidia > driver_override
- Change to the sysfs directory that represents the
nvidiakernel module.# cd /sys/bus/pci/drivers/nvidia
- Write the domain, bus, slot, and function of the GPU to the bind file in this directory.
# echo domain:bus:slot.function > bind
- domain
- bus
- slot
- function
-
The domain, bus, slot, and function of the GPU, without a
0xprefix.
This example writes the domain, bus, slot, and function of the GPU with the domain
0000and PCI device BDF06:00.0.# echo 0000:06:00.0 > bind
- Change to the sysfs directory that contains the PCI device information for the physical GPU.
You can now configure the GPU with vGPU as explained in Installing and Configuring the NVIDIA Virtual GPU Manager for Red Hat Enterprise Linux KVM or RHV.
2.10.7. NVIDIA vGPU Information in the sysfs File System
Information about the NVIDIA vGPU types supported by each physical GPU in a Linux with KVM hypervisor host is stored in the sysfs file system.
All physical GPUs on the host are registered with the mdev kernel module. Information about the physical GPUs and the vGPU types that can be created on each physical GPU is stored in directories and files under the /sys/class/mdev_bus/ directory.
The sysfs directory for each physical GPU is at the following locations:
- /sys/bus/pci/devices/
- /sys/class/mdev_bus/
Both directories are a symbolic link to the real directory for PCI devices in the sysfs file system.
The organization the sysfs directory for each physical GPU is as follows:
            /sys/class/mdev_bus/
           |-parent-physical-device
             |-mdev_supported_types
               |-nvidia-vgputype-id
                 |-available_instances
                 |-create
                 |-description
                 |-device_api
                 |-devices
                 |-name
- parent-physical-device
-
Each physical GPU on the host is represented by a subdirectory of the /sys/class/mdev_bus/ directory.
The name of each subdirectory is as follows:
domain\:bus\:slot.function
domain, bus, slot, function are the domain, bus, slot, and function of the GPU, for example,
0000\:06\:00.0.Each directory is a symbolic link to the real directory for PCI devices in the sysfs file system. For example:
            # ll /sys/class/mdev_bus/
total 0
lrwxrwxrwx. 1 root root 0 Dec 12 03:20 0000:05:00.0 -> ../../devices/pci0000:00/0000:00:03.0/0000:03:00.0/0000:04:08.0/0000:05:00.0
lrwxrwxrwx. 1 root root 0 Dec 12 03:20 0000:06:00.0 -> ../../devices/pci0000:00/0000:00:03.0/0000:03:00.0/0000:04:09.0/0000:06:00.0
lrwxrwxrwx. 1 root root 0 Dec 12 03:20 0000:07:00.0 -> ../../devices/pci0000:00/0000:00:03.0/0000:03:00.0/0000:04:10.0/0000:07:00.0
lrwxrwxrwx. 1 root root 0 Dec 12 03:20 0000:08:00.0 -> ../../devices/pci0000:00/0000:00:03.0/0000:03:00.0/0000:04:11.0/0000:08:00.0
- mdev_supported_types
-
A directory named mdev_supported_types is required under the sysfs directory for each physical GPU that will be configured with NVIDIA vGPU. How this directory is created for a GPU depends on whether the GPU supports SR-IOV.
- For a GPU that does not support SR-IOV, this directory is created automatically after the Virtual GPU Manager is installed on the host and the host has been rebooted.
- For a GPU that supports SR-IOV, such as a GPU based on the NVIDIA Ampere architecture, you must create this directory by enabling the virtual function for the GPU as explained in Creating an NVIDIA vGPU on a Linux with KVM Hypervisor. The mdev_supported_types directory itself is never visible on the physical function.
The mdev_supported_types directory contains a subdirectory for each vGPU type that the physical GPU supports. The name of each subdirectory is nvidia-vgputype-id, where vgputype-id is an unsigned integer serial number. For example:
            # ll mdev_supported_types/
total 0
drwxr-xr-x 3 root root 0 Dec  6 01:37 nvidia-35
drwxr-xr-x 3 root root 0 Dec  5 10:43 nvidia-36
drwxr-xr-x 3 root root 0 Dec  5 10:43 nvidia-37
drwxr-xr-x 3 root root 0 Dec  5 10:43 nvidia-38
drwxr-xr-x 3 root root 0 Dec  5 10:43 nvidia-39
drwxr-xr-x 3 root root 0 Dec  5 10:43 nvidia-40
drwxr-xr-x 3 root root 0 Dec  5 10:43 nvidia-41
drwxr-xr-x 3 root root 0 Dec  5 10:43 nvidia-42
drwxr-xr-x 3 root root 0 Dec  5 10:43 nvidia-43
drwxr-xr-x 3 root root 0 Dec  5 10:43 nvidia-44
drwxr-xr-x 3 root root 0 Dec  5 10:43 nvidia-45
- nvidia-vgputype-id
-
Each directory represents an individual vGPU type and contains the following files and directories:
- available_instances
-
This file contains the number of instances of this vGPU type that can still be created. This file is updated any time a vGPU of this type is created on or removed from the physical GPU.
Note:
When a time-sliced vGPU is created, the content of the available_instances for all other time-sliced vGPU types on the physical GPU is set to 0. This behavior enforces the requirement that all time-sliced vGPUs on a physical GPU must be of the same type. However, this requirement does not apply to MIG-backed vGPUs. Therefore, when a MIG-backed vGPU is created, available_instances for all other MIG-backed vGPU types on the physical GPU is not set to 0
- create
- This file is used for creating a vGPU instance. A vGPU instance is created by writing the UUID of the vGPU to this file. The file is write only.
- description
-
This file contains the following details of the vGPU type:
- The maximum number of virtual display heads that the vGPU type supports
- The frame rate limiter (FRL) configuration in frames per second
- The frame buffer size in Mbytes
- The maximum resolution per display head
- The maximum number of vGPU instances per physical GPU
For example:
            # cat description
num_heads=4, frl_config=60, framebuffer=2048M, max_resolution=4096x2160, max_instance=4
- device_api
-
This file contains the string
vfio_pcito indicate that a vGPU is a PCI device. - devices
-
This directory contains all the
mdevdevices that are created for the vGPU type. For example:# ll devices total 0 lrwxrwxrwx 1 root root 0 Dec 6 01:52 aa618089-8b16-4d01-a136-25a0f3c73123 -> ../../../aa618089-8b16-4d01-a136-25a0f3c73123
- name
-
This file contains the name of the vGPU type. For example:
            # cat name
GRID M10-2Q
2.11. Configuring a GPU for MIG-Backed vGPUs
To support GPU instances with NVIDIA vGPU, a GPU must be configured with MIG mode enabled and GPU instances must be created and configured on the physical GPU. Optionally, you can create compute instances within the GPU instances. If you don't create compute instances within the GPU instances, they can be added later for individual vGPUs from within the guest VMs.
Ensure that the following prerequisites are met:
- The NVIDIA Virtual GPU Manager is installed on the hypervisor host.
- You have root user privileges on your hypervisor host machine.
- You have determined which GPU instances correspond to the vGPU types of the MIG-backed vGPUs that you will create.
To get this information, consult the table of MIG-backed vGPUs for your GPU in Virtual GPU Types for Supported GPUs.
- The GPU is not being used by any other processes, such as CUDA applications, monitoring applications, or the nvidia-smi command.
To configure a GPU for MIG-backed vGPUs, follow these instructions:
-
Note:
For VMware vSphere, only enabling MIG mode is required because VMware vSphere creates the GPU instances and, after the VM is booted and guest driver is installed, one compute instance is automatically created in the VM.
After configuring a GPU for MIG-backed vGPUs, create the vGPUs that you need and add them to their VMs.
2.11.1. Enabling MIG Mode for a GPU
Perform this task in your hypervisor command shell.
- Open a command shell as the root user on your hypervisor host machine. On all supported hypervisors, you can use secure shell (SSH) for this purpose. Individual hypervisors may provide additional means for logging in. For details, refer to the documentation for your hypervisor.
- Determine whether MIG mode is enabled. Use the nvidia-smi command for this purpose. By default, MIG mode is disabled.
This example shows that MIG mode is disabled on GPU 0.
Note:In the output from nvidia-smi, the NVIDIA A100 HGX 40GB GPU is referred to as A100-SXM4-40GB.
            $ nvidia-smi -i 0
+-----------------------------------------------------------------------------+
| NVIDIA-SMI 510.108.03  Driver Version: 510.108.03   CUDA Version: 11.6     |
|-------------------------------+----------------------+----------------------+
| GPU  Name        Persistence-M| Bus-Id        Disp.A | Volatile Uncorr. ECC |
| Fan  Temp  Perf  Pwr:Usage/Cap|         Memory-Usage | GPU-Util  Compute M. |
|                               |                      |               MIG M. |
|===============================+======================+======================|
|   0  A100-SXM4-40GB      On   | 00000000:36:00.0 Off |                    0 |
| N/A   29C    P0    62W / 400W |      0MiB / 40537MiB |      6%      Default |
|                               |                      |             Disabled |
+-------------------------------+----------------------+----------------------+
- If MIG mode is disabled, enable it.
$ nvidia-smi -i [gpu-ids] -mig 1
- gpu-ids
- A comma-separated list of GPU indexes, PCI bus IDs or UUIDs that specifies the GPUs on which you want to enable MIG mode. If gpu-ids is omitted, MIG mode is enabled on all GPUs on the system.
This example enables MIG mode on GPU 0.
            $ nvidia-smi -i 0 -mig 1
Enabled MIG Mode for GPU 00000000:36:00.0
All done.
Note:If the GPU is being used by another process, this command fails and displays a warning message that MIG mode for the GPU is in the pending enable state. In this situation, stop all processes that are using the GPU and retry the command.
- VMware vSphere ESXi only: Reboot the hypervisor host.
- Query the GPUs on which you enabled MIG mode to confirm that MIG mode is enabled.
This example queries GPU 0 for the PCI bus ID and MIG mode in comma-separated values (CSV) format.
            $ nvidia-smi -i 0 --query-gpu=pci.bus_id,mig.mode.current --format=csv
pci.bus_id, mig.mode.current
00000000:36:00.0, Enabled
2.11.2. Creating GPU Instances on a MIG-Enabled GPU
If you are using VMware vSphere, omit this task. VMware vSphere creates the GPU instances automatically.
Perform this task in your hypervisor command shell.
- If necessary, open a command shell as the root user on your hypervisor host machine.
- List the GPU instance profiles that are available on your GPU.
You will need to specify the profiles by their IDs, not their names, when you create them.
            $ nvidia-smi mig -lgip
+--------------------------------------------------------------------------+
| GPU instance profiles:                                                   |
| GPU   Name          ID    Instances   Memory     P2P    SM    DEC   ENC  |
|                           Free/Total   GiB              CE    JPEG  OFA  |
|==========================================================================|
|   0  MIG 1g.5gb     19     7/7        4.95       No     14     0     0   |
|                                                          1     0     0   |
+--------------------------------------------------------------------------+
|   0  MIG 2g.10gb    14     3/3        9.90       No     28     1     0   |
|                                                          2     0     0   |
+--------------------------------------------------------------------------+
|   0  MIG 3g.20gb     9     2/2        19.79      No     42     2     0   |
|                                                          3     0     0   |
+--------------------------------------------------------------------------+
|   0  MIG 4g.20gb     5     1/1        19.79      No     56     2     0   |
|                                                          4     0     0   |
+--------------------------------------------------------------------------+
|   0  MIG 7g.40gb     0     1/1        39.59      No     98     5     0   |
|                                                          7     1     1   |
+--------------------------------------------------------------------------+
- Create the GPU instances that correspond to the vGPU types of the MIG-backed vGPUs that you will create.
$ nvidia-smi mig -cgi gpu-instance-profile-ids
- gpu-instance-profile-ids
- A comma-separated list of GPU instance profile IDs that specifies the GPU instances that you want to create.
This example creates two GPU instances of type
2g.10gb, which has profile ID 14.$ nvidia-smi mig -cgi 14,14 Successfully created GPU instance ID 5 on GPU 2 using profile MIG 2g.10gb (ID 14) Successfully created GPU instance ID 3 on GPU 2 using profile MIG 2g.10gb (ID 14)
2.11.3. Optional: Creating Compute Instances in a GPU instance
Creating compute instances within GPU instances is optional. If you don't create compute instances within the GPU instances, they can be added later for individual vGPUs from within the guest VMs.
If you are using VMware vSphere, omit this task. After the VM is booted and guest driver is installed, one compute instance is automatically created in the VM.
Perform this task in your hypervisor command shell.
- If necessary, open a command shell as the root user on your hypervisor host machine.
- List the available GPU instances.
            $ nvidia-smi mig -lgi
+----------------------------------------------------+
| GPU instances:                                     |
| GPU   Name          Profile  Instance   Placement  |
|                       ID       ID       Start:Size |
|====================================================|
|   2  MIG 2g.10gb      14        3          0:2     |
+----------------------------------------------------+
|   2  MIG 2g.10gb      14        5          4:2     |
+----------------------------------------------------+
- Create the compute instances that you need within each GPU instance.
$ nvidia-smi mig -cci -gi gpu-instance-ids
- gpu-instance-ids
- A comma-separated list of GPU instance IDs that specifies the GPU instances within which you want to create the compute instances.
CAUTION:To avoid an inconsistent state between a guest VM and the hypervisor host, do not create compute instances from the hypervisor on a GPU instance on which an active guest VM is running. Instead, create the compute instances from within the guest VM as explained in Modifying a MIG-Backed vGPU's Configuration.
This example creates a compute instance on each of GPU instances 3 and 5.
            $ nvidia-smi mig -cci -gi 3,5
Successfully created compute instance on GPU  0 GPU instance ID  1 using profile ID  2
Successfully created compute instance on GPU  0 GPU instance ID  2 using profile ID  2
- Verify that the compute instances were created within each GPU instance.
            $ nvidia-smi
+-----------------------------------------------------------------------------+
| MIG devices:                                                                |
+------------------+----------------------+-----------+-----------------------+
| GPU  GI  CI  MIG |         Memory-Usage |        Vol|         Shared        |
|      ID  ID  Dev |           BAR1-Usage | SM     Unc| CE  ENC  DEC  OFA  JPG|
|                  |                      |        ECC|                       |
|==================+======================+===========+=======================|
|  2    3   0   0  |      0MiB /  9984MiB | 28      0 |  2   0    1    0    0 |
|                  |      0MiB / 16383MiB |           |                       |
+------------------+----------------------+-----------+-----------------------+
|  2    5   0   1  |      0MiB /  9984MiB | 28      0 |  2   0    1    0    0 |
|                  |      0MiB / 16383MiB |           |                       |
+------------------+----------------------+-----------+-----------------------+

+-----------------------------------------------------------------------------+
| Processes:                                                                  |
|  GPU   GI   CI        PID   Type   Process name                  GPU Memory |
|        ID   ID                                                   Usage      |
|=============================================================================|
Note:Additional compute instances that have been created in a VM are destroyed when the VM is shut down or rebooted. After the shutdown or reboot, only one compute instance remains in the VM. This compute instance is created automatically after the NVIDIA vGPU software graphics driver is installed.
2.12. Disabling MIG Mode for One or More GPUs
If a GPU that you want to use for time-sliced vGPUs or GPU pass through has previously been configured for MIG-backed vGPUs, disable MIG mode on the GPU.
Ensure that the following prerequisites are met:
- The NVIDIA Virtual GPU Manager is installed on the hypervisor host.
- You have root user privileges on your hypervisor host machine.
- The GPU is not being used by any other processes, such as CUDA applications, monitoring applications, or the nvidia-smi command.
Perform this task in your hypervisor command shell.
- Open a command shell as the root user on your hypervisor host machine. You can use secure shell (SSH) for this purpose.
- Determine whether MIG mode is disabled. Use the nvidia-smi command for this purpose. By default, MIG mode is disabled, but might have previously been enabled.
This example shows that MIG mode is enabled on GPU 0.
Note:In the output from output from nvidia-smi, the NVIDIA A100 HGX 40GB GPU is referred to as A100-SXM4-40GB.
            $ nvidia-smi -i 0
+-----------------------------------------------------------------------------+
| NVIDIA-SMI 510.108.03   Driver Version: 510.108.03  CUDA Version: 11.6     |
|-------------------------------+----------------------+----------------------+
| GPU  Name        Persistence-M| Bus-Id        Disp.A | Volatile Uncorr. ECC |
| Fan  Temp  Perf  Pwr:Usage/Cap|         Memory-Usage | GPU-Util  Compute M. |
|                               |                      |               MIG M. |
|===============================+======================+======================|
|   0  A100-SXM4-40GB      Off  | 00000000:36:00.0 Off |                    0 |
| N/A   29C    P0    62W / 400W |      0MiB / 40537MiB |      6%      Default |
|                               |                      |              Enabled |
+-------------------------------+----------------------+----------------------+
- If MIG mode is enabled, disable it.
$ nvidia-smi -i [gpu-ids] -mig 0
- gpu-ids
- A comma-separated list of GPU indexes, PCI bus IDs or UUIDs that specifies the GPUs on which you want to disable MIG mode. If gpu-ids is omitted, MIG mode is disabled on all GPUs on the system.
This example disables MIG mode on GPU 0.
            $ sudo nvidia-smi -i 0 -mig 0
Disabled MIG Mode for GPU 00000000:36:00.0
All done.
- Confirm that MIG mode was disabled. Use the nvidia-smi command for this purpose.
This example shows that MIG mode is disabled on GPU 0.
            $ nvidia-smi -i 0
+-----------------------------------------------------------------------------+
| NVIDIA-SMI 510.108.03   Driver Version: 510.108.03  CUDA Version: 11.6     |
|-------------------------------+----------------------+----------------------+
| GPU  Name        Persistence-M| Bus-Id        Disp.A | Volatile Uncorr. ECC |
| Fan  Temp  Perf  Pwr:Usage/Cap|         Memory-Usage | GPU-Util  Compute M. |
|                               |                      |               MIG M. |
|===============================+======================+======================|
|   0  A100-SXM4-40GB      Off  | 00000000:36:00.0 Off |                    0 |
| N/A   29C    P0    62W / 400W |      0MiB / 40537MiB |      6%      Default |
|                               |                      |             Disabled |
+-------------------------------+----------------------+----------------------+
2.13. Disabling and Enabling ECC Memory
Some GPUs that support NVIDIA vGPU software support error correcting code (ECC) memory with NVIDIA vGPU. ECC memory improves data integrity by detecting and handling double-bit errors. However, not all GPUs, vGPU types, and hypervisor software versions support ECC memory with NVIDIA vGPU.
On GPUs that support ECC memory with NVIDIA vGPU, ECC memory is supported with C-series and Q-series vGPUs, but not with A-series and B-series vGPUs. Although A-series and B-series vGPUs start on physical GPUs on which ECC memory is enabled, enabling ECC with vGPUs that do not support it might incur some costs.
On physical GPUs that do not have HBM2 memory, the amount of frame buffer that is usable by vGPUs is reduced. All types of vGPU are affected, not just vGPUs that support ECC memory.
The effects of enabling ECC memory on a physical GPU are as follows:
- ECC memory is exposed as a feature on all supported vGPUs on the physical GPU.
- In VMs that support ECC memory, ECC memory is enabled, with the option to disable ECC in the VM.
- ECC memory can be enabled or disabled for individual VMs. Enabling or disabling ECC memory in a VM does not affect the amount of frame buffer that is usable by vGPUs.
GPUs based on the Pascal GPU architecture and later GPU architectures support ECC memory with NVIDIA vGPU. To determine whether ECC memory is enabled for a GPU, run nvidia-smi -q for the GPU.
Tesla M60 and M6 GPUs support ECC memory when used without GPU virtualization, but NVIDIA vGPU does not support ECC memory with these GPUs. In graphics mode, these GPUs are supplied with ECC memory disabled by default.
Some hypervisor software versions do not support ECC memory with NVIDIA vGPU.
If you are using a hypervisor software version or GPU that does not support ECC memory with NVIDIA vGPU and ECC memory is enabled, NVIDIA vGPU fails to start. In this situation, you must ensure that ECC memory is disabled on all GPUs if you are using NVIDIA vGPU.
2.13.1. Disabling ECC Memory
If ECC memory is unsuitable for your workloads but is enabled on your GPUs, disable it. You must also ensure that ECC memory is disabled on all GPUs if you are using NVIDIA vGPU with a hypervisor software version or a GPU that does not support ECC memory with NVIDIA vGPU. If your hypervisor software version or GPU does not support ECC memory and ECC memory is enabled, NVIDIA vGPU fails to start.
Where to perform this task depends on whether you are changing ECC memory settings for a physical GPU or a vGPU.
- For a physical GPU, perform this task from the hypervisor host.
- For a vGPU, perform this task from the VM to which the vGPU is assigned.
Note:
ECC memory must be enabled on the physical GPU on which the vGPUs reside.
Before you begin, ensure that NVIDIA Virtual GPU Manager is installed on your hypervisor. If you are changing ECC memory settings for a vGPU, also ensure that the NVIDIA vGPU software graphics driver is installed in the VM to which the vGPU is assigned.
- Use nvidia-smi to list the status of all physical GPUs or vGPUs, and check for ECC noted as enabled.
            # nvidia-smi -q

==============NVSMI LOG==============

Timestamp                           : Mon Dec 26 18:36:45 2022
Driver Version                      : 510.108.03

Attached GPUs                       : 1
GPU 0000:02:00.0

[...]

    Ecc Mode
        Current                     : Enabled
        Pending                     : Enabled

[...]
- Change the ECC status to off for each GPU for which ECC is enabled.
- If you want to change the ECC status to off for all GPUs on your host machine or vGPUs assigned to the VM, run this command:
# nvidia-smi -e 0
- If you want to change the ECC status to off for a specific GPU or vGPU, run this command:
# nvidia-smi -i id -e 0
id is the index of the GPU or vGPU as reported by nvidia-smi.
This example disables ECC for the GPU with index
0000:02:00.0.# nvidia-smi -i 0000:02:00.0 -e 0
- If you want to change the ECC status to off for all GPUs on your host machine or vGPUs assigned to the VM, run this command:
- Reboot the host or restart the VM.
- Confirm that ECC is now disabled for the GPU or vGPU.
            # nvidia—smi —q

==============NVSMI LOG==============

Timestamp                           : Mon Dec 26 18:37:53 2022
Driver Version                      : 510.108.03

Attached GPUs                       : 1
GPU 0000:02:00.0
[...]

    Ecc Mode
        Current                     : Disabled
        Pending                     : Disabled

[...]
If you later need to enable ECC on your GPUs or vGPUs, follow the instructions in Enabling ECC Memory.
2.13.2. Enabling ECC Memory
If ECC memory is suitable for your workloads and is supported by your hypervisor software and GPUs, but is disabled on your GPUs or vGPUs, enable it.
Where to perform this task depends on whether you are changing ECC memory settings for a physical GPU or a vGPU.
- For a physical GPU, perform this task from the hypervisor host.
- For a vGPU, perform this task from the VM to which the vGPU is assigned.
Note:
ECC memory must be enabled on the physical GPU on which the vGPUs reside.
Before you begin, ensure that NVIDIA Virtual GPU Manager is installed on your hypervisor. If you are changing ECC memory settings for a vGPU, also ensure that the NVIDIA vGPU software graphics driver is installed in the VM to which the vGPU is assigned.
- Use nvidia-smi to list the status of all physical GPUs or vGPUs, and check for ECC noted as disabled.
            # nvidia-smi -q

==============NVSMI LOG==============

Timestamp                           : Mon Dec 26 18:36:45 2022
Driver Version                      : 510.108.03

Attached GPUs                       : 1
GPU 0000:02:00.0

[...]

    Ecc Mode
        Current                     : Disabled
        Pending                     : Disabled

[...]
- Change the ECC status to on for each GPU or vGPU for which ECC is enabled.
- If you want to change the ECC status to on for all GPUs on your host machine or vGPUs assigned to the VM, run this command:
# nvidia-smi -e 1
- If you want to change the ECC status to on for a specific GPU or vGPU, run this command:
# nvidia-smi -i id -e 1
id is the index of the GPU or vGPU as reported by nvidia-smi.
This example enables ECC for the GPU with index
0000:02:00.0.# nvidia-smi -i 0000:02:00.0 -e 1
- If you want to change the ECC status to on for all GPUs on your host machine or vGPUs assigned to the VM, run this command:
- Reboot the host or restart the VM.
- Confirm that ECC is now enabled for the GPU or vGPU.
            # nvidia—smi —q

==============NVSMI LOG==============

Timestamp                           : Mon Dec 26 18:37:53 2022
Driver Version                      : 510.108.03

Attached GPUs                       : 1
GPU 0000:02:00.0
[...]

    Ecc Mode
        Current                     : Enabled
        Pending                     : Enabled

[...]
If you later need to disable ECC on your GPUs or vGPUs, follow the instructions in Disabling ECC Memory.
2.14. Configuring a vGPU VM for Use with NVIDIA GPUDirect Storage Technology
To use NVIDIA® GPUDirect Storage® technology with NVIDIA vGPU, you must install all the required software in the VM that is configured with NVIDIA vGPU.
Ensure that the prerequisites in Prerequisites for Using NVIDIA vGPU are met.
- Install and configure the NVIDIA Virtual GPU Manager as explained in Installing and Configuring the NVIDIA Virtual GPU Manager for Red Hat Enterprise Linux KVM or RHV.
- As root, log in to the VM that you configured with NVIDIA vGPU in the previous step.
- Install the Mellanox OpenFabrics Enterprise Distribution for Linux (MLNX_OFED) in the VM as explained in Installation Procedure in Installing Mellanox OFED.
In the command to run the installation script, specify the following options:
- --with-nvmf
- --with-nfsrdma
- --enable-gds
- --add-kernel-support
- Install the NVIDIA vGPU software graphics driver for Linux in the VM from a distribution-specific package.
Note:
GPUDirect Storage technology does not support installation of the NVIDIA vGPU software graphics driver for Linux from a .run file.
Follow the instructions for the Linux distribution that is installed in the VM:
- Install NVIDIA CUDA Toolkit from a .run file, deselecting the CUDA driver when selecting the CUDA components to install.
Note:
To avoid overwriting the NVIDIA vGPU software graphics driver that you installed in the previous step, do not install NVIDIA CUDA Toolkit from a distribution-specific package.
For instructions, refer to Runfile Installation in NVIDIA CUDA Installation Guide for Linux.
- Use the package manager of the Linux distribution that is installed in the VM to install the GPUDirect Storage technology packages, omitting the installation of the NVIDIA CUDA Toolkit packages.
Follow the instructions in NVIDIA CUDA Installation Guide for Linux for the Linux distribution that is installed in the VM:
-
In the step to install CUDA, execute only the command to include all GPUDirect Storage technology packages:
sudo dnf install nvidia-gds
- Ubuntu In the step to install CUDA, execute only the command to include all GPUDirect Storage technology packages:
sudo apt-get install nvidia-gds
-
After you configure a vGPU VM for use with NVIDIA GPUDirect Storage technology, you can license the NVIDIA vGPU software licensed products that you are using. For instructions, refer to Virtual GPU Client Licensing User Guide.
GPU pass-through is used to directly assign an entire physical GPU to one VM, bypassing the NVIDIA Virtual GPU Manager. In this mode of operation, the GPU is accessed exclusively by the NVIDIA driver running in the VM to which it is assigned; the GPU is not shared among VMs.
In pass-through mode, GPUs based on NVIDIA GPU architectures after the Maxwell architecture support error-correcting code (ECC).
GPU pass-through can be used in a server platform alongside NVIDIA vGPU, with some restrictions:
- A physical GPU can host NVIDIA vGPUs, or can be used for pass-through, but cannot do both at the same time. Some hypervisors, for example VMware vSphere ESXi, require a host reboot to change a GPU from pass-through mode to vGPU mode.
- A single VM cannot be configured for both vGPU and GPU pass-through at the same time.
- The performance of a physical GPU passed through to a VM can be monitored only from within the VM itself. Such a GPU cannot be monitored by tools that operate through the hypervisor, such as XenCenter or nvidia-smi (see Monitoring GPU Performance).
-
The following BIOS settings must be enabled on your server platform:
- VT-D/IOMMU
- SR-IOV in Advanced Options
- All GPUs directly connected to each other through NVLink must be assigned to the same VM.
If you intend to configure all GPUs in your server platform for pass-through, you do not need to install the NVIDIA Virtual GPU Manager.
3.1. Display Resolutions for Physical GPUs
The display resolutions supported by a physical GPU depend on the NVIDIA GPU architecture and the NVIDIA vGPU software license that is applied to the GPU.
vWS Physical GPU Resolutions
GPUs that are licensed with a vWS license support a maximum combined resolution based on the number of available pixels, which is determined by the NVIDIA GPU architecture. You can choose between using a small number of high resolution displays or a larger number of lower resolution displays with these GPUs.
The following table lists the maximum number of displays per GPU at each supported display resolution for configurations in which all displays have the same resolution.
| NVIDIA GPU Architecture | Available Pixels | Display Resolution | Displays per GPU |
|---|---|---|---|
| Pascal and later | 66355200 | 7680×4320 | 2 |
| 5120×2880 or lower | 4 | ||
| Maxwell | 35389440 | 5120×2880 | 2 |
| 4096×2160 or lower | 4 |
The following table provides examples of configurations with a mixture of display resolutions.
| NVIDIA GPU Architecture | Available Pixels | Available Pixel Basis | Maximum Displays | Sample Mixed Display Configurations |
|---|---|---|---|---|
| Pascal and later | 66355200 | 2 7680×4320 displays | 4 | 1 7680×4320 display plus 2 5120×2880 displays |
| 1 7680×4320 display plus 3 4096×2160 displays | ||||
| Maxwell | 35389440 | 4 4096×2160 displays | 4 | 1 5120×2880 display plus 2 4096×2160 displays |
You cannot use more than four displays even if the combined resolution of the displays is less than the number of available pixels from the GPU. For example, you cannot use five 4096×2160 displays with a GPU based on the NVIDIA Pascal architecture even though the combined resolution of the displays (44236800) is less than the number of available pixels from the GPU (66355200).
vApps or vCS Physical GPU Resolutions
GPUs that are licensed with a vApps or a vCS license support a single display with a fixed maximum resolution. The maximum resolution depends on the following factors:
- NVIDIA GPU architecture
- The NVIDIA vGPU Software license that is applied to the GPU
- The operating system that is running in the on the system to which the GPU is assigned
| License | NVIDIA GPU Architecture | Operating System | Maximum Display Resolution | Displays per GPU |
|---|---|---|---|---|
| vApps | Pascal or later | Linux | 2560×1600 | 1 |
| Pascal or later | Windows | 1280×1024 | 1 | |
| Maxwell | Windows and Linux | 2560×1600 | 1 | |
| vCS | Pascal or later | Linux | 4096×2160 | 1 |
3.2. Using GPU Pass-Through on Citrix Hypervisor
You can configure a GPU for pass-through on Citrix Hypervisor by using XenCenter or by using the xe command.
The following additional restrictions apply when GPU pass-through is used in a server platform alongside NVIDIA vGPU:
- The performance of a physical GPU passed through to a VM cannot be monitored through XenCenter.
- nvidia-smi in dom0 no longer has access to the GPU.
- Pass-through GPUs do not provide console output through XenCenter’s VM Console tab. Use a remote graphics connection directly into the VM to access the VM’s OS.
3.2.1. Configuring a VM for GPU Pass Through by Using XenCenter
Select the Pass-through whole GPU option as the GPU type in the VM’s Properties:
Figure 15. Using XenCenter to configure a pass-through GPU
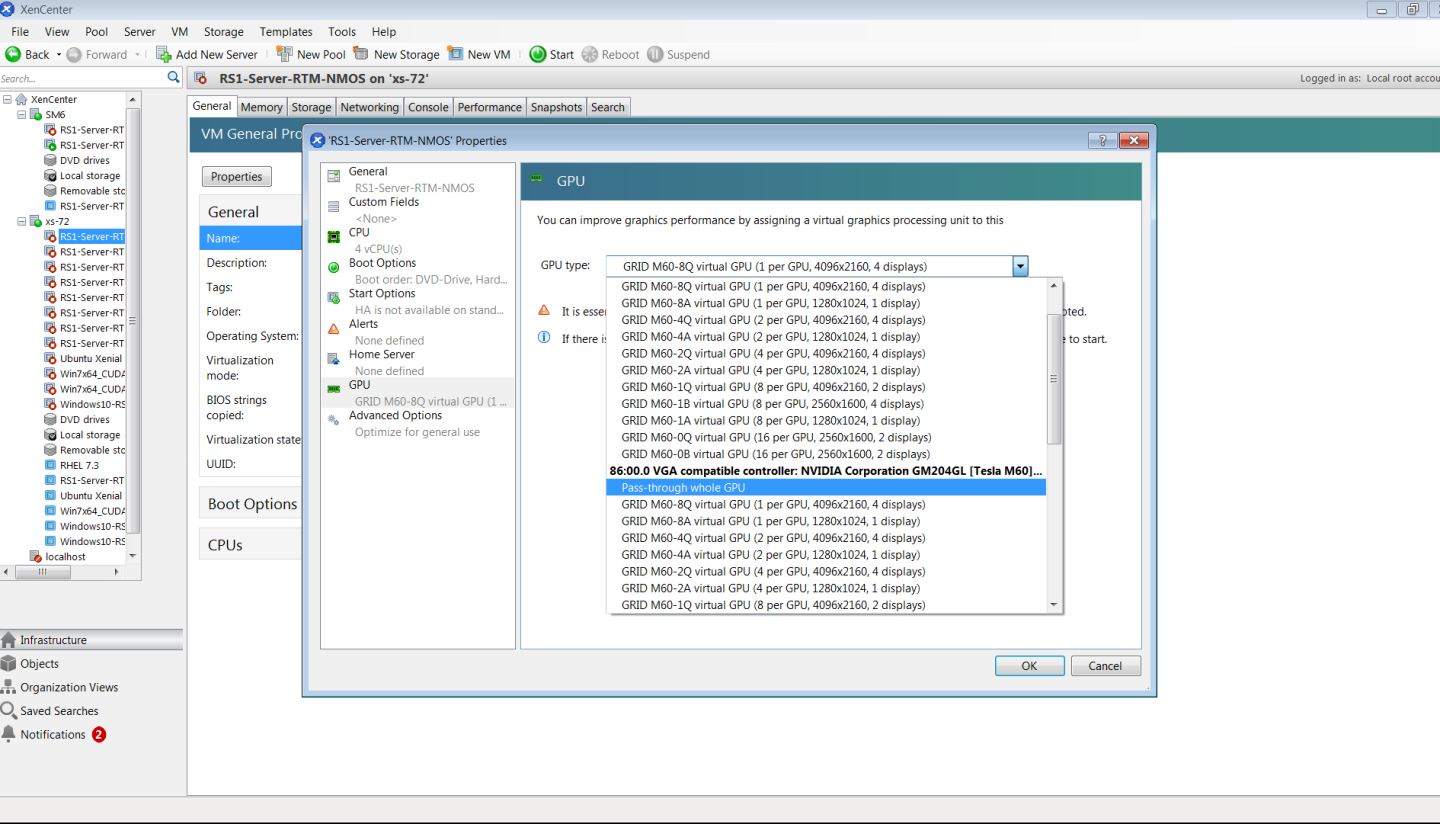
After configuring a Citrix Hypervisor VM for GPU pass through, install the NVIDIA graphics driver in the guest OS on the VM as explained in Installing the NVIDIA vGPU Software Graphics Driver.
3.2.2. Configuring a VM for GPU Pass Through by Using xe
Create a vgpu object with the passthrough vGPU type:
            [root@xenserver ~]# xe vgpu-type-list model-name="passthrough"
uuid ( RO)                : fa50b0f0-9705-6c59-689e-ea62a3d35237
         vendor-name ( RO):
          model-name ( RO): passthrough
    framebuffer-size ( RO): 0

[root@xenserver ~]# xe vgpu-create vm-uuid=753e77a9-e10d-7679-f674-65c078abb2eb vgpu-type-uuid=fa50b0f0-9705-6c59-689e-ea62a3d35237 gpu-group-uuid=585877ef-5a6c-66af-fc56-7bd525bdc2f6
6aa530ec-8f27-86bd-b8e4-fe4fde8f08f9
[root@xenserver ~]#
Do not assign pass-through GPUs using the legacy other-config:pci parameter setting. This mechanism is not supported alongside the XenCenter UI and xe vgpu mechanisms, and attempts to use it may lead to undefined results.
After configuring a Citrix Hypervisor VM for GPU pass through, install the NVIDIA graphics driver in the guest OS on the VM as explained in Installing the NVIDIA vGPU Software Graphics Driver.
3.3. Using GPU Pass-Through on Red Hat Enterprise Linux KVM or Ubuntu
You can configure a GPU for pass-through on Red Hat Enterprise Linux Kernel-based Virtual Machine (KVM) or Ubuntu by using any of the following tools:
- The Virtual Machine Manager (virt-manager) graphical tool
- The virsh command
- The QEMU command line
Before configuring a GPU for pass-through on Red Hat Enterprise Linux KVM or Ubuntu, ensure that the following prerequisites are met:
- Red Hat Enterprise Linux KVM or Ubuntu is installed.
- A virtual disk has been created.
Note:
Do not create any virtual disks in /root.
- A virtual machine has been created.
3.3.1. Configuring a VM for GPU Pass-Through by Using Virtual Machine Manager (virt-manager)
For more information about using Virtual Machine Manager, see the following topics in the documentation for Red Hat Enterprise Linux 7:
- Managing Guests with the Virtual Machine Manager (virt-manager)
- Starting virt-manager
- Assigning a PCI Device with virt-manager
- Start virt-manager.
- In the virt-manager main window, select the VM that you want to configure for pass-through.
- From the Edit menu, choose Virtual Machine Details.
- In the virtual machine hardware information window that opens, click Add Hardware.
- In the Add New Virtual Hardware dialog box that opens, in the hardware list on the left, select PCI Host Device.
- From the Host Device list that appears, select the GPU that you want to assign to the VM and click Finish.
If you want to remove a GPU from the VM to which it is assigned, in the virtual machine hardware information window, select the GPU and click Remove.
After configuring the VM for GPU pass through, install the NVIDIA graphics driver in the guest OS on the VM as explained in Installing the NVIDIA vGPU Software Graphics Driver.
3.3.2. Configuring a VM for GPU Pass-Through by Using virsh
For more information about using virsh, see the following topics in the documentation for Red Hat Enterprise Linux 7:
- Verify that the
vfio-pcimodule is loaded.# lsmod | grep vfio-pci
- Obtain the PCI device bus/device/function (BDF) of the GPU that you want to assign in pass-through mode to a VM.
# lspci | grep NVIDIA
The NVIDIA GPUs listed in this example have the PCI device BDFs
85:00.0and86:00.0.# lspci | grep NVIDIA 85:00.0 VGA compatible controller: NVIDIA Corporation GM204GL [Tesla M60] (rev a1) 86:00.0 VGA compatible controller: NVIDIA Corporation GM204GL [Tesla M60] (rev a1)
- Obtain the full identifier of the GPU from its PCI device BDF.
# virsh nodedev-list --cap pci| grep transformed-bdf
- transformed-bdf
-
The PCI device BDF of the GPU with the colon and the period replaced with underscores, for example,
85_00_0.
This example obtains the full identifier of the GPU with the PCI device BDF
85:00.0.# virsh nodedev-list --cap pci| grep 85_00_0 pci_0000_85_00_0
- Obtain the domain, bus, slot, and function of the GPU.
virsh nodedev-dumpxml full-identifier| egrep 'domain|bus|slot|function'
- full-identifier
-
The full identifier of the GPU that you obtained in the previous step, for example,
pci_0000_85_00_0.
This example obtains the domain, bus, slot, and function of the GPU with the PCI device BDF
85:00.0.# virsh nodedev-dumpxml pci_0000_85_00_0| egrep 'domain|bus|slot|function' <domain>0x0000</domain> <bus>0x85</bus> <slot>0x00</slot> <function>0x0</function> <address domain='0x0000' bus='0x85' slot='0x00' function='0x0'/>
- In virsh, open for editing the XML file of the VM that you want to assign the GPU to.
# virsh edit vm-name
- vm-name
- The name of the VM to that you want to assign the GPU to.
- Add a device entry in the form of an
addresselement inside thesourceelement to assign the GPU to the guest VM. You can optionally add a second address element after thesourceelement to set a fixed PCI device BDF for the GPU in the guest operating system.<hostdev mode='subsystem' type='pci' managed='yes'> <source> <address domain='domain' bus='bus' slot='slot' function='function'/> </source> <address type='pci' domain='0x0000' bus='0x00' slot='0x05' function='0x0'/> </hostdev>
- domain
- bus
- slot
- function
- The domain, bus, slot, and function of the GPU, which you obtained in the previous step.
This example adds a device entry for the GPU with the PCI device BDF
85:00.0and fixes the BDF for the GPU in the guest operating system.<hostdev mode='subsystem' type='pci' managed='yes'> <source> <address domain='0x0000' bus='0x85' slot='0x00' function='0x0'/> </source> <address type='pci' domain='0x0000' bus='0x00' slot='0x05' function='0x0'/> </hostdev>
- Start the VM that you assigned the GPU to.
# virsh start vm-name
- vm-name
- The name of the VM that you assigned the GPU to.
After configuring the VM for GPU pass through, install the NVIDIA graphics driver in the guest OS on the VM as explained in Installing the NVIDIA vGPU Software Graphics Driver.
3.3.3. Configuring a VM for GPU Pass-Through by Using the QEMU Command Line
- Obtain the PCI device bus/device/function (BDF) of the GPU that you want to assign in pass-through mode to a VM.
# lspci | grep NVIDIA
The NVIDIA GPUs listed in this example have the PCI device BDFs
85:00.0and86:00.0.# lspci | grep NVIDIA 85:00.0 VGA compatible controller: NVIDIA Corporation GM204GL [Tesla M60] (rev a1) 86:00.0 VGA compatible controller: NVIDIA Corporation GM204GL [Tesla M60] (rev a1)
- Add the following option to the QEMU command line:
-device vfio-pci,host=bdf
- bdf
-
The PCI device BDF of the GPU that you want to assign in pass-through mode to a VM, for example,
85:00.0.
This example assigns the GPU with the PCI device BDF
85:00.0in pass-through mode to a VM.-device vfio-pci,host=85:00.0
After configuring the VM for GPU pass through, install the NVIDIA graphics driver in the guest OS on the VM as explained in Installing the NVIDIA vGPU Software Graphics Driver.
3.3.4. Preparing a GPU Configured for vGPU for Use in Pass-Through Mode
The mode in which a physical GPU is being used determines the Linux kernel module to which the GPU is bound. If you want to switch the mode in which a GPU is being used, you must unbind the GPU from its current kernel module and bind it to the kernel module for the new mode. After binding the GPU to the correct kernel module, you can then configure it for pass-through.
When the Virtual GPU Manager is installed on a Red Hat Enterprise Linux KVM or Ubuntu host, the physical GPUs on the host are bound to the nvidia kernel module. A physical GPU that is bound to the nvidia kernel module can be used only for vGPU. To enable the GPU to be passed through to a VM, the GPU must be unbound from nvidia kernel module and bound to the vfio-pci kernel module.
Before you begin, ensure that you have the domain, bus, slot, and function of the GPU that you are preparing for use in pass-through mode. For instructions, see Getting the BDF and Domain of a GPU on a Linux with KVM Hypervisor.
- If you are using a GPU that supports SR-IOV, such as a GPU based on the NVIDIA Ampere architecture, disable the virtual function for the GPU in the sysfs file system.
If your GPU does not support SR-IOV, omit this step.
Note:Before performing this step, ensure that the GPU is not being used by any other processes, such as CUDA applications, monitoring applications, or the nvidia-smi command.
Use the custom script sriov-manage provided by NVIDIA vGPU software for this purpose.
# /usr/lib/nvidia/sriov-manage -d domain:bus:slot.function
- domain
- bus
- slot
- function
-
The domain, bus, slot, and function of the GPU, without the
0xprefix.
This example disables the virtual function for the GPU with the domain
00, bus06, slot0000, and function0.# /usr/lib/nvidia/sriov-manage -d 00:06:0000.0
- Determine the kernel module to which the GPU is bound by running the lspci command with the -k option on the NVIDIA GPUs on your host.
# lspci -d 10de: -k
The
Kernel driver in use:field indicates the kernel module to which the GPU is bound.The following example shows that the NVIDIA Tesla M60 GPU with BDF
06:00.0is bound to thenvidiakernel module and is being used for vGPU.06:00.0 VGA compatible controller: NVIDIA Corporation GM204GL [Tesla M60] (rev a1) Subsystem: NVIDIA Corporation Device 115e Kernel driver in use: nvidia
- To ensure that no clients are using the GPU, acquire the unbind lock of the GPU.
- Ensure that no VM is running to which a vGPU on the physical GPU is assigned and that no process running on the host is using that GPU. Processes on the host that use the GPU include the nvidia-smi command and all processes based on the NVIDIA Management Library (NVML).
- Change to the directory in the proc file system that represents the GPU.
# cd /proc/driver/nvidia/gpus/domain\:bus\:slot.function
- domain
- bus
- slot
- function
-
The domain, bus, slot, and function of the GPU, without a
0xprefix.
This example changes to the directory in the proc file system that represents the GPU with the domain
0000and PCI device BDF06:00.0.# cd /proc/driver/nvidia/gpus/0000\:06\:00.0
- Write the value
1to the unbindLock file in this directory.# echo 1 > unbindLock
- Confirm that the unbindLock file now contains the value
1.# cat unbindLock 1
If the unbindLock file contains the value
0, the unbind lock could not be acquired because a process or client is using the GPU.
- Unbind the GPU from
nvidiakernel module.- Change to the sysfs directory that represents the
nvidiakernel module.# cd /sys/bus/pci/drivers/nvidia
- Write the domain, bus, slot, and function of the GPU to the unbind file in this directory.
# echo domain:bus:slot.function > unbind
- domain
- bus
- slot
- function
-
The domain, bus, slot, and function of the GPU, without a
0xprefix.
This example writes the domain, bus, slot, and function of the GPU with the domain
0000and PCI device BDF06:00.0.# echo 0000:06:00.0 > unbind
- Change to the sysfs directory that represents the
- Bind the GPU to the
vfio-pcikernel module.- Change to the sysfs directory that contains the PCI device information for the physical GPU.
# cd /sys/bus/pci/devices/domain\:bus\:slot.function
- domain
- bus
- slot
- function
-
The domain, bus, slot, and function of the GPU, without a
0xprefix.
This example changes to the sysfs directory that contains the PCI device information for the GPU with the domain
0000and PCI device BDF06:00.0.# cd /sys/bus/pci/devices/0000\:06\:00.0
- Write the kernel module name
vfio-pcito the driver_override file in this directory.# echo vfio-pci > driver_override
- Change to the sysfs directory that represents the
nvidiakernel module.# cd /sys/bus/pci/drivers/vfio-pci
- Write the domain, bus, slot, and function of the GPU to the bind file in this directory.
# echo domain:bus:slot.function > bind
- domain
- bus
- slot
- function
-
The domain, bus, slot, and function of the GPU, without a
0xprefix.
This example writes the domain, bus, slot, and function of the GPU with the domain
0000and PCI device BDF06:00.0.# echo 0000:06:00.0 > bind
- Change back to the sysfs directory that contains the PCI device information for the physical GPU.
# cd /sys/bus/pci/devices/domain\:bus\:slot.function
- Clear the content of the driver_override file in this directory.
# echo > driver_override
- Change to the sysfs directory that contains the PCI device information for the physical GPU.
You can now configure the GPU for use in pass-through mode as explained in Using GPU Pass-Through on Red Hat Enterprise Linux KVM or Ubuntu.
3.4. Using GPU Pass-Through on Microsoft Windows Server
On supported versons of Microsoft Windows Server with Hyper-V role, you can use Discrete Device Assignment (DDA) to enable a VM to access a GPU directly.
3.4.1. Assigning a GPU to a VM on Microsoft Windows Server with Hyper-V
Perform this task in Windows PowerShell. If you do not know the location path of the GPU that you want to assign to a VM, use Device Manager to obtain it.
If you are using an actively cooled NVIDIA Quadro graphics card such as the RTX 8000 or RTX 6000, you must also pass through the audio device on the graphics card.
Ensure that the following prerequisites are met:
-
Windows Server with Desktop Experience and the Hyper-V role are installed and configured on your server platform, and a VM is created.
For instructions, refer to the following articles on the Microsoft technical documentation site:
- The guest OS is installed in the VM.
- The VM is powered off.
- Obtain the location path of the GPU that you want to assign to a VM.
- In the device manager, context-click the GPU and from the menu that pops up, choose Properties.
- In the Properties window that opens, click the Details tab and in the Properties drop-down list, select Location paths.
An example location path is as follows:
PCIROOT(80)#PCI(0200)#PCI(0000)#PCI(1000)#PCI(0000)
- If you are using an actively cooled NVIDIA Quadro graphics card, obtain the location path of the audio device on the graphics card and disable the device.
- In the device manager, from the View menu, choose Devices by connection.
- Navigate to ACPI x64-based PC > Microsoft ACPI-Compliant System > PCI Express Root Complex > PCI-to-PCI Bridge.
- Context-click High Definition Audio Controller and from the menu that pops up, choose Properties.
- In the Properties window that opens, click the Details tab and in the Properties drop-down list, select Location paths.
- Context-click High Definition Audio Controller again and from the menu that pops up, choose Disable device.
- Dismount the GPU and, if present, the audio device from host to make them unavailable to the host so that they can be used solely by the VM.
For each device that you are dismounting, type the following command:
Dismount-VMHostAssignableDevice -LocationPath gpu-device-location -force
- gpu-device-location
- The location path of the GPU or the audio device that you obtained previously.
This example dismounts the GPU at the location path
PCIROOT(80)#PCI(0200)#PCI(0000)#PCI(1000)#PCI(0000).Dismount-VMHostAssignableDevice -LocationPath "PCIROOT(80)#PCI(0200)#PCI(0000)#PCI(1000)#PCI(0000)" -force
- Assign the GPU and, if present, the audio device that you dismounted in the previous step to the VM.
For each device that you are assigning, type the following command:
Add-VMAssignableDevice -LocationPath gpu-device-location -VMName vm-name
- gpu-device-location
- The location path of the GPU or the audio device that you dismounted in the previous step.
- vm-name
- The name of the VM to which you are attaching the GPU or the audio device.
Note:You can assign a pass-through GPU and, if present, its audio device to only one virtual machine at a time.
This example assigns the GPU at the location path
PCIROOT(80)#PCI(0200)#PCI(0000)#PCI(1000)#PCI(0000)to the VMVM1.Add-VMAssignableDevice -LocationPath "PCIROOT(80)#PCI(0200)#PCI(0000)#PCI(1000)#PCI(0000)" -VMName VM1
- Power on the VM. The guest OS should now be able to use the GPU and, if present, the audio device.
After assigning a GPU to a VM, install the NVIDIA graphics driver in the guest OS on the VM as explained in Installing the NVIDIA vGPU Software Graphics Driver.
3.4.2. Returning a GPU to the Host OS from a VM on Windows Server with Hyper-V
Perform this task in the Windows PowerShell.
If you are using an actively cooled NVIDIA Quadro graphics card such as the RTX 8000 or RTX 6000, you must also return the audio device on the graphics card.
- List the GPUs and, if present, the audio devices that are currently assigned to the virtual machine (VM).
Get-VMAssignableDevice -VMName vm-name
- vm-name
- The name of the VM whose assigned GPUs and audio devices you want to list.
- Shut down the VM to which the GPU and any audio devices are assigned.
- Remove the GPU and, if present, the audio device from the VM to which they are assigned.
For each device that you are removing, type the following command:
Remove-VMAssignableDevice –LocationPath gpu-device-location -VMName vm-name
- gpu-device-location
- The location path of the GPU or the audio device that you are removing, which you obtained previously.
- vm-name
- The name of the VM from which you are removing the GPU or the audio device.
This example removes the GPU at the location path
PCIROOT(80)#PCI(0200)#PCI(0000)#PCI(1000)#PCI(0000)from the VMVM1.Remove-VMAssignableDevice –LocationPath "PCIROOT(80)#PCI(0200)#PCI(0000)#PCI(1000)#PCI(0000)" -VMName VM1
After the GPU and, if present, its audio device are removed from the VM, they are unavailable to the host operating system (OS) until you remount them on the host OS.
- Remount the GPU and, if present, its audio device on the host OS.
For each device that you are remounting, type the following command:
Mount-VMHostAssignableDevice –LocationPath gpu-device-location
- gpu-device-location
- The location path of the GPU or the audio device that you are remounting, which you specified in the previous step to remove the GPU or the audio device from the VM.
This example remounts the GPU at the location path
PCIROOT(80)#PCI(0200)#PCI(0000)#PCI(1000)#PCI(0000)on the host OS.Mount-VMHostAssignableDevice -LocationPath "PCIROOT(80)#PCI(0200)#PCI(0000)#PCI(1000)#PCI(0000)"
The host OS should now be able to use the GPU and, if present, its audio device.
3.5. Using GPU Pass-Through on VMware vSphere
On VMware vSphere, you can use Virtual Dedicated Graphics Acceleration (vDGA) to enable a VM to access a GPU directly. vDGA is a feature of VMware vSphere that dedicates a single physical GPU on an ESXi host to a single virtual machine.
Before configuring a vSphere VM with vDGA, ensure that these prerequisites are met
- The VM and the ESXi host are configured as explained in Preparing for vDGA Capabilities in the VMware Horizon documentation.
- The VM is powered off.
- Open the vCenter Web UI.
- In the vCenter Web UI, right-click the ESXi host and choose Settings.
- From the Hardware menu, choose PCI Devices and click the Edit icon.
- Select all NVIDIA GPUs and click OK.
- Reboot the ESXi host.
- After the ESXi host has booted, right-click the VM and choose Edit Settings.
- From the New Device menu, choose PCI Device and click Add.
- On the page that opens, from the New Device drop-down list, select the GPU.
- Click Reserve all memory and click OK.
- Start the VM.
For more information about vDGA, see the following topics in the VMware Horizon documentation:
After configuring a vSphere VM with vDGA, install the NVIDIA graphics driver in the guest OS on the VM as explained in Installing the NVIDIA vGPU Software Graphics Driver.
The process for installing the NVIDIA vGPU software graphics driver depends on the OS that you are using. However, for any OS, the process for installing the driver is the same in a VM configured with vGPU, in a VM that is running pass-through GPU, or on a physical host in a bare-metal deployment.
After you install the NVIDIA vGPU software graphics driver, you can license any NVIDIA vGPU software licensed products that you are using.
4.1. Installing the NVIDIA vGPU Software Graphics Driver on Windows
Installation in a VM: After you create a Windows VM on the hypervisor and boot the VM, the VM should boot to a standard Windows desktop in VGA mode at 800×600 resolution. You can use the Windows screen resolution control panel to increase the resolution to other standard resolutions, but to fully enable GPU operation, the NVIDIA vGPU software graphics driver must be installed. Windows guest VMs are supported only on Q-series, B-series, and A-series NVIDIA vGPU types. They are not supported on C-series NVIDIA vGPU types.
Installation on bare metal: When the physical host is booted before the NVIDIA vGPU software graphics driver is installed, boot and the primary display are handled by an on-board graphics adapter. To install the NVIDIA vGPU software graphics driver, access the Windows desktop on the host by using a display connected through the on-board graphics adapter.
The procedure for installing the driver is the same in a VM and on bare metal.
- Copy the NVIDIA Windows driver package to the guest VM or physical host where you are installing the driver.
- Execute the package to unpack and run the driver installer.
Figure 16. NVIDIA driver installation

- Click through the license agreement.
- Select Express Installation and click NEXT. After the driver installation is complete, the installer may prompt you to restart the platform.
- If prompted to restart the platform, do one of the following:
- Select Restart Now to reboot the VM or physical host.
- Exit the installer and reboot the VM or physical host when you are ready.
After the VM or physical host restarts, it boots to a Windows desktop.
- Verify that the NVIDIA driver is running.
- Right-click on the desktop.
- From the menu that opens, choose NVIDIA Control Panel.
- In the NVIDIA Control Panel, from the Help menu, choose System Information.
NVIDIA Control Panel reports the vGPU or physical GPU that is being used, its capabilities, and the NVIDIA driver version that is loaded.
Figure 17. Verifying NVIDIA driver operation using NVIDIA Control Panel

Installation in a VM: After you install the NVIDIA vGPU software graphics driver, you can license any NVIDIA vGPU software licensed products that you are using. For instructions, refer to Virtual GPU Client Licensing User Guide.
Installation on bare metal: After you install the NVIDIA vGPU software graphics driver, complete the bare-metal deployment as explained in Bare-Metal Deployment.
4.2. Installing the NVIDIA vGPU Software Graphics Driver on Linux
The NVIDIA vGPU software graphics driver for Linux is distributed as a .run file that can be installed on all supported Linux distributions. The driver is also distributed as a Debian package for Ubuntu distributions and as an RPM package for Red Hat distributions.
Installation in a VM: After you create a Linux VM on the hypervisor and boot the VM, install the NVIDIA vGPU software graphics driver in the VM to fully enable GPU operation. 64-bit Linux guest VMs are supported only on Q-series, C-series, and B-series NVIDIA vGPU types. They are not supported on A-series NVIDIA vGPU types.
Installation on bare metal: When the physical host is booted before the NVIDIA vGPU software graphics driver is installed, the vesa Xorg driver starts the X server. If a primary display device is connected to the host, use the device to access the desktop. Otherwise, use secure shell (SSH) to log in to the host from a remote host. If the Nouveau driver for NVIDIA graphics cards is present, disable it before installing the NVIDIA vGPU software graphics driver. For instructions, refer to Disabling the Nouveau Driver for NVIDIA Graphics Cards.
The procedure for installing the driver is the same in a VM and on bare metal.
If you are using a Linux OS for which the Wayland display server protocol is enabled by default, disable it as explained in Disabling the Wayland Display Server Protocol for Red Hat Enterprise Linux.
How to install the NVIDIA vGPU softwaregraphics driver on Linux depends on the distribution format from which you are installing the driver. For detailed instructions, refer to:
- Installing the NVIDIA vGPU Software Graphics Driver on Linux from a .run File
- Installing the NVIDIA vGPU Software Graphics Driver on Ubuntu from a Debian Package
- Installing the NVIDIA vGPU Software Graphics Driver on Red Hat Distributions from an RPM Package
Installation in a VM: After you install the NVIDIA vGPU software graphics driver, you can license any NVIDIA vGPU software licensed products that you are using. For instructions, refer to Virtual GPU Client Licensing User Guide.
Installation on bare metal: After you install the NVIDIA vGPU software graphics driver, complete the bare-metal deployment as explained in Bare-Metal Deployment.
4.2.1. Installing the NVIDIA vGPU Software Graphics Driver on Linux from a .run File
You can use the .run file to install the NVIDIA vGPU software graphics driver on any supported Linux distribution.
Installation of the NVIDIA vGPU software graphics driver for Linux from a .run file requires:
- Compiler toolchain
- Kernel headers
If a driver has previously been installed on the guest VM or physical host from a Debian package or RPM package, uninstall that driver before installing the driver from a .run file.
If Dynamic Kernel Module Support (DKMS) is enabled, ensure that the dkms package is installed.
- Copy the NVIDIA vGPU software Linux driver package, for example NVIDIA-Linux_x86_64-510.108.03-grid.run, to the guest VM or physical host where you are installing the driver.
- Before attempting to run the driver installer, exit the X server and terminate all OpenGL applications.
- On Red Hat Enterprise Linux and CentOS systems, exit the X server by transitioning to runlevel 3:
[nvidia@localhost ~]$ sudo init 3
- On Ubuntu platforms, do the following:
- Use CTRL-ALT-F1 to switch to a console login prompt.
- Log in and shut down the display manager:
-
For Ubuntu 18 and later releases, stop the gdm service.
[nvidia@localhost ~]$ sudo service gdm stop
-
For releases earlier than Ubuntu 18, stop the lightdm service.
[nvidia@localhost ~]$ sudo service lightdm stop
-
- On Red Hat Enterprise Linux and CentOS systems, exit the X server by transitioning to runlevel 3:
- From a console shell, run the driver installer as the root user.
sudo sh ./NVIDIA-Linux_x86_64-510.108.03-grid.run
dkmspackage to be installed.sudo sh ./NVIDIA-Linux_x86_64-510.108.03-grid.run -dkms
            sudo sh ./NVIDIA-Linux_x86_64-510.108.03-grid.run \
–kernel-source-path=/usr/src/kernels/3.10.0-229.11.1.el7.x86_64
- When prompted, accept the option to update the X configuration file (xorg.conf).
Figure 18. Update xorg.conf settings

- After the installation is complete, select OK to exit the installer.
- Verify that the NVIDIA driver is operational.
- Reboot the system and log in.
- Run nvidia-settings.
[nvidia@localhost ~]$ nvidia-settings
4.2.2. Installing the NVIDIA vGPU Software Graphics Driver on Ubuntu from a Debian Package
The NVIDIA vGPU software graphics driver for Ubuntu is distributed as a Debian package file.
This task requires sudo privileges.
- Copy the NVIDIA vGPU software Linux driver package, for example nvidia-linux-grid-510_510.108.03_amd64.deb, to the guest VM where you are installing the driver.
- Log in to the guest VM as a user with sudo privileges.
- Open a command shell and change to the directory that contains the NVIDIA vGPU software Linux driver package.
- From the command shell, run the command to install the package.
$ sudo apt-get install ./nvidia-linux-grid-510_510.108.03_amd64.deb
- Verify that the NVIDIA driver is operational.
- Reboot the system and log in.
- After the system has rebooted, confirm that you can see your NVIDIA vGPU device in the output from the nvidia-smi command.
$ nvidia-smi
4.2.3. Installing the NVIDIA vGPU Software Graphics Driver on Red Hat Distributions from an RPM Package
The NVIDIA vGPU software graphics driver for Red Hat Distributions is distributed as an RPM package file.
This task requires root user privileges.
- Copy the NVIDIA vGPU software Linux driver package, for example nvidia-linux-grid-510_510.108.03_amd64.rpm, to the guest VM where you are installing the driver.
- Log in to the guest VM as a user with
rootuser privileges. - Open a command shell and change to the directory that contains the NVIDIA vGPU software Linux driver package.
- From the command shell, run the command to install the package.
$ rpm -iv ./nvidia-linux-grid-510_510.108.03_amd64.rpm
- Verify that the NVIDIA driver is operational.
- Reboot the system and log in.
- After the system has rebooted, confirm that you can see your NVIDIA vGPU device in the output from the nvidia-smi command.
$ nvidia-smi
4.2.4. Disabling the Nouveau Driver for NVIDIA Graphics Cards
If the Nouveau driver for NVIDIA graphics cards is present, disable it before installing the NVIDIA vGPU software graphics driver.
If you are using SUSE Linux Enterprise Server, you can skip this task because the Nouveau driver is not present in SUSE Linux Enterprise Server.
Run the following command and if the command prints any output, the Nouveau driver is present and must be disabled.
$ lsmod | grep nouveau
- Create the file /etc/modprobe.d/blacklist-nouveau.conf with the following contents:
            blacklist nouveau
options nouveau modeset=0
- Regenerate the kernel initial RAM file system (initramfs). The command to run to regenerate the kernel initramfs depends on the Linux distribution that you are using.
Linux Distribution Command CentOS $ sudo dracut --force
Debian $ sudo update-initramfs -u
Red Hat Enterprise Linux $ sudo dracut --force
Ubuntu $ sudo update-initramfs -u
- Reboot the host or guest VM.
4.2.5. Disabling the Wayland Display Server Protocol for Red Hat Enterprise Linux
Starting with Red Hat Enterprise Linux Desktop 8.0, the Wayland display server protocol is used by default on supported GPU and graphics driver configurations. However, the NVIDIA vGPU software graphics driver for Linux requires the X Window System. Before installing the driver, you must disable the Wayland display server protocol to revert to the X Window System.
Perform this task from the host or guest VM that is running Red Hat Enterprise Linux Desktop.
This task requires administrative access.
- In a plain text editor, edit the file /etc/gdm/custom.conf and remove the comment from the option
WaylandEnable=false. - Save your changes to /etc/gdm/custom.conf.
- Reboot the host or guest VM.
4.2.6. Disabling GSP Firmware
Some GPUs include a GPU System Processor (GSP), which may be used to offload GPU initialization and management tasks. GSP is supported only for vCS in GPU pass through and bare-metal deployments on Linux. If you are using any other product in a GPU pass through or bare-metal deployment on Linux, you must disable the GSP firmware.
For NVIDIA vGPU deployments on Linux and all NVIDIA vGPU software deployments on Windows, GSP is also not supported but GSP firmware is already disabled. For these deployments, omit this task.
For each NVIDIA vGPU software product, the following table lists whether GSP is supported in deployments in which GSP firmware can be enabled. The table also summarizes the behavior of NVIDIA vGPU software if a VM or host requests a license when GSP firmware is enabled. The deployments in which GSP firmware can be enabled are GPU pass through and bare-metal deployments on Linux.
| Product | GSP | License Request | Error Message |
|---|---|---|---|
| vCS | Supported | Allowed | Not applicable |
| vApps | Not supported | Blocked | Printed |
| vWS | Not supported | Blocked | Printed |
When a license request is blocked, the following error message is written to the licensing event log file at the location given in Virtual GPU Client Licensing User Guide:
            Invalid feature requested for the underlying GSP firmware configuration.
Disable GSP firmware to use this feature.
Perform this task on the VM to which the GPU is passed through or on the bare-metal host.
Ensure that the NVIDIA vGPU software graphics driver for Linux is installed on the VM or bare-metal host.
- Log in to the VM or bare-metal host and open a command shell.
- Determine whether GSP firmware is enabled.
$ nvidia-smi -q
- If GSP firmware is enabled, the command displays the GSP firmware version, for example:
GSP Firmware Version : 510.108.03
- Otherwise, the command displays N/A as the GSP firmware version.
- If GSP firmware is enabled, the command displays the GSP firmware version, for example:
- If GSP firmware is enabled, disable it by setting the NVIDIA module parameter
NVreg_EnableGpuFirmwareto 0.Set this parameter by adding the following entry to the /etc/modprobe.d/nvidia.conf file:
options nvidia NVreg_EnableGpuFirmware=0
If the /etc/modprobe.d/nvidia.conf file does not already exist, create it.
- Reboot the VM or bare-metal host.
If you later need to enable GSP firmware, set the NVIDIA module parameter NVreg_EnableGpuFirmware to 1.
NVIDIA vGPU is a licensed product. When booted on a supported GPU, a vGPU initially operates at full capability but its performance is degraded over time if the VM fails to obtain a license. If the performance of a vGPU has been degraded, the full capability of the vGPU is restored when a license is acquired. For information about how the performance of an unlicensed vGPU is degraded, see Virtual GPU Client Licensing User Guide.
After you license NVIDIA vGPU, the VM that is set up to use NVIDIA vGPU is capable of running the full range of DirectX and OpenGL graphics applications.
If licensing is configured, the virtual machine (VM) obtains a license from the license server when a vGPU is booted on these GPUs. The VM retains the license until it is shut down. It then releases the license back to the license server. Licensing settings persist across reboots and need only be modified if the license server address changes, or the VM is switched to running GPU pass through.
How to license an NVIDIA vGPU depends on whether your licenses are served from NVIDIA License System or the legacy NVIDIA vGPU software license server.
For complete information about configuring and using NVIDIA vGPU software licensed features, including vGPU, refer to Virtual GPU Client Licensing User Guide.
5.1. Prerequisites for Configuring a Licensed Client of NVIDIA License System
A client with a network connection obtains a license by leasing it from a NVIDIA License System service instance. The service instance serves the license to the client over the network from a pool of floating licenses obtained from the NVIDIA Licensing Portal. The license is returned to the service instance when the licensed client is shut down.
Before configuring a licensed client, ensure that the following prerequisites are met:
- The NVIDIA vGPU software graphics driver is installed on the client.
- The client configuration token that you want to deploy on the client has been created from the NVIDIA Licensing Portal or the DLS as explained in NVIDIA License System User Guide.
- Ports 443 and 80 in your firewall or proxy must be open to allow HTTPS traffic between a service instance and its the licensed clients. These ports must be open for both CLS instances and DLS instances.
Note:
For DLS releases before DLS 1.1, ports 8081 and 8082 were also required to be open to allow HTTPS traffic between a DLS instance and its licensed clients. Although these ports are no longer required, they remain supported for backward compatibility.
The graphics driver creates a default location in which to store the client configuration token on the client.
The process for configuring a licensed client is the same for CLS and DLS instances but depends on the OS that is running on the client.
5.1.1. Configuring a Licensed Client on Windows
Perform this task from the client.
- Physical GPUs only: Add the
FeatureTypeDWord (REG_DWORD) registry value to the Windows registry keyHKEY_LOCAL_MACHINE\SOFTWARE\NVIDIA Corporation\Global\GridLicensing.Set this value to the feature type of a GPU in pass-through mode or a bare-metal deployment:Note:- If you're licensing an NVIDIA vGPU, the
FeatureTypeDWord (REG_DWORD) registry value is not required. NVIDIA vGPU software automatically selects the correct type of license based on the vGPU type. - If you are upgrading an existing driver, this value is already set.
- 0: NVIDIA Virtual Applications
- 2: NVIDIA RTX Virtual Workstation
- If you're licensing an NVIDIA vGPU, the
- Optional: If you want store the client configuration token in a custom location, add the
ClientConfigTokenPathString (REG_SZ) registry value to the Windows registry keyHKEY_LOCAL_MACHINE\SOFTWARE\NVIDIA Corporation\Global\GridLicensing.Set the value to the full path to the folder in which you want to store the client configuration token for the client. You can use the syntax \\fully-qualified-domain-name\share-name for the path to the folder. By default, the client searches for the client configuration token in the %SystemDrive%:\Program Files\NVIDIA Corporation\vGPU Licensing\ClientConfigToken folder.
By specifying a shared network drive mapped on the client, you can simplify the deployment of the same client configuration token on multiple clients. Instead of copying the client configuration token to each client individually, you can keep only one copy in the shared network drive.
- Since 14.3: If a non-transparent proxy server is configured between your licensed client and a CLS instance, provide the address and port number of the proxy server.
Note:
Authenticated non-transparent proxy servers are not supported.
Provide this information by adding the following registry values to the Windows registry key
HKEY_LOCAL_MACHINE\SOFTWARE\NVIDIA Corporation\Global\GridLicensing.-
ProxyServerAddressString(REG_SZ) -
The address of the proxy server. The address can be a fully qualified domain name such as
iproxy1.example.com, or an IP address such as10.31.20.45. -
ProxyServerPortString(REG_SZ) - The port number of the proxy server.
-
- If you are storing the client configuration token in a custom location, create the folder in which you want to store the client configuration token.
If the folder is a shared network drive, ensure that the following conditions are met:
- The folder is mapped locally on the client to the path specified in the
ClientConfigTokenPathregistry value. - The
COMPUTERobject has the rights to access the folder on the shared network drive. TheCOMPUTERobject requires these rights because the license service runs before any user logs in.
If you are storing the client configuration token in the default location, omit this step. The default folder in which the client configuration token is stored is created automatically after the graphics driver is installed.
- The folder is mapped locally on the client to the path specified in the
- Copy the client configuration token to the folder in which you want to store the client configuration token. Ensure that this folder contains only the client configuration token that you want to deploy on the client and no other files or folders. If the folder contains more than one client configuration token, the client uses the newest client configuration token in the folder.
- If you want to store the client configuration token in the default location, copy the client configuration token to the %SystemDrive%:\Program Files\NVIDIA Corporation\vGPU Licensing\ClientConfigToken folder.
- If you want to store the client configuration token in a custom location, copy the token to the folder that you created in the previous step.
- Restart the NvDisplayContainer service.
The NVIDIA service on the client should now automatically obtain a license from the CLS or DLS instance.
After a Windows licensed client has been configured, options for configuring licensing for a network-based license server are no longer available in NVIDIA Control Panel.
5.1.2. Configuring a Licensed Client on Linux
Perform this task from the client.
- As root, open the file /etc/nvidia/gridd.conf in a plain-text editor, such as vi.
$ sudo vi /etc/nvidia/gridd.conf
Note:You can create the /etc/nvidia/gridd.conf file by copying the supplied template file /etc/nvidia/gridd.conf.template.
- Add the
FeatureTypeconfiguration parameter to the file /etc/nvidia/gridd.conf on a new line asFeatureType="value".value depends on the type of the GPU assigned to the licensed client that you are configuring.
GPU Type Value NVIDIA vGPU 1. NVIDIA vGPU software automatically selects the correct type of license based on the vGPU type. Physical GPU The feature type of a GPU in pass-through mode or a bare-metal deployment: - 0: NVIDIA Virtual Applications
- 2: NVIDIA RTX Virtual Workstation
- 4: NVIDIA Virtual Compute Server
This example shows how to configure a licensed Linux client for NVIDIA Virtual Compute Server.
            # /etc/nvidia/gridd.conf.template - Configuration file for NVIDIA Grid Daemon
…
# Description: Set Feature to be enabled
# Data type: integer
# Possible values:
# 0 => for unlicensed state
# 1 => for NVIDIA vGPU
# 2 => for NVIDIA RTX Virtual Workstation
# 4 => for NVIDIA Virtual Compute Server
FeatureType=4
...
- Since 14.3: If a non-transparent proxy server is configured between your licensed client and a CLS instance, provide the address and port number of the proxy server.
Note:
Authenticated non-transparent proxy servers are not supported.
Provide this information by adding the following configuration parameters to the file /etc/nvidia/gridd.conf on separate lines.
            ProxyServerAddress=address
ProxyServerPort=port
- address
-
The address of the proxy server. The address can be a fully qualified domain name such as
iproxy1.example.com, or an IP address such as10.31.20.45. - port
- The port number of the proxy server.
This example sets the address of a proxy server to
10.31.20.45and the port number to3128.# /etc/nvidia/gridd.conf.template - Configuration file for NVIDIA Grid Daemon … ProxyServerAddress=10.31.20.45 ProxyServerPort=3128 ...
- Optional: If you want store the client configuration token in a custom location, add the
ClientConfigTokenPathconfiguration parameter to the file /etc/nvidia/gridd.conf on a new line asClientConfigTokenPath="path"- path
- The full path to the directory in which you want to store the client configuration token for the client. By default, the client searches for the client configuration token in the /etc/nvidia/ClientConfigToken/ directory.
By specifying a shared network directory that is mounted locally on the client, you can simplify the deployment of the same client configuration token on multiple clients. Instead of copying the client configuration token to each client individually, you can keep only one copy in the shared network directory.
This example shows how to configure a licensed Linux client to search for the client configuration token in the /mnt/nvidia/ClientConfigToken/ directory. This directory is a mount point on the client for a shared network directory.
            # /etc/nvidia/gridd.conf.template - Configuration file for NVIDIA Grid Daemon
…
ClientConfigTokenPath=/mnt/nvidia/ClientConfigToken/
...
- Save your changes to the /etc/nvidia/gridd.conf file and close the file.
- If you are storing the client configuration token in a custom location, create the directory in which you want to store the client configuration token.
If the directory is a shared network directory, ensure that it is mounted locally on the client at the path specified in the
ClientConfigTokenPathconfiguration parameter.If you are storing the client configuration token in the default location, omit this step. The default directory in which the client configuration token is stored is created automatically after the graphics driver is installed.
- Copy the client configuration token to the directory in which you want to store the client configuration token. Ensure that this directory contains only the client configuration token that you want to deploy on the client and no other files or directories. If the directory contains more than one client configuration token, the client uses the newest client configuration token in the directory.
- If you want to store the client configuration token in the default location, copy the client configuration token to the /etc/nvidia/ClientConfigToken directory.
- If you want to store the client configuration token in a custom location, copy the token to the directory that you created in the previous step.
- Ensure that the file access modes of the client configuration token allow the owner to read, write, and execute the token, and the group and others only to read the token.
- Determine the current file access modes of the client configuration token.
# ls -l client-configuration-token-directory
- If necessary, change the mode of the client configuration token to 744.
# chmod 744 client-configuration-token-directory/client_configuration_token_*.tok
- client-configuration-token-directory
- The directory to which you copied the client configuration token in the previous step.
- Determine the current file access modes of the client configuration token.
- Restart the nvidia-gridd service.
The NVIDIA service on the client should now automatically obtain a license from the CLS or DLS instance.
After a Linux licensed client has been configured, options for configuring licensing for a network-based license server are no longer available in NVIDIA X Server Settings.
5.1.3. Verifying the NVIDIA vGPU Software License Status of a Licensed Client
After configuring a client with an NVIDIA vGPU software license, verify the license status by displaying the licensed product name and status.
To verify the license status of a licensed client, run nvidia-smi with the –q or --query option. If the product is licensed, the expiration date is shown in the license status.
            nvidia-smi -q
==============NVSMI LOG==============

Timestamp                           : Wed Mar 31 01:49:28 2020
Driver Version                      : 440.88
CUDA Version                        : 10.0

Attached GPUs                       : 1
GPU 00000000:00:08.0
    Product Name                    : Tesla T4
    Product Brand                   : Grid
    Display Mode                    : Enabled
    Display Active                  : Disabled
    Persistence Mode                : N/A
    Accounting Mode                 : Disabled
    Accounting Mode Buffer Size     : 4000
    Driver Model
        Current                     : WDDM
        Pending                     : WDDM
    Serial Number                   : 0334018000638
    GPU UUID                        : GPU-ba2310b6-95d1-802b-f96f-5865410fe517
    Minor Number                    : N/A
    VBIOS Version                   : 90.04.21.00.01
    MultiGPU Board                  : No
    Board ID                        : 0x8
    GPU Part Number                 : 699-2G183-0200-100
    Inforom Version
        Image Version               : G183.0200.00.02
        OEM Object                  : 1.1
        ECC Object                  : 5.0
        Power Management Object     : N/A
    GPU Operation Mode
        Current                     : N/A
        Pending                     : N/A
    GPU Virtualization Mode
        Virtualization mode         : Pass-Through
    vGPU Software Licensed Product Product Name : NVIDIA Virtual Compute Server License Status : Licensed (Expiry: 2021-11-13 18:29:59 GMT)
    …
    …
5.2. Licensing NVIDIA vGPU from the Legacy License Server
How to license NVIDIA vGPU depends on the guest OS that is running in the VM.
5.2.1. Licensing an NVIDIA vGPU on Windows
Perform this task from the guest VM to which the vGPU is assigned.
The NVIDIA Control Panel tool that you use to perform this task detects that a vGPU is assigned to the VM and, therefore, provides no options for selecting the license type. After you license the vGPU, NVIDIA vGPU software automatically selects the correct type of license based on the vGPU type.
- Open NVIDIA Control Panel:
- Right-click on the Windows desktop and select NVIDIA Control Panel from the menu.
- Open Windows Control Panel and double-click the NVIDIA Control Panel icon.
- In NVIDIA Control Panel, select the Manage License task in the Licensing section of the navigation pane.
The Manage License task pane shows that NVIDIA vGPU is currently unlicensed.Note:
If the Licensing section and Manage License task are not displayed in NVIDIA Control Panel, the system has been configured to hide licensing controls in NVIDIA Control Panel. For information about registry settings, refer to Virtual GPU Client Licensing User Guide.
Figure 19. Managing vGPU licensing in NVIDIA Control Panel

- In the Primary License Server field, enter the address of your primary NVIDIA vGPU software License Server. The address can be a fully-qualified domain name such as
gridlicense1.example.com, or an IP address such as10.31.20.45. If you have only one license server configured, enter its address in this field. - Leave the Port Number field under the Primary License Server field unset. The port defaults to
7070, which is the default port number used by NVIDIA vGPU software License Server. - In the Secondary License Server field, enter the address of your secondary NVIDIA vGPU software License Server. If you have only one license server configured, leave this field unset. The address can be a fully-qualified domain name such as
gridlicense2.example.com, or an IP address such as10.31.20.46. - Leave the Port Number field under the Secondary License Server field unset. The port defaults to
7070, which is the default port number used by NVIDIA vGPU software License Server. - Click Apply to assign the settings. The system requests the appropriate license for the current vGPU from the configured license server.
The vGPU within the VM should now operate at full capability without any performance degradation over time for as long as the vGPU is licensed.
If the system fails to obtain a license, see Virtual GPU Client Licensing User Guide for guidance on troubleshooting.
5.2.2. Licensing an NVIDIA vGPU on Linux
Perform this task from the guest VM to which the vGPU is assigned.
The NVIDIA X Server Settings tool that you use to perform this task detects that a vGPU is assigned to the VM and, therefore, provides no options for selecting the license type. After you license the vGPU, NVIDIA vGPU software automatically selects the correct type of license based on the vGPU type.
Ensure that the Manage License option is enabled as explained in Virtual GPU Client Licensing User Guide.
Do not enable the Manage License option with Red Hat Enterprise Linux 6.8 and 6.9 or CentOS 6.8 and 6.9. To prevent a segmentation fault in DBus code from causing the nvidia-gridd service from exiting, the GUI for licensing must be disabled with these OS versions.
- Start NVIDIA X Server Settings by using the method for launching applications provided by your Linux distribution. For example, on Ubuntu Desktop, open the Dash, search for NVIDIA X Server Settings, and click the NVIDIA X Server Settings icon.
- In the NVIDIA X Server Settings window that opens, click Manage GRID License. The License Edition section of the NVIDIA X Server Settings window shows that NVIDIA vGPU is currently unlicensed.
- In the Primary Server field, enter the address of your primary NVIDIA vGPU software License Server. The address can be a fully-qualified domain name such as
gridlicense1.example.com, or an IP address such as10.31.20.45. If you have only one license server configured, enter its address in this field. - Leave the Port Number field under the Primary Server field unset. The port defaults to
7070, which is the default port number used by NVIDIA vGPU software License Server. - In the Secondary Server field, enter the address of your secondary NVIDIA vGPU software License Server. If you have only one license server configured, leave this field unset. The address can be a fully-qualified domain name such as
gridlicense2.example.com, or an IP address such as10.31.20.46. - Leave the Port Number field under the Secondary Server field unset. The port defaults to
7070, which is the default port number used by NVIDIA vGPU software License Server. - Click Apply to assign the settings. The system requests the appropriate license for the current vGPU from the configured license server.
The vGPU within the VM should now operate at full capability without any performance degradation over time for as long as the vGPU is licensed.
If the system fails to obtain a license, refer to Virtual GPU Client Licensing User Guide for guidance on troubleshooting.
You can modify a VM's NVIDIA vGPU configuration by removing the NVIDIA vGPU configuration from a VM or by modifying GPU allocation policy.
6.1. Removing a VM’s NVIDIA vGPU Configuration
Remove a VM’s NVIDIA vGPU configuration when you no longer require the VM to use a virtual GPU.
6.1.1. Removing a Citrix Virtual Apps and Desktops VM’s vGPU configuration
You can remove a virtual GPU assignment from a VM, such that it no longer uses a virtual GPU, by using either XenCenter or the xe command.
The VM must be in the powered-off state in order for its vGPU configuration to be modified or removed.
6.1.1.1. Removing a VM’s vGPU configuration by using XenCenter
- Set the GPU type to None in the VM’s GPU Properties, as shown in Figure 20.
Figure 20. Using XenCenter to remove a vGPU configuration from a VM

- Click OK.
6.1.1.2. Removing a VM’s vGPU configuration by using xe
- Use vgpu-list to discover the vGPU object UUID associated with a given VM:
            [root@xenserver ~]# xe vgpu-list vm-uuid=e71afda4-53f4-3a1b-6c92-a364a7f619c2
uuid ( RO)              : c1c7c43d-4c99-af76-5051-119f1c2b4188
           vm-uuid ( RO): e71afda4-53f4-3a1b-6c92-a364a7f619c2
    gpu-group-uuid ( RO): d53526a9-3656-5c88-890b-5b24144c3d96
- Use vgpu-destroy to delete the virtual GPU object associated with the VM:
            [root@xenserver ~]# xe vgpu-destroy uuid=c1c7c43d-4c99-af76-5051-119f1c2b4188
[root@xenserver ~]#
6.1.2. Removing a vSphere VM’s vGPU Configuration
To remove a vSphere vGPU configuration from a VM:
- Select Edit settings after right-clicking on the VM in the vCenter Web UI.
- Select the Virtual Hardware tab.
- Mouse over the PCI Device entry showing NVIDIA GRID vGPU and click on the (X) icon to mark the device for removal.
- Click OK to remove the device and update the VM settings.
6.2. Modifying GPU Allocation Policy
Citrix Hypervisor and VMware vSphere both support the breadth first and depth-first GPU allocation policies for vGPU-enabled VMs.
- breadth-first
- The breadth-first allocation policy attempts to minimize the number of vGPUs running on each physical GPU. Newly created vGPUs are placed on the physical GPU that can support the new vGPU and that has the fewest vGPUs already resident on it. This policy generally leads to higher performance because it attempts to minimize sharing of physical GPUs, but it may artificially limit the total number of vGPUs that can run.
- depth-first
- The depth-first allocation policy attempts to maximize the number of vGPUs running on each physical GPU. Newly created vGPUs are placed on the physical GPU that can support the new vGPU and that has the most vGPUs already resident on it. This policy generally leads to higher density of vGPUs, particularly when different types of vGPUs are being run, but may result in lower performance because it attempts to maximize sharing of physical GPUs.
Each hypervisor uses a different GPU allocation policy by default.
- Citrix Hypervisor uses the depth-first allocation policy.
- VMware vSphere ESXi uses the breadth-first allocation policy.
If the default GPU allocation policy does not meet your requirements for performance or density of vGPUs, you can change it.
6.2.1. Modifying GPU Allocation Policy on Citrix Hypervisor
You can modify GPU allocation policy on Citrix Hypervisor by using XenCenter or the xe command.
6.2.1.1. Modifying GPU Allocation Policy by Using xe
The allocation policy of a GPU group is stored in the allocation-algorithm parameter of the gpu-group object.
To change the allocation policy of a GPU group, use gpu-group-param-set:
            [root@xenserver ~]# xe gpu-group-param-get uuid=be825ba2-01d7-8d51-9780-f82cfaa64924 param-name=allocation-algorithmdepth-first
[root@xenserver ~]# xe gpu-group-param-set uuid=be825ba2-01d7-8d51-9780-f82cfaa64924 allocation-algorithm=breadth-first
[root@xenserver ~]#
6.2.1.2. Modifying GPU Allocation Policy GPU by Using XenCenter
You can modify GPU allocation policy from the GPU tab in XenCenter.
Figure 21. Modifying GPU placement policy in XenCenter
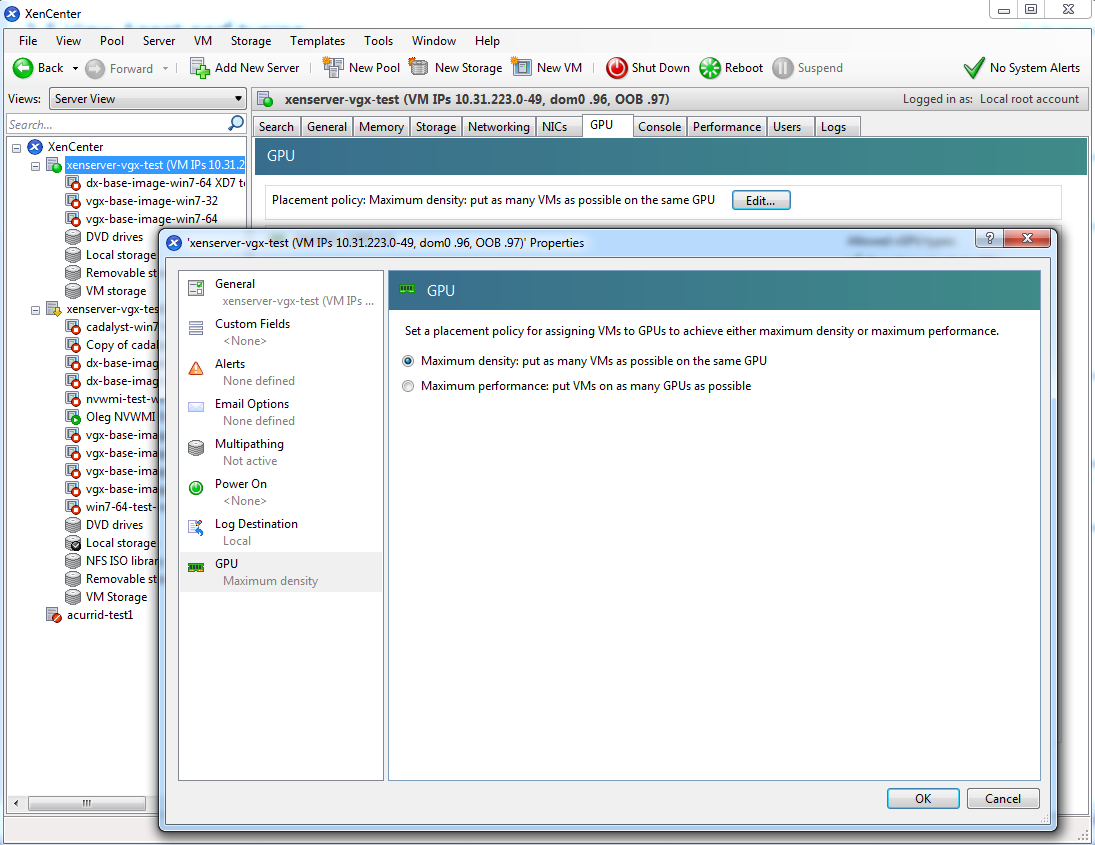
6.2.2. Modifying GPU Allocation Policy on VMware vSphere
How to switch to a depth-first allocation scheme depends on the version of VMware vSphere that you are using.
-
Supported versions earlier than 6.5: Add the following parameter to /etc/vmware/config:
vGPU.consolidation = true
- Version 6.5: Use the vSphere Web Client.
Before using the vSphere Web Client to change the allocation scheme, ensure that the ESXi host is running and that all VMs on the host are powered off.
- Log in to vCenter Server by using the vSphere Web Client.
- In the navigation tree, select your ESXi host and click the Configure tab.
- From the menu, choose Graphics and then click the Host Graphics tab.
- On the Host Graphics tab, click Edit.
Figure 22. Breadth-first allocation scheme setting for vGPU-enabled VMs
- In the Edit Host Graphics Settings dialog box that opens, select these options and click OK.
- If not already selected, select Shared Direct.
- Select Group VMs on GPU until full.
Figure 23. Host graphics settings for vGPU

After you click OK, the default graphics type changes to Shared Direct and the allocation scheme for vGPU-enabled VMs is breadth-first.
Figure 24. Depth-first allocation scheme setting for vGPU-enabled VMs

- Restart the ESXi host or the Xorg service on the host.
See also the following topics in the VMware vSphere documentation:
6.3. Migrating a VM Configured with vGPU
On some hypervisors, NVIDIA vGPU software supports migration of VMs that are configured with vGPU.
Before migrating a VM configured with vGPU, ensure that the following prerequisites are met:
- The VM is configured with vGPU.
- The VM is running.
- The VM obtained a suitable vGPU license when it was booted.
- The destination host has a physical GPU of the same type as the GPU where the vGPU currently resides.
- ECC memory configuration (enabled or disabled) on both the source and destination hosts must be identical.
- The GPU topologies (including NVLink widths) on both the source and destination hosts must be identical.
vGPU migration is disabled for a VM for which any of the following NVIDIA CUDA Toolkit features is enabled:
- Unified memory
- Debuggers
- Profilers
How to migrate a VM configured with vGPU depends on the hypervisor that you are using.
After migration, the vGPU type of the vGPU remains unchanged.
The time required for migration depends on the amount of frame buffer that the vGPU has. Migration for a vGPU with a large amount of frame buffer is slower than for a vGPU with a small amount of frame buffer.
6.3.1. Migrating a VM Configured with vGPU on Citrix Hypervisor
NVIDIA vGPU software supports XenMotion for VMs that are configured with vGPU. XenMotion enables you to move a running virtual machine from one physical host machine to another host with very little disruption or downtime. For a VM that is configured with vGPU, the vGPU is migrated with the VM to an NVIDIA GPU on the other host. The NVIDIA GPUs on both host machines must be of the same type.
For details about which Citrix Hypervisor versions, NVIDIA GPUs, and guest OS releases support XenMotion with vGPU, see Virtual GPU Software for Citrix Hypervisor Release Notes.
For best performance, the physical hosts should be configured to use the following:
- Shared storage, such as NFS, iSCSI, or Fiberchannel
If shared storage is not used, migration can take a very long time because vDISK must also be migrated.
- 10 GB networking.
- In Citrix XenCenter, context-click the VM and from the menu that opens, choose Migrate.
- From the list of available hosts, select the destination host to which you want to migrate the VM. The destination host must have a physical GPU of the same type as the GPU where the vGPU currently resides. Furthermore, the physical GPU must be capable of hosting the vGPU. If these requirements are not met, no available hosts are listed.
6.3.2. Migrating a VM Configured with vGPU on VMware vSphere
NVIDIA vGPU software supports VMware vMotion for VMs that are configured with vGPU. VMware vMotion enables you to move a running virtual machine from one physical host machine to another host with very little disruption or downtime. For a VM that is configured with vGPU, the vGPU is migrated with the VM to an NVIDIA GPU on the other host. The NVIDIA GPUs on both host machines must be of the same type.
For details about which VMware vSphere versions, NVIDIA GPUs, and guest OS releases support suspend and resume, see Virtual GPU Software for VMware vSphere Release Notes.
Perform this task in the VMware vSphere web client by using the Migration wizard.
Before migrating a VM configured with vGPU on VMware vSphere, ensure that the following prerequisites are met:
- Your hosts are correctly configured for VMware vMotion. See Host Configuration for vMotion in the VMware documentation.
- The prerequisites listed for all supported hypervisors in Migrating a VM Configured with vGPU are met.
- NVIDIA vGPU migration is configured. See Configuring VMware vMotion with vGPU for VMware vSphere.
- Context-click the VM and from the menu that opens, choose Migrate.
- For the type of migration, select Change compute resource only and click Next. If you select Change both compute resource and storage, the time required for the migration increases.
- Select the destination host and click Next. The destination host must have a physical GPU of the same type as the GPU where the vGPU currently resides. Furthermore, the physical GPU must be capable of hosting the vGPU. If these requirements are not met, no available hosts are listed.
- Select the destination network and click Next.
- Select the migration priority level and click Next.
- Review your selections and click Finish.
For more information, see the following topics in the VMware documentation:
If NVIDIA vGPU migration is not configured, any attempt to migrate a VM with an NVIDIA vGPU fails and a window containing the following error message is displayed:
            Compatibility Issue/Host
Migration was temporarily disabled due to another
migration activity.
vGPU hot migration is not enabled.
The window appears as follows:
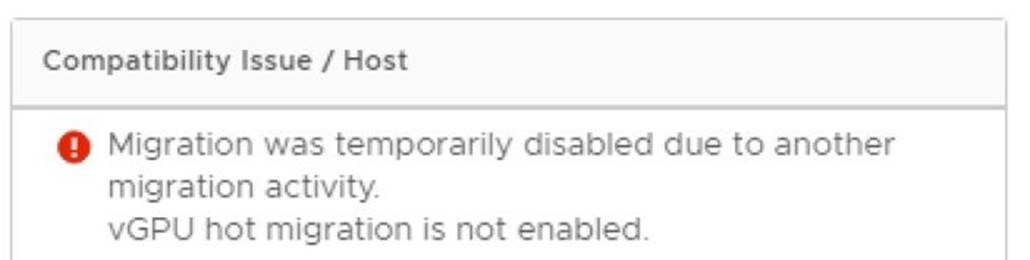
If you see this error, configure NVIDIA vGPU migration as explained in Configuring VMware vMotion with vGPU for VMware vSphere.
If your version of VMware vSpehere ESXi does not support vMotion for VMs configured with NVIDIA vGPU, any attempt to migrate a VM with an NVIDIA vGPU fails and a window containing the following error message is displayed:
            Compatibility Issues
...
A required migration feature is not supported on the "Source" host 'host-name'.

A warning or error occurred when migrating the virtual machine.
Virtual machine relocation, or power on after relocation or cloning can fail if
vGPU resources are not available on the destination host.
The window appears as follows:

For details about which VMware vSphere versions, NVIDIA GPUs, and guest OS releases support suspend and resume, see Virtual GPU Software for VMware vSphere Release Notes.
6.3.3. Suspending and Resuming a VM Configured with vGPU on VMware vSphere
NVIDIA vGPU software supports suspend and resume for VMs that are configured with vGPU.
For details about which VMware vSphere versions, NVIDIA GPUs, and guest OS releases support suspend and resume, see Virtual GPU Software for VMware vSphere Release Notes.
Perform this task in the VMware vSphere web client.
- To suspend a VM, context-click the VM that you want to suspend, and from the context menu that pops up, choose Power > Suspend.
- To resume a VM, context-click the VM that you want to resume, and from the context menu that pops up, choose Power > Power On.
6.4. Modifying a MIG-Backed vGPU's Configuration
If compute instances weren't created within the GPU instances when the GPU was configured for MIG-backed vGPUs, you can add the compute instances for an individual vGPU from within the guest VM. If you want to replace the compute instances that were created when the GPU was configured for MIG-backed vGPUs, you can delete them before adding the compute instances from within the guest VM.
Ensure that the following prerequisites are met:
- You have root user privileges in the guest VM.
- The GPU instance is not being used by any other processes, such as CUDA applications, monitoring applications, or the nvidia-smi command.
Perform this task in a guest VM command shell.
- Open a command shell as the root user in the guest VM. You can use secure shell (SSH) for this purpose.
- List the available GPU instance.
            $ nvidia-smi mig -lgi
+----------------------------------------------------+
| GPU instances:                                     |
| GPU   Name          Profile  Instance   Placement  |
|                       ID       ID       Start:Size |
|====================================================|
|   0  MIG 2g.10gb       0        0          0:8     |
+----------------------------------------------------+
- Optional: If compute instances were created when the GPU was configured for MIG-backed vGPUs that you no longer require, delete them.
$ nvidia-smi mig -dci -ci compute-instance-id -gi gpu-instance-id
- compute-instance-id
- The ID of the compute instance that you want to delete.
- gpu-instance-id
- The ID of the GPU instance from which you want to delete the compute instance.
Note:If the GPU instance is being used by another process, this command fails. In this situation, stop all processes that are using the GPU instance and retry the command.
This example deletes compute instance 0 from GPU instance 0 on GPU 0.
            $ nvidia-smi mig -dci -ci 0 -gi 0
Successfully destroyed compute instance ID  0 from GPU  0 GPU instance ID  0
- List the compute instance profiles that are available for your GPU instance.
$ nvidia-smi mig -lcip
MIG 2g.10gbcompute instance or twoMIG 1c.2g.10gbcompute instances can be created within the GPU instance.$ nvidia-smi mig -lcip +-------------------------------------------------------------------------------+ | Compute instance profiles: | | GPU GPU Name Profile Instances Exclusive Shared | | Instance ID Free/Total SM DEC ENC OFA | | ID CE JPEG | |===============================================================================| | 0 0 MIG 1c.2g.10gb 0 2/2 14 1 0 0 | | 2 0 | +-------------------------------------------------------------------------------+ | 0 0 MIG 2g.10gb 1* 1/1 28 1 0 0 | | 2 0 | +-------------------------------------------------------------------------------+
- Create the compute instances that you need within the available GPU instance.
Create each compute instance individually by running the following command.
$ nvidia-smi mig -cci compute-instance-profile-id -gi gpu-instance-id
- compute-instance-profile-id
- The compute instance profile ID that specifies the compute instance.
- gpu-instance-id
- The GPU instance ID that specifies the GPU instance within which you want to create the compute instance.
Note:If the GPU instance is being used by another process, this command fails. In this situation, stop all processes that are using the GPU and retry the command.
This example creates a
MIG 2g.10gbcompute instance on GPU instance 0.$ nvidia-smi mig -cci 1 -gi 0 Successfully created compute instance ID 0 on GPU 0 GPU instance ID 0 using profile MIG 2g.10gb (ID 1)
This example creates two
MIG 1c.2g.10gbcompute instances on GPU instance 0 by running the same command twice.$ nvidia-smi mig -cci 0 -gi 0 Successfully created compute instance ID 0 on GPU 0 GPU instance ID 0 using profile MIG 1c.2g.10gb (ID 0) $ nvidia-smi mig -cci 0 -gi 0 Successfully created compute instance ID 1 on GPU 0 GPU instance ID 0 using profile MIG 1c.2g.10gb (ID 0)
- Verify that the compute instances were created within the GPU instance. Use the nvidia-smi command for this purpose.
This example confirms that a
MIG 2g.10gbcompute instance was created on GPU instance 0.nvidia-smi Mon Dec 26 19:01:24 2022 +-----------------------------------------------------------------------------+ | NVIDIA-SMI 510.108.03 Driver Version: 510.108.03 CUDA Version: 11.6 | |-------------------------------+----------------------+----------------------+ | GPU Name Persistence-M| Bus-Id Disp.A | Volatile Uncorr. ECC | | Fan Temp Perf Pwr:Usage/Cap| Memory-Usage | GPU-Util Compute M. | | | | MIG M. | |===============================+======================+======================| | 0 GRID A100X-2-10C On | 00000000:00:08.0 Off | On | | N/A N/A P0 N/A / N/A | 1058MiB / 10235MiB | N/A Default | | | | Enabled | +-------------------------------+----------------------+----------------------+ +-----------------------------------------------------------------------------+ | MIG devices: | +------------------+----------------------+-----------+-----------------------+ | GPU GI CI MIG | Memory-Usage | Vol| Shared | | ID ID Dev | BAR1-Usage | SM Unc| CE ENC DEC OFA JPG| | | | ECC| | |==================+======================+===========+=======================| | 0 0 0 0 | 1058MiB / 10235MiB | 28 0 | 2 0 1 0 0 | | | 0MiB / 4096MiB | | | +------------------+----------------------+-----------+-----------------------+ +-----------------------------------------------------------------------------+ | Processes: | | GPU GI CI PID Type Process name GPU Memory | | ID ID Usage | |=============================================================================| | No running processes found | +-----------------------------------------------------------------------------+
This example confirms that two
MIG 1c.2g.10gbcompute instances were created on GPU instance 0.$ nvidia-smi Mon Dec 26 19:01:24 2022 +-----------------------------------------------------------------------------+ | NVIDIA-SMI 510.108.03 Driver Version: 510.108.03 CUDA Version: 11.6 | |-------------------------------+----------------------+----------------------+ | GPU Name Persistence-M| Bus-Id Disp.A | Volatile Uncorr. ECC | | Fan Temp Perf Pwr:Usage/Cap| Memory-Usage | GPU-Util Compute M. | | | | MIG M. | |===============================+======================+======================| | 0 GRID A100X-2-10C On | 00000000:00:08.0 Off | On | | N/A N/A P0 N/A / N/A | 1058MiB / 10235MiB | N/A Default | | | | Enabled | +-------------------------------+----------------------+----------------------+ +-----------------------------------------------------------------------------+ | MIG devices: | +------------------+----------------------+-----------+-----------------------+ | GPU GI CI MIG | Memory-Usage | Vol| Shared | | ID ID Dev | BAR1-Usage | SM Unc| CE ENC DEC OFA JPG| | | | ECC| | |==================+======================+===========+=======================| | 0 0 0 0 | 1058MiB / 10235MiB | 14 0 | 2 0 1 0 0 | | | 0MiB / 4096MiB | | | +------------------+ +-----------+-----------------------+ | 0 0 1 1 | | 14 0 | 2 0 1 0 0 | | | | | | +------------------+----------------------+-----------+-----------------------+ +-----------------------------------------------------------------------------+ | Processes: | | GPU GI CI PID Type Process name GPU Memory | | ID ID Usage | |=============================================================================| | No running processes found | +-----------------------------------------------------------------------------+
6.5. Enabling Unified Memory for a vGPU
Unified memory is disabled by default. If used, you must enable unified memory individually for each vGPU that requires it by setting a vGPU plugin parameter. How to enable unified memory for a vGPU depends on the hypervisor that you are using.
6.5.1. Enabling Unified Memory for a vGPU on Citrix Hypervisor
On Citrix Hypervisor, enable unified memory by setting the enable_uvm vGPU plugin parameter.
Perform this task for each vGPU that requires unified memory by using the xe command.
Set the enable_uvm vGPU plugin parameter for the vGPU to 1 as explained in Setting vGPU Plugin Parameters on Citrix Hypervisor.
This example enables unified memory for the vGPU that has the UUID d15083f8-5c59-7474-d0cb-fbc3f7284f1b.
[root@xenserver ~] xe vgpu-param-set uuid=d15083f8-5c59-7474-d0cb-fbc3f7284f1b extra_args='enable_uvm=1'
6.5.2. Enabling Unified Memory for a vGPU on Red Hat Enterprise Linux KVM
On Red Hat Enterprise Linux KVM, enable unified memory by setting the enable_uvm vGPU plugin parameter.
Ensure that the mdev device file that represents the vGPU has been created as explained in Creating an NVIDIA vGPU on a Linux with KVM Hypervisor.
Perform this task for each vGPU that requires unified memory.
Set the enable_uvm vGPU plugin parameter for the mdev device file that represents the vGPU to 1 as explained in Setting vGPU Plugin Parameters on a Linux with KVM Hypervisor.
6.5.3. Enabling Unified Memory for a vGPU on VMware vSphere
On VMware vSphere, enable unified memory by setting the pciPassthruvgpu-id.cfg.enable_uvm configuration parameter in advanced VM attributes.
Ensure that the VM to which the vGPU is assigned is powered off.
Perform this task in the vSphere Client for each vGPU that requires unified memory.
In advanced VM attributes, set the pciPassthruvgpu-id.cfg.enable_uvm vGPU plugin parameter for the vGPU to 1 as explained in Setting vGPU Plugin Parameters on VMware vSphere.
- vgpu-id
- A positive integer that identifies the vGPU assigned to a VM. For the first vGPU assigned to a VM, vgpu-id is 0. For example, if two vGPUs are assigned to a VM and you are enabling unified memory for both vGPUs, set pciPassthru0.cfg.enable_uvm and pciPassthru1.cfg.enable_uvm to 1.
6.6. Enabling NVIDIA CUDA Toolkit Development Tools for NVIDIA vGPU
By default, NVIDIA CUDA Toolkit development tools are disabled on NVIDIA vGPU. If used, you must enable NVIDIA CUDA Toolkit development tools individually for each VM that requires them by setting vGPU plugin parameters. One parameter must be set for enabling NVIDIA CUDA Toolkit debuggers and a different parameter must be set for enabling NVIDIA CUDA Toolkit profilers.
6.6.1. Enabling NVIDIA CUDA Toolkit Debuggers for NVIDIA vGPU
By default, NVIDIA CUDA Toolkit debuggers are disabled. If used, you must enable them for each vGPU VM that requires them by setting a vGPU plugin parameter. How to set the parameter to enable NVIDIA CUDA Toolkit debuggers for a vGPU VM depends on the hypervisor that you are using.
You can enable NVIDIA CUDA Toolkit debuggers for any number of VMs configured with vGPUs on the same GPU. When NVIDIA CUDA Toolkit debuggers are enabled for a VM, the VM cannot be migrated.
Perform this task for each VM for which you want to enable NVIDIA CUDA Toolkit debuggers.
Enabling NVIDIA CUDA Toolkit Debuggers for NVIDIA vGPU on Citrix Hypervisor
Set the enable_debugging vGPU plugin parameter for the vGPU that is assigned to the VM to 1 as explained in Setting vGPU Plugin Parameters on Citrix Hypervisor.
This example enables NVIDIA CUDA Toolkit debuggers for the vGPU that has the UUID d15083f8-5c59-7474-d0cb-fbc3f7284f1b.
[root@xenserver ~] xe vgpu-param-set uuid=d15083f8-5c59-7474-d0cb-fbc3f7284f1b extra_args='enable_debugging=1'
The setting of this parameter is preserved after a guest VM is restarted and after the hypervisor host is restarted.
Enabling NVIDIA CUDA Toolkit Debuggers for NVIDIA vGPU on Red Hat Enterprise Linux KVM
Set the enable_debugging vGPU plugin parameter for the mdev device file that represents the vGPU that is assigned to the VM to 1 as explained in Setting vGPU Plugin Parameters on a Linux with KVM Hypervisor.
The setting of this parameter is preserved after a guest VM is restarted. However, this parameter is reset to its default value after the hypervisor host is restarted.
Enabling NVIDIA CUDA Toolkit Debuggers for NVIDIA vGPU on on VMware vSphere
Ensure that the VM for which you want to enable NVIDIA CUDA Toolkit debuggers is powered off.
In advanced VM attributes, set the pciPassthruvgpu-id.cfg.enable_debugging vGPU plugin parameter for the vGPU that is assigned to the VM to 1 as explained in Setting vGPU Plugin Parameters on VMware vSphere.
- vgpu-id
- A positive integer that identifies the vGPU assigned to the VM. For the first vGPU assigned to a VM, vgpu-id is 0. For example, if two vGPUs are assigned to a VM and you are enabling debuggers for both vGPUs, set pciPassthru0.cfg.enable_debugging and pciPassthru1.cfg.enable_debugging to 1.
The setting of this parameter is preserved after a guest VM is restarted. However, this parameter is reset to its default value after the hypervisor host is restarted.
6.6.2. Enabling NVIDIA CUDA Toolkit Profilers for NVIDIA vGPU
By default, only GPU workload trace is enabled. If you want to use all NVIDIA CUDA Toolkit profiler features that NVIDIA vGPU supports, you must enable them for each vGPU VM that requires them.
Enabling profiling for a VM gives the VM access to the GPU’s global performance counters, which may include activity from other VMs executing on the same GPU. Enabling profiling for a VM also allows the VM to lock clocks on the GPU, which impacts all other VMs executing on the same GPU.
6.6.2.1. Supported NVIDIA CUDA Toolkit Profiler Features
You can enable the following NVIDIA CUDA Toolkit profiler features for a vGPU VM:
- NVIDIA Nsight™ Compute
- NVIDIA Nsight Systems
- CUDA Profiling Tools Interface (CUPTI)
6.6.2.2. Clock Management for a vGPU VM for Which NVIDIA CUDA Toolkit Profilers Are Enabled
Clocks are not locked for periodic sampling use cases such as NVIDIA Nsight Systems profiling.
Clocks are locked for multipass profiling such as:
- NVIDIA Nsight Compute kernel profiling
- CUPTI range profiling
Clocks are locked automatically when profiling starts and are unlocked automatically when profiling ends.
6.6.2.3. Limitations on the Use of NVIDIA CUDA Toolkit Profilers with NVIDIA vGPU
The following limitations apply when NVIDIA CUDA Toolkit profilers are enabled for NVIDIA vGPU:
- NVIDIA CUDA Toolkit profilers can be used on only one VM at a time.
- Multiple CUDA contexts cannot be profiled simultaneously.
- Profiling data is collected separately for each context.
- A VM for which NVIDIA CUDA Toolkit profilers are enabled cannot be migrated.
Because NVIDIA CUDA Toolkit profilers can be used on only one VM at a time, you should enable them for only one VM assigned a vGPU on a GPU. However, NVIDIA vGPU software cannot enforce this requirement. If NVIDIA CUDA Toolkit profilers are enabled on more than one VM assigned a vGPU on a GPU, profiling data is collected only for the first VM to start the profiler.
6.6.2.4. Enabling NVIDIA CUDA Toolkit Profilers for a vGPU VM
You enable NVIDIA CUDA Toolkit profilers for a vGPU VM by setting a vGPU plugin parameter. How to set the parameter to enable NVIDIA CUDA Toolkit profilers for a vGPU VM depends on the hypervisor that you are using.
Perform this task for the VM for which you want to enable NVIDIA CUDA Toolkit profilers.
Enabling NVIDIA CUDA Toolkit Profilers for NVIDIA vGPU on Citrix Hypervisor
Set the enable_profiling vGPU plugin parameter for the vGPU that is assigned to the VM to 1 as explained in Setting vGPU Plugin Parameters on Citrix Hypervisor.
This example enables NVIDIA CUDA Toolkit profilers for the vGPU that has the UUID d15083f8-5c59-7474-d0cb-fbc3f7284f1b.
[root@xenserver ~] xe vgpu-param-set uuid=d15083f8-5c59-7474-d0cb-fbc3f7284f1b extra_args='enable_profiling=1'
The setting of this parameter is preserved after a guest VM is restarted and after the hypervisor host is restarted.
Enabling NVIDIA CUDA Toolkit Profilers for NVIDIA vGPU on Red Hat Enterprise Linux KVM
Set the enable_profiling vGPU plugin parameter for the mdev device file that represents the vGPU that is assigned to the VM to 1 as explained in Setting vGPU Plugin Parameters on a Linux with KVM Hypervisor.
The setting of this parameter is preserved after a guest VM is restarted. However, this parameter is reset to its default value after the hypervisor host is restarted.
Enabling NVIDIA CUDA Toolkit Profilers for NVIDIA vGPU on on VMware vSphere
Ensure that the VM for which you want to enable NVIDIA CUDA Toolkit profilers is powered off.
In advanced VM attributes, set the pciPassthruvgpu-id.cfg.enable_profiling vGPU plugin parameter for the vGPU that is assigned to the VM to 1 as explained in Setting vGPU Plugin Parameters on VMware vSphere.
- vgpu-id
- A positive integer that identifies the vGPU assigned to the VM. For the first vGPU assigned to a VM, vgpu-id is 0. For example, if two vGPUs are assigned to a VM and you are enabling profilers for the second vGPU, set pciPassthru1.cfg.enable_profiling to 1.
The setting of this parameter is preserved after a guest VM is restarted. However, this parameter is reset to its default value after the hypervisor host is restarted.
6.7. Enabling the TCC Driver Model for a vGPU
The Tesla Compute Cluster (TCC) driver model supports CUDA C/C++ applications. This model is optimized for compute applications and reduces kernel launch times on Windows. By default, the driver model of a vGPU that is assigned to a Windows VM is Windows Display Driver Model (WDDM). If you want to use the TCC driver model, you must enable it explicitly.
This task requires administrator privileges.
Perform this task from the VM to which the vGPU is assigned.
Only Q-series vGPUs support the TCC driver model.
- Log on to the VM to which the vGPU is assigned.
- Set the driver model of the vGPU to the TCC driver model.
nvidia-smi -g vgpu-id -dm 1
- vgpu-id
- The ID of the vGPU for which you want to enable the TCC driver model. If the -g is omitted, the TCC driver model is enabled for all vGPUs that are assigned to the VM.
- Reboot the VM.
NVIDIA vGPU software enables you to monitor the performance of physical GPUs and virtual GPUs from the hypervisor and from within individual guest VMs. You can use several tools for monitoring GPU performance:
- From any supported hypervisor, and from a guest VM that is running a 64-bit edition of Windows or Linux, you can use NVIDIA System Management Interface, nvidia-smi.
- From Citrix Hypervisor, you can use Citrix XenCenter.
- From a Windows guest VM, you can use these tools:
- Windows Performance Monitor
- Windows Management Instrumentation (WMI)
7.1. NVIDIA System Management Interface nvidia-smi
NVIDIA System Management Interface, nvidia-smi, is a command-line tool that reports management information for NVIDIA GPUs.
The nvidia-smi tool is included in the following packages:
- NVIDIA Virtual GPU Manager package for each supported hypervisor
- NVIDIA driver package for each supported guest OS
The scope of the reported management information depends on where you run nvidia-smi from:
-
From a hypervisor command shell, such as the Citrix Hypervisor dom0 shell or VMware ESXi host shell, nvidia-smi reports management information for NVIDIA physical GPUs and virtual GPUs present in the system.
Note:When run from a hypervisor command shell, nvidia-smi will not list any GPU that is currently allocated for GPU pass-through.
-
From a guest VM, nvidia-smi retrieves usage statistics for vGPUs or pass-through GPUs that are assigned to the VM.
From a Windows guest VM, you can run nvidia-smi from a command prompt by changing to the C:\Program Files\NVIDIA Corporation\NVSMI folder and running the nvidia-smi.exe command.
7.2. Monitoring GPU Performance from a Hypervisor
You can monitor GPU performance from any supported hypervisor by using the NVIDIA System Management Interface nvidia-smi command-line utility. On Citrix Hypervisor platforms, you can also use Citrix XenCenter to monitor GPU performance.
You cannot monitor from the hypervisor the performance of GPUs that are being used for GPU pass-through. You can monitor the performance of pass-through GPUs only from within the guest VM that is using them.
7.2.1. Using nvidia-smi to Monitor GPU Performance from a Hypervisor
You can get management information for the NVIDIA physical GPUs and virtual GPUs present in the system by running nvidia-smi from a hypervisor command shell such as the Citrix Hypervisor dom0 shell or the VMware ESXi host shell.
Without a subcommand, nvidia-smi provides management information for physical GPUs. To examine virtual GPUs in more detail, use nvidia-smi with the vgpu subcommand.
From the command line, you can get help information about the nvidia-smi tool and the vgpu subcommand.
| Help Information | Command |
|---|---|
| A list of subcommands supported by the nvidia-smi tool. Note that not all subcommands apply to GPUs that support NVIDIA vGPU software. | nvidia-smi -h |
| A list of all options supported by the vgpu subcommand. | nvidia-smi vgpu –h |
7.2.1.1. Getting a Summary of all Physical GPUs in the System
To get a summary of all physical GPUs in the system, along with PCI bus IDs, power state, temperature, current memory usage, and so on, run nvidia-smi without additional arguments.
Each vGPU instance is reported in the Compute processes section, together with its physical GPU index and the amount of frame-buffer memory assigned to it.
In the example that follows, three vGPUs are running in the system: One vGPU is running on each of the physical GPUs 0, 1, and 2.
            [root@vgpu ~]# nvidia-smi
Fri Dec 23 09:26:18 2022
+-----------------------------------------------------------------------------+
| NVIDIA-SMI 510.108.03               Driver Version: 510.108.03              |
|-------------------------------+----------------------+----------------------+
| GPU  Name        Persistence-M| Bus-Id        Disp.A | Volatile Uncorr. ECC |
| Fan  Temp  Perf  Pwr:Usage/Cap|         Memory-Usage | GPU-Util  Compute M. |
|===============================+======================+======================|
|   0  Tesla M60           On   | 0000:83:00.0     Off |                  Off |
| N/A   31C    P8    23W / 150W |   1889MiB /  8191MiB |      7%      Default |
+-------------------------------+----------------------+----------------------+
|   1  Tesla M60           On   | 0000:84:00.0     Off |                  Off |
| N/A   26C    P8    23W / 150W |    926MiB /  8191MiB |      9%      Default |
+-------------------------------+----------------------+----------------------+
|   2  Tesla M10           On   | 0000:8A:00.0     Off |                  N/A |
| N/A   23C    P8    10W /  53W |   1882MiB /  8191MiB |     12%      Default |
+-------------------------------+----------------------+----------------------+
|   3  Tesla M10           On   | 0000:8B:00.0     Off |                  N/A |
| N/A   26C    P8    10W /  53W |     10MiB /  8191MiB |      0%      Default |
+-------------------------------+----------------------+----------------------+
|   4  Tesla M10           On   | 0000:8C:00.0     Off |                  N/A |
| N/A   34C    P8    10W /  53W |     10MiB /  8191MiB |      0%      Default |
+-------------------------------+----------------------+----------------------+
|   5  Tesla M10           On   | 0000:8D:00.0     Off |                  N/A |
| N/A   32C    P8    10W /  53W |     10MiB /  8191MiB |      0%      Default |
+-------------------------------+----------------------+----------------------+
+-----------------------------------------------------------------------------+
| Processes:                                                       GPU Memory |
|  GPU       PID  Type  Process name                               Usage      |
|=============================================================================|
|    0     11924  C+G   /usr/lib64/xen/bin/vgpu                       1856MiB |
|    1     11903  C+G   /usr/lib64/xen/bin/vgpu                        896MiB |
|    2     11908  C+G   /usr/lib64/xen/bin/vgpu                       1856MiB |
+-----------------------------------------------------------------------------+
[root@vgpu ~]#
7.2.1.2. Getting a Summary of all vGPUs in the System
To get a summary of the vGPUs currently that are currently running on each physical GPU in the system, run nvidia-smi vgpu without additional arguments.
            [root@vgpu ~]# nvidia-smi vgpu
Fri Dec 23 09:27:06 2022
+-----------------------------------------------------------------------------+
| NVIDIA-SMI 510.108.03               Driver Version: 510.108.03              |
|-------------------------------+--------------------------------+------------+
| GPU  Name                     | Bus-Id                         | GPU-Util   |
|      vGPU ID    Name          | VM ID    VM Name               | vGPU-Util  |
|===============================+================================+============|
|   0  Tesla M60                | 0000:83:00.0                   |   7%       |
|      11924      GRID M60-2Q   | 3        Win7-64 GRID test 2   |       6%   |
+-------------------------------+--------------------------------+------------+
|   1  Tesla M60                | 0000:84:00.0                   |   9%       |
|      11903      GRID M60-1B   | 1        Win8.1-64 GRID test 3 |       8%   |
+-------------------------------+--------------------------------+------------+
|   2  Tesla M10                | 0000:8A:00.0                   |  12%       |
|      11908      GRID M10-2Q   | 2        Win7-64 GRID test 1   |      10%   |
+-------------------------------+--------------------------------+------------+
|   3  Tesla M10                | 0000:8B:00.0                   |   0%       |
+-------------------------------+--------------------------------+------------+
|   4  Tesla M10                | 0000:8C:00.0                   |   0%       |
+-------------------------------+--------------------------------+------------+
|   5  Tesla M10                | 0000:8D:00.0                   |   0%       |
+-------------------------------+--------------------------------+------------+
[root@vgpu ~]#
7.2.1.3. Getting vGPU Details
To get detailed information about all the vGPUs on the platform, run nvidia-smi vgpu with the –q or --query option.
To limit the information retrieved to a subset of the GPUs on the platform, use the –i or --id option to select one or more vGPUs.
            [root@vgpu ~]# nvidia-smi vgpu -q -i 1
GPU 00000000:86:00.0
    Active vGPUs              : 1
    vGPU ID                   : 3251634178
        VM ID                 : 1
        VM Name               : Win7
        vGPU Name             : GRID M60-8Q
        vGPU Type             : 22
        vGPU UUID             : b8c6d0e1-d167-11e8-b8c9-55705e5a54a6
        Guest Driver Version  : 411.81
        License Status        : Unlicensed
        Accounting Mode       : Disabled
        Accounting Buffer Size: 4000
        Frame Rate Limit      : 3 FPS
        FB Memory Usage       :
            Total             : 8192 MiB
            Used              : 675 MiB
            Free              : 7517 MiB
        Utilization           :
            Gpu               : 3 %
            Memory            : 0 %
            Encoder           : 0 %
            Decoder           : 0 %
        Encoder Stats         :
            Active Sessions   : 0
            Average FPS       : 0
            Average Latency   : 0
        FBC Stats             :
            Active Sessions   : 1
            Average FPS       : 227
            Average Latency   : 4403
[root@vgpu ~]#
7.2.1.4. Monitoring vGPU engine usage
To monitor vGPU engine usage across multiple vGPUs, run nvidia-smi vgpu with the –u or --utilization option.
For each vGPU, the usage statistics in the following table are reported once every second. The table also shows the name of the column in the command output under which each statistic is reported.
| Statistic | Column |
|---|---|
| 3D/Compute | sm |
| Memory controller bandwidth | mem |
| Video encoder | enc |
| Video decoder | dec |
Each reported percentage is the percentage of the physical GPU’s capacity that a vGPU is using. For example, a vGPU that uses 20% of the GPU’s graphics engine’s capacity will report 20%.
To modify the reporting frequency, use the –l or --loop option.
To limit monitoring to a subset of the GPUs on the platform, use the –i or --id option to select one or more vGPUs.
            [root@vgpu ~]# nvidia-smi vgpu -u
# gpu    vgpu    sm   mem   enc   dec
# Idx      Id     %     %     %     %
    0   11924     6     3     0     0
    1   11903     8     3     0     0
    2   11908    10     4     0     0
    3       -     -     -     -     -
    4       -     -     -     -     -
    5       -     -     -     -     -
    0   11924     6     3     0     0
    1   11903     9     3     0     0
    2   11908    10     4     0     0
    3       -     -     -     -     -
    4       -     -     -     -     -
    5       -     -     -     -     -
    0   11924     6     3     0     0
    1   11903     8     3     0     0
    2   11908    10     4     0     0
    3       -     -     -     -     -
    4       -     -     -     -     -
    5       -     -     -     -     -
^C[root@vgpu ~]#
7.2.1.5. Monitoring vGPU engine usage by applications
To monitor vGPU engine usage by applications across multiple vGPUs, run nvidia-smi vgpu with the –p option.
For each application on each vGPU, the usage statistics in the following table are reported once every second. Each application is identified by its process ID and process name. The table also shows the name of the column in the command output under which each statistic is reported.
| Statistic | Column |
|---|---|
| 3D/Compute | sm |
| Memory controller bandwidth | mem |
| Video encoder | enc |
| Video decoder | dec |
Each reported percentage is the percentage of the physical GPU’s capacity used by an application running on a vGPU that resides on the physical GPU. For example, an application that uses 20% of the GPU’s graphics engine’s capacity will report 20%.
To modify the reporting frequency, use the –l or --loop option.
To limit monitoring to a subset of the GPUs on the platform, use the –i or --id option to select one or more vGPUs.
            [root@vgpu ~]# nvidia-smi vgpu -p
# GPU    vGPU process        process   sm  mem  enc  dec
# Idx      Id      Id           name    %    %    %    %
    0   38127    1528        dwm.exe    0    0    0    0
    1   37408    4232  DolphinVS.exe   32   25    0    0
    1  257869    4432    FurMark.exe   16   12    0    0
    1  257969    4552    FurMark.exe   48   37    0    0
    0   38127    1528        dwm.exe    0    0    0    0
    1   37408    4232  DolphinVS.exe   16   12    0    0
    1  257911     656  DolphinVS.exe   32   24    0    0
    1  257969    4552    FurMark.exe   48   37    0    0
    0   38127    1528        dwm.exe    0    0    0    0
    1  257869    4432    FurMark.exe   38   30    0    0
    1  257911     656  DolphinVS.exe   19   14    0    0
    1  257969    4552    FurMark.exe   38   30    0    0
    0   38127    1528        dwm.exe    0    0    0    0
    1  257848    3220    Balls64.exe   16   12    0    0
    1  257869    4432    FurMark.exe   16   12    0    0
    1  257911     656  DolphinVS.exe   16   12    0    0
    1  257969    4552    FurMark.exe   48   37    0    0
    0   38127    1528        dwm.exe    0    0    0    0
    1  257911     656  DolphinVS.exe   32   25    0    0
    1  257969    4552    FurMark.exe   64   50    0    0
    0   38127    1528        dwm.exe    0    0    0    0
    1   37408    4232  DolphinVS.exe   16   12    0    0
    1  257911     656  DolphinVS.exe   16   12    0    0
    1  257969    4552    FurMark.exe   64   49    0    0
    0   38127    1528        dwm.exe    0    0    0    0
    1   37408    4232  DolphinVS.exe   16   12    0    0
    1  257869    4432    FurMark.exe   16   12    0    0
    1  257969    4552    FurMark.exe   64   49    0    0
[root@vgpu ~]#
7.2.1.6. Monitoring Encoder Sessions
Encoder sessions can be monitored only for vGPUs assigned to Windows VMs. No encoder session statistics are reported for vGPUs assigned to Linux VMs.
To monitor the encoder sessions for processes running on multiple vGPUs, run nvidia-smi vgpu with the –es or --encodersessions option.
For each encoder session, the following statistics are reported once every second:
- GPU ID
- vGPU ID
- Encoder session ID
- PID of the process in the VM that created the encoder session
- Codec type, for example, H.264 or H.265
- Encode horizontal resolution
- Encode vertical resolution
- One-second trailing average encoded FPS
- One-second trailing average encode latency in microseconds
To modify the reporting frequency, use the –l or --loop option.
To limit monitoring to a subset of the GPUs on the platform, use the –i or --id option to select one or more vGPUs.
            [root@vgpu ~]# nvidia-smi vgpu -es
# GPU    vGPU Session Process   Codec       H       V Average     Average
# Idx      Id      Id      Id    Type     Res     Res     FPS Latency(us)
    1   21211       2    2308   H.264    1920    1080     424        1977
    1   21206       3    2424   H.264    1920    1080       0           0
    1   22011       1    3676   H.264    1920    1080     374        1589
    1   21211       2    2308   H.264    1920    1080     360         807
    1   21206       3    2424   H.264    1920    1080     325        1474
    1   22011       1    3676   H.264    1920    1080     313        1005
    1   21211       2    2308   H.264    1920    1080     329        1732
    1   21206       3    2424   H.264    1920    1080     352        1415
    1   22011       1    3676   H.264    1920    1080     434        1894
    1   21211       2    2308   H.264    1920    1080     362        1818
    1   21206       3    2424   H.264    1920    1080     296        1072
    1   22011       1    3676   H.264    1920    1080     416        1994
    1   21211       2    2308   H.264    1920    1080     444        1912
    1   21206       3    2424   H.264    1920    1080     330        1261
    1   22011       1    3676   H.264    1920    1080     436        1644
    1   21211       2    2308   H.264    1920    1080     344        1500
    1   21206       3    2424   H.264    1920    1080     393        1727
    1   22011       1    3676   H.264    1920    1080     364        1945
    1   21211       2    2308   H.264    1920    1080     555        1653
    1   21206       3    2424   H.264    1920    1080     295         925
    1   22011       1    3676   H.264    1920    1080     372        1869
    1   21211       2    2308   H.264    1920    1080     326        2206
    1   21206       3    2424   H.264    1920    1080     318        1366
    1   22011       1    3676   H.264    1920    1080     464        2015
    1   21211       2    2308   H.264    1920    1080     305        1167
    1   21206       3    2424   H.264    1920    1080     445        1892
    1   22011       1    3676   H.264    1920    1080     361         906
    1   21211       2    2308   H.264    1920    1080     353        1436
    1   21206       3    2424   H.264    1920    1080     354        1798
    1   22011       1    3676   H.264    1920    1080     373        1310
^C[root@vgpu ~]#
7.2.1.7. Monitoring Frame Buffer Capture (FBC) Sessions
To monitor the FBC sessions for processes running on multiple vGPUs, run nvidia-smi vgpu with the -fs or --fbcsessions option.
For each FBC session, the following statistics are reported once every second:
- GPU ID
- vGPU ID
- FBC session ID
- PID of the process in the VM that created the FBC session
- Display ordinal associated with the FBC session.
- FBC session type
- FBC session flags
- Capture mode
- Maximum horizontal resolution supported by the session
- Maximum vertical resolution supported by the session
- Horizontal resolution requested by the caller in the capture call
- Vertical resolution requested by the caller in the capture call
- Moving average of new frames captured per second by the session
- Moving average new frame capture latency in microseconds for the session
To modify the reporting frequency, use the –l or --loop option.
To limit monitoring to a subset of the GPUs on the platform, use the –i or --id option to select one or more vGPUs.
[root@vgpu ~]# nvidia-smi vgpu -fs
# GPU vGPU Session Process Display Session Diff. Map Class. Map Capture Max H Max V H V Average Average
# Idx Id Id Id Ordinal Type State State Mode Res Res Res Res FPS Latency(us)
0 - - - - - - - - - - - - - -
1 3251634178 - - - - - - - - - - - - -
2 - - - - - - - - - - - - - -
0 - - - - - - - - - - - - - -
1 3251634178 - - - - - - - - - - - - -
2 - - - - - - - - - - - - - -
0 - - - - - - - - - - - - - -
1 3251634178 - - - - - - - - - - - - -
2 - - - - - - - - - - - - - -
0 - - - - - - - - - - - - - -
1 3251634178 - - - - - - - - - - - - -
2 - - - - - - - - - - - - - -
0 - - - - - - - - - - - - - -
1 3251634178 - - - - - - - - - - - - -
2 - - - - - - - - - - - - - -
0 - - - - - - - - - - - - - -
1 3251634178 1 3984 0 ToSys Disabled Disabled Unknown 4096 2160 0 0 0 0
2 - - - - - - - - - - - - - -
0 - - - - - - - - - - - - - -
1 3251634178 1 3984 0 ToSys Disabled Disabled Unknown 4096 2160 0 0 0 0
2 - - - - - - - - - - - - - -
# GPU vGPU Session Process Display Session Diff. Map Class. Map Capture Max H Max V H V Average Average
# Idx Id Id Id Ordinal Type State State Mode Res Res Res Res FPS Latency(us)
0 - - - - - - - - - - - - - -
1 3251634178 1 3984 0 ToSys Disabled Disabled Unknown 4096 2160 0 0 0 0
2 - - - - - - - - - - - - - -
0 - - - - - - - - - - - - - -
1 3251634178 1 3984 0 ToSys Disabled Disabled Unknown 4096 2160 0 0 0 0
2 - - - - - - - - - - - - - -
0 - - - - - - - - - - - - - -
1 3251634178 1 3984 0 ToSys Disabled Disabled Unknown 4096 2160 0 0 0 0
2 - - - - - - - - - - - - - -
0 - - - - - - - - - - - - - -
1 3251634178 1 3984 0 ToSys Disabled Disabled Unknown 4096 2160 0 0 0 0
2 - - - - - - - - - - - - - -
0 - - - - - - - - - - - - - -
1 3251634178 1 3984 0 ToSys Disabled Disabled Unknown 4096 2160 0 0 0 0
2 - - - - - - - - - - - - - -
0 - - - - - - - - - - - - - -
1 3251634178 1 3984 0 ToSys Disabled Disabled Unknown 4096 2160 0 0 0 0
2 - - - - - - - - - - - - - -
0 - - - - - - - - - - - - - -
1 3251634178 1 3984 0 ToSys Disabled Disabled Unknown 4096 2160 0 0 0 0
2 - - - - - - - - - - - - - -
0 - - - - - - - - - - - - - -
1 3251634178 1 3984 0 ToSys Disabled Disabled Blocking 4096 2160 1600 900 25 39964
2 - - - - - - - - - - - - - -
0 - - - - - - - - - - - - - -
1 3251634178 1 3984 0 ToSys Disabled Disabled Blocking 4096 2160 1600 900 25 39964
2 - - - - - - - - - - - - - -
0 - - - - - - - - - - - - - -
1 3251634178 1 3984 0 ToSys Disabled Disabled Blocking 4096 2160 0 0 0 0
2 - - - - - - - - - - - - - -
# GPU vGPU Session Process Display Session Diff. Map Class. Map Capture Max H Max V H V Average Average
# Idx Id Id Id Ordinal Type State State Mode Res Res Res Res FPS Latency(us)
0 - - - - - - - - - - - - - -
1 3251634178 1 3984 0 ToSys Disabled Disabled Blocking 4096 2160 0 0 0 0
2 - - - - - - - - - - - - - -
0 - - - - - - - - - - - - - -
1 3251634178 1 3984 0 ToSys Disabled Disabled Blocking 4096 2160 0 0 0 0
2 - - - - - - - - - - - - - -
0 - - - - - - - - - - - - - -
1 3251634178 1 3984 0 ToSys Disabled Disabled Blocking 4096 2160 0 0 0 0
2 - - - - - - - - - - - - - -
0 - - - - - - - - - - - - - -
1 3251634178 1 3984 0 ToSys Disabled Disabled Blocking 4096 2160 0 0 0 0
2 - - - - - - - - - - - - - -
0 - - - - - - - - - - - - - -
1 3251634178 1 3984 0 ToSys Disabled Disabled Blocking 4096 2160 0 0 0 0
2 - - - - - - - - - - - - - -
0 - - - - - - - - - - - - - -
1 3251634178 1 3984 0 ToSys Disabled Disabled Blocking 4096 2160 1600 900 135 7400
2 - - - - - - - - - - - - - -
0 - - - - - - - - - - - - - -
1 3251634178 1 3984 0 ToSys Disabled Disabled Blocking 4096 2160 1600 900 227 4403
2 - - - - - - - - - - - - - -
0 - - - - - - - - - - - - - -
1 3251634178 1 3984 0 ToSys Disabled Disabled Blocking 4096 2160 1600 900 227 4403
2 - - - - - - - - - - - - - -
0 - - - - - - - - - - - - - -
1 3251634178 1 3984 0 ToSys Disabled Disabled Blocking 4096 2160 0 0 0 0
2 - - - - - - - - - - - - - -
0 - - - - - - - - - - - - - -
1 3251634178 1 3984 0 ToSys Disabled Disabled Blocking 4096 2160 0 0 0 0
2 - - - - - - - - - - - - - -
# GPU vGPU Session Process Display Session Diff. Map Class. Map Capture Max H Max V H V Average Average
# Idx Id Id Id Ordinal Type State State Mode Res Res Res Res FPS Latency(us)
0 - - - - - - - - - - - - - -
1 3251634178 1 3984 0 ToSys Disabled Disabled Blocking 4096 2160 0 0 0 0
2 - - - - - - - - - - - - - -
0 - - - - - - - - - - - - - -
1 3251634178 1 3984 0 ToSys Disabled Disabled Blocking 4096 2160 0 0 0 0
2 - - - - - - - - - - - - - -
0 - - - - - - - - - - - - - -
1 3251634178 1 3984 0 ToSys Disabled Disabled Blocking 4096 2160 0 0 0 0
2 - - - - - - - - - - - - - -
0 - - - - - - - - - - - - - -
1 3251634178 1 3984 0 ToSys Disabled Disabled Blocking 4096 2160 0 0 0 0
2 - - - - - - - - - - - - - -
0 - - - - - - - - - - - - - -
1 3251634178 1 3984 0 ToSys Disabled Disabled Blocking 4096 2160 0 0 0 0
2 - - - - - - - - - - - - - -
0 - - - - - - - - - - - - - -
1 3251634178 1 3984 0 ToSys Disabled Disabled Blocking 4096 2160 0 0 0 0
2 - - - - - - - - - - - - - -
0 - - - - - - - - - - - - - -
1 3251634178 1 3984 0 ToSys Disabled Disabled Blocking 4096 2160 0 0 0 0
2 - - - - - - - - - - - - - -
0 - - - - - - - - - - - - - -
1 3251634178 1 3984 0 ToSys Disabled Disabled Blocking 4096 2160 0 0 0 0
2 - - - - - - - - - - - - - -
0 - - - - - - - - - - - - - -
1 3251634178 1 3984 0 ToSys Disabled Disabled Blocking 4096 2160 0 0 0 0
2 - - - - - - - - - - - - - -
0 - - - - - - - - - - - - - -
1 3251634178 1 3984 0 ToSys Disabled Disabled Blocking 4096 2160 0 0 0 0
2 - - - - - - - - - - - - - -
^C[root@vgpu ~]#
7.2.1.8. Listing Supported vGPU Types
To list the virtual GPU types that the GPUs in the system support, run nvidia-smi vgpu with the –s or --supported option.
To limit the retrieved information to a subset of the GPUs on the platform, use the –i or --id option to select one or more vGPUs.
            [root@vgpu ~]# nvidia-smi vgpu -s -i 0
GPU 0000:83:00.0
    GRID M60-0B
    GRID M60-0Q
    GRID M60-1A
    GRID M60-1B
    GRID M60-1Q
    GRID M60-2A
    GRID M60-2Q
    GRID M60-4A
    GRID M60-4Q
    GRID M60-8A
    GRID M60-8Q
[root@vgpu ~]#
To view detailed information about the supported vGPU types, add the –v or --verbose option:
            [root@vgpu ~]# nvidia-smi vgpu -s -i 0 -v   | less
GPU 00000000:83:00.0
    vGPU Type ID              : 0xb
        Name                  : GRID M60-0B
        Class                 : NVS
        Max Instances         : 16
        Device ID             : 0x13f210de
        Sub System ID         : 0x13f21176
        FB Memory             : 512 MiB
        Display Heads         : 2
        Maximum X Resolution  : 2560
        Maximum Y Resolution  : 1600
        Frame Rate Limit      : 45 FPS
        GRID License          : GRID-Virtual-PC,2.0;GRID-Virtual-WS,2.0;GRID-Virtual-WS-Ext,2.0;Quadro-Virtual-DWS,5.0
    vGPU Type ID              : 0xc
        Name                  : GRID M60-0Q
        Class                 : Quadro
        Max Instances         : 16
        Device ID             : 0x13f210de
        Sub System ID         : 0x13f2114c
        FB Memory             : 512 MiB
        Display Heads         : 2
        Maximum X Resolution  : 2560
        Maximum Y Resolution  : 1600
        Frame Rate Limit      : 60 FPS
        GRID License          : GRID-Virtual-WS,2.0;GRID-Virtual-WS-Ext,2.0;Quadro-Virtual-DWS,5.0
    vGPU Type ID              : 0xd
        Name                  : GRID M60-1A
        Class                 : NVS
        Max Instances         : 8
…
[root@vgpu ~]#
7.2.1.9. Listing the vGPU Types that Can Currently Be Created
To list the virtual GPU types that can currently be created on GPUs in the system, run nvidia-smi vgpu with the –c or --creatable option.
This property is a dynamic property that varies for each GPU depending on whether MIG mode is enabled for the GPU.
- If MIG mode is not enabled for the GPU, or if the GPU does not support MIG, this property reflects the number and type of vGPUs that are already running on the GPU.
- If no vGPUs are running on the GPU, all vGPU types that the GPU supports are listed.
- If one or more vGPUs are running on the GPU, but the GPU is not fully loaded, only the type of the vGPUs that are already running is listed.
- If the GPU is fully loaded, no vGPU types are listed.
- If MIG mode is enabled for the GPU, the result reflects the number and type of GPU instances on which no vGPUs are already running.
- If no GPU instances have been created, no vGPU types are listed.
- If GPU instances have been created, only the vGPU types that correspond to GPU instances on which no vGPU is running are listed.
- If a vGPU is running on every GPU instance, no vGPU types are listed.
To limit the retrieved information to a subset of the GPUs on the platform, use the –i or --id option to select one or more vGPUs.
            [root@vgpu ~]# nvidia-smi vgpu -c -i 0
GPU 0000:83:00.0
    GRID M60-2Q
[root@vgpu ~]#
To view detailed information about the vGPU types that can currently be created, add the –v or --verbose option.
7.2.2. Using Citrix XenCenter to monitor GPU performance
If you are using Citrix Hypervisor as your hypervisor, you can monitor GPU performance in XenCenter.
- Click on a server’s Performance tab.
- Right-click on the graph window, then select Actions and New Graph.
- Provide a name for the graph.
- In the list of available counter resources, select one or more GPU counters.
Counters are listed for each physical GPU not currently being used for GPU pass-through.
Figure 25. Using Citrix XenCenter to monitor GPU performance
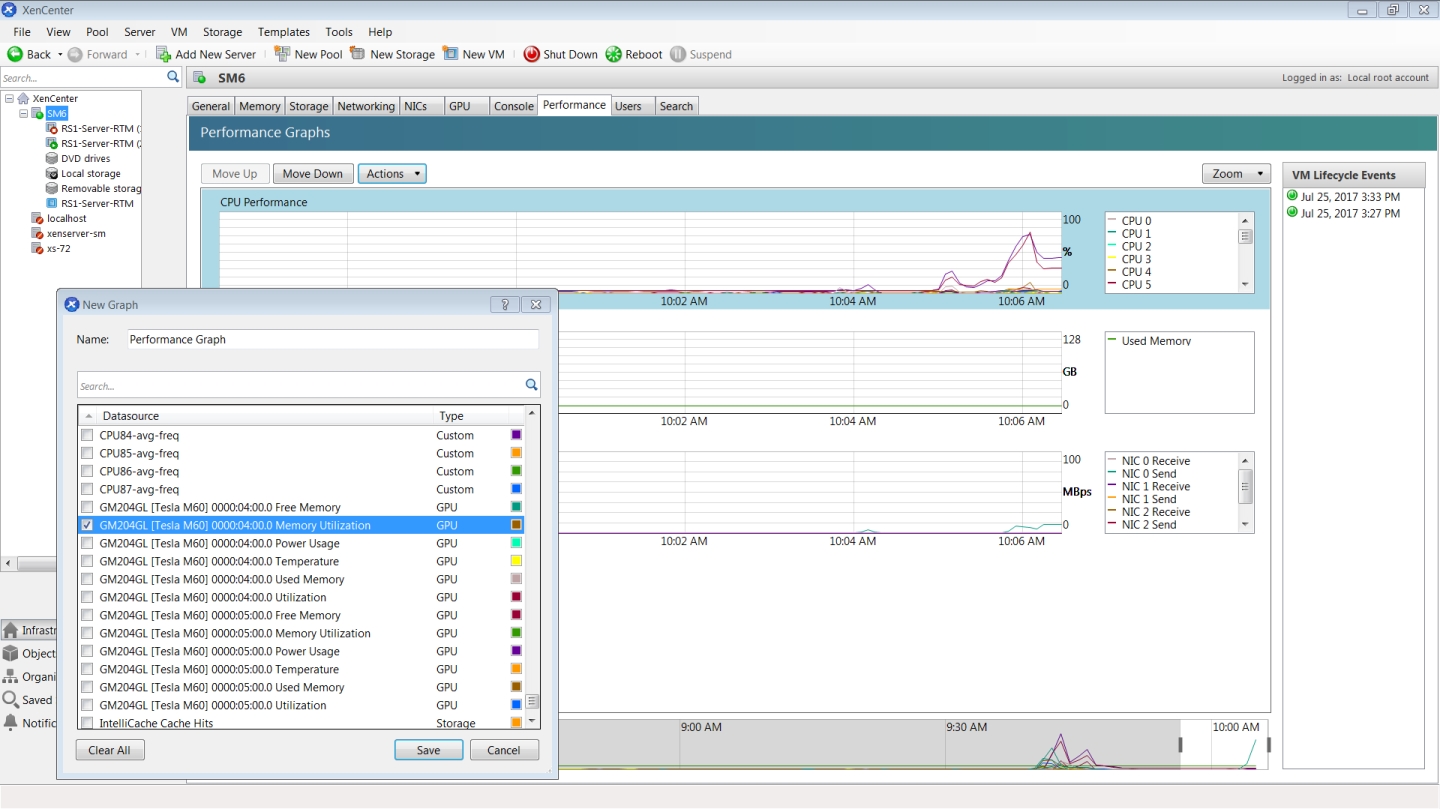
7.3. Monitoring GPU Performance from a Guest VM
You can use monitoring tools within an individual guest VM to monitor the performance of vGPUs or pass-through GPUs that are assigned to the VM. The scope of these tools is limited to the guest VM within which you use them. You cannot use monitoring tools within an individual guest VM to monitor any other GPUs in the platform.
For a vGPU, only these metrics are reported in a guest VM:
- 3D/Compute
- Memory controller
- Video encoder
- Video decoder
- Frame buffer usage
Other metrics normally present in a GPU are not applicable to a vGPU and are reported as zero or N/A, depending on the tool that you are using.
7.3.1. Using nvidia-smi to Monitor GPU Performance from a Guest VM
In guest VMs, you can use the nvidia-smi command to retrieve statistics for the total usage by all applications running in the VM and usage by individual applications of the following resources:
- GPU
- Video encoder
- Video decoder
- Frame buffer
To use nvidia-smi to retrieve statistics for the total resource usage by all applications running in the VM, run the following command:
nvidia-smi dmon
The following example shows the result of running nvidia-smi dmon from within a Windows guest VM.
Figure 26. Using nvidia-smi from a Windows guest VM to get total resource usage by all applications
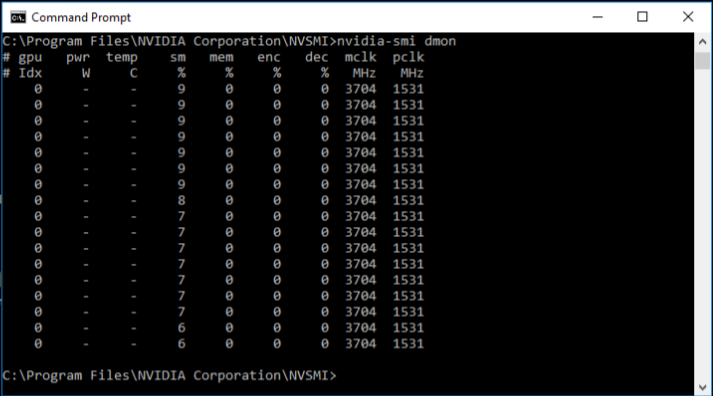
To use nvidia-smi to retrieve statistics for resource usage by individual applications running in the VM, run the following command:
nvidia-smi pmon
Figure 27. Using nvidia-smi from a Windows guest VM to get resource usage by individual applications
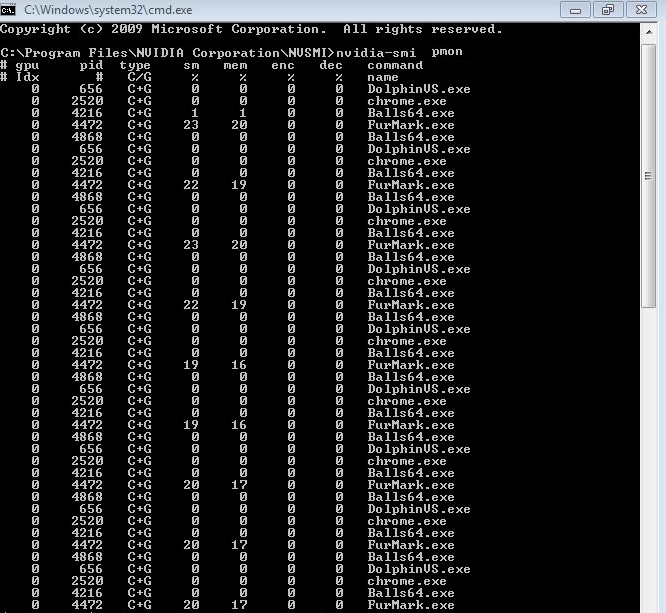
7.3.2. Using Windows Performance Counters to monitor GPU performance
In Windows VMs, GPU metrics are available as Windows Performance Counters through the NVIDIA GPU object.
Any application that is enabled to read performance counters can access these metrics. You can access these metrics directly through the Windows Performance Monitor application that is included with the Windows OS.
The following example shows GPU metrics in the Performance Monitor application.
Figure 28. Using Windows Performance Monitor to monitor GPU performance
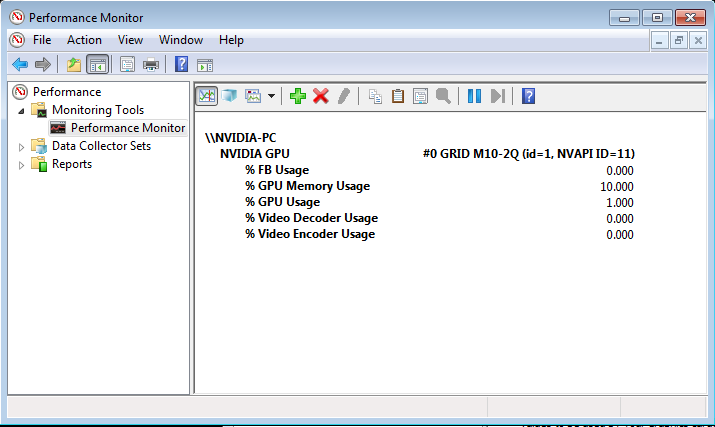
On vGPUs, the following GPU performance counters read as 0 because they are not applicable to vGPUs:
- % Bus Usage
- % Cooler rate
- Core Clock MHz
- Fan Speed
- Memory Clock MHz
- PCI-E current speed to GPU Mbps
- PCI-E current width to GPU
- PCI-E downstream width to GPU
- Power Consumption mW
- Temperature C
7.3.3. Using NVWMI to monitor GPU performance
In Windows VMs, Windows Management Instrumentation (WMI) exposes GPU metrics in the ROOT\CIMV2\NV namespace through NVWMI. NVWMI is included with the NVIDIA driver package. After the driver is installed, NVWMI help information in Windows Help format is available as follows:
C:\Program Files\NVIDIA Corporation\NVIDIA WMI Provider>nvwmi.chm
Any WMI-enabled application can access these metrics. The following example shows GPU metrics in the third-party application WMI Explorer, which is available for download from the from the CodePlex WMI Explorer page.
Figure 29. Using WMI Explorer to monitor GPU performance
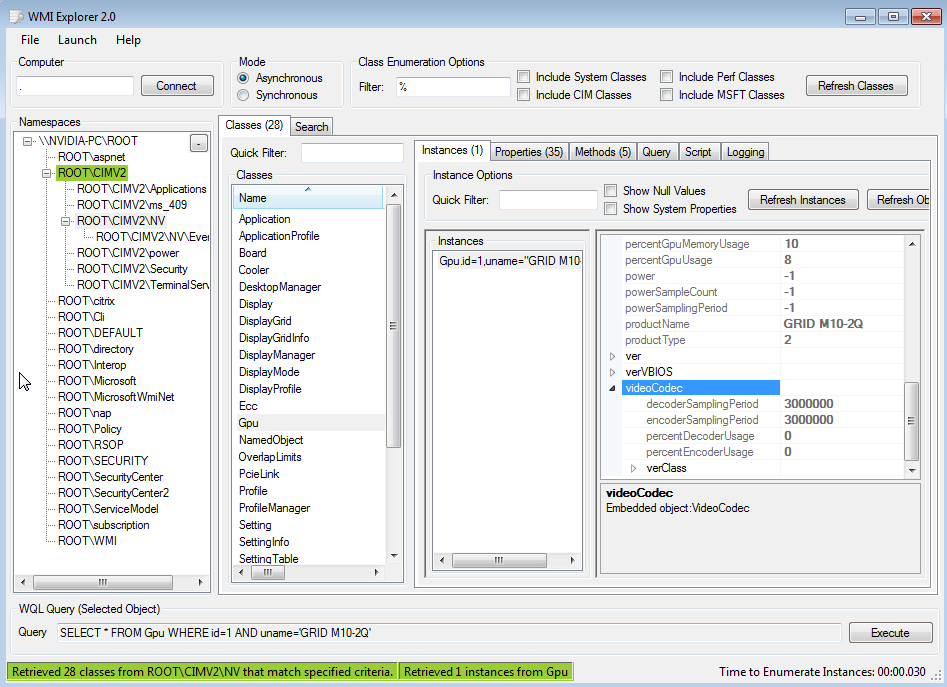
On vGPUs, some instance properties of the following classes do not apply to vGPUs:
- Gpu
- PcieLink
Gpu instance properties that do not apply to vGPUs
| Gpu Instance Property | Value reported on vGPU |
|---|---|
| gpuCoreClockCurrent | -1 |
| memoryClockCurrent | -1 |
| pciDownstreamWidth | 0 |
| pcieGpu.curGen | 0 |
| pcieGpu.curSpeed | 0 |
| pcieGpu.curWidth | 0 |
| pcieGpu.maxGen | 1 |
| pcieGpu.maxSpeed | 2500 |
| pcieGpu.maxWidth | 0 |
| power | -1 |
| powerSampleCount | -1 |
| powerSamplingPeriod | -1 |
| verVBIOS.orderedValue | 0 |
| verVBIOS.strValue | - |
| verVBIOS.value | 0 |
PcieLink instance properties that do not apply to vGPUs
No instances of PcieLink are reported for vGPU.
NVIDIA GPUs based on the NVIDIA Maxwell™ graphic architecture implement a best effort vGPU scheduler that aims to balance performance across vGPUs. The best effort scheduler allows a vGPU to use GPU processing cycles that are not being used by other vGPUs. Under some circumstances, a VM running a graphics-intensive application may adversely affect the performance of graphics-light applications running in other VMs.
GPUs based on NVIDIA GPU architectures after the Maxwell architecture additionally support equal share and fixed share vGPU schedulers. These schedulers impose a limit on GPU processing cycles used by a vGPU, which prevents graphics-intensive applications running in one VM from affecting the performance of graphics-light applications running in other VMs. On GPUs that support multiple vGPU schedulers, you can select the vGPU scheduler to use. You can also set the length of the time slice for the equal share and fixed share vGPU schedulers.
If you use the equal share or fixed share vGPU scheduler, the frame-rate limiter (FRL) is disabled.
The best effort scheduler is the default scheduler for all supported GPU architectures.
If you are unsure of the NVIDIA GPU architecture of your GPU, consult the release notes for your hypervisor at NVIDIA Virtual GPU Software Documentation.
8.1. Scheduling Policies for Time-Sliced vGPUs
In addition to the default best effort scheduler, GPUs based on NVIDIA GPU architectures after the Maxwell architecture support equal share and fixed share vGPU schedulers.
- Equal share scheduler
- The physical GPU is shared equally amongst the running vGPUs that reside on it. As vGPUs are added to or removed from a GPU, the share of the GPU's processing cycles allocated to each vGPU changes accordingly. As a result, the performance of a vGPU may increase as other vGPUs on the same GPU are stopped, or decrease as other vGPUs are started on the same GPU.
- Fixed share scheduler
- Each vGPU is given a fixed share of the physical GPU's processing cycles, the amount of which depends on the vGPU type, which in turn determines the maximum number of vGPUs per physical GPU. For example, the maximum number of T4-4C vGPUs per physical GPU is 4. When the scheduling policy is fixed share, each T4-4C vGPU is given one quarter, or 25%, the physical GPU's processing cycles. As vGPUs are added to or removed from a GPU, the share of the GPU's processing cycles allocated to each vGPU remains constant. As a result, the performance of a vGPU remains unchanged as other vGPUs are stopped or started on the same GPU.
8.2. Scheduler Time Slice for Time-Sliced vGPUs
When multiple VMs access the vGPUs on a single GPU, the GPU performs the work for each VM serially. The vGPU scheduler time slice represents the amount of time that the work of a VM is allowed to run on the GPU before it is preempted and the work of the next VM is performed.
For the equal share and fixed share vGPU schedulers, you can set the length of the time slice. The length of the time slice affects latency and throughput. The optimal length of the time slice depends the workload that the GPU is handling.
-
For workloads that require low latency, a shorter time slice is optimal. Typically, these workloads are applications that must generate output at a fixed interval, such as graphics applications that generate output at a frame rate of 60 FPS. These workloads are sensitive to latency and should be allowed to run at least once per interval. A shorter time slice reduces latency and improves responsiveness by causing the scheduler to switch more frequently between VMs.
- For workloads that require maximum throughput, a longer time slice is optimal. Typically, these workloads are applications that must complete their work as quickly as possible and do not require responsiveness, such as CUDA applications. A longer time slice increases throughput by preventing frequent switching between VMs.
8.3.
RmPVMRL
Registry Key
The RmPVMRL registry key controls the scheduling behavior for NVIDIA vGPUs by setting the scheduling policy and the length of the time slice.
You can change the vGPU scheduling behavior only on GPUs that support multiple vGPU schedulers, that is, GPUs based on NVIDIA GPU architectures after the Maxwell architecture.
Type
Dword
Contents
| Value | Meaning |
|---|---|
0x00 (default) |
Best effort scheduler |
0x01 |
Equal share scheduler with the default time slice length |
0x00TT0001 |
Equal share scheduler with a user-defined time slice length TT |
0x11 |
Fixed share scheduler with the default time slice length |
0x00TT0011 |
Fixed share scheduler with a user-defined time slice length TT |
The default time slice length depends on the maximum number of vGPUs per physical GPU allowed for the vGPU type.
| Maximum Number of vGPUs | Default Time Slice Length |
|---|---|
| Less than or equal to 8 | 2 ms |
| Greater than 8 | 1 ms |
- TT
-
Two hexadecimal digits in the range 01 to 1E that set the length of the time slice in milliseconds (ms) for the equal share and fixed share schedulers. The minimum length is 1 ms and the maximum length is 30 ms.
If TT is 00, the length is set to the default length for the vGPU type.
If TT is greater than 1E, the length is set to 30 ms.
Examples
This example sets the vGPU scheduler to equal share scheduler with the default time slice length.
RmPVMRL=0x01
This example sets the vGPU scheduler to equal share scheduler with a time slice that is 3 ms long.
RmPVMRL=0x00030001
This example sets the vGPU scheduler to fixed share scheduler with the default time slice length.
RmPVMRL=0x11
This example sets the vGPU scheduler to fixed share scheduler with a time slice that is 24 (0x18) ms long.
RmPVMRL=0x00180011
8.4. Getting the Current Time-Sliced vGPU Scheduling Behavior for All GPUs
Get the current scheduling behavior before changing the scheduling behavior of one or more GPUs to determine if you need to change it or after changing it to confirm the change.
Perform this task in your hypervisor command shell.
- Open a command shell on your hypervisor host machine. On all supported hypervisors, you can use secure shell (SSH) for this purpose. Individual hypervisors may provide additional means for logging in. For details, refer to the documentation for your hypervisor.
- Use the dmesg command to display messages from the kernel that contain the strings
NVRMandscheduler.$ dmesg | grep NVRM | grep scheduler
The scheduling behavior is indicated in these messages by the following strings:
-
BEST_EFFORT -
EQUAL_SHARE -
FIXED_SHARE
If the scheduling behavior is equal share or fixed share, the scheduler time slice in ms is also displayed.
This example gets the scheduling behavior of the GPUs in a system in which the behavior of one GPU is set to best effort, one GPU is set to equal share, and one GPU is set to fixed share.
            $ dmesg | grep NVRM | grep scheduler
2020-10-05T02:58:08.928Z cpu79:2100753)NVRM: GPU at 0000:3d:00.0 has software scheduler DISABLED with policy BEST_EFFORT.
2020-10-05T02:58:09.818Z cpu79:2100753)NVRM: GPU at 0000:5e:00.0 has software scheduler ENABLED with policy EQUAL_SHARE.
NVRM: Software scheduler timeslice set to 1 ms.
2020-10-05T02:58:12.115Z cpu79:2100753)NVRM: GPU at 0000:88:00.0 has software scheduler ENABLED with policy FIXED_SHARE.
NVRM: Software scheduler timeslice set to 1 ms.
-
8.5. Changing the Time-Sliced vGPU Scheduling Behavior for All GPUs
You can change the vGPU scheduling behavior only on GPUs that support multiple vGPU schedulers, that is, GPUs based on NVIDIA GPU architectures after the Maxwell architecture.
Perform this task in your hypervisor command shell.
- Open a command shell on your hypervisor host machine. On all supported hypervisors, you can use secure shell (SSH) for this purpose. Individual hypervisors may provide additional means for logging in. For details, refer to the documentation for your hypervisor.
- Set the
RmPVMRLregistry key to the value that sets the GPU scheduling policy and the length of the time slice that you want.-
On Citrix Hypervisor, Red Hat Enterprise Linux KVM, or Red Hat Virtualization (RHV), add the following entry to the /etc/modprobe.d/nvidia.conf file.
options nvidia NVreg_RegistryDwords="RmPVMRL=value"
If the /etc/modprobe.d/nvidia.conf file does not already exist, create it.
-
On VMware vSphere, use the esxcli set command.
# esxcli system module parameters set -m nvidia -p "NVreg_RegistryDwords=RmPVMRL=value"
- value
-
The value that sets the GPU scheduling policy and the length of the time slice that you want, for example:
-
0x01 - Sets the vGPU scheduling policy to equal share scheduler with the default time slice length.
-
0x00030001 - Sets the GPU scheduling policy to equal share scheduler with a time slice that is 3 ms long.
-
0x11 - Sets the vGPU scheduling policy to fixed share scheduler with the default time slice length.
-
0x00180011 - Sets the GPU scheduling policy to fixed share scheduler with a time slice that is 24 (0x18) ms long.
-
For all supported values, see RmPVMRL Registry Key.
-
- Reboot your hypervisor host machine.
Confirm that the scheduling behavior was changed as required as explained in Getting the Current Time-Sliced vGPU Scheduling Behavior for All GPUs.
8.6. Changing the Time-Sliced vGPU Scheduling Behavior for Select GPUs
You can change the vGPU scheduling behavior only on GPUs that support multiple vGPU schedulers, that is, GPUs based on NVIDIA GPU architectures after the Maxwell architecture.
Perform this task in your hypervisor command shell.
- Open a command shell on your hypervisor host machine. On all supported hypervisors, you can use secure shell (SSH) for this purpose. Individual hypervisors may provide additional means for logging in. For details, refer to the documentation for your hypervisor.
- Use the lspci command to obtain the PCI domain and bus/device/function (BDF) of each GPU for which you want to change the scheduling behavior.
- On Citrix Hypervisor, Red Hat Enterprise Linux KVM, or Red Hat Virtualization (RHV), add the -D option to display the PCI domain and the -d 10de: option to display information only for NVIDIA GPUs.
# lspci -D -d 10de:
- On VMware vSphere, pipe the output of lspci to the grep command to display information only for NVIDIA GPUs.
# lspci | grep NVIDIA
The NVIDIA GPU listed in this example has the PCI domain
0000and BDF86:00.0.0000:86:00.0 3D controller: NVIDIA Corporation GP104GL [Tesla P4] (rev a1)
- On Citrix Hypervisor, Red Hat Enterprise Linux KVM, or Red Hat Virtualization (RHV), add the -D option to display the PCI domain and the -d 10de: option to display information only for NVIDIA GPUs.
- Use the module parameter
NVreg_RegistryDwordsPerDeviceto set thepciandRmPVMRLregistry keys for each GPU.-
On Citrix Hypervisor, Red Hat Enterprise Linux KVM, or RHV, add the following entry to the /etc/modprobe.d/nvidia.conf file.
            options nvidia NVreg_RegistryDwordsPerDevice="pci=pci-domain:pci-bdf;RmPVMRL=value
[;pci=pci-domain:pci-bdf;RmPVMRL=value...]"
If the /etc/modprobe.d/nvidia.conf file does not already exist, create it.
-
On VMware vSphere, use the esxcli set command.
            # esxcli system module parameters set -m nvidia \
-p "NVreg_RegistryDwordsPerDevice=pci=pci-domain:pci-bdf;RmPVMRL=value\
[;pci=pci-domain:pci-bdf;RmPVMRL=value...]"
For each GPU, provide the following information:
- pci-domain
- The PCI domain of the GPU.
- pci-bdf
- The PCI device BDF of the GPU.
- value
-
The value that sets the GPU scheduling policy and the length of the time slice that you want, for example:
-
0x01 - Sets the GPU scheduling policy to equal share scheduler with the default time slice length.
-
0x00030001 - Sets the GPU scheduling policy to equal share scheduler with a time slice that is 3 ms long.
-
0x11 - Sets the GPU scheduling policy to fixed share scheduler with the default time slice length.
-
0x00180011 - Sets the GPU scheduling policy to fixed share scheduler with a time slice that is 24 (0x18) ms long.
For all supported values, see RmPVMRL Registry Key.
-
This example adds an entry to the /etc/modprobe.d/nvidia.conf file to change the scheduling behavior of a single GPU. The entry sets the GPU scheduling policy of the GPU at PCI domain
0000and BDF86:00.0to fixed share scheduler with the default time slice length.options nvidia NVreg_RegistryDwordsPerDevice= "pci=0000:86:00.0;RmPVMRL=0x11"
This example adds an entry to the /etc/modprobe.d/nvidia.conf file to change the scheduling behavior of a single GPU. The entry sets the scheduling policy of the GPU at PCI domain
0000and BDF86:00.0to fixed share scheduler with a time slice that is 24 (0x18) ms long.options nvidia NVreg_RegistryDwordsPerDevice= "pci=0000:86:00.0;RmPVMRL=0x00180011"
This example changes the scheduling behavior of a single GPU on a hypervisor host that is running VMware vSphere. The command sets the scheduling policy of the GPU at PCI domain
0000and BDF15:00.0to fixed share scheduler with the default time slice length.# esxcli system module parameters set -m nvidia -p \ "NVreg_RegistryDwordsPerDevice=pci=0000:15:00.0;RmPVMRL=0x11[;pci=0000:15:00.0;RmPVMRL=0x11]"
This example changes the scheduling behavior of a single GPU on a hypervisor host that is running VMware vSphere. The command sets the scheduling policy of the GPU at PCI domain
0000and BDF15:00.0to fixed share scheduler with a time slice that is 24 (0x18) ms long.# esxcli system module parameters set -m nvidia -p \ "NVreg_RegistryDwordsPerDevice=pci=0000:15:00.0;RmPVMRL=0x11[;pci=0000:15:00.0;RmPVMRL=0x00180011]"
-
- Reboot your hypervisor host machine.
Confirm that the scheduling behavior was changed as required as explained in Getting the Current Time-Sliced vGPU Scheduling Behavior for All GPUs.
8.7. Restoring Default Time-Sliced vGPU Scheduler Settings
Perform this task in your hypervisor command shell.
- Open a command shell on your hypervisor host machine. On all supported hypervisors, you can use secure shell (SSH) for this purpose. Individual hypervisors may provide additional means for logging in. For details, refer to the documentation for your hypervisor.
- Unset the
RmPVMRLregistry key.-
On Citrix Hypervisor, Red Hat Enterprise Linux KVM, or Red Hat Virtualization (RHV), comment out the entries in the /etc/modprobe.d/nvidia.conf file that set
RmPVMRLby prefixing each entry with the#character. -
On VMware vSphere, set the module parameter to an empty string.
# esxcli system module parameters set -m nvidia -p "module-parameter="
- module-parameter
-
The module parameter to set, which depends on whether the scheduling behavior was changed for all GPUs or select GPUs:
- For all GPUs, set the
NVreg_RegistryDwordsmodule parameter. - For select GPUs, set the
NVreg_RegistryDwordsPerDevicemodule parameter.
- For all GPUs, set the
For example, to restore default vGPU scheduler settings after they were changed for all GPUs, enter this command:
# esxcli system module parameters set -m nvidia -p "NVreg_RegistryDwords="
-
- Reboot your hypervisor host machine.
This chapter describes basic troubleshooting steps for NVIDIA vGPU on Citrix Hypervisor, Red Hat Enterprise Linux KVM, Red Hat Virtualization (RHV), and VMware vSphere, and how to collect debug information when filing a bug report.
9.1. Known issues
Before troubleshooting or filing a bug report, review the release notes that accompany each driver release, for information about known issues with the current release, and potential workarounds.
9.2. Troubleshooting steps
If a vGPU-enabled VM fails to start, or doesn’t display any output when it does start, follow these steps to narrow down the probable cause.
9.2.1. Verifying the NVIDIA Kernel Driver Is Loaded
- Use the command that your hypervisor provides to verify that the kernel driver is loaded:
- On Citrix Hypervisor, Red Hat Enterprise Linux KVM, and RHV, use lsmod:
            [root@xenserver ~]# lsmod|grep nvidia
nvidia               9604895  84
i2c_core               20294  2 nvidia,i2c_i801
[root@xenserver ~]#
- On VMware vSphere, use vmkload_mod:
            [root@esxi:~] vmkload_mod -l | grep nvidia
nvidia                   5    8420
- On Citrix Hypervisor, Red Hat Enterprise Linux KVM, and RHV, use lsmod:
- If the nvidia driver is not listed in the output, check dmesg for any load-time errors reported by the driver (see Examining NVIDIA kernel driver output).
- On Citrix Hypervisor, Red Hat Enterprise Linux KVM, and RHV, also use the rpm -q command to verify that the NVIDIA GPU Manager package is correctly installed.
rpm -q vgpu-manager-rpm-package-name
- vgpu-manager-rpm-package-name
-
The RPM package name of the NVIDIA GPU Manager package, for example
NVIDIA-vGPU-NVIDIA-vGPU-CitrixHypervisor-8.2-510.108.03for Citrix Hypervisor.
This example verifies that the NVIDIA GPU Manager package for Citrix Hypervisor is correctly installed.
            [root@xenserver ~]# rpm –q NVIDIA-vGPU-NVIDIA-vGPU-CitrixHypervisor-8.2-510.108.03
[root@xenserver ~]#
If an existing NVIDIA GRID package is already installed and you don’t select the upgrade (-U) option when installing a newer GRID package, the rpm command will return many conflict errors.
Preparing packages for installation...
        file /usr/bin/nvidia-smi from install of NVIDIA-vGPU-NVIDIA-vGPU-CitrixHypervisor-8.2-510.108.03.x86_64 conflicts with file from package NVIDIA-vGPU-xenserver-8.2-510.85.02.x86_64
        file /usr/lib/libnvidia-ml.so from install of NVIDIA-vGPU-NVIDIA-vGPU-CitrixHypervisor-8.2-510.108.03.x86_64 conflicts with file from package NVIDIA-vGPU-xenserver-8.2-510.85.02.x86_64
        ...
9.2.2. Verifying that nvidia-smi works
If the NVIDIA kernel driver is correctly loaded on the physical GPU, run nvidia-smi and verify that all physical GPUs not currently being used for GPU pass-through are listed in the output. For details on expected output, see NVIDIA System Management Interface nvidia-smi.
If nvidia-smi fails to report the expected output, check dmesg for NVIDIA kernel driver messages.
9.2.3. Examining NVIDIA kernel driver output
Information and debug messages from the NVIDIA kernel driver are logged in kernel logs, prefixed with NVRM or nvidia.
Run dmesg on Citrix Hypervisor, Red Hat Enterprise Linux KVM, RHV, and VMware vSphere and check for the NVRM and nvidia prefixes:
            [root@xenserver ~]# dmesg | grep -E "NVRM|nvidia"
[   22.054928] nvidia: module license 'NVIDIA' taints kernel.
[   22.390414] NVRM: loading
[   22.829226] nvidia 0000:04:00.0: enabling device (0000 -> 0003)
[   22.829236] nvidia 0000:04:00.0: PCI INT A -> GSI 32 (level, low) -> IRQ 32
[   22.829240] NVRM: This PCI I/O region assigned to your NVIDIA device is invalid:
[   22.829241] NVRM: BAR0 is 0M @ 0x0 (PCI:0000:00:04.0)
[   22.829243] NVRM: The system BIOS may have misconfigured your GPU.
9.2.4. Examining NVIDIA Virtual GPU Manager Messages
Information and debug messages from the NVIDIA Virtual GPU Manager are logged to the hypervisor’s log files, prefixed with vmiop.
9.2.4.1. Examining Citrix Hypervisor vGPU Manager Messages
For Citrix Hypervisor, NVIDIA Virtual GPU Manager messages are written to /var/log/messages.
Look in the /var/log/messages file for the vmiop prefix:
            [root@xenserver ~]# grep vmiop /var/log/messages
Dec 26 10:34:03 localhost vgpu-ll[25698]: notice: vmiop_log: gpu-pci-id : 0000:05:00.0
Dec 26 10:34:03 localhost vgpu-ll[25698]: notice: vmiop_log: vgpu_type : quadro
Dec 26 10:34:03 localhost vgpu-ll[25698]: notice: vmiop_log: Framebuffer: 0x74000000
Dec 26 10:34:03 localhost vgpu-ll[25698]: notice: vmiop_log: Virtual Device Id: 0xl3F2:0xll4E
Dec 26 10:34:03 localhost vgpu-ll[25698]: notice: vmiop_log: ######## vGPU Manager Information: ########
Dec 26 10:34:03 localhost vgpu-ll[25698]: notice: vmiop_log: Driver Version: 510.108.03
Dec 26 10:34:03 localhost vgpu-ll[25698]: notice: vmiop_log: Init frame copy engine: syncing...
Dec 26 10:35:31 localhost vgpu-ll[25698]: notice: vmiop_log: ######## Guest NVIDIA Driver Information: ########
Dec 26 10:35:31 localhost vgpu-ll[25698]: notice: vmiop_log: Driver Version: 514.08
Dec 26 10:35:36 localhost vgpu-ll[25698]: notice: vmiop_log: Current max guest pfn = 0xllbc84!
Dec 26 10:35:40 localhost vgpu-ll[25698]: notice: vmiop_log: Current max guest pfn = 0xlleff0!
[root@xenserver ~]#
9.2.4.2. Examining Red Hat Enterprise Linux KVM vGPU Manager Messages
For Red Hat Enterprise Linux KVM and RHV, NVIDIA Virtual GPU Manager messages are written to /var/log/messages.
Look in these files for the vmiop_log: prefix:
            # grep vmiop_log: /var/log/messages
[2022-12-23 04:46:12] vmiop_log: [2022-12-23 04:46:12] notice: vmiop-env: guest_max_gpfn:0x11f7ff
[2022-12-23 04:46:12] vmiop_log: [2022-12-23 04:46:12] notice: pluginconfig: /usr/share/nvidia/vgx/grid_m60-1q.conf,gpu-pci-id=0000:06:00.0
[2022-12-23 04:46:12] vmiop_log: [2022-12-23 04:46:12] notice: Loading Plugin0: libnvidia-vgpu
[2022-12-23 04:46:12] vmiop_log: [2022-12-23 04:46:12] notice: Successfully update the env symbols!
[2022-12-23 04:46:12] vmiop_log: [2022-12-23 04:46:12] notice: vmiop_log: gpu-pci-id : 0000:06:00.0
[2022-12-23 04:46:12] vmiop_log: [2022-12-23 04:46:12] notice: vmiop_log: vgpu_type : quadro
[2022-12-23 04:46:12] vmiop_log: [2022-12-23 04:46:12] notice: vmiop_log: Framebuffer: 0x38000000
[2022-12-23 04:46:12] vmiop_log: [2022-12-23 04:46:12] notice: vmiop_log: Virtual Device Id: 0x13F2:0x114D
[2022-12-23 04:46:12] vmiop_log: [2022-12-23 04:46:12] notice: vmiop_log: ######## vGPU Manager Information: ########
[2022-12-23 04:46:12] vmiop_log: [2022-12-23 04:46:12] notice: vmiop_log: Driver Version: 510.108.03
[2022-12-23 04:46:12] vmiop_log: [2022-12-23 04:46:12] notice: vmiop_log: Init frame copy engine: syncing...
[2022-12-23 05:09:14] vmiop_log: [2022-12-23 05:09:14] notice: vmiop_log: ######## Guest NVIDIA Driver Information: ########
[2022-12-23 05:09:14] vmiop_log: [2022-12-23 05:09:14] notice: vmiop_log: Driver Version: 514.08
[2022-12-23 05:09:14] vmiop_log: [2022-12-23 05:09:14] notice: vmiop_log: Current max guest pfn = 0x11a71f!
[2022-12-23 05:12:09] vmiop_log: [2022-12-23 05:12:09] notice: vmiop_log: vGPU license state: (0x00000001)
#
9.2.4.3. Examining VMware vSphere vGPU Manager Messages
For VMware vSphere, NVIDIA Virtual GPU Manager messages are written to the vmware.log file in the guest VM’s storage directory.
Look in the vmware.log file for the vmiop prefix:
            [root@esxi:~] grep vmiop /vmfs/volumes/datastore1/win7-vgpu-test1/vmware.log
2022-12-23T14:02:21.275Z| vmx| I120: DICT   pciPassthru0.virtualDev = "vmiop"
2022-12-23T14:02:21.344Z| vmx| I120: GetPluginPath testing /usr/lib64/vmware/plugin/libvmx-vmiop.so
2022-12-23T14:02:21.344Z| vmx| I120: PluginLdr_LoadShared: Loaded shared plugin libvmx-vmiop.so from /usr/lib64/vmware/plugin/libvmx-vmiop.so
2022-12-23T14:02:21.344Z| vmx| I120: VMIOP: Loaded plugin libvmx-vmiop.so:VMIOP_InitModule
2022-12-23T14:02:21.359Z| vmx| I120: VMIOP: Initializing plugin vmiop-display
2022-12-23T14:02:21.365Z| vmx| I120: vmiop_log: gpu-pci-id : 0000:04:00.0
2022-12-23T14:02:21.365Z| vmx| I120: vmiop_log: vgpu_type : quadro
2022-12-23T14:02:21.365Z| vmx| I120: vmiop_log: Framebuffer: 0x74000000
2022-12-23T14:02:21.365Z| vmx| I120: vmiop_log: Virtual Device Id: 0x11B0:0x101B
2022-12-23T14:02:21.365Z| vmx| I120: vmiop_log: ######## vGPU Manager Information: ########
2022-12-23T14:02:21.365Z| vmx| I120: vmiop_log: Driver Version: 510.108.03
2022-12-23T14:02:21.365Z| vmx| I120: vmiop_log: VGX Version: 14.4
2022-12-23T14:02:21.445Z| vmx| I120: vmiop_log: Init frame copy engine: syncing...
2022-12-23T14:02:37.031Z| vthread-12| I120: vmiop_log: ######## Guest NVIDIA Driver Information: ########
2022-12-23T14:02:37.031Z| vthread-12| I120: vmiop_log: Driver Version: 514.08
2022-12-23T14:02:37.031Z| vthread-12| I120: vmiop_log: VGX Version: 14.4
2022-12-23T14:02:37.093Z| vthread-12| I120: vmiop_log: Clearing BAR1 mapping
2022-12-26T23:39:55.726Z| vmx| I120: VMIOP: Shutting down plugin vmiop-display
[root@esxi:~]
9.3. Capturing configuration data for filing a bug report
When filing a bug report with NVIDIA, capture relevant configuration data from the platform exhibiting the bug in one of the following ways:
- On any supported hypervisor, run nvidia-bug-report.sh.
- On Citrix Citrix Hypervisor, create a Citrix Hypervisor server status report.
9.3.1. Capturing configuration data by running nvidia-bug-report.sh
The nvidia-bug-report.sh script captures debug information into a gzip-compressed log file on the server.
Run nvidia-bug-report.sh from theCitrix Hypervisor dom0 shell, the Red Hat Enterprise Linux KVM host shell, the Red Hat Virtualization (RHV) host shell, or the VMware ESXi host shell.
This example runs nvidia-bug-report.sh on Citrix Hypervisor, but the procedure is the same on Red Hat Enterprise Linux KVM, RHV, or VMware vSphere ESXi.
            [root@xenserver ~]# nvidia-bug-report.sh

nvidia-bug-report.sh will now collect information about your
system and create the file 'nvidia-bug-report.log.gz' in the current
directory.  It may take several seconds to run.  In some
cases, it may hang trying to capture data generated dynamically
by the Linux kernel and/or the NVIDIA kernel module.  While
the bug report log file will be incomplete if this happens, it
may still contain enough data to diagnose your problem.

For Xen open source/XCP users, if you are reporting a domain issue,
please run: nvidia-bug-report.sh --domain-name <"domain_name">

Please include the 'nvidia-bug-report.log.gz' log file when reporting
your bug via the NVIDIA Linux forum (see devtalk.nvidia.com)
or by sending email to 'linux-bugs@nvidia.com'.

Running nvidia-bug-report.sh...

If the bug report script hangs after this point consider running with
--safe-mode command line argument.

 complete

[root@xenserver ~]#
9.3.2. Capturing Configuration Data by Creating a Citrix Hypervisor Status Report
- In XenCenter, from the Tools menu, choose Server Status Report.
- Select the Citrix Hypervisor instance from which you want to collect a status report.
- Select the data to include in the report.
- To include NVIDIA vGPU debug information, select NVIDIA-logs in the Report Content Item list.
- Generate the report.
Figure 30. Including NVIDIA logs in a Citrix Hypervisor status report

A.1. Virtual GPU Types for Supported GPUs
NVIDIA vGPU is available as a licensed product on supported NVIDIA GPUs. For a list of recommended server platforms and supported GPUs, consult the release notes for supported hypervisors at NVIDIA Virtual GPU Software Documentation.
A.1.1. NVIDIA A100 PCIe 40GB Virtual GPU Types
Physical GPUs per board: 1 This GPU supports MIG-backed virtual GPUs and time-sliced virtual GPUs.
MIG-Backed C-Series Virtual GPU Types for NVIDIA A100 PCIe 40GB
Required license edition: vCS or vWS
For details of GPU instance profiles, see NVIDIA Multi-Instance GPU User Guide.
| Virtual GPU Type | Intended Use Case | Frame Buffer (MB) | Maximum vGPUs per GPU | Slices per vGPU | Compute Instances per vGPU | Corresponding GPU Instance Profile |
|---|---|---|---|---|---|---|
| A100-7-40C | Training Workloads | 40960 | 1 | 7 | 7 | MIG 7g.40gb |
| A100-4-20C | Training Workloads | 20480 | 1 | 4 | 4 | MIG 4g.20gb |
| A100-3-20C | Training Workloads | 20480 | 2 | 3 | 3 | MIG 3g.20gb |
| A100-2-10C | Training Workloads | 10240 | 3 | 2 | 2 | MIG 2g.10gb |
| A100-1-5C | Inference Workloads | 5120 | 7 | 1 | 1 | MIG 1g.5gb |
| A100-1-5CME | Inference Workloads | 5120 | 1 | 1 | 1 | MIG 1g.5gb+me |
Time-Sliced C-Series Virtual GPU Types for NVIDIA A100 PCIe 40GB
Required license edition: vCS or vWS
These vGPU types support a single display with a fixed maximum resolution.
| Virtual GPU Type | Intended Use Case | Frame Buffer (MB) | Maximum vGPUs per GPU | Maximum vGPUs per Board | Maximum Display Resolution | Virtual Displays per vGPU |
|---|---|---|---|---|---|---|
| A100-40C | Training Workloads | 40960 | 1 | 1 | 4096×21602 | 1 |
| A100-20C | Training Workloads | 20480 | 2 | 2 | 4096×21602 | 1 |
| A100-10C | Training Workloads | 10240 | 4 | 4 | 4096×21602 | 1 |
| A100-8C | Training Workloads | 8192 | 5 | 5 | 4096×21602 | 1 |
| A100-5C | Inference Workloads | 5120 | 8 | 8 | 4096×21602 | 1 |
| A100-4C | Inference Workloads | 4096 | 10 | 10 | 4096×21602 | 1 |
A.1.2. NVIDIA A100 HGX 40GB Virtual GPU Types
Physical GPUs per board: 1 This GPU supports MIG-backed virtual GPUs and time-sliced virtual GPUs.
MIG-Backed C-Series Virtual GPU Types for NVIDIA A100 HGX 40GB
Required license edition: vCS or vWS
For details of GPU instance profiles, see NVIDIA Multi-Instance GPU User Guide.
| Virtual GPU Type | Intended Use Case | Frame Buffer (MB) | Maximum vGPUs per GPU | Slices per vGPU | Compute Instances per vGPU | Corresponding GPU Instance Profile |
|---|---|---|---|---|---|---|
| A100X-7-40C | Training Workloads | 40960 | 1 | 7 | 7 | MIG 7g.40gb |
| A100X-4-20C | Training Workloads | 20480 | 1 | 4 | 4 | MIG 4g.20gb |
| A100X-3-20C | Training Workloads | 20480 | 2 | 3 | 3 | MIG 3g.20gb |
| A100X-2-10C | Training Workloads | 10240 | 3 | 2 | 2 | MIG 2g.10gb |
| A100X-1-5C | Inference Workloads | 5120 | 7 | 1 | 1 | MIG 1g.5gb |
| A100X-1-5CME | Inference Workloads | 5120 | 1 | 1 | 1 | MIG 1g.5gb+me |
Time-Sliced C-Series Virtual GPU Types for NVIDIA A100 HGX 40GB
Required license edition: vCS or vWS
These vGPU types support a single display with a fixed maximum resolution.
| Virtual GPU Type | Intended Use Case | Frame Buffer (MB) | Maximum vGPUs per GPU | Maximum vGPUs per Board | Maximum Display Resolution | Virtual Displays per vGPU |
|---|---|---|---|---|---|---|
| A100X-40C | Training Workloads | 40960 | 1 | 1 | 4096×21602 | 1 |
| A100X-20C | Training Workloads | 20480 | 2 | 2 | 4096×21602 | 1 |
| A100X-10C | Training Workloads | 10240 | 4 | 4 | 4096×21602 | 1 |
| A100X-8C | Training Workloads | 8192 | 5 | 5 | 4096×21602 | 1 |
| A100X-5C | Inference Workloads | 5120 | 8 | 8 | 4096×21602 | 1 |
| A100X-4C | Inference Workloads | 4096 | 10 | 10 | 4096×21602 | 1 |
A.1.3. NVIDIA A100 PCIe 80GB and NVIDIA A100X Virtual GPU Types
Physical GPUs per board: 1
This GPU supports MIG-backed virtual GPUs and time-sliced virtual GPUs.
The virtual GPU types for the NVIDIA A100 PCIe 80GB and NVIDIA A100X GPUs are identical.
MIG-Backed C-Series Virtual GPU Types for NVIDIA A100 PCIe 80GB and NVIDIA A100X
Required license edition: vCS or vWS
For details of GPU instance profiles, see NVIDIA Multi-Instance GPU User Guide.
| Virtual GPU Type | Intended Use Case | Frame Buffer (MB) | Maximum vGPUs per GPU | Slices per vGPU | Compute Instances per vGPU | Corresponding GPU Instance Profile |
|---|---|---|---|---|---|---|
| A100D-7-80C | Training Workloads | 81920 | 1 | 7 | 7 | MIG 7g.80gb |
| A100D-4-40C | Training Workloads | 40960 | 1 | 4 | 4 | MIG 4g.40gb |
| A100D-3-40C | Training Workloads | 40960 | 2 | 3 | 3 | MIG 3g.40gb |
| A100D-2-20C | Training Workloads | 20480 | 3 | 2 | 2 | MIG 2g.20gb |
| A100D-1-10C | Training Workloads | 10240 | 7 | 1 | 1 | MIG 1g.10gb |
| A100D-1-10CME | Training Workloads | 10240 | 1 | 1 | 1 | MIG 1g.10gb+me |
Time-Sliced C-Series Virtual GPU Types for NVIDIA A100 PCIe 80GB and NVIDIA A100X
Required license edition: vCS or vWS
These vGPU types support a single display with a fixed maximum resolution.
| Virtual GPU Type | Intended Use Case | Frame Buffer (MB) | Maximum vGPUs per GPU | Maximum vGPUs per Board | Maximum Display Resolution | Virtual Displays per vGPU |
|---|---|---|---|---|---|---|
| A100D-80C | Training Workloads | 81920 | 1 | 1 | 4096×21602 | 1 |
| A100D-40C | Training Workloads | 40960 | 2 | 2 | 4096×21602 | 1 |
| A100D-20C | Training Workloads | 20480 | 4 | 4 | 4096×21602 | 1 |
| A100D-16C | Inference Workloads | 16384 | 5 | 5 | 4096×21602 | 1 |
| A100D-10C | Training Workloads | 10240 | 8 | 8 | 4096×21602 | 1 |
| A100D-8C | Training Workloads | 8192 | 10 | 10 | 4096×21602 | 1 |
| A100D-4C | Inference Workloads | 4096 | 20 | 20 | 4096×21602 | 1 |
A.1.4. NVIDIA A100 HGX 80GB Virtual GPU Types
Physical GPUs per board: 1 This GPU supports MIG-backed virtual GPUs and time-sliced virtual GPUs.
MIG-Backed C-Series Virtual GPU Types for NVIDIA A100 HGX 80GB
Required license edition: vCS or vWS
For details of GPU instance profiles, see NVIDIA Multi-Instance GPU User Guide.
| Virtual GPU Type | Intended Use Case | Frame Buffer (MB) | Maximum vGPUs per GPU | Slices per vGPU | Compute Instances per vGPU | Corresponding GPU Instance Profile |
|---|---|---|---|---|---|---|
| A100DX-7-80C | Training Workloads | 81920 | 1 | 7 | 7 | MIG 7g.80gb |
| A100DX-4-40C | Training Workloads | 40960 | 1 | 4 | 4 | MIG 4g.40gb |
| A100DX-3-40C | Training Workloads | 40960 | 2 | 3 | 3 | MIG 3g.40gb |
| A100DX-2-20C | Training Workloads | 20480 | 3 | 2 | 2 | MIG 2g.20gb |
| A100DX-1-10C | Training Workloads | 10240 | 7 | 1 | 1 | MIG 1g.10gb |
| A100DX-1-10CME | Training Workloads | 10240 | 1 | 1 | 1 | MIG 1g.10gb+me |
Time-Sliced C-Series Virtual GPU Types for NVIDIA A100 HGX 80GB
Required license edition: vCS or vWS
These vGPU types support a single display with a fixed maximum resolution.
| Virtual GPU Type | Intended Use Case | Frame Buffer (MB) | Maximum vGPUs per GPU | Maximum vGPUs per Board | Maximum Display Resolution | Virtual Displays per vGPU |
|---|---|---|---|---|---|---|
| A100DX-80C | Training Workloads | 81920 | 1 | 1 | 4096×21602 | 1 |
| A100DX-40C | Training Workloads | 40960 | 2 | 2 | 4096×21602 | 1 |
| A100DX-20C | Training Workloads | 20480 | 4 | 4 | 4096×21602 | 1 |
| A100DX-16C | Inference Workloads | 16384 | 5 | 5 | 4096×21602 | 1 |
| A100DX-10C | Training Workloads | 10240 | 8 | 8 | 4096×21602 | 1 |
| A100DX-8C | Training Workloads | 8192 | 10 | 10 | 4096×21602 | 1 |
| A100DX-4C | Inference Workloads | 4096 | 20 | 20 | 4096×21602 | 1 |
A.1.5. NVIDIA A40 Virtual GPU Types
Physical GPUs per board: 1
Q-Series Virtual GPU Types for NVIDIA A40
Required license edition: vWS
These vGPU types support a maximum combined resolution based on the number of available pixels, which is determined by their frame buffer size. You can choose between using a small number of high resolution displays or a larger number of lower resolution displays with these vGPU types. The maximum number of displays per vGPU is based on a configuration in which all displays have the same resolution. For examples of configurations with a mixture of display resolutions, see Mixed Display Configurations for B-Series and Q-Series vGPUs.
| Virtual GPU Type | Intended Use Case | Frame Buffer (MB) | Maximum vGPUs per GPU | Maximum vGPUs per Board | Available Pixels | Display Resolution | Virtual Displays per vGPU |
|---|---|---|---|---|---|---|---|
| A40-48Q | Virtual Workstations | 49152 | 1 | 1 | 66355200 | 7680×4320 | 2 |
| 5120×2880 or lower | 4 | ||||||
| A40-24Q | Virtual Workstations | 24576 | 2 | 2 | 66355200 | 7680×4320 | 2 |
| 5120×2880 or lower | 4 | ||||||
| A40-16Q | Virtual Workstations | 16384 | 3 | 3 | 66355200 | 7680×4320 | 2 |
| 5120×2880 or lower | 4 | ||||||
| A40-12Q | Virtual Workstations | 12288 | 4 | 4 | 66355200 | 7680×4320 | 2 |
| 5120×2880 or lower | 4 | ||||||
| A40-8Q | Virtual Workstations | 8192 | 6 | 6 | 66355200 | 7680×4320 | 2 |
| 5120×2880 or lower | 4 | ||||||
| A40-6Q | Virtual Workstations | 6144 | 8 | 8 | 58982400 | 7680×4320 | 1 |
| 5120×2880 or lower | 4 | ||||||
| A40-4Q | Virtual Workstations | 4096 | 12 | 12 | 58982400 | 7680×4320 | 1 |
| 5120×2880 or lower | 4 | ||||||
| A40-3Q | Virtual Workstations | 3072 | 16 | 16 | 35389440 | 7680×4320 | 1 |
| 5120×2880 | 2 | ||||||
| 4096×2160 or lower | 4 | ||||||
| A40-2Q | Virtual Workstations | 2048 | 24 | 24 | 35389440 | 7680×4320 | 1 |
| 5120×2880 | 2 | ||||||
| 4096×2160 or lower | 4 | ||||||
| A40-1Q | Virtual Workstations | 1024 | 327 | 32 | 17694720 | 5120×2880 | 1 |
| 4096×2160 | 2 | ||||||
| 3840×2160 | 2 | ||||||
| 2560×1600 or lower | 4 |
B-Series Virtual GPU Types for NVIDIA A40
Required license edition: vPC or vWS
These vGPU types support a maximum combined resolution based on the number of available pixels, which is determined by their frame buffer size. You can choose between using a small number of high resolution displays or a larger number of lower resolution displays with these vGPU types. The maximum number of displays per vGPU is based on a configuration in which all displays have the same resolution. For examples of configurations with a mixture of display resolutions, see Mixed Display Configurations for B-Series and Q-Series vGPUs.
| Virtual GPU Type | Intended Use Case | Frame Buffer (MB) | Maximum vGPUs per GPU | Maximum vGPUs per Board | Available Pixels | Display Resolution | Virtual Displays per vGPU |
|---|---|---|---|---|---|---|---|
| A40-2B | Virtual Desktops | 2048 | 24 | 24 | 17694720 | 5120×2880 | 1 |
| 4096×2160 | 2 | ||||||
| 3840×2160 | 2 | ||||||
| 2560×1600 or lower | 4 | ||||||
| A40-1B | Virtual Desktops | 1024 | 32 | 32 | 16384000 | 5120×2880 | 1 |
| 4096×2160 | 1 | ||||||
| 3840×2160 | 1 | ||||||
| 2560×1600 or lower | 45 |
C-Series Virtual GPU Types for NVIDIA A40
Required license edition: vCS or vWS
These vGPU types support a single display with a fixed maximum resolution.
| Virtual GPU Type | Intended Use Case | Frame Buffer (MB) | Maximum vGPUs per GPU | Maximum vGPUs per Board | Maximum Display Resolution | Virtual Displays per vGPU |
|---|---|---|---|---|---|---|
| A40-48C | Training Workloads | 49152 | 1 | 1 | 4096×21602 | 1 |
| A40-24C | Training Workloads | 24576 | 2 | 2 | 4096×21602 | 1 |
| A40-16C | Training Workloads | 16384 | 3 | 3 | 4096×21602 | 1 |
| A40-12C | Training Workloads | 12288 | 4 | 4 | 4096×21602 | 1 |
| A40-8C | Training Workloads | 8192 | 6 | 6 | 4096×21602 | 1 |
| A40-6C | Training Workloads | 6144 | 8 | 8 | 4096×21602 | 1 |
| A40-4C | Inference Workloads | 4096 | 83 | 12 | 4096×21602 | 1 |
A-Series Virtual GPU Types for NVIDIA A40
Required license edition: vApps
These vGPU types support a single display with a fixed maximum resolution.
| Virtual GPU Type | Intended Use Case | Frame Buffer (MB) | Maximum vGPUs per GPU | Maximum vGPUs per Board | Maximum Display Resolution | Virtual Displays per vGPU |
|---|---|---|---|---|---|---|
| A40-48A | Virtual Applications | 49152 | 1 | 1 | 1280×10246 | 16 |
| A40-24A | Virtual Applications | 24576 | 2 | 2 | 1280×10246 | 16 |
| A40-16A | Virtual Applications | 16384 | 3 | 3 | 1280×10246 | 16 |
| A40-12A | Virtual Applications | 12288 | 4 | 4 | 1280×10246 | 16 |
| A40-8A | Virtual Applications | 8192 | 6 | 6 | 1280×10246 | 16 |
| A40-6A | Virtual Applications | 6144 | 8 | 8 | 1280×10246 | 16 |
| A40-4A | Virtual Applications | 4096 | 12 | 12 | 1280×10246 | 16 |
| A40-3A | Virtual Applications | 3072 | 16 | 16 | 1280×10246 | 16 |
| A40-2A | Virtual Applications | 2048 | 24 | 24 | 1280×10246 | 16 |
| A40-1A | Virtual Applications | 1024 | 327 | 32 | 1280×10246 | 16 |
A.1.6. NVIDIA A30 and NVIDIA A30X Virtual GPU Types
Physical GPUs per board: 1
This GPU supports MIG-backed virtual GPUs and time-sliced virtual GPUs.
The virtual GPU types for the NVIDIA A30 and NVIDIA A30X GPUs are identical.
MIG-Backed C-Series Virtual GPU Types for NVIDIA A30 and NVIDIA A30X
Required license edition: vCS or vWS
For details of GPU instance profiles, see NVIDIA Multi-Instance GPU User Guide.
| Virtual GPU Type | Intended Use Case | Frame Buffer (MB) | Maximum vGPUs per GPU | Slices per vGPU | Compute Instances per vGPU | Corresponding GPU Instance Profile |
|---|---|---|---|---|---|---|
| A30-4-24C | Training Workloads | 24576 | 1 | 4 | 4 | MIG 4g.24gb |
| A30-2-12C | Training Workloads | 12288 | 2 | 2 | 2 | MIG 2g.12gb |
| A30-1-6C | Inference Workloads | 6144 | 4 | 1 | 1 | MIG 1g.6gb |
| A30-1-6CME | Inference Workloads | 6144 | 1 | 1 | 1 | MIG 1g.6gb+me |
Time-Sliced C-Series Virtual GPU Types for NVIDIA A30 and NVIDIA A30X
Required license edition: vCS or vWS
These vGPU types support a single display with a fixed maximum resolution.
| Virtual GPU Type | Intended Use Case | Frame Buffer (MB) | Maximum vGPUs per GPU | Maximum vGPUs per Board | Maximum Display Resolution | Virtual Displays per vGPU |
|---|---|---|---|---|---|---|
| A30-24C | Training Workloads | 24576 | 1 | 1 | 4096×21602 | 1 |
| A30-12C | Training Workloads | 12288 | 2 | 2 | 4096×21602 | 1 |
| A30-8C | Training Workloads | 8192 | 3 | 3 | 4096×21602 | 1 |
| A30-6C | Inference Workloads | 6144 | 4 | 4 | 4096×21602 | 1 |
| A30-4C | Inference Workloads | 4096 | 6 | 6 | 4096×21602 | 1 |
A.1.7. NVIDIA A16 Virtual GPU Types
Physical GPUs per board: 4
Q-Series Virtual GPU Types for NVIDIA A16
Required license edition: vWS
These vGPU types support a maximum combined resolution based on the number of available pixels, which is determined by their frame buffer size. You can choose between using a small number of high resolution displays or a larger number of lower resolution displays with these vGPU types. The maximum number of displays per vGPU is based on a configuration in which all displays have the same resolution. For examples of configurations with a mixture of display resolutions, see Mixed Display Configurations for B-Series and Q-Series vGPUs.
| Virtual GPU Type | Intended Use Case | Frame Buffer (MB) | Maximum vGPUs per GPU | Maximum vGPUs per Board | Available Pixels | Display Resolution | Virtual Displays per vGPU |
|---|---|---|---|---|---|---|---|
| A16-16Q | Virtual Workstations | 16384 | 1 | 4 | 66355200 | 7680×4320 | 2 |
| 5120×2880 or lower | 4 | ||||||
| A16-8Q | Virtual Workstations | 8192 | 2 | 8 | 66355200 | 7680×4320 | 2 |
| 5120×2880 or lower | 4 | ||||||
| A16-4Q | Virtual Workstations | 4096 | 4 | 16 | 58982400 | 7680×4320 | 1 |
| 5120×2880 or lower | 4 | ||||||
| A16-2Q | Virtual Workstations | 2048 | 8 | 32 | 35389440 | 7680×4320 | 1 |
| 5120×2880 | 2 | ||||||
| 4096×2160 or lower | 4 | ||||||
| A16-1Q | Virtual Desktops, Virtual Workstations | 1024 | 16 | 64 | 17694720 | 5120×2880 | 1 |
| 4096×2160 | 2 | ||||||
| 3840×2160 | 2 | ||||||
| 2560×1600 or lower | 4 |
B-Series Virtual GPU Types for NVIDIA A16
Required license edition: vPC or vWS
These vGPU types support a maximum combined resolution based on the number of available pixels, which is determined by their frame buffer size. You can choose between using a small number of high resolution displays or a larger number of lower resolution displays with these vGPU types. The maximum number of displays per vGPU is based on a configuration in which all displays have the same resolution. For examples of configurations with a mixture of display resolutions, see Mixed Display Configurations for B-Series and Q-Series vGPUs.
| Virtual GPU Type | Intended Use Case | Frame Buffer (MB) | Maximum vGPUs per GPU | Maximum vGPUs per Board | Available Pixels | Display Resolution | Virtual Displays per vGPU |
|---|---|---|---|---|---|---|---|
| A16-2B | Virtual Desktops | 2048 | 8 | 32 | 17694720 | 5120×2880 | 1 |
| 4096×2160 | 2 | ||||||
| 3840×2160 | 2 | ||||||
| 2560×1600 or lower | 4 | ||||||
| A16-1B | Virtual Desktops | 1024 | 16 | 64 | 16384000 | 5120×2880 | 1 |
| 4096×2160 | 1 | ||||||
| 3840×2160 | 1 | ||||||
| 2560×1600 or lower | 45 |
C-Series Virtual GPU Types for NVIDIA A16
Required license edition: vCS or vWS
These vGPU types support a single display with a fixed maximum resolution.
A-Series Virtual GPU Types for NVIDIA A16
Required license edition: vApps
These vGPU types support a single display with a fixed maximum resolution.
| Virtual GPU Type | Intended Use Case | Frame Buffer (MB) | Maximum vGPUs per GPU | Maximum vGPUs per Board | Maximum Display Resolution | Virtual Displays per vGPU |
|---|---|---|---|---|---|---|
| A16-16A | Virtual Applications | 16384 | 1 | 4 | 1280×10246 | 16 |
| A16-8A | Virtual Applications | 8192 | 2 | 8 | 1280×10246 | 16 |
| A16-4A | Virtual Applications | 4096 | 4 | 16 | 1280×10246 | 16 |
| A16-2A | Virtual Applications | 2048 | 8 | 32 | 1280×10246 | 16 |
| A16-1A | Virtual Applications | 1024 | 16 | 64 | 1280×10246 | 16 |
A.1.8. NVIDIA A10 Virtual GPU Types
Physical GPUs per board: 1
Q-Series Virtual GPU Types for NVIDIA A10
Required license edition: vWS
These vGPU types support a maximum combined resolution based on the number of available pixels, which is determined by their frame buffer size. You can choose between using a small number of high resolution displays or a larger number of lower resolution displays with these vGPU types. The maximum number of displays per vGPU is based on a configuration in which all displays have the same resolution. For examples of configurations with a mixture of display resolutions, see Mixed Display Configurations for B-Series and Q-Series vGPUs.
| Virtual GPU Type | Intended Use Case | Frame Buffer (MB) | Maximum vGPUs per GPU | Maximum vGPUs per Board | Available Pixels | Display Resolution | Virtual Displays per vGPU |
|---|---|---|---|---|---|---|---|
| A10-24Q | Virtual Workstations | 24576 | 1 | 1 | 66355200 | 7680×4320 | 2 |
| 5120×2880 or lower | 4 | ||||||
| A10-12Q | Virtual Workstations | 12288 | 2 | 2 | 66355200 | 7680×4320 | 2 |
| 5120×2880 or lower | 4 | ||||||
| A10-8Q | Virtual Workstations | 8192 | 3 | 3 | 66355200 | 7680×4320 | 2 |
| 5120×2880 or lower | 4 | ||||||
| A10-6Q | Virtual Workstations | 6144 | 4 | 4 | 58982400 | 7680×4320 | 1 |
| 5120×2880 or lower | 4 | ||||||
| A10-4Q | Virtual Workstations | 4096 | 6 | 6 | 58982400 | 7680×4320 | 1 |
| 5120×2880 or lower | 4 | ||||||
| A10-3Q | Virtual Workstations | 3072 | 8 | 8 | 35389440 | 7680×4320 | 1 |
| 5120×2880 | 2 | ||||||
| 4096×2160 or lower | 4 | ||||||
| A10-2Q | Virtual Workstations | 2048 | 12 | 12 | 35389440 | 7680×4320 | 1 |
| 5120×2880 | 2 | ||||||
| 4096×2160 or lower | 4 | ||||||
| A10-1Q | Virtual Workstations | 1024 | 24 | 24 | 17694720 | 5120×2880 | 1 |
| 4096×2160 | 2 | ||||||
| 3840×2160 | 2 | ||||||
| 2560×1600 or lower | 4 |
B-Series Virtual GPU Types for NVIDIA A10
Required license edition: vPC or vWS
These vGPU types support a maximum combined resolution based on the number of available pixels, which is determined by their frame buffer size. You can choose between using a small number of high resolution displays or a larger number of lower resolution displays with these vGPU types. The maximum number of displays per vGPU is based on a configuration in which all displays have the same resolution. For examples of configurations with a mixture of display resolutions, see Mixed Display Configurations for B-Series and Q-Series vGPUs.
| Virtual GPU Type | Intended Use Case | Frame Buffer (MB) | Maximum vGPUs per GPU | Maximum vGPUs per Board | Available Pixels | Display Resolution | Virtual Displays per vGPU |
|---|---|---|---|---|---|---|---|
| A10-2B | Virtual Desktops | 2048 | 12 | 12 | 17694720 | 5120×2880 | 1 |
| 4096×2160 | 2 | ||||||
| 3840×2160 | 2 | ||||||
| 2560×1600 or lower | 4 | ||||||
| A10-1B | Virtual Desktops | 1024 | 24 | 24 | 16384000 | 5120×2880 | 1 |
| 4096×2160 | 1 | ||||||
| 3840×2160 | 1 | ||||||
| 2560×1600 or lower | 45 |
C-Series Virtual GPU Types for NVIDIA A10
Required license edition: vCS or vWS
These vGPU types support a single display with a fixed maximum resolution.
| Virtual GPU Type | Intended Use Case | Frame Buffer (MB) | Maximum vGPUs per GPU | Maximum vGPUs per Board | Maximum Display Resolution | Virtual Displays per vGPU |
|---|---|---|---|---|---|---|
| A10-24C | Training Workloads | 24576 | 1 | 1 | 4096×21602 | 1 |
| A10-12C | Training Workloads | 12288 | 2 | 2 | 4096×21602 | 1 |
| A10-8C | Training Workloads | 8192 | 3 | 3 | 4096×21602 | 1 |
| A10-6C | Training Workloads | 6144 | 4 | 4 | 4096×21602 | 1 |
| A10-4C | Inference Workloads | 4096 | 6 | 6 | 4096×21602 | 1 |
A-Series Virtual GPU Types for NVIDIA A10
Required license edition: vApps
These vGPU types support a single display with a fixed maximum resolution.
| Virtual GPU Type | Intended Use Case | Frame Buffer (MB) | Maximum vGPUs per GPU | Maximum vGPUs per Board | Maximum Display Resolution | Virtual Displays per vGPU |
|---|---|---|---|---|---|---|
| A10-24A | Virtual Applications | 24576 | 1 | 1 | 1280×10246 | 16 |
| A10-12A | Virtual Applications | 12288 | 2 | 2 | 1280×10246 | 16 |
| A10-8A | Virtual Applications | 8192 | 3 | 3 | 1280×10246 | 16 |
| A10-6A | Virtual Applications | 6144 | 4 | 4 | 1280×10246 | 16 |
| A10-4A | Virtual Applications | 4096 | 6 | 6 | 1280×10246 | 16 |
| A10-3A | Virtual Applications | 3072 | 8 | 8 | 1280×10246 | 16 |
| A10-2A | Virtual Applications | 2048 | 12 | 12 | 1280×10246 | 16 |
| A10-1A | Virtual Applications | 1024 | 24 | 24 | 1280×10246 | 16 |
A.1.9. NVIDIA A2 Virtual GPU Types
Physical GPUs per board: 1
Q-Series Virtual GPU Types for NVIDIA A2
Required license edition: vWS
These vGPU types support a maximum combined resolution based on the number of available pixels, which is determined by their frame buffer size. You can choose between using a small number of high resolution displays or a larger number of lower resolution displays with these vGPU types. The maximum number of displays per vGPU is based on a configuration in which all displays have the same resolution. For examples of configurations with a mixture of display resolutions, see Mixed Display Configurations for B-Series and Q-Series vGPUs.
| Virtual GPU Type | Intended Use Case | Frame Buffer (MB) | Maximum vGPUs per GPU | Maximum vGPUs per Board | Available Pixels | Display Resolution | Virtual Displays per vGPU |
|---|---|---|---|---|---|---|---|
| A2-16Q | Virtual Workstations | 16384 | 1 | 1 | 66355200 | 7680×4320 | 2 |
| 5120×2880 or lower | 4 | ||||||
| A2-8Q | Virtual Workstations | 8192 | 2 | 2 | 66355200 | 7680×4320 | 2 |
| 5120×2880 or lower | 4 | ||||||
| A2-4Q | Virtual Workstations | 4096 | 4 | 4 | 58982400 | 7680×4320 | 1 |
| 5120×2880 or lower | 4 | ||||||
| A2-2Q | Virtual Workstations | 2048 | 8 | 8 | 35389440 | 7680×4320 | 1 |
| 5120×2880 | 2 | ||||||
| 4096×2160 or lower | 4 | ||||||
| A2-1Q | Virtual Desktops, Virtual Workstations | 1024 | 16 | 16 | 17694720 | 5120×2880 | 1 |
| 4096×2160 | 2 | ||||||
| 3840×2160 | 2 | ||||||
| 2560×1600 or lower | 4 |
B-Series Virtual GPU Types for NVIDIA A2
Required license edition: vPC or vWS
These vGPU types support a maximum combined resolution based on the number of available pixels, which is determined by their frame buffer size. You can choose between using a small number of high resolution displays or a larger number of lower resolution displays with these vGPU types. The maximum number of displays per vGPU is based on a configuration in which all displays have the same resolution. For examples of configurations with a mixture of display resolutions, see Mixed Display Configurations for B-Series and Q-Series vGPUs.
| Virtual GPU Type | Intended Use Case | Frame Buffer (MB) | Maximum vGPUs per GPU | Maximum vGPUs per Board | Available Pixels | Display Resolution | Virtual Displays per vGPU |
|---|---|---|---|---|---|---|---|
| A2-2B | Virtual Desktops | 2048 | 8 | 8 | 17694720 | 5120×2880 | 1 |
| 4096×2160 | 2 | ||||||
| 3840×2160 | 2 | ||||||
| 2560×1600 or lower | 4 | ||||||
| A2-1B | Virtual Desktops | 1024 | 16 | 16 | 16384000 | 5120×2880 | 1 |
| 4096×2160 | 1 | ||||||
| 3840×2160 | 1 | ||||||
| 2560×1600 or lower | 45 |
C-Series Virtual GPU Types for NVIDIA A2
Required license edition: vCS or vWS
These vGPU types support a single display with a fixed maximum resolution.
A-Series Virtual GPU Types for NVIDIA A2
Required license edition: vApps
These vGPU types support a single display with a fixed maximum resolution.
| Virtual GPU Type | Intended Use Case | Frame Buffer (MB) | Maximum vGPUs per GPU | Maximum vGPUs per Board | Maximum Display Resolution | Virtual Displays per vGPU |
|---|---|---|---|---|---|---|
| A2-16A | Virtual Applications | 16384 | 1 | 1 | 1280×10246 | 16 |
| A2-8A | Virtual Applications | 8192 | 2 | 2 | 1280×10246 | 16 |
| A2-4A | Virtual Applications | 4096 | 4 | 4 | 1280×10246 | 16 |
| A2-2A | Virtual Applications | 2048 | 8 | 8 | 1280×10246 | 16 |
| A2-1A | Virtual Applications | 1024 | 16 | 16 | 1280×10246 | 16 |
A.1.10. NVIDIA RTX A6000 Virtual GPU Types
Physical GPUs per board: 1
Q-Series Virtual GPU Types for NVIDIA RTX A6000
Required license edition: vWS
These vGPU types support a maximum combined resolution based on the number of available pixels, which is determined by their frame buffer size. You can choose between using a small number of high resolution displays or a larger number of lower resolution displays with these vGPU types. The maximum number of displays per vGPU is based on a configuration in which all displays have the same resolution. For examples of configurations with a mixture of display resolutions, see Mixed Display Configurations for B-Series and Q-Series vGPUs.
| Virtual GPU Type | Intended Use Case | Frame Buffer (MB) | Maximum vGPUs per GPU | Maximum vGPUs per Board | Available Pixels | Display Resolution | Virtual Displays per vGPU |
|---|---|---|---|---|---|---|---|
| RTXA6000-48Q | Virtual Workstations | 49152 | 1 | 1 | 66355200 | 7680×4320 | 2 |
| 5120×2880 or lower | 4 | ||||||
| RTXA6000-24Q | Virtual Workstations | 24576 | 2 | 2 | 66355200 | 7680×4320 | 2 |
| 5120×2880 or lower | 4 | ||||||
| RTXA6000-16Q | Virtual Workstations | 16384 | 3 | 3 | 66355200 | 7680×4320 | 2 |
| 5120×2880 or lower | 4 | ||||||
| RTXA6000-12Q | Virtual Workstations | 12288 | 4 | 4 | 66355200 | 7680×4320 | 2 |
| 5120×2880 or lower | 4 | ||||||
| RTXA6000-8Q | Virtual Workstations | 8192 | 6 | 6 | 66355200 | 7680×4320 | 2 |
| 5120×2880 or lower | 4 | ||||||
| RTXA6000-6Q | Virtual Workstations | 6144 | 8 | 8 | 58982400 | 7680×4320 | 1 |
| 5120×2880 or lower | 4 | ||||||
| RTXA6000-4Q | Virtual Workstations | 4096 | 12 | 12 | 58982400 | 7680×4320 | 1 |
| 5120×2880 or lower | 4 | ||||||
| RTXA6000-3Q | Virtual Workstations | 3072 | 16 | 16 | 35389440 | 7680×4320 | 1 |
| 5120×2880 | 2 | ||||||
| 4096×2160 or lower | 4 | ||||||
| RTXA6000-2Q | Virtual Workstations | 2048 | 24 | 24 | 35389440 | 7680×4320 | 1 |
| 5120×2880 | 2 | ||||||
| 4096×2160 or lower | 4 | ||||||
| RTXA6000-1Q | Virtual Workstations | 1024 | 328 | 32 | 17694720 | 5120×2880 | 1 |
| 4096×2160 | 2 | ||||||
| 3840×2160 | 2 | ||||||
| 2560×1600 or lower | 4 |
B-Series Virtual GPU Types for NVIDIA RTX A6000
Required license edition: vPC or vWS
These vGPU types support a maximum combined resolution based on the number of available pixels, which is determined by their frame buffer size. You can choose between using a small number of high resolution displays or a larger number of lower resolution displays with these vGPU types. The maximum number of displays per vGPU is based on a configuration in which all displays have the same resolution. For examples of configurations with a mixture of display resolutions, see Mixed Display Configurations for B-Series and Q-Series vGPUs.
| Virtual GPU Type | Intended Use Case | Frame Buffer (MB) | Maximum vGPUs per GPU | Maximum vGPUs per Board | Available Pixels | Display Resolution | Virtual Displays per vGPU |
|---|---|---|---|---|---|---|---|
| RTXA6000-2B | Virtual Desktops | 2048 | 24 | 24 | 17694720 | 5120×2880 | 1 |
| 4096×2160 | 2 | ||||||
| 3840×2160 | 2 | ||||||
| 2560×1600 or lower | 4 | ||||||
| RTXA6000-1B | Virtual Desktops | 1024 | 32 | 32 | 16384000 | 5120×2880 | 1 |
| 4096×2160 | 1 | ||||||
| 3840×2160 | 1 | ||||||
| 2560×1600 or lower | 45 |
C-Series Virtual GPU Types for NVIDIA RTX A6000
Required license edition: vCS or vWS
These vGPU types support a single display with a fixed maximum resolution.
| Virtual GPU Type | Intended Use Case | Frame Buffer (MB) | Maximum vGPUs per GPU | Maximum vGPUs per Board | Maximum Display Resolution | Virtual Displays per vGPU |
|---|---|---|---|---|---|---|
| RTXA6000-48C | Training Workloads | 49152 | 1 | 1 | 4096×21602 | 1 |
| RTXA6000-24C | Training Workloads | 24576 | 2 | 2 | 4096×21602 | 1 |
| RTXA6000-16C | Training Workloads | 16384 | 3 | 3 | 4096×21602 | 1 |
| RTXA6000-12C | Training Workloads | 12288 | 4 | 4 | 4096×21602 | 1 |
| RTXA6000-8C | Training Workloads | 8192 | 6 | 6 | 4096×21602 | 1 |
| RTXA6000-6C | Training Workloads | 6144 | 8 | 8 | 4096×21602 | 1 |
| RTXA6000-4C | Inference Workloads | 4096 | 83 | 12 | 4096×21602 | 1 |
A-Series Virtual GPU Types for NVIDIA RTX A6000
Required license edition: vApps
These vGPU types support a single display with a fixed maximum resolution.
| Virtual GPU Type | Intended Use Case | Frame Buffer (MB) | Maximum vGPUs per GPU | Maximum vGPUs per Board | Maximum Display Resolution | Virtual Displays per vGPU |
|---|---|---|---|---|---|---|
| RTXA6000-48A | Virtual Applications | 49152 | 1 | 1 | 1280×10246 | 16 |
| RTXA6000-24A | Virtual Applications | 24576 | 2 | 2 | 1280×10246 | 16 |
| RTXA6000-16A | Virtual Applications | 16384 | 3 | 3 | 1280×10246 | 16 |
| RTXA6000-12A | Virtual Applications | 12288 | 4 | 4 | 1280×10246 | 16 |
| RTXA6000-8A | Virtual Applications | 8192 | 6 | 6 | 1280×10246 | 16 |
| RTXA6000-6A | Virtual Applications | 6144 | 8 | 8 | 1280×10246 | 16 |
| RTXA6000-4A | Virtual Applications | 4096 | 12 | 12 | 1280×10246 | 16 |
| RTXA6000-3A | Virtual Applications | 3072 | 16 | 16 | 1280×10246 | 16 |
| RTXA6000-2A | Virtual Applications | 2048 | 24 | 24 | 1280×10246 | 16 |
| RTXA6000-1A | Virtual Applications | 1024 | 328 | 32 | 1280×10246 | 16 |
A.1.11. NVIDIA RTX A5500 Virtual GPU Types
Physical GPUs per board: 1
Q-Series Virtual GPU Types for NVIDIA RTX A5500
Required license edition: vWS
These vGPU types support a maximum combined resolution based on the number of available pixels, which is determined by their frame buffer size. You can choose between using a small number of high resolution displays or a larger number of lower resolution displays with these vGPU types. The maximum number of displays per vGPU is based on a configuration in which all displays have the same resolution. For examples of configurations with a mixture of display resolutions, see Mixed Display Configurations for B-Series and Q-Series vGPUs.
| Virtual GPU Type | Intended Use Case | Frame Buffer (MB) | Maximum vGPUs per GPU | Maximum vGPUs per Board | Available Pixels | Display Resolution | Virtual Displays per vGPU |
|---|---|---|---|---|---|---|---|
| RTXA5500-24Q | Virtual Workstations | 24576 | 1 | 1 | 66355200 | 7680×4320 | 2 |
| 5120×2880 or lower | 4 | ||||||
| RTXA5500-12Q | Virtual Workstations | 12288 | 2 | 2 | 66355200 | 7680×4320 | 2 |
| 5120×2880 or lower | 4 | ||||||
| RTXA5500-8Q | Virtual Workstations | 8192 | 3 | 3 | 66355200 | 7680×4320 | 2 |
| 5120×2880 or lower | 4 | ||||||
| RTXA5500-6Q | Virtual Workstations | 6144 | 4 | 4 | 58982400 | 7680×4320 | 1 |
| 5120×2880 or lower | 4 | ||||||
| RTXA5500-4Q | Virtual Workstations | 4096 | 6 | 6 | 58982400 | 7680×4320 | 1 |
| 5120×2880 or lower | 4 | ||||||
| RTXA5500-3Q | Virtual Workstations | 3072 | 8 | 8 | 35389440 | 7680×4320 | 1 |
| 5120×2880 | 2 | ||||||
| 4096×2160 or lower | 4 | ||||||
| RTXA5500-2Q | Virtual Workstations | 2048 | 12 | 12 | 35389440 | 7680×4320 | 1 |
| 5120×2880 | 2 | ||||||
| 4096×2160 or lower | 4 | ||||||
| RTXA5500-1Q | Virtual Workstations | 1024 | 24 | 24 | 17694720 | 5120×2880 | 1 |
| 4096×2160 | 2 | ||||||
| 3840×2160 | 2 | ||||||
| 2560×1600 or lower | 4 |
B-Series Virtual GPU Types for NVIDIA RTX A5500
Required license edition: vPC or vWS
These vGPU types support a maximum combined resolution based on the number of available pixels, which is determined by their frame buffer size. You can choose between using a small number of high resolution displays or a larger number of lower resolution displays with these vGPU types. The maximum number of displays per vGPU is based on a configuration in which all displays have the same resolution. For examples of configurations with a mixture of display resolutions, see Mixed Display Configurations for B-Series and Q-Series vGPUs.
| Virtual GPU Type | Intended Use Case | Frame Buffer (MB) | Maximum vGPUs per GPU | Maximum vGPUs per Board | Available Pixels | Display Resolution | Virtual Displays per vGPU |
|---|---|---|---|---|---|---|---|
| RTXA5500-2B | Virtual Desktops | 2048 | 12 | 12 | 17694720 | 5120×2880 | 1 |
| 4096×2160 | 2 | ||||||
| 3840×2160 | 2 | ||||||
| 2560×1600 or lower | 4 | ||||||
| RTXA5500-1B | Virtual Desktops | 1024 | 24 | 24 | 16384000 | 5120×2880 | 1 |
| 4096×2160 | 1 | ||||||
| 3840×2160 | 1 | ||||||
| 2560×1600 or lower | 45 |
C-Series Virtual GPU Types for NVIDIA RTX A5500
Required license edition: vCS or vWS
These vGPU types support a single display with a fixed maximum resolution.
| Virtual GPU Type | Intended Use Case | Frame Buffer (MB) | Maximum vGPUs per GPU | Maximum vGPUs per Board | Maximum Display Resolution | Virtual Displays per vGPU |
|---|---|---|---|---|---|---|
| RTXA5500-24C | Training Workloads | 24576 | 1 | 1 | 4096×21602 | 1 |
| RTXA5500-12C | Training Workloads | 12288 | 2 | 2 | 4096×21602 | 1 |
| RTXA5500-8C | Training Workloads | 8192 | 3 | 3 | 4096×21602 | 1 |
| RTXA5500-6C | Training Workloads | 6144 | 4 | 4 | 4096×21602 | 1 |
| RTXA5500-4C | Inference Workloads | 4096 | 6 | 6 | 4096×21602 | 1 |
A-Series Virtual GPU Types for NVIDIA RTX A5500
Required license edition: vApps
These vGPU types support a single display with a fixed maximum resolution.
| Virtual GPU Type | Intended Use Case | Frame Buffer (MB) | Maximum vGPUs per GPU | Maximum vGPUs per Board | Maximum Display Resolution | Virtual Displays per vGPU |
|---|---|---|---|---|---|---|
| RTXA5500-24A | Virtual Applications | 24576 | 1 | 1 | 1280×10246 | 16 |
| RTXA5500-12A | Virtual Applications | 12288 | 2 | 2 | 1280×10246 | 16 |
| RTXA5500-8A | Virtual Applications | 8192 | 3 | 3 | 1280×10246 | 16 |
| RTXA5500-6A | Virtual Applications | 6144 | 4 | 4 | 1280×10246 | 16 |
| RTXA5500-4A | Virtual Applications | 4096 | 6 | 6 | 1280×10246 | 16 |
| RTXA5500-3A | Virtual Applications | 3072 | 8 | 8 | 1280×10246 | 16 |
| RTXA5500-2A | Virtual Applications | 2048 | 12 | 12 | 1280×10246 | 16 |
| RTXA5500-1A | Virtual Applications | 1024 | 24 | 24 | 1280×10246 | 16 |
A.1.12. NVIDIA RTX A5000 Virtual GPU Types
Physical GPUs per board: 1
Q-Series Virtual GPU Types for NVIDIA RTX A5000
Required license edition: vWS
These vGPU types support a maximum combined resolution based on the number of available pixels, which is determined by their frame buffer size. You can choose between using a small number of high resolution displays or a larger number of lower resolution displays with these vGPU types. The maximum number of displays per vGPU is based on a configuration in which all displays have the same resolution. For examples of configurations with a mixture of display resolutions, see Mixed Display Configurations for B-Series and Q-Series vGPUs.
| Virtual GPU Type | Intended Use Case | Frame Buffer (MB) | Maximum vGPUs per GPU | Maximum vGPUs per Board | Available Pixels | Display Resolution | Virtual Displays per vGPU |
|---|---|---|---|---|---|---|---|
| RTXA5000-24Q | Virtual Workstations | 24576 | 1 | 1 | 66355200 | 7680×4320 | 2 |
| 5120×2880 or lower | 4 | ||||||
| RTXA5000-12Q | Virtual Workstations | 12288 | 2 | 2 | 66355200 | 7680×4320 | 2 |
| 5120×2880 or lower | 4 | ||||||
| RTXA5000-8Q | Virtual Workstations | 8192 | 3 | 3 | 66355200 | 7680×4320 | 2 |
| 5120×2880 or lower | 4 | ||||||
| RTXA5000-6Q | Virtual Workstations | 6144 | 4 | 4 | 58982400 | 7680×4320 | 1 |
| 5120×2880 or lower | 4 | ||||||
| RTXA5000-4Q | Virtual Workstations | 4096 | 6 | 6 | 58982400 | 7680×4320 | 1 |
| 5120×2880 or lower | 4 | ||||||
| RTXA5000-3Q | Virtual Workstations | 3072 | 8 | 8 | 35389440 | 7680×4320 | 1 |
| 5120×2880 | 2 | ||||||
| 4096×2160 or lower | 4 | ||||||
| RTXA5000-2Q | Virtual Workstations | 2048 | 12 | 12 | 35389440 | 7680×4320 | 1 |
| 5120×2880 | 2 | ||||||
| 4096×2160 or lower | 4 | ||||||
| RTXA5000-1Q | Virtual Workstations | 1024 | 24 | 24 | 17694720 | 5120×2880 | 1 |
| 4096×2160 | 2 | ||||||
| 3840×2160 | 2 | ||||||
| 2560×1600 or lower | 4 |
B-Series Virtual GPU Types for NVIDIA RTX A5000
Required license edition: vPC or vWS
These vGPU types support a maximum combined resolution based on the number of available pixels, which is determined by their frame buffer size. You can choose between using a small number of high resolution displays or a larger number of lower resolution displays with these vGPU types. The maximum number of displays per vGPU is based on a configuration in which all displays have the same resolution. For examples of configurations with a mixture of display resolutions, see Mixed Display Configurations for B-Series and Q-Series vGPUs.
| Virtual GPU Type | Intended Use Case | Frame Buffer (MB) | Maximum vGPUs per GPU | Maximum vGPUs per Board | Available Pixels | Display Resolution | Virtual Displays per vGPU |
|---|---|---|---|---|---|---|---|
| RTXA5000-2B | Virtual Desktops | 2048 | 12 | 12 | 17694720 | 5120×2880 | 1 |
| 4096×2160 | 2 | ||||||
| 3840×2160 | 2 | ||||||
| 2560×1600 or lower | 4 | ||||||
| RTXA5000-1B | Virtual Desktops | 1024 | 24 | 24 | 16384000 | 5120×2880 | 1 |
| 4096×2160 | 1 | ||||||
| 3840×2160 | 1 | ||||||
| 2560×1600 or lower | 45 |
C-Series Virtual GPU Types for NVIDIA RTX A5000
Required license edition: vCS or vWS
These vGPU types support a single display with a fixed maximum resolution.
| Virtual GPU Type | Intended Use Case | Frame Buffer (MB) | Maximum vGPUs per GPU | Maximum vGPUs per Board | Maximum Display Resolution | Virtual Displays per vGPU |
|---|---|---|---|---|---|---|
| RTXA5000-24C | Training Workloads | 24576 | 1 | 1 | 4096×21602 | 1 |
| RTXA5000-12C | Training Workloads | 12288 | 2 | 2 | 4096×21602 | 1 |
| RTXA5000-8C | Training Workloads | 8192 | 3 | 3 | 4096×21602 | 1 |
| RTXA5000-6C | Training Workloads | 6144 | 4 | 4 | 4096×21602 | 1 |
| RTXA5000-4C | Inference Workloads | 4096 | 6 | 6 | 4096×21602 | 1 |
A-Series Virtual GPU Types for NVIDIA RTX A5000
Required license edition: vApps
These vGPU types support a single display with a fixed maximum resolution.
| Virtual GPU Type | Intended Use Case | Frame Buffer (MB) | Maximum vGPUs per GPU | Maximum vGPUs per Board | Maximum Display Resolution | Virtual Displays per vGPU |
|---|---|---|---|---|---|---|
| RTXA5000-24A | Virtual Applications | 24576 | 1 | 1 | 1280×10246 | 16 |
| RTXA5000-12A | Virtual Applications | 12288 | 2 | 2 | 1280×10246 | 16 |
| RTXA5000-8A | Virtual Applications | 8192 | 3 | 3 | 1280×10246 | 16 |
| RTXA5000-6A | Virtual Applications | 6144 | 4 | 4 | 1280×10246 | 16 |
| RTXA5000-4A | Virtual Applications | 4096 | 6 | 6 | 1280×10246 | 16 |
| RTXA5000-3A | Virtual Applications | 3072 | 8 | 8 | 1280×10246 | 16 |
| RTXA5000-2A | Virtual Applications | 2048 | 12 | 12 | 1280×10246 | 16 |
| RTXA5000-1A | Virtual Applications | 1024 | 24 | 24 | 1280×10246 | 16 |
A.1.13. Tesla M60 Virtual GPU Types
Physical GPUs per board: 2
Q-Series Virtual GPU Types for Tesla M60
Required license edition: vWS
These vGPU types support a maximum combined resolution based on the number of available pixels, which is determined by their frame buffer size. You can choose between using a small number of high resolution displays or a larger number of lower resolution displays with these vGPU types. The maximum number of displays per vGPU is based on a configuration in which all displays have the same resolution. For examples of configurations with a mixture of display resolutions, see Mixed Display Configurations for B-Series and Q-Series vGPUs.
| Virtual GPU Type | Intended Use Case | Frame Buffer (MB) | Maximum vGPUs per GPU | Maximum vGPUs per Board | Available Pixels | Display Resolution | Virtual Displays per vGPU |
|---|---|---|---|---|---|---|---|
| M60-8Q | Virtual Workstations | 8192 | 1 | 2 | 35389440 | 5120×2880 | 2 |
| 4096×2160 or lower | 4 | ||||||
| M60-4Q | Virtual Workstations | 4096 | 2 | 4 | 35389440 | 5120×2880 | 2 |
| 4096×2160 or lower | 4 | ||||||
| M60-2Q | Virtual Workstations | 2048 | 4 | 8 | 35389440 | 5120×2880 | 2 |
| 4096×2160 or lower | 4 | ||||||
| M60-1Q | Virtual Desktops, Virtual Workstations | 1024 | 8 | 16 | 17694720 | 5120×2880 | 1 |
| 4096×2160 | 2 | ||||||
| 3840×2160 | 2 | ||||||
| 2560×1600 or lower | 4 | ||||||
| M60-0Q | Virtual Desktops, Virtual Workstations | 512 | 16 | 32 | 8192000 | 2560×1600 | 21 |
B-Series Virtual GPU Types for Tesla M60
Required license edition: vPC or vWS
These vGPU types support a maximum combined resolution based on the number of available pixels, which is determined by their frame buffer size. You can choose between using a small number of high resolution displays or a larger number of lower resolution displays with these vGPU types. The maximum number of displays per vGPU is based on a configuration in which all displays have the same resolution. For examples of configurations with a mixture of display resolutions, see Mixed Display Configurations for B-Series and Q-Series vGPUs.
| Virtual GPU Type | Intended Use Case | Frame Buffer (MB) | Maximum vGPUs per GPU | Maximum vGPUs per Board | Available Pixels | Display Resolution | Virtual Displays per vGPU |
|---|---|---|---|---|---|---|---|
| M60-2B | Virtual Desktops | 2048 | 4 | 8 | 17694720 | 5120×2880 | 1 |
| 4096×2160 | 2 | ||||||
| 3840×2160 | 2 | ||||||
| 2560×1600 or lower | 4 | ||||||
| M60-2B44 | Virtual Desktops | 2048 | 4 | 8 | 17694720 | 5120×2880 | 1 |
| 4096×2160 | 2 | ||||||
| 3840×2160 | 2 | ||||||
| 2560×1600 or lower | 4 | ||||||
| M60-1B | Virtual Desktops | 1024 | 8 | 16 | 16384000 | 5120×2880 | 1 |
| 4096×2160 | 1 | ||||||
| 3840×2160 | 1 | ||||||
| 2560×1600 or lower | 45 | ||||||
| M60-1B44 | Virtual Desktops | 1024 | 8 | 16 | 16384000 | 5120×2880 | 1 |
| 4096×2160 | 1 | ||||||
| 3840×2160 | 1 | ||||||
| 2560×1600 or lower | 45 | ||||||
| M60-0B | Virtual Desktops | 512 | 16 | 32 | 8192000 | 2560×1600 | 21 |
A-Series Virtual GPU Types for Tesla M60
Required license edition: vApps
These vGPU types support a single display with a fixed maximum resolution.
| Virtual GPU Type | Intended Use Case | Frame Buffer (MB) | Maximum vGPUs per GPU | Maximum vGPUs per Board | Maximum Display Resolution | Virtual Displays per vGPU |
|---|---|---|---|---|---|---|
| M60-8A | Virtual Applications | 8192 | 1 | 2 | 1280×10246 | 16 |
| M60-4A | Virtual Applications | 4096 | 2 | 4 | 1280×10246 | 16 |
| M60-2A | Virtual Applications | 2048 | 4 | 8 | 1280×10246 | 16 |
| M60-1A | Virtual Applications | 1024 | 8 | 16 | 1280×10246 | 16 |
A.1.14. Tesla M10 Virtual GPU Types
Physical GPUs per board: 4
Q-Series Virtual GPU Types for Tesla M10
Required license edition: vWS
These vGPU types support a maximum combined resolution based on the number of available pixels, which is determined by their frame buffer size. You can choose between using a small number of high resolution displays or a larger number of lower resolution displays with these vGPU types. The maximum number of displays per vGPU is based on a configuration in which all displays have the same resolution. For examples of configurations with a mixture of display resolutions, see Mixed Display Configurations for B-Series and Q-Series vGPUs.
| Virtual GPU Type | Intended Use Case | Frame Buffer (MB) | Maximum vGPUs per GPU | Maximum vGPUs per Board | Available Pixels | Display Resolution | Virtual Displays per vGPU |
|---|---|---|---|---|---|---|---|
| M10-8Q | Virtual Workstations | 8192 | 1 | 4 | 35389440 | 5120×2880 | 2 |
| 4096×2160 or lower | 4 | ||||||
| M10-4Q | Virtual Workstations | 4096 | 2 | 8 | 35389440 | 5120×2880 | 2 |
| 4096×2160 or lower | 4 | ||||||
| M10-2Q | Virtual Workstations | 2048 | 4 | 16 | 35389440 | 5120×2880 | 2 |
| 4096×2160 or lower | 4 | ||||||
| M10-1Q | Virtual Desktops, Virtual Workstations | 1024 | 8 | 32 | 17694720 | 5120×2880 | 1 |
| 4096×2160 | 2 | ||||||
| 3840×2160 | 2 | ||||||
| 2560×1600 or lower | 4 | ||||||
| M10-0Q | Virtual Desktops, Virtual Workstations | 512 | 16 | 64 | 8192000 | 2560×1600 | 21 |
B-Series Virtual GPU Types for Tesla M10
Required license edition: vPC or vWS
These vGPU types support a maximum combined resolution based on the number of available pixels, which is determined by their frame buffer size. You can choose between using a small number of high resolution displays or a larger number of lower resolution displays with these vGPU types. The maximum number of displays per vGPU is based on a configuration in which all displays have the same resolution. For examples of configurations with a mixture of display resolutions, see Mixed Display Configurations for B-Series and Q-Series vGPUs.
| Virtual GPU Type | Intended Use Case | Frame Buffer (MB) | Maximum vGPUs per GPU | Maximum vGPUs per Board | Available Pixels | Display Resolution | Virtual Displays per vGPU |
|---|---|---|---|---|---|---|---|
| M10-2B | Virtual Desktops | 2048 | 4 | 16 | 17694720 | 5120×2880 | 1 |
| 4096×2160 | 2 | ||||||
| 3840×2160 | 2 | ||||||
| 2560×1600 or lower | 4 | ||||||
| M10-2B44 | Virtual Desktops | 2048 | 4 | 16 | 17694720 | 5120×2880 | 1 |
| 4096×2160 | 2 | ||||||
| 3840×2160 | 2 | ||||||
| 2560×1600 or lower | 4 | ||||||
| M10-1B | Virtual Desktops | 1024 | 8 | 32 | 16384000 | 5120×2880 | 1 |
| 4096×2160 | 1 | ||||||
| 3840×2160 | 1 | ||||||
| 2560×1600 or lower | 45 | ||||||
| M10-1B44 | Virtual Desktops | 1024 | 8 | 32 | 16384000 | 5120×2880 | 1 |
| 4096×2160 | 1 | ||||||
| 3840×2160 | 1 | ||||||
| 2560×1600 or lower | 45 | ||||||
| M10-0B | Virtual Desktops | 512 | 16 | 64 | 8192000 | 2560×1600 | 21 |
A-Series Virtual GPU Types for Tesla M10
Required license edition: vApps
These vGPU types support a single display with a fixed maximum resolution.
| Virtual GPU Type | Intended Use Case | Frame Buffer (MB) | Maximum vGPUs per GPU | Maximum vGPUs per Board | Maximum Display Resolution | Virtual Displays per vGPU |
|---|---|---|---|---|---|---|
| M10-8A | Virtual Applications | 8192 | 1 | 4 | 1280×10246 | 16 |
| M10-4A | Virtual Applications | 4096 | 2 | 8 | 1280×10246 | 16 |
| M10-2A | Virtual Applications | 2048 | 4 | 16 | 1280×10246 | 16 |
| M10-1A | Virtual Applications | 1024 | 8 | 32 | 1280×10246 | 16 |
A.1.15. Tesla M6 Virtual GPU Types
Physical GPUs per board: 1
Q-Series Virtual GPU Types for Tesla M6
Required license edition: vWS
These vGPU types support a maximum combined resolution based on the number of available pixels, which is determined by their frame buffer size. You can choose between using a small number of high resolution displays or a larger number of lower resolution displays with these vGPU types. The maximum number of displays per vGPU is based on a configuration in which all displays have the same resolution. For examples of configurations with a mixture of display resolutions, see Mixed Display Configurations for B-Series and Q-Series vGPUs.
| Virtual GPU Type | Intended Use Case | Frame Buffer (MB) | Maximum vGPUs per GPU | Maximum vGPUs per Board | Available Pixels | Display Resolution | Virtual Displays per vGPU |
|---|---|---|---|---|---|---|---|
| M6-8Q | Virtual Workstations | 8192 | 1 | 1 | 35389440 | 5120×2880 | 2 |
| 4096×2160 or lower | 4 | ||||||
| M6-4Q | Virtual Workstations | 4096 | 2 | 2 | 35389440 | 5120×2880 | 2 |
| 4096×2160 or lower | 4 | ||||||
| M6-2Q | Virtual Workstations | 2048 | 4 | 4 | 35389440 | 5120×2880 | 2 |
| 4096×2160 or lower | 4 | ||||||
| M6-1Q | Virtual Desktops, Virtual Workstations | 1024 | 8 | 8 | 17694720 | 5120×2880 | 1 |
| 4096×2160 | 2 | ||||||
| 3840×2160 | 2 | ||||||
| 2560×1600 or lower | 4 | ||||||
| M6-0Q | Virtual Desktops, Virtual Workstations | 512 | 16 | 16 | 8192000 | 2560×1600 | 21 |
B-Series Virtual GPU Types for Tesla M6
Required license edition: vPC or vWS
These vGPU types support a maximum combined resolution based on the number of available pixels, which is determined by their frame buffer size. You can choose between using a small number of high resolution displays or a larger number of lower resolution displays with these vGPU types. The maximum number of displays per vGPU is based on a configuration in which all displays have the same resolution. For examples of configurations with a mixture of display resolutions, see Mixed Display Configurations for B-Series and Q-Series vGPUs.
| Virtual GPU Type | Intended Use Case | Frame Buffer (MB) | Maximum vGPUs per GPU | Maximum vGPUs per Board | Available Pixels | Display Resolution | Virtual Displays per vGPU |
|---|---|---|---|---|---|---|---|
| M6-2B | Virtual Desktops | 2048 | 4 | 4 | 17694720 | 5120×2880 | 1 |
| 4096×2160 | 2 | ||||||
| 3840×2160 | 2 | ||||||
| 2560×1600 or lower | 4 | ||||||
| M6-2B44 | Virtual Desktops | 2048 | 4 | 4 | 17694720 | 5120×2880 | 1 |
| 4096×2160 | 2 | ||||||
| 3840×2160 | 2 | ||||||
| 2560×1600 or lower | 4 | ||||||
| M6-1B | Virtual Desktops | 1024 | 8 | 8 | 16384000 | 5120×2880 | 1 |
| 4096×2160 | 1 | ||||||
| 3840×2160 | 1 | ||||||
| 2560×1600 or lower | 45 | ||||||
| M6-1B44 | Virtual Desktops | 1024 | 8 | 8 | 16384000 | 5120×2880 | 1 |
| 4096×2160 | 1 | ||||||
| 3840×2160 | 1 | ||||||
| 2560×1600 or lower | 45 | ||||||
| M6-0B | Virtual Desktops | 512 | 16 | 16 | 8192000 | 2560×1600 | 21 |
A-Series Virtual GPU Types for Tesla M6
Required license edition: vApps
These vGPU types support a single display with a fixed maximum resolution.
| Virtual GPU Type | Intended Use Case | Frame Buffer (MB) | Maximum vGPUs per GPU | Maximum vGPUs per Board | Maximum Display Resolution | Virtual Displays per vGPU |
|---|---|---|---|---|---|---|
| M6-8A | Virtual Applications | 8192 | 1 | 1 | 1280×10246 | 16 |
| M6-4A | Virtual Applications | 4096 | 2 | 2 | 1280×10246 | 16 |
| M6-2A | Virtual Applications | 2048 | 4 | 4 | 1280×10246 | 16 |
| M6-1A | Virtual Applications | 1024 | 8 | 8 | 1280×10246 | 16 |
A.1.16. Tesla P100 PCIe 12GB Virtual GPU Types
Physical GPUs per board: 1
Q-Series Virtual GPU Types for Tesla P100 PCIe 12GB
Required license edition: vWS
These vGPU types support a maximum combined resolution based on the number of available pixels, which is determined by their frame buffer size. You can choose between using a small number of high resolution displays or a larger number of lower resolution displays with these vGPU types. The maximum number of displays per vGPU is based on a configuration in which all displays have the same resolution. For examples of configurations with a mixture of display resolutions, see Mixed Display Configurations for B-Series and Q-Series vGPUs.
| Virtual GPU Type | Intended Use Case | Frame Buffer (MB) | Maximum vGPUs per GPU | Maximum vGPUs per Board | Available Pixels | Display Resolution | Virtual Displays per vGPU |
|---|---|---|---|---|---|---|---|
| P100C-12Q | Virtual Workstations | 12288 | 1 | 1 | 66355200 | 7680×4320 | 2 |
| 5120×2880 or lower | 4 | ||||||
| P100C-6Q | Virtual Workstations | 6144 | 2 | 2 | 58982400 | 7680×4320 | 1 |
| 5120×2880 or lower | 4 | ||||||
| P100C-4Q | Virtual Workstations | 4096 | 3 | 3 | 58982400 | 7680×4320 | 1 |
| 5120×2880 or lower | 4 | ||||||
| P100C-2Q | Virtual Workstations | 2048 | 6 | 6 | 35389440 | 7680×4320 | 1 |
| 5120×2880 | 2 | ||||||
| 4096×2160 or lower | 4 | ||||||
| P100C-1Q | Virtual Desktops, Virtual Workstations | 1024 | 12 | 12 | 17694720 | 5120×2880 | 1 |
| 4096×2160 | 2 | ||||||
| 3840×2160 | 2 | ||||||
| 2560×1600 or lower | 4 |
B-Series Virtual GPU Types for Tesla P100 PCIe 12GB
Required license edition: vPC or vWS
These vGPU types support a maximum combined resolution based on the number of available pixels, which is determined by their frame buffer size. You can choose between using a small number of high resolution displays or a larger number of lower resolution displays with these vGPU types. The maximum number of displays per vGPU is based on a configuration in which all displays have the same resolution. For examples of configurations with a mixture of display resolutions, see Mixed Display Configurations for B-Series and Q-Series vGPUs.
| Virtual GPU Type | Intended Use Case | Frame Buffer (MB) | Maximum vGPUs per GPU | Maximum vGPUs per Board | Available Pixels | Display Resolution | Virtual Displays per vGPU |
|---|---|---|---|---|---|---|---|
| P100C-2B | Virtual Desktops | 2048 | 6 | 6 | 17694720 | 5120×2880 | 1 |
| 4096×2160 | 2 | ||||||
| 3840×2160 | 2 | ||||||
| 2560×1600 or lower | 4 | ||||||
| P100C-2B44 | Virtual Desktops | 2048 | 6 | 6 | 17694720 | 5120×2880 | 1 |
| 4096×2160 | 2 | ||||||
| 3840×2160 | 2 | ||||||
| 2560×1600 or lower | 4 | ||||||
| P100C-1B | Virtual Desktops | 1024 | 12 | 12 | 16384000 | 5120×2880 | 1 |
| 4096×2160 | 1 | ||||||
| 3840×2160 | 1 | ||||||
| 2560×1600 or lower | 45 | ||||||
| P100C-1B44 | Virtual Desktops | 1024 | 12 | 12 | 16384000 | 5120×2880 | 1 |
| 4096×2160 | 1 | ||||||
| 3840×2160 | 1 | ||||||
| 2560×1600 or lower | 45 |
C-Series Virtual GPU Types for Tesla P100 PCIe 12GB
Required license edition: vCS or vWS
These vGPU types support a single display with a fixed maximum resolution.
| Virtual GPU Type | Intended Use Case | Frame Buffer (MB) | Maximum vGPUs per GPU | Maximum vGPUs per Board | Maximum Display Resolution | Virtual Displays per vGPU |
|---|---|---|---|---|---|---|
| P100C-12C | Training Workloads | 12288 | 1 | 1 | 4096×21602 | 1 |
| P100C-6C | Training Workloads | 6144 | 2 | 2 | 4096×21602 | 1 |
| P100C-4C | Inference Workloads | 4096 | 3 | 3 | 4096×21602 | 1 |
A-Series Virtual GPU Types for Tesla P100 PCIe 12GB
Required license edition: vApps
These vGPU types support a single display with a fixed maximum resolution.
| Virtual GPU Type | Intended Use Case | Frame Buffer (MB) | Maximum vGPUs per GPU | Maximum vGPUs per Board | Maximum Display Resolution | Virtual Displays per vGPU |
|---|---|---|---|---|---|---|
| P100C-12A | Virtual Applications | 12288 | 1 | 1 | 1280×10246 | 16 |
| P100C-6A | Virtual Applications | 6144 | 2 | 2 | 1280×10246 | 16 |
| P100C-4A | Virtual Applications | 4096 | 3 | 3 | 1280×10246 | 16 |
| P100C-2A | Virtual Applications | 2048 | 6 | 6 | 1280×10246 | 16 |
| P100C-1A | Virtual Applications | 1024 | 12 | 12 | 1280×10246 | 16 |
A.1.17. Tesla P100 PCIe 16GB Virtual GPU Types
Physical GPUs per board: 1
Q-Series Virtual GPU Types for Tesla P100 PCIe 16GB
Required license edition: vWS
These vGPU types support a maximum combined resolution based on the number of available pixels, which is determined by their frame buffer size. You can choose between using a small number of high resolution displays or a larger number of lower resolution displays with these vGPU types. The maximum number of displays per vGPU is based on a configuration in which all displays have the same resolution. For examples of configurations with a mixture of display resolutions, see Mixed Display Configurations for B-Series and Q-Series vGPUs.
| Virtual GPU Type | Intended Use Case | Frame Buffer (MB) | Maximum vGPUs per GPU | Maximum vGPUs per Board | Available Pixels | Display Resolution | Virtual Displays per vGPU |
|---|---|---|---|---|---|---|---|
| P100-16Q | Virtual Workstations | 16384 | 1 | 1 | 66355200 | 7680×4320 | 2 |
| 5120×2880 or lower | 4 | ||||||
| P100-8Q | Virtual Workstations | 8192 | 2 | 2 | 66355200 | 7680×4320 | 2 |
| 5120×2880 or lower | 4 | ||||||
| P100-4Q | Virtual Workstations | 4096 | 4 | 4 | 58982400 | 7680×4320 | 1 |
| 5120×2880 or lower | 4 | ||||||
| P100-2Q | Virtual Workstations | 2048 | 8 | 8 | 35389440 | 7680×4320 | 1 |
| 5120×2880 | 2 | ||||||
| 4096×2160 or lower | 4 | ||||||
| P100-1Q | Virtual Desktops, Virtual Workstations | 1024 | 16 | 16 | 17694720 | 5120×2880 | 1 |
| 4096×2160 | 2 | ||||||
| 3840×2160 | 2 | ||||||
| 2560×1600 or lower | 4 |
B-Series Virtual GPU Types for Tesla P100 PCIe 16GB
Required license edition: vPC or vWS
These vGPU types support a maximum combined resolution based on the number of available pixels, which is determined by their frame buffer size. You can choose between using a small number of high resolution displays or a larger number of lower resolution displays with these vGPU types. The maximum number of displays per vGPU is based on a configuration in which all displays have the same resolution. For examples of configurations with a mixture of display resolutions, see Mixed Display Configurations for B-Series and Q-Series vGPUs.
| Virtual GPU Type | Intended Use Case | Frame Buffer (MB) | Maximum vGPUs per GPU | Maximum vGPUs per Board | Available Pixels | Display Resolution | Virtual Displays per vGPU |
|---|---|---|---|---|---|---|---|
| P100-2B | Virtual Desktops | 2048 | 8 | 8 | 17694720 | 5120×2880 | 1 |
| 4096×2160 | 2 | ||||||
| 3840×2160 | 2 | ||||||
| 2560×1600 or lower | 4 | ||||||
| P100-2B44 | Virtual Desktops | 2048 | 8 | 8 | 17694720 | 5120×2880 | 1 |
| 4096×2160 | 2 | ||||||
| 3840×2160 | 2 | ||||||
| 2560×1600 or lower | 4 | ||||||
| P100-1B | Virtual Desktops | 1024 | 16 | 16 | 16384000 | 5120×2880 | 1 |
| 4096×2160 | 1 | ||||||
| 3840×2160 | 1 | ||||||
| 2560×1600 or lower | 45 | ||||||
| P100-1B44 | Virtual Desktops | 1024 | 16 | 16 | 16384000 | 5120×2880 | 1 |
| 4096×2160 | 1 | ||||||
| 3840×2160 | 1 | ||||||
| 2560×1600 or lower | 45 |
C-Series Virtual GPU Types for Tesla P100 PCIe 16GB
Required license edition: vCS or vWS
These vGPU types support a single display with a fixed maximum resolution.
| Virtual GPU Type | Intended Use Case | Frame Buffer (MB) | Maximum vGPUs per GPU | Maximum vGPUs per Board | Maximum Display Resolution | Virtual Displays per vGPU |
|---|---|---|---|---|---|---|
| P100-16C | Training Workloads | 16384 | 1 | 1 | 4096×21602 | 1 |
| P100-8C | Training Workloads | 8192 | 2 | 2 | 4096×21602 | 1 |
| P100-4C | Inference Workloads | 4096 | 4 | 4 | 4096×21602 | 1 |
A-Series Virtual GPU Types for Tesla P100 PCIe 16GB
Required license edition: vApps
These vGPU types support a single display with a fixed maximum resolution.
| Virtual GPU Type | Intended Use Case | Frame Buffer (MB) | Maximum vGPUs per GPU | Maximum vGPUs per Board | Maximum Display Resolution | Virtual Displays per vGPU |
|---|---|---|---|---|---|---|
| P100-16A | Virtual Applications | 16384 | 1 | 1 | 1280×10246 | 16 |
| P100-8A | Virtual Applications | 8192 | 2 | 2 | 1280×10246 | 16 |
| P100-4A | Virtual Applications | 4096 | 4 | 4 | 1280×10246 | 16 |
| P100-2A | Virtual Applications | 2048 | 8 | 8 | 1280×10246 | 16 |
| P100-1A | Virtual Applications | 1024 | 16 | 16 | 1280×10246 | 16 |
A.1.18. Tesla P100 SXM2 Virtual GPU Types
Physical GPUs per board: 1
Q-Series Virtual GPU Types for Tesla P100 SXM2
Required license edition: vWS
These vGPU types support a maximum combined resolution based on the number of available pixels, which is determined by their frame buffer size. You can choose between using a small number of high resolution displays or a larger number of lower resolution displays with these vGPU types. The maximum number of displays per vGPU is based on a configuration in which all displays have the same resolution. For examples of configurations with a mixture of display resolutions, see Mixed Display Configurations for B-Series and Q-Series vGPUs.
| Virtual GPU Type | Intended Use Case | Frame Buffer (MB) | Maximum vGPUs per GPU | Maximum vGPUs per Board | Available Pixels | Display Resolution | Virtual Displays per vGPU |
|---|---|---|---|---|---|---|---|
| P100X-16Q | Virtual Workstations | 16384 | 1 | 1 | 66355200 | 7680×4320 | 2 |
| 5120×2880 or lower | 4 | ||||||
| P100X-8Q | Virtual Workstations | 8192 | 2 | 2 | 66355200 | 7680×4320 | 2 |
| 5120×2880 or lower | 4 | ||||||
| P100X-4Q | Virtual Workstations | 4096 | 4 | 4 | 58982400 | 7680×4320 | 1 |
| 5120×2880 or lower | 4 | ||||||
| P100X-2Q | Virtual Workstations | 2048 | 8 | 8 | 35389440 | 7680×4320 | 1 |
| 5120×2880 | 2 | ||||||
| 4096×2160 or lower | 4 | ||||||
| P100X-1Q | Virtual Desktops, Virtual Workstations | 1024 | 16 | 16 | 17694720 | 5120×2880 | 1 |
| 4096×2160 | 2 | ||||||
| 3840×2160 | 2 | ||||||
| 2560×1600 or lower | 4 |
B-Series Virtual GPU Types for Tesla P100 SXM2
Required license edition: vPC or vWS
These vGPU types support a maximum combined resolution based on the number of available pixels, which is determined by their frame buffer size. You can choose between using a small number of high resolution displays or a larger number of lower resolution displays with these vGPU types. The maximum number of displays per vGPU is based on a configuration in which all displays have the same resolution. For examples of configurations with a mixture of display resolutions, see Mixed Display Configurations for B-Series and Q-Series vGPUs.
| Virtual GPU Type | Intended Use Case | Frame Buffer (MB) | Maximum vGPUs per GPU | Maximum vGPUs per Board | Available Pixels | Display Resolution | Virtual Displays per vGPU |
|---|---|---|---|---|---|---|---|
| P100X-2B | Virtual Desktops | 2048 | 8 | 8 | 17694720 | 5120×2880 | 1 |
| 4096×2160 | 2 | ||||||
| 3840×2160 | 2 | ||||||
| 2560×1600 or lower | 4 | ||||||
| P100X-2B44 | Virtual Desktops | 2048 | 8 | 8 | 17694720 | 5120×2880 | 1 |
| 4096×2160 | 2 | ||||||
| 3840×2160 | 2 | ||||||
| 2560×1600 or lower | 4 | ||||||
| P100X-1B | Virtual Desktops | 1024 | 16 | 16 | 16384000 | 5120×2880 | 1 |
| 4096×2160 | 1 | ||||||
| 3840×2160 | 1 | ||||||
| 2560×1600 or lower | 45 | ||||||
| P100X-1B44 | Virtual Desktops | 1024 | 16 | 16 | 16384000 | 5120×2880 | 1 |
| 4096×2160 | 1 | ||||||
| 3840×2160 | 1 | ||||||
| 2560×1600 or lower | 45 |
C-Series Virtual GPU Types for Tesla P100 SXM2
Required license edition: vCS or vWS
These vGPU types support a single display with a fixed maximum resolution.
| Virtual GPU Type | Intended Use Case | Frame Buffer (MB) | Maximum vGPUs per GPU | Maximum vGPUs per Board | Maximum Display Resolution | Virtual Displays per vGPU |
|---|---|---|---|---|---|---|
| P100X-16C | Training Workloads | 16384 | 1 | 1 | 4096×21602 | 1 |
| P100X-8C | Training Workloads | 8192 | 2 | 2 | 4096×21602 | 1 |
| P100X-4C | Inference Workloads | 4096 | 4 | 4 | 4096×21602 | 1 |
A-Series Virtual GPU Types for Tesla P100 SXM2
Required license edition: vApps
These vGPU types support a single display with a fixed maximum resolution.
| Virtual GPU Type | Intended Use Case | Frame Buffer (MB) | Maximum vGPUs per GPU | Maximum vGPUs per Board | Maximum Display Resolution | Virtual Displays per vGPU |
|---|---|---|---|---|---|---|
| P100X-16A | Virtual Applications | 16384 | 1 | 1 | 1280×10246 | 16 |
| P100X-8A | Virtual Applications | 8192 | 2 | 2 | 1280×10246 | 16 |
| P100X-4A | Virtual Applications | 4096 | 4 | 4 | 1280×10246 | 16 |
| P100X-2A | Virtual Applications | 2048 | 8 | 8 | 1280×10246 | 16 |
| P100X-1A | Virtual Applications | 1024 | 16 | 16 | 1280×10246 | 16 |
A.1.19. Tesla P40 Virtual GPU Types
Physical GPUs per board: 1
Q-Series Virtual GPU Types for Tesla P40
Required license edition: vWS
These vGPU types support a maximum combined resolution based on the number of available pixels, which is determined by their frame buffer size. You can choose between using a small number of high resolution displays or a larger number of lower resolution displays with these vGPU types. The maximum number of displays per vGPU is based on a configuration in which all displays have the same resolution. For examples of configurations with a mixture of display resolutions, see Mixed Display Configurations for B-Series and Q-Series vGPUs.
| Virtual GPU Type | Intended Use Case | Frame Buffer (MB) | Maximum vGPUs per GPU | Maximum vGPUs per Board | Available Pixels | Display Resolution | Virtual Displays per vGPU |
|---|---|---|---|---|---|---|---|
| P40-24Q | Virtual Workstations | 24576 | 1 | 1 | 66355200 | 7680×4320 | 2 |
| 5120×2880 or lower | 4 | ||||||
| P40-12Q | Virtual Workstations | 12288 | 2 | 2 | 66355200 | 7680×4320 | 2 |
| 5120×2880 or lower | 4 | ||||||
| P40-8Q | Virtual Workstations | 8192 | 3 | 3 | 66355200 | 7680×4320 | 2 |
| 5120×2880 or lower | 4 | ||||||
| P40-6Q | Virtual Workstations | 6144 | 4 | 4 | 58982400 | 7680×4320 | 1 |
| 5120×2880 or lower | 4 | ||||||
| P40-4Q | Virtual Workstations | 4096 | 6 | 6 | 58982400 | 7680×4320 | 1 |
| 5120×2880 or lower | 4 | ||||||
| P40-3Q | Virtual Workstations | 3072 | 8 | 8 | 35389440 | 7680×4320 | 1 |
| 5120×2880 | 2 | ||||||
| 4096×2160 or lower | 4 | ||||||
| P40-2Q | Virtual Workstations | 2048 | 12 | 12 | 35389440 | 7680×4320 | 1 |
| 5120×2880 | 2 | ||||||
| 4096×2160 or lower | 4 | ||||||
| P40-1Q | Virtual Desktops, Virtual Workstations | 1024 | 24 | 24 | 17694720 | 5120×2880 | 1 |
| 4096×2160 | 2 | ||||||
| 3840×2160 | 2 | ||||||
| 2560×1600 or lower | 4 |
B-Series Virtual GPU Types for Tesla P40
Required license edition: vPC or vWS
These vGPU types support a maximum combined resolution based on the number of available pixels, which is determined by their frame buffer size. You can choose between using a small number of high resolution displays or a larger number of lower resolution displays with these vGPU types. The maximum number of displays per vGPU is based on a configuration in which all displays have the same resolution. For examples of configurations with a mixture of display resolutions, see Mixed Display Configurations for B-Series and Q-Series vGPUs.
| Virtual GPU Type | Intended Use Case | Frame Buffer (MB) | Maximum vGPUs per GPU | Maximum vGPUs per Board | Available Pixels | Display Resolution | Virtual Displays per vGPU |
|---|---|---|---|---|---|---|---|
| P40-2B | Virtual Desktops | 2048 | 12 | 12 | 17694720 | 5120×2880 | 1 |
| 4096×2160 | 2 | ||||||
| 3840×2160 | 2 | ||||||
| 2560×1600 or lower | 4 | ||||||
| P40-2B44 | Virtual Desktops | 2048 | 12 | 12 | 17694720 | 5120×2880 | 1 |
| 4096×2160 | 2 | ||||||
| 3840×2160 | 2 | ||||||
| 2560×1600 or lower | 4 | ||||||
| P40-1B | Virtual Desktops | 1024 | 24 | 24 | 16384000 | 5120×2880 | 1 |
| 4096×2160 | 1 | ||||||
| 3840×2160 | 1 | ||||||
| 2560×1600 or lower | 45 | ||||||
| P40-1B44 | Virtual Desktops | 1024 | 24 | 24 | 16384000 | 5120×2880 | 1 |
| 4096×2160 | 1 | ||||||
| 3840×2160 | 1 | ||||||
| 2560×1600 or lower | 45 |
C-Series Virtual GPU Types for Tesla P40
Required license edition: vCS or vWS
These vGPU types support a single display with a fixed maximum resolution.
| Virtual GPU Type | Intended Use Case | Frame Buffer (MB) | Maximum vGPUs per GPU | Maximum vGPUs per Board | Maximum Display Resolution | Virtual Displays per vGPU |
|---|---|---|---|---|---|---|
| P40-24C | Training Workloads | 24576 | 1 | 1 | 4096×21602 | 1 |
| P40-12C | Training Workloads | 12288 | 2 | 2 | 4096×21602 | 1 |
| P40-8C | Training Workloads | 8192 | 3 | 3 | 4096×21602 | 1 |
| P40-6C | Training Workloads | 6144 | 4 | 4 | 4096×21602 | 1 |
| P40-4C | Inference Workloads | 4096 | 6 | 6 | 4096×21602 | 1 |
A-Series Virtual GPU Types for Tesla P40
Required license edition: vApps
These vGPU types support a single display with a fixed maximum resolution.
| Virtual GPU Type | Intended Use Case | Frame Buffer (MB) | Maximum vGPUs per GPU | Maximum vGPUs per Board | Maximum Display Resolution | Virtual Displays per vGPU |
|---|---|---|---|---|---|---|
| P40-24A | Virtual Applications | 24576 | 1 | 1 | 1280×10246 | 16 |
| P40-12A | Virtual Applications | 12288 | 2 | 2 | 1280×10246 | 16 |
| P40-8A | Virtual Applications | 8192 | 3 | 3 | 1280×10246 | 16 |
| P40-6A | Virtual Applications | 6144 | 4 | 4 | 1280×10246 | 16 |
| P40-4A | Virtual Applications | 4096 | 6 | 6 | 1280×10246 | 16 |
| P40-3A | Virtual Applications | 3072 | 8 | 8 | 1280×10246 | 16 |
| P40-2A | Virtual Applications | 2048 | 12 | 12 | 1280×10246 | 16 |
| P40-1A | Virtual Applications | 1024 | 24 | 24 | 1280×10246 | 16 |
A.1.20. Tesla P6 Virtual GPU Types
Physical GPUs per board: 1
Q-Series Virtual GPU Types for Tesla P6
Required license edition: vWS
These vGPU types support a maximum combined resolution based on the number of available pixels, which is determined by their frame buffer size. You can choose between using a small number of high resolution displays or a larger number of lower resolution displays with these vGPU types. The maximum number of displays per vGPU is based on a configuration in which all displays have the same resolution. For examples of configurations with a mixture of display resolutions, see Mixed Display Configurations for B-Series and Q-Series vGPUs.
| Virtual GPU Type | Intended Use Case | Frame Buffer (MB) | Maximum vGPUs per GPU | Maximum vGPUs per Board | Available Pixels | Display Resolution | Virtual Displays per vGPU |
|---|---|---|---|---|---|---|---|
| P6-16Q | Virtual Workstations | 16384 | 1 | 1 | 66355200 | 7680×4320 | 2 |
| 5120×2880 or lower | 4 | ||||||
| P6-8Q | Virtual Workstations | 8192 | 2 | 2 | 66355200 | 7680×4320 | 2 |
| 5120×2880 or lower | 4 | ||||||
| P6-4Q | Virtual Workstations | 4096 | 4 | 4 | 58982400 | 7680×4320 | 1 |
| 5120×2880 or lower | 4 | ||||||
| P6-2Q | Virtual Workstations | 2048 | 8 | 8 | 35389440 | 7680×4320 | 1 |
| 5120×2880 | 2 | ||||||
| 4096×2160 or lower | 4 | ||||||
| P6-1Q | Virtual Desktops, Virtual Workstations | 1024 | 16 | 16 | 17694720 | 5120×2880 | 1 |
| 4096×2160 | 2 | ||||||
| 3840×2160 | 2 | ||||||
| 2560×1600 or lower | 4 |
B-Series Virtual GPU Types for Tesla P6
Required license edition: vPC or vWS
These vGPU types support a maximum combined resolution based on the number of available pixels, which is determined by their frame buffer size. You can choose between using a small number of high resolution displays or a larger number of lower resolution displays with these vGPU types. The maximum number of displays per vGPU is based on a configuration in which all displays have the same resolution. For examples of configurations with a mixture of display resolutions, see Mixed Display Configurations for B-Series and Q-Series vGPUs.
| Virtual GPU Type | Intended Use Case | Frame Buffer (MB) | Maximum vGPUs per GPU | Maximum vGPUs per Board | Available Pixels | Display Resolution | Virtual Displays per vGPU |
|---|---|---|---|---|---|---|---|
| P6-2B | Virtual Desktops | 2048 | 8 | 8 | 17694720 | 5120×2880 | 1 |
| 4096×2160 | 2 | ||||||
| 3840×2160 | 2 | ||||||
| 2560×1600 or lower | 4 | ||||||
| P6-2B44 | Virtual Desktops | 2048 | 8 | 8 | 17694720 | 5120×2880 | 1 |
| 4096×2160 | 2 | ||||||
| 3840×2160 | 2 | ||||||
| 2560×1600 or lower | 4 | ||||||
| P6-1B | Virtual Desktops | 1024 | 16 | 16 | 16384000 | 5120×2880 | 1 |
| 4096×2160 | 1 | ||||||
| 3840×2160 | 1 | ||||||
| 2560×1600 or lower | 45 | ||||||
| P6-1B44 | Virtual Desktops | 1024 | 16 | 16 | 16384000 | 5120×2880 | 1 |
| 4096×2160 | 1 | ||||||
| 3840×2160 | 1 | ||||||
| 2560×1600 or lower | 45 |
C-Series Virtual GPU Types for Tesla P6
Required license edition: vCS or vWS
These vGPU types support a single display with a fixed maximum resolution.
A-Series Virtual GPU Types for Tesla P6
Required license edition: vApps
These vGPU types support a single display with a fixed maximum resolution.
| Virtual GPU Type | Intended Use Case | Frame Buffer (MB) | Maximum vGPUs per GPU | Maximum vGPUs per Board | Maximum Display Resolution | Virtual Displays per vGPU |
|---|---|---|---|---|---|---|
| P6-16A | Virtual Applications | 16384 | 1 | 1 | 1280×10246 | 16 |
| P6-8A | Virtual Applications | 8192 | 2 | 2 | 1280×10246 | 16 |
| P6-4A | Virtual Applications | 4096 | 4 | 4 | 1280×10246 | 16 |
| P6-2A | Virtual Applications | 2048 | 8 | 8 | 1280×10246 | 16 |
| P6-1A | Virtual Applications | 1024 | 16 | 16 | 1280×10246 | 16 |
A.1.21. Tesla P4 Virtual GPU Types
Physical GPUs per board: 1
Q-Series Virtual GPU Types for Tesla P4
Required license edition: vWS
These vGPU types support a maximum combined resolution based on the number of available pixels, which is determined by their frame buffer size. You can choose between using a small number of high resolution displays or a larger number of lower resolution displays with these vGPU types. The maximum number of displays per vGPU is based on a configuration in which all displays have the same resolution. For examples of configurations with a mixture of display resolutions, see Mixed Display Configurations for B-Series and Q-Series vGPUs.
| Virtual GPU Type | Intended Use Case | Frame Buffer (MB) | Maximum vGPUs per GPU | Maximum vGPUs per Board | Available Pixels | Display Resolution | Virtual Displays per vGPU |
|---|---|---|---|---|---|---|---|
| P4-8Q | Virtual Workstations | 8192 | 1 | 1 | 66355200 | 7680×4320 | 2 |
| 5120×2880 or lower | 4 | ||||||
| P4-4Q | Virtual Workstations | 4096 | 2 | 2 | 58982400 | 7680×4320 | 1 |
| 5120×2880 or lower | 4 | ||||||
| P4-2Q | Virtual Workstations | 2048 | 4 | 4 | 35389440 | 7680×4320 | 1 |
| 5120×2880 | 2 | ||||||
| 4096×2160 or lower | 4 | ||||||
| P4-1Q | Virtual Desktops, Virtual Workstations | 1024 | 8 | 8 | 17694720 | 5120×2880 | 1 |
| 4096×2160 | 2 | ||||||
| 3840×2160 | 2 | ||||||
| 2560×1600 or lower | 4 |
B-Series Virtual GPU Types for Tesla P4
Required license edition: vPC or vWS
These vGPU types support a maximum combined resolution based on the number of available pixels, which is determined by their frame buffer size. You can choose between using a small number of high resolution displays or a larger number of lower resolution displays with these vGPU types. The maximum number of displays per vGPU is based on a configuration in which all displays have the same resolution. For examples of configurations with a mixture of display resolutions, see Mixed Display Configurations for B-Series and Q-Series vGPUs.
| Virtual GPU Type | Intended Use Case | Frame Buffer (MB) | Maximum vGPUs per GPU | Maximum vGPUs per Board | Available Pixels | Display Resolution | Virtual Displays per vGPU |
|---|---|---|---|---|---|---|---|
| P4-2B | Virtual Desktops | 2048 | 4 | 4 | 17694720 | 5120×2880 | 1 |
| 4096×2160 | 2 | ||||||
| 3840×2160 | 2 | ||||||
| 2560×1600 or lower | 4 | ||||||
| P4-2B44 | Virtual Desktops | 2048 | 4 | 4 | 17694720 | 5120×2880 | 1 |
| 4096×2160 | 2 | ||||||
| 3840×2160 | 2 | ||||||
| 2560×1600 or lower | 4 | ||||||
| P4-1B | Virtual Desktops | 1024 | 8 | 8 | 16384000 | 5120×2880 | 1 |
| 4096×2160 | 1 | ||||||
| 3840×2160 | 1 | ||||||
| 2560×1600 or lower | 45 | ||||||
| P4-1B44 | Virtual Desktops | 1024 | 8 | 8 | 16384000 | 5120×2880 | 1 |
| 4096×2160 | 1 | ||||||
| 3840×2160 | 1 | ||||||
| 2560×1600 or lower | 45 |
C-Series Virtual GPU Types for Tesla P4
Required license edition: vCS or vWS
These vGPU types support a single display with a fixed maximum resolution.
A-Series Virtual GPU Types for Tesla P4
Required license edition: vApps
These vGPU types support a single display with a fixed maximum resolution.
| Virtual GPU Type | Intended Use Case | Frame Buffer (MB) | Maximum vGPUs per GPU | Maximum vGPUs per Board | Maximum Display Resolution | Virtual Displays per vGPU |
|---|---|---|---|---|---|---|
| P4-8A | Virtual Applications | 8192 | 1 | 1 | 1280×10246 | 16 |
| P4-4A | Virtual Applications | 4096 | 2 | 2 | 1280×10246 | 16 |
| P4-2A | Virtual Applications | 2048 | 4 | 4 | 1280×10246 | 16 |
| P4-1A | Virtual Applications | 1024 | 8 | 8 | 1280×10246 | 16 |
A.1.22. Tesla T4 Virtual GPU Types
Physical GPUs per board: 1
Q-Series Virtual GPU Types for Tesla T4
Required license edition: vWS
These vGPU types support a maximum combined resolution based on the number of available pixels, which is determined by their frame buffer size. You can choose between using a small number of high resolution displays or a larger number of lower resolution displays with these vGPU types. The maximum number of displays per vGPU is based on a configuration in which all displays have the same resolution. For examples of configurations with a mixture of display resolutions, see Mixed Display Configurations for B-Series and Q-Series vGPUs.
| Virtual GPU Type | Intended Use Case | Frame Buffer (MB) | Maximum vGPUs per GPU | Maximum vGPUs per Board | Available Pixels | Display Resolution | Virtual Displays per vGPU |
|---|---|---|---|---|---|---|---|
| T4-16Q | Virtual Workstations | 16384 | 1 | 1 | 66355200 | 7680×4320 | 2 |
| 5120×2880 or lower | 4 | ||||||
| T4-8Q | Virtual Workstations | 8192 | 2 | 2 | 66355200 | 7680×4320 | 2 |
| 5120×2880 or lower | 4 | ||||||
| T4-4Q | Virtual Workstations | 4096 | 4 | 4 | 58982400 | 7680×4320 | 1 |
| 5120×2880 or lower | 4 | ||||||
| T4-2Q | Virtual Workstations | 2048 | 8 | 8 | 35389440 | 7680×4320 | 1 |
| 5120×2880 | 2 | ||||||
| 4096×2160 or lower | 4 | ||||||
| T4-1Q | Virtual Desktops, Virtual Workstations | 1024 | 16 | 16 | 17694720 | 5120×2880 | 1 |
| 4096×2160 | 2 | ||||||
| 3840×2160 | 2 | ||||||
| 2560×1600 or lower | 4 |
B-Series Virtual GPU Types for Tesla T4
Required license edition: vPC or vWS
These vGPU types support a maximum combined resolution based on the number of available pixels, which is determined by their frame buffer size. You can choose between using a small number of high resolution displays or a larger number of lower resolution displays with these vGPU types. The maximum number of displays per vGPU is based on a configuration in which all displays have the same resolution. For examples of configurations with a mixture of display resolutions, see Mixed Display Configurations for B-Series and Q-Series vGPUs.
| Virtual GPU Type | Intended Use Case | Frame Buffer (MB) | Maximum vGPUs per GPU | Maximum vGPUs per Board | Available Pixels | Display Resolution | Virtual Displays per vGPU |
|---|---|---|---|---|---|---|---|
| T4-2B | Virtual Desktops | 2048 | 8 | 8 | 17694720 | 5120×2880 | 1 |
| 4096×2160 | 2 | ||||||
| 3840×2160 | 2 | ||||||
| 2560×1600 or lower | 4 | ||||||
| T4-2B44 | Virtual Desktops | 2048 | 8 | 8 | 17694720 | 5120×2880 | 1 |
| 4096×2160 | 2 | ||||||
| 3840×2160 | 2 | ||||||
| 2560×1600 or lower | 4 | ||||||
| T4-1B | Virtual Desktops | 1024 | 16 | 16 | 16384000 | 5120×2880 | 1 |
| 4096×2160 | 1 | ||||||
| 3840×2160 | 1 | ||||||
| 2560×1600 or lower | 45 | ||||||
| T4-1B44 | Virtual Desktops | 1024 | 16 | 16 | 16384000 | 5120×2880 | 1 |
| 4096×2160 | 1 | ||||||
| 3840×2160 | 1 | ||||||
| 2560×1600 or lower | 45 |
C-Series Virtual GPU Types for Tesla T4
Required license edition: vCS or vWS
These vGPU types support a single display with a fixed maximum resolution.
A-Series Virtual GPU Types for Tesla T4
Required license edition: vApps
These vGPU types support a single display with a fixed maximum resolution.
| Virtual GPU Type | Intended Use Case | Frame Buffer (MB) | Maximum vGPUs per GPU | Maximum vGPUs per Board | Maximum Display Resolution | Virtual Displays per vGPU |
|---|---|---|---|---|---|---|
| T4-16A | Virtual Applications | 16384 | 1 | 1 | 1280×10246 | 16 |
| T4-8A | Virtual Applications | 8192 | 2 | 2 | 1280×10246 | 16 |
| T4-4A | Virtual Applications | 4096 | 4 | 4 | 1280×10246 | 16 |
| T4-2A | Virtual Applications | 2048 | 8 | 8 | 1280×10246 | 16 |
| T4-1A | Virtual Applications | 1024 | 16 | 16 | 1280×10246 | 16 |
A.1.23. Tesla V100 SXM2 Virtual GPU Types
Physical GPUs per board: 1
Q-Series Virtual GPU Types for Tesla V100 SXM2
Required license edition: vWS
These vGPU types support a maximum combined resolution based on the number of available pixels, which is determined by their frame buffer size. You can choose between using a small number of high resolution displays or a larger number of lower resolution displays with these vGPU types. The maximum number of displays per vGPU is based on a configuration in which all displays have the same resolution. For examples of configurations with a mixture of display resolutions, see Mixed Display Configurations for B-Series and Q-Series vGPUs.
| Virtual GPU Type | Intended Use Case | Frame Buffer (MB) | Maximum vGPUs per GPU | Maximum vGPUs per Board | Available Pixels | Display Resolution | Virtual Displays per vGPU |
|---|---|---|---|---|---|---|---|
| V100X-16Q | Virtual Workstations | 16384 | 1 | 1 | 66355200 | 7680×4320 | 2 |
| 5120×2880 or lower | 4 | ||||||
| V100X-8Q | Virtual Workstations | 8192 | 2 | 2 | 66355200 | 7680×4320 | 2 |
| 5120×2880 or lower | 4 | ||||||
| V100X-4Q | Virtual Workstations | 4096 | 4 | 4 | 58982400 | 7680×4320 | 1 |
| 5120×2880 or lower | 4 | ||||||
| V100X-2Q | Virtual Workstations | 2048 | 8 | 8 | 35389440 | 7680×4320 | 1 |
| 5120×2880 | 2 | ||||||
| 4096×2160 or lower | 4 | ||||||
| V100X-1Q | Virtual Desktops, Virtual Workstations | 1024 | 16 | 16 | 17694720 | 5120×2880 | 1 |
| 4096×2160 | 2 | ||||||
| 3840×2160 | 2 | ||||||
| 2560×1600 or lower | 4 |
B-Series Virtual GPU Types for Tesla V100 SXM2
Required license edition: vPC or vWS
These vGPU types support a maximum combined resolution based on the number of available pixels, which is determined by their frame buffer size. You can choose between using a small number of high resolution displays or a larger number of lower resolution displays with these vGPU types. The maximum number of displays per vGPU is based on a configuration in which all displays have the same resolution. For examples of configurations with a mixture of display resolutions, see Mixed Display Configurations for B-Series and Q-Series vGPUs.
| Virtual GPU Type | Intended Use Case | Frame Buffer (MB) | Maximum vGPUs per GPU | Maximum vGPUs per Board | Available Pixels | Display Resolution | Virtual Displays per vGPU |
|---|---|---|---|---|---|---|---|
| V100X-2B | Virtual Desktops | 2048 | 8 | 8 | 17694720 | 5120×2880 | 1 |
| 4096×2160 | 2 | ||||||
| 3840×2160 | 2 | ||||||
| 2560×1600 or lower | 4 | ||||||
| V100X-2B44 | Virtual Desktops | 2048 | 8 | 8 | 17694720 | 5120×2880 | 1 |
| 4096×2160 | 2 | ||||||
| 3840×2160 | 2 | ||||||
| 2560×1600 or lower | 4 | ||||||
| V100X-1B | Virtual Desktops | 1024 | 16 | 16 | 16384000 | 5120×2880 | 1 |
| 4096×2160 | 1 | ||||||
| 3840×2160 | 1 | ||||||
| 2560×1600 or lower | 45 | ||||||
| V100X-1B44 | Virtual Desktops | 1024 | 16 | 16 | 16384000 | 5120×2880 | 1 |
| 4096×2160 | 1 | ||||||
| 3840×2160 | 1 | ||||||
| 2560×1600 or lower | 45 |
C-Series Virtual GPU Types for Tesla V100 SXM2
Required license edition: vCS or vWS
These vGPU types support a single display with a fixed maximum resolution.
| Virtual GPU Type | Intended Use Case | Frame Buffer (MB) | Maximum vGPUs per GPU | Maximum vGPUs per Board | Maximum Display Resolution | Virtual Displays per vGPU |
|---|---|---|---|---|---|---|
| V100X-16C | Training Workloads | 16384 | 1 | 1 | 4096×21602 | 1 |
| V100X-8C | Training Workloads | 8192 | 2 | 2 | 4096×21602 | 1 |
| V100X-4C | Inference Workloads | 4096 | 4 | 4 | 4096×21602 | 1 |
A-Series Virtual GPU Types for Tesla V100 SXM2
Required license edition: vApps
These vGPU types support a single display with a fixed maximum resolution.
| Virtual GPU Type | Intended Use Case | Frame Buffer (MB) | Maximum vGPUs per GPU | Maximum vGPUs per Board | Maximum Display Resolution | Virtual Displays per vGPU |
|---|---|---|---|---|---|---|
| V100X-16A | Virtual Applications | 16384 | 1 | 1 | 1280×10246 | 16 |
| V100X-8A | Virtual Applications | 8192 | 2 | 2 | 1280×10246 | 16 |
| V100X-4A | Virtual Applications | 4096 | 4 | 4 | 1280×10246 | 16 |
| V100X-2A | Virtual Applications | 2048 | 8 | 8 | 1280×10246 | 16 |
| V100X-1A | Virtual Applications | 1024 | 16 | 16 | 1280×10246 | 16 |
A.1.24. Tesla V100 SXM2 32GB Virtual GPU Types
Physical GPUs per board: 1
Q-Series Virtual GPU Types for Tesla V100 SXM2 32GB
Required license edition: vWS
These vGPU types support a maximum combined resolution based on the number of available pixels, which is determined by their frame buffer size. You can choose between using a small number of high resolution displays or a larger number of lower resolution displays with these vGPU types. The maximum number of displays per vGPU is based on a configuration in which all displays have the same resolution. For examples of configurations with a mixture of display resolutions, see Mixed Display Configurations for B-Series and Q-Series vGPUs.
| Virtual GPU Type | Intended Use Case | Frame Buffer (MB) | Maximum vGPUs per GPU | Maximum vGPUs per Board | Available Pixels | Display Resolution | Virtual Displays per vGPU |
|---|---|---|---|---|---|---|---|
| V100DX-32Q | Virtual Workstations | 32768 | 1 | 1 | 66355200 | 7680×4320 | 2 |
| 5120×2880 or lower | 4 | ||||||
| V100DX-16Q | Virtual Workstations | 16384 | 2 | 2 | 66355200 | 7680×4320 | 2 |
| 5120×2880 or lower | 4 | ||||||
| V100DX-8Q | Virtual Workstations | 8192 | 4 | 4 | 66355200 | 7680×4320 | 2 |
| 5120×2880 or lower | 4 | ||||||
| V100DX-4Q | Virtual Workstations | 4096 | 8 | 8 | 58982400 | 7680×4320 | 1 |
| 5120×2880 or lower | 4 | ||||||
| V100DX-2Q | Virtual Workstations | 2048 | 16 | 16 | 35389440 | 7680×4320 | 1 |
| 5120×2880 | 2 | ||||||
| 4096×2160 or lower | 4 | ||||||
| V100DX-1Q | Virtual Desktops, Virtual Workstations | 1024 | 32 | 32 | 17694720 | 5120×2880 | 1 |
| 4096×2160 | 2 | ||||||
| 3840×2160 | 2 | ||||||
| 2560×1600 or lower | 4 |
B-Series Virtual GPU Types for Tesla V100 SXM2 32GB
Required license edition: vPC or vWS
These vGPU types support a maximum combined resolution based on the number of available pixels, which is determined by their frame buffer size. You can choose between using a small number of high resolution displays or a larger number of lower resolution displays with these vGPU types. The maximum number of displays per vGPU is based on a configuration in which all displays have the same resolution. For examples of configurations with a mixture of display resolutions, see Mixed Display Configurations for B-Series and Q-Series vGPUs.
| Virtual GPU Type | Intended Use Case | Frame Buffer (MB) | Maximum vGPUs per GPU | Maximum vGPUs per Board | Available Pixels | Display Resolution | Virtual Displays per vGPU |
|---|---|---|---|---|---|---|---|
| V100DX-2B | Virtual Desktops | 2048 | 16 | 16 | 17694720 | 5120×2880 | 1 |
| 4096×2160 | 2 | ||||||
| 3840×2160 | 2 | ||||||
| 2560×1600 or lower | 4 | ||||||
| V100DX-2B44 | Virtual Desktops | 2048 | 16 | 16 | 17694720 | 5120×2880 | 1 |
| 4096×2160 | 2 | ||||||
| 3840×2160 | 2 | ||||||
| 2560×1600 or lower | 4 | ||||||
| V100DX-1B | Virtual Desktops | 1024 | 32 | 32 | 16384000 | 5120×2880 | 1 |
| 4096×2160 | 1 | ||||||
| 3840×2160 | 1 | ||||||
| 2560×1600 or lower | 45 | ||||||
| V100DX-1B44 | Virtual Desktops | 1024 | 32 | 32 | 16384000 | 5120×2880 | 1 |
| 4096×2160 | 1 | ||||||
| 3840×2160 | 1 | ||||||
| 2560×1600 or lower | 45 |
C-Series Virtual GPU Types for Tesla V100 SXM2 32GB
Required license edition: vCS or vWS
These vGPU types support a single display with a fixed maximum resolution.
| Virtual GPU Type | Intended Use Case | Frame Buffer (MB) | Maximum vGPUs per GPU | Maximum vGPUs per Board | Maximum Display Resolution | Virtual Displays per vGPU |
|---|---|---|---|---|---|---|
| V100DX-32C | Training Workloads | 32768 | 1 | 1 | 4096×21602 | 1 |
| V100DX-16C | Training Workloads | 16384 | 2 | 2 | 4096×21602 | 1 |
| V100DX-8C | Training Workloads | 8192 | 4 | 4 | 4096×21602 | 1 |
| V100DX-4C | Inference Workloads | 4096 | 8 | 8 | 4096×21602 | 1 |
A-Series Virtual GPU Types for Tesla V100 SXM2 32GB
Required license edition: vApps
These vGPU types support a single display with a fixed maximum resolution.
| Virtual GPU Type | Intended Use Case | Frame Buffer (MB) | Maximum vGPUs per GPU | Maximum vGPUs per Board | Maximum Display Resolution | Virtual Displays per vGPU |
|---|---|---|---|---|---|---|
| V100DX-32A | Virtual Applications | 32768 | 1 | 1 | 1280×10246 | 16 |
| V100DX-16A | Virtual Applications | 16384 | 2 | 2 | 1280×10246 | 16 |
| V100DX-8A | Virtual Applications | 8192 | 4 | 4 | 1280×10246 | 16 |
| V100DX-4A | Virtual Applications | 4096 | 8 | 8 | 1280×10246 | 16 |
| V100DX-2A | Virtual Applications | 2048 | 16 | 16 | 1280×10246 | 16 |
| V100DX-1A | Virtual Applications | 1024 | 32 | 32 | 1280×10246 | 16 |
A.1.25. Tesla V100 PCIe Virtual GPU Types
Physical GPUs per board: 1
Q-Series Virtual GPU Types for Tesla V100 PCIe
Required license edition: vWS
These vGPU types support a maximum combined resolution based on the number of available pixels, which is determined by their frame buffer size. You can choose between using a small number of high resolution displays or a larger number of lower resolution displays with these vGPU types. The maximum number of displays per vGPU is based on a configuration in which all displays have the same resolution. For examples of configurations with a mixture of display resolutions, see Mixed Display Configurations for B-Series and Q-Series vGPUs.
| Virtual GPU Type | Intended Use Case | Frame Buffer (MB) | Maximum vGPUs per GPU | Maximum vGPUs per Board | Available Pixels | Display Resolution | Virtual Displays per vGPU |
|---|---|---|---|---|---|---|---|
| V100-16Q | Virtual Workstations | 16384 | 1 | 1 | 66355200 | 7680×4320 | 2 |
| 5120×2880 or lower | 4 | ||||||
| V100-8Q | Virtual Workstations | 8192 | 2 | 2 | 66355200 | 7680×4320 | 2 |
| 5120×2880 or lower | 4 | ||||||
| V100-4Q | Virtual Workstations | 4096 | 4 | 4 | 58982400 | 7680×4320 | 1 |
| 5120×2880 or lower | 4 | ||||||
| V100-2Q | Virtual Workstations | 2048 | 8 | 8 | 35389440 | 7680×4320 | 1 |
| 5120×2880 | 2 | ||||||
| 4096×2160 or lower | 4 | ||||||
| V100-1Q | Virtual Desktops, Virtual Workstations | 1024 | 16 | 16 | 17694720 | 5120×2880 | 1 |
| 4096×2160 | 2 | ||||||
| 3840×2160 | 2 | ||||||
| 2560×1600 or lower | 4 |
B-Series Virtual GPU Types for Tesla V100 PCIe
Required license edition: vPC or vWS
These vGPU types support a maximum combined resolution based on the number of available pixels, which is determined by their frame buffer size. You can choose between using a small number of high resolution displays or a larger number of lower resolution displays with these vGPU types. The maximum number of displays per vGPU is based on a configuration in which all displays have the same resolution. For examples of configurations with a mixture of display resolutions, see Mixed Display Configurations for B-Series and Q-Series vGPUs.
| Virtual GPU Type | Intended Use Case | Frame Buffer (MB) | Maximum vGPUs per GPU | Maximum vGPUs per Board | Available Pixels | Display Resolution | Virtual Displays per vGPU |
|---|---|---|---|---|---|---|---|
| V100-2B | Virtual Desktops | 2048 | 8 | 8 | 17694720 | 5120×2880 | 1 |
| 4096×2160 | 2 | ||||||
| 3840×2160 | 2 | ||||||
| 2560×1600 or lower | 4 | ||||||
| V100-2B44 | Virtual Desktops | 2048 | 8 | 8 | 17694720 | 5120×2880 | 1 |
| 4096×2160 | 2 | ||||||
| 3840×2160 | 2 | ||||||
| 2560×1600 or lower | 4 | ||||||
| V100-1B | Virtual Desktops | 1024 | 16 | 16 | 16384000 | 5120×2880 | 1 |
| 4096×2160 | 1 | ||||||
| 3840×2160 | 1 | ||||||
| 2560×1600 or lower | 45 | ||||||
| V100-1B44 | Virtual Desktops | 1024 | 16 | 16 | 16384000 | 5120×2880 | 1 |
| 4096×2160 | 1 | ||||||
| 3840×2160 | 1 | ||||||
| 2560×1600 or lower | 45 |
C-Series Virtual GPU Types for Tesla V100 PCIe
Required license edition: vCS or vWS
These vGPU types support a single display with a fixed maximum resolution.
| Virtual GPU Type | Intended Use Case | Frame Buffer (MB) | Maximum vGPUs per GPU | Maximum vGPUs per Board | Maximum Display Resolution | Virtual Displays per vGPU |
|---|---|---|---|---|---|---|
| V100-16C | Training Workloads | 16384 | 1 | 1 | 4096×21602 | 1 |
| V100-8C | Training Workloads | 8192 | 2 | 2 | 4096×21602 | 1 |
| V100-4C | Inference Workloads | 4096 | 4 | 4 | 4096×21602 | 1 |
A-Series Virtual GPU Types for Tesla V100 PCIe
Required license edition: vApps
These vGPU types support a single display with a fixed maximum resolution.
| Virtual GPU Type | Intended Use Case | Frame Buffer (MB) | Maximum vGPUs per GPU | Maximum vGPUs per Board | Maximum Display Resolution | Virtual Displays per vGPU |
|---|---|---|---|---|---|---|
| V100-16A | Virtual Applications | 16384 | 1 | 1 | 1280×10246 | 16 |
| V100-8A | Virtual Applications | 8192 | 2 | 2 | 1280×10246 | 16 |
| V100-4A | Virtual Applications | 4096 | 4 | 4 | 1280×10246 | 16 |
| V100-2A | Virtual Applications | 2048 | 8 | 8 | 1280×10246 | 16 |
| V100-1A | Virtual Applications | 1024 | 16 | 16 | 1280×10246 | 16 |
A.1.26. Tesla V100 PCIe 32GB Virtual GPU Types
Physical GPUs per board: 1
Q-Series Virtual GPU Types for Tesla V100 PCIe 32GB
Required license edition: vWS
These vGPU types support a maximum combined resolution based on the number of available pixels, which is determined by their frame buffer size. You can choose between using a small number of high resolution displays or a larger number of lower resolution displays with these vGPU types. The maximum number of displays per vGPU is based on a configuration in which all displays have the same resolution. For examples of configurations with a mixture of display resolutions, see Mixed Display Configurations for B-Series and Q-Series vGPUs.
| Virtual GPU Type | Intended Use Case | Frame Buffer (MB) | Maximum vGPUs per GPU | Maximum vGPUs per Board | Available Pixels | Display Resolution | Virtual Displays per vGPU |
|---|---|---|---|---|---|---|---|
| V100D-32Q | Virtual Workstations | 32768 | 1 | 1 | 66355200 | 7680×4320 | 2 |
| 5120×2880 or lower | 4 | ||||||
| V100D-16Q | Virtual Workstations | 16384 | 2 | 2 | 66355200 | 7680×4320 | 2 |
| 5120×2880 or lower | 4 | ||||||
| V100D-8Q | Virtual Workstations | 8192 | 4 | 4 | 66355200 | 7680×4320 | 2 |
| 5120×2880 or lower | 4 | ||||||
| V100D-4Q | Virtual Workstations | 4096 | 8 | 8 | 58982400 | 7680×4320 | 1 |
| 5120×2880 or lower | 4 | ||||||
| V100D-2Q | Virtual Workstations | 2048 | 16 | 16 | 35389440 | 7680×4320 | 1 |
| 5120×2880 | 2 | ||||||
| 4096×2160 or lower | 4 | ||||||
| V100D-1Q | Virtual Desktops, Virtual Workstations | 1024 | 32 | 32 | 17694720 | 5120×2880 | 1 |
| 4096×2160 | 2 | ||||||
| 3840×2160 | 2 | ||||||
| 2560×1600 or lower | 4 |
B-Series Virtual GPU Types for Tesla V100 PCIe 32GB
Required license edition: vPC or vWS
These vGPU types support a maximum combined resolution based on the number of available pixels, which is determined by their frame buffer size. You can choose between using a small number of high resolution displays or a larger number of lower resolution displays with these vGPU types. The maximum number of displays per vGPU is based on a configuration in which all displays have the same resolution. For examples of configurations with a mixture of display resolutions, see Mixed Display Configurations for B-Series and Q-Series vGPUs.
| Virtual GPU Type | Intended Use Case | Frame Buffer (MB) | Maximum vGPUs per GPU | Maximum vGPUs per Board | Available Pixels | Display Resolution | Virtual Displays per vGPU |
|---|---|---|---|---|---|---|---|
| V100D-2B | Virtual Desktops | 2048 | 16 | 16 | 17694720 | 5120×2880 | 1 |
| 4096×2160 | 2 | ||||||
| 3840×2160 | 2 | ||||||
| 2560×1600 or lower | 4 | ||||||
| V100D-2B44 | Virtual Desktops | 2048 | 16 | 16 | 17694720 | 5120×2880 | 1 |
| 4096×2160 | 2 | ||||||
| 3840×2160 | 2 | ||||||
| 2560×1600 or lower | 4 | ||||||
| V100D-1B | Virtual Desktops | 1024 | 32 | 32 | 16384000 | 5120×2880 | 1 |
| 4096×2160 | 1 | ||||||
| 3840×2160 | 1 | ||||||
| 2560×1600 or lower | 45 | ||||||
| V100D-1B44 | Virtual Desktops | 1024 | 32 | 32 | 16384000 | 5120×2880 | 1 |
| 4096×2160 | 1 | ||||||
| 3840×2160 | 1 | ||||||
| 2560×1600 or lower | 45 |
C-Series Virtual GPU Types for Tesla V100 PCIe 32GB
Required license edition: vCS or vWS
These vGPU types support a single display with a fixed maximum resolution.
| Virtual GPU Type | Intended Use Case | Frame Buffer (MB) | Maximum vGPUs per GPU | Maximum vGPUs per Board | Maximum Display Resolution | Virtual Displays per vGPU |
|---|---|---|---|---|---|---|
| V100D-32C | Training Workloads | 32768 | 1 | 1 | 4096×21602 | 1 |
| V100D-16C | Training Workloads | 16384 | 2 | 2 | 4096×21602 | 1 |
| V100D-8C | Training Workloads | 8192 | 4 | 4 | 4096×21602 | 1 |
| V100D-4C | Inference Workloads | 4096 | 8 | 8 | 4096×21602 | 1 |
A-Series Virtual GPU Types for Tesla V100 PCIe 32GB
Required license edition: vApps
These vGPU types support a single display with a fixed maximum resolution.
| Virtual GPU Type | Intended Use Case | Frame Buffer (MB) | Maximum vGPUs per GPU | Maximum vGPUs per Board | Maximum Display Resolution | Virtual Displays per vGPU |
|---|---|---|---|---|---|---|
| V100D-32A | Virtual Applications | 32768 | 1 | 1 | 1280×10246 | 16 |
| V100D-16A | Virtual Applications | 16384 | 2 | 2 | 1280×10246 | 16 |
| V100D-8A | Virtual Applications | 8192 | 4 | 4 | 1280×10246 | 16 |
| V100D-4A | Virtual Applications | 4096 | 8 | 8 | 1280×10246 | 16 |
| V100D-2A | Virtual Applications | 2048 | 16 | 16 | 1280×10246 | 16 |
| V100D-1A | Virtual Applications | 1024 | 32 | 32 | 1280×10246 | 16 |
A.1.27. Tesla V100S PCIe 32GB Virtual GPU Types
Physical GPUs per board: 1
Q-Series Virtual GPU Types for Tesla V100S PCIe 32GB
Required license edition: vWS
These vGPU types support a maximum combined resolution based on the number of available pixels, which is determined by their frame buffer size. You can choose between using a small number of high resolution displays or a larger number of lower resolution displays with these vGPU types. The maximum number of displays per vGPU is based on a configuration in which all displays have the same resolution. For examples of configurations with a mixture of display resolutions, see Mixed Display Configurations for B-Series and Q-Series vGPUs.
| Virtual GPU Type | Intended Use Case | Frame Buffer (MB) | Maximum vGPUs per GPU | Maximum vGPUs per Board | Available Pixels | Display Resolution | Virtual Displays per vGPU |
|---|---|---|---|---|---|---|---|
| V100S-32Q | Virtual Workstations | 32768 | 1 | 1 | 66355200 | 7680×4320 | 2 |
| 5120×2880 or lower | 4 | ||||||
| V100S-16Q | Virtual Workstations | 16384 | 2 | 2 | 66355200 | 7680×4320 | 2 |
| 5120×2880 or lower | 4 | ||||||
| V100S-8Q | Virtual Workstations | 8192 | 4 | 4 | 66355200 | 7680×4320 | 2 |
| 5120×2880 or lower | 4 | ||||||
| V100S-4Q | Virtual Workstations | 4096 | 8 | 8 | 58982400 | 7680×4320 | 1 |
| 5120×2880 or lower | 4 | ||||||
| V100S-2Q | Virtual Workstations | 2048 | 16 | 16 | 35389440 | 7680×4320 | 1 |
| 5120×2880 | 2 | ||||||
| 4096×2160 or lower | 4 | ||||||
| V100S-1Q | Virtual Desktops, Virtual Workstations | 1024 | 32 | 32 | 17694720 | 5120×2880 | 1 |
| 4096×2160 | 2 | ||||||
| 3840×2160 | 2 | ||||||
| 2560×1600 or lower | 4 |
B-Series Virtual GPU Types for Tesla V100S PCIe 32GB
Required license edition: vPC or vWS
These vGPU types support a maximum combined resolution based on the number of available pixels, which is determined by their frame buffer size. You can choose between using a small number of high resolution displays or a larger number of lower resolution displays with these vGPU types. The maximum number of displays per vGPU is based on a configuration in which all displays have the same resolution. For examples of configurations with a mixture of display resolutions, see Mixed Display Configurations for B-Series and Q-Series vGPUs.
| Virtual GPU Type | Intended Use Case | Frame Buffer (MB) | Maximum vGPUs per GPU | Maximum vGPUs per Board | Available Pixels | Display Resolution | Virtual Displays per vGPU |
|---|---|---|---|---|---|---|---|
| V100S-2B | Virtual Desktops | 2048 | 16 | 16 | 17694720 | 5120×2880 | 1 |
| 4096×2160 | 2 | ||||||
| 3840×2160 | 2 | ||||||
| 2560×1600 or lower | 4 | ||||||
| V100S-1B | Virtual Desktops | 1024 | 32 | 32 | 16384000 | 5120×2880 | 1 |
| 4096×2160 | 1 | ||||||
| 3840×2160 | 1 | ||||||
| 2560×1600 or lower | 45 |
C-Series Virtual GPU Types for Tesla V100S PCIe 32GB
Required license edition: vCS or vWS
These vGPU types support a single display with a fixed maximum resolution.
| Virtual GPU Type | Intended Use Case | Frame Buffer (MB) | Maximum vGPUs per GPU | Maximum vGPUs per Board | Maximum Display Resolution | Virtual Displays per vGPU |
|---|---|---|---|---|---|---|
| V100S-32C | Training Workloads | 32768 | 1 | 1 | 4096×21602 | 1 |
| V100S-16C | Training Workloads | 16384 | 2 | 2 | 4096×21602 | 1 |
| V100S-8C | Training Workloads | 8192 | 4 | 4 | 4096×21602 | 1 |
| V100S-4C | Inference Workloads | 4096 | 8 | 8 | 4096×21602 | 1 |
A-Series Virtual GPU Types for Tesla V100S PCIe 32GB
Required license edition: vApps
These vGPU types support a single display with a fixed maximum resolution.
| Virtual GPU Type | Intended Use Case | Frame Buffer (MB) | Maximum vGPUs per GPU | Maximum vGPUs per Board | Maximum Display Resolution | Virtual Displays per vGPU |
|---|---|---|---|---|---|---|
| V100S-32A | Virtual Applications | 32768 | 1 | 1 | 1280×10246 | 16 |
| V100S-16A | Virtual Applications | 16384 | 2 | 2 | 1280×10246 | 16 |
| V100S-8A | Virtual Applications | 8192 | 4 | 4 | 1280×10246 | 16 |
| V100S-4A | Virtual Applications | 4096 | 8 | 8 | 1280×10246 | 16 |
| V100S-2A | Virtual Applications | 2048 | 16 | 16 | 1280×10246 | 16 |
| V100S-1A | Virtual Applications | 1024 | 32 | 32 | 1280×10246 | 16 |
A.1.28. Tesla V100 FHHL Virtual GPU Types
Physical GPUs per board: 1
Q-Series Virtual GPU Types for Tesla V100 FHHL
Required license edition: vWS
These vGPU types support a maximum combined resolution based on the number of available pixels, which is determined by their frame buffer size. You can choose between using a small number of high resolution displays or a larger number of lower resolution displays with these vGPU types. The maximum number of displays per vGPU is based on a configuration in which all displays have the same resolution. For examples of configurations with a mixture of display resolutions, see Mixed Display Configurations for B-Series and Q-Series vGPUs.
| Virtual GPU Type | Intended Use Case | Frame Buffer (MB) | Maximum vGPUs per GPU | Maximum vGPUs per Board | Available Pixels | Display Resolution | Virtual Displays per vGPU |
|---|---|---|---|---|---|---|---|
| V100L-16Q | Virtual Workstations | 16384 | 1 | 1 | 66355200 | 7680×4320 | 2 |
| 5120×2880 or lower | 4 | ||||||
| V100L-8Q | Virtual Workstations | 8192 | 2 | 2 | 66355200 | 7680×4320 | 2 |
| 5120×2880 or lower | 4 | ||||||
| V100L-4Q | Virtual Workstations | 4096 | 4 | 4 | 58982400 | 7680×4320 | 1 |
| 5120×2880 or lower | 4 | ||||||
| V100L-2Q | Virtual Workstations | 2048 | 8 | 8 | 35389440 | 7680×4320 | 1 |
| 5120×2880 | 2 | ||||||
| 4096×2160 or lower | 4 | ||||||
| V100L-1Q | Virtual Desktops, Virtual Workstations | 1024 | 16 | 16 | 17694720 | 5120×2880 | 1 |
| 4096×2160 | 2 | ||||||
| 3840×2160 | 2 | ||||||
| 2560×1600 or lower | 4 |
B-Series Virtual GPU Types for Tesla V100 FHHL
Required license edition: vPC or vWS
These vGPU types support a maximum combined resolution based on the number of available pixels, which is determined by their frame buffer size. You can choose between using a small number of high resolution displays or a larger number of lower resolution displays with these vGPU types. The maximum number of displays per vGPU is based on a configuration in which all displays have the same resolution. For examples of configurations with a mixture of display resolutions, see Mixed Display Configurations for B-Series and Q-Series vGPUs.
| Virtual GPU Type | Intended Use Case | Frame Buffer (MB) | Maximum vGPUs per GPU | Maximum vGPUs per Board | Available Pixels | Display Resolution | Virtual Displays per vGPU |
|---|---|---|---|---|---|---|---|
| V100L-2B | Virtual Desktops | 2048 | 8 | 8 | 17694720 | 5120×2880 | 1 |
| 4096×2160 | 2 | ||||||
| 3840×2160 | 2 | ||||||
| 2560×1600 or lower | 4 | ||||||
| V100L-2B44 | Virtual Desktops | 2048 | 8 | 8 | 17694720 | 5120×2880 | 1 |
| 4096×2160 | 2 | ||||||
| 3840×2160 | 2 | ||||||
| 2560×1600 or lower | 4 | ||||||
| V100L-1B | Virtual Desktops | 1024 | 16 | 16 | 16384000 | 5120×2880 | 1 |
| 4096×2160 | 1 | ||||||
| 3840×2160 | 1 | ||||||
| 2560×1600 or lower | 45 | ||||||
| V100L-1B44 | Virtual Desktops | 1024 | 16 | 16 | 16384000 | 5120×2880 | 1 |
| 4096×2160 | 1 | ||||||
| 3840×2160 | 1 | ||||||
| 2560×1600 or lower | 45 |
C-Series Virtual GPU Types for Tesla V100 FHHL
Required license edition: vCS or vWS
These vGPU types support a single display with a fixed maximum resolution.
| Virtual GPU Type | Intended Use Case | Frame Buffer (MB) | Maximum vGPUs per GPU | Maximum vGPUs per Board | Maximum Display Resolution | Virtual Displays per vGPU |
|---|---|---|---|---|---|---|
| V100L-16C | Training Workloads | 16384 | 1 | 1 | 4096×21602 | 1 |
| V100L-8C | Training Workloads | 8192 | 2 | 2 | 4096×21602 | 1 |
| V100L-4C | Inference Workloads | 4096 | 4 | 4 | 4096×21602 | 1 |
A-Series Virtual GPU Types for Tesla V100 FHHL
Required license edition: vApps
These vGPU types support a single display with a fixed maximum resolution.
| Virtual GPU Type | Intended Use Case | Frame Buffer (MB) | Maximum vGPUs per GPU | Maximum vGPUs per Board | Maximum Display Resolution | Virtual Displays per vGPU |
|---|---|---|---|---|---|---|
| V100L-16A | Virtual Applications | 16384 | 1 | 1 | 1280×10246 | 16 |
| V100L-8A | Virtual Applications | 8192 | 2 | 2 | 1280×10246 | 16 |
| V100L-4A | Virtual Applications | 4096 | 4 | 4 | 1280×10246 | 16 |
| V100L-2A | Virtual Applications | 2048 | 8 | 8 | 1280×10246 | 16 |
| V100L-1A | Virtual Applications | 1024 | 16 | 16 | 1280×10246 | 16 |
A.1.29. Quadro RTX 8000 Virtual GPU Types
Physical GPUs per board: 1
Q-Series Virtual GPU Types for Quadro RTX 8000
Required license edition: vWS
These vGPU types support a maximum combined resolution based on the number of available pixels, which is determined by their frame buffer size. You can choose between using a small number of high resolution displays or a larger number of lower resolution displays with these vGPU types. The maximum number of displays per vGPU is based on a configuration in which all displays have the same resolution. For examples of configurations with a mixture of display resolutions, see Mixed Display Configurations for B-Series and Q-Series vGPUs.
| Virtual GPU Type | Intended Use Case | Frame Buffer (MB) | Maximum vGPUs per GPU | Maximum vGPUs per Board | Available Pixels | Display Resolution | Virtual Displays per vGPU |
|---|---|---|---|---|---|---|---|
| RTX8000-48Q | Virtual Workstations | 49152 | 1 | 1 | 66355200 | 7680×4320 | 2 |
| 5120×2880 or lower | 4 | ||||||
| RTX8000-24Q | Virtual Workstations | 24576 | 2 | 2 | 66355200 | 7680×4320 | 2 |
| 5120×2880 or lower | 4 | ||||||
| RTX8000-16Q | Virtual Workstations | 16384 | 3 | 3 | 66355200 | 7680×4320 | 2 |
| 5120×2880 or lower | 4 | ||||||
| RTX8000-12Q | Virtual Workstations | 12288 | 4 | 4 | 66355200 | 7680×4320 | 2 |
| 5120×2880 or lower | 4 | ||||||
| RTX8000-8Q | Virtual Workstations | 8192 | 6 | 6 | 66355200 | 7680×4320 | 2 |
| 5120×2880 or lower | 4 | ||||||
| RTX8000-6Q | Virtual Workstations | 6144 | 8 | 8 | 58982400 | 7680×4320 | 1 |
| 5120×2880 or lower | 4 | ||||||
| RTX8000-4Q | Virtual Workstations | 4096 | 12 | 12 | 58982400 | 7680×4320 | 1 |
| 5120×2880 or lower | 4 | ||||||
| RTX8000-3Q | Virtual Workstations | 3072 | 16 | 16 | 35389440 | 7680×4320 | 1 |
| 5120×2880 | 2 | ||||||
| 4096×2160 or lower | 4 | ||||||
| RTX8000-2Q | Virtual Workstations | 2048 | 24 | 24 | 35389440 | 7680×4320 | 1 |
| 5120×2880 | 2 | ||||||
| 4096×2160 or lower | 4 | ||||||
| RTX8000-1Q | Virtual Workstations | 1024 | 329 | 32 | 17694720 | 5120×2880 | 1 |
| 4096×2160 | 2 | ||||||
| 3840×2160 | 2 | ||||||
| 2560×1600 or lower | 4 |
B-Series Virtual GPU Types for Quadro RTX 8000
Required license edition: vPC or vWS
These vGPU types support a maximum combined resolution based on the number of available pixels, which is determined by their frame buffer size. You can choose between using a small number of high resolution displays or a larger number of lower resolution displays with these vGPU types. The maximum number of displays per vGPU is based on a configuration in which all displays have the same resolution. For examples of configurations with a mixture of display resolutions, see Mixed Display Configurations for B-Series and Q-Series vGPUs.
| Virtual GPU Type | Intended Use Case | Frame Buffer (MB) | Maximum vGPUs per GPU | Maximum vGPUs per Board | Available Pixels | Display Resolution | Virtual Displays per vGPU |
|---|---|---|---|---|---|---|---|
| RTX8000-2B | Virtual Desktops | 2048 | 24 | 24 | 17694720 | 5120×2880 | 1 |
| 4096×2160 | 2 | ||||||
| 3840×2160 | 2 | ||||||
| 2560×1600 or lower | 4 | ||||||
| RTX8000-1B | Virtual Desktops | 1024 | 32 | 32 | 16384000 | 5120×2880 | 1 |
| 4096×2160 | 1 | ||||||
| 3840×2160 | 1 | ||||||
| 2560×1600 or lower | 45 |
C-Series Virtual GPU Types for Quadro RTX 8000
Required license edition: vCS or vWS
These vGPU types support a single display with a fixed maximum resolution.
| Virtual GPU Type | Intended Use Case | Frame Buffer (MB) | Maximum vGPUs per GPU | Maximum vGPUs per Board | Maximum Display Resolution | Virtual Displays per vGPU |
|---|---|---|---|---|---|---|
| RTX8000-48C | Training Workloads | 49152 | 1 | 1 | 4096×21602 | 1 |
| RTX8000-24C | Training Workloads | 24576 | 2 | 2 | 4096×21602 | 1 |
| RTX8000-16C | Training Workloads | 16384 | 3 | 3 | 4096×21602 | 1 |
| RTX8000-12C | Training Workloads | 12288 | 4 | 4 | 4096×21602 | 1 |
| RTX8000-8C | Training Workloads | 8192 | 6 | 6 | 4096×21602 | 1 |
| RTX8000-6C | Training Workloads | 6144 | 8 | 8 | 4096×21602 | 1 |
| RTX8000-4C | Inference Workloads | 4096 | 83 | 8 | 4096×21602 | 1 |
A-Series Virtual GPU Types for Quadro RTX 8000
Required license edition: vApps
These vGPU types support a single display with a fixed maximum resolution.
| Virtual GPU Type | Intended Use Case | Frame Buffer (MB) | Maximum vGPUs per GPU | Maximum vGPUs per Board | Maximum Display Resolution | Virtual Displays per vGPU |
|---|---|---|---|---|---|---|
| RTX8000-48A | Virtual Applications | 49152 | 1 | 1 | 1280×10246 | 16 |
| RTX8000-24A | Virtual Applications | 24576 | 2 | 2 | 1280×10246 | 16 |
| RTX8000-16A | Virtual Applications | 16384 | 3 | 3 | 1280×10246 | 16 |
| RTX8000-12A | Virtual Applications | 12288 | 4 | 4 | 1280×10246 | 16 |
| RTX8000-8A | Virtual Applications | 8192 | 6 | 6 | 1280×10246 | 16 |
| RTX8000-6A | Virtual Applications | 6144 | 8 | 8 | 1280×10246 | 16 |
| RTX8000-4A | Virtual Applications | 4096 | 12 | 12 | 1280×10246 | 16 |
| RTX8000-3A | Virtual Applications | 3072 | 16 | 16 | 1280×10246 | 16 |
| RTX8000-2A | Virtual Applications | 2048 | 24 | 24 | 1280×10246 | 16 |
| RTX8000-1A | Virtual Applications | 1024 | 329 | 32 | 1280×10246 | 16 |
A.1.30. Quadro RTX 8000 Passive Virtual GPU Types
Physical GPUs per board: 1
Q-Series Virtual GPU Types for Quadro RTX 8000 Passive
Required license edition: vWS
These vGPU types support a maximum combined resolution based on the number of available pixels, which is determined by their frame buffer size. You can choose between using a small number of high resolution displays or a larger number of lower resolution displays with these vGPU types. The maximum number of displays per vGPU is based on a configuration in which all displays have the same resolution. For examples of configurations with a mixture of display resolutions, see Mixed Display Configurations for B-Series and Q-Series vGPUs.
| Virtual GPU Type | Intended Use Case | Frame Buffer (MB) | Maximum vGPUs per GPU | Maximum vGPUs per Board | Available Pixels | Display Resolution | Virtual Displays per vGPU |
|---|---|---|---|---|---|---|---|
| RTX8000P-48Q | Virtual Workstations | 49152 | 1 | 1 | 66355200 | 7680×4320 | 2 |
| 5120×2880 or lower | 4 | ||||||
| RTX8000P-24Q | Virtual Workstations | 24576 | 2 | 2 | 66355200 | 7680×4320 | 2 |
| 5120×2880 or lower | 4 | ||||||
| RTX8000P-16Q | Virtual Workstations | 16384 | 3 | 3 | 66355200 | 7680×4320 | 2 |
| 5120×2880 or lower | 4 | ||||||
| RTX8000P-12Q | Virtual Workstations | 12288 | 4 | 4 | 66355200 | 7680×4320 | 2 |
| 5120×2880 or lower | 4 | ||||||
| RTX8000P-8Q | Virtual Workstations | 8192 | 6 | 6 | 66355200 | 7680×4320 | 2 |
| 5120×2880 or lower | 4 | ||||||
| RTX8000P-6Q | Virtual Workstations | 6144 | 8 | 8 | 58982400 | 7680×4320 | 1 |
| 5120×2880 or lower | 4 | ||||||
| RTX8000P-4Q | Virtual Workstations | 4096 | 12 | 12 | 58982400 | 7680×4320 | 1 |
| 5120×2880 or lower | 4 | ||||||
| RTX8000P-3Q | Virtual Workstations | 3072 | 16 | 16 | 35389440 | 7680×4320 | 1 |
| 5120×2880 | 2 | ||||||
| 4096×2160 or lower | 4 | ||||||
| RTX8000P-2Q | Virtual Workstations | 2048 | 24 | 24 | 35389440 | 7680×4320 | 1 |
| 5120×2880 | 2 | ||||||
| 4096×2160 or lower | 4 | ||||||
| RTX8000P-1Q | Virtual Workstations | 1024 | 3210 | 32 | 17694720 | 5120×2880 | 1 |
| 4096×2160 | 2 | ||||||
| 3840×2160 | 2 | ||||||
| 2560×1600 or lower | 4 |
B-Series Virtual GPU Types for Quadro RTX 8000 Passive
Required license edition: vPC or vWS
These vGPU types support a maximum combined resolution based on the number of available pixels, which is determined by their frame buffer size. You can choose between using a small number of high resolution displays or a larger number of lower resolution displays with these vGPU types. The maximum number of displays per vGPU is based on a configuration in which all displays have the same resolution. For examples of configurations with a mixture of display resolutions, see Mixed Display Configurations for B-Series and Q-Series vGPUs.
| Virtual GPU Type | Intended Use Case | Frame Buffer (MB) | Maximum vGPUs per GPU | Maximum vGPUs per Board | Available Pixels | Display Resolution | Virtual Displays per vGPU |
|---|---|---|---|---|---|---|---|
| RTX8000P-2B | Virtual Desktops | 2048 | 24 | 24 | 17694720 | 5120×2880 | 1 |
| 4096×2160 | 2 | ||||||
| 3840×2160 | 2 | ||||||
| 2560×1600 or lower | 4 | ||||||
| RTX8000P-1B | Virtual Desktops | 1024 | 32 | 32 | 16384000 | 5120×2880 | 1 |
| 4096×2160 | 1 | ||||||
| 3840×2160 | 1 | ||||||
| 2560×1600 or lower | 45 |
C-Series Virtual GPU Types for Quadro RTX 8000 Passive
Required license edition: vCS or vWS
These vGPU types support a single display with a fixed maximum resolution.
| Virtual GPU Type | Intended Use Case | Frame Buffer (MB) | Maximum vGPUs per GPU | Maximum vGPUs per Board | Maximum Display Resolution | Virtual Displays per vGPU |
|---|---|---|---|---|---|---|
| RTX8000P-48C | Training Workloads | 49152 | 1 | 1 | 4096×21602 | 1 |
| RTX8000P-24C | Training Workloads | 24576 | 2 | 2 | 4096×21602 | 1 |
| RTX8000P-16C | Training Workloads | 16384 | 3 | 3 | 4096×21602 | 1 |
| RTX8000P-12C | Training Workloads | 12288 | 4 | 4 | 4096×21602 | 1 |
| RTX8000P-8C | Training Workloads | 8192 | 6 | 6 | 4096×21602 | 1 |
| RTX8000P-6C | Training Workloads | 6144 | 8 | 8 | 4096×21602 | 1 |
| RTX8000P-4C | Inference Workloads | 4096 | 83 | 8 | 4096×21602 | 1 |
A-Series Virtual GPU Types for Quadro RTX 8000 Passive
Required license edition: vApps
These vGPU types support a single display with a fixed maximum resolution.
| Virtual GPU Type | Intended Use Case | Frame Buffer (MB) | Maximum vGPUs per GPU | Maximum vGPUs per Board | Maximum Display Resolution | Virtual Displays per vGPU |
|---|---|---|---|---|---|---|
| RTX8000P-48A | Virtual Applications | 49152 | 1 | 1 | 1280×10246 | 16 |
| RTX8000P-24A | Virtual Applications | 24576 | 2 | 2 | 1280×10246 | 16 |
| RTX8000P-16A | Virtual Applications | 16384 | 3 | 3 | 1280×10246 | 16 |
| RTX8000P-12A | Virtual Applications | 12288 | 4 | 4 | 1280×10246 | 16 |
| RTX8000P-8A | Virtual Applications | 8192 | 6 | 6 | 1280×10246 | 16 |
| RTX8000P-6A | Virtual Applications | 6144 | 8 | 8 | 1280×10246 | 16 |
| RTX8000P-4A | Virtual Applications | 4096 | 12 | 12 | 1280×10246 | 16 |
| RTX8000P-3A | Virtual Applications | 3072 | 16 | 16 | 1280×10246 | 16 |
| RTX8000P-2A | Virtual Applications | 2048 | 24 | 24 | 1280×10246 | 16 |
| RTX8000P-1A | Virtual Applications | 1024 | 3210 | 32 | 1280×10246 | 16 |
A.1.31. Quadro RTX 6000 Virtual GPU Types
Physical GPUs per board: 1
Q-Series Virtual GPU Types for Quadro RTX 6000
Required license edition: vWS
These vGPU types support a maximum combined resolution based on the number of available pixels, which is determined by their frame buffer size. You can choose between using a small number of high resolution displays or a larger number of lower resolution displays with these vGPU types. The maximum number of displays per vGPU is based on a configuration in which all displays have the same resolution. For examples of configurations with a mixture of display resolutions, see Mixed Display Configurations for B-Series and Q-Series vGPUs.
| Virtual GPU Type | Intended Use Case | Frame Buffer (MB) | Maximum vGPUs per GPU | Maximum vGPUs per Board | Available Pixels | Display Resolution | Virtual Displays per vGPU |
|---|---|---|---|---|---|---|---|
| RTX6000-24Q | Virtual Workstations | 24576 | 1 | 1 | 66355200 | 7680×4320 | 2 |
| 5120×2880 or lower | 4 | ||||||
| RTX6000-12Q | Virtual Workstations | 12288 | 2 | 2 | 66355200 | 7680×4320 | 2 |
| 5120×2880 or lower | 4 | ||||||
| RTX6000-8Q | Virtual Workstations | 8192 | 3 | 3 | 66355200 | 7680×4320 | 2 |
| 5120×2880 or lower | 4 | ||||||
| RTX6000-6Q | Virtual Workstations | 6144 | 4 | 4 | 58982400 | 7680×4320 | 1 |
| 5120×2880 or lower | 4 | ||||||
| RTX6000-4Q | Virtual Workstations | 4096 | 6 | 6 | 58982400 | 7680×4320 | 1 |
| 5120×2880 or lower | 4 | ||||||
| RTX6000-3Q | Virtual Workstations | 3072 | 8 | 8 | 35389440 | 7680×4320 | 1 |
| 5120×2880 | 2 | ||||||
| 4096×2160 or lower | 4 | ||||||
| RTX6000-2Q | Virtual Workstations | 2048 | 12 | 12 | 35389440 | 7680×4320 | 1 |
| 5120×2880 | 2 | ||||||
| 4096×2160 or lower | 4 | ||||||
| RTX6000-1Q | Virtual Workstations | 1024 | 24 | 24 | 17694720 | 5120×2880 | 1 |
| 4096×2160 | 2 | ||||||
| 3840×2160 | 2 | ||||||
| 2560×1600 or lower | 4 |
B-Series Virtual GPU Types for Quadro RTX 6000
Required license edition: vPC or vWS
These vGPU types support a maximum combined resolution based on the number of available pixels, which is determined by their frame buffer size. You can choose between using a small number of high resolution displays or a larger number of lower resolution displays with these vGPU types. The maximum number of displays per vGPU is based on a configuration in which all displays have the same resolution. For examples of configurations with a mixture of display resolutions, see Mixed Display Configurations for B-Series and Q-Series vGPUs.
| Virtual GPU Type | Intended Use Case | Frame Buffer (MB) | Maximum vGPUs per GPU | Maximum vGPUs per Board | Available Pixels | Display Resolution | Virtual Displays per vGPU |
|---|---|---|---|---|---|---|---|
| RTX6000-2B | Virtual Desktops | 2048 | 12 | 12 | 17694720 | 5120×2880 | 1 |
| 4096×2160 | 2 | ||||||
| 3840×2160 | 2 | ||||||
| 2560×1600 or lower | 4 | ||||||
| RTX6000-1B | Virtual Desktops | 1024 | 24 | 24 | 16384000 | 5120×2880 | 1 |
| 4096×2160 | 1 | ||||||
| 3840×2160 | 1 | ||||||
| 2560×1600 or lower | 45 |
C-Series Virtual GPU Types for Quadro RTX 6000
Required license edition: vCS or vWS
These vGPU types support a single display with a fixed maximum resolution.
| Virtual GPU Type | Intended Use Case | Frame Buffer (MB) | Maximum vGPUs per GPU | Maximum vGPUs per Board | Maximum Display Resolution | Virtual Displays per vGPU |
|---|---|---|---|---|---|---|
| RTX6000-24C | Training Workloads | 24576 | 1 | 1 | 4096×21602 | 1 |
| RTX6000-12C | Training Workloads | 12288 | 2 | 2 | 4096×21602 | 1 |
| RTX6000-8C | Training Workloads | 8192 | 3 | 3 | 4096×21602 | 1 |
| RTX6000-6C | Training Workloads | 6144 | 4 | 4 | 4096×21602 | 1 |
| RTX6000-4C | Inference Workloads | 4096 | 6 | 6 | 4096×21602 | 1 |
A-Series Virtual GPU Types for Quadro RTX 6000
Required license edition: vApps
These vGPU types support a single display with a fixed maximum resolution.
| Virtual GPU Type | Intended Use Case | Frame Buffer (MB) | Maximum vGPUs per GPU | Maximum vGPUs per Board | Maximum Display Resolution | Virtual Displays per vGPU |
|---|---|---|---|---|---|---|
| RTX6000-24A | Virtual Applications | 24576 | 1 | 1 | 1280×10246 | 16 |
| RTX6000-12A | Virtual Applications | 12288 | 2 | 2 | 1280×10246 | 16 |
| RTX6000-8A | Virtual Applications | 8192 | 3 | 3 | 1280×10246 | 16 |
| RTX6000-6A | Virtual Applications | 6144 | 4 | 4 | 1280×10246 | 16 |
| RTX6000-4A | Virtual Applications | 4096 | 6 | 6 | 1280×10246 | 16 |
| RTX6000-3A | Virtual Applications | 3072 | 8 | 8 | 1280×10246 | 16 |
| RTX6000-2A | Virtual Applications | 2048 | 12 | 12 | 1280×10246 | 16 |
| RTX6000-1A | Virtual Applications | 1024 | 24 | 24 | 1280×10246 | 16 |
A.1.32. Quadro RTX 6000 Passive Virtual GPU Types
Physical GPUs per board: 1
Q-Series Virtual GPU Types for Quadro RTX 6000 Passive
Required license edition: vWS
These vGPU types support a maximum combined resolution based on the number of available pixels, which is determined by their frame buffer size. You can choose between using a small number of high resolution displays or a larger number of lower resolution displays with these vGPU types. The maximum number of displays per vGPU is based on a configuration in which all displays have the same resolution. For examples of configurations with a mixture of display resolutions, see Mixed Display Configurations for B-Series and Q-Series vGPUs.
| Virtual GPU Type | Intended Use Case | Frame Buffer (MB) | Maximum vGPUs per GPU | Maximum vGPUs per Board | Available Pixels | Display Resolution | Virtual Displays per vGPU |
|---|---|---|---|---|---|---|---|
| RTX6000P-24Q | Virtual Workstations | 24576 | 1 | 1 | 66355200 | 7680×4320 | 2 |
| 5120×2880 or lower | 4 | ||||||
| RTX6000P-12Q | Virtual Workstations | 12288 | 2 | 2 | 66355200 | 7680×4320 | 2 |
| 5120×2880 or lower | 4 | ||||||
| RTX6000P-8Q | Virtual Workstations | 8192 | 3 | 3 | 66355200 | 7680×4320 | 2 |
| 5120×2880 or lower | 4 | ||||||
| RTX6000P-6Q | Virtual Workstations | 6144 | 4 | 4 | 58982400 | 7680×4320 | 1 |
| 5120×2880 or lower | 4 | ||||||
| RTX6000P-4Q | Virtual Workstations | 4096 | 6 | 6 | 58982400 | 7680×4320 | 1 |
| 5120×2880 or lower | 4 | ||||||
| RTX6000P-3Q | Virtual Workstations | 3072 | 8 | 8 | 35389440 | 7680×4320 | 1 |
| 5120×2880 | 2 | ||||||
| 4096×2160 or lower | 4 | ||||||
| RTX6000P-2Q | Virtual Workstations | 2048 | 12 | 12 | 35389440 | 7680×4320 | 1 |
| 5120×2880 | 2 | ||||||
| 4096×2160 or lower | 4 | ||||||
| RTX6000P-1Q | Virtual Workstations | 1024 | 24 | 24 | 17694720 | 5120×2880 | 1 |
| 4096×2160 | 2 | ||||||
| 3840×2160 | 2 | ||||||
| 2560×1600 or lower | 4 |
B-Series Virtual GPU Types for Quadro RTX 6000 Passive
Required license edition: vPC or vWS
These vGPU types support a maximum combined resolution based on the number of available pixels, which is determined by their frame buffer size. You can choose between using a small number of high resolution displays or a larger number of lower resolution displays with these vGPU types. The maximum number of displays per vGPU is based on a configuration in which all displays have the same resolution. For examples of configurations with a mixture of display resolutions, see Mixed Display Configurations for B-Series and Q-Series vGPUs.
| Virtual GPU Type | Intended Use Case | Frame Buffer (MB) | Maximum vGPUs per GPU | Maximum vGPUs per Board | Available Pixels | Display Resolution | Virtual Displays per vGPU |
|---|---|---|---|---|---|---|---|
| RTX6000P-2B | Virtual Desktops | 2048 | 12 | 12 | 17694720 | 5120×2880 | 1 |
| 4096×2160 | 2 | ||||||
| 3840×2160 | 2 | ||||||
| 2560×1600 or lower | 4 | ||||||
| RTX6000P-1B | Virtual Desktops | 1024 | 24 | 24 | 16384000 | 5120×2880 | 1 |
| 4096×2160 | 1 | ||||||
| 3840×2160 | 1 | ||||||
| 2560×1600 or lower | 45 |
C-Series Virtual GPU Types for Quadro RTX 6000 Passive
Required license edition: vCS or vWS
These vGPU types support a single display with a fixed maximum resolution.
| Virtual GPU Type | Intended Use Case | Frame Buffer (MB) | Maximum vGPUs per GPU | Maximum vGPUs per Board | Maximum Display Resolution | Virtual Displays per vGPU |
|---|---|---|---|---|---|---|
| RTX6000P-24C | Training Workloads | 24576 | 1 | 1 | 4096×21602 | 1 |
| RTX6000P-12C | Training Workloads | 12288 | 2 | 2 | 4096×21602 | 1 |
| RTX6000P-8C | Training Workloads | 8192 | 3 | 3 | 4096×21602 | 1 |
| RTX6000P-6C | Training Workloads | 6144 | 4 | 4 | 4096×21602 | 1 |
| RTX6000P-4C | Inference Workloads | 4096 | 6 | 6 | 4096×21602 | 1 |
A-Series Virtual GPU Types for Quadro RTX 6000 Passive
Required license edition: vApps
These vGPU types support a single display with a fixed maximum resolution.
| Virtual GPU Type | Intended Use Case | Frame Buffer (MB) | Maximum vGPUs per GPU | Maximum vGPUs per Board | Maximum Display Resolution | Virtual Displays per vGPU |
|---|---|---|---|---|---|---|
| RTX6000P-24A | Virtual Applications | 24576 | 1 | 1 | 1280×10246 | 16 |
| RTX6000P-12A | Virtual Applications | 12288 | 2 | 2 | 1280×10246 | 16 |
| RTX6000P-8A | Virtual Applications | 8192 | 3 | 3 | 1280×10246 | 16 |
| RTX6000P-6A | Virtual Applications | 6144 | 4 | 4 | 1280×10246 | 16 |
| RTX6000P-4A | Virtual Applications | 4096 | 6 | 6 | 1280×10246 | 16 |
| RTX6000P-3A | Virtual Applications | 3072 | 8 | 8 | 1280×10246 | 16 |
| RTX6000P-2A | Virtual Applications | 2048 | 12 | 12 | 1280×10246 | 16 |
| RTX6000P-1A | Virtual Applications | 1024 | 24 | 24 | 1280×10246 | 16 |
A.2. Mixed Display Configurations for B-Series and Q-Series vGPUs
A.2.1. Mixed Display Configurations for B-Series vGPUs
| Virtual GPU Type | Available Pixels | Available Pixel Basis | Maximum Displays | Sample Mixed Display Configurations |
|---|---|---|---|---|
| -2B | 17694720 | 2 4096×2160 displays | 4 | 1 4096×2160 display plus 2 2560×1600 displays |
| -2B4 | 17694720 | 2 4096×2160 displays | 4 | 1 4096×2160 display plus 2 2560×1600 displays |
| -1B | 16384000 | 4 2560×1600 displays | 4 | 1 4096×2160 display plus 1 2560×1600 display |
| -1B4 | 16384000 | 4 2560×1600 displays | 4 | 1 4096×2160 display plus 1 2560×1600 display |
| -0B | 8192000 | 2 2560×1600 displays | 2 | 1 2560×1600 display plus 1 1280×1024 display |
A.2.2. Mixed Display Configurations for Q-Series vGPUs Based on the NVIDIA Maxwell Architecture
| Virtual GPU Type | Available Pixels | Available Pixel Basis | Maximum Displays | Sample Mixed Display Configurations |
|---|---|---|---|---|
| -8Q | 35389440 | 4 4096×2160 displays | 4 | 1 5120×2880 display plus 2 4096×2160 displays |
| -4Q | 35389440 | 4 4096×2160 displays | 4 | 1 5120×2880 display plus 2 4096×2160 displays |
| -2Q | 35389440 | 4 4096×2160 displays | 4 | 1 5120×2880 display plus 2 4096×2160 displays |
| -1Q | 17694720 | 2 4096×2160 displays | 4 | 1 4096×2160 display plus 2 2560×1600 displays |
| -0Q | 8192000 | 2 2560×1600 displays | 2 | 1 2560×1600 display plus 1 1280×1024 display |
A.2.3. Mixed Display Configurations for Q-Series vGPUs Based on Architectures after NVIDIA Maxwell
| Virtual GPU Type | Available Pixels | Available Pixel Basis | Maximum Displays | Sample Mixed Display Configurations |
|---|---|---|---|---|
| -8Q and above | 66355200 | 2 7680×4320 displays | 4 | 1 7680×4320 display plus 2 5120×2880 displays |
| 1 7680×4320 display plus 3 4096×2160 displays | ||||
| -6Q | 58982400 | 4 5120×2880 displays | 4 | 1 7680×4320 display plus 1 5120×2880 display |
| -4Q | 58982400 | 4 5120×2880 displays | 4 | 1 7680×4320 display plus 1 5120×2880 display |
| -3Q | 35389440 | 4 4096×2160 displays | 4 | 1 5120×2880 display plus 2 4096×2160 displays |
| -2Q | 35389440 | 4 4096×2160 displays | 4 | 1 5120×2880 display plus 2 4096×2160 displays |
| -1Q | 17694720 | 2 4096×2160 displays | 4 | 1 4096×2160 display plus 2 2560×1600 displays |
Strategies for allocating physical hardware resources to VMs and vGPUs can improve the performance of VMs running with NVIDIA vGPU. They include strategies for pinning VM CPU cores to physical cores on Non-Uniform Memory Access (NUMA) platforms, allocating VMs to CPUs, and allocating vGPUs to physical GPUs. These allocation strategies are supported by Citrix Hypervisor and VMware vSphere.
B.1. NUMA Considerations
Server platforms typically implement multiple CPU sockets, with system memory and PCI Express expansion slots local to each CPU socket, as illustrated in Figure 31:
Figure 31. A NUMA Server Platform
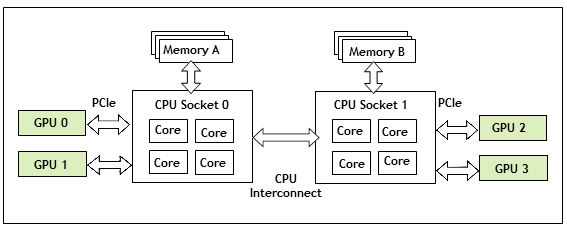
These platforms are typically configured to operate in Non-Uniform Memory Access (NUMA) mode; physical memory is arranged sequentially in the address space, with all the memory attached to each socket appearing in a single contiguous block of addresses. The cost of accessing a range of memory from a CPU or GPU varies; memory attached to the same socket as the CPU or GPU is accessible at lower latency than memory on another CPU socket, because accesses to remote memory must additionally traverse the interconnect between CPU sockets.
B.1.1. Obtaining Best Performance on a NUMA Platform with Citrix Hypervisor
To obtain best performance on a NUMA platform, NVIDIA recommends pinning VM vCPU cores to physical cores on the same CPU socket to which the physical GPU hosting the VM’s vGPU is attached. For example, using as a reference, a VM with a vGPU allocated on physical GPU 0 or 1 should have its vCPUs pinned to CPU cores on CPU socket 0. Similarly, a VM with a vGPU allocated on physical GPU 2 or 3 should have its vCPUs pinned to CPU cores on socket 1.
See Pinning VMs to a specific CPU socket and cores for guidance on pinning vCPUs, and How GPU locality is determined for guidance on determining which CPU socket a GPU is connected to. Controlling the vGPU types enabled on specific physical GPUs describes how to precisely control which physical GPU is used to host a vGPU, by creating GPU groups for specific physical GPUs.
B.1.2. Obtaining Best Performance on a NUMA Platform with VMware vSphere ESXi
For some types of workloads or system configurations, you can optimize performance by specifying the placement of VMs explicitly. For best performance, pin each VM to the NUMA node to which the physical GPU hosting the VM’s vGPU is attached.
The following types of workloads and system configurations benefit from explicit placement of VMs:
- Memory-intensive workloads, such as an in-memory database or an HPC application with a large data set
- A hypervisor host configured with a small number of virtual machines
VMware vSphere ESXi provides the NUMA Node Affinity option for specifying the placement of VMs explicitly. For general information about the options in VMware vSphere ESXi for NUMA placement, see Specifying NUMA Controls in the VMware documentation.
Before setting the NUMA Node Affinity option, run the nvidia-smi topo -m command in the ESXi host shell to determine the NUMA affinity of the GPU device.
After determining the NUMA affinity of the GPU device, set the NUMA Node Affinity option as explained in Associate Virtual Machines with Specified NUMA Nodes in the VMware documentation.
B.2. Maximizing Performance
To maximize performance as the number of vGPU-enabled VMs on the platform increases, NVIDIA recommends adopting a breadth-first allocation: allocate new VMs on the least-loaded CPU socket, and allocate the VM’s vGPU on an available, least-loaded, physical GPU connected via that socket.
Citrix Hypervisor and VMware vSphere ESXi use a different GPU allocation policy by default.
-
Citrix Hypervisor creates GPU groups with a default allocation policy of depth-first.
See Modifying GPU Allocation Policy on Citrix Hypervisor for details on switching the allocation policy to breadth-first.
-
VMware vSphere ESXi creates GPU groups with a default allocation policy of breadth-first.
See Modifying GPU Allocation Policy on VMware vSphere for details on switching the allocation policy to depth-first.
Due to vGPU’s requirement that only one type of vGPU can run on a physical GPU at any given time, not all physical GPUs may be available to host the vGPU type required by the new VM.
x11vnc is a virtual network computing (VNC) server that provides remote access to an existing X session with any VNC viewer. You can use x11vnc to confirm that the NVIDIA GPU in a Linux server to which no display devices are directly connected is working as expected. Examples of servers to which no display devices are directly connected include a VM that is configured with NVIDIA vGPU, a VM that is configured with a pass-through GPU, and a headless physical host in a bare-metal deployment.
Before you begin, ensure that the following prerequisites are met:
- The NVIDIA vGPU software software graphics driver for Linux is installed on the server.
- A secure shell (SSH) client is installed on your local system:
- On Windows, you must use a third-party SSH client such as PuTTY.
- On Linux, you can run the SSH client that is included with the OS from a shell or terminal window.
Configuring x11vnc involves following the sequence of instructions in these sections:
- Configuring the Xorg Server on the Linux Server
- Installing and Configuring x11vnc on the Linux Server
- Using a VNC Client to Connect to the Linux Server
After connecting to the server, you can use NVIDIA X Server Settings to confirm that the NVIDIA GPU is working as expected.
C.1. Configuring the Xorg Server on the Linux Server
You must configure the Xorg server to specify which GPU or vGPU is to be used by the Xorg server if multiple GPUs are installed in your server and to allow the Xorg server to start even if no connected display devices can be detected.
- Log in to the Linux server.
- Determine the PCI bus identifier of the GPUs or vGPUs on the server.
            # nvidia-xconfig --query-gpu-info
Number of GPUs: 1

GPU #0:
  Name      : GRID T4-2Q
  UUID      : GPU-ea80de2d-1dd8-11b2-8305-c955f034e718
  PCI BusID : PCI:2:2:0

  Number of Display Devices: 0
- In a plain text editor, edit the /etc/X11/xorg.conf file to specify the GPU is to be used by the Xorg server and allow the Xorg server to start even if no connected display devices can be detected.
- In the
Devicesection, add the PCI bus identifier of GPU to be used by the Xorg server.Section "Device" Identifier "Device0" Driver "nvidia" VendorName "NVIDIA Corporation" BusID "PCI:2:2:0" EndSection
Note:The three numbers in the PCI BusID obtained by nvidia-xconfig in the previous step are hexadecimal numbers. They must be converted to decimal numbers in the PCI bus identifier in the
Devicesection. For example, if the PCI bus identifier obtained in the previous step is PCI:A:10:0, it must be specified as PCI:10:16:0 in the PCI bus identifier in theDevicesection. - In the
Screensection, ensure that theAllowEmptyInitialConfigurationoption is set toTrue.Section "Screen" Identifier "Screen0" Device "Device0" Option "AllowEmptyInitialConfiguration" "True" EndSection
- In the
- Restart the Xorg server in one of the following ways:
- Restart the server.
- Run the startx command.
- If the Linux server is in run level 3, run the init 5 command to run the server in graphical mode.
- Confirm that the Xorg server is running.
# ps -ef | grep X
On Ubuntu, this command displays output similar to the following example.
            root     16500 16499  2 03:01 tty2     00:00:00 /usr/lib/xorg/Xorg -nolisten tcp :0 -auth /tmp/serverauth.s7CE4mMeIz
root      1140  1126  0 18:46 tty1     00:00:00 /usr/lib/xorg/Xorg vt1 -displayfd 3 -auth /run/user/121/gdm/Xauthority -background none -noreset -keeptty -verbose 3
root     17011 17108  0 18:50 pts/0    00:00:00 grep --color=auto X
On Red Hat Enterprise Linux, this command displays output similar to the following example.
            root      5285  5181  0 16:29 pts/0    00:00:00 grep --color=auto X
root      5880     1  0 Jun13 ?        00:00:00 /usr/bin/abrt-watch-log -F Backtrace /var/log/Xorg.0.log -- /usr/bin/abrt-dump-xorg -xD
root      7039  6289  0 Jun13 tty1     00:00:03 /usr/bin/X :0 -background none -noreset -audit 4 -verbose -auth /run/gdm/auth-for-gdm-vr4MFC/database -seat seat0 vt1
C.2. Installing and Configuring x11vnc on the Linux Server
Unlike other VNC servers, such as TigerVNC or Vino, x11vnc does not create an extra X session for remote access. Instead, x11vnc provides remote access to the existing X session on the Linux server.
- Install the required
x11vncpackage and any dependent packages.-
For distributions based on Red Hat, use the yum package manager to install the
x11vncpackage.# yum install x11vnc
-
For distributions based on Debian, use the apt package manager to install the
x11vncpackage.# sudo apt install x11vnc
-
For SuSE Linux distributions, install x11vnc from the x11vnc openSUSE Software page.
-
- Get the display numbers of the servers for the Xorg server.
            # cat /proc/*/environ 2>/dev/null | tr '\0' '\n' | grep '^DISPLAY=:' | uniq
DISPLAY=:0
DISPLAY=:100
- Start the x11vnc server, specifying the display number to use.
The following example starts the x11vnc server on display 0 on a Linux server that is running the Gnome desktop.
            # x11vnc -display :0 -auth /run/user/121/gdm/Xauthority -forever \
-shared -ncache -bg
Note:If you are using a C-series vGPU, omit the -ncache option.
The x11vnc server starts on display hostname:0, for example,
my-linux-host:0.26/03/20200 04:23:13 The VNC desktop is: my-linux-host:0 PORT=5900
C.3. Using a VNC Client to Connect to the Linux Server
- On your client computer, install a VNC client such as TightVNC.
- Start the VNC client and connect to the Linux server.

The X session on the server opens in the VNC client.

Troubleshooting: If your VNC client cannot connect to the server, change permissions on the Linux server as follows:
- Allow the VNC client to connect to the server by making one of the following changes:
- Disable the firewall and the iptables service.
- Open the VNC port in the firewall.
- Ensure that permissive mode is enabled for Security Enhanced Linux (SELinux).
After connecting to the server, you can use NVIDIA X Server Settings to confirm that the NVIDIA GPU is working as expected.

By default on Windows Server operating systems, the NVIDIA Notification Icon application is started with every Citrix Published Application user session. This application might prevent the Citrix Published Application user session from being logged off even after the user has quit all other applications.
The NVIDIA Notification Icon application appears in Citrix Connection Center on the endpoint client that is running Citrix Receiver or Citrix Workspace.
The following image shows the NVIDIA Notification Icon in Citrix Connection Center for a user session in which the Adobe Acrobat Reader DC and Google Chrome applications are published.

Administrators can disable the NVIDIA Notification Icon application for all users' sessions as explained in Disabling NVIDIA Notification Icon for All Users' Citrix Published Application Sessions.
Individual users can disable the NVIDIA Notification Icon application for their own sessions as explained in Disabling NVIDIA Notification Icon for your Citrix Published Application User Sessions.
If an administrator has enabled the NVIDIA Notification Icon application for the administrator's own session, the application is enabled for all users' sessions, even the sessions of users who have previously disabled the application.
D.1. Disabling NVIDIA Notification Icon for All Users' Citrix Published Application Sessions
Administrators can set a registry key to disable the NVIDIA Notification Icon application for all users' Citrix Published Application sessions on a VM. To ensure that the NVIDIA Notification Icon application is disabled on any virtual delivery agent (VDA) that is created from a master image, set this key in the master image.
Perform this task from the VM on which the Citrix Published Application sessions will be created.
Before you begin, ensure that the NVIDIA vGPU software graphics driver is installed in the VM.
- Set the system-level StartOnLogin Windows registry key to 0.
            [HKEY_LOCAL_MACHINE\SYSTEM\CurrentControlSet\Services\nvlddmkm\NvTray]
Value: "StartOnLogin"
Type: DWORD
Data: 00000000
The data value 0 disables the NVIDIA Notification Icon, and the data value 1 enables it.
- Restart the VM. You must restart the VM to ensure that the registry key is set before the NVIDIA service in the user session starts.
D.2. Disabling NVIDIA Notification Icon for your Citrix Published Application User Sessions
Individual users can disable the NVIDIA Notification Icon for their own Citrix Published Application sessions.
Before you begin, ensure that you are logged on to a Citrix Published Application session.
- Set the current user's StartOnLogin Windows registry key to 0.
            [HKEY_CURRENT_USER\SOFTWARE\NVIDIA Corporation\NvTray\]
Value: "StartOnLogin"
Type: DWORD
Data: 00000000
The data value 0 disables the NVIDIA Notification Icon, and the data value 1 enables it.
- Log off and log on again or restart the VM. You must log on and log off again or restart the VM to ensure that the registry key is set before the NVIDIA service in the user session starts.
To install and configure NVIDIA vGPU software and optimize Citrix Hypervisor operation with vGPU, some basic operations on Citrix Hypervisor are needed.
E.1. Opening a dom0 shell
Most configuration commands must be run in a command shell in the Citrix Hypervisor dom0 domain. You can open a shell in the Citrix Hypervisor dom0 domain in any of the following ways:
- Using the console window in XenCenter
- Using a standalone secure shell (SSH) client
E.1.1. Accessing the dom0 shell through XenCenter
- In the left pane of the XenCenter window, select the Citrix Hypervisor host that you want to connect to.
- Click on the Console tab to open the Citrix Hypervisor console.
- Press Enter to start a shell prompt.
Figure 32. Connecting to the dom0 shell by using XenCenter
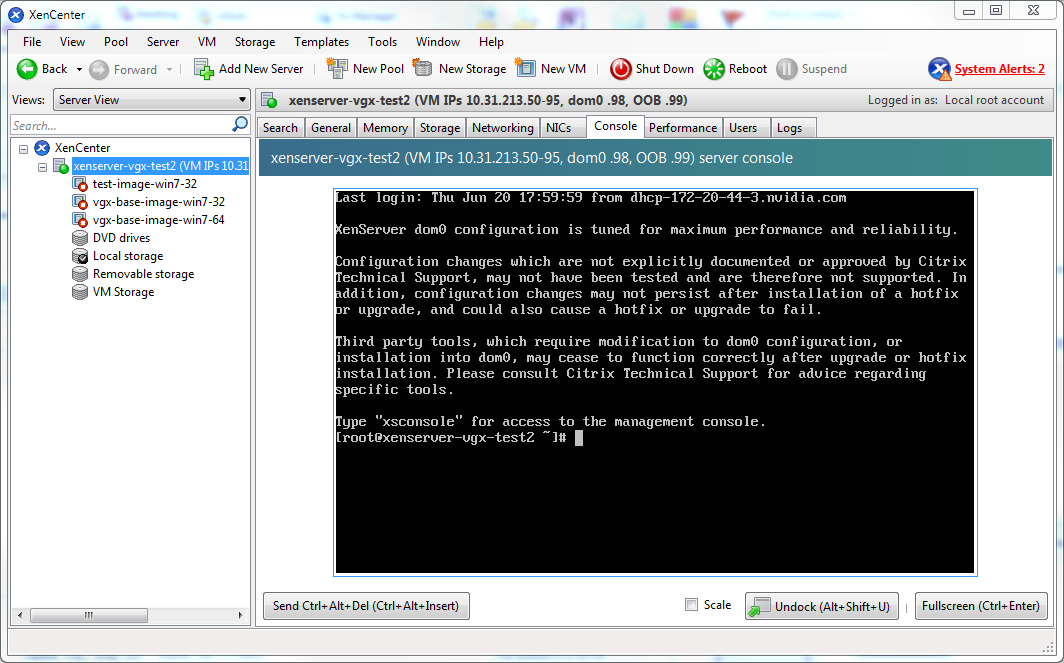
E.1.2. Accessing the dom0 shell through an SSH client
- Ensure that you have an SSH client suite such as PuTTY on Windows, or the SSH client from OpenSSH on Linux.
- Connect your SSH client to the management IP address of the Citrix Hypervisor host.
- Log in as the root user.
E.2. Copying files to dom0
You can easily copy files to and from Citrix Hypervisor dom0 in any of the following ways:
- Using a Secure Copy Protocol (SCP) client
- Using a network-mounted file system
E.2.1. Copying files by using an SCP client
The SCP client to use for copying files to dom0 depends on where you are running the client from.
-
If you are running the client from dom0, use the secure copy command scp.
The scp command is part of the SSH suite of applications. It is implemented in dom0 and can be used to copy from a remote SSH-enabled server:
            [root@xenserver ~]# scp root@10.31.213.96:/tmp/somefile .
The authenticity of host '10.31.213.96 (10.31.213.96)' can't be established.
RSA key fingerprint is 26:2d:9b:b9:bf:6c:81:70:36:76:13:02:c1:82:3d:3c.
Are you sure you want to continue connecting (yes/no)? yes
Warning: Permanently added '10.31.213.96' (RSA) to the list of known hosts.
root@10.31.213.96's password:
somefile                                     100%  532     0.5KB/s   00:00
[root@xenserver ~]#
-
If you are running the client from Windows, use the pscp program.
The pscp program is part of the PuTTY suite and can be used to copy files from a remote Windows system to Citrix Hypervisor:
            C:\Users\nvidia>pscp somefile root@10.31.213.98:/tmp
root@10.31.213.98's password:
somefile             | 80 kB |  80.1 kB/s | ETA: 00:00:00 | 100%

C:\Users\nvidia>
E.2.2. Copying files by using a CIFS-mounted file system
You can copy files to and from a CIFS/SMB file share by mounting the share from dom0.
The following example shows how to mount a network share \\myserver.example.com\myshare at /mnt/myshare on dom0 and how to copy files to and from the share. The example assumes that the file share is part of an Active Directory domain called example.com and that user myuser has permissions to access the share.
- Create the directory /mnt/myshare on dom0.
[root@xenserver ~]# mkdir /mnt/myshare
- Mount the network share \\myserver.example.com\myshare at /mnt/myshare on dom0.
            [root@xenserver ~]# mount -t cifs -o username=myuser,workgroup=example.com //myserver.example.com/myshare /mnt/myshare
Password:
[root@xenserver ~]#
- When prompted for a password, enter the password for
myuserin theexample.comdomain. - After the share has been mounted, copy files to and from the file share by using the cp command to copy them to and from /mnt/myshare:
            [root@xenserver ~]# cp /mnt/myshare/NVIDIA-vGPU-NVIDIA-vGPU-CitrixHypervisor-8.2-510.108.03.x86_64.rpm .
[root@xenserver ~]#
E.3. Determining a VM’s UUID
You can determine a virtual machine’s UUID in any of the following ways:
- Using the xe vm-list command in a dom0 shell
- Using XenCenter
E.3.1. Determining a VM’s UUID by using xe vm-list
Use the xe vm-list command to list all VMs and their associated UUIDs or to find the UUID of a specific named VM.
-
To list all VMs and their associated UUIDs, use
xe vm-listwithout any parameters:[root@xenserver ~]# xe vm-list uuid ( RO) : 6b5585f6-bd74-2e3e-0e11-03b9281c3ade name-label ( RW): vgx-base-image-win7-64 power-state ( RO): halted uuid ( RO) : fa3d15c7-7e88-4886-c36a-cdb23ed8e275 name-label ( RW): test-image-win7-32 power-state ( RO): halted uuid ( RO) : 501bb598-a9b3-4afc-9143-ff85635d5dc3 name-label ( RW): Control domain on host: xenserver power-state ( RO): running uuid ( RO) : 8495adf7-be9d-eee1-327f-02e4f40714fc name-label ( RW): vgx-base-image-win7-32 power-state ( RO): halted
-
To find the UUID of a specific named VM, use the
name-labelparameter to xe vm-list:[root@xenserver ~]# xe vm-list name-label=test-image-win7-32 uuid ( RO) : fa3d15c7-7e88-4886-c36a-cdb23ed8e275 name-label ( RW): test-image-win7-32 power-state ( RO): halted
E.3.2. Determining a VM’s UUID by using XenCenter
- In the left pane of the XenCenter window, select the VM whose UUID you want to determine.
- In the right pane of the XenCenter window, click the General tab.
The UUID is listed in the VM’s General Properties.
Figure 33. Using XenCenter to determine a VM's UUID
E.4. Using more than two vCPUs with Windows client VMs
Windows client operating systems support a maximum of two CPU sockets. When allocating vCPUs to virtual sockets within a guest VM, Citrix Hypervisor defaults to allocating one vCPU per socket. Any more than two vCPUs allocated to the VM won’t be recognized by the Windows client OS.
To ensure that all allocated vCPUs are recognized, set platform:cores-per-socket to the number of vCPUs that are allocated to the VM:
[root@xenserver ~]# xe vm-param-set uuid=vm-uuid platform:cores-per-socket=4 VCPUs-max=4 VCPUs-at-startup=4
vm-uuid is the VM’s UUID, which you can obtain as explained in Determining a VM’s UUID.
E.5. Pinning VMs to a specific CPU socket and cores
- Use xe host-cpu-info to determine the number of CPU sockets and logical CPU cores in the server platform. In this example the server implements 32 logical CPU cores across two sockets:
            [root@xenserver ~]# xe host-cpu-info
cpu_count                : 32
             socket_count: 2
                   vendor: GenuineIntel
                    speed: 2600.064
                modelname: Intel(R) Xeon(R) CPU E5-2670 0 @ 2.60GHz
                   family: 6
                    model: 45
                 stepping: 7
                    flags: fpu de tsc msr pae mce cx8 apic sep mtrr mca cmov pat clflush acpi mmx fxsr sse sse2 ss ht nx constant_tsc nonstop_tsc aperfmperf pni pclmulqdq vmx est ssse3 sse4_1 sse4_2 x2apic popcnt aes hypervisor ida arat tpr_shadow vnmi flexpriority ept vpid
                 features: 17bee3ff-bfebfbff-00000001-2c100800
    features_after_reboot: 17bee3ff-bfebfbff-00000001-2c100800
        physical_features: 17bee3ff-bfebfbff-00000001-2c100800
                 maskable: full
- Set
VCPUs-params:maskto pin a VM’s vCPUs to a specific socket or to specific cores within a socket. This setting persists over VM reboots and shutdowns. In a dual socket platform with 32 total cores, cores 0-15 are on socket 0, and cores 16-31 are on socket 1. In the examples that follow, vm-uuid is the VM’s UUID, which you can obtain as explained in Determining a VM’s UUID.- To restrict a VM to only run on socket 0, set the mask to specify cores 0-15:
[root@xenserver ~]# xe vm-param-set uuid=vm-uuid VCPUs-params:mask=0,1,2,3,4,5,6,7,8,9,10,11,12,13,14,15
- To restrict a VM to only run on socket 1, set the mask to specify cores 16-31:
[root@xenserver ~]# xe vm-param-set uuid=vm-uuid VCPUs-params:mask=16,17,18,19,20,21,22,23,24,25,26,27,28,29,30,31
- To pin vCPUs to specific cores within a socket, set the mask to specify the cores directly:
[root@xenserver ~]# xe vm-param-set uuid=vm-uuid VCPUs-params:mask=16,17,18,19
- To restrict a VM to only run on socket 0, set the mask to specify cores 0-15:
- Use xl vcpu-list to list the current assignment of vCPUs to physical CPUs:
            [root@xenserver ~]# xl vcpu-list
Name                                ID  VCPU   CPU State  Time(s)  CPU Affinity
Domain-0                             0     0   25   -b-   9188.4   any cpu
Domain-0                             0     1   19   r--   8908.4   any cpu
Domain-0                             0     2   30   -b-   6815.1   any cpu
Domain-0                             0     3   17   -b-   4881.4   any cpu
Domain-0                             0     4   22   -b-   4956.9   any cpu
Domain-0                             0     5   20   -b-   4319.2   any cpu
Domain-0                             0     6   28   -b-   5720.0   any cpu
Domain-0                             0     7   26   -b-   5736.0   any cpu
test-image-win7-32                  34     0    9   -b-     17.0   4-15
test-image-win7-32                  34     1    4   -b-     13.7   4-15
E.6. Changing dom0 vCPU Default configuration
By default, dom0 vCPUs are configured as follows:
- The number of vCPUs assigned to dom0 is 8.
- The dom0 shell’s vCPUs are unpinned and able to run on any physical CPU in the system.
E.6.1. Changing the number of dom0 vCPUs
The default number of vCPUs assigned to dom0 is 8.
- Modify the
dom0_max_vcpusparameter in the Xen boot line.For example:
[root@xenserver ~]# /opt/xensource/libexec/xen-cmdline --set-xen dom0_max_vcpus=4
- After applying this setting, reboot the system for the setting to take effect by doing one of the following:
- Run the following command:
shutdown –r
- Reboot the system from XenCenter.
- Run the following command:
E.6.2. Pinning dom0 vCPUs
By default, dom0’s vCPUs are unpinned, and able to run on any physical CPU in the system.
- To pin dom0 vCPUs to specific physical CPUs, use xl vcpu-pin.
For example, to pin dom0’s vCPU 0 to physical CPU 18, use the following command:
[root@xenserver ~]# xl vcpu-pin Domain-0 0 18
CPU pinnings applied this way take effect immediately but do not persist over reboots.
- To make settings persistent, add xl vcpu-pin commands into /etc/rc.local.
For example:
            xl vcpu-pin 0 0 0-15
xl vcpu-pin 0 1 0-15
xl vcpu-pin 0 2 0-15
xl vcpu-pin 0 3 0-15
xl vcpu-pin 0 4 16-31
xl vcpu-pin 0 5 16-31
xl vcpu-pin 0 6 16-31
xl vcpu-pin 0 7 16-31
E.7. How GPU locality is determined
As noted in NUMA Considerations, current multi-socket servers typically implement PCIe expansion slots local to each CPU socket and it is advantageous to pin VMs to the same socket that their associated physical GPU is connected to.
For current Intel platforms, CPU socket 0 typically has its PCIe root ports located on bus 0, so any GPU below a root port located on bus 0 is connected to socket 0. CPU socket 1 has its root ports on a higher bus number, typically bus 0x20 or bus 0x80 depending on the specific server platform.
You can perform Citrix Hypervisor advanced vGPU management techniques by using XenCenter and by using xe command line operations.
F.1. Management objects for GPUs
Citrix Hypervisor uses four underlying management objects for GPUs: physical GPUs, vGPU types, GPU groups, and vGPUs. These objects are used directly when managing vGPU by using xe, and indirectly when managing vGPU by using XenCenter.
F.1.1.
pgpu
- Physical GPU
A pgpu object represents a physical GPU, such as one of the multiple GPUs present on a Tesla M60 or M10 card. Citrix Hypervisor automatically creates pgpu objects at startup to represent each physical GPU present on the platform.
F.1.1.1. Listing the
pgpu
Objects Present on a Platform
To list the physical GPU objects present on a platform, use xe pgpu-list.
For example, this platform contains a Tesla P40 card with a single physical GPU and a Tesla M60 card with two physical GPUs:
            [root@xenserver ~]# xe pgpu-list
uuid ( RO)              : f76d1c90-e443-4bfc-8f26-7959a7c85c68
       vendor-name ( RO): NVIDIA Corporation
       device-name ( RO): GP102GL [Tesla P40]
    gpu-group-uuid ( RW): 134a7b71-5ceb-8066-ef1b-3b319fb2bef3

uuid ( RO)              : 4c5e05d9-60fa-4fe5-9cfc-c641e95c8e85
       vendor-name ( RO): NVIDIA Corporation
       device-name ( RO): GM204GL [Tesla M60]
    gpu-group-uuid ( RW): 3df80574-c303-f020-efb3-342f969da5de

uuid ( RO)              : 4960e63c-c9fe-4a25-add4-ee697263e04c
       vendor-name ( RO): NVIDIA Corporation
       device-name ( RO): GM204GL [Tesla M60]
    gpu-group-uuid ( RW): d32560f2-2158-42f9-d201-511691e1cb2b
[root@xenserver ~]#
F.1.1.2. Viewing Detailed Information About a
pgpu
Object
To view detailed information about a pgpu, use xe pgpu-param-list:
            [root@xenserver ~]# xe pgpu-param-list uuid=4960e63c-c9fe-4a25-add4-ee697263e04c
uuid ( RO)                        : 4960e63c-c9fe-4a25-add4-ee697263e04c
                 vendor-name ( RO): NVIDIA Corporation
                 device-name ( RO): GM204GL [Tesla M60]
                 dom0-access ( RO): enabled
    is-system-display-device ( RO): false
              gpu-group-uuid ( RW): d32560f2-2158-42f9-d201-511691e1cb2b
        gpu-group-name-label ( RO): 86:00.0 VGA compatible controller: NVIDIA Corporation GM204GL   [Tesla M60] (rev a1)
                   host-uuid ( RO): b55452df-1ee4-4e4e-bd97-3aee97b2123a
             host-name-label ( RO): xs7.1
                      pci-id ( RO): 0000:86:00.0
                dependencies (SRO):
                other-config (MRW):
        supported-VGPU-types ( RO): 5b9acd25-06fa-43e1-8b53-c35bceb8515c; 16326fcb-543f-4473-a4ae-2d30516a2779; 0f9fc39a-0758-43c8-88cc-54c8491aa4d4; cecb2033-3b4a-437c-a0c0-c9dfdb692d9b; 095d8939-5f84-405d-a39a-684738f9b957; 56c335be-4036-4a38-816c-c246a60556ac; ef0a94fd-2230-4fd4-aee0-d6d3f6ced4ef; 11615f73-47b8-4494-806e-2a7b5e1d7bea; dbd8f2ac-f548-4c40-804b-9133cfda8090; a33189f1-1417-4593-aa7d-978c4f25b953; 3f437337-3682-4897-a7ba-6334519f4c19; 99900aab-42b0-4cc4-8832-560ff6b60231
          enabled-VGPU-types (SRW): 5b9acd25-06fa-43e1-8b53-c35bceb8515c; 16326fcb-543f-4473-a4ae-2d30516a2779; 0f9fc39a-0758-43c8-88cc-54c8491aa4d4; cecb2033-3b4a-437c-a0c0-c9dfdb692d9b; 095d8939-5f84-405d-a39a-684738f9b957; 56c335be-4036-4a38-816c-c246a60556ac; ef0a94fd-2230-4fd4-aee0-d6d3f6ced4ef; 11615f73-47b8-4494-806e-2a7b5e1d7bea; dbd8f2ac-f548-4c40-804b-9133cfda8090; a33189f1-1417-4593-aa7d-978c4f25b953; 3f437337-3682-4897-a7ba-6334519f4c19; 99900aab-42b0-4cc4-8832-560ff6b60231
              resident-VGPUs ( RO):
[root@xenserver ~]#
F.1.1.3. Viewing physical GPUs in XenCenter
To view physical GPUs in XenCenter, click on the server’s GPU tab:
Figure 34. Physical GPU display in XenCenter
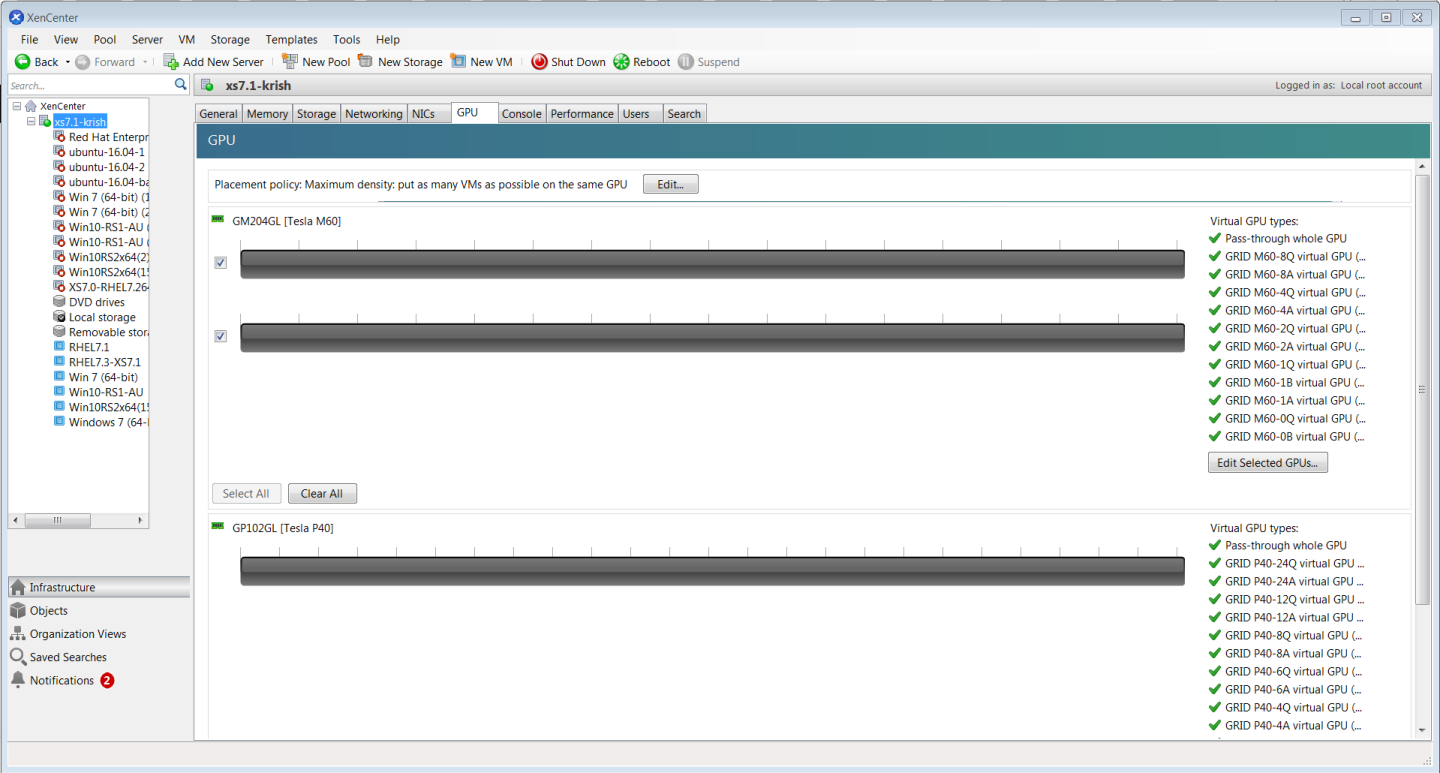
F.1.2.
vgpu-type
- Virtual GPU Type
A vgpu-type represents a type of virtual GPU, such as M60-0B, P40-8A, and P100-16Q. An additional, pass-through vGPU type is defined to represent a physical GPU that is directly assignable to a single guest VM.
Citrix Hypervisor automatically creates vgpu-type objects at startup to represent each virtual type supported by the physical GPUs present on the platform.
F.1.2.1. Listing the
vgpu-type
Objects Present on a Platform
To list the vgpu-type objects present on a platform, use xe vgpu-type-list.
For example, as this platform contains Tesla P100, Tesla P40, and Tesla M60 cards, the vGPU types reported are the types supported by these cards:
            [root@xenserver ~]# xe vgpu-type-list
uuid ( RO)              : d27f84a2-53f8-4430-ad15-0eca225cd974
       vendor-name ( RO): NVIDIA Corporation
        model-name ( RO): GRID P40-12A
         max-heads ( RO): 1
    max-resolution ( RO): 1280x1024


uuid ( RO)              : 57bb231f-f61b-408e-a0c0-106bddd91019
       vendor-name ( RO): NVIDIA Corporation
        model-name ( RO): GRID P40-3Q
         max-heads ( RO): 4
    max-resolution ( RO): 4096x2160


uuid ( RO)              : 9b2eaba5-565f-4cb4-ad9b-6347cfb03e93
       vendor-name ( RO): NVIDIA Corporation
        model-name ( RO): GRID P40-2Q
         max-heads ( RO): 4
    max-resolution ( RO): 4096x2160


uuid ( RO)              : af593219-0800-42da-a51d-d13b35f589e1
       vendor-name ( RO): NVIDIA Corporation
        model-name ( RO): GRID P40-4A
         max-heads ( RO): 1
    max-resolution ( RO): 1280x1024


uuid ( RO)              : 5b9acd25-06fa-43e1-8b53-c35bceb8515c
       vendor-name ( RO):
        model-name ( RO): passthrough
         max-heads ( RO): 0
    max-resolution ( RO): 0x0


uuid ( RO)              : af121387-0b58-498a-8d04-fe0305e4308f
       vendor-name ( RO): NVIDIA Corporation
        model-name ( RO): GRID P40-3A
         max-heads ( RO): 1
    max-resolution ( RO): 1280x1024


uuid ( RO)              : 3b28a628-fd6c-4cda-b0fb-80165699229e
       vendor-name ( RO): NVIDIA Corporation
        model-name ( RO): GRID P100-4Q
         max-heads ( RO): 4
    max-resolution ( RO): 4096x2160


uuid ( RO)              : 99900aab-42b0-4cc4-8832-560ff6b60231
       vendor-name ( RO): NVIDIA Corporation
        model-name ( RO): GRID M60-1Q
         max-heads ( RO): 2
    max-resolution ( RO): 4096x2160


uuid ( RO)              : 0f9fc39a-0758-43c8-88cc-54c8491aa4d4
       vendor-name ( RO): NVIDIA Corporation
        model-name ( RO): GRID M60-4A
         max-heads ( RO): 1
    max-resolution ( RO): 1280x1024


uuid ( RO)              : 4017c9dd-373f-431a-b36f-50e4e5c9f0c0
       vendor-name ( RO): NVIDIA Corporation
        model-name ( RO): GRID P40-6A
         max-heads ( RO): 1
    max-resolution ( RO): 1280x1024


uuid ( RO)              : 125fbbdf-406e-4d7c-9de8-a7536aa1a838
       vendor-name ( RO): NVIDIA Corporation
        model-name ( RO): GRID P40-24A
         max-heads ( RO): 1
    max-resolution ( RO): 1280x1024


uuid ( RO)              : 88162a34-1151-49d3-98ae-afcd963f3105
       vendor-name ( RO): NVIDIA Corporation
        model-name ( RO): GRID P40-2A
         max-heads ( RO): 1
    max-resolution ( RO): 1280x1024


uuid ( RO)              : ad00a95c-d066-4158-b361-487abf57dd30
       vendor-name ( RO): NVIDIA Corporation
        model-name ( RO): GRID P40-1A
         max-heads ( RO): 1
    max-resolution ( RO): 1280x1024


uuid ( RO)              : 11615f73-47b8-4494-806e-2a7b5e1d7bea
       vendor-name ( RO): NVIDIA Corporation
        model-name ( RO): GRID M60-0Q
         max-heads ( RO): 2
    max-resolution ( RO): 2560x1600


uuid ( RO)              : 6ea0cd56-526c-4966-8f53-7e1721b95a5c
       vendor-name ( RO): NVIDIA Corporation
        model-name ( RO): GRID P40-4Q
         max-heads ( RO): 4
    max-resolution ( RO): 4096x2160


uuid ( RO)              : 095d8939-5f84-405d-a39a-684738f9b957
       vendor-name ( RO): NVIDIA Corporation
        model-name ( RO): GRID M60-4Q
         max-heads ( RO): 4
    max-resolution ( RO): 4096x2160


uuid ( RO)              : 9626e649-6802-4396-976d-94c0ead1f835
       vendor-name ( RO): NVIDIA Corporation
        model-name ( RO): GRID P40-12Q
         max-heads ( RO): 4
    max-resolution ( RO): 4096x2160


uuid ( RO)              : a33189f1-1417-4593-aa7d-978c4f25b953
       vendor-name ( RO): NVIDIA Corporation
        model-name ( RO): GRID M60-0B
         max-heads ( RO): 2
    max-resolution ( RO): 2560x1600


uuid ( RO)              : dbd8f2ac-f548-4c40-804b-9133cfda8090
       vendor-name ( RO): NVIDIA Corporation
        model-name ( RO): GRID M60-1A
         max-heads ( RO): 1
    max-resolution ( RO): 1280x1024


uuid ( RO)              : ef0a94fd-2230-4fd4-aee0-d6d3f6ced4ef
       vendor-name ( RO): NVIDIA Corporation
        model-name ( RO): GRID M60-8Q
         max-heads ( RO): 4
    max-resolution ( RO): 4096x2160


uuid ( RO)              : 67fa06ab-554e-452b-a66e-a4048a5bfdf7
       vendor-name ( RO): NVIDIA Corporation
        model-name ( RO): GRID P40-6Q
         max-heads ( RO): 4
    max-resolution ( RO): 4096x2160


uuid ( RO)              : 739d7b8e-50e2-48a1-ae0d-5047aa490f0e
       vendor-name ( RO): NVIDIA Corporation
        model-name ( RO): GRID P40-8A
         max-heads ( RO): 1
    max-resolution ( RO): 1280x1024


uuid ( RO)              : 9fb62f31-7dfb-46f8-a4a9-cca8db48147e
       vendor-name ( RO): NVIDIA Corporation
        model-name ( RO): GRID P100-8Q
         max-heads ( RO): 4
    max-resolution ( RO): 4096x2160


uuid ( RO)              : 56c335be-4036-4a38-816c-c246a60556ac
       vendor-name ( RO): NVIDIA Corporation
        model-name ( RO): GRID M60-1B
         max-heads ( RO): 4
    max-resolution ( RO): 2560x1600


uuid ( RO)              : 3f437337-3682-4897-a7ba-6334519f4c19
       vendor-name ( RO): NVIDIA Corporation
        model-name ( RO): GRID M60-8A
         max-heads ( RO): 1
    max-resolution ( RO): 1280x1024


uuid ( RO)              : 25dbb2d3-a074-4f9f-92ce-b42d8b3d1de2
       vendor-name ( RO): NVIDIA Corporation
        model-name ( RO): GRID P40-1B
         max-heads ( RO): 4
    max-resolution ( RO): 2560x1600


uuid ( RO)              : cecb2033-3b4a-437c-a0c0-c9dfdb692d9b
       vendor-name ( RO): NVIDIA Corporation
        model-name ( RO): GRID M60-2Q
         max-heads ( RO): 4
    max-resolution ( RO): 4096x2160


uuid ( RO)              : 16326fcb-543f-4473-a4ae-2d30516a2779
       vendor-name ( RO): NVIDIA Corporation
        model-name ( RO): GRID M60-2A
         max-heads ( RO): 1
    max-resolution ( RO): 1280x1024


uuid ( RO)              : 7ca2399f-89ab-49dd-bf96-75071ced28fc
       vendor-name ( RO): NVIDIA Corporation
        model-name ( RO): GRID P40-24Q
         max-heads ( RO): 4
    max-resolution ( RO): 4096x2160


uuid ( RO)              : 9611a3f4-d130-4a66-a61b-21d4a2ca4663
       vendor-name ( RO): NVIDIA Corporation
        model-name ( RO): GRID P40-8Q
         max-heads ( RO): 4
    max-resolution ( RO): 4096x2160


uuid ( RO)              : d0e4a116-a944-42ef-a8dc-62a54c4d2d77
       vendor-name ( RO): NVIDIA Corporation
        model-name ( RO): GRID P40-1Q
         max-heads ( RO): 2
    max-resolution ( RO): 4096x2160

[root@xenserver ~]#
F.1.2.2. Viewing Detailed Information About a
vgpu-type
Object
To see detailed information about a vgpu-type, use xe vgpu-type-param-list:
            [root@xenserver ~]# xe xe vgpu-type-param-list uuid=7ca2399f-89ab-49dd-bf96-75071ced28fc
uuid ( RO)                       : 7ca2399f-89ab-49dd-bf96-75071ced28fc
                vendor-name ( RO): NVIDIA Corporation
                 model-name ( RO): GRID P40-24Q
           framebuffer-size ( RO): 24092082176
                  max-heads ( RO): 4
             max-resolution ( RO): 4096x2160
         supported-on-PGPUs ( RO): f76d1c90-e443-4bfc-8f26-7959a7c85c68
           enabled-on-PGPUs ( RO): f76d1c90-e443-4bfc-8f26-7959a7c85c68
    supported-on-GPU-groups ( RO): 134a7b71-5ceb-8066-ef1b-3b319fb2bef3
      enabled-on-GPU-groups ( RO): 134a7b71-5ceb-8066-ef1b-3b319fb2bef3
                 VGPU-uuids ( RO):
               experimental ( RO): false
[root@xenserver ~]#
F.1.3.
gpu-group
- collection of physical GPUs
A gpu-group is a collection of physical GPUs, all of the same type. Citrix Hypervisor automatically creates gpu-group objects at startup to represent the distinct types of physical GPU present on the platform.
F.1.3.1. Listing the
gpu-group
Objects Present on a Platform
To list the gpu-group objects present on a platform, use xe gpu-group-list.
For example, a system with a single Tesla P100 card, a single Tesla P40 card, and two Tesla M60 cards contains a single GPU group of type Tesla P100, a single GPU group of type Tesla P40, and two GPU groups of type Tesla M60:
            [root@xenserver ~]# xe gpu-group-list
uuid ( RO)                : 3d652a59-beaf-ddb3-3b19-c8c77ef60605
          name-label ( RW): Group of NVIDIA Corporation GP100GL [Tesla P100 PCIe 16GB] GPUs
    name-description ( RW):

uuid ( RO)                : 3df80574-c303-f020-efb3-342f969da5de
          name-label ( RW): 85:00.0 VGA compatible controller: NVIDIA Corporation GM204GL [Tesla M60] (rev a1)
    name-description ( RW): 85:00.0 VGA compatible controller: NVIDIA Corporation GM204GL [Tesla M60] (rev a1)

uuid ( RO)                : 134a7b71-5ceb-8066-ef1b-3b319fb2bef3
          name-label ( RW): 87:00.0 3D controller: NVIDIA Corporation GP102GL [TESLA P40] (rev a1)
    name-description ( RW): 87:00.0 3D controller: NVIDIA Corporation GP102GL [TESLA P40] (rev a1)

uuid ( RO)                : d32560f2-2158-42f9-d201-511691e1cb2b
          name-label ( RW): 86:00.0 VGA compatible controller: NVIDIA Corporation GM204GL [Tesla M60] (rev a1)
    name-description ( RW): 86:00.0 VGA compatible controller: NVIDIA Corporation GM204GL [Tesla M60] (rev a1)
[root@xenserver ~]#
F.1.3.2. Viewing Detailed Information About a
gpu-group
Object
To view detailed information about a gpu-group, use xe gpu-group-param-list:
            [root@xenserver ~]# xe gpu-group-param-list uuid=134a7b71-5ceb-8066-ef1b-3b319fb2bef3
uuid ( RO)                    : 134a7b71-5ceb-8066-ef1b-3b319fb2bef3
              name-label ( RW): 87:00.0 3D controller: NVIDIA Corporation GP102GL [TESLA P40] (rev a1)
        name-description ( RW): 87:00.0 3D controller: NVIDIA Corporation GP102GL [TESLA P40] (rev a1)
              VGPU-uuids (SRO): 101fb062-427f-1999-9e90-5a914075e9ca
              PGPU-uuids (SRO): f76d1c90-e443-4bfc-8f26-7959a7c85c68
            other-config (MRW):
      enabled-VGPU-types ( RO): d0e4a116-a944-42ef-a8dc-62a54c4d2d77; 9611a3f4-d130-4a66-a61b-21d4a2ca4663; 7ca2399f-89ab-49dd-bf96-75071ced28fc; 25dbb2d3-a074-4f9f-92ce-b42d8b3d1de2; 739d7b8e-50e2-48a1-ae0d-5047aa490f0e; 67fa06ab-554e-452b-a66e-a4048a5bfdf7; 9626e649-6802-4396-976d-94c0ead1f835; 6ea0cd56-526c-4966-8f53-7e1721b95a5c; ad00a95c-d066-4158-b361-487abf57dd30; 88162a34-1151-49d3-98ae-afcd963f3105; 125fbbdf-406e-4d7c-9de8-a7536aa1a838; 4017c9dd-373f-431a-b36f-50e4e5c9f0c0; af121387-0b58-498a-8d04-fe0305e4308f; 5b9acd25-06fa-43e1-8b53-c35bceb8515c; af593219-0800-42da-a51d-d13b35f589e1; 9b2eaba5-565f-4cb4-ad9b-6347cfb03e93; 57bb231f-f61b-408e-a0c0-106bddd91019; d27f84a2-53f8-4430-ad15-0eca225cd974
    supported-VGPU-types ( RO): d0e4a116-a944-42ef-a8dc-62a54c4d2d77; 9611a3f4-d130-4a66-a61b-21d4a2ca4663; 7ca2399f-89ab-49dd-bf96-75071ced28fc; 25dbb2d3-a074-4f9f-92ce-b42d8b3d1de2; 739d7b8e-50e2-48a1-ae0d-5047aa490f0e; 67fa06ab-554e-452b-a66e-a4048a5bfdf7; 9626e649-6802-4396-976d-94c0ead1f835; 6ea0cd56-526c-4966-8f53-7e1721b95a5c; ad00a95c-d066-4158-b361-487abf57dd30; 88162a34-1151-49d3-98ae-afcd963f3105; 125fbbdf-406e-4d7c-9de8-a7536aa1a838; 4017c9dd-373f-431a-b36f-50e4e5c9f0c0; af121387-0b58-498a-8d04-fe0305e4308f; 5b9acd25-06fa-43e1-8b53-c35bceb8515c; af593219-0800-42da-a51d-d13b35f589e1; 9b2eaba5-565f-4cb4-ad9b-6347cfb03e93; 57bb231f-f61b-408e-a0c0-106bddd91019; d27f84a2-53f8-4430-ad15-0eca225cd974
    allocation-algorithm ( RW): depth-first
[root@xenserver ~]
F.1.4.
vgpu
- Virtual GPU
A vgpu object represents a virtual GPU. Unlike the other GPU management objects, vgpu objects are not created automatically by Citrix Hypervisor. Instead, they are created as follows:
- When a VM is configured through XenCenter or through xe to use a vGPU
- By cloning a VM that is configured to use vGPU, as explained in Cloning vGPU-Enabled VMs
F.2. Creating a vGPU Using xe
Use xe vgpu-create to create a vgpu object, specifying the type of vGPU required, the GPU group it will be allocated from, and the VM it is associated with:
            [root@xenserver ~]# xe vgpu-create vm-uuid=e71afda4-53f4-3a1b-6c92-a364a7f619c2 gpu-group-uuid=be825ba2-01d7-8d51-9780-f82cfaa64924 vgpu-type-uuid=3f318889-7508-c9fd-7134-003d4d05ae56b73cbd30-096f-8a9a-523e-a800062f4ca7
[root@xenserver ~]#
Creating the vgpu object for a VM does not immediately cause a virtual GPU to be created on a physical GPU. Instead, the vgpu object is created whenever its associated VM is started. For more details on how vGPUs are created at VM startup, see Controlling vGPU allocation.
The owning VM must be in the powered-off state in order for the vgpu-create command to succeed.
A vgpu object’s owning VM, associated GPU group, and vGPU type are fixed at creation and cannot be subsequently changed. To change the type of vGPU allocated to a VM, delete the existing vgpu object and create another one.
F.3. Controlling vGPU allocation
Configuring a VM to use a vGPU in XenCenter, or creating a vgpu object for a VM using xe, does not immediately cause a virtual GPU to be created; rather, the virtual GPU is created at the time the VM is next booted, using the following steps:
- The GPU group that the
vgpuobject is associated with is checked for a physical GPU that can host a vGPU of the required type (i.e. thevgpuobject’s associatedvgpu-type). Because vGPU types cannot be mixed on a single physical GPU, the new vGPU can only be created on a physical GPU that has no vGPUs resident on it, or only vGPUs of the same type, and less than the limit of vGPUs of that type that the physical GPU can support. - If no such physical GPUs exist in the group, the
vgpucreation fails and the VM startup is aborted. - Otherwise, if more than one such physical GPU exists in the group, a physical GPU is selected according to the GPU group’s allocation policy, as described in Modifying GPU Allocation Policy.
F.3.1. Determining the Physical GPU on Which a Virtual GPU is Resident
The vgpu object’s resident-on parameter returns the UUID of the pgpu object for the physical GPU the vGPU is resident on.
To determine the physical GPU that a virtual GPU is resident on, use vgpu-param-get:
            [root@xenserver ~]# xe vgpu-param-get uuid=101fb062-427f-1999-9e90-5a914075e9ca param-name=resident-on
f76d1c90-e443-4bfc-8f26-7959a7c85c68

[root@xenserver ~]# xe pgpu-param-list uuid=f76d1c90-e443-4bfc-8f26-7959a7c85c68
uuid ( RO)                        : f76d1c90-e443-4bfc-8f26-7959a7c85c68
                 vendor-name ( RO): NVIDIA Corporation
                 device-name ( RO): GP102GL [Tesla P40]
              gpu-group-uuid ( RW): 134a7b71-5ceb-8066-ef1b-3b319fb2bef3
        gpu-group-name-label ( RO): 87:00.0 3D controller: NVIDIA Corporation GP102GL [TESLA P40] (rev a1)
                   host-uuid ( RO): b55452df-1ee4-4e4e-bd97-3aee97b2123a
             host-name-label ( RO): xs7.1-krish
                      pci-id ( RO): 0000:87:00.0
                dependencies (SRO):
                other-config (MRW):
        supported-VGPU-types ( RO): 5b9acd25-06fa-43e1-8b53-c35bceb8515c; 88162a34-1151-49d3-98ae-afcd963f3105; 9b2eaba5-565f-4cb4-ad9b-6347cfb03e93; 739d7b8e-50e2-48a1-ae0d-5047aa490f0e; d0e4a116-a944-42ef-a8dc-62a54c4d2d77; 7ca2399f-89ab-49dd-bf96-75071ced28fc; 67fa06ab-554e-452b-a66e-a4048a5bfdf7; 9611a3f4-d130-4a66-a61b-21d4a2ca4663; d27f84a2-53f8-4430-ad15-0eca225cd974; 125fbbdf-406e-4d7c-9de8-a7536aa1a838; 4017c9dd-373f-431a-b36f-50e4e5c9f0c0; 6ea0cd56-526c-4966-8f53-7e1721b95a5c; af121387-0b58-498a-8d04-fe0305e4308f; 9626e649-6802-4396-976d-94c0ead1f835; ad00a95c-d066-4158-b361-487abf57dd30; af593219-0800-42da-a51d-d13b35f589e1; 25dbb2d3-a074-4f9f-92ce-b42d8b3d1de2; 57bb231f-f61b-408e-a0c0-106bddd91019
          enabled-VGPU-types (SRW): 5b9acd25-06fa-43e1-8b53-c35bceb8515c; 88162a34-1151-49d3-98ae-afcd963f3105; 9b2eaba5-565f-4cb4-ad9b-6347cfb03e93; 739d7b8e-50e2-48a1-ae0d-5047aa490f0e; d0e4a116-a944-42ef-a8dc-62a54c4d2d77; 7ca2399f-89ab-49dd-bf96-75071ced28fc; 67fa06ab-554e-452b-a66e-a4048a5bfdf7; 9611a3f4-d130-4a66-a61b-21d4a2ca4663; d27f84a2-53f8-4430-ad15-0eca225cd974; 125fbbdf-406e-4d7c-9de8-a7536aa1a838; 4017c9dd-373f-431a-b36f-50e4e5c9f0c0; 6ea0cd56-526c-4966-8f53-7e1721b95a5c; af121387-0b58-498a-8d04-fe0305e4308f; 9626e649-6802-4396-976d-94c0ead1f835; ad00a95c-d066-4158-b361-487abf57dd30; af593219-0800-42da-a51d-d13b35f589e1; 25dbb2d3-a074-4f9f-92ce-b42d8b3d1de2; 57bb231f-f61b-408e-a0c0-106bddd91019
              resident-VGPUs ( RO): 101fb062-427f-1999-9e90-5a914075e9ca
[root@xenserver ~]#
If the vGPU is not currently running, the resident-on parameter is not instantiated for the vGPU, and the vgpu-param-get operation returns:
<not in database>
F.3.2. Controlling the vGPU types enabled on specific physical GPUs
Physical GPUs support several vGPU types, as defined in Virtual GPU Types for Supported GPUs and the “pass-through” type that is used to assign an entire physical GPU to a VM (see Using GPU Pass-Through on Citrix Hypervisor).
F.3.2.1. Controlling vGPU types enabled on specific physical GPUs by using XenCenter
To limit the types of vGPU that may be created on a specific physical GPU:
- Open the server’s GPU tab in XenCenter.
- Select the box beside one or more GPUs on which you want to limit the types of vGPU.
- Select Edit Selected GPUs.
Figure 35. Editing a GPU’s enabled vGPU types using XenCenter

F.3.2.2. Controlling vGPU Types Enabled on Specific Physical GPUs by Using xe
The physical GPU’s pgpu object’s enabled-vGPU-types parameter controls the vGPU types enabled on specific physical GPUs.
To modify the pgpu object’s enabled-vGPU-types parameter , use xe pgpu-param-set:
            [root@xenserver ~]# xe pgpu-param-list uuid=cb08aaae-8e5a-47cb-888e-60dcc73c01d3
uuid ( RO)	                : cb08aaae-8e5a-47cb-888e-60dcc73c01d3
             vendor-name ( RO): NVIDIA Corporation
			 device-name ( RO): GP102GL [Tesla P40]
             domO-access ( RO): enabled
is-system-display-device ( RO): false
          gpu-group-uuid ( RW): bfel603d-c526-05f3-e64f-951485ef3b49
	gpu-group-name-label ( RO): 87:00.0 3D controller: NVIDIA Corporation GP102GL [Tesla P40] (rev al)
	           host-uuid ( RO): fdeb6bbb-e460-4cfl-ad43-49ac81c20540
		 host-name-label ( RO): xs-72
                  pci-id ( RO): 0000:87:00.0
			dependencies (SRO):
			other-config (MRW):
    supported-VGPU-types ( RO): 23e6b80b-le5e-4c33-bedb-e6dlae472fec; f5583e39-2540-440d-a0ee-dde9f0783abf; al8e46ff-4d05-4322-b040-667ce77d78a8; adell9a9-84el-435f-b0e9-14cl62e212fb; 2560d066-054a-48a9-a44d-3f3f90493a00; 47858f38-045d-4a05-9blc-9128fee6b0ab; Ifb527f6-493f-442b-abe2-94a6fafd49ce; 78b8e044-09ae-4a4c-8a96-b20c7a585842; 18ed7e7e-f8b7-496e-9784-8ba4e35acaa3; 48681d88-c4e5-4e39-85ff-c9bal2e8e484 ; cc3dbbfb-4b83-400d-8c52-811948b7f8c4; 8elad75a-ed5f-4609-83ff-5f9bca9aaca2; 840389a0-f511-4f90-8153-8a749d85b09e; a2042742-da67-4613-a538-ldl7d30dccb9; 299e47c2-8fcl-4edf-aa31-e29db84168c6; e95c636e-06e6-4 47e-8b49-14b37d308922; 0524a5d0-7160-48c5-a9el-cc33e76dc0de; 09043fb2-6d67-4443-b312-25688f13e012
      enabled-VGPU-types (SRW): 23e6b80b-le5e-4c33-bedb-e6dlae472fec; f5583e39-2540-440d-a0ee-dde9f0783abf; al8e46ff-4d05-4322-b040-667ce77d78a8; adell9a9-84el-435f-b0e9-14cl62e212fb; 2560d066-054a-48a9-a44d-3f3f90493a00; 47858f38-045d-4a05-9blc-9128fee6b0ab; Ifb527f6-493f-442b-abe2-94a6fafd49ce; 78b8e044-09ae-4a4c-8a96-b20c7a585842; 18ed7e7e-f8b7-496e-9784-8ba4e35acaa3; 48681d88-c4e5-4e39-85ff-c9bal2e8e484 ; cc3dbbfb-4b83-400d-8c52-811948b7f8c4; 8elad75a-ed5f-4609-83ff-5f9bca9aaca2; 840389a0-f511-4f90-8153-8a749d85b09e; a2042742-da67-4613-a538-ldl7d30dccb9; 299e47c2-8fcl-4edf-aa31-e29db84168c6; e95c636e-06e6-4 47e-8b49-14b37d308922; 0524a5d0-7160-48c5-a9el-cc33e76dc0de; 09043fb2-6d67-4443-b312-25688f13e012
	      resident-VGPUs ( RO):

[root@xenserver-vgx-test ~]#  xe pgpu-param-set uuid=cb08aaae-8e5a-47cb-888e-60dcc73c01d3 enabled-VGPU-types=23e6b80b-le5e-4c33-bedb-e6dlae472fec
F.3.3. Creating vGPUs on Specific Physical GPUs
To precisely control allocation of vGPUs on specific physical GPUs, create separate GPU groups for the physical GPUs you wish to allocate vGPUs on. When creating a virtual GPU, create it on the GPU group containing the physical GPU you want it to be allocated on.
For example, to create a new GPU group for the physical GPU at PCI bus ID 0000:87:00.0, follow these steps:
- Create the new GPU group with an appropriate name:
            [root@xenserver ~]# xe gpu-group-create name-label="GRID P40 87:0.0" 3f870244-41da-469f-71f3-22bc6d700e71
[root@xenserver ~]#
- Find the UUID of the physical GPU at
0000:87:0.0that you want to assign to the new GPU group:[root@xenserver ~]# xe pgpu-list pci-id=0000:87:00.0 uuid ( RO) : f76d1c90-e443-4bfc-8f26-7959a7c85c68 vendor-name ( RO): NVIDIA Corporation device-name ( RO): GP102GL [Tesla P40] gpu-group-uuid ( RW): 134a7b71-5ceb-8066-ef1b-3b319fb2bef3 [root@xenserver ~]
Note:The
pci-idparameter passed to the pgpu-list command must be in the exact format shown, with the PCI domain fully specified (for example,0000) and the PCI bus and devices numbers each being two digits (for example,87:00.0). - Ensure that no vGPUs are currently operating on the physical GPU by checking the
resident-VGPUsparameter:[root@xenserver ~]# xe pgpu-param-get uuid=f76d1c90-e443-4bfc-8f26-7959a7c85c68 param-name=resident-VGPUs [root@xenserver ~]#
- If any vGPUs are listed, shut down the VMs associated with them.
- Change the
gpu-group-uuidparameter of the physical GPU to the UUID of the newly-created GPU group:[root@xenserver ~]# xe pgpu-param-set uuid=7c1e3cff-1429-0544-df3d-bf8a086fb70a gpu-group-uuid=585877ef-5a6c-66af-fc56-7bd525bdc2f6 [root@xenserver ~]#
Any vgpu object now created that specifies this GPU group UUID will always have its vGPUs created on the GPU at PCI bus ID 0000:05:0.0.
You can add more than one physical GPU to a manually-created GPU group – for example, to represent all the GPUs attached to the same CPU socket in a multi-socket server platform - but as for automatically-created GPU groups, all the physical GPUs in the group must be of the same type.
In XenCenter, manually-created GPU groups appear in the GPU type listing in a VM’s GPU Properties. Select a GPU type within the group from which you wish the vGPU to be allocated:
Figure 36. Using a custom GPU group within XenCenter
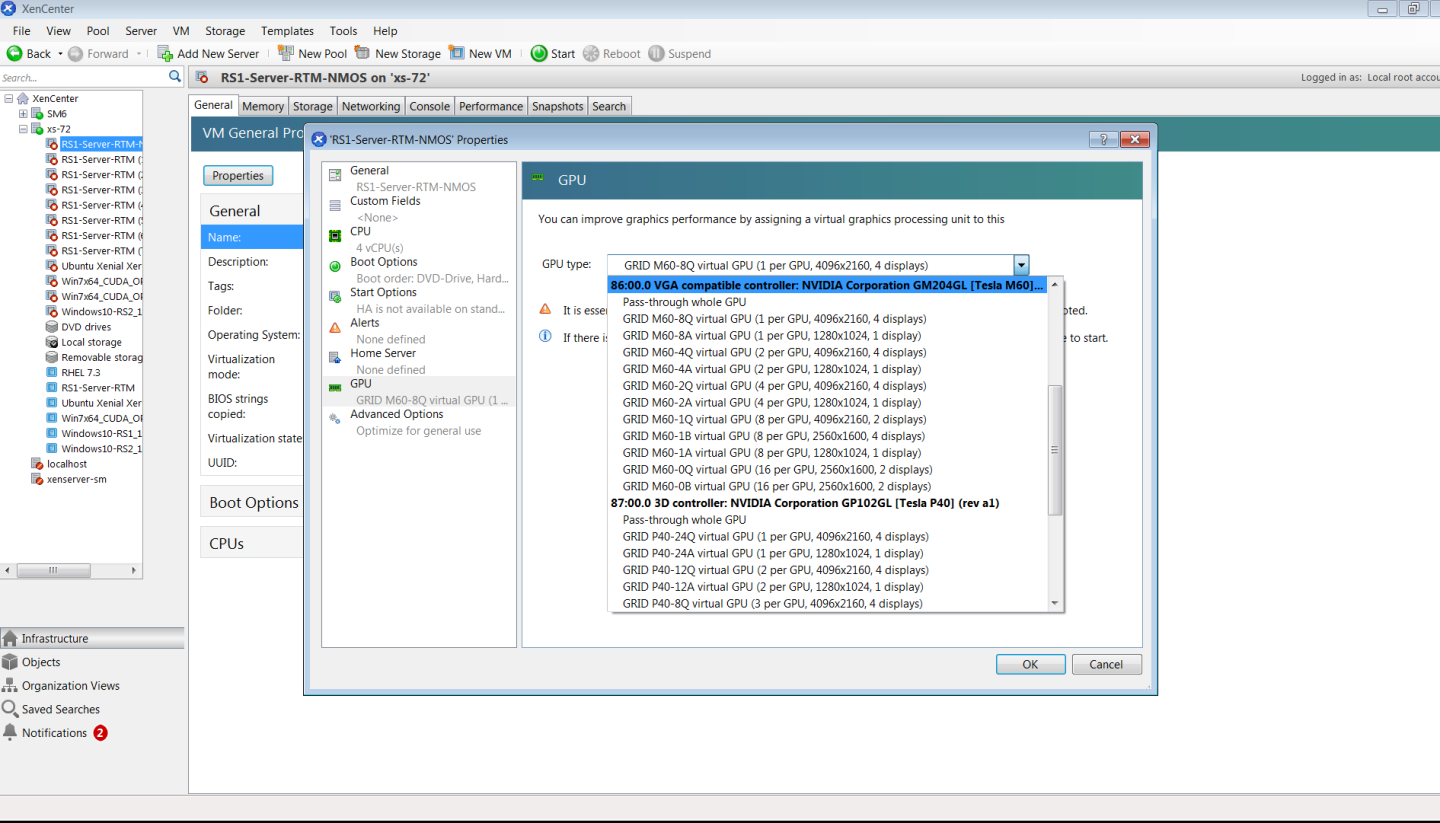
F.4. Cloning vGPU-Enabled VMs
The fast-clone or copying feature of Citrix Hypervisor can be used to rapidly create new VMs from a “golden” base VM image that has been configured with NVIDIA vGPU, the NVIDIA driver, applications, and remote graphics software.
When a VM is cloned, any vGPU configuration associated with the base VM is copied to the cloned VM. Starting the cloned VM will create a vGPU instance of the same type as the original VM, from the same GPU group as the original vGPU.
F.4.1. Cloning a vGPU-enabled VM by using xe
To clone a vGPU-enabled VM from the dom0 shell, use vm-clone:
            [root@xenserver ~]# xe vm-clone new-name-label="new-vm" vm="base-vm-name" 7f7035cb-388d-1537-1465-1857fb6498e7
[root@xenserver ~]#
F.4.2. Cloning a vGPU-enabled VM by using XenCenter
To clone a vGPU-enabled VM by using XenCenter, use the VM’s Copy VM command as shown in Figure 37.
Figure 37. Cloning a VM using XenCenter
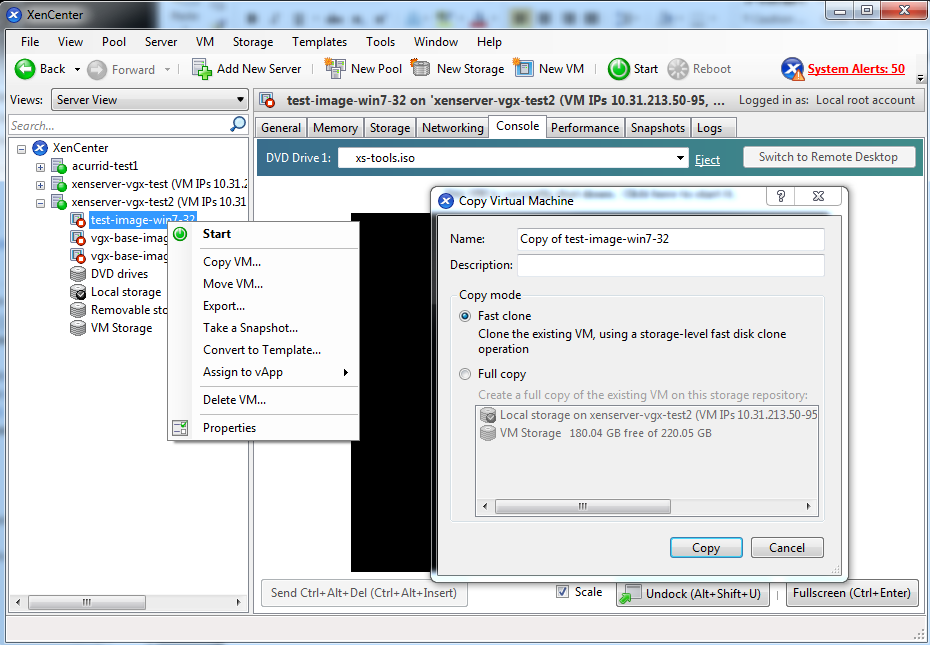
This chapter provides recommendations on optimizing performance for VMs running with NVIDIA vGPU on Citrix Hypervisor.
G.1. Citrix Hypervisor Tools
To get maximum performance out of a VM running on Citrix Hypervisor, regardless of whether you are using NVIDIA vGPU, you must install Citrix Hypervisor tools within the VM. Without the optimized networking and storage drivers that the Citrix Hypervisor tools provide, remote graphics applications running on NVIDIA vGPU will not deliver maximum performance.
G.2. Using Remote Graphics
NVIDIA vGPU implements a console VGA interface that permits the VM’s graphics output to be viewed through XenCenter’s console tab. This feature allows the desktop of a vGPU-enabled VM to be visible in XenCenter before any NVIDIA graphics driver is loaded in the virtual machine, but it is intended solely as a management convenience; it only supports output of vGPU’s primary display and isn’t designed or optimized to deliver high frame rates.
To deliver high frames from multiple heads on vGPU, NVIDIA recommends that you install a high-performance remote graphics stack such as Citrix Virtual Apps and Desktops with HDX 3D Pro remote graphics and, after the stack is installed, disable vGPU’s console VGA.
G.2.1. Disabling Console VGA
The console VGA interface in vGPU is optimized to consume minimal resources, but when a system is loaded with a high number of VMs, disabling the console VGA interface entirely may yield some performance benefit.
Once you have installed an alternate means of accessing a VM (such as Citrix Virtual Apps and Desktops or a VNC server), its vGPU console VGA interface can be disabled as follows, depending on the version of Citrix Hypervisor that you are using:
- Citrix Hypervisor 8.1 or later: Create the vGPU by using the
xecommand, and specify plugin parameters for the group to which the vGPU belongs:- Create the vGPU.
[root@xenserver ~]# xe vgpu-create gpu-group-uuid=gpu-group-uuid vgpu-type-uuid=vgpu-type-uuid vm-uuid=vm-uuid
- Specify plugin parameters for the group to which the vGPU belongs.
[root@xenserver ~]# xe vgpu-param-set uuid=vgpu-uuid extra_args=disable_vnc=1
- Create the vGPU.
- Citrix Hypervisor earlier than 8.1: Specify
disable_vnc=1in the VM’splatform:vgpu_extra_argsparameter:[root@xenserver ~]# xe vm-param-set uuid=vm-uuid platform:vgpu_extra_args="disable_vnc=1"
If you disable console VGA before you have installed or enabled an alternate mechanism to access the VM (such as Citrix Virtual Apps and Desktops), you will not be able to interact with the VM once it has booted.
You can recover console VGA access by making one of the following changes:
- Removing the vGPU plugin's parameters:
- Citrix Hypervisor 8.1 or later: Removing the
extra_argskey the from group to which the vGPU belongs - Citrix Hypervisor earlier than 8.1: Removing the
vgpu_extra_argskey from theplatformparameter
- Citrix Hypervisor 8.1 or later: Removing the
- Removing
disable_vnc=1from theextra_argsorvgpu_extra_argskey - Setting
disable_vnc=0, for example:- Citrix Hypervisor 8.1 or later:
[root@xenserver ~]# xe vgpu-param-set uuid=vgpu-uuid extra_args=disable_vnc=0
- Citrix Hypervisor earlier than 8.1:
[root@xenserver ~]# xe vm-param-set uuid=vm-uuid platform:vgpu_extra_args="disable_vnc=0"
- Citrix Hypervisor 8.1 or later:
Notice
This document is provided for information purposes only and shall not be regarded as a warranty of a certain functionality, condition, or quality of a product. NVIDIA Corporation (“NVIDIA”) makes no representations or warranties, expressed or implied, as to the accuracy or completeness of the information contained in this document and assumes no responsibility for any errors contained herein. NVIDIA shall have no liability for the consequences or use of such information or for any infringement of patents or other rights of third parties that may result from its use. This document is not a commitment to develop, release, or deliver any Material (defined below), code, or functionality.
NVIDIA reserves the right to make corrections, modifications, enhancements, improvements, and any other changes to this document, at any time without notice.
Customer should obtain the latest relevant information before placing orders and should verify that such information is current and complete.
NVIDIA products are sold subject to the NVIDIA standard terms and conditions of sale supplied at the time of order acknowledgement, unless otherwise agreed in an individual sales agreement signed by authorized representatives of NVIDIA and customer (“Terms of Sale”). NVIDIA hereby expressly objects to applying any customer general terms and conditions with regards to the purchase of the NVIDIA product referenced in this document. No contractual obligations are formed either directly or indirectly by this document.
NVIDIA products are not designed, authorized, or warranted to be suitable for use in medical, military, aircraft, space, or life support equipment, nor in applications where failure or malfunction of the NVIDIA product can reasonably be expected to result in personal injury, death, or property or environmental damage. NVIDIA accepts no liability for inclusion and/or use of NVIDIA products in such equipment or applications and therefore such inclusion and/or use is at customer’s own risk.
NVIDIA makes no representation or warranty that products based on this document will be suitable for any specified use. Testing of all parameters of each product is not necessarily performed by NVIDIA. It is customer’s sole responsibility to evaluate and determine the applicability of any information contained in this document, ensure the product is suitable and fit for the application planned by customer, and perform the necessary testing for the application in order to avoid a default of the application or the product. Weaknesses in customer’s product designs may affect the quality and reliability of the NVIDIA product and may result in additional or different conditions and/or requirements beyond those contained in this document. NVIDIA accepts no liability related to any default, damage, costs, or problem which may be based on or attributable to: (i) the use of the NVIDIA product in any manner that is contrary to this document or (ii) customer product designs.
No license, either expressed or implied, is granted under any NVIDIA patent right, copyright, or other NVIDIA intellectual property right under this document. Information published by NVIDIA regarding third-party products or services does not constitute a license from NVIDIA to use such products or services or a warranty or endorsement thereof. Use of such information may require a license from a third party under the patents or other intellectual property rights of the third party, or a license from NVIDIA under the patents or other intellectual property rights of NVIDIA.
Reproduction of information in this document is permissible only if approved in advance by NVIDIA in writing, reproduced without alteration and in full compliance with all applicable export laws and regulations, and accompanied by all associated conditions, limitations, and notices.
THIS DOCUMENT AND ALL NVIDIA DESIGN SPECIFICATIONS, REFERENCE BOARDS, FILES, DRAWINGS, DIAGNOSTICS, LISTS, AND OTHER DOCUMENTS (TOGETHER AND SEPARATELY, “MATERIALS”) ARE BEING PROVIDED “AS IS.” NVIDIA MAKES NO WARRANTIES, EXPRESSED, IMPLIED, STATUTORY, OR OTHERWISE WITH RESPECT TO THE MATERIALS, AND EXPRESSLY DISCLAIMS ALL IMPLIED WARRANTIES OF NONINFRINGEMENT, MERCHANTABILITY, AND FITNESS FOR A PARTICULAR PURPOSE. TO THE EXTENT NOT PROHIBITED BY LAW, IN NO EVENT WILL NVIDIA BE LIABLE FOR ANY DAMAGES, INCLUDING WITHOUT LIMITATION ANY DIRECT, INDIRECT, SPECIAL, INCIDENTAL, PUNITIVE, OR CONSEQUENTIAL DAMAGES, HOWEVER CAUSED AND REGARDLESS OF THE THEORY OF LIABILITY, ARISING OUT OF ANY USE OF THIS DOCUMENT, EVEN IF NVIDIA HAS BEEN ADVISED OF THE POSSIBILITY OF SUCH DAMAGES. Notwithstanding any damages that customer might incur for any reason whatsoever, NVIDIA’s aggregate and cumulative liability towards customer for the products described herein shall be limited in accordance with the Terms of Sale for the product.
VESA DisplayPort
DisplayPort and DisplayPort Compliance Logo, DisplayPort Compliance Logo for Dual-mode Sources, and DisplayPort Compliance Logo for Active Cables are trademarks owned by the Video Electronics Standards Association in the United States and other countries.
HDMI
HDMI, the HDMI logo, and High-Definition Multimedia Interface are trademarks or registered trademarks of HDMI Licensing LLC.
OpenCL
OpenCL is a trademark of Apple Inc. used under license to the Khronos Group Inc.
Trademarks
NVIDIA, the NVIDIA logo, NVIDIA GRID, NVIDIA GRID vGPU, NVIDIA Maxwell, NVIDIA Pascal, NVIDIA Turing, NVIDIA Volta, GPUDirect, Quadro, and Tesla are trademarks or registered trademarks of NVIDIA Corporation in the U.S. and other countries. Other company and product names may be trademarks of the respective companies with which they are associated.
- Instead of -1B4 vGPU types, use -1B vGPU types.
- Instead of -2B4 vGPU types, use -2B vGPU types.