

Host Setup
Holoscan sensor bridge is supported on the following configurations:
- IGX systems configured with IGX OS 1.1.2+ with CX7 SmartNIC devices.
- AGX Orin systems running JP6.2.1+. In this configuration, the on-board Ethernet controller is used with the Linux kernel network stack for data I/O; all network I/O is performed by the CPU without network acceleration.
- AGX Thor systems running JP7.2 with MGBE SmartNIC device and CoE transport.
- DGX Spark systems running DGX OS 7.2.3+ with CX7 SmartNIC devices.
- x86 Linux workstations with an NVIDIA discrete GPU. Two host receive paths are supported: unaccelerated Linux socket-based receivers (used primarily for development or testing purposes) and an accelerated RoCE path that requires a ConnectX network adapter on the link to the sensor bridge. Note that this configuration is not part of the primary reference platforms; GPUDirect RDMA into GPU memory on the RoCE path may appear available from the GPU and driver even when the PCIe path on the host does not support it, in which case you must disable GPU VRAM frame buffers at build time (see the x86 Linux tab).
After the Holoscan sensor bridge board is set up, configure a few prerequisites in your host system. While holoscan sensor bridge demonstration applications usually run in a container, these commands are all to be executed outside the container, on the host system directly. These configurations are remembered across power cycles and therefore only need to be set up once.
-
Install git-lfs
Some data files in the Holoscan sensor bridge source repository use GIT LFS.
-
Grant your user permission to the docker subsystem:
Reboot the computer to activate this setting.
Next, follow the directions on the appropriate tab below to configure your host system.
IGX
-
Update the GPU driver to 535.309.01 and install IGX 1.1.3 by running the following.
Reboot the machine so the new driver loads:
After rebooting, confirm the new driver is active:
-
Determine the name of the network device associated with the first CX7 port. This is the rightmost QSFP port when looking at the back of the IGX unit.
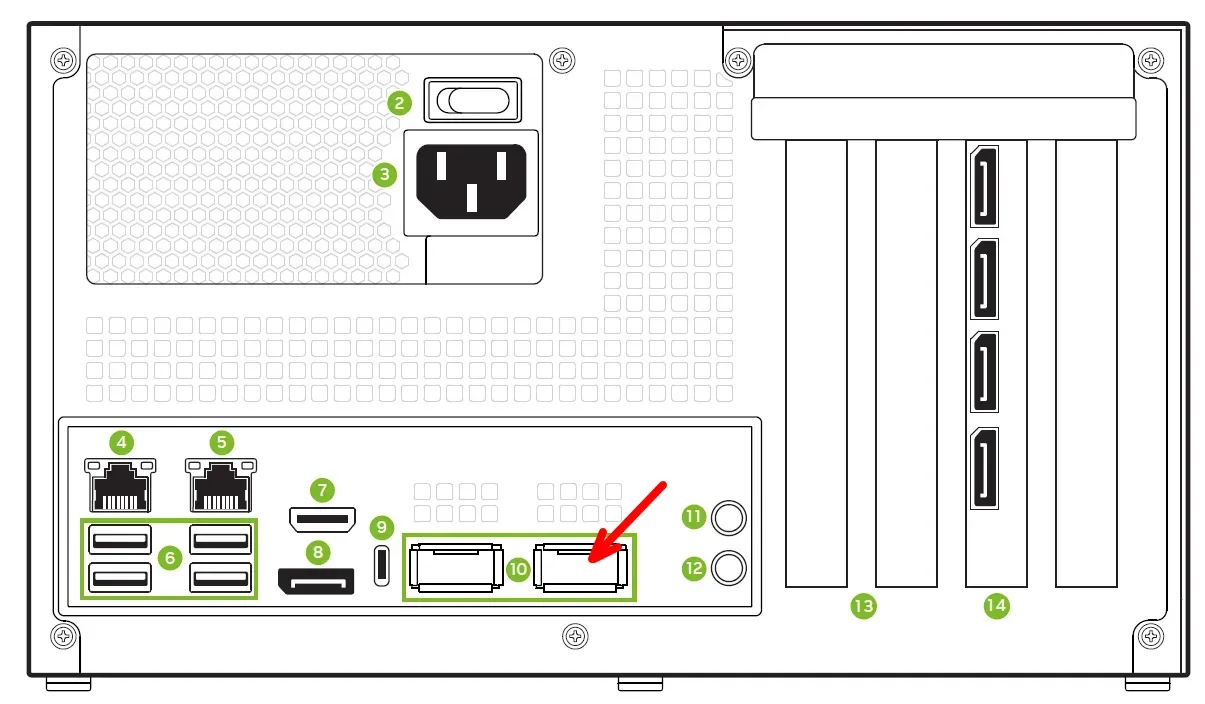
This will produce a list of CX7 ports; your device names may vary. The lowest numbered
one, in this case roceP5p3s0f0, is the first CX7 port.
Check the CX7 firmware version using one of the devices names that appear on your machine from the command above.
If the version is 28.38.1026 or lower, please download the appropriate “ConnectX-7 Firmware” iso and upgrade the CX7 firmware. Make sure to reboot the machine and re-check the firmware has loaded to the newer one.
Assign the name of the first CX7 port to the variable $IN0.
Next, determine which host ethernet port is associated with that device, and assign that
to the variable $EN0, which we’ll use later during network configuration.
In summary, the host network interface associated with $IN0 (roceP5p3s0f0) is $EN0
(enP5p3s0f0np0); your specific device names may vary.
- IGX OS uses NetworkManager to configure network interfaces. By default, the sensor
bridge device uses the address 192.168.0.2 for the first port. Set up your first
ethernet device (
$EN0) to use the address 192.168.0.101 with a permanent route to 192.168.0.2 using the recommended MTU for use with RoCE: (Here is more information about configuring your system if you cannot use the 192.168.0.0/24 network in this way.)
Apply power to the sensor bridge device, ensure that it’s properly connected, then
ping 192.168.0.2 to check connectivity:
- The second SFP+ connector on the sensor bridge device is used to transmit data acquired from the second camera on a stereo camera module (like the IMX274). By default, the sensor bridge device uses the address 192.168.0.3 for that second port. Connect the second IGX QSFP port (indicated with the red arrow below) to the second SFP+ port on the sensor bridge device.
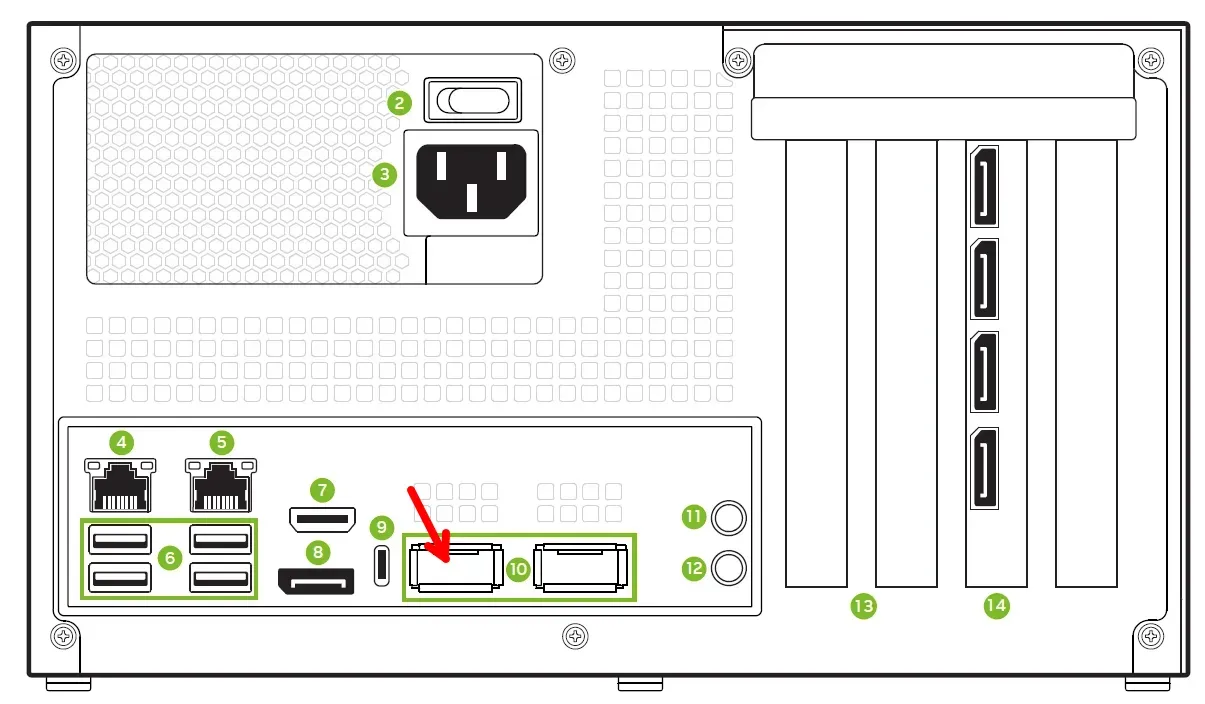
Let’s refer to these as $IN1 and $EN1. Given the commands to assign $IN0 and
$EN0 above,
As above, your device names may be different. Configure the second QSFP network port with an appropriate address and permanent route:
Now test the second connection with ping 192.168.0.3:
When the second port is configured, the first port should continue to respond to pings as appropriate.
AGX Orin
Demos and examples in this package assume a sensor bridge device is connected to eno1,
which is the RJ45 connector on the AGX Orin.
- Configure a static IP address of 192.168.0.101 on the on-board network port.
L4T uses NetworkManager to configure interfaces; by default interfaces are configured as DHCP clients. Use the following command to update the IP address to 192.168.0.101. (Here is more information about configuring your system if you cannot use the 192.168.0.0/24 network in this way.)
Note that for AGX running JP6.2.1, the on-board ethernet device is eno1, and for
JP7.2, the on-board ethernet device is end0; if you’re running a different
configuration, use the appropriate name for the variable EN0:
Apply power to the sensor bridge device, ensure that it’s properly connected, then
ping 192.168.0.2 to check connectivity.
- For the Linux socket-based examples, isolating a processor core from Linux kernel is recommended. For high bandwidth applications, like 4k video acquisition, isolation of the network receiver core is required. When an example program runs with processor affinity set to that isolated core, performance is improved and latency is reduced. By default, sensor bridge software runs the time-critical background network receiver process on the third processor core. If that core is isolated from Linux scheduling, no processes will be scheduled on that core without an explicit request from the user, and reliability and performance is greatly improved.
Isolating that core from Linux can be achieved by editing
/boot/extlinux/extlinux.conf. Add the setting isolcpus=2 to the end of the line that
starts with APPEND. Your file should look like something like this:
Sensor bridge applications can run the network receiver process on another core by
setting the environment variable HOLOLINK_AFFINITY to the core it should run on. For
example, to run on the first processor core,
Setting HOLOLINK_AFFINITY to blank will skip any core affinity settings in the sensor
bridge code.
- Run the “jetson_clocks” tool on startup, to set the core clocks to their maximum.
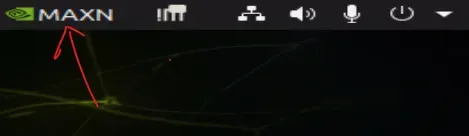
- Set the AGX Orin power mode to ‘MAXN’ for optimal performance. The setting can be changed via L4T power drop down setting found on the upper left corner of the screen:
- Restart the AGX Orin. This allows core isolation and performance settings to take effect. If configuring for ‘MAXN’ performance doesn’t request that you reset the unit, then execute the reboot command manually:
DGX Spark
- First check for the OTA ConnectX-7 hotplug feature and disable + reboot if present. This disables the NIC if no link is detected which can interfere with these instructions and HSB operation. Note that if your NIC powers down without anything attached, but the file below is not present, you may not have the ability to disable and should update OTA.
- Determine the name of the network device associated with the first CX7 port. This is
the leftmost QSFP port when looking at the back of the DGX Spark unit (“port 0” in the
image below). Note the specific device names
echo’d below may be different or change depending on the specific system’s driver configuration.
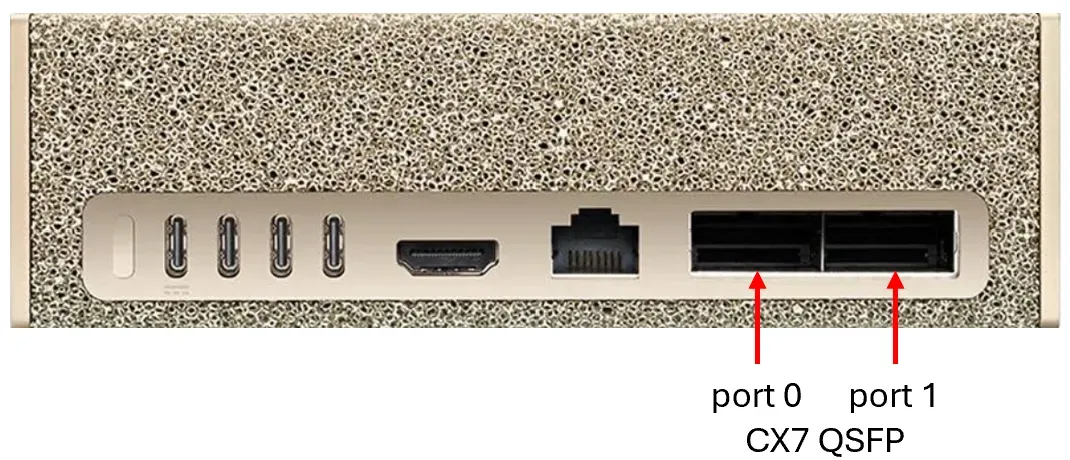
This will produce a list of infiniband devices connected to the CX7 ports; your device
names may vary. The lowest numbered one, in this case roceP2p1s0f0, is the first CX7
port. Let’s assign that name to the variable $IN0.
Next, determine which host ethernet port is associated with that device, and assign that
to the variable $EN0, which we’ll use later during network configuration.
In summary, the host network interface associated with $IN0 (roceP2p1s0f0) is $EN0
(enP2p1s0f0np0); your specific device names may vary.
- DGX OS uses NetworkManager to configure network interfaces. By default, the sensor
bridge device uses the address 192.168.0.2 for the first port. Set up your first
ethernet device (
$EN0) to use the address 192.168.0.101 with a permanent route to 192.168.0.2 using the recommended MTU for use with RoCE: (Here is more information about configuring your system if you cannot use the 192.168.0.0/24 network in this way.)
Apply power to the sensor bridge device, ensure that it’s properly connected, then
ping 192.168.0.2 to check connectivity:
- The second SFP+ connector on the sensor bridge device is used to transmit data acquired from the second camera on a stereo camera module (like the IMX274). By default, the sensor bridge device uses the address 192.168.0.3 for that second port. Connect the second DGX Spark QSFP port (“port 1” in the image above) to the second SFP+ port on the sensor bridge device.
Let’s refer to these as $IN1 and $EN1. Given the commands to assign $IN0 and
$EN0 above,
As above, your device names may be different. Configure the second QSFP network port with an appropriate address and permanent route:
Now test the second connection with ping 192.168.0.3:
When the second port is configured, the first port should continue to respond to pings as appropriate.
AGX Thor
- After installing JP 7.2 on the Thor Devkit, complete the following steps.
If installation was done using the ISO method, install CUDA Toolkit 13.2 and execute the following:
- For the Linux socket-based examples, isolating a processor core from Linux kernel is recommended. For high bandwidth applications, like 4k video acquisition, isolation of the network receiver core is required. When an example program runs with processor affinity set to that isolated core, performance is improved and latency is reduced. By default, sensor bridge software runs the time-critical background network receiver process on the third processor core. If that core is isolated from Linux scheduling, no processes will be scheduled on that core without an explicit request from the user, and reliability and performance is greatly improved.
Isolating that core from Linux can be achieved by editing
/boot/extlinux/extlinux.conf. Add the setting isolcpus=2 to the end of the line that
starts with APPEND. Your file should look like something like this:
Sensor bridge applications can run the network receiver process on another core by
setting the environment variable HOLOLINK_AFFINITY to the core it should run on. For
example, to run on the first processor core,
Setting HOLOLINK_AFFINITY to blank will skip any core affinity settings in the sensor
bridge code.
This step requires a system reboot to take effect.
- Install Holoscan SDK v4.4.0:
- Install other Holoscan sensor bridge dependencies:
- Enable the network interface and ensure that the camera enumerates (assumes camera IP address 192.168.0.2):
- Obtain and build holoscan sensor bridge:
holoscan sensor bridge release v2.6 supports running C++ Li VB1940 accelerated networking based examples from the terminal cli as well as running Li VB1940 and IMX274 python examples from within the holoscan sensor bridge container.
as a first step, please clone the holoscan sensor bridge repository:
to run C++ Li VB1940 accelerated networking SIPL based examples in the terminal cli use the following commands:
Running the CoE-Accelerated Examples
Thor’s hardware-accelerated CoE capabilities can be leveraged by Holoscan Sensor Bridge using one of two different paths outlined below.
SIPL
SIPL is a modular, extensible framework for image sensor control and image processing that exposes the full hardware capabilities of Thor including CoE and ISP hardware acceleration. SIPL-enabled sensor drivers are written using the Unified Device Driver Framework (UDDF), and reference VB1940 UDDF drivers are included with JetPack 7.2.
Use the following to run the SIPL-based CoE example applications for the VB1940 sensor:
- Retrieve your camera’s MAC ID:
Example output:
- Update the
ip_addressandmac_addressfields in these configuration files (multiple instances in each file):
NOTE: The provided JSON sipl_config files are compatible with JP7.2. For JP7.1,
pull the source files from the
HSB 2.5.0 release
and make necessary modifications to them.
- Allow root to access the X display (ensure
DISPLAYis set if using SSH):
- Run the
sipl_playerapplication (HW ISP capture mode):
- For RAW capture mode (image quality will be poor without proper ISP processing):
FuSa
FuSa is a new API included with JetPack 7.1+ which exposes access to Thor’s CoE data capture path without providing the additional camera control and ISP access that is offered by SIPL. This allows applications direct control of the Holoscan Sensor Bridge and attached sensors in a CoE-accelerated environment, bypassing the need for SIPL and its UDDF driver implementations. This enables applications to follow a more traditional Holoscan Sensor Bridge implementation where the sensor control is managed directly by the application instead of by external drivers. Because of this, FuSa example applications exist for the IMX274, VB1940, and TauroTech DA326 Hawk sensors using the existing reference drivers provided by Holoscan Sensor Bridge.
A number of FuSa-based example applications are included for the IMX274, VB1940, and
TauroTech DA326 Hawk using the fusa_coe_ prefix (Hawk variants:
fusa_coe_max96716a_player, fusa_coe_hawk_single_link_player,
fusa_coe_hawk_dual_link_player, fusa_coe_single_network_stereo_hawk_player). The C++
sample applications can be run natively (not using a container) and are built by the
host setup instructions above, while the Python variants must be run using the
Holoscan Sensor Bridge container.
NOTE: The python/setup.py will by default not enable the necessary FuSa or SIPL
components unless it detects the required /dev/coe* devices or the COE_OFFLOAD
environment variable is set. No action is required in the provided docker container or
in native python binding builds on supported platforms.
For example, to run the C++ VB1940 player example, run the following command with the IP address replaced with the IP address of the device:
- Building and running Li VB1940, IMX274, and TauroTech DA326 Hawk python examples from within the holoscan sensor bridge container is explained in the following pages of the user guide.
x86 Linux
Use this tab when the host is an x86 PC running Linux with an NVIDIA discrete GPU.
Capture paths on x86
-
Socket-based receiver — The standard Linux network stack path used by examples whose names are prefixed with
linux_(for examplelinux_imx274_player). This does not require a ConnectX adapter; use whichever Ethernet interface reaches the sensor bridge and follow the same IP and PTP guidance as for other hosts. Note that this path is not accelerated, and so is often unable to keep up with the data rates required to stream typical sensor (e.g. camera) data, leading to intermittent data loss. This path is primarily meant for development purposes. -
RoCE-accelerated receiver — Uses RDMA over Converged Ethernet to the sensor bridge and requires a Mellanox/NVIDIA ConnectX adapter on that link. The interface setup requirements (i.e. addresses, routes, ring buffers, MTU) match IGX or DGX Spark: the sensor bridge must be reachable at its assigned address (e.g.
192.168.0.2) using the same scheme as in the IGX or DGX Spark tabs above (adapt device names such as$IN0,$EN0to your system).
GPUDirect RDMA on the RoCE path
Using RoCE with GPUDirect RDMA into GPU memory requires the following:
- A workstation-class NVIDIA GPU (consumer and mobile GPUs do not support GPUDirect RDMA).
- The NVIDIA open kernel driver packages on the host (e.g.
nvidia-driver-open). - A PCIe topology where the ConnectX NIC and the GPU are peers such that the NIC can perform RDMA directly to the GPU (platform firmware, root-port layout, and IOMMU settings must allow this end-to-end).
When these requirements are met, frame buffers can reside in GPU memory and data received from the sensor bridge can be written via RDMA directly to GPU memory. When the GPU and driver support GPUDirect registration but the host PCIe system path does not actually deliver RDMA writes into that memory, data received from the sensor bridge will not actually be written to the GPU memory and will typically result in incorrect data (e.g. black/blank image frames) and/or metadata mismatch errors. If this is the case, the build must be configured to force the use of pinned host memory instead (see next section).
Demo container on x86
Install Docker, Docker Buildx, and the NVIDIA Container Toolkit on the host. Build the demo image with the dGPU option (see build instructions):
When GPUDirect RDMA does not work end-to-end
It may be the case that RoCE RDMA looks healthy while RDMA writes into registered GPU memory do not actually succeed; for example, when the GPU supports GPUDirect but the PCIe configuration does not allow the ConnectX NIC to reach the GPU as an RDMA peer. Symptoms include a black or blank image and application log lines similar to:
This is a strong indication to rebuild with GPU VRAM disabled so the RoCE receiver uses pinned host memory instead:
- Demo container: pass
--disable-roce-gpu-vramtodocker/build.sh(together with--dgpuas usual) to build the image. Example:
- Native CMake build: configure with:
Using pinned host memory instead of GPU VRAM enables a partly accelerated path: the NIC will still RDMA directly to the system memory using RoCE, bypassing the Linux networking subsystem, but this data will then need to be transferred across PCIe when the GPU later reads the data.
When the GPUDirect RDMA requirements are satisfied
on your machine, the default build keeps HOLOLINK_ROCE_USE_GPU_VRAM on and the fully
accelerated GPUDirect RDMA path can be used. Internally, this path has been validated on
an AMD Threadripper-based Lenovo ThinkStation workstation with a ConnectX-6 Dx network
adapter and Quadro RTX 6000 GPU.
Now, for all configurations,
-
Configure the network receiver buffer for running unaccelerated network examples: Holoscan sensor bridge supports running Li VB1940, IMX274, and TauroTech DA326 Hawk using unaccelerated network Linux sockets. For best performance of these examples increase the Linux sockets network receiver buffer:
-
Make sure that $EN0 is set to the name of the Ethernet controller connected to HSB. Some installations require reboots which will clear this value, so be sure and configure it appropriately for your configuration per the instructions above.
-
Enable PTP on $EN0. This synchronizes the timestamps reported with received data with the host time.
Run the
phc2systool at boot time. This synchronizes the clock in $EN0 with the system clock. First, install thelinuxptptool.Next, set up a systemd service file that will run
phc2sys.Configure it for execution at startup, and start it now.
Next, run ptp4l to send PTP SYNC messages to $EN0.
Set up a systemd service file for this.
Finally, run it.
-
For Orin iGPU with Cuda 12 configurations only (Jetpack 6 and IGX 1.X): Install NVIDIA DLA compiler. Applications using inference need this at initialization time; some OS images for iGPU don’t include it.
-
Log in to Nvidia GPU Cloud (NGC) with your developer account:
-
If you don’t have a developer account for NGC please register at https://catalog.ngc.nvidia.com/
-
Create an API key for your account: https://ngc.nvidia.com/setup/api-key
-
Use your API key to log in to nvcr.io:
-
Now proceed to build and test the Holoscan Sensor Bridge container.