Step #2: Virtual Assistant Inference Pipeline
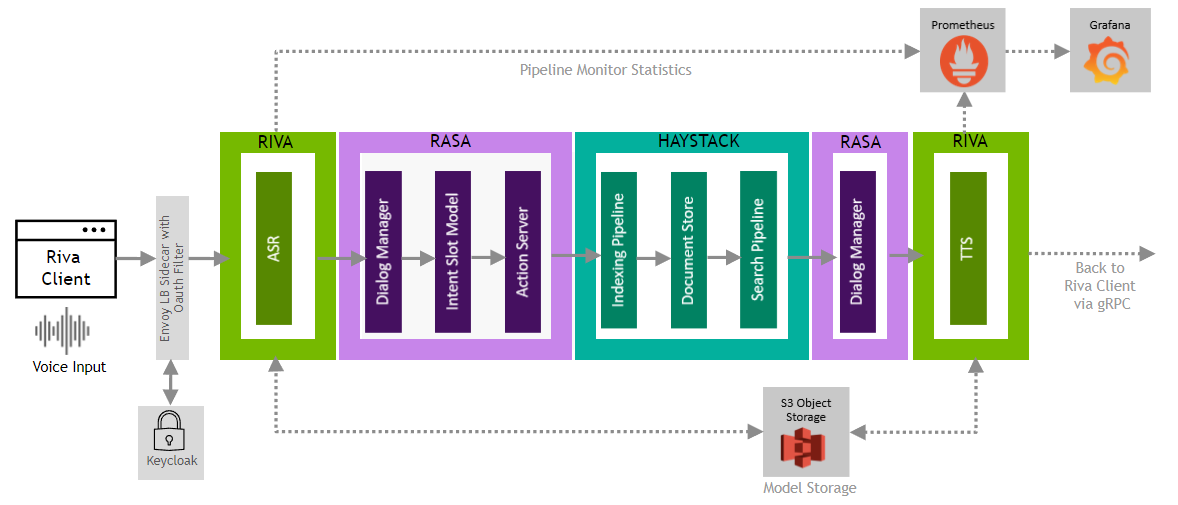
We are now ready to deploy the intelligent virtual assistant solution, which integrates Riva’s transcription capabilities with third-party bot frameworks, Rasa and Haystack. These components are deployed as microservices and integrated with cloud-native components like Keycloak, Prometheus, and Grafana for authentication and monitoring to demonstrate what an enterprise deployment of this solution may look like.
Next, we’ll need to generate an access token to use for the client to authenticate with the Triton service. Run the following command in the SSH Console:
curl -k -L -X POST '{{ keycloak_token_endpoint }}' -H 'Content-Type: application/x-www-form-urlencoded' --data-urlencode 'client_id={{ keycloak_client_id }}' --data-urlencode 'grant_type=password' --data-urlencode 'client_secret={{ keycloak_client_secret }}' --data-urlencode 'scope=openid' --data-urlencode 'username={{ keycloak_realm_user }}' --data-urlencode 'password={{ keycloak_realm_user_password }}'
If needed, the information below can be used to manually configure Keycloak and/or generate the curl request according to the template below. A link to Keycloak is also provided in the left pane.
curl -k -L -X POST 'TOKEN_ENDPOINT' -H 'Content-Type: application/x-www-form-urlencoded' --data-urlencode 'client_id=CLIENT_ID' --data-urlencode 'grant_type=password' --data-urlencode 'client_secret=CLIENT_SECRET' --data-urlencode 'scope=openid' --data-urlencode 'username=USERNAME' --data-urlencode 'password=PASSWORD'
Admin User: admin
Admin Password: {{ keycloak_admin_password }}
Realm Name: {{ keycloak_realm }}
Realm User: {{ keycloak_realm_user }}
Realm Password: {{ keycloak_realm_user_password }}
Client ID: {{ keycloak_client_id }}
Client Secret: {{ keycloak_client_secret }}
Token Endpoint: {{ keycloak_token_endpoint }}
Once you’ve run the curl request, you should receive a JSON string like below
{"access_token":"eyJhbGc...","expires_in":54000,"refresh_expires_in":108000,"refresh_token":"eyJhbGci...","not-before-policy":0,"session_state":"e7e23016-2307-4290-af45-2c79ee79d0a1","scope":"openid email profile"}
Note down the
access_token, this field will be required later on in the workflow, within the Jupyter notebook.Note down the following Haystack and Rasa API endpoint URLs as well in case they are required during the deployment workflow:
Haystack: haystack-api.riva.svc.cluster.local
Rasa: rasa.riva.svc.cluster.local
Next, open the Inference Pipeline link in the left pane under the LaunchPad section.
NoteEnsure you open the correct link to the Inference Pipeline, not the Training Pipeline. The training pipeline must be completed first, prior to proceeding with the inference pipeline steps.
Run through the provided Jupyter notebooks to complete the Inference Pipeline.
The AI application includes sample dashboards and components set up for this pipeline. They can be accessed using the links provided in the left pane, using the credentials below:
Grafana:
User: admin
Password: {{ grafana_password }}