Step #3: BYOM model/video
The following examples will require using the system console of the GPU host. Click on the System Console link in the left menu of this page to open a web-based SSH session.

The bring-your-own-model pipeline will be using the GXF framework, more details can be found in the user guide https://docs.nvidia.com/clara-holoscan/sdk-user-guide/gxf/index.html.
See more details on the bring-your-own-model assets on NGC here https://catalog.ngc.nvidia.com/orgs/nvidia/teams/clara-holoscan/resources/holoscan_colonoscopy_sample_data.
Through the bring-your-own-model process, with minor modifications to an existing sample app, you can run a model of your choice on data of your choice. In this exercise you will modify the sample ultrasound app to run on colonoscopy data and identify polyps. The /data/holoscan/assets/launch_byom_run_container.sh script loads the assets from /data/holoscan/byom, including the AI model for polyp identification and a recorded colonoscopy video.
Launch the runtime container with bring-your-own-model options with the script you can find at /data/holoscan/assets/launch_byom_run_container.sh with: bash /data/holoscan/assets/launch_byom_run_container.sh
            #!/bin/bash

set -x

sudo xhost +local:docker

IMAGE_NAME="nvcr.io/nvidia/clara-holoscan/clara_holoscan_sample_runtime"
IMAGE_TAG="v0.3.0"
NGC_BYOM_PATH="/data/holoscan/byom"
ASSETS_PATH="/data/holoscan/assets"

TRT_ENGINES_PATH=${ASSETS_PATH}/trt_engines

sudo docker run -it --rm \
--runtime=nvidia -e NVIDIA_DRIVER_CAPABILITIES=graphics,video,compute,utility,display \
# mount the BYOM model into the container
-v ${NGC_BYOM_PATH}/model:/workspace/my_model \
# mount the BYOM video data into the container
-v ${NGC_BYOM_PATH}/video:/workspace/my_data \
-e DISPLAY=${DISPLAY} -v /tmp/.X11-unix:/tmp/.X11-unix \
# mount the pre-generated TRT model to avoid delay; you should comment out the mount options when bringing another model for the BYOM process
-v ${TRT_ENGINES_PATH}/col_Tesla-T4_c75_n40.engine:/workspace/my_model/cache/Tesla-T4_c75_n40.engine \
-v ${TRT_ENGINES_PATH}/endoscopy_Tesla-T4_c75_n40.engine:/workspace/test_data/endoscopy/model/tool_loc_convlstm_engines/Tesla-T4_c75_n40.engine \
-v ${TRT_ENGINES_PATH}/ultrasound_Tesla-T4_c75_n40.engine:/workspace/test_data/ultrasound/model/us_unet_256x256_nhwc_engines/Tesla-T4_c75_n40.engine \
# mount the yaml file from /data/holoscan/byom/video/segmentation_replayer.yaml, which already specifies the app definition for the BYOM application; you can comment out the mount option to edit the yaml file yourself following the documentation
-v ${NGC_BYOM_PATH}/video/segmentation_replayer.yaml:/opt/holoscan_sdk/apps/ultrasound_segmentation_gxf/segmentation_replayer.yaml \
-w /opt/holoscan_sdk/ \
${IMAGE_NAME}:${IMAGE_TAG}
If you choose to edit the application file yourself and go through the step by step bring-your-own-model process, disable the option -v ${NGC_BYOM_PATH}/video/segmentation_replayer.yaml:/opt/holoscan_sdk/apps/ultrasound_segmentation_gxf/segmentation_replayer.yaml in file /data/holoscan/assets/launch_byom_run_container.sh by removing the line before launching. If you are bringing your own model that is different from the example colonoscopy model, please also disable the option -v ${TRT_ENGINES_PATH}/col_Tesla-T4_c75_n40.engine:/workspace/my_model/cache/Tesla-T4_c75_n40.engine by removing the line before launching.
Follow the Clara Holoscan SDK user guide on how to edit the file /opt/holoscan_sdk/apps/ultrasound_segmentation_gxf/segmentation_replayer.yaml within the container.
Since we already launched the runtime container, start at Step 2 in the SDK user guide: “Check that the model and data correctly appear under /workspace/my_model and /workspace/my_data”.
To edit the file /opt/holoscan_sdk/apps/ultrasound_segmentation_gxf/segmentation_replayer.yaml within the launched docker container, we will use Visual Studio Code. Enter code in the terminal to launch VS Code. Once launched, go to the left hand side bar and click on “Extensions”, and check that the extension “Dev Containers” is installed. Otherwise, install the extension.

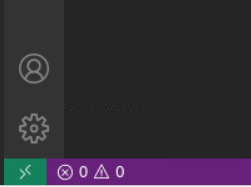
Click on the green “Open a Remote Window” button at the bottom left corner.

There should be a dropdown list that opens at the top, choose “Attach to Running Container”

You will see all currently launched containers, choose the one we have just launched with /data/holoscan/assets/launch_byom_run_container.sh

Use the “Explorer” on the left hand side to open the / folder in the container, and navigate to open /opt/holoscan_sdk/apps/ultrasound_segmentation_gxf/segmentation_replayer.yaml

From this point, you can follow the instructions here to modify the yaml file.
If you have troubles modifying your own yaml file, you can refer to the file /data/holoscan/byom/video/segmentation_replayer.yaml, or mount the file directly into your runtime container by keeping the following line enabled in launch_byom_run_container.sh:
-v ${NGC_BYOM_PATH}/video/segmentation_replayer.yaml:/opt/holoscan_sdk/apps/ultrasound_segmentation_gxf/segmentation_replayer.yaml \
From within the container, run the BYOM pipeline with ./apps/ultrasound_segmentation_gxf/segmentation_replayer.