Step #2: Create Your First NVIDIA AI Enterprise VM
To proceed with this guide, you will create a VM with the hardware configuration in the steps below. This VM will be used for training (using TensorFlow) as well as for deploying Triton Inference Server.
Within a production environment, two VMs would be created. One VM would be the AI Training VM and the other VM would be to host the Triton Inference Server.
Within your AI LaunchPad journey you will create a VM from scratch that will support NVIDIA AI Enterprise. Later, the VM will be used as a gold master image.
Select AI Launchpad host in the left pane of the vSphere Client.
Right-click the LaunchPad host and select New Virtual Machine.
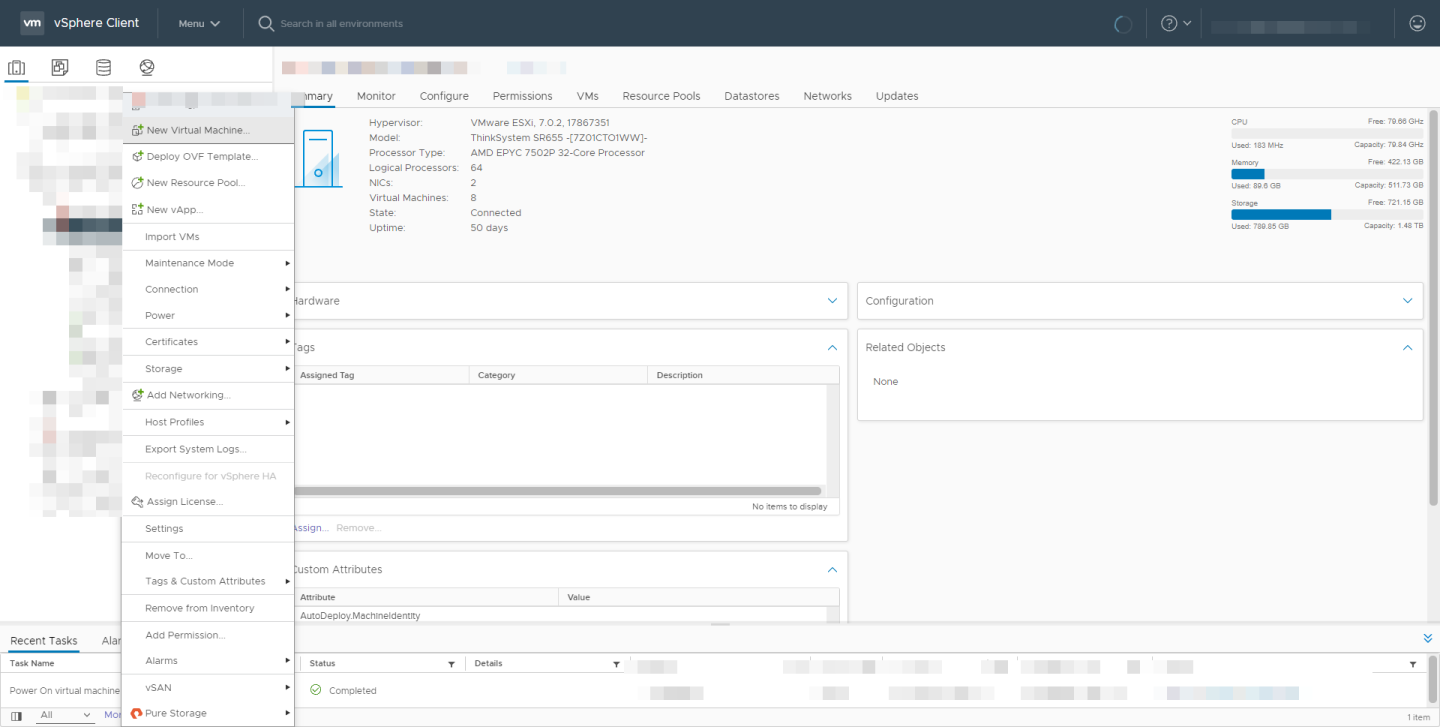
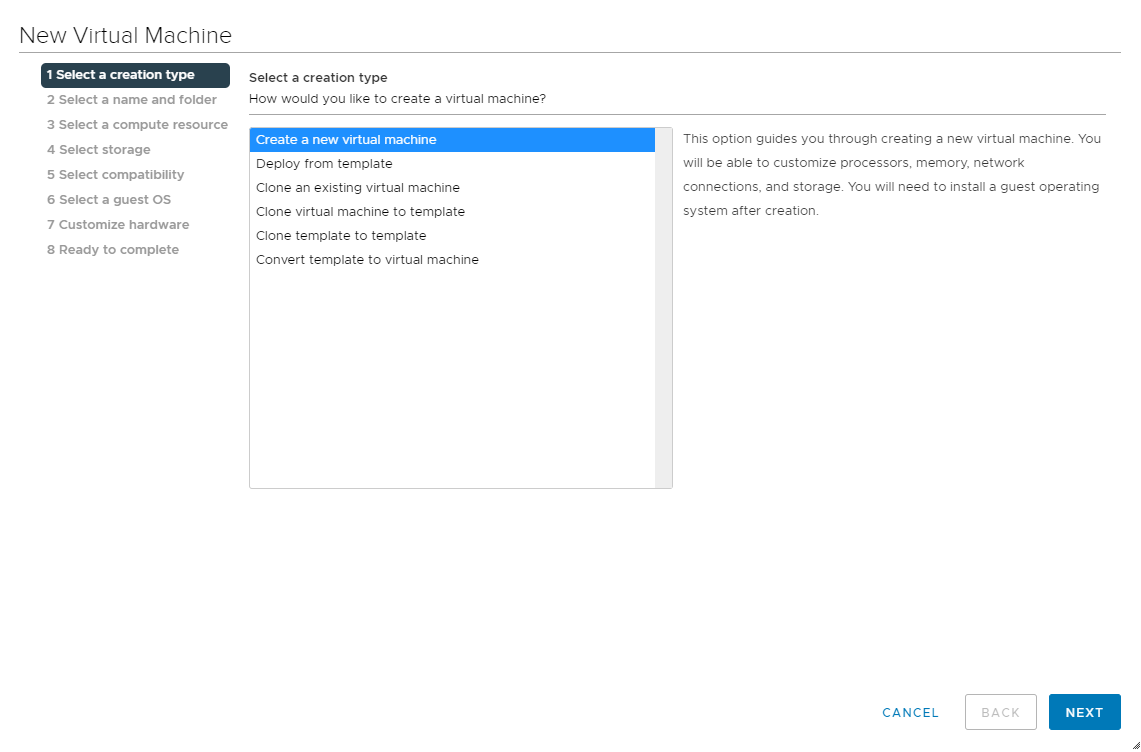
Select Create a new virtual machine and click Next.
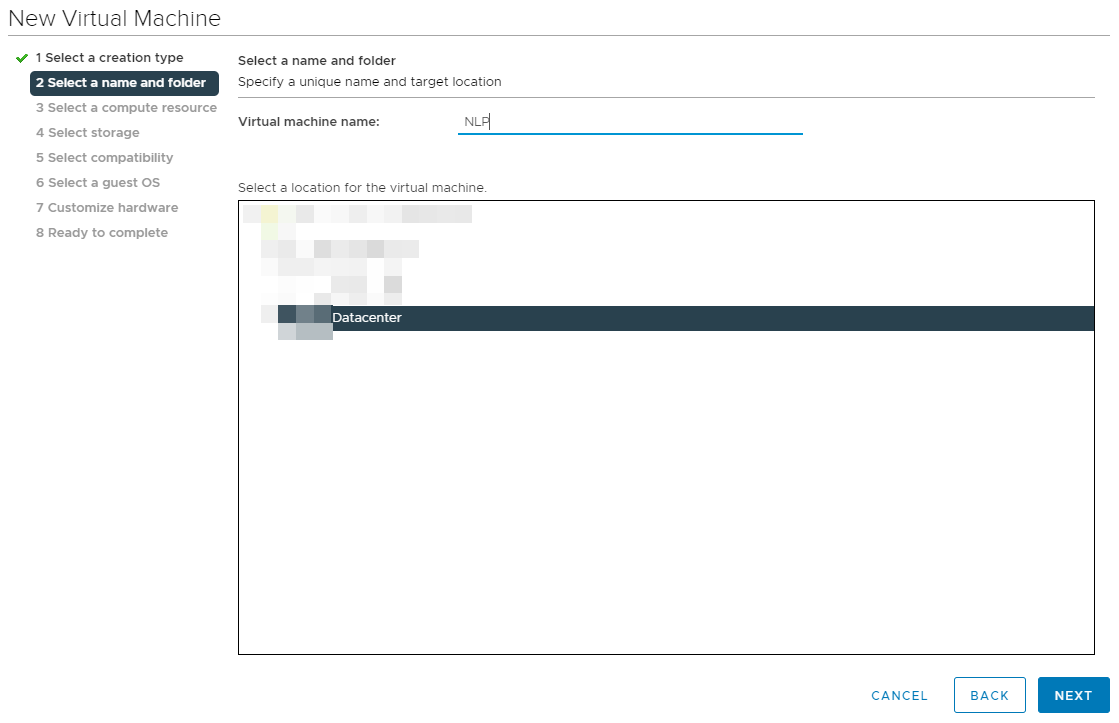
Enter NLP for the virtual machine name. Next, choose the location to host the virtual machine using the Select a location for the virtual machine section. Click Next to continue.
Select a compute resource to run the VM. Click Next to continue.
NoteThis compute resource should include an NVIDIA AI Enterprise enabled GPU which has been installed and correctly configured.

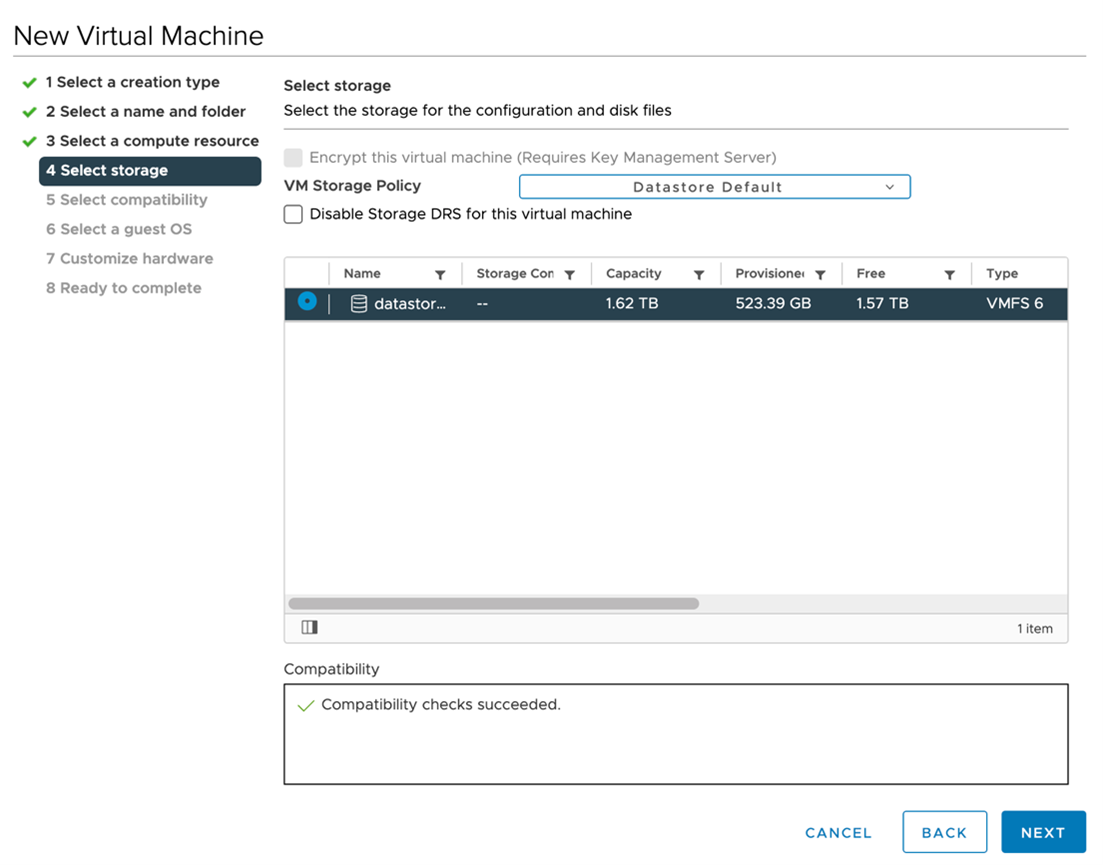
Select the datastore to host the virtual machine. Click Next to continue.
Next, select compatibility for the virtual machine. This should reflect the ESXi version for your NVIDIA-Certified Systems. Click Next to continue.

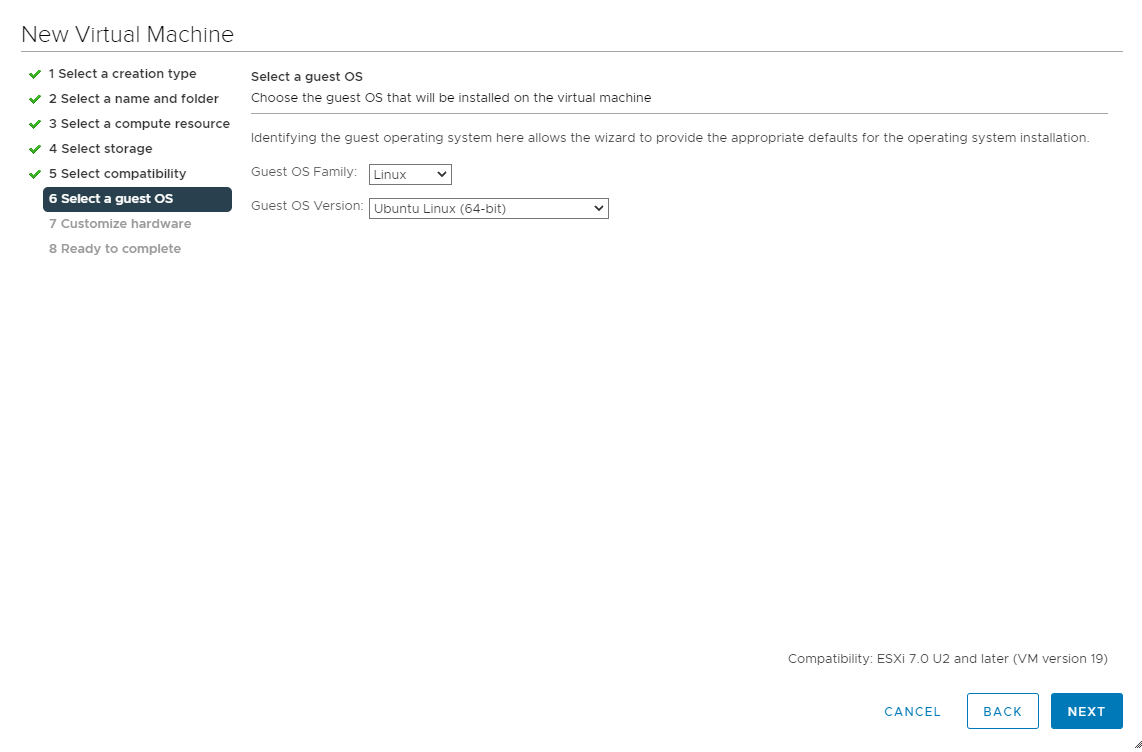
Select the appropriate Ubuntu Linux OS from the Guest OS Family and Guest OS Version pull-down menus. Click Next to continue.
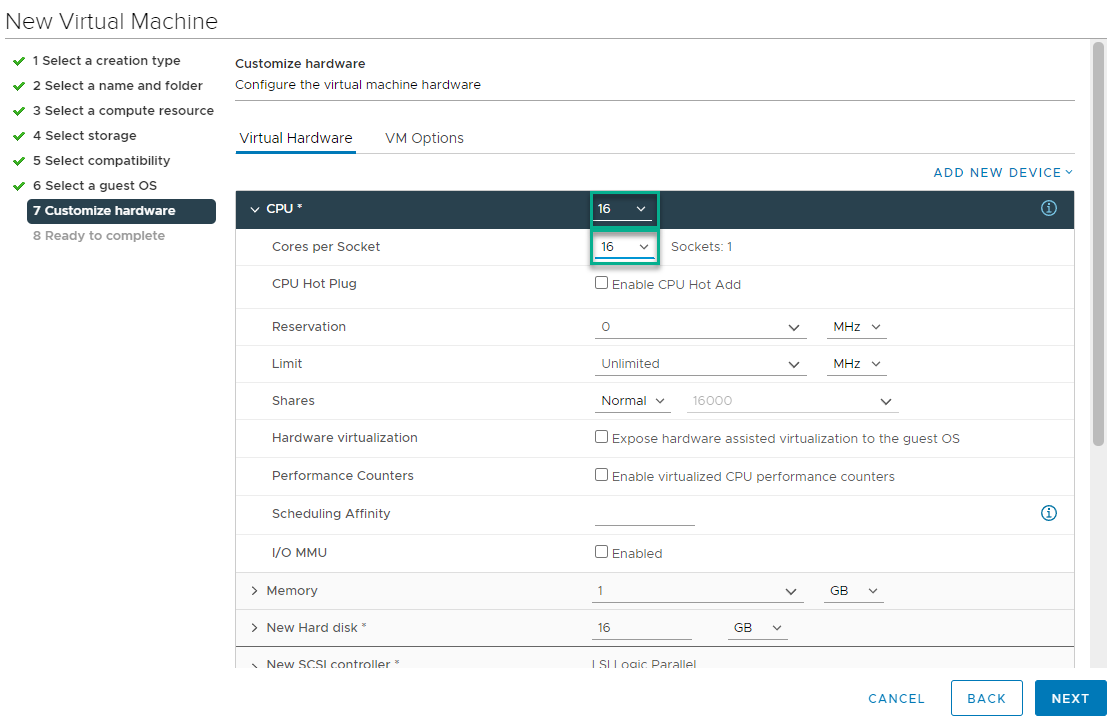
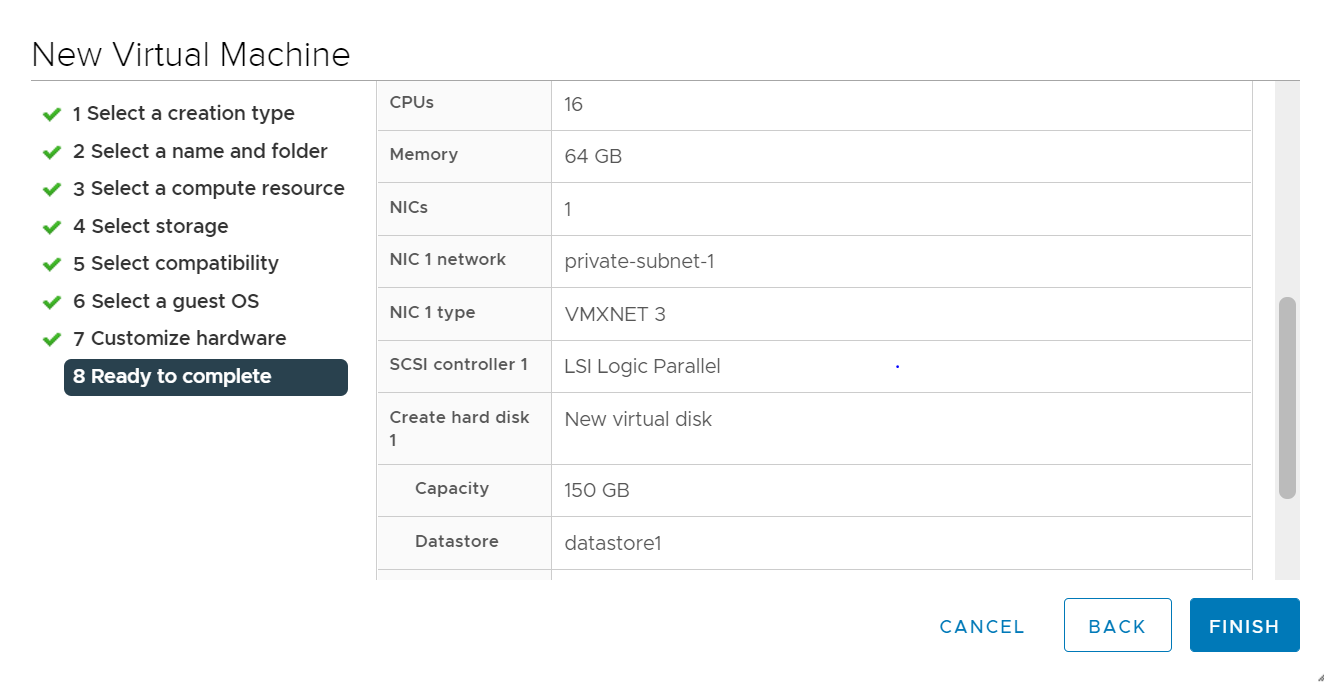
Customize hardware is next. Set the virtual hardware based on the table below. Click Next to continue.
Virtual Machine Configuration
CPU
16 vCPU on a single socket
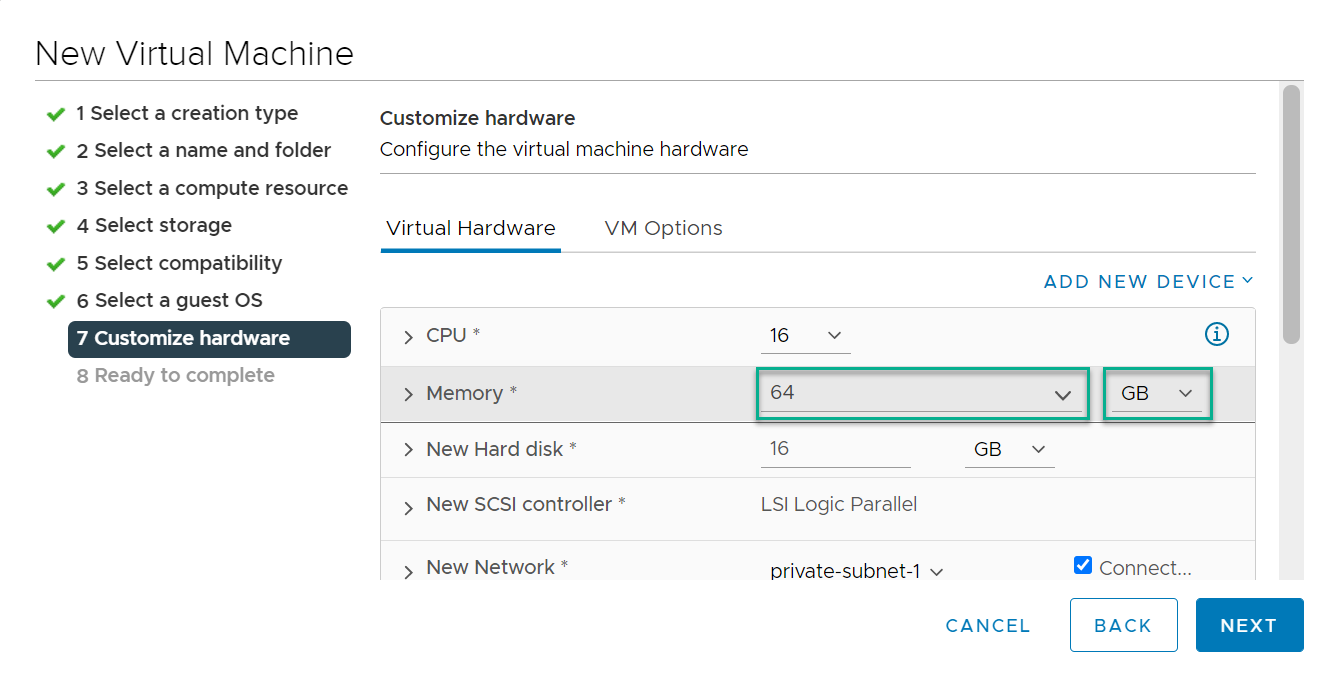
RAM
64GB
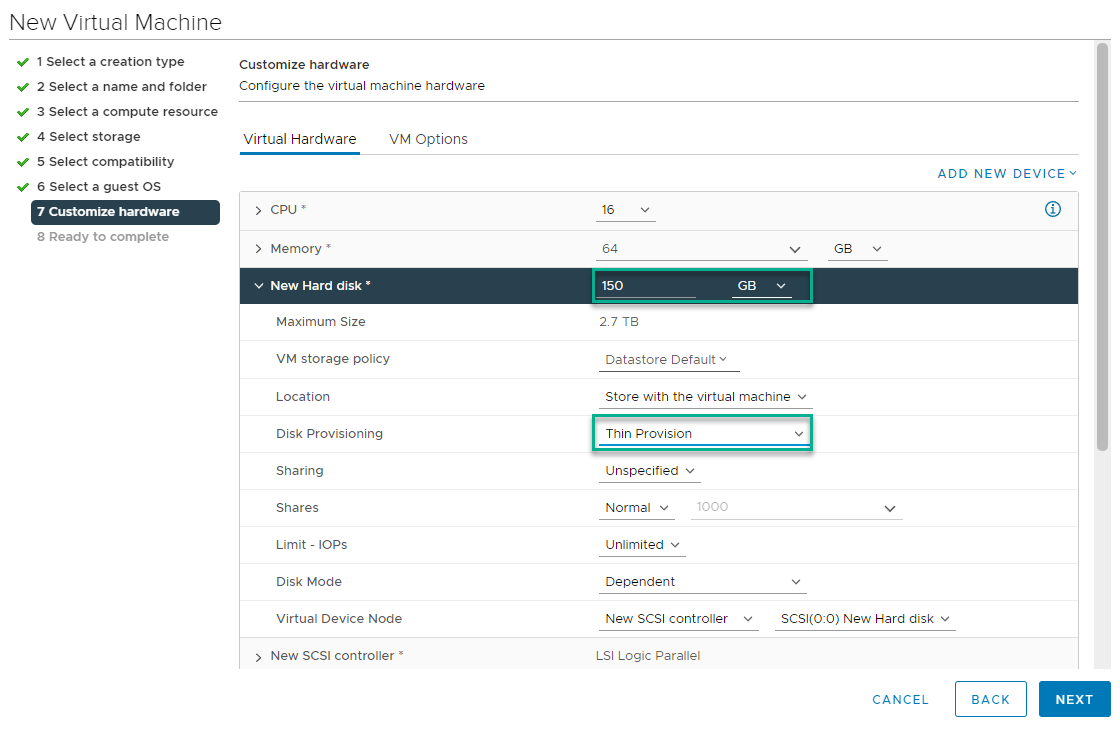
Storage
150GB thin provisioned disk
Expand the CPU options by clicking the greater than sign. Set the CPU to 16 and the Cores per Socket to 16.
Next set the Memory to 64 GB.
Next expand the New Hard disk option by clicking on the greater than sign. Set the storage to 150 GB and the Disk Provisioning to Thin Provision.
Review the New Virtual Machine configuration before completion. Click Finish when ready.
The new virtual machine container is created.
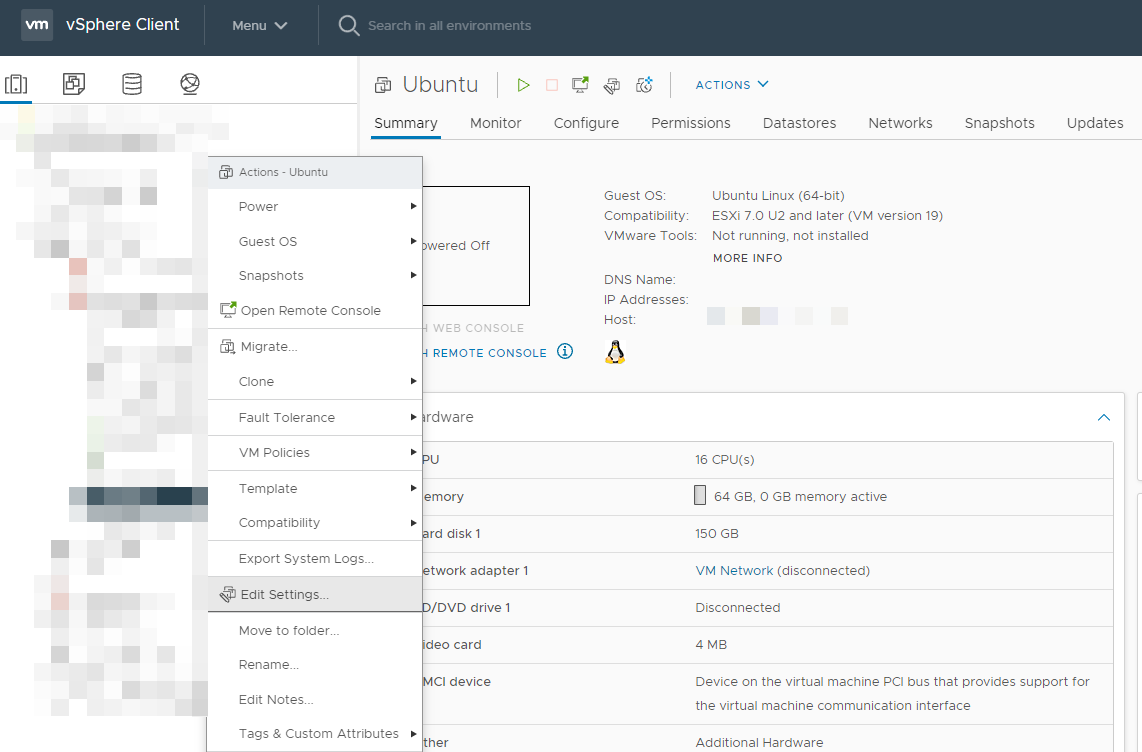
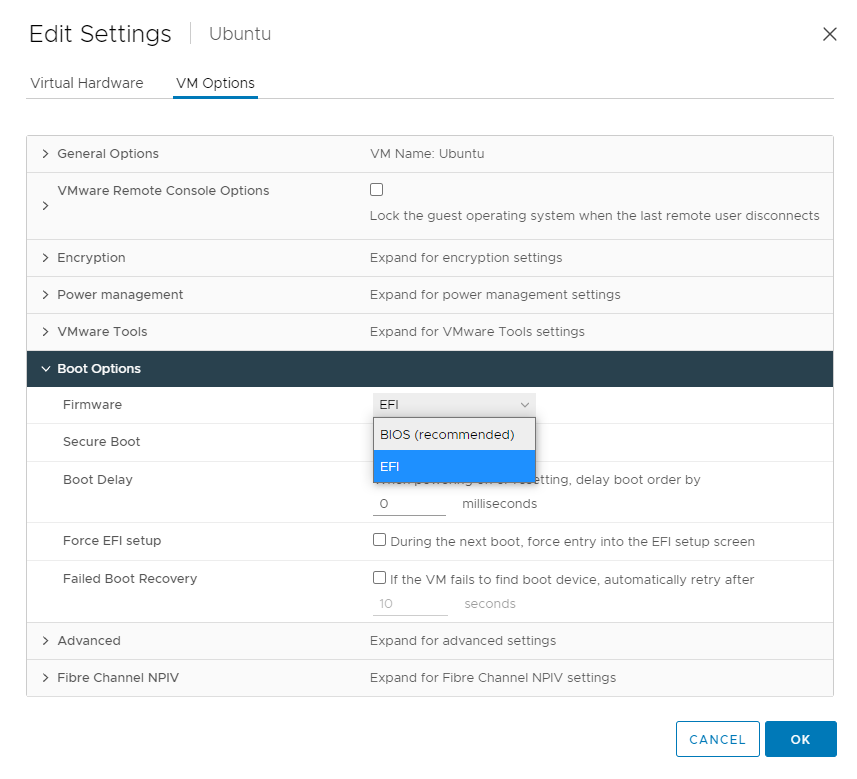
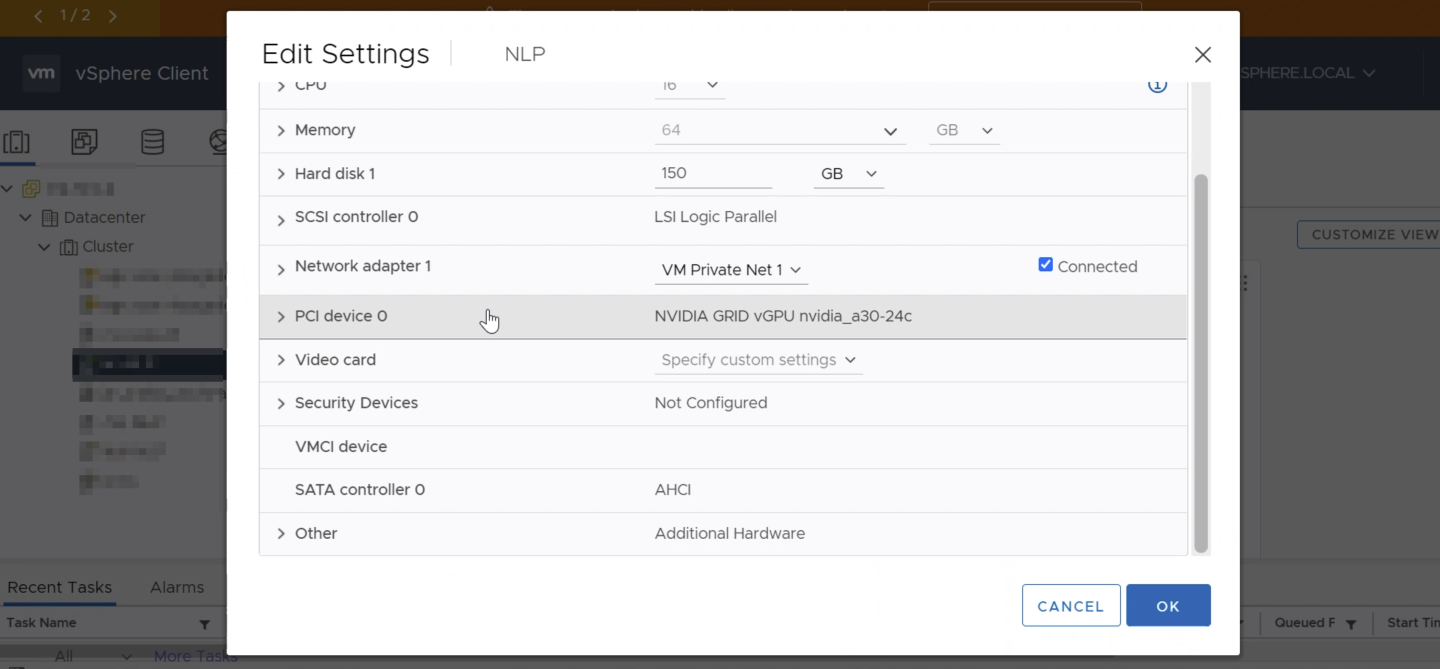
Configure the VM boot options for EFI. Right-click on the new VM and select Edit Settings.
Click on the VM Options tab, expand Boot Options, change the Firmware from BIOS to EFI.
Expand Advanced and select Edit Configuration.
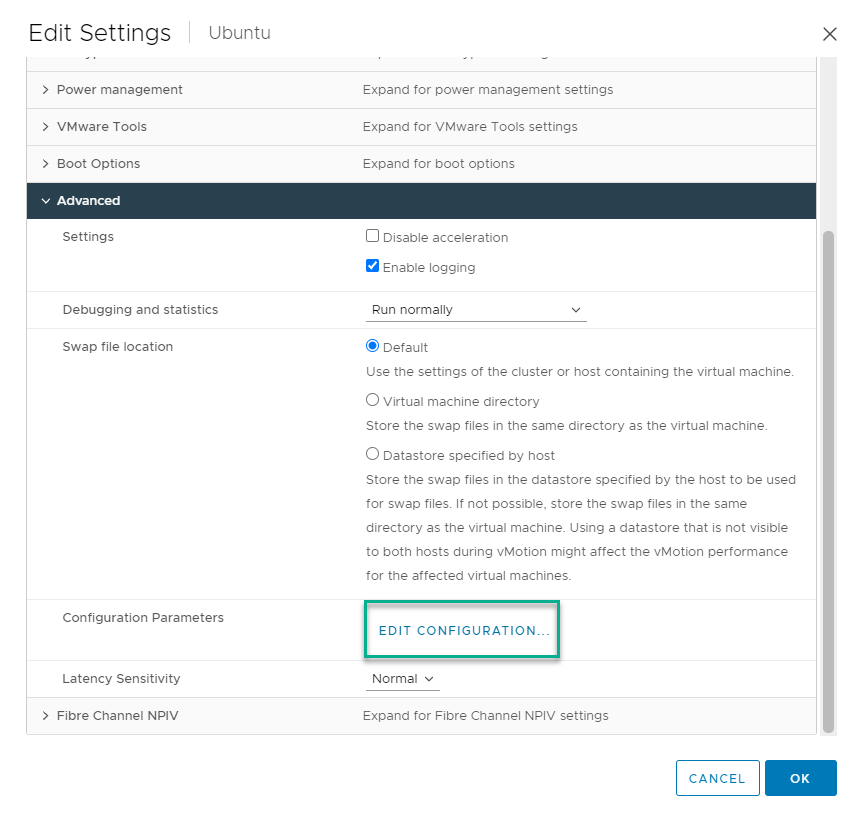
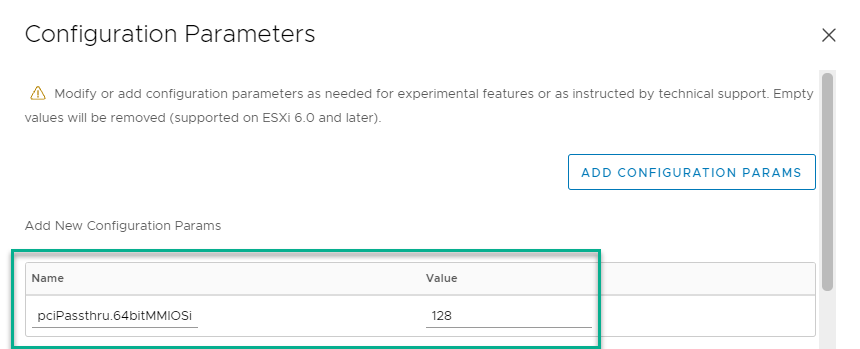
Click Add Configuration Params button.

Adjust the Memory Mapped I/O (MMIO) settings for the VM
Add the parameters from the table below.
Name
Value
pciPassthru.64bitMMIOSizeGB
128
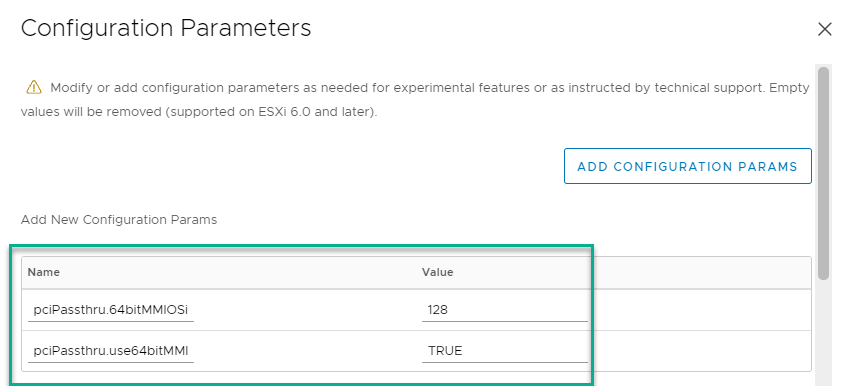
Click Add Configuration Params again and add the parameters from the table.
Name
Value
pciPassthru.64bitMMIO
True
Click Ok to close the advance configuration window, then click Ok to complete the VM configuration.
NVIDIA AI Enterprise is supported on Ubuntu 20.04 LTS operating systems. It is important to note there are two Ubuntu ISO types: Desktop and Live Server. The Desktop version includes a graphical user interface (GUI), while the Live Server version only operates via a command line. Within your LaunchPad journey you will use the Live Server version 20.04 (amd64 architecture) of Ubuntu.
Right-click on the VM and select Edit Settings.
Under CDDVD drive 1 select Datastore ISO File from the drop down menu.
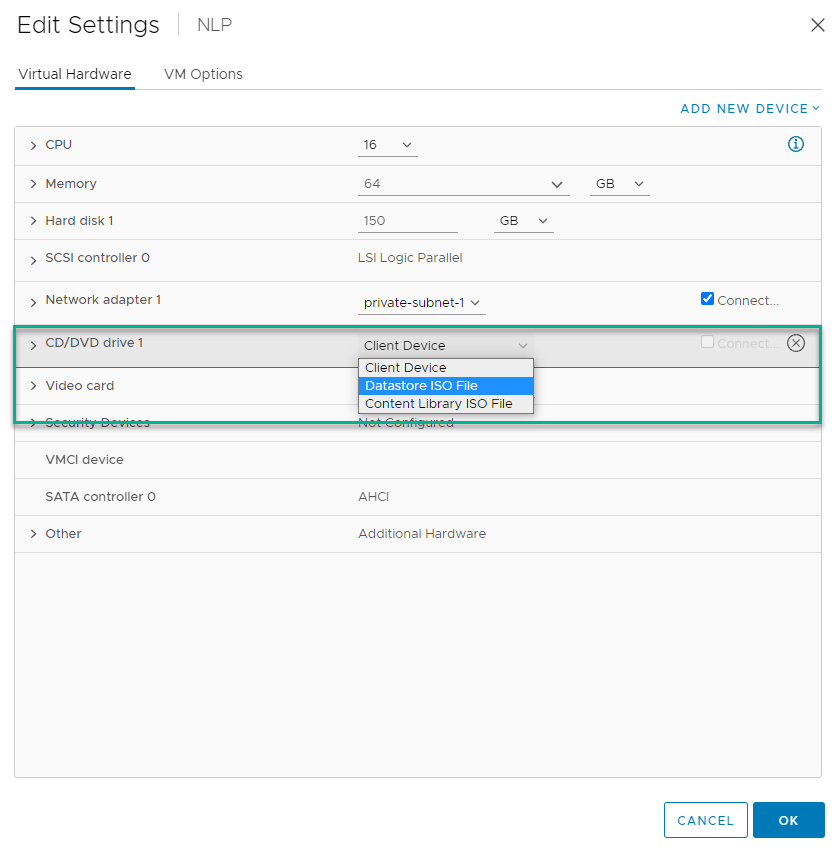
Expand the datastore by clicking the greater than sign and select the ubuntu-20.04.2-live-server-amd64.iso file and click OK.

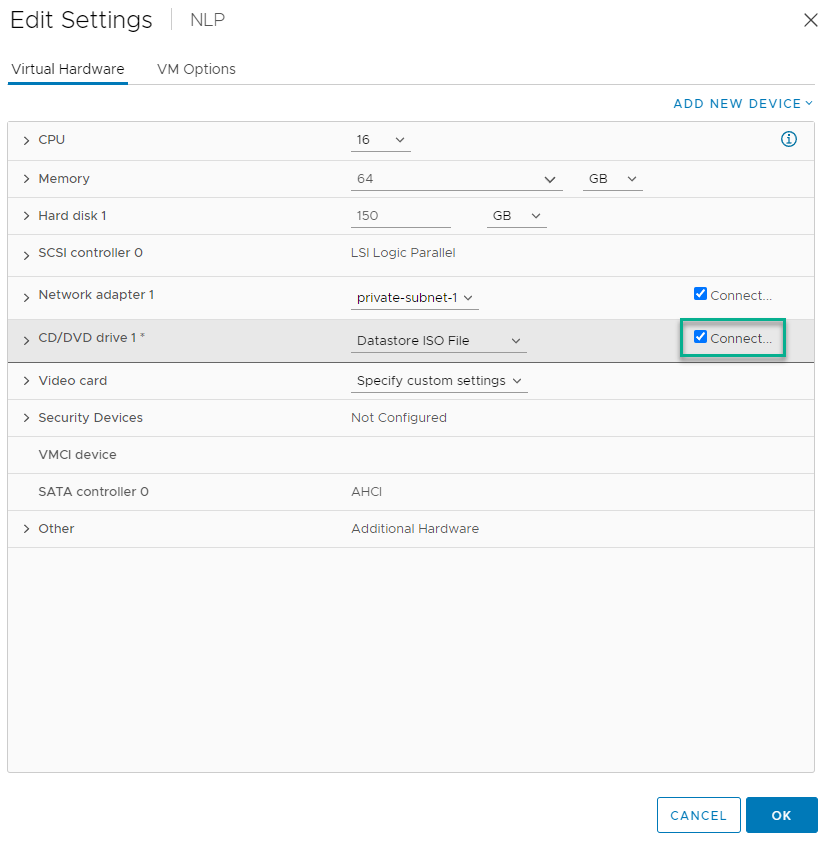
Make sure to check the Connect at power on button and click OK.
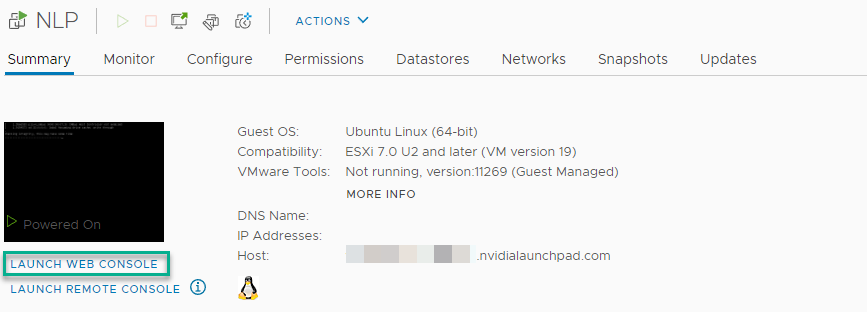
Power on the VM.
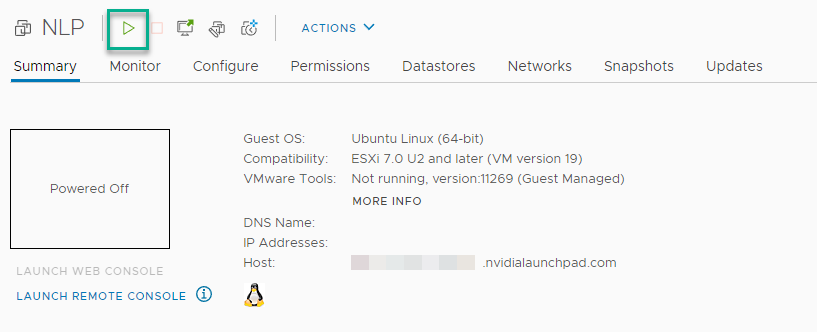
Launch Web Console and wait for the install to appear.
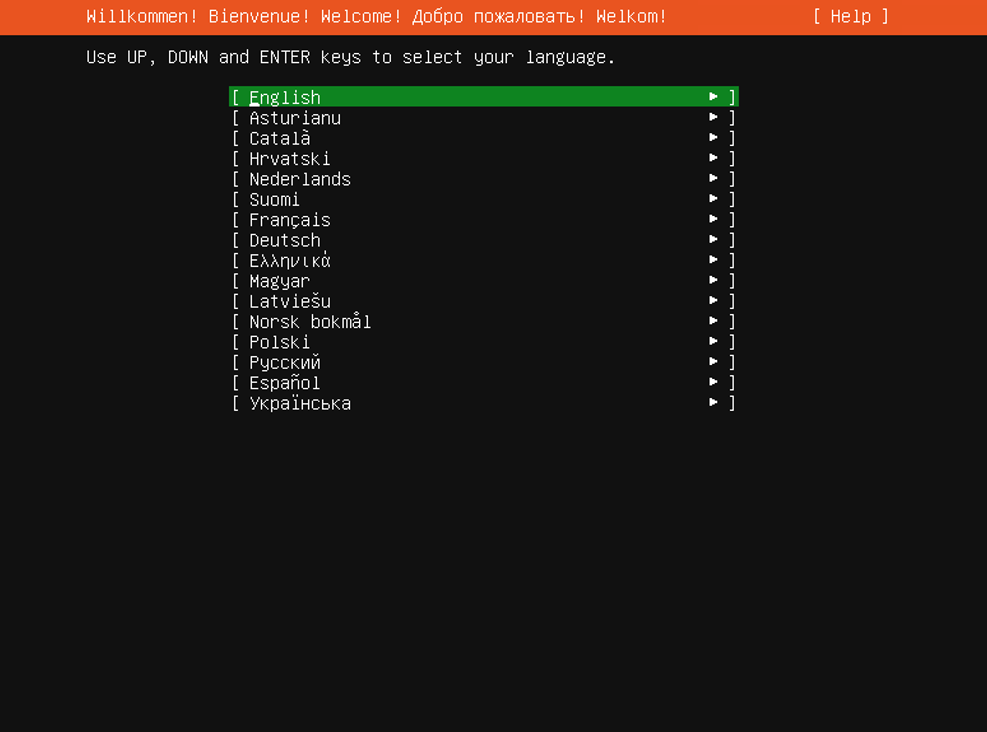
Select your preferred language and press the enter key.
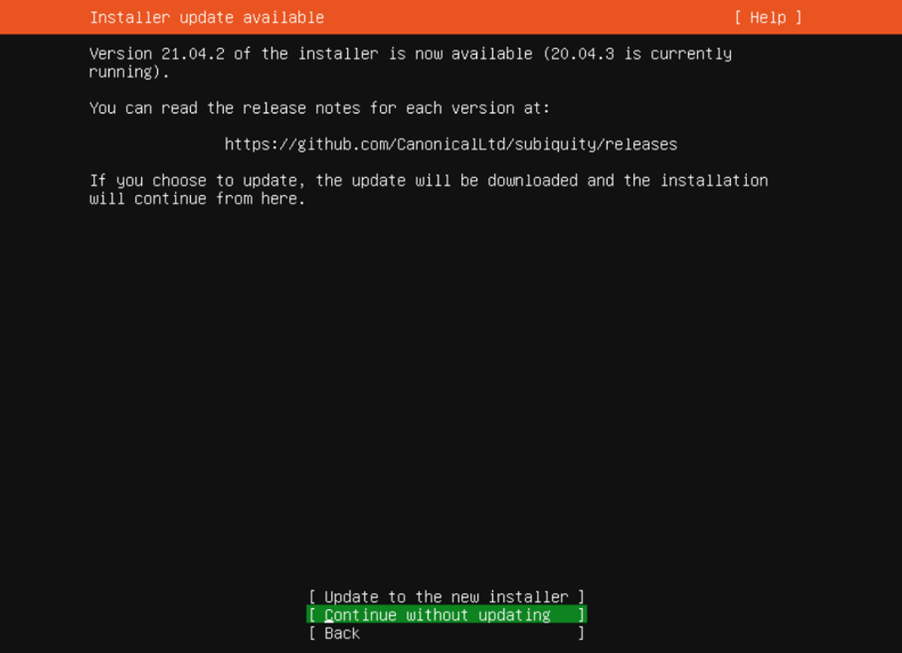
Continue without updating as this guide is built around 20.04.
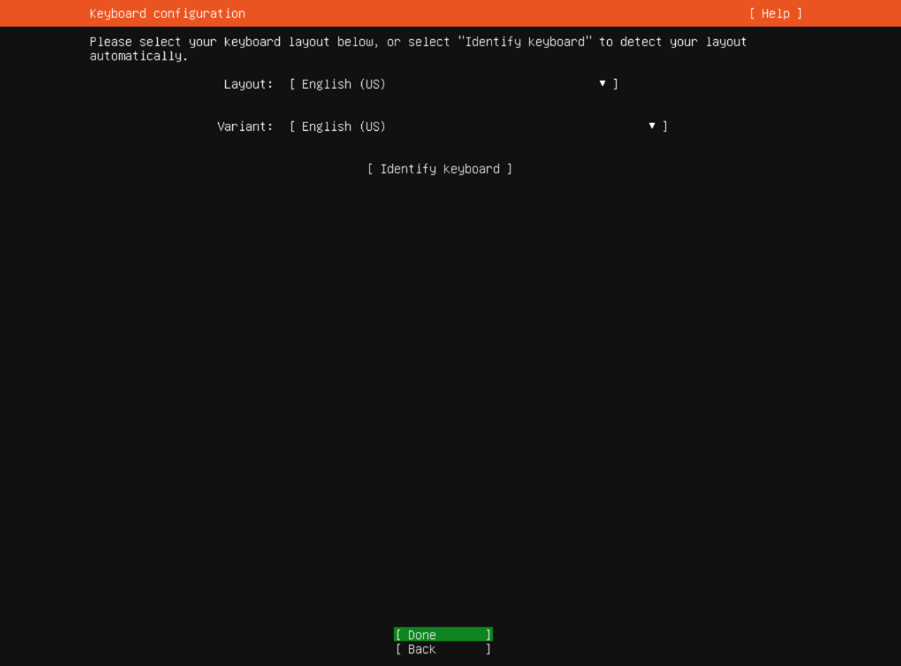
Configure the keyboard layout and press the enter key.
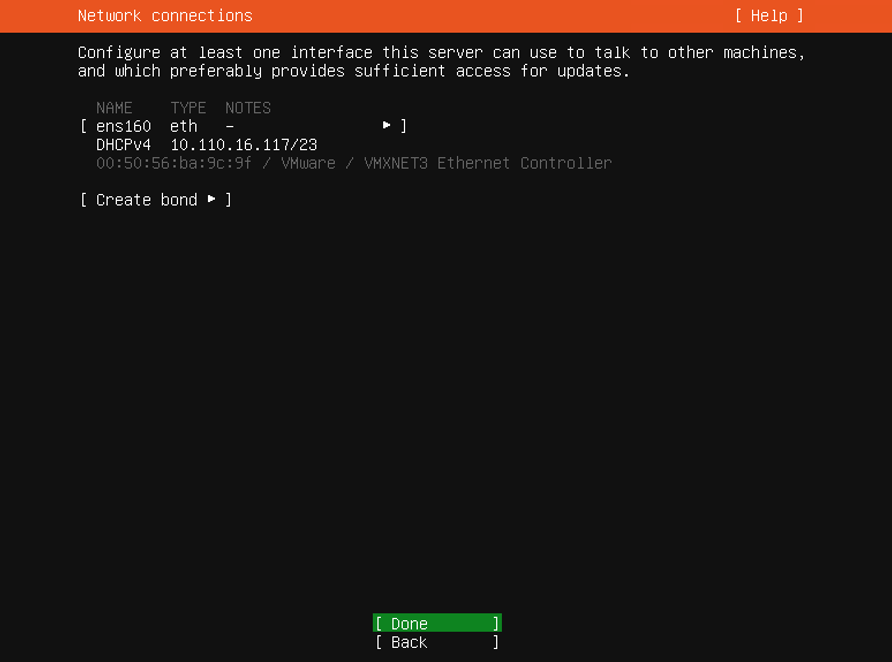
On this screen, select your network connection type and modify it to fit your internal requirements. This guide uses DHCP for the configuration.
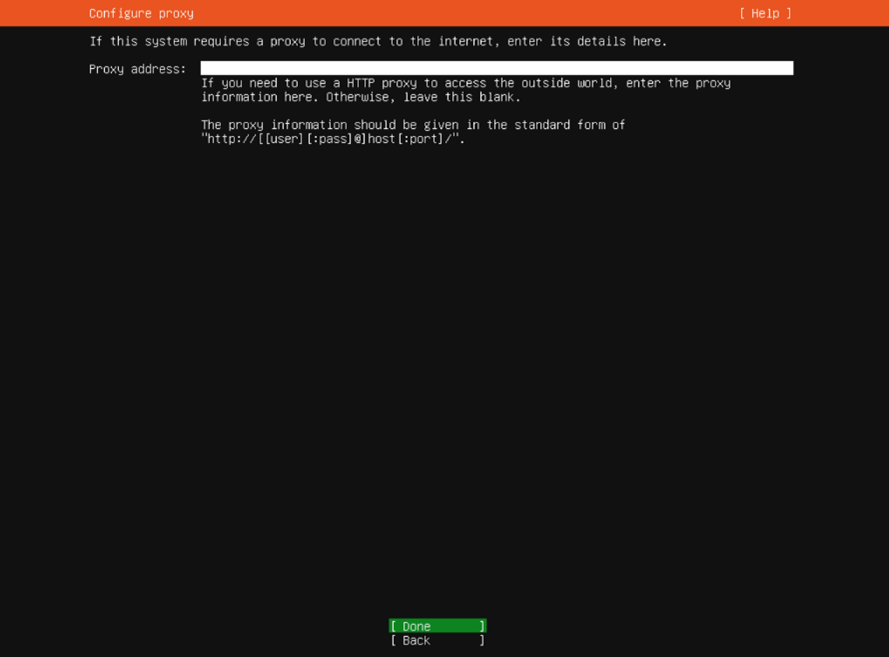
In your LaunchPad Journey, you will not use a proxy address.
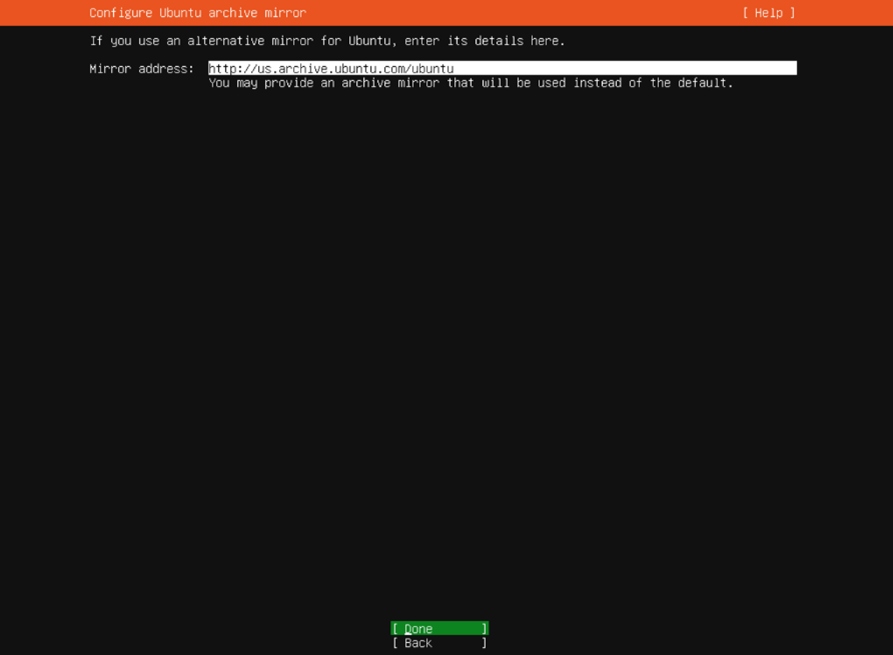
Use the default address and press Done.
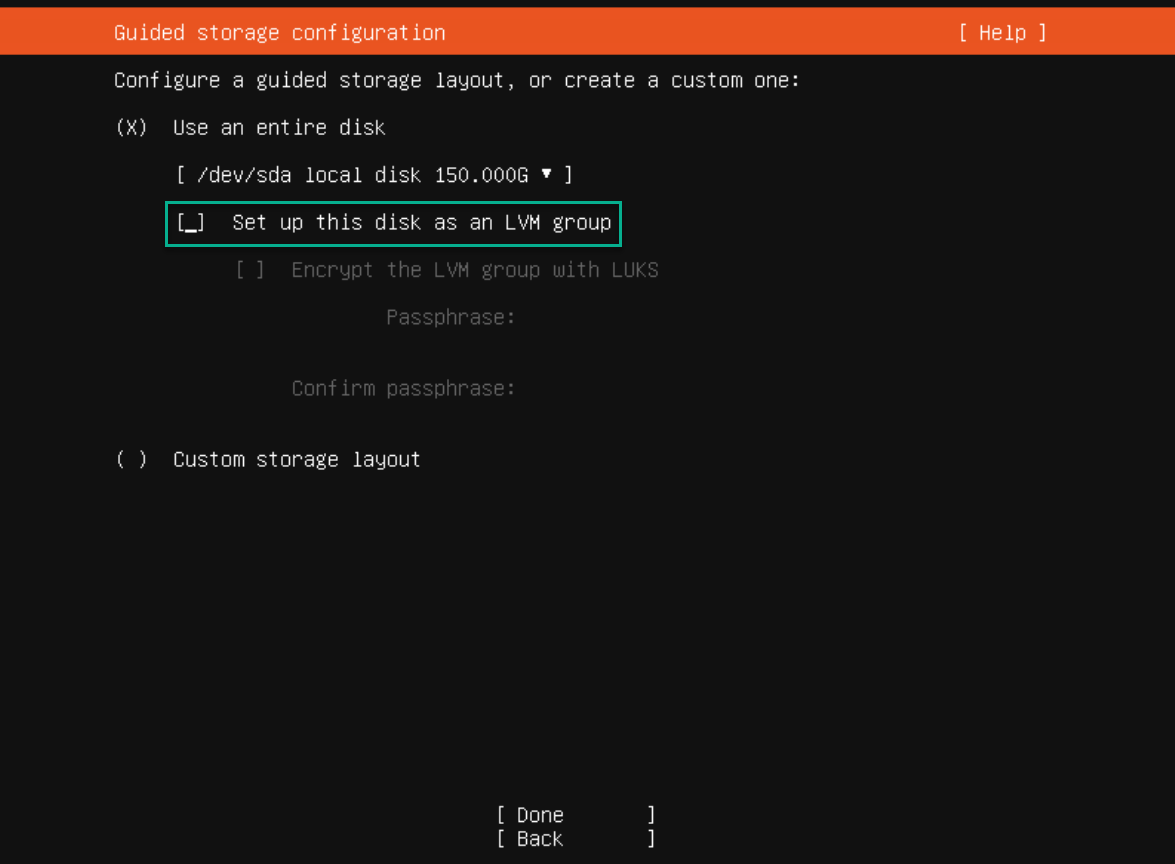
Select Use an entire disk and uncheck Set up this disk as an LVM group if it is selected. Click Done.
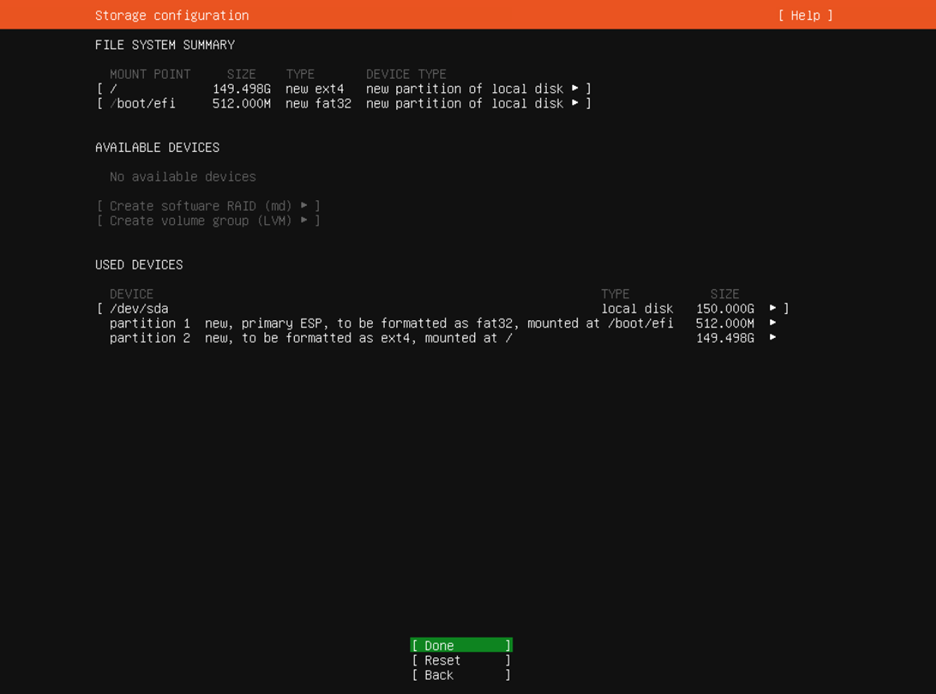
Review the file system summary and select Done if satisfactory.
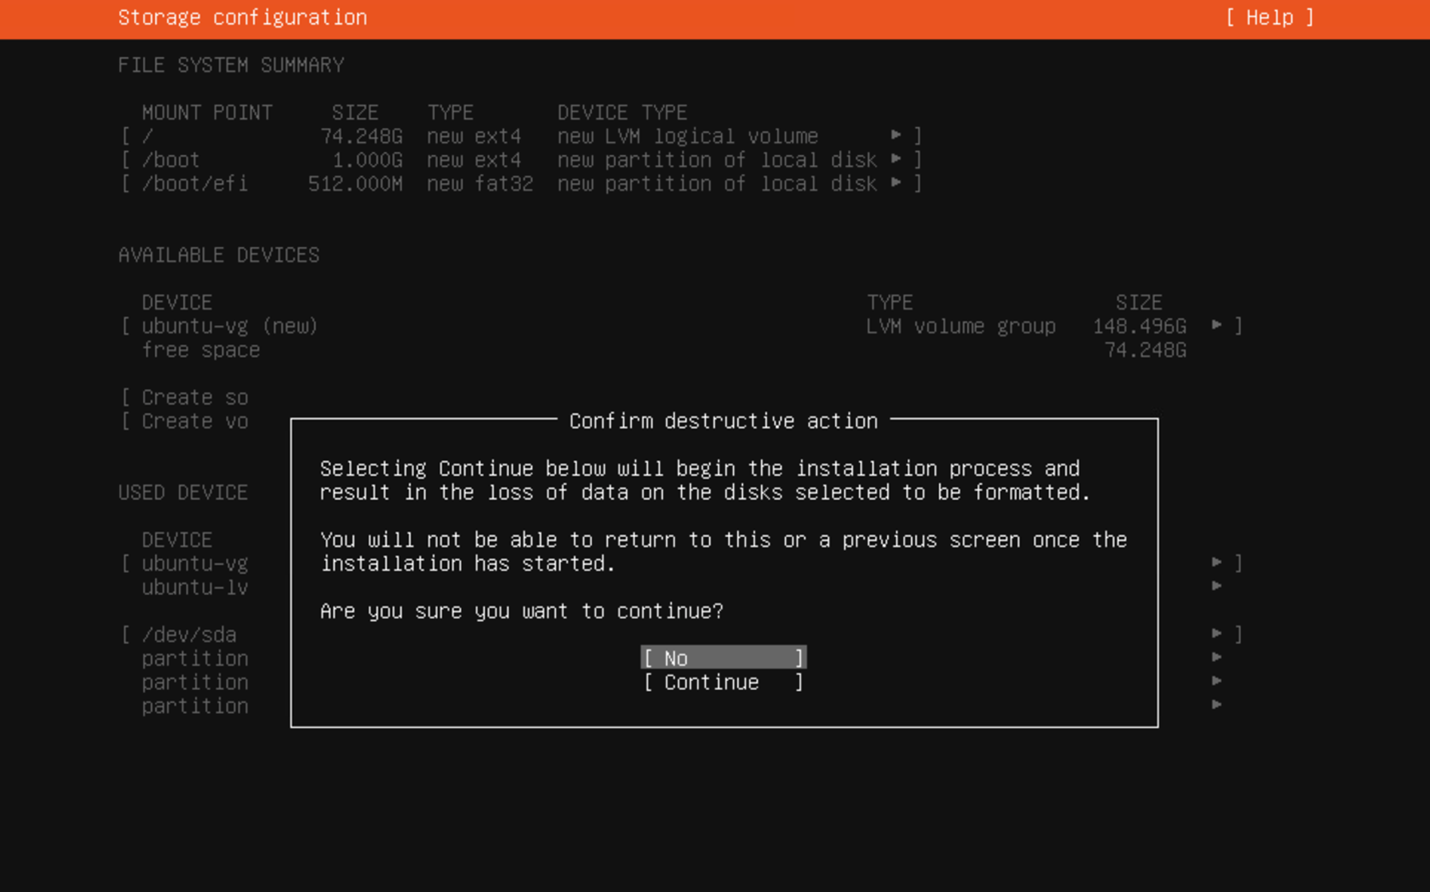
Select Continue, on the Confirm Destructive Action screen.
Configure the VM with a user account, name, and password.
Username: temp
Password: launchpad!
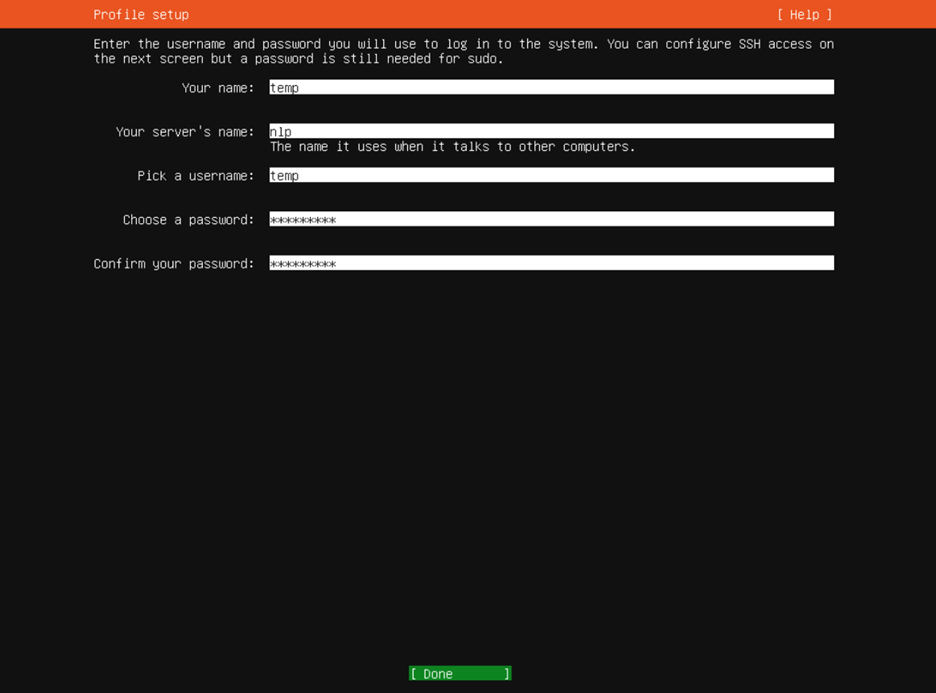
Select Install OpenSSH server and select Done.
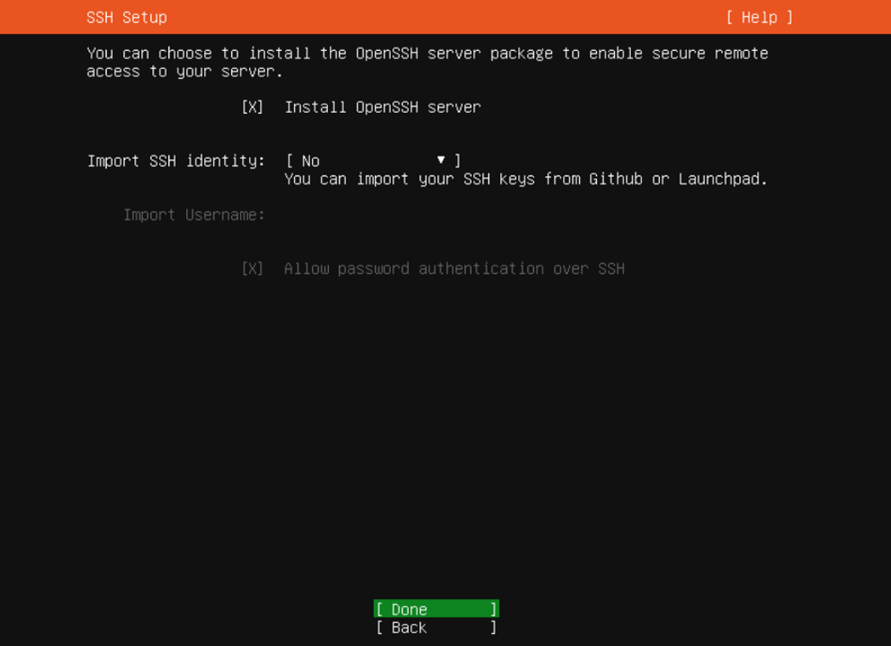
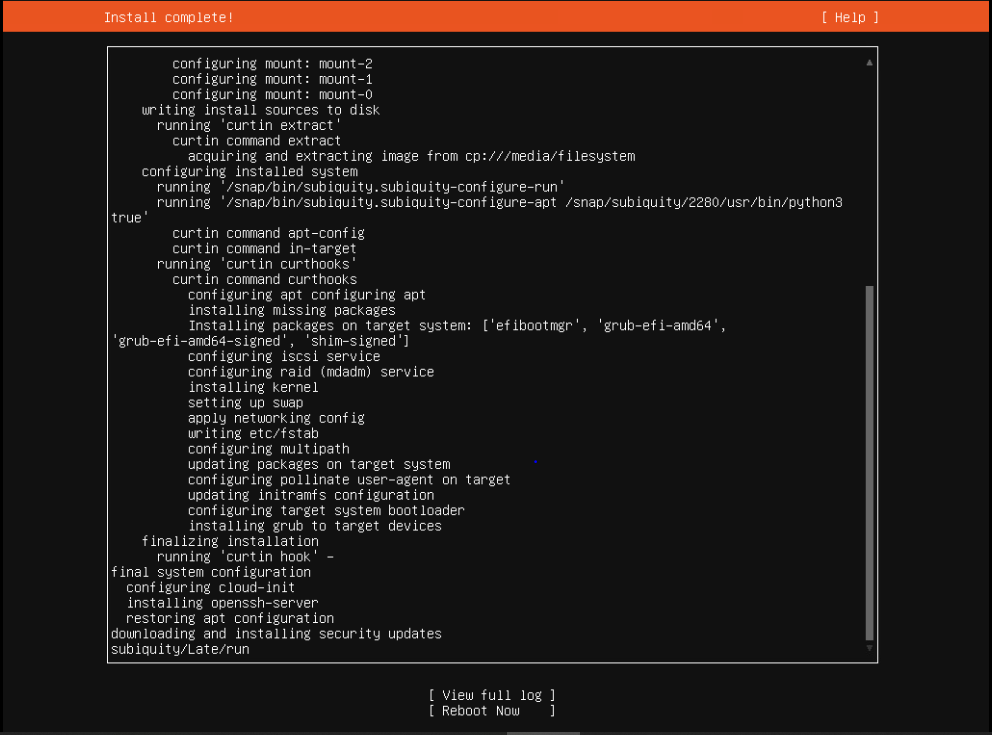
Click Done to start the OS installation. This may take several minutes to complete.
Select Reboot Now on the Ubuntu OS screen.
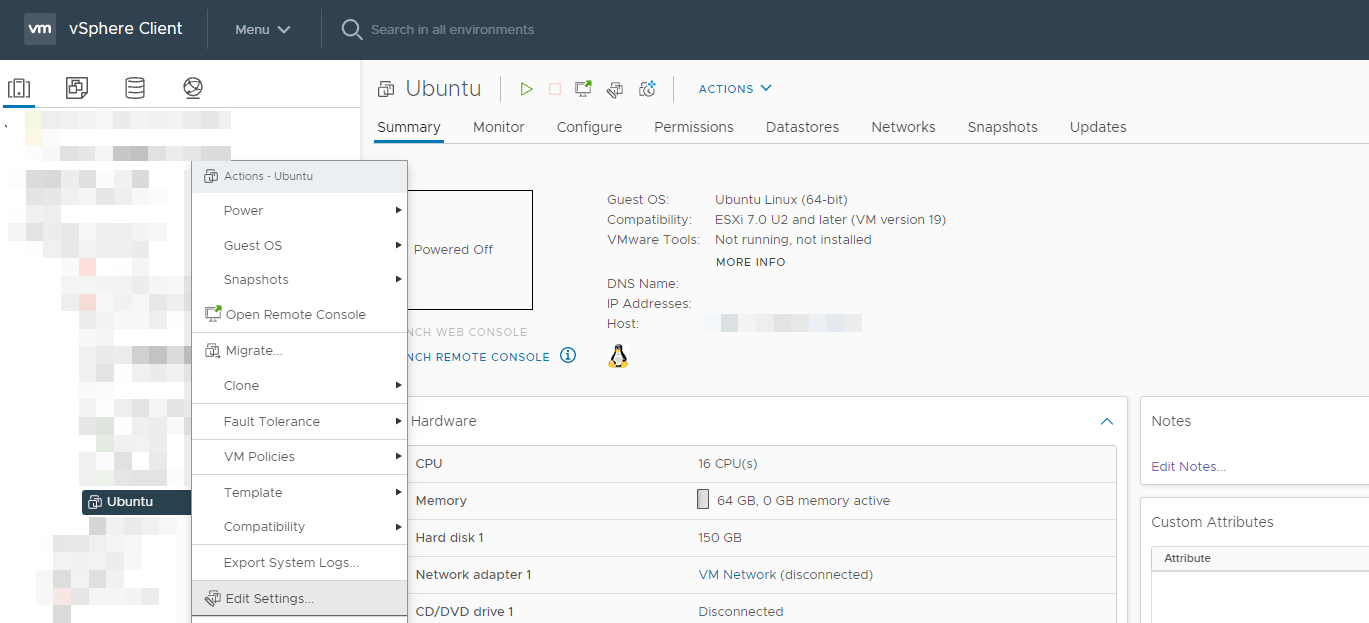
When the reboot is complete, return to vCenter. Right click on the VM, select Po**wer, and click Power Off.

Click on the VM in the Navigator window. Right-click the VM and select Edit Settings. Uncheck Connect check box on the CD/DVD drive 1.
Use the following procedure to enable vGPU support for your virtual machine. You must edit the virtual machine settings.
Right click on the VM and click Edit Settings…
Click on the Add New Device bar and select PCI device.
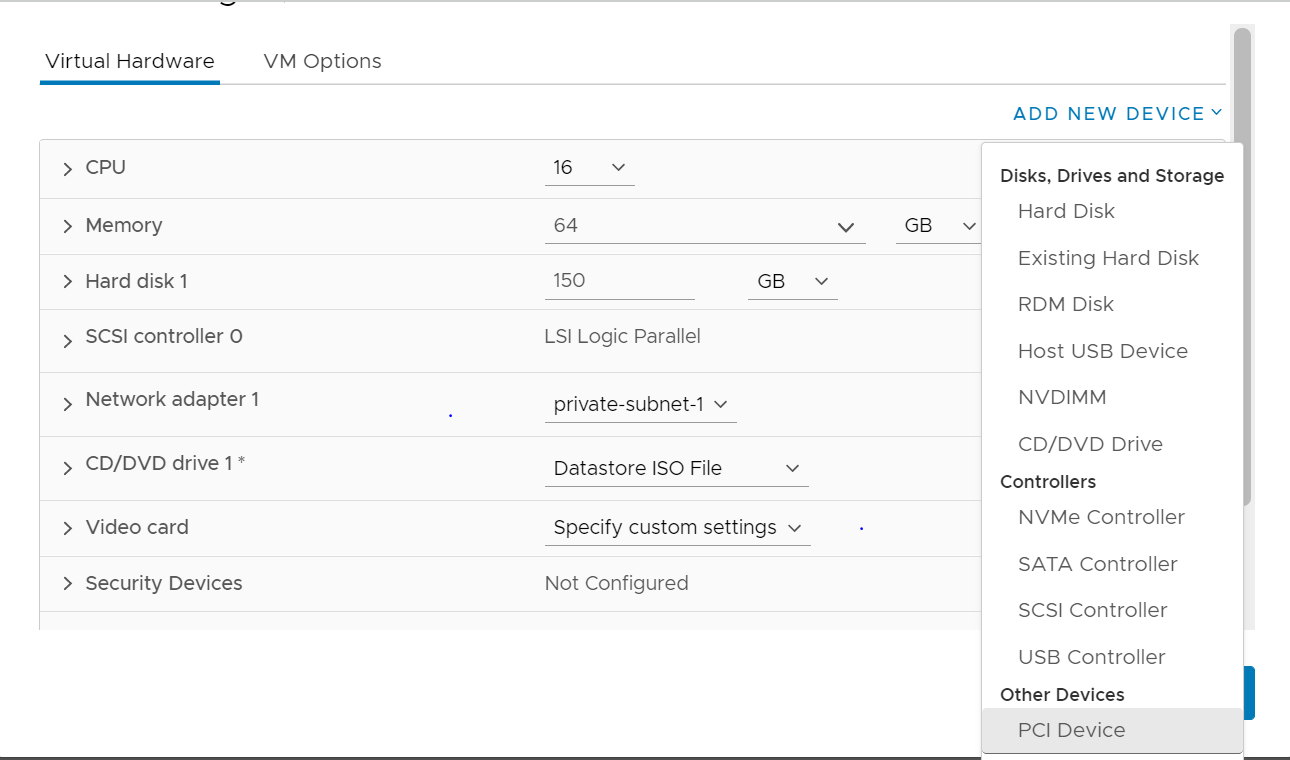
Select the desired GPU Profile underneath the New PCI device drop-down.
 Note
NoteThe NVIDIA vGPU listed within LaunchPad should be A30-24C. NVIDIA AI Enterprise requires a C-series profile.
Power on the VM.
A single VM may have multiple GPU (PCI devices) attached, however, this requires that each GPU be configured with maximum memory allocation.
GPU partitions can be a valid option for executing Deep Learning workloads for Ampere based GPUs. An example is Deep Learning training workflows, which utilize smaller sentence sizes, smaller models, or batch sizes. Inferencing workloads typically don’t require as much GPU memory as training workflows, and the model is generally quantized to run at a lower memory footprint (INT8 and FP16). vGPU with MIG partitioning, allows for a single GPU to be sliced up to seven accelerators. These partitions can then be leveraged by up to seven different VMs, bringing optimal GPU utilization and VM density. To turn MIG on or off on the server, please refer to the Advanced GPU Configuration section of NVIDIA AI Enterprise for VMware vSphere Deployment Guide.
Using MIG partitions for Triton Inference server deployments within a production environment provides a better ROI for many organizations. Therefore, when you are doing your POC, the Triton VM can be assigned a fractional MIG profile such as A100-3-20C. Additional information on MIG is located here.
Now that you created a Linux VM, we will boot the VM, and install the NVIDIA AI Enterprise Guest driver in the VM to fully enable GPU operation.
Downloading the NVIDIA AI Enterprise Software Driver Using NGC
Before you begin you will need to generate or use an existing API key.
You received an email from NVIDIA NGC when you were approved for NVIDIA LaunchPad, if you have not done so already, please click on the link within the email to activate the NVIDIA AI Enterprise NGC Catalog.
From a browser, go to https://ngc.nvidia.com/signin/email and then enter your email and password.
In the top right corner, click your user account icon and select Setup.
Click Get API key to open the Setup > API Key page.
NoteThe API Key is the mechanism used to authenticate your access to the NGC container registry.
Click Generate API Key to generate your API key. A warning message appears to let you know that your old API key will become invalid if you create a new key.
Click Confirm to generate the key.
Your API key appears.
ImportantYou only need to generate an API Key once. NGC does not save your key, so store it in a secure place. (You can copy your API Key to the clipboard by clicking the copy icon to the right of the API key.)Should you lose your API Key, you can generate a new one from the NGC website. When you generate a new API Key, the old one is invalidated.
Now you will log into the VM using the VM Console link on the left pane of this page.
Log in using the credentials previously set in Step 16 from the Installing Ubuntu Server 20.04 LTS (Focal Fossa) section.
Disable Nouveau using the commands below.
            $ printf 'blacklist nouveau\noptions nouveau modeset=0\n' | sudo tee -a /etc/modprobe.d/blacklist-nouveau.conf
$ sudo update-initramfs -u
$ sudo shutdown -r now
Close the VM Console window once the session has ended.
Wait 60 seconds and log into the VM using the VM Console link on the left pane of this page again.
Run the following commands to install the NGC CLI.
Install unzip:
sudo apt-get install unzip
Download, unzip, and install from the command line by moving to a directory where you have execute permissions and then running the following command:
$ wget -O ngccli_linux.zip https://ngc.nvidia.com/downloads/ngccli_linux.zip && unzip -o ngccli_linux.zip && chmod u+x ngc
Check the binary’s md5 hash to ensure the file wasn’t corrupted during download:
$ md5sum -c ngc.md5
Add your current directory to path:
$ echo "export PATH=\"\$PATH:$(pwd)\"" >> ~/.bash_profile && source ~/.bash_profile
You must configure NGC CLI for your use so that you can run the commands. Enter the following command, including your API key when prompted:
            $ ngc config set

Enter API key [no-apikey]. Choices: [<VALID_APIKEY>, 'no-apikey']: (COPY/PASTE API KEY)

Enter CLI output format type [ascii]. Choices: [ascii, csv, json]: ascii

Enter org [no-org]. Choices: ['ea-nvidia-ai-enterprise']:


Enter team [no-team]. Choices: ['no-team']:

Enter ace [no-ace]. Choices: ['no-ace']:
The following will be outputted to the console:
Successfully saved NGC configuration to /home/$username/.ngc/config
Download the NVIDIA AI Enterprise Software Driver.
$ ngc registry resource download-version "ea-nvidia-ai-enterprise/vgpu_guest_driver:470.63.01-ubuntu20.04"
Installing the NVIDIA Driver using the .run file
Installation of the NVIDIA AI Enterprise software driver for Linux requires:
Compiler toolchain
Kernel headers
Check for updates.
$ sudo apt-get update
Installation of the NVIDIA AI Enterprise software driver for Linux requires compiler toolchain and kernel headers. Running the command below satisfies these requirements, by installing the gcc compiler and the make tool.
$ sudo apt-get install build-essential
Navigate to the directory containing the NVIDIA Driver .run file. Then, add the executable permission to the NVIDIA Driver file using the chmod command.
            $ cd vgpu_guest_driver_v470.63.01-ubuntu20.04/
$ sudo chmod +x NVIDIA-Linux-x86_64-470.63.01-grid.run
From a console shell, run the driver installer as the root user, and accept defaults.
$ sudo sh ./NVIDIA-Linux-x86_64-470.63.01-grid.run
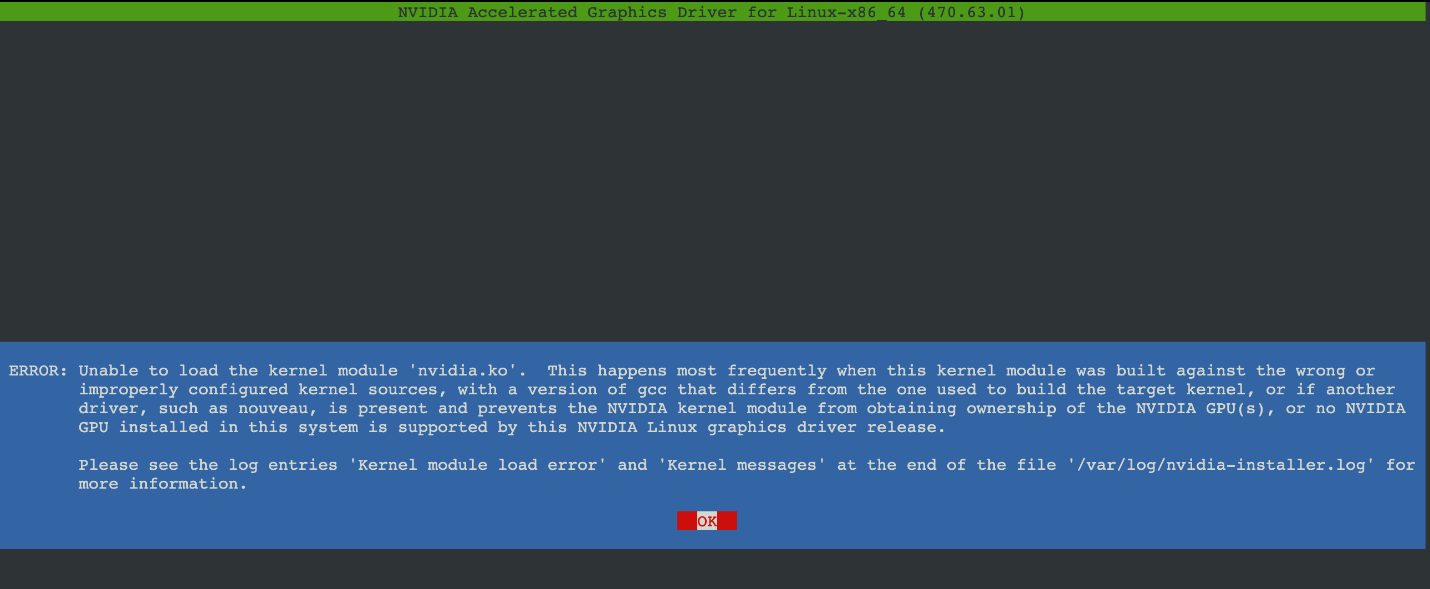
NoteAfter the driver install has ran, the following screen may be displayed. In such case, verify that you have assigned a vGPU PCIe device the VM. Repeat driver install after properly assigning the PCIe device.
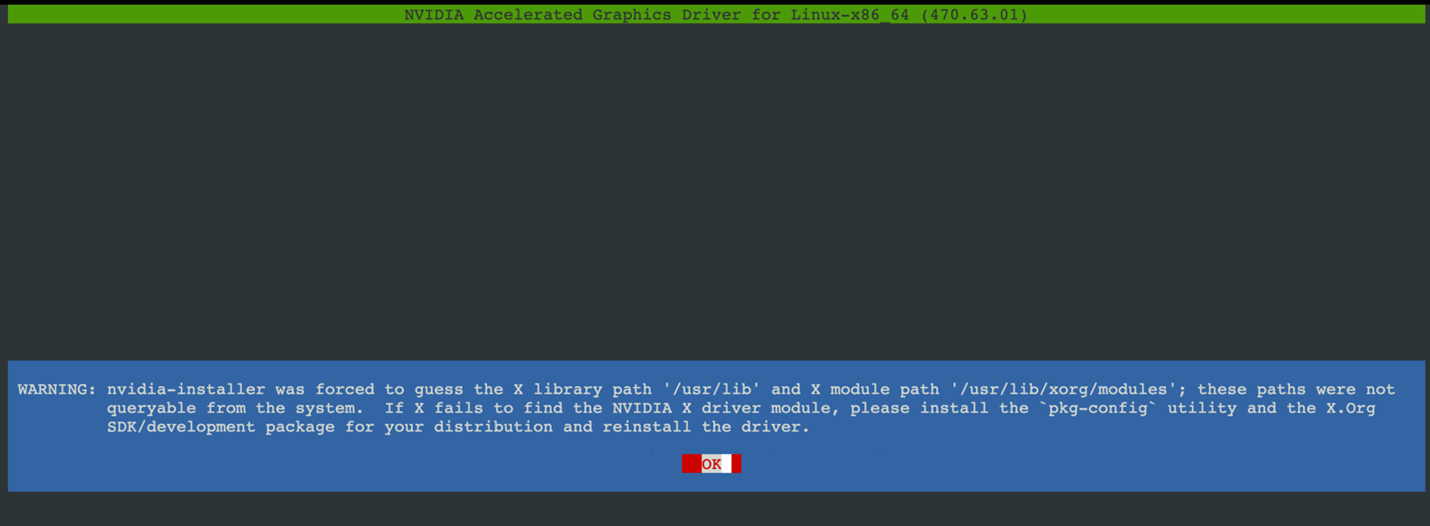
The following screen will be displayed after the vGPU driver has been installed, select OK.
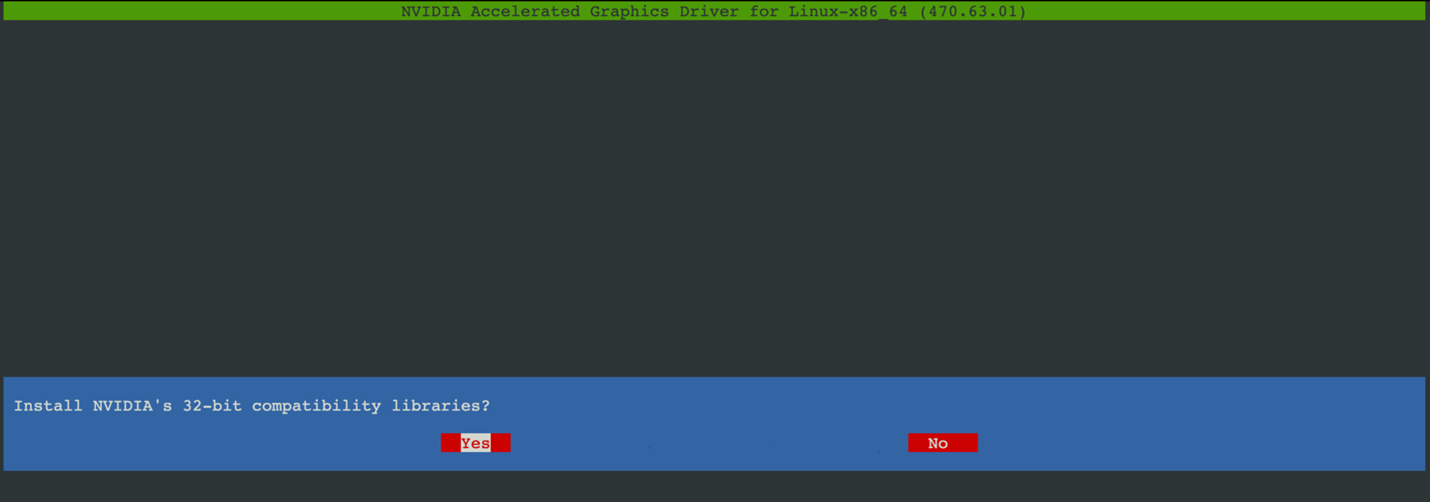
Select Yes.
Reboot the system and log in.
After the system has rebooted, confirm that you can see your NVIDIA vGPU device in the output from nvidia-smi.
$ nvidia-smi
The following nvidia-smi verifies the installation of the driver.
            Last login: Wed Feb  9 08:27:16 2022
temp@NLP:~$ nvidia-smi
Wed Feb  9 08:51:30 2022
+-----------------------------------------------------------------------------+
| NVIDIA-SMI 470.63.01   Driver Version: 470.63.01   CUDA Version: 11.4     |
|-------------------------------+----------------------+----------------------+
| GPU  Name        Persistence-M| Bus-Id        Disp.A | Volatile Uncorr. ECC |
| Fan  Temp  Perf  Pwr:Usage/Cap|         Memory-Usage | GPU-Util  Compute M. |
|                               |                      |               MIG M. |
|===============================+======================+======================|
|   0  NVIDIA A30-24C      On   | 00000000:02:00.0 Off |                  N/A |
| N/A   N/A    P0    N/A /  N/A |   2236MiB / 24571MiB |      0%      Default |
|                               |                      |             Disabled |
+-------------------------------+----------------------+----------------------+

+-----------------------------------------------------------------------------+
| Processes:                                                                  |
|  GPU   GI   CI        PID   Type   Process name                  GPU Memory |
|        ID   ID                                                   Usage      |
|=============================================================================|
|  No running processes found                                                 |
+-----------------------------------------------------------------------------+
temp@NLP:~$
After installing the NVIDIA AI Enterprise guest driver, you will need license the NVIDIA AI Enterprise Software.
To use an NVIDIA vGPU software licensed product, each client system to which a physical or virtual GPU is assigned must be able to obtain a license from the NVIDIA License System.
Download the token file with the command below.
$ ngc registry resource download-version "nvlp-aienterprise/licensetoken:1"
NoteThe license will be inside the folder that you just downloaded.
Find the name of your token by using the list command.
$ ls
Copy the token file to the
/etc/nvida/ClientConfigToken.$ sudo cp client_configuration_token.tok /etc/nvidia/ClientConfigToken/
Ensure that the
client_configuration_token.tokfile has Read and Write permissions.$ sudo chmod +rw /etc/nvidia/ClientConfigToken/client_configuration_token.tok
Copy
/etc/nvidia/gridd.conf.templateto/etc/nvidia/gridd.conf.$ sudo cp /etc/nvidia/gridd.conf.template /etc/nvidia/gridd.conf
Set FeatureType to 4 in
gridd.conf.$ sudo nano /etc/nvidia/gridd.conf
Restart the nvidia-gridd service.
$ sudo systemctl restart nvidia-gridd
NotePlease allow for 5 to 10 minutes for the license to apply after restarting nvidia-gridd service.
You can confirm that VM is licensed by running the command below.
$ nvidia-smi -q |modern
            temp@NLP:~$ nvidia-smi -q |more

==============NVSMI LOG==============

Timestamp                                 : Wed Feb  9 08:53:01 2022
Driver Version                            : 470.63.01
CUDA Version                              : 11.4

Attached GPUs                             : 1
GPU 00000000:02:00.0
    Product Name                          : NVIDIA A30-24C
    Product Brand                         : NVIDIA Virtual Compute Server
    Display Mode                          : Enabled
    Display Active                        : Disabled
    Persistence Mode                      : Enabled
    MIG Mode
        Current                           : Disabled
        Pending                           : Disabled
    Accounting Mode                       : Disabled
    Accounting Mode Buffer Size           : 4000
    Driver Model
        Current                           : N/A
        Pending                           : N/A
    Serial Number                         : N/A
    GPU UUID                              : GPU-c5649d10-2334-11b2-99d7-7b62f705120a
    Minor Number                          : 0
    VBIOS Version                         : 00.00.00.00.00
    MultiGPU Board                        : No
    Board ID                              : 0x200
    GPU Part Number                       : N/A
    Module ID                             : N/A
    Inforom Version
        Image Version                     : N/A
        OEM Object                        : N/A
        ECC Object                        : N/A
        Power Management Object           : N/A
    GPU Operation Mode
        Current                           : N/A
        Pending                           : N/A
    GSP Firmware Version                  : N/A
    GPU Virtualization Mode
        Virtualization Mode               : VGPU
        Host VGPU Mode                    : N/A
    vGPU Software Licensed Product
        Product Name                      : NVIDIA Virtual Compute Server
License Status                    : Licensed (Expiry: 2022-2-10 16:27:5 GMT)